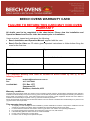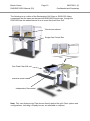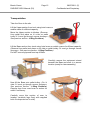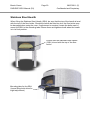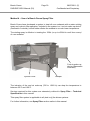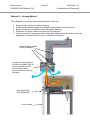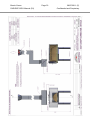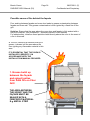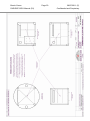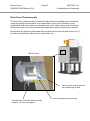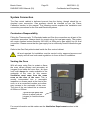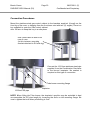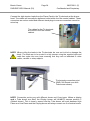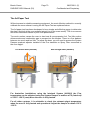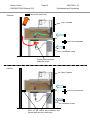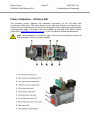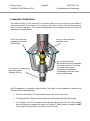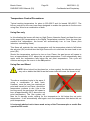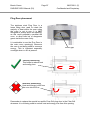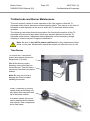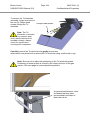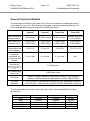
1
Installation and Operation Manual RND - REC - RGO Oven Series (Revision 1 – July 2011) To obtain the best results from your Beech Oven, please read this manual in it‟s entirety before operation. © Beech Ovens Pty Ltd 2010 BEECH OVENS WARRANTY CARD FAILURE TO RETURN THIS CARD MAY VOID OVEN WARRANTY All details need to be completed in the chart below. Please view the Installation and Operation Manual and Pre-fire video documents prior to installation. I have received, viewed and understood the following: Beech Installation and Operation Manual supplied with the oven. Beech Pre-fire Video on CD which gives important instructions to follow before firing the oven for the first time. Name: Signature: Purchaser: Oven installation location: Model Number: Serial No: Warranty Start Date: The completed warranty card must be returned to Beech Ovens by one (1) of the following methods: Email: Fax: Certified Mail: [email protected] +617 3397 0030 P.O. Box 1577 Coorparoo DC, Brisbane, Australia, 4151 Warranty conditions: The main body of the Stone Hearth and Tandoor ovens consisting of steel, refractory and insulation shall be free from defects in materials and workmanship for a period of four (4) years from the date of purchase. All other equipment including accessories to Stone Hearth and Tandoors ovens, Char Grills, Bread Ovens and all other custom equipment shall be free from defects in materials and workmanship for a period of one (1) year from the date of purchase. All gas and electrical components and accessories shall be free from defects in materials and workmanship for a period of one (1) year from the date of purchase. This warranty does not apply; 1. 2. 3. 4. 5. 6. To shipping or transit damage, incorrect installation, product modifications or abuse of the product. Installation must be carried out according to the Beech Ovens Installation and Operation Manual and Pre-Fire video. In cases where the customer uses water to clean any part of the oven whilst it is at operating temperature. For normal cracking due to expansion and contraction of the oven roof, wall and floor. If the data/rating plate has been removed or made unreadable. For the cost of customs duty or import taxes. For labour costs to change over replacement parts. Beech Ovens RND-REC-RGO Manual (R1) Page 2 28/07/2011 (C) Confidential and Proprietary CRITICAL ISSUES TO BE CONSIDERED 1. Beech Ovens must be installed with adequate ventilation allowance both above and below the oven including tube burner vent device. (Refer pages 37 – 42) 2. When using spray filters, ensure all necessary services are considered and installed as required. (Refer page 58). 3. When using gas systems, ensure the correct supply pipe sizes are installed to operate gas system on full load. (Refer original drawing & page 119 - for gas usage) 4. For correct fitment of enclosures or facades, refer to original supplied drawing for all dimensions including critical recommended „Air Gaps‟ for efficient insulation. (Refer also page 19) 5. On ovens supplied with windows, ensure the supplied vent device is connected correctly to the exhaust system. (Refer page 62) 6. Avoid using combustible materials on the oven body when building surrounding enclosures and facades. (Refer page 13) 7. Oven installations require correct air flow requirements with suitable temperature rated fans for correct operation. (Refer page 31) 8. Ensure power supply to the gas control system is correctly wired as the system is “Polarity Sensitive “. (Refer page 64) 9. Follow correct “Heat-Up” procedures to avoid damage to the oven when initially commissioning the oven. (Refer pages 86 – 88) Beech Ovens RND-REC-RGO Manual (R1) Page 3 28/07/2011 (C) Confidential and Proprietary Contents Section 1 - Installation .................................................................. 7 Important Information .............................................................................8 WARNING: ................................................................................................................ 8 For your safety .......................................................................................................... 8 Disposal of ashes.................................................................................................... 8 Oven Overview.........................................................................................9 Preliminary checks ..................................................................................11 Site Preparation ........................................................................................................ 12 Protection of Combustible floors ............................................................................... 13 Oven Installation Procedure ...................................................................14 Lifting Positions ......................................................................................................... 14 Transportation ........................................................................................................... 15 Assembly................................................................................................................... 16 Stainless Steel Hearth .............................................................................20 Flue Connection ......................................................................................21 Flue Transition .......................................................................................................... 21 Spray Filter...............................................................................................22 Spray Filter - Technical Specifications ...................................................................... 23 Interlock System - Australian markets ONLY. ........................................................... 24 Water Flow Sensor - UK market ONLY................................................................... 26 Exhaust Duct Design ...............................................................................27 Flue Material ............................................................................................................. 27 Recommended Flue size .......................................................................................... 27 Nominal airflow required (at Flue Connection) .......................................................... 27 Methods of Exhaust ducting ...................................................................................... 28 Method 1 – Natural Draft......................................................................................... 28 Method 2 – Use of Exhaust Fan.............................................................................. 29 Method 3 – Use of Existing System ........................................................................ 29 Method 4 – Use of a Beech Ovens Spray Filter ...................................................... 30 Spray Filter normal operating Temperatures and Air flow volumes ........................ 31 Method 5 – Canopy Method .................................................................................... 32 General Information on Flues .................................................................34 Flue Fires .................................................................................................................. 34 Possible cause of Flue fire ........................................................................................ 35 Possible cause of fire behind the façade ................................................................... 36 Ventilation Requirement .........................................................................37 Tube Burner Ventilation ............................................................................................ 38 Installing the Tube Burner Vent ................................................................................. 39 Gas Systems overview ............................................................................43 Gas Control Cabinets ................................................................................................ 43 Gas Control Cabinet Functions ................................................................................. 45 Main Control Switch ................................................................................................ 45 Burner On Indicator Light ........................................................................................ 45 Fault/ Reset button.................................................................................................. 46 Beech Ovens RND-REC-RGO Manual (R1) Page 4 28/07/2011 (C) Confidential and Proprietary Digital Temperature Controller ................................................................................ 46 Gas Burners .............................................................................................................. 47 Tube burner ............................................................................................................ 47 Display burner ......................................................................................................... 47 Gas Char Grill ......................................................................................................... 47 Tri-Electrode/ Igniter Assembly ................................................................................. 48 Thermocouple ........................................................................................................... 49 Duck Oven Thermocouple......................................................................................... 51 System Connection .................................................................................52 Contractors Responsibility......................................................................................... 52 Venting the Oven ...................................................................................................... 52 Connection Procedures ............................................................................................. 53 Char Grill Connection ................................................................................................ 56 Double Burner Installations ....................................................................................... 57 Spray Filter Connection ............................................................................................. 58 Window Installation ................................................................................................... 59 Window Vent Connection .......................................................................................... 62 Spotlight Connection ................................................................................................. 63 Electrical Connection ................................................................................................ 64 Final Checks ............................................................................................................. 64 Installation Checklist ...............................................................................65 Section 2 - Commissioning .......................................................... 66 Commissioning........................................................................................67 System Damper Calibration ....................................................................68 Oven Draw (Suction) variables.................................................................................. 68 Cool Air Make-up check ............................................................................................ 69 The A4 Paper Test .................................................................................................... 70 Ventilation Test ......................................................................................................... 72 System Balancing....................................................................................73 Flame Calibration – Sit Nova 826 ...........................................................75 Setting High and Low Flame Pressure ...................................................................... 76 High Flame ............................................................................................................. 77 Low Flame .............................................................................................................. 78 Flame Calibration - Char Grill .................................................................79 Inspirator Calibration ..............................................................................80 Installation & Commissioning Check Sheet ..........................................82 Installation Check Sheet............................................................................................ 83 Commissioning Check Sheet .................................................................................... 84 Section 3 – Operation.................................................................... 85 Preheating with Gas ................................................................................86 Preheating with Wood .............................................................................87 Adjustments for Normal use ...................................................................88 Firing up to Cook .....................................................................................89 Gas Control Cabinet Functions ................................................................................. 90 Main Control Switch ................................................................................................ 90 Burner On Indicator Light ........................................................................................ 90 Beech Ovens RND-REC-RGO Manual (R1) Page 5 28/07/2011 (C) Confidential and Proprietary Fault/ Reset button.................................................................................................. 91 Digital Temperature Controller ................................................................................ 91 Temperature Control Procedures .............................................................................. 92 Using Gas only........................................................................................................ 92 Using Gas and Wood .............................................................................................. 92 Using Wood only ..................................................................................................... 93 Gas Ovens ................................................................................................................ 93 Combined Wood and Gas ......................................................................................... 93 Wood Fired Ovens .................................................................................................... 93 Char Grill ................................................................................................................... 94 Lighting the burners (Char Grill) .............................................................................. 94 Replacing the Char Grill Piezo Battery.................................................................... 95 Finishing for the Day ...............................................................................96 Plug Door placement ................................................................................................. 97 Section 4 – Maintenance & Technical Specifications ................ 98 Oven Maintenance ...................................................................................99 Tri-Electrode and Burner Maintenance ..................................................103 Tube Burner .............................................................................................................. 103 Display Burner........................................................................................................... 106 Char Grill Maintenance ............................................................................................. 108 Window Maintenance ................................................................................................ 109 Cleaning the Internal Glass ..................................................................................... 109 Spotlight Maintenance ............................................................................................... 111 Spray Filter Maintenance .......................................................................................... 112 Spare Parts List .......................................................................................113 General Technical Details .......................................................................119 CE Specifications ...................................................................................................... 120 Oven Materials .......................................................................................................... 121 ECFIA General MSDS .............................................................................................. 122 Troubleshooting Guide ...........................................................................129 Index .........................................................................................................133 Beech Ovens Page 6 RND-REC-RGO Manual (R1) 28/07/2011 (C) Confidential and Proprietary Introduction This manual outlines the recommended methods and procedures for installation and operation of a Beech Oven. Improper installation, adjustment, alteration, service or maintenance can result in property damage, injury or death. It is strongly advised that any personnel involved with the installation, commissioning or maintenance of the oven, read this manual in its entirety before installing or servicing this equipment. Failure to follow the recommendation of the content of this manual, or the advice of Beech Oven personnel, may result in property damage, serious injury or death. Failure to follow the recommendation of the content of this manual, or the advice of Beech Oven personnel, will void the manufacturers warranty and liability. A warranty document is supplied with every Beech Oven. It is compulsory that this document be completed and returned to Beech Oven‟s Head Office in a timely manner. Failure to do so will void the warranty of your product. The following information is compiled to ensure that your Beech Oven is installed and maintained to provide it‟s safest and most efficient performance at all times. All measurements shown are as a guide only. Refer to design documentation and technical specifications for correct dimensions. Contact Information Beech Ovens Head Office: 36 Gladys St Stones Corner Brisbane Qld 4120 Australia Postal Address: PO Box 1577 Coorparoo DC 4151 Brisbane, Australia Tel: +61 (0)7 3397 0277 Fax: +61 (0)7 3397 0030 Web: www.beechovens.com E-mail: [email protected] Technical Support: [email protected] Beech Ovens Page 7 RND-REC-RGO Manual (R1) 28/07/2011 (C) Confidential and Proprietary Section 1 - Installation Installation Beech Ovens RND-REC-RGO Manual (R1) Page 8 28/07/2011 (C) Confidential and Proprietary Important Information WARNING: Improper installation, adjustment, alteration, service or maintenance of a Beech Oven can result in property damage, injury or death. Read the installation, operation and maintenance instructions thoroughly before installing or servicing this equipment. It is recommended that suitably qualified professional personnel install this oven. Installation of the exhaust system must be in accordance with your local authority guidelines. The oven flue must be inspected at three monthly intervals to determine if soot, oil or carbon deposits have occurred. If deposits have accumulated, these must be removed to reduce the risk of fire (refer to the Maintenance section in this manual) For your safety Never use gasoline, gasoline-type lantern fuel, kerosene, charcoal lighter fluid, or similar liquids to start or „freshen up‟ a fire in this oven. Keep all such liquids well away from the oven when in use. Do not in any way block the required air spaces with insulation or other materials. Ventilation must be maintained. Do not use products not specified for use with this oven. Do not over fire. If flame spills out of the oven opening, you are over firing. Disposal of ashes Ashes should be placed in a metal container with a tight-fitting lid. The closed container of ashes should be placed on a non-combustible floor or on the ground, well away from all combustible materials, pending final disposal. If the ashes are disposed by burial in soil or otherwise locally dispersed, they should be retained in the closed container until all cinders have thoroughly cooled. Local regulations may apply. Retain this manual for future use Additional copies of this manual are available from Beech Ovens, online or from your local Beech Ovens representative. Beech Ovens RND-REC-RGO Manual (R1) Page 9 28/07/2011 (C) Confidential and Proprietary Oven Overview Due to the many variations of Beech Ovens the following ovens are an outline as to the most common components that make up a standard construction. Spray Filter/Transition (Optional) Oven Base (5mm Mild Steel frame with “High Alumina” bricks for hot face) Upper Refractory (5mm Mild Steel lined with hot face Refractory, overrated by factor of 2.) Tube Burner Flame Shroud (Optional) (Stainless Steel 316) Display Burner Shroud (Optional) (Stainless Steel) Display Burner (Optional) Gas /Control Cabinet (Optional with Burner(s)) Tube Burner (Optional) Removable Base Support Leg (Mild Steel SHS) Note: This diagram shows a Round RND1300 oven with both a Display burner, Tube burner and a Spray Filter. Your particular Beech Oven may not include the listed Options as displayed. Beech Ovens RND-REC-RGO Manual (R1) Page 10 28/07/2011 (C) Confidential and Proprietary The following is an outline of the Rectangular Grill Oven or RGO1250. Many components are the same as the previous RND1300 Round oven, though the RGO1250 has the added feature of an in-oven Gas fired Char Grill. Tube burner shroud Single Gas Control Box Gas Fired Char Grill unit Stainless Steel Hearth Independent Gas control Note: This oven features the Tube burner directly behind the grill. Other options and configurations, including a Display burner, are available on request. Beech Ovens Page 11 RND-REC-RGO Manual (R1) 28/07/2011 (C) Confidential and Proprietary Preliminary checks The oven is transported by truck, ship or plane to its destination. The oven is shipped in two halves; the Upper Refractory and the Base. (The consignment document is a good check to establish the correct oven weight.) Upper Refractory on pallet. (Weight between 500kg 1800kg) Check carefully for transit damage prior to unpacking. (Document damage with photos and report to supplier) Do NOT remove clamps or Plywood Oven Base on Pallet. (Weight between 400kg - 1100kg) Check that all parts and accessories are present and free from transit damage. DO NOT remove plywood sheet from top of oven, until base is in position for final assembly. Note: It is strongly recommended to use proper lifting equipment for the transportation and placement of these components. DO NOT attempt to move these items by hand or by any other means that may damage the goods or injure personnel. Beech Ovens Page 12 RND-REC-RGO Manual (R1) 28/07/2011 (C) Confidential and Proprietary Site Preparation Once on the ground, the method of installation is dependent on the type of access. If there is level access of sufficient width e.g. 1600mm (in the case of the round RND 1300 model) and no stairs, the oven can be moved by pallet trolley or forklift to its desired location. In the case where access includes navigating through narrow corridors and stairs, both halves of the oven must be individually placed on their edge on a pallet trolley (or similar) and moved through the narrow passages. Min 700mm (Be sure to secure the oven to the trolley during transportation using ropes or strapping) Leave timber supports on base when transporting The oven top and base will fit into a standard elevator. Be sure to check elevator load capacity is adequate. For installation purposes, we utilize thick sheets of ply to spread the weight of the oven when we transport it over any surface which may be damaged by the wheels of the trolley. Beech Ovens Page 13 RND-REC-RGO Manual (R1) 28/07/2011 (C) Confidential and Proprietary If there are stairs, there must be sufficient width to install the ‟A‟ frame to move the halves up the stairs. If there are too many stairs or the corridor has corners that are too sharp, or the opening is narrower than 700mm, the oven cannot be installed without modifications to the building. Seek special advice from Beech Ovens Technical Support. [email protected] Investigation must be made to ensure that the floor both where the oven is to be transported upon and the floor under where the oven shall be installed are sufficient to support the oven. Protection of Combustible floors All Beech Ovens must be installed upon non-combustible material. The minimum hearth extension areas to be covered with non-combustible material in relation to the door opening of the oven shall cover at least the following areas: 750 mm to each side of the door opening. 900 mm in front of the door opening. Combustible material (e.g. Wood) Non-Combustible material (e.g. Stainless Steel) 900mm 750mm Door Opening If you have an ash disposal container it must also be placed on non-combustible material, have legs to raise it from floor contact and have a tight-fitting lid. Beech Ovens Page 14 RND-REC-RGO Manual (R1) 28/07/2011 (C) Confidential and Proprietary Oven Installation Procedure Prior to installing the oven, visit the installation area and determine if there are doorways narrower than the oven in an upright (normal) position. If there are no narrow doorways, the oven can be kept in the horizontal plane i.e. not tilted on its side to go through doorways. The oven has been designed to fit through any standard doorway on its side and to fit in most standard elevators which are capable of the weight. Lifting Positions The above diagrams show the positions in which to lift the Base and Upper sections of the Oven depending on access to the final installation position. 1. Lift here if the Oven Base is to be placed on pallet trolley on its side. 2. Lift here if the Oven Base is to be placed flat onto pallet trolley (pallet). 3. Lift here if the Upper section is to be placed flat onto pallet trolley (pallet). 4. Lift here if the Upper section is to be placed flat after having been transported on its side. 5. Lift here if the Upper section is to be placed on its side to navigate narrow passageways. NOTE: Installation is to be carried out using suitable lifting equipment with sufficient load capacity to suit the Oven weight. E.g. Hotel crane, mobile crane, strapping, hooks, etc. Take care when lifting these sections. Beech Ovens Page 15 RND-REC-RGO Manual (R1) 28/07/2011 (C) Confidential and Proprietary Transportation Take the Oven to the site. Lift the Upper section from truck using hotel crane or mobile crane of sufficient capacity. Move the Upper section to kitchen. (Remove from pallet and place on it’s side on pallet trolley if it must go through narrow doorways See previous section - Lifting Positions) Lift the Base section from truck using hotel crane or mobile crane of sufficient capacity. (Remove from pallet and place on its side on pallet trolley if it must go through narrow doorways - See previous section - Lifting Positions) Do NOT remove plywood from top of Base. Carefully remove the equipment stored beneath the Base and store in a secure location (ready for later assembly). Now lift the Base onto pallet trolley. (On i’s side if it must go through narrow doorways: See previous section - Lifting Positions) Remove legs from oven base to reduce its width if necessary. Carefully move this section of oven to location (re-attach legs firmly with supplied bolts if transported on its side). Beech Ovens Page 16 RND-REC-RGO Manual (R1) 28/07/2011 (C) Confidential and Proprietary Assembly The procedure mentioned below uses an “A-Frame” lifting method for assembling the oven. Other lifting methods may be used e.g. a fork truck or crane, however the following principals still apply. Assemble lifting frame in kitchen where space permits. (The assembled oven must be able to be moved within the kitchen area without obstruction later on the trolley.) Utilizing lifting point 3 on previous diagram, lift the top free of the pallet and place on the ground, whilst moving the base into position. Lift the oven top to such a height to leave a clear space underneath of minimum 1150mm to enable the base of the oven to fit under oven top. (Lift the base of the oven to a horizontal position and fit legs if previously removed.) Move base under elevated top section using a lifting frame or a stack of narrow pallets, being careful not to damage any equipment under the oven; e.g. burners, sensors, etc. You may now remove the protective plywood from the top of the base. Beech Ovens RND-REC-RGO Manual (R1) Page 17 28/07/2011 (C) Confidential and Proprietary Place strips of 60mm x 13mm ceramic insulation wool (supplied) beneath the top of the oven where the top section touches the base. NOTE: No wool should come between the steel of the top and base. Position wool strips so that they remain hidden when the two halves of the oven are assembled together. Align the top and base using the positioning tabs welded to the base, locating the rear tab first. Ensure that the oven mouth aligns with the cutouts in the base. With the two halves together the oven is now ready to have the supplied 50mm ceramic insulation wool fitted to the external surfaces. The “A-frame” can now be dismantled and removed. Beech Ovens Page 18 RND-REC-RGO Manual (R1) 28/07/2011 (C) Confidential and Proprietary The external surfaces (sides and top) of the oven are then completely covered with ceramic insulation wool (50mm Superwool) using the high temperature “Kaogrip” glue provided. First cut all pieces required to cover the sides and top using a sharp knife. These should fit closely up to each other with no visible gaps to allow heat to escape. When all pieces are cut, place each piece on the floor and, one at a time, apply a generous coat of “Kaogrip” glue to the wool as shown using a trowel or similar application tool. An important area to be aware of is directly in front of the exhaust spigot of the oven. If the façade protrudes from the spigot there may be an area between the spigot and the façade which is left uncovered and vulnerable to soot and grease build up. This area is commonly overlooked when constructing the oven façade and if not sufficiently sealed creates a fire hazard. Exhaust Spigot Insulation between spigot and façade face Be sure to sufficiently seal the area between the exhaust spigot and the façade with a metal infill to ensure high temperatures and flame do not enter the façade cavity Façade face Beech Ovens Page 19 RND-REC-RGO Manual (R1) 28/07/2011 (C) Confidential and Proprietary When fitting the ceramic insulation wool to the oven, be sure that the wool is firmly in place and that all air pockets are removed. The glue will dry in approximately one (1) hour depending on ambient conditions. The oven is now ready to be moved carefully and exactly into its final position, using the lifting frame and a pallet trolley (or similar). Using a spirit level or similar, ensure that the oven floor is level. 25mm Air Circulation Gap If required, fasten the legs to the floor using approved fasteners for the specific type of floor material. NOTE: Fully assembled the oven can be extremely heavy. Be sure to use suitable lifting equipment when moving to final position. NOTE: A 25mm Air Circulation Gap is to be left between the ceramic wool and any surface surrounding the oven after final installation. Failure to leave this air gap will result in above normal temperatures being transferred to exterior surfaces, causing a fire hazard. Beech Ovens RND-REC-RGO Manual (R1) Page 20 28/07/2011 (C) Confidential and Proprietary Stainless Steel Hearth When fitting the Stainless Steel Hearth (SSH), be sure that the top of the hearth is level with the top of the floor bricks. Should the hearth be fitted too low, the floor bricks may be damaged when using the oven. If adjustment is required, loosen the bolts used to mount the SSH to the mounting tabs. Ensure these are tightened well when the hearth is in its final position. Ensure that the Stainless Steel Hearth (SSH) is level with the top of the floor bricks Mounting tabs for the SSH. (Loose fitting bolts allow for slight adjustment) Beech Ovens Page 21 RND-REC-RGO Manual (R1) 28/07/2011 (C) Confidential and Proprietary Flue Connection Most Beech Ovens are supplied with either a Flue Transition or a Spray Filter. The main function of the Flue Transition is to form a transition from the oven spigot to a standard commercial flue duct connection point directly above the oven. The Spray Filter has the same properties as the Flue Transition though it has the added feature of a fine mist spray to remove particulate and dampen embers expelled from the oven. Both systems have an integrated System Damper and two (2) inspection/ cleaning ports. Both systems are of similar dimension though distinctively different. Flue Transition Flue Transition Each unit is fitted with two (2) inspection/ cleaning Inspection/ ports to allow for Cleaning port easy access. The System Damper is designed to regulate the amount of air allowed to be drawn from the oven to achieve a correct operational balance. System Damper adjuster The Cool Air make-up system (Barometric Controller) is a factory set, balanced exhaust dilution device designed to, automatically regulate the amount of cool air required to maintain an acceptable flue gas temperature. Cool Air make-up inlet (Wherever possible, it is recommended that cool air from an outside environment be connected to the cool air make-up device. Consult your mechanical service consultant to design connection.) Beech Ovens Page 22 28/07/2011 (C) RND-REC-RGO Manual (R1) Confidential and Proprietary Spray Filter The improved Spray Filter, released into production in August 2010, includes a removable cyclonic filter. The cyclonic filter is permanently washed with a water misting spray which is designed to adhere to particulate such as soot, ash and grease and contain it in the waste water, which is then drained away. The basic function is outlined below. Water mist throughout entire intake cavity Oven exhaust mixes with cool air. Exhaust is now less than 75 degrees C when it enters the duct Water misting sprays (X2) Cool air make-up inlet (Barometric controller) Cyclonic filter (Side section) Hot air from oven spigot Cyclonic action with water mist collects ash and debris. Dirty Water runs out the base of the filter to the floor of the Spray Filter and drains out through the waste at the rear. Beech Ovens Page 23 RND-REC-RGO Manual (R1) 28/07/2011 (C) Confidential and Proprietary Spray Filter - Technical Specifications Water Usage @ 1.5 bar – 11.2l/Hr X 2 = 22.4l/Hr Total @ 3 bar – 15.8l/Hr x 2 = 31.6l/Hr Total Air Flow Volume 1 Door Oven = 700 litres/sec (2520m3/Hr) 2+ Door Oven = 1000 litres/sec (3600m3/Hr) Cool Air Make-up Ensure a fresh air supply is available. If the area above the oven is NOT well ventilated, the cool air inlet should be connected to a fresh (cool) air supply (outside air recommended) Exhaust Connection 300mm x 300mm standard duct flange. (See above for required Air flow volumes) ½” BSP (15mm ID) fitting connected to the shut off valve fitted to Spray Filter. Water Connection Minimum flow rate = 1.5 bar Maximum flow rate = 6 bar (greater than 3 bar is less effective and noisy) Electrical Connection 240VAC Single Phase - 10Amp The solenoid should be interlocked with the exhaust fan: When the exhaust fan is on, the solenoid is open and water can flow - when the exhaust fan is turned off the solenoid should close. NOTE: The solenoid should ALWAYS be activated (open) whenever the oven is hot – this includes approx 3 hours after shut down. Waste Water Connection 1½” BSP fitting connected to rear of spray filter with 40mm (or equivalent) copper pipe to be plumbed to the kitchen waste via a clearly visible tundish. (The tundish should be clearly visible so that the operator can see that water is flowing through the spray filter and it is operational) NOTE: Do NOT use plastic or PVC pipe as the waste water can be warm/hot and melt the plastic. See System Connection section for connection locations. Beech Ovens Page 24 RND-REC-RGO Manual (R1) 28/07/2011 (C) Confidential and Proprietary Interlock System - Australian markets ONLY. For all Gas fired Oven installations within Australia, there is a requirement by the Australian Gas Association (AGA) for the Gas system of your Beech Oven to comply with the Gas Installation Standard AS5601. To meet this requirement, all Gas fired Beech Ovens are required to be fitted with a “Power flue” system of exhaust extraction. This is to safeguard against spillage of combustion product gases into the kitchen area. In line with this requirement, it is required that the Gas system of the oven is interlocked with the performance of the Flue. If the flue performance deteriorates (so that spillage may occur) the Gas system should shut off and “lock-out” in such a manner that to re-start the Gas system, the operator must manually reset the system. (This will give warning to the operator that there may be a problem with the “Power Flue.”) To reset the system, turn the Main Control switch on the front of the Gas control cabinet to OFF, then ON again. Interlock Thermocouple (Shown here fitted into the Flue Transition using a Gland nut) Alternate fitting position if space is not available above oven (Side of Flue Transition) Thermocouple cable (Wired into Gas control box) Beech Ovens RND-REC-RGO Manual (R1) Page 25 28/07/2011 (C) Confidential and Proprietary Beech Ovens supply a flue performance monitoring system that will fulfil the requirement of this Standard. The system consists of an Interlock Thermocouple, a mounting gland nut and a temperature controller, most of which are assembled into the Gas control cabinet. The operation of this system is to monitor the temperature of the exhaust gas at the top of the flue spigot above the oven mouth. During normal operation with the flue fan operating, this area of the exhaust is around 120-170°C. This temperature is caused by a mixture of hot gases from the oven and cool gases (air), from the area in front of the oven, being draw together into the exhaust spigot. Should the power for the system fail or deteriorate to an extent where there may be spillage of combustion product from the oven, the amount of cool air from the kitchen area being drawn into the flue spigot will decrease and the temperature in this spigot area will rapidly increase. The interlock temperature controller is preset to 200°C. When this temperature is found in the flue spigot by the thermocouple probe, the system controller will interrupt the power supply to the main oven gas system. This will in effect turn off the gas to the oven burners. The gas system will automatically relight and resume its pre-programmed operation when the main control switch on the front of the Gas control cabinet has been reset. (Turn OFF and turn ON.) Before this is done, to stop repeated cut-outs, the flue system should be inspected to verify correct operation. (Refer to System Damper Calibration in this Manual.) The before mentioned 200°C limit is used, as this temperature is quickly achieved even when the oven is started from cold and the fan has not been switched on. (In testing, the Gas system will turn off in less than 2 minutes if this situation occurs) Once the oven is hot, this interruption time is much less. 200°C is also a good flue temperature to avoid because of the ability for spontaneous combustion to occur at temperatures above this value. The only additional work required outside of normal installation, is to fit the Interlock Thermocouple probe to the Flue Transition (Adapter) above the oven mouth as illustrated on the previous page. NOTE: When coiling the cable to the Thermocouple, be sure not to kink or damage the cable. The cable is to be routed in a tidy manner using the supplied clips and cable ties under the oven base ensuring that it is not attached to other cables, metallic or sharp objects. Beech Ovens Page 26 RND-REC-RGO Manual (R1) 28/07/2011 (C) Confidential and Proprietary Water Flow Sensor - UK market ONLY For those ovens supplied to the United Kingdom with a Spray Filter, a Water Flow Sensor is fitted to safeguard that the water supply to the spray filter is on and constant. This device is fitted into the water inlet assembly and the electrical cable from the flow switch should be connected to the dedicated plug on the back of the gas control cabinet. Because the water inlet solenoid should be connected to the exhaust fan (when the exhaust fan is on the solenoid should be on/open) when the oven is switched on, the flow switch should be activate which allows the oven to proceed to normal use. In the event that the water supply is interrupted due to any of the following, the sensor will close and the Gas supply to the oven will be stopped. exhaust fan failing exhaust fan being switched off (or not switched on) water supply is interrupted (or not turned on) spraying nozzles are blocked in line mesh water filter is blocked When the water supply has been restored, the system will then need to be manually reset, by turning the main control switch to OFF, and then ON again. If the water supply is no longer interrupted, the gas will not turn on again and the system will function normally. To test the system is working correctly, shut off the water supply to the spray filter. The Gas system should shut down. Should the sensor be faulty, replace and test before commencing normal oven operation. Beech Ovens Page 27 RND-REC-RGO Manual (R1) 28/07/2011 (C) Confidential and Proprietary Exhaust Duct Design The following section is for your guidance in establishing a design to suit your Exhaust duct design requirements. Exhaust ductwork should be carried out by a qualified, experienced trade team with knowledge of local authority requirements. The following information is supplied ONLY as a guide. NOTE: The temperature of the oven is dependent on the size of the fire and the volume of airflow to the exhaust duct. The ’exhaust flow’ is controlled by the system damper and the fan capacity. Access to the system damper is required for initial adjustment, for cleaning and maintenance and for further adjustment should ambient conditions change. Flue Material Check your local authority requirements. Also available and highly recommended are a variety of specialised proprietary flue systems including stainless steel twin and triple skinned products. (Your local mechanical contractor should advise you of available systems.) Recommended Flue size 300mm square or equivalent cross-sectional area in round or rectangular section. For ducted systems more than 6 metres long or containing more than 4 bends, professional ducting advice should be obtained. Nominal airflow required (at Flue Connection) 130Pa Static Pressure Maximum total flue airflow - 700 litres / second for a single opening. Maximum total flue airflow - 1000 litres / second for multi-door ovens. The oven flue can be connected to any exhaust system with a much higher flow rate by controlling the suction utilising a damper. Beech Ovens Page 28 RND-REC-RGO Manual (R1) 28/07/2011 (C) Confidential and Proprietary Methods of Exhaust ducting The exhaust system is an integral part of the oven‟s safe and reliable operation. It is strongly recommended that all exhaust ductwork be carried out using a qualified and experienced trade team with knowledge of local authority requirements. All ductwork will require access for cleaning and require regular maintenance. The following methods are to be used ONLY as a guide. There are typically five (5) methods of exhaust ductwork for a Beech Oven. These methods are using: Natural Draft – Dedicated system an Exhaust Fan – Dedicated system an Existing Exhaust System – Shared system a Spray Filter Canopy method - Preferred Method 1 – Natural Draft Dedicated flue less than 15m in length with less than 3m horizontal. Normally this system is used for Wood Only ovens though if used with Gas, a special test should be performed to ensure that no spillage occurs. Contact Beech Ovens Technical Support for more information. [email protected] Flue size 300mm x 300mm or equivalent (internal dimension). The integrated system damper is designed to control the draft. Access to the system damper is required to allow small adjustments for varying conditions (In some instances a fan may need to be fitted later if natural draft does not work effectively or reliably.) Use of a weatherproof vertical discharge capable of minimizing the effect of wind is recommended. Allow access to duct for periodic cleaning. Refer to local regulations for discharge and installation requirements. NOTE: Because of the residual build-up in the flue, it is highly recommended that the flue be inspected after three (3) months and a cleaning schedule be implemented as required. Failure to properly maintain the flue, may result in flue failure and potential fire hazard. Beech Ovens Page 29 28/07/2011 (C) RND-REC-RGO Manual (R1) Confidential and Proprietary Method 2 – Use of Exhaust Fan Dedicated oven system. Optional high temp sprinkler head connected to sprinkler system Flue size 300mm x 300mm or equivalent (internal dimension). For ovens that will be using wood fuel, we recommend the use of a dedicated flue for the oven connecting to a dedicated fan. There are two methods of fan extraction, (A) Low volume extraction. This is a very hot system and is NOT recommended. As low as 150l/s can be drawn through the system. (B) High volume extraction. Extraction systems in excess of 700l/s can be set up to extract approx 150l/s per door from the oven. With the use of the system damper and the cool air make-up device (Barometric Controller), cool air can be introduced to add additional safety to the system by lowering the flue temperature and increasing the flue gas velocity. This helps to keep the system clean and efficient. (Wherever possible, it is recommended that cool air from an outside environment be connected to the cool air make-up device. Consult your mechanical service consultant to design connection.) Method 3 – Use of Existing System In some instances it is possible to connect the oven exhaust exhaust duct. These are generally available in kitchens that place for other appliances. Professional advice should be compatibility of the existing system to accept the additional inclusion. to an established kitchen have canopy systems in sought to ascertain the load of the oven system It must also be acceptable to local certifying engineers. We strongly recommend the inclusion of a Spray Filter in these instances to reduce the possibility of fire from excessive temperature or from spark ignition of flue debris. Beech Ovens Page 30 RND-REC-RGO Manual (R1) 28/07/2011 (C) Confidential and Proprietary Method 4 – Use of a Beech Ovens Spray Filter Beech Ovens have developed a system to treat all oven exhausts with a water misting spray and cyclonic filter operation. Included in the system is a “cool air make-up device” (barometric controller), which further dilutes the exhaust to a much lower temperature. The misting spray is effective in treating the 150l/s (or up to 450l/s for multi door ovens) of oven exhaust. Cool air make-up device (Barometric controller) Cyclonic Filter Damper The inclusion of the cool air make-up (700 to 1500 l/s) can drop the temperature to between 35°C and 100°C. Services required for this system are extensively outlined in Spray Filter – Technical Specification in this manual. This spray filter system is applicable to all (and only) fan driven systems. For further information, see Spray Filter section earlier in this manual. Beech Ovens Page 31 RND-REC-RGO Manual (R1) 28/07/2011 (C) Confidential and Proprietary Spray Filter normal operating Temperatures and Air flow volumes The diagram below identifies the normal operating temperatures for the Spray filter System. NOTE: Normal operating temperatures should be under 100°C. This will rapidly increase due to the following; Fan failure, Power Failure and/or Mechanical Ventilation Failure. If an Ansul system is required, we recommend a single head at top of the exhaust spigot which should be manually activated by the oven operator. Exhaust Exit temperature less than 100°C (@700l/sec – 1000l/sec for 2 door oven) Optional high temp sprinkler head connected to sprinkler system Optional manually activated Ansul Spray head for fire protection (Refer to local specialist) Cool Air make-up unit. Approx 30°C (@ approx 550 l/sec) Exhaust Temperature entering Spray filter approx 150-180°C (@ approx 150l/sec) Cyclonic Filter helps to removes pollutants (Creosote, ash, etc) Fresh air (approx 22°C) mixes with hot air from oven cavity Oven Facade Oven Temperature approx 350°C Beech Ovens RND-REC-RGO Manual (R1) Page 32 28/07/2011 (C) Confidential and Proprietary Method 5 – Canopy Method The installation of a canopy has several benefits. These are; 1. 2. 3. 4. 5. Easy access to filters for regular cleaning Visible break between spigot and canopy to alert if flash fire should occur Better access to oven spigot to allow for regular cleaning Allowance for Spray heads to be fitted for fire protection Options such as an Automatic Water Wash and Misting Spray System for high use applications (Contact Beech Ovens for detailed information) Optional Spray heads for fire protection Canopy filter consisting of Cyclonic and Mesh filter to remove grease, fat and creosote and help to prevent embers entering ductwork Gas Fired Char Grill (RGO1250) Oven Facade Beech Ovens RND-REC-RGO Manual (R1) Page 33 28/07/2011 (C) Confidential and Proprietary Beech Ovens Page 34 RND-REC-RGO Manual (R1) 28/07/2011 (C) Confidential and Proprietary General Information on Flues Due to the nature of wood fired ovens, the exhaust temperatures can be quite high and sparks or embers may be present (hence fire danger should be considered.) To avoid problems there are a number of options to be considered: It is always important to keep the flue system clean. When firing the oven with wood, we strongly recommend the use of good, clean hardwood fuel only. A build-up of soot and/or creosote in the flue is not good in any situation. We recommend inspections every three months. Through these regular inspections you can develop a program for regular cleaning of your system. Flue Fires To reduce the possibility of flue fire we recommend the following steps. 1. Keep the flue system clean. This includes the oven spigot (prior to the Spray Filter if fitted) and all ductwork. Introduce regular inspections to develop a program for regular cleaning of your system. 2. For solid fuel ovens it is recommended they be connected to a dedicated exhaust extraction system. 3. To further reduce the risk of fire, a high temperature sprinkler head can be installed into the duct, connected to a constant/ secure water supply. This can be included on any flue system. Contact your local fire safety consultant for more information. 4. Where possible, if connecting to a communal kitchen extraction system, connect oven to ducting from the dishwasher canopy. 5. For additional safety, use a Beech Oven Spray Filter. 6. Cool air from the ceiling void, restaurant or ideally from outside the building can be introduced into the Cool Air make-up inlet. 7. Where possible, install the oven under a recommended canopy exhaust system. Beech Ovens Page 35 RND-REC-RGO Manual (R1) 28/07/2011 (C) Confidential and Proprietary Possible cause of Flue fire Flue fires are primarily due to poor maintenance and the lack of a rigid cleaning schedule. Most flue fires can be prevented by implementing a regular and thorough maintenance schedule as outlined in the Maintenance section of the Installation and Operation Manual. The illustration below outlines the possible cause of a flue fire and highlights the most vulnerable area which requires regular cleaning and maintenance. Although all Spray Filters supplied from July 2010 are designed to prevent the spread of fire past the cyclonic filter, this should not be assumed to be a fire blocking mechanism. Fire prevention by regular maintenance and cleaning is always best practise. 2. The fire, fuelled by a residual build up of grease, fat and creosote, is drawn into the Spray filter. REGULAR DUCT MAINTENANCE IS ESSENTIAL. WE RECOMMEND A 3 MONTHLY MAINTENANCE SCHEDULE. 1. Grease build up on spigot walls ignites from flash fire on Char Grill THE SPIGOT WALLS MUST BE CLEANED DAILY OR WEEKLY DEPENDING ON THE GREASE BUILD UP FIRE Beech Ovens Page 36 RND-REC-RGO Manual (R1) 28/07/2011 (C) Confidential and Proprietary Possible cause of fire behind the façade Poor sealing between façade and oven door leads to grease contamination between façade and oven wall. This grease contamination is then ignited by a flash fire off the grill. Solution: Ensure that the area above the oven door and façade is fully sealed with a fire proof material. (See Installation – Assembly section in this manual) For added safety, install an Ansul sprinkler head directly above the oven in the event of a fire in this area. 2. The fire, fuelled by a residual build up of grease, is drawn into the area above the oven igniting any flammable material in this area. IT IS ESSENTIAL THAT THE OVEN IS INSTALLED CORRECTLY IN ACCORDANCE WITH THE INSTALLATION MANUAL PROVIDED 1. Grease build up between the façade and spigot ignites from flash fire on Char Grill THE AREA BETWEEN THE SPIGOT AND THE FAÇADE MUST BE SEALED WITH A FIREPROOF MATERIAL E.g. METAL STRIP FIRE Beech Ovens RND-REC-RGO Manual (R1) Page 37 28/07/2011 (C) Confidential and Proprietary Ventilation Requirement A very important area which is commonly overlooked with gas fired Stone Hearth Ovens is access and, most importantly, Ventilation to under and above the oven. With many of Beech Ovens being gas fired there is either a Tube or Display burner mounted into the oven floor, which needs a fresh air supply to function correctly. A common problem with the oven installation process is that insufficient ventilation is allowed for. This can result in the burner being starved of oxygen and not functioning correctly, or air is being drawn from above or below the oven causing the flame to “disappear” below the oven floor, causing the burner to fail. Both these cases result in poor oven operation and irregular temperature fluctuations. Below is an image showing an example of the ideal location for Ventilation and Access panels in Beech Stone Hearth ovens. NOTE: The ventilation panel below the oven must be in the same room as the oven mouth to ensure that a balanced air pressure is obtained within the oven cavity. Min 600mm x 400mm Access and Ventilation panel – preferable this side to allow access to spray filter and related components. Minimum 600mm x 600mm Access and Ventilation panel below oven floor – this should be either below or close to oven mouth and in same room. Beech Ovens Page 38 RND-REC-RGO Manual (R1) 28/07/2011 (C) Confidential and Proprietary Tube Burner Ventilation From October 2010, all ovens supplied with a tube burner will also be supplied with a ventilation kit that should be installed as per the instructions below. This is designed to eliminate any problems related to poor or insufficient ventilation resulting in the flame being drawn or “disappearing” under the oven floor. It is critical that this ventilation tube be installed correctly, and in the correct position, to eliminate the risk of poor oven performance, erratic flame behaviour or flame failure. In some instances the ventilation panels both below and above is not sufficient to overcome excessive air movement from above and around the oven. This is commonly caused by the ceiling space being used as a return air plenum for the restaurant air conditioning and ventilation systems. NEGATIVE PRESSURE Oven Facade POSITIVE PRESSURE Ventilation Panel Flame is being drawn under the oven Even though a ventilation panel is fitted below the oven, the negative pressure above the oven can be greater than the pressure below the oven. Because the tube burner is installed in the floor of the oven, the hole in the oven floor is a clear passage for air to flow, thus sucking the flame with it. Beech Ovens Page 39 RND-REC-RGO Manual (R1) 28/07/2011 (C) Confidential and Proprietary Installing the Tube Burner Vent All ovens with a tube burner supplied from October 2010 will be fitted with a revised tube burner mount which has a 125mm round attachment. (Retro-fit kits are available for earlier rectangular models) New design tube burner mount The following fittings will also be provided; Vent box with vent panel with removable front panel 2-3 metres (approx) of 125mm semi-rigid aluminium flexible duct Beech Ovens RND-REC-RGO Manual (R1) Page 40 28/07/2011 (C) Confidential and Proprietary Keeping in mind to leave enough room for the 125mm flexible tube, cut a hole in the front façade panel big enough to house the vent box. NOTE: The vent MUST be below the oven mouth and in the same room as the oven mouth. It cannot be installed in an adjacent room. Hole for vent box (130mm x 130mm for sheet wall) (145mm x 145mm for stud wall) Vent panel MUST be within this area The reason for having the vent under the mouth of the oven is to ensure that the pressure into the oven mouth is the same as that supplied to the tube burner, thus eliminating the pressure differential through the tube burner hole. Access is still required to the underside of the oven, though with the ventilation panel installed; this can now be from behind the oven or in an alternate location other than in the front face of the oven. The control cabinet can also be remotely located as long as it is accessible for both the operator and maintenance staff. Beech Ovens RND-REC-RGO Manual (R1) Page 41 28/07/2011 (C) Confidential and Proprietary Install the vent box into the façade wall using appropriate fixings. Vent box installed into façade wall (seen from behind) With the vent box now in position, connect the vent box to the tube burner mount using the supplied 125mm semi-rigid flexible duct tube. This should be fixed using either aluminium duct tape or a suitably sized hose clamp. 125mm flexible semi rigid duct Fix both ends with duct tape or hose clamp Beech Ovens Page 42 RND-REC-RGO Manual (R1) 28/07/2011 (C) Confidential and Proprietary With the duct connected the front vent panel can now be fitted using the 4 screws as supplied. Do not over tighten. Vent panel fixing screws (x4) NOTE: Do NOT cover the vent panel during operation. This may cause the flame to stifle and fail. Beech Ovens Page 43 28/07/2011 (C) RND-REC-RGO Manual (R1) Confidential and Proprietary Gas Systems overview The gas management system automatically controls and monitors the oven temperature and can maintain an impressive display burner. The system features easily programmable and adjustable components. The use of high quality, electronic ignition and flame management components combine to give a simple and reliable system. Gas Control Cabinets There are three types of gas systems available. A single burner or Gas back-up system (GB), a double burner or Full Gas (FG) system and an independent gas Char Grill (CG) option. The Char Grill option is a fully independent system connected (in most applications) directly to the reticulated Gas supply. (Australian systems require an additional Grill Interlock.) The double burner system (FG) system is two independent burners together with shared control components, ideally suited to larger ovens. The Gas control cabinet has the following external controls and indicators: Full Gas control cabinet (Double burner) Gas Back-up control cabinet (Single burner) Burner On indicator light Main control switch Digital Temperature controller Fault/ Reset indicator button The thermal input of the Gas system, depending on the application (oven size and burner type) is between 50 and 100 Mega Joules. (Refer to the Data plate inside the Gas cabinet for specific details.) Beech Ovens Page 44 RND-REC-RGO Manual (R1) 28/07/2011 (C) Confidential and Proprietary The Gas control cabinet has the following internal components: Flame Pack Thermocouple Combination Gas Valve Electrical Circuit Breaker Manual Gas Isolation Valve Power supply cord Components for installation. E.g. SS gas pipe and fittings. Data plate NOTE: The Gas Control cabinet shown is a single burner system or Gas Back-up (GB) control cabinet. The Full Gas (FG) control cabinet has double of some of these components. The Gas control cabinet will also contain some components required for installation when delivered as seen here in the bottom of the cabinet. The system is fitted with an emergency manual gas isolation valve located inside the control cabinet. This is near the bottom of the cabinet and is prior to the Combination Gas valve which also incorporates the pressure regulator and High and Low flame adjustments. See more information in the General Technical Details at the rear of this manual. A data plate is also visible in the door of the oven gas control cabinet stating technical details for the specific system. Beech Ovens Page 45 RND-REC-RGO Manual (R1) 28/07/2011 (C) Confidential and Proprietary Gas Control Cabinet Functions Main Control Switch The Main Control Switch has three positions: OFF Both temperature controller & burner are off in this position. CONTROL The temperature controller only is energized. In this position the temperature controller will read the current oven temperature (PV) and the set point temperature (SV). The current oven temperature (PV) is monitored at the stone hearth (floor) level. The actual oven temperature will be higher than indicated. This is useful if firing on timber to easily see the cooking temperature. This is a read out only and has no control over the oven temperature with the control switch in this position. ON In this position the oven will start automatically, cycling the gas system to maintain the preset temperature or set point temperature (SV) of the oven. The operation of the gas flame will cycle automatically from Low Flame to High Flame or Off as required to maintain the set point temperature. See “Digital Temperature Controller” description below for more details. Burner On Indicator Light This light is lit when the ON position is selected on the main control switch and a flame is preset inside the oven. The main control switch should always be set to OFF when any service work or inspections occur. Disconnect power from the wall socket. All service work should be carried out by a qualified and authorized technician. Beech Ovens Page 46 RND-REC-RGO Manual (R1) 28/07/2011 (C) Confidential and Proprietary Fault/ Reset button In the event of the burner failing to light, the Fault/ Reset button will light and the burner will go into „lock-out mode‟. In this mode, the oven is 100% safe; no gas can flow. To restart the burner from „lock-out mode‟ (white light on) press the white light „reset‟ button. If the burner fails to light after three attempts, turn the control switch to OFF and refer to the troubleshooting section of this manual or call in a service professional. Digital Temperature Controller The Digital Temperature controller has two (2) main functions. To display the current oven temperature (PV- Present Value) and an adjustable setting to enable the operator to determine the desired oven operating temperature (SV - Set point value). To change the set point (SV) temperature up or down; Press SET Press ◄R/S to move the degree of change. (i.e. to change tens or hundreds) Press the ▲ (up) or ▼ (down) arrows until desired temperature is selected Press SET to enter the information See Section 3 Operation for the different temperature control procedures. Beech Ovens Page 47 RND-REC-RGO Manual (R1) 28/07/2011 (C) Confidential and Proprietary Gas Burners There are three (3) types of burners available: Tube burner This burner mounts below the oven floor and fires into the oven chamber through a floor brick with a 100mm hole. The advantages of this burner are little oven floor space used and good back-up properties for dual fuel use. NOTE: Wood should not be placed on, or lean against, the tube burner shroud – any ash or debris that falls down the burner tube will cause the burner to fail. Display burner This burner is primarily for full gas ovens and is used for its spectacular visual appearance. The Display burner has similar heating properties to the Tube burner. It is not recommended for dual fuel as ash and embers can easily contaminate the burner and Trielectrode. Gas Char Grill This option gives the added convenience of a slide out grill drawer with a separate and independent gas system of burners and radiants for grill cooking inside the oven. Both the Tube and Display burners are controlled by the Gas Control system that monitors the oven temperature using a sensor (thermocouple) located within the oven space. This is connected to the Digital Temperature controller which in turn controls a Flame Pack and a Combination Gas Valve. The Char Grill is manually regulated. Beech Ovens Page 48 RND-REC-RGO Manual (R1) 28/07/2011 (C) Confidential and Proprietary Tri-Electrode/ Igniter Assembly A high voltage spark, energized from the Flame Pack, (which also controls the Flame Failure System) ignites the burner. This Flame Pack will also immediately close the main valve (Combination Gas Valve) in the event of a fault, causing flame failure. The Tri-electrode/ Igniter assembly includes 3 probes; Flame ignition probe Flame sensor probe Earth probe Flame sensor probe Flame sensor probe connector (Black plug) Spark point Earth probe Flame ignition probe Earth probe connector (Green plug) Flame ignition connector (Red plug) NOTE: The Tri-electrode assembly shown is for the Tube burner. Size and connection points for each Tri-electrode may vary between the different burner types. It is imperative that the probes are correctly connected, as incorrect wiring will cause damage to the Flame Pack. Because the Flame ignition probe relies on the earth probe to create a spark, it is vital that the Flame ignition probe, including its cable and connector, are not in contact OR close proximity of any hot surface or sharp edges. If this occurs, a spark will not be created at the spark point, resulting in the gas failing to ignite. It is also vital that the “Spark point” and entire Tri-electrode assembly be kept clean and free of foreign objects. If the probes are not clean a spark will not be created. Beech Ovens RND-REC-RGO Manual (R1) Page 49 28/07/2011 (C) Confidential and Proprietary Thermocouple The Thermocouple is a probe which is inserted into the oven floor from beneath, finishing flush or slightly below working surface in the oven space. The positioning of the Thermocouple varies depending on the oven type. The Thermocouple is connected to the Digital Temperature controller and supplies information relating to the current oven temperature. A cross section of the RND1300 Round oven shows the Thermocouple, in this instance, mounted in the middle of the floor and connected back to the Gas control box A close-up view of the Thermocouple shows the gland nut mounted into the underside of the oven base. Beech Ovens RND-REC-RGO Manual (R1) Page 50 28/07/2011 (C) Confidential and Proprietary Beech Ovens Page 51 RND-REC-RGO Manual (R1) 28/07/2011 (C) Confidential and Proprietary Duck Oven Thermocouple The Duck Oven thermocouple is located directly below the spotlight and is accessed using the spotlight access panel. It is located here to give a true indication of the temperature where the ducks are situated in the oven, unlike a pizza oven which has the thermocouple in the floor to sense the temperature where the pizzas are cooked. Be sure that the thermocouple probe does not protrude through the wall of the oven. It should be located flush with the inner wall of the oven. Section view End of probe to sit flush with the inside edge of wall. Use this bolt to hold the thermocouple in place - Do not over tighten. Thermocouple probe and lead Beech Ovens Page 52 RND-REC-RGO Manual (R1) 28/07/2011 (C) Confidential and Proprietary System Connection The Gas control cabinet is delivered pre-set from the factory, though should be rechecked upon connection. Gas pressure should be checked as per the Flame Calibration section in this manual. The following section explains the installation and connection procedures for the Gas and Electrical systems. Contractors Responsibility Fitting the Thermocouple, Tri-Electrode leads and Gas line connection are all part of the connection procedure. Always check for correct set-up for local gas supply. The system will require earthed mains electricity 220-240V at 50Hz and a gas supply line for final connection. Please ensure that the gas supply line is sufficiently sized to handle the gas load. Refer to the Gas Data plate located inside the Gas control cabinet. All work required for installation must be carried out by approved persons and comply with all local codes and regulations in force at time of installation. Venting the Oven With all ovens using Gas, to sustain a flame, the oven utilizes primary and secondary air (oxygen) from below the oven floor. An open vent must always be made available to the underside of the oven for this reason. Ventilation must come from the same room as the door of the oven. This is usually incorporated into a removable inspection or access panel at the front of the oven, or at a convenient location as to allow easy access to the underside of the oven. The size of the vent should be a minimum of 600mm x 600mm. Typical access panel with louvers to allow fresh air (oxygen) to feed the burner flame For more information on this matter see the Ventilation Requirement section in this manual. Beech Ovens Page 53 RND-REC-RGO Manual (R1) 28/07/2011 (C) Confidential and Proprietary Connection Procedures Mount the stainless steel gas control cabinet to the brackets supplied. (Usually on the front leg of the oven, or hanging from the front base strut with two (2) angles) There is a key supplied to open the Gas control cabinet door. Be sure to keep this key in a safe place. Gas Control box as seen from rear of oven. (In this instance, mounting bracket attached to RH side leg) Connect the 12.25mm stainless steel pipe supplied, from the Combination Gas valve to the burner/ inspirator. No sealant is required on this type of connection. Tube burner mounting flange Inspirator 12.25mm SS pipe NOTE: When fitting the Tube burner, the inspirator’s position may be swivelled to best accommodate the SS pipe length by loosening the bolts on the mounting flange. Be sure to tighten the bolts when positioning is final. Beech Ovens Page 54 RND-REC-RGO Manual (R1) 28/07/2011 (C) Confidential and Proprietary Connect the high-tension leads from the Flame Pack to the Tri-electrode at the burner head. The cables will normally be delivered coiled within the Gas control cabinet. These connectors are colour-coded and different sized plugs to ensure connection cannot be mixed up. The cables for the Tri-electrode are found in the Gas control cabinet. NOTE: When coiling the leads to the Tri-electrode, be sure not to kink or damage the leads. The leads are to be routed in a tidy manner using the supplied clips and cable ties under the oven base ensuring that they are not attached to other cables, metallic or sharp objects. Tri-electrode connection point (RND1300 Round oven with Tube burner shown) NOTE: Connection points vary with different burner and Oven types. Where a display and a Tube burner are fitted, the Display burner will ALWAYS assume position 2 (Default burner). This is done to ensure that the Tube burner will cycle between High Flame and Low Flame and the Display burner will always remain on as a feature burner. Beech Ovens RND-REC-RGO Manual (R1) Page 55 28/07/2011 (C) Confidential and Proprietary The stainless steel burner shroud should now be fitted inside the oven. The main purpose of the shroud is to protect the burner from debris and foreign objects. Ensure that these are fitted properly, as failure to do so may result in burner and/or ignition problems. Tube burner shroud Display burner shroud Mount the 6mm-diameter Thermocouple probe into the pre-fitted brass gland nut in the oven base. The tip of the Thermocouple should be flush or 0-3mm below the oven cooking surface. (The hole in the gland nut is drilled eccentric to allow for any misalignment that may occur between the gland nut and the base brick during transport. Should the Thermocouple not align with the hole in the base brick, turn the gland nut slowly until it aligns correctly as per the diagram below.) A close-up view of the Thermocouple shows the gland nut mounted into the underside of the oven base. NOTE: Tighten firmly, though do not over tighten the clamp fitting. Beech Ovens Page 56 RND-REC-RGO Manual (R1) 28/07/2011 (C) Confidential and Proprietary NOTE: When coiling the lead to the Thermocouple, be sure not to kink or damage the lead. The lead is to be routed in a tidy manner using the supplied clips and cable ties under the oven base ensuring that it is not attached to other cables, metallic or sharp objects. Connect to reticulated gas supply at the 19mm flare fitting at the base of the gas cabinet. An isolation valve should be fitted prior to the gas control cabinet to allow gas supply to be completely isolated from the appliance. Purging of the gas supply lines may also be necessary. Check with your Gas installer that these items are done in accordance with local regulation. NOTE: Gas can be odourless in new installations. 19mm reticulated Gas supply connected here. NOTE: Connection of the Gas supply line should be carried out by qualified personnel. Be sure to check for correct gas type and set-up for local gas supply. Be sure that the lines are purged in accordance with local regulation. Char Grill Connection A separate gas supply is required for the Char Grill. This can be taken from the main gas supply line, though care must be taken to ensure the correct line size is achieved to handle the gas load. (Refer to General Technical Details at the rear of this manual) This connection should have an isolation valve fitted prior to the gas manifold. For Australian installations a „slam-shut‟ valve is supplied to meet requirements of AS5601. Char Grill manifold Beech Ovens Page 57 RND-REC-RGO Manual (R1) 28/07/2011 (C) Confidential and Proprietary Double Burner Installations Most two (2) burner ovens use a Tube burner and a Display burner. The Display burner is expected to be the primary burner and is connected to Zone 2 components. This is done to ensure that the Tube burner will cycle between High Flame, Low Flame and Off and the Display burner will cycle only between High Flame and Low Flame, remaining on as a feature burner. (The display burner will turn off at around 400°C.) To ensure that each burner is connected correctly each Burner, Combination Gas Valve and Flame pack are labelled with corresponding zone numbers; Zone 1 and Zone 2. It is critical that all Combination gas valves, Burners and Flame packs are connected to the corresponding zone components. If this labelling seems incorrect or there is confusion as to which burner should be connected to which component, please contact Beech Ovens Technical Support for assistance. [email protected] Zones 1 & 2 burner connection points Reticulated Gas supply connection point Display burner (Zone 2) Tube burner (Zone 1) Beech Ovens Page 58 28/07/2011 (C) RND-REC-RGO Manual (R1) Confidential and Proprietary Spray Filter Connection The diagram below shows the connection location for the spray filter services. The services details are outlined in the Spray Filter – Technical Specifications section of this manual. Exhaust Connection (300mm x 300mm standard duct flange) Cool Air Make-up (Ensure a fresh air source is available) Electrical Connection (To be interlocked with exhaust fan) Water Connection (½” (15mm) Connection) Waste Water Connection (11/2” Connection) When installing the Spray Filter, be sure to remove any packing tape holding the filter in place. Loosen the nuts on the top access panel and remove the panel. Remove the packing tape and making sure that the filter is securely in its correct position (as shown below) replace the access panel. Access panel Packing tape Beech Ovens Page 59 RND-REC-RGO Manual (R1) 28/07/2011 (C) Confidential and Proprietary Window Installation From July 2010, Beech Ovens have introduced a new design for the viewing window assembly. This new design is to ensure that the outer surface temperature of the viewing glass is safe to touch and the surrounding façade materials do not damage from excess heat transfer from the viewing window. To ensure the window is not damaged in transit, it is packed separately to the oven. The diagram below illustrates how the viewing window is fitted into the oven. NOTE: Be careful not to damage the edge of the glass on the steel frame of the window. Once unpacked, the outer glass assembly needs to be removed from the window. Remove the top 2 plastic caps ONLY. Do NOT remove the bottom 2! Remove the top 2 screws using a 4mm hex key. NOTE: Hold the glass in place so it doesn‟t fall outwards. Beech Ovens Page 60 RND-REC-RGO Manual (R1) 28/07/2011 (C) Confidential and Proprietary Carefully lean the top of the outer glass assembly forward (1) and lift so the lugs on the bottom release (2). 1 2 3 1 2 Tilt the window out slightly at the top enough to allow the bottom hinge cylinder to slip over the bottom of the hinge rod. Lift and tilt back and let the top hinge cylinder slip over the top of the hinge rod. Beech Ovens RND-REC-RGO Manual (R1) Page 61 28/07/2011 (C) Confidential and Proprietary Close the door and lock with a 6mm hex key. Remove the hex key and re-fit the outer glass assembly in reverse order. NOTE: Ensure that the plastic caps are fitted as the steel section will become very hot during use. Most windows will need to be trimmed to the façade wall. Ensure that the trims do not cover the vent slots in the top and bottom of the window frame. The slots are to allow cool air to circulate past the glass to keep it cool. Beech Ovens RND-REC-RGO Manual (R1) Page 62 28/07/2011 (C) Confidential and Proprietary Window Vent Connection All viewing windows are now delivered with a window vent transition, 2 x duct spigots and flexible duct which should be connected to the exhaust duct. For those installations using a Spray Filter, this connection should be made at least 200mm after the Spray Filter. The diagram below outlines the window vent correctly connected. Screw or rivet spigot (with damper) to exhaust duct (after Spray Filter) Flexible duct Tape or clamp flexible duct to spigot Screw or rivet spigot to vent transition Beech Ovens RND-REC-RGO Manual (R1) Page 63 28/07/2011 (C) Confidential and Proprietary Spotlight Connection For those ovens fitted with a spotlight, there will be a cable from the main control cabinet that must be connected in order for the spotlight to function. The cable will be coiled on the back of the control cabinet and provision for running the cable (clamps and holes cut in oven body where required) to the spotlight fitting has already been made. All installation and connection of electrical cabling should be carried out by a licensed electrician. NOTE: Ensure adequate access is provided in the oven façade to allow access to the spotlight cover panel for future service and maintenance. Without external access, the glass and spotlight globe cannot be replaced. Cable from control cabinet Spotlight Body (Globe inside) Remove to replace globe 1 2 Spotlight access cover panel Beech Ovens Page 64 RND-REC-RGO Manual (R1) 28/07/2011 (C) Confidential and Proprietary Electrical Connection The system will require the following earthed mains electricity supply; 220-240 Volt (other voltages available by request) 50Hz 10 Amp Within the Gas cabinet a power supply cable is supplied connected to an Australian standard plug. Should your oven be installed outside of Australia, a common practice is to purchase an adapter to suit your local socket configuration. In some instances a new plug may be fitted to suit your local socket configuration, or you may wish to hard-wire your system to an isolator. If these methods are used, ensure to adhere to the following instruction. NOTE: Power supply to the system is polarity sensitive. The following colour codes MUST be adhered to for your system to operate. Brown = Active / Live Blue = Neutral / Common Green = Earth Final Checks 1. Check all gas, mechanical and electrical connections to all equipment. Ensure that the burner and shroud are firmly located. 2. Check gas flow logic, opening all relevant manual valves. 3. Proceed with start up procedure outlined in the Commissioning section of this manual. Beech Ovens RND-REC-RGO Manual (R1) Page 65 28/07/2011 (C) Confidential and Proprietary Installation Checklist When the initial installation is complete, please read through the following checklist to make sure the oven is safe for commissioning. Legs fastened sufficiently to floor (if applicable) – oven is stable in position. (Refer to Assembly) Outer ceramic wool insulation complete and well fastened. (Refer to Assembly) 25mm Air Circulation Gap evident. (Refer to Assembly) Gas control cabinet and Burner(s) mounted firmly in position. (Refer to Connection Procedures) Shrouds firmly in place. (Refer to Connection Procedures) All Gas fittings tight and correctly connected. (Refer to Connection Procedures) All electrical components correctly installed – Mains Electricity Supply sufficient earthed and in accordance with local regulation. (Refer to Electrical Installation) Check that the Exhaust Duct installation is compliant with local regulation. (Refer to Exhaust Duct Design) For those systems fitted with a Spray Filter, check that all water, drain and electrical connections are correct and complete. (Refer to Flue Connection – Spray Filter) Check that there is sufficient access and ventilation both below and above the Oven for maintenance and inspection. (Refer to Venting the Oven) If applicable, check that the Stainless Steel Hearth is fitted correctly, level with the floor bricks. (Refer to Stainless Steel Hearth) Check that all wiring and cabling is routed correctly. (Refer to relevant component) Check that the area below and surrounding the oven is clean, tidy and free of debris. Ensure that ONLY non-combustible materials are used in the construction of any façade surrounding the oven, including the areas closest to the oven steelwork, e.g. doors and windows. Refer to the Oven Façade Guide – available from Beech Ovens Head Office. Check to ensure that suitable fire extinguishing equipment is close at hand. Beech Ovens Page 66 RND-REC-RGO Manual (R1) 28/07/2011 (C) Confidential and Proprietary Section 2 - Commissioning Commissioning Beech Ovens Page 67 RND-REC-RGO Manual (R1) 28/07/2011 (C) Confidential and Proprietary Commissioning The gas system is fully automatic and when switched to ON sends a high voltage spark to the gas burner head. It continues to spark for 6-10 seconds. The flame will light automatically, heating up the oven space on high flame, then drop to low flame once set point temperature (SV) is reached. (If the burner does not ignite in 6-10 seconds, the system stops sparking for flame failure protection. The white FAULT/ RESET button will light. Press the white FAULT/ RESET button for successive attempts. Several attempts may be required for initial purging of the gas line.) As part of connection, the Gas supply lines are to be purged of any air that may be in the pipes. (Refer to the Connection section in this manual.) The following steps are used ONLY to check the ovens general function. Before the oven may be used for cooking it must undergo a Preheat stage. (Refer to the Preheating section in this manual) 1. Turn the main control switch to CONTROL. The Digital Temperature controller will self check then display the current oven temperature (PV). 2. Set the set point temperature (SV) to 100°C. (Refer to Digital Temperature Controller section in this manual.) 3. Turn the main control switch to ON. (Listen for the spark) The burner(s) should now ignite. If the burner fails to light, the white FAULT/ RESET button will light. To reset the ignition process, press the white FAULT/ RESET button. Should the burner fail to ignite after four (4) attempts, checks should be made by using the troubleshooting guide in this manual. 4. The gas system can be turned off by turning the main control switch to OFF. Before Preheating, refer to the following section System Damper Calibration. Beech Ovens Page 68 28/07/2011 (C) RND-REC-RGO Manual (R1) Confidential and Proprietary System Damper Calibration For those ovens supplied with either a Flue Transition or a Spray Filter from Beech Ovens, an integrated System Damper is fitted. Correct adjustment of the System Damper is an extremely important part of commissioning to ensure oven efficiency and safe operation. The following section explains the relevant variables in flue suction levels and the methods used to correctly calibrate the System Damper. Oven Draw (Suction) variables The amount of suction is affected by the following; Relative pressure of the restaurant/kitchen area which is affected by whether there is fresh air inlet for air-conditioning, open windows, doors, ceiling voids, nearby extraction canopies, vents or other factors which may give different pressure regions about the oven and flue system. Whether the restaurant/kitchen is open air and if so the effect of wind on the oven. Whether the exhaust is affected by prevailing winds. The specific geometric layout of the duct work. The quantity of suction depends on the design of the exhaust system. There are a number of options: Exhaust Design Natural Draft Forced Draft (fan) with cool air inlet (Door 1) Additional Doors Including Char Grill (per door) Exhaust Canopy Air Flow ~ 150 litres/ second ~ 700 litres/ second ~ 300 litres/ second As per manufacturers specifications The above airflow rates are indicative only for fan sizing and calculation of duct air flow requirements. Static pressure of 130Pa within the duct is required. Beech Ovens RND-REC-RGO Manual (R1) Page 69 28/07/2011 (C) Confidential and Proprietary Cool Air Make-up check It is strongly recommended that the cool air make-up device (Barometric Controller) have access to well ventilated fresh air, preferably an outside air source. Consult your mechanical service consultant to design supply. This is done to eliminate the possibility of the cool air make-up device drawing air from the underside of the oven causing a negative pressure in the oven cavity. This can result in flame failure and/or reduced oven efficiency. Before calibrating the flue, check that the cool air make-up device functions properly. It is important to make sure that the flap can move freely and that it has not suffered any damage in transport or during the course of installation. To check the cool air make-up device‟s function, close the System Damper fully and check that the cool air make-up flap opens to allow fresh air in. When the fan is switched off, the cool air make-up flap should then close. This may have a delayed reaction. Cool air make-up flap System Damper flap Flue Transition NOTE: Before preparing to calibrate the System Damper, ensure that all the variables that will effect the oven such as air-conditioning, windows and doors and all ancillary exhaust devices are either on or as they would be during normal operation. This is to ensure that the calibration will be true when the oven is in full operation in conjunction with other equipment. Beech Ovens RND-REC-RGO Manual (R1) Page 70 28/07/2011 (C) Confidential and Proprietary The A4 Paper Test Without access to suitable measuring equipment, the most effective method to correctly calibrate the oven exhaust is using the A4 Paper Test as explained below. The A4 paper test has been developed to be a simple and effective gauge to determine the draw (suction) at the oven exhaust spigot (top of the oven mouth). This is a common and often overlooked cause of poor oven performance. Too much suction causes the oven to lose heat & use excessive fuel. Too little suction allows smoke and combustion gas to escape into the kitchen. There is a fine balance between too much and too little. To adjust the draw, you will need to access the System Damper quadrant adjuster installed in the Flue transition or Spray Filter connected to the oven spigot. Too much draw (suction) Not enough draw (suction) For Australian installations using the Interlock System (AS5601) the Flue temperature can be adjusted using the System Damper to achieve a PV (Interlock) of 130°C -150°C (max) when the oven is fully heated. For all other systems, it is advisable to check the exhaust spigot temperature when the oven is fully heated and operational. Adjust the damper to obtain 130°C -150°C. Beech Ovens Page 71 28/07/2011 (C) RND-REC-RGO Manual (R1) Confidential and Proprietary Exhaust spigot with paper folded width wise held in position. (RND1300 Round oven) With the exhaust fan running, the suction at the exhaust spigot at the mouth of the oven should be enough to hold a sheet of A4 paper folded in half width wise. However, the suction should NOT be so much that it will hold the A4 paper when folded lengthwise. NOTE: It is acceptable to use either A4 or Letter size paper. A4 paper folded length wise A4 paper folder width wise If the sheet falls from position the System Damper will need to be adjusted (opened slightly) to increase the airflow. NOTE: When the System Damper is in a “SHUT” position, a small amount of air can still pass through the damper. To adjust, loosen wing nut and move the quadrant adjuster until correct required air flow is achieved. Beech Ovens Page 72 28/07/2011 (C) RND-REC-RGO Manual (R1) Confidential and Proprietary With the A4 sheet folded lengthwise the suction should not be able to hold the paper in position at the flue spigot at the mouth of the oven. If the sheet stays in position the System damper will need to be adjusted (closed slightly) to decrease the airflow. In the case of multi door ovens or ovens fitted with a char grill, repeat these instructions for all doors. (For ovens fitted with a Char Grill, suction is automatically biased to the Char Grill side of the exhaust spigot) Careful work here will increase performance and help to resolve problems otherwise overlooked. Remember, too much suction removes great amounts of heat from this style of oven. Correct calibration is critical. This test is simple and approximate. Additional calibration may be required should spillage be observed or if the exhaust spigot temperature exceeds the recommended 130-150°C (max). If you have any questions, [email protected] contact Beech Ovens Technical Support. Ventilation Test As mentioned in the earlier section Venting the Oven, for all ovens with gas, an open vent must always be made available to the underside of the oven. To sustain a flame, the oven utilizes primary and secondary air (oxygen) from below the oven floor. When firing the oven with gas, if the flame burns erratically check that the flame is not being drawn under the oven and Burner blow-back leaking from the blowchute back chute. If flames are visible here, this means there is an ambient pressure imbalance. (Higher pressure in the oven – Lower pressure below the oven) If smoke or flames are visible during the Ventilation test, shut the system immediately and refer to the section Ventilation Requirement. Beech Ovens Page 73 RND-REC-RGO Manual (R1) 28/07/2011 (C) Confidential and Proprietary System Balancing Having checked that the oven is correctly vented and that the Flue is correctly calibrated, in some cases there may be external air pressure differences that can affect the performance of the oven. In some instances an imbalance may occur between the space above the oven and the space below the oven. This may result in air being drawn from within the oven to compensate for this imbalance. A direct result of this may be that the flame, or smoke, is being drawn under the oven causing the flame to behave erratically and the ovens performance deteriorates. In most cases this is due to two (2) possible causes: Insufficient ventilation below the oven In the case of insufficient ventilation below the oven, refer to Ventilation Requirement in this manual. Excessive draw from above the oven If there is excessive draw from above the oven, this may result in the ventilation below the oven being insufficient. In worst case scenarios it may be required that the base of the oven be sealed off to prevent any air being drawn from within the oven cavity resulting in the flame being drawn under the oven. The following diagrams explains excessive draw from above the oven and the most common solution to this issue. For further assistance refer to www.beechovens.com or contact [email protected] the technical assistance section on Beech Ovens Technical support. Beech Ovens Page 74 RND-REC-RGO Manual (R1) Problem: 28/07/2011 (C) Confidential and Proprietary NEGATIVE PRESSURE Oven Facade POSITIVE PRESSURE Ventilation Panel Flame is being drawn under the oven Solution: Oven Facade POSITIVE PRESSURE Ventilation Panel Seal off the entire area between the façade wall and the oven body Beech Ovens Page 75 RND-REC-RGO Manual (R1) 28/07/2011 (C) Confidential and Proprietary Flame Calibration – Sit Nova 826 The following section explains the calibration procedure for the Sit Nova 826 Combination Gas valve. The valve allows for use with both Propane and Natural gas, however the jet in the burner will need to be changed and the data plate updated when converting gas types. Conversion kits are available to purchase from Beech Ovens Head Office ([email protected]) or your local Beech Ovens representative. Note: Never attempt to convert gas types without first changing the burner jet and data plate in the Gas control cabinet. Beech Ovens Page 76 RND-REC-RGO Manual (R1) 28/07/2011 (C) Confidential and Proprietary The calibration procedure is identical for Propane and Natural gas systems, though the reader must refer to the General Technical Details chart for adjusted pressure requirements. Note: This calibration procedure should be carried out by an experienced gas technician and is performed in situ with the system fully operational. It is very important to follow these instructions to set up the Combination Gas valve to achieve maximum performance. Each installation will vary and although the factory setting will produce a flame, it is necessary to fine tune the valve settings. This is standard practice for most gas appliances on installation. For ovens using Natural Gas, the burner will (in most cases) have been jetted at the factory to produce 80MJ with a supply pressure (outlet pressure) of 1kPa. (Refer to data plate inside the Gas control cabinet for oven specific details.) This is the High Flame setting. The Low Flame setting is set to a lower pressure after the High Flame setting has been adjusted. When this has been done it is necessary to re-check the High Flame setting. Before going further, you should familiarize yourself with the Sit Nova 826 Combination Gas valve to be aware of the location of the test and adjustment points. (Refer to the identification diagram above.) Setting High and Low Flame Pressure Before calibration, check that all other kitchen appliances connected to the main Gas supply line are running at maximum capacity. If flame calibration of the oven is done independently of other appliances being in use, the following steps will need to be repeated when these appliances are running to ensure the main Gas supply is capable of the supplying the required flow. To begin adjustment, the main Gas supply pressure should first be checked on the inlet side of the valve to confirm that sufficient pressure is being supplied. The screw for the Inlet (supply) pressure test point (4 in above diagram) can be removed and an appropriate fitting or hose used to connect to the test gauge. This should confirm supply pressure in excess of the required pressure of 2.0kPa for Natural Gas and 2.75kPa for Propane Gas. Should supply pressure fall below these levels, gas supply to the kitchen will need to be improved. Note: Supply pressure above 5.0kPa will damage the valve. If supply pressure is above 5.0kPa, a pressure regulator must be installed. Replace the inlet pressure test point screw and tighten to 2.5Nm. Beech Ovens Page 77 RND-REC-RGO Manual (R1) 28/07/2011 (C) Confidential and Proprietary High Flame Confirm that the Digital Temperature controller on the front of the Gas Control cabinet door is set so that the set point temperature (SV) is at least 100°C greater than the present value temperature (PV). This procedure will ensure that the valve remains on High Flame while calibrating. (Refer to Digital Temperature Controller for full instructions.) Turn on/start the gas system. (Refer to Commissioning for full instructions) Remove the Outlet pressure test screw. Connect to the test gauge using an appropriate fitting or hose to check the High Flame pressure. The pressure should be 1kPa for Natural Gas and 2.75kPa for Propane Gas. If adjustment is required, remove the plastic cap covering the adjustment Inlet pressure test screw screw by first removing the tie wire, twisting counter-clockwise then pulling up. (see below) Outlet pressure test screw Using a 10mm spanner, adjust the brass nut clockwise to increase pressure and counter-clockwise to reduce pressure. (see below) The Pressure Adjustment screws are as follows; Plastic Cap (Remove tie wire, twist and pull up to remove) 10mm Brass nut (High Flame adjustment) Phillips head screw (Low Flame adjustment) The lower brass hex nut is NOT for adjustment. Do NOT loosen. Beech Ovens RND-REC-RGO Manual (R1) Page 78 28/07/2011 (C) Confidential and Proprietary Low Flame When the correct pressure is achieved for High Flame, set the Digital Temperature controller so that the set point temperature (SV) is 12°C below the current oven temperature (PV). This will cause the Combination Gas valve to switch to Low Flame mode. The Low Flame pressure setting can now be set to a recommended pressure of 0.375kPa for Natural Gas and 0.75kPa for Propane Gas. Hold the position of the Brass nut in place with the 10mm spanner. With a No:1 Phillips head (star) screwdriver, adjust the Phillips head screw clockwise to increase pressure and counter-clockwise to reduce pressure. (see above) If it is found that the recommended setting is not functioning as desired, Low Flame can be adjusted with the help of an observer to regulate the flame to a satisfactory size. (This may be the case with multi-burner ovens, though the recommended minimum pressures remain 0.375kPa for Natural Gas and 0.75kPa for Propane Gas. Re-check the High Flame settings as outlined in High Flame. When the settings are correct replace the Plastic cover. Remove test gauge fitting (hose), replace the outlet pressure test point screw and tighten to 2.5Nm. Reset the Digital Temperature controller‟s set point temperature (SV) to the required temperature. (Refer to Digital Temperature Controller for full instructions.) Beech Ovens Page 79 RND-REC-RGO Manual (R1) 28/07/2011 (C) Confidential and Proprietary Flame Calibration - Char Grill The procedure for calibrating the Char Grill flame is outlined below. Note: This calibration procedure should be carried out by an experienced gas technician and is performed in situ with the system fully operational. Before calibration, check that all other kitchen appliances connected to the main Gas supply line are running at maximum capacity. If flame calibration of the Char Grill is done independently of other appliances being in use, the following steps will need to be repeated when these appliances are running to ensure the main Gas supply is capable of the supplying the required flow. To begin adjustment, the main Gas supply pressure should first be checked on the inlet side of the valve to confirm that sufficient pressure is being supplied. Remove the control knob from the Gas control valve. This is a „press fit‟ type knob. Connect a Gas pressure gauge to the test point as shown below. Test for incoming gas pressures as listed below. (For Natural Gas, adjust incoming pressure at supply regulator prior to Gas control valve) With the correct pressure at the control valve, proceed to check the High and Low Flame settings, using the relative adjustment screws as shown below. When the correct flame settings are calibrated, remove the test gauge and replace control knob. Piezo Igniter (Battery behind knob) Gas pressure test point. Natural Gas - 1.0kPa Propane/LPG - 2.75kPa „High Flame‟ adjustment screw. Max flow when screw is 2mm below top of hole. Screw in (clockwise) to decrease pressure (flame size). „Low Flame‟ adjustment screw. Screw in to decrease low flame setting. (Maintain strong flame setting) Beech Ovens RND-REC-RGO Manual (R1) Page 80 28/07/2011 (C) Confidential and Proprietary Inspirator Calibration The main function of the inspirator is to allow fresh air to mix with the gas before it enters the nozzle of the burner. The amount of air that is mixed with the gas governs how the flame will burn. The correct adjustment of the air/gas mixture is critical to achieving a suitable flame. Fresh air enters the inspirator and mixes with the gas 12.25mm S/S Supply pipe connection point (Display burner) Gas jet. Gas enters the inspirator here. Air/ Gas mixture disc. By screwing the disc upwards, it limits the amount of air that is mixed with the gas. Screwing it downwards increases the amount of air mixed with the gas. After Preheating is completed, adjust the Air/ Gas disc on the inspirator to achieve the following flame characteristics: For the Tube burner, the flame should reach the roof of the oven. For Natural Gas, all flames should be blue at the base with light yellow tails, For Propane or LPG, the flame will be mostly light yellow. The Air/ Gas mixture disc will need to be nearly fully open for Propane. (Deep yellow to orange is NOT correct and will deposit soot on the roof of the oven.) Beech Ovens RND-REC-RGO Manual (R1) Page 81 28/07/2011 (C) Confidential and Proprietary Please direct gas technical questions to the Beech Ovens Technical Support team in Australia at: [email protected] Refer to the following Commissioning Checklist before firing the oven for the first time. NOTE: Before the oven can be used for normal use, the Oven must undergo a Preheat stage. For Preheat instructions, refer to Preheating with Gas or Preheating with Wood. Beech Ovens RND-REC-RGO Manual (R1) Page 82 28/07/2011 (C) Confidential and Proprietary Installation & Commissioning Check Sheet Please complete and return to Beech Ovens after commissioning. Failure to return to this form may void the warranty of the oven. A signed copy must remain with site personnel. Commissioning Technician: ______________________________ Date: ______________ Installation Contractor: __________________________________ Install Date: ______________ Model: ______________ Serial Number: ______________ Customer Name (Executive Chef/ Hotel Engineer/ etc): _______________________________ Installation Address: __________________________________________________________ ___________________________________________________________________________ ___________________________________________________________________________ Phone: __________________________ Email: __________________________ Beech Ovens contact information Beech Ovens Head Office: 36 Gladys St Stones Corner Brisbane Qld 4120 Australia Tel: +61 (0)7 3397 0277 Fax: +61 (0)7 3397 0030 Web: www.beechovens.com E-mail: [email protected] Technical Support: [email protected] Postal Address: PO Box 1577 Coorparoo DC 4151 Brisbane, Australia Beech Ovens Page 83 28/07/2011 (C) RND-REC-RGO Manual (R1) Confidential and Proprietary Installation Check Sheet Assembly Check: □ Flue System. □ Fitted Oven Components. □ Access above and below oven. Ensure that ONLY non-combustible materials are used in the construction of any façade surrounding the oven, including the areas closest to the oven steelwork, e.g. doors and windows. Exhaust Type: Check that the Exhaust Duct installation is compliant with local regulation. Spray Filter. □ Flue Transition. □ Canopy. □Other: ____________________ (Spray Filter) Water connected. (Spray Filter) 40mm Drain connected. (Spray Filter) Power connected and linked to Exhaust fan circuit. Gas Connection: All Gas fittings tight and correctly connected. Gas control cabinet and Burner(s) mounted firmly in position. Shrouds firmly in place. Gas Type corresponds to that stated on the Data plate located in the Gas control cabinet. Burner connected to Gas control cabinet. For Dual burners – Tube burner connected to “Burner 1” connection on Gas control cabinet. Electrical Connection: Check that all wiring and cabling is routed correctly. All electrical components correctly installed – Mains Electricity Supply sufficient earthed and in accordance with local regulation. Correct Polarity (Power (Live) = Brown Neutral = Blue Earth = Green) Tri-Electrode connections and corresponding cabling is correctly fitted. (All burners: Zones 1 & 2) Spark evident. General Installation Check: Legs fastened sufficiently to floor (if applicable) – oven is stable in position. Outer ceramic wool insulation complete and well fastened. 25mm Air Circulation Gap evident. If applicable, check that the Stainless Steel Hearth is fitted correctly, level with the floor bricks. Check that the area below and surrounding the oven is clean, tidy and free of debris. Check to ensure that suitable fire extinguishing equipment is close at hand. Beech Ovens Page 84 28/07/2011 (C) RND-REC-RGO Manual (R1) Confidential and Proprietary Commissioning Check Sheet Electrical and Water supply: Power supply to Gas control cabinet is connected and turned on. If the exhaust system is fan forced, ensure that the fan is running and rotating the correct direction. Check for suction (draw) at oven spigot. Where applicable, check that the Spray Filter is correctly installed and functioning correctly. (Spray Filter) Water connected and on. (Spray Filter) Power connected and on. (Spray Filter) Water present at Tundish when operational. Gas Pressures: All relevant Gas supply is correctly connected to the Gas control cabinet, the flexible gas tube is connected securely to the correct burner and the manual valves are open (On). Check for leaks. Check gas pressures with all burners operating and at least 80% of all gas appliances in kitchen operating. Check the Flame size and colour to make sure the correct gas pressures are calibrated. Check High and Low Flame settings on all burners. Check that the Inspirator(s) is correctly calibrated to give the correct flame colour and size. General Commissioning check: (Australia Only) Check Interlock Thermocouple is correctly installed and functioning correctly. Check that the flue is installed and compliant with local regulation. Check that there is sufficient ventilation below the oven. Check that the Thermocouple is fitted correctly, flush with the oven base. Check that the System Damper is calibrated correctly and sufficient balance is achieved in the flue. Check that all areas are clean and tidy both below and above the oven. Remove any debris from oven area. Check the Cool Air Make-up device function. Cool Air Make-up connected to outside air source. Operator Training: How to work the oven. □ Preheat instructions. □ Insert Plug Door correctly. Gas safety – How to isolate gas supply to the oven if the smell of gas is detected near the oven. Starting sequence – Check power/gas, Canopy/Fan on, Check heat-up. Digital Temperature controller operation. Maintenance and flue cleaning required 3/6 monthly. (Maintenance schedule in Installation and Operation Manual outlined and explained) Warranty card returned. Installation and Operation Manual has been received by the client. Beech Ovens Page 85 RND-REC-RGO Manual (R1) 28/07/2011 (C) Confidential and Proprietary Section 3 – Operation Operation Beech Ovens Page 86 RND-REC-RGO Manual (R1) 28/07/2011 (C) Confidential and Proprietary Preheating with Gas Before the oven can be used for cooking it must undergo a Preheat or curing stage. This is a gradual, low flame stage designed to thoroughly “warm” the oven prior to use. This is common practice for all ovens and must be done to ensure that the materials in the oven are slowly “cured” to reduce cracking. The oven should be preheated for at least 72 hours. (three (3) days) Once the oven has been commissioned and all installation work is complete, the oven is now ready for Preheating. For ovens with two (2) burners, leave one (1) manual gas isolation valve closed. To preheat the oven, turn the main control switch to ON. While on High Flame, manually decrease the flame size to approximately half (approx 150mm high) by closing the manual gas isolation valve. This will allow a lesser amount of gas to burn, allowing a smaller flame. Manual gas isolation valve in half open position. Handle Vertical = OPEN Handle Horizontal = CLOSED With the settings in place from commissioning, the oven will now run continuously, automatically keeping the set point temperature (SV) at 100°C. After day one (1) raise the set point temperature (SV) to 150°C. After day two (2) raise the set point temperature (SV) to 200°C. NOTE: It is vital that only a small flame is used to preheat the oven. A large, fierce flame may crack the walls. Cracking can not be repaired, though will not effect the longevity or performance of the oven. Beech Ovens Page 87 RND-REC-RGO Manual (R1) 28/07/2011 (C) Confidential and Proprietary Preheating with Wood As mentioned in Preheating with Gas, before the oven can be used for cooking it must undergo a Preheat or curing stage. This is best done by making a fire just as you would build any fire for a barbeque. The best wood to use is anything hard, dry and dense which is untreated and without paint. To start the fire follow the following steps: 1. Place a flattened cardboard box on the oven floor just inside the opening of the oven. 2. Scrunch up several sheets of newspaper and place them in the middle of the cardboard. 3. Place kindling (small pieces of wood) on the newspaper. 4. Place some larger pieces of wood on top of the kindling. 5. Light the newspaper. 6. Once the kindling is satisfactorily alight and the larger wood begins to burn, push the whole lot to the position in the oven where you will normally locate the fire. (Either to the side or to the back of the oven) This fire of approximately 400mm diameter should be kept going for at least 72 hours (three (3) days), to thoroughly preheat the oven prior to first use. It is important to keep the temperature rise below 100°C per day. After day one (1) raise the oven temperature to 150°C. After day two (2) raise the oven temperature to 200°C. NOTE: It is vital that only a small fire is used to preheat the oven. A large, fierce fire may crack the walls. Cracking can not be repaired, though will not effect the longevity or performance of the oven. The purpose of this fire is to dry out the oven mortar slowly to reduce cracking. Once this preheating is complete, you can operate the oven with just wood, just gas or a combination of both. Beech Ovens Page 88 RND-REC-RGO Manual (R1) 28/07/2011 (C) Confidential and Proprietary Adjustments for Normal use After the three (3) days of preheating are completed, some adjustments must be made to allow the oven to function normally. The following section explains the adjustments required to set the oven for normal use. Return the manual gas isolation valve to fully open. Restriction of gas flow is no longer required. Reset the Digital Temperature control to the required temperature. (Refer to Digital Temperature controller for instructions) Read and understand the following section Firing up to Cook. Ensure to retain this manual in a safe and accessible place. This manual is to be available for maintenance and kitchen personnel. Beech Ovens RND-REC-RGO Manual (R1) Page 89 28/07/2011 (C) Confidential and Proprietary Firing up to Cook From cold, allow the oven approximately 3 hours to heat up initially. Thereafter, warm up should take about 60 minutes, depending on the size of the oven. This time can be reduced by using gas. The oven temperature is basically controlled by the size of the fire or the set point temperature (SV) of the gas system and the draft up into the flue system. The flue suction should be sufficient to not allow smoke into the kitchen during normal operation. It is a fine balance. When firing with wood, the time of maximum smoke is at ignition time in the morning. (To reduce the amount of smoke produced when lighting, dry the wood in the oven cavity overnight. Be sure to keep the wood clear of embers.) Optimum temperature for pizzas is approx 250-350°C. If pizzas do not cook in around five (5) minutes, the oven is too cool and a larger fire may be required. Check the troubleshooting guide if a larger fire does not increase the temperature. The pizzas should be rotated and moved about to cook them evenly. The chef soon becomes familiar with the radiated and reflected heat properties of the oven and moves the pizzas around to suit these different heat zones. Most restaurants place the pizza base directly on the oven floor although they can be placed on trays for time enough to toast the base a little before finishing off directly on the oven floor. Others leave the pizzas on trays for the whole process. This is a decision for the Executive Chef. The oven can be used for cooking foods other than pizzas and many chefs experiment with different wood types to get interesting flavours. Food can be roasted in cooking trays and fried in black metal pans. If required, we can arrange the services of an experienced Wood Fired Oven chef for training purposes. For any enquiries please feel free to call or email Beech Oven‟s Head Office. [email protected] Beech Ovens Page 90 RND-REC-RGO Manual (R1) 28/07/2011 (C) Confidential and Proprietary Gas Control Cabinet Functions Main Control Switch The Main Control Switch has three positions: OFF Both temperature controller & burner are off in this position. CONTROL The temperature controller only is energized. In this position the temperature controller will read the current oven temperature (PV) and the set point temperature (SV). The current oven temperature (PV) is monitored at the stone hearth (floor) level. The actual oven temperature will be higher than indicated. This is useful if firing on timber to easily see the cooking temperature. This is a read out only and has no control over the oven temperature with the control switch in this position. ON In this position the oven will start automatically, cycling the gas system to maintain the preset temperature or set point temperature (SV) of the oven. The operation of the gas flame will cycle automatically from Low Flame to High Flame or Off as required to maintain the set point temperature. See Digital Temperature Controller description below for more details. Burner On Indicator Light This light is lit when the ON position is selected on the main control switch and a flame is preset inside the oven. The main control switch should always be set to OFF when any service work or inspections occur. Disconnect power from the wall socket. All service work should be carried out by a qualified and authorized technician. Beech Ovens Page 91 RND-REC-RGO Manual (R1) 28/07/2011 (C) Confidential and Proprietary Fault/ Reset button In the event of the burner failing to light, the Fault/ Reset button will light and the burner will go into „lock-out mode‟. In this mode, the oven is 100% safe; no gas can flow. To restart the burner from „lock-out mode‟ (white light on) press the white light „reset‟ button. If the burner fails to light after three attempts, turn the control switch to OFF and refer to the troubleshooting section of this manual or call in a service professional. Digital Temperature Controller The Digital Temperature controller has two (2) main functions. To display the current oven temperature (PV- Present Value) and an adjustable setting to enable the operator to determine the desired oven operating temperature (SV - Set point value). To change the set point (SV) temperature up or down; Press SET Press ◄R/S to move the degree of change. (i.e. to change tens or hundreds) Press the ▲ (up) or ▼ (down) arrows until desired temperature is selected Press SET to enter the information See the following section for the different temperature control procedures. Beech Ovens Page 92 RND-REC-RGO Manual (R1) 28/07/2011 (C) Confidential and Proprietary Temperature Control Procedures Typical cooking temperature for pizza is 250-350°C and for breads 200-250°C. The burner controls on this oven have been designed to enable the operator to fire the oven using Gas, Wood or a combination of both. Using Gas only In this situation the burner will start on High Flame (intensive flame) and heat the oven to the preset (SV) temperature on the Digital Temperature controller. Once the oven has reached this temperature, the burner will automatically turn to Low Flame (less intensive, maintaining flame). This flame will maintain the oven temperature until the temperature starts to fall below the set point (SV) at which time the High Flame will cut in and heat the oven back to set point (SV). Should the temperature continue to rise on Low Flame, the gas burner will cease to burn at approximately 20°C above the set point temperature. It will automatically start again once the temperature falls below the set point temperature. This cycle will continue as long as the oven is in the ON position. Using Gas and Wood NOTE: Wood should not be placed on, or lean against, the tube burner shroud – any ash or debris that falls down the burner tube will cause the burner to fail. The above mentioned cycle is the same if using a combination of both fuels. However, once the oven has reached set point and turned to Low Flame, should the temperature continue to rise, (due to the burning wood) the gas burner will cease to burn at approximately 20°C above the set point temperature. The Gas system will then be in standby mode, waiting for the temperature to fall below the set point temperature. It will automatically start again once the temperature falls below the set point temperature. It is strongly advised not to burn wood on top of the Thermocouple or erratic Gas operation will result. Beech Ovens RND-REC-RGO Manual (R1) Page 93 28/07/2011 (C) Confidential and Proprietary Using Wood only Using Wood only in an oven that has a gas back-up system is quite an acceptable and common practice. The Digital Temperature controller can tell you the present oven temperature (PV) when the operating switch is set in the CONTROL position. This is very useful for gauging the fuel requirements of the oven. Gas Ovens The gas flame modulates from OFF, LOW FLAME and HIGH FLAME keeping the oven at the desired set point (SV) temperature. (250-350°C) Once the oven reaches cooking temperature the pizzas can be placed in the oven with or without trays within 150mm of the fire and in layers out. Combined Wood and Gas When firing using combined Wood and Gas, if the gas back-up burner does not appear to be firing much, it may just mean that there is sufficient heat from the wood fire to satisfy the thermocouple, not requiring the gas burner operation. Wood Fired Ovens As described in Preheating with Wood, start a small fire in the mouth of the oven with kindling and proceed making the fire with progressively larger pieces of wood. When the large logs (100mm-125mm diameter) are burning, push the fire to the back or side of the oven chamber. To reduce the amount of smoke produced when lighting, dry the wood in the oven cavity overnight. Be sure to keep the wood clear of embers. As the wood embers reduce, more wood should be placed on the fire. When there appears to be too much ash, simply drag this out and place in your steel ash receptacle. There is, however, a surprisingly small amount of ash compared to the amount of wood consumed. Most restaurants only clean out once a day in the morning at start-up. The quantity of ash reduces when using better quality hard wood fuel. NOTE: Removing ash should always be done with great care as hot embers may be hidden in the ash. Beech Ovens RND-REC-RGO Manual (R1) Page 94 28/07/2011 (C) Confidential and Proprietary Char Grill The following instruction relates to those ovens fitted with the Char Grill option. The Char Grill is a fully independent gas system connected directly to the main Gas supply and is not directly controlled by the Gas Control cabinet. The Char Grill is manually operated using the Main valve located between the oven doors. Pilot Position Off Position Piezo Igniter High Flame Position Low Flame Position Lighting the burners (Char Grill) Press slightly and turn the Main valve counter-clockwise to (Pilot) position and press fully in. While pressing the Main valve in, push and hold Piezo igniter button to light the pilot unit located below the hearth. Char Grill Pilot flame (Visible from front of grill) Beech Ovens Page 95 RND-REC-RGO Manual (R1) 28/07/2011 (C) Confidential and Proprietary Continue to press the main valve for twenty (20) seconds. (This is to allow the thermocouple enough time to sense a flame and open the main burner’s gas supply.) Release the main valve. (The pilot flame should now stay alight.) To choose between High and Low Flame, slightly depress the main valve and turn to the required flame. For the three (3) and four (4) burner Char Grills, repeat for both pilots. To turn off, depress the main valve slightly and turn to ● (OFF) position. (The Char Grill can be safely left in the Pilot position when not in use, though it is recommended to turn to the ● (OFF) position when finishing for the day.) Replacing the Char Grill Piezo Battery If the Piezo does not spark, it is possible that the battery has expired. To replace the battery follow the instructions below. 1. Unscrew the Piezo button. 2. Replace the battery. (Be sure to insert the new battery with the poles in the correct direction) 3. Replace the Piezo button. (Do not over tighten) If the Piezo still does not spark – having checked that the battery is OK and fitted correctly – check that the cable from the Piezo to the pilot is connected and in good repair. For further assistance contact Beech Ovens service department [email protected] Beech Ovens Page 96 RND-REC-RGO Manual (R1) 28/07/2011 (C) Confidential and Proprietary All Beech Ovens supplied with a char grill option are supplied with a spigot cleaning brush. This long handled brush should be used daily to clean any excess soot or grease from the exhaust spigot above the mouth of the grill. This area can get contaminated with flammable material from the grilling process. Fire risk occurs with poor maintenance. (Refer to Flue Fires section in this manual.) Grill Drawer (Slides Out) Exhaust spigot – Clean here daily using supplied spigot cleaning brush Grill Drip Tray Finishing for the Day When you have finished for the day, simply turn the main Gas control switch to OFF and if you wish, spread the coals. This is not always necessary. Any size fire can be left burning safely. Some owners put another log on to keep the oven hot overnight. It is safe to leave the fire burning and the gas switched ON or OFF. A stainless steel Plug Door is supplied and recommended for the oven to keep the heat in overnight. See the following section Plug Door Placement Beech Ovens Page 97 RND-REC-RGO Manual (R1) 28/07/2011 (C) Confidential and Proprietary Plug Door placement The stainless steel Plug Door is a loose fitting door used to retain the majority of heat within the oven when the oven is not in use. It is NOT designed to entirely block the opening, as this could potentially overheat the oven, or allow build up of dangerous gases inside the oven cavity. It is advisable to use the Plug Door in the main oven opening(s) whenever the oven is not being used to conserve energy. This is important especially overnight when no fire is present. 25mm gap Correct positioning. This helps to reduce heat and energy loss. Incorrect positioning. Heat and energy is lost from the oven into the flue. Remember to replace the special low profile Char Grill plug door in the Char Grill whenever it is not being used to reduce heat and energy loss from this opening. Beech Ovens RND-REC-RGO Manual (R1) Page 98 28/07/2011 (C) Confidential and Proprietary Section 4 – Maintenance & Technical Specifications Maintenance & Technical Specifications Beech Ovens RND-REC-RGO Manual (R1) Page 99 28/07/2011 (C) Confidential and Proprietary Oven Maintenance If properly cared for, your Beech Oven will give you many years of trouble free operation. We recommend you consider adopting the following Preventative Maintenance Service Schedule, which will ensure your oven operates at optimum efficiency, saving you money on operating and repair costs, ensuring your business is trading to its full potential. It is critical to maintain the Beech Oven and associated equipment on a regular basis, to avoid the possibility of a serious fire or malfunction. Regular Preventative Maintenance Service will also save you money on loss of profits from any down time. Beech Ovens strongly recommends a three (3) monthly inspection of the Flue system as to ascertain the levels of soot, grease and creosote build up during this period. Through these regular inspections you can develop a program for regular cleaning of your exhaust system. (Refer to General Information on Flues) A minimum of 25mm Air Circulation Gap is recommended between the outer oven insulation and any other material. It is of utmost importance that these spaces remain free to circulate air. Checks should be made on a regular basis as to confirm these spaces are maintained. These items are critical to the safe and reliable operation of the oven. Where additional options are fitted, such as the Interlock system (Australia Only) and the Water Flow Sensor (UK Only), maintenance to these items will need to be included into the following maintenance schedule. The following maintenance Schedule is a summation of information contained within this Installation and Operation Manual. Beech Ovens Page 100 28/07/2011 (C) RND-REC-RGO Manual (R1) Confidential and Proprietary Frequency Item 1 2 3 4 5 6 7 Task to be performed Each morning before the oven is fired up, remove fire ashes from the floor centre, using an ash pan and a shovel or brush. A damp cloth may be used to remove any remaining dust. Clean the oven floor prior to cooking. Do NOT use water! Cleanliness around the oven is essential. Ensure no debris or rubbish is left around, under or in the oven area. Ensure that a draft at spigot exhaust above the oven mouth is detected when the exhaust fan is operating. For ovens equipped with a char grill, regular cleaning of the oven spigot is required, depending on usage. After a suitable cooling down time, stainless steel grill plates, drip tray and cast iron radiants should be removed for cleaning and the remainder of the char grill should be wiped out. Take care not to damage the gas pilot assembly. Ribbon burners should be removed for cleaning and blown out with compressed air. For ovens equipped with a spray filter, the tundish drain should be checked that water is flowing at a trickle rate. Visually inspect the oven interior roof for blackness. Should blackness become evident, the oven may need some attention. If the blackness is from cooking foodstuffs, the oven may need a period of high firing in excess of 450C, to burn clean the oven cavity. If the blackness appears to be from the gas flame, a qualified technician should be called to service and adjust the system. Performed by Daily Oven Operator Oven Operator Oven Operator Oven Operator Oven Operator Weekly Oven Operator 3 Months Oven Operator Technician Oven Operator Monthly 6 Months Beech Ovens Page 101 28/07/2011 (C) RND-REC-RGO Manual (R1) Item Task to be performed Confidential and Proprietary Performed by Frequency Daily 8 9 10 11 12 13 Visually check and clean any foodstuff, dirt or deposits from burner with a suitable small brush. Take care not to damage the tri-electrode over burner. Carry out a comprehensive check of the oven, gas system and exhaust, including spray filter (or flue transition) and ductwork. Check that approved and inspected fire extinguishing equipment is in close proximity to the oven. Check correct exhaust airflow calibration and temperature at the exhaust spigot over the oven mouth, using the A4 paper test method. Adjustment of damper should not be necessary, unless restaurant / kitchen conditions have changed. Having the correct draw at oven mouth is critical to performance. Inspect and clean out oven extraction flue and ductwork, to remove any accumulation of creosote, soot and grease which may have occurred. If accumulation is present, it should be removed to reduce the risk of fire. Ensuring extraction ductwork is kept clean, will reduce the risk of fire. Check and verify correct operation of gas interlock system. When exhaust fan is switched off, the thermocouple probe in exhaust duct should register a rise in temperature and shut off the gas supply to oven burners. Inspect high temperature cables from control box to burner head and tri-electrode device. Ensure insulation is in good order especially where cables may cross over metal framework. Check cables at burner and end for any sign of burning. Oven Operator Weekly Monthly 3 Months Oven Operator Technician Technician Technician Technician Technician 6 Months Beech Ovens Page 102 28/07/2011 (C) RND-REC-RGO Manual (R1) Item Task to be performed Confidential and Proprietary Performed by Frequency Daily 14 15 16 17 18 19 20 21 22 Check correct burner flame / air mixture adjustment. Check for correct operation, ensure flame is not luminous and the burner is free from debris. Visually inspect condition of tri-electrode and carefully clean any ash or food which may be present. Check tri-electrodes have correct clearance from burner. Check for correct operation of balanced cool air make-up device, fitted to flue transition, when the fan is switched on and off. Check that temperature indicated at oven thermostat control is calibrated to provide accurate oven temperature. For ovens equipped with spray filter, check water is flowing to tundish at a trickle rate (15-35lts/hr). Check for water leakage at spray filter and clean tundish drain. Ensure water return flow and that tundish is clear. For ovens equipped with spray filter, remove and clean the spray filter nozzle and supply tube. Check for correct spray pattern. The inline water filter should be cleaned / replaced at this time. Remove and clean the cyclonic filter at this time. Check the area under oven is free of obstruction for correct ventilation to burners. Ensure no debris or rubbish is left around, under or in the oven area. Check / adjust gas pressure at the outlet side of gas regulator. Natural Gas is set to 1.0 kpa. LPG is set to 2.75 kpa Check exhaust fan for correct operation. Weekly Monthly 3 Months Technician Beech Technician Beech Technician Beech Technician Beech Technician Beech Technician Beech Technician 6 Months Beech Technician Beech Technician Beech Ovens Page 103 RND-REC-RGO Manual (R1) 28/07/2011 (C) Confidential and Proprietary Tri-Electrode and Burner Maintenance The most common cause of erratic operation of the Gas system is that the Trielectrode and/or burner becomes contaminated by debris. This may be in the form of foodstuffs or ash deposited in the area in which the Tri-electrode and/or burner operates. The following instruction shows the procedure for checking the position of the Trielectrode and removal of any debris which may become present around the Trielectrode and/or burner. Adjustment should generally not be necessary, though cleaning is common as part of regular maintenance. Note: Be sure to turn off the power and Gas before any maintenance takes place on the oven. Maintenance should be carried out when the oven is cold. Tube Burner To remove the Tube burner, loosen and remove the burner flange bolts (3-5 bolts). Should the burner require cleaning, remove the gas line into the burner. This is a flared connection and does not require sealant. Note: Be sure not to kink or damage the Gas line whilst handling the burner. Clean, if required, by turning upside down and blowing out any debris that may have built up in the burner nozzle. In extreme cases, the burner can be washed and scrubbed with a brush. Use compressed air for final clean. Beech Ovens Page 104 RND-REC-RGO Manual (R1) To remove the Tri-electrode assembly, loosen and remove the two (2) Phillips head screws holding the Trielectrode. 28/07/2011 (C) Confidential and Proprietary Phillips head screws Note: The Trielectrode is mounted in a ceramic base and is easily cracked if not handled correctly. Always check for cracks when servicing this component. Carefully remove the Tri-electrode and gently remove any debris which may have built up around the Tri-electrode using a soft brush or rag. Note: Be sure not to adjust the positioning of the Tri-electrode probes. Positioning of these probes is critical for the correct function of the gas system. See next page for correct positioning details. As general maintenance, clear any debris that may have accumulated in the base of blow back chute. Beech Ovens Page 105 28/07/2011 (C) RND-REC-RGO Manual (R1) Confidential and Proprietary If the position of the probes has been altered, be sure that the Flame Ignition probe and Earth probe have an approximately 5mm gap between them at the Spark point. These two (2) probes should NOT be close to any other metallic surface or close to each other, other than at the Spark point as shown below. The Flame Sensor probe should be slightly off centre. Flame Sensor probe slightly off centre 5mm gap at Spark point The gap between the burner nozzle and the Tri-electrode probes should be no closer than 8mm. Note: Be sure to check that all Gas lines, cabling and bolts are correctly assembled and secured before turning on power and gas for re-start. Beech Ovens RND-REC-RGO Manual (R1) Page 106 28/07/2011 (C) Confidential and Proprietary Display Burner When using a Display burner, wood fuel should NOT be used. However, foodstuffs and other debris can disrupt the correct operating function of the Tri-electrode on a Display burner. If the oven is cold and access is possible, in some cases the Display burner can be accessed through the door of the oven. The Tri-electrode is directly behind the burner shroud. If access is not possible through the door, the entire Display burner assembly can be removed through the base of the oven. To remove the Display burner, loosen and remove the four (4) bolts in the rear support of the oven base. Should the burner require cleaning, remove the gas line into the burner. This is a flared connection and does not require sealant. Check the condition of the blue high tension/temperature leads and insulting sleeve to the Trielectrode. Replace if necessary. Beech Ovens RND-REC-RGO Manual (R1) Page 107 28/07/2011 (C) Confidential and Proprietary Carefully lower the Display burner from the oven base. Be sure not to bump the position of the Trielectrode when removing and replacing the burner. With the Display burner removed the Tri-electrode and/or burner can be cleaned and/or adjusted. Connect the leads securely to the Tri-electrode correctly and be sure that it is correctly adjusted before reassembly. Incorrect positioning of the Tri-electrode is also a common cause of erratic Gas System operation with the Display burner. Correct positioning: A spark is generated at the Spark point. Incorrect positioning: A spark is generated between the Flame Ignition probe and the burner body. Note: Be sure to check that all Gas lines, cabling and bolts are correctly assembled and secured before turning on power and gas for re-start. Beech Ovens RND-REC-RGO Manual (R1) Page 108 28/07/2011 (C) Confidential and Proprietary Char Grill Maintenance As part of the daily maintenance schedule, the Char Grill should be cleaned thoroughly after each service. The drip trays may need to be emptied during service depending on the type of product being cooked. The upper drip tray is located under the front of the grill drawer and is easily removed out of the right hand side of the grill drawer. The lower drip tray pulls forward and out. To remove the grill plates, roll the grill drawer forward and lift the grill plates out of the grill drawer, one (1) at a time. With the grill plates removed, the entire upper grill drawer can be removed for maintenance if required. Locking bar – under grill plates Grill drawer Lift the locking bar in the centre of the drawer and carefully pull forward. Try to keep the drawer level when removing as to not damage any of the roller components. NOTE: Do NOT place the entire drawer in a dishwasher or wash with acidic cleaning agents. The drawer rollers contain bearings which can be damaged. Beech Ovens RND-REC-RGO Manual (R1) Page 109 28/07/2011 (C) Confidential and Proprietary Window Maintenance Some ovens have a viewing window accessory which enables the internal of the oven to be viewed by the public to enhance the visual experience of stone hearth cooking. In some cases the window may need to be cleaned as soot and smoke can contaminate the inner glass. Note: Only open the oven viewing window when the oven is OFF and cool. There are a number of different cleaning agents available on the market, though the method below explains a simple, cheap and effective method to cleaning the inner glass. Cleaning the Internal Glass Using a sheet of regular newspaper, scrunch the sheet and lightly dampen the paper in water. Apply the damp newspaper to some of the cool ash from the wood fire and lightly wipe the glass to loosen the soot from the glass. When the soot is dissolved, use a fresh sheet of damp newspaper to clean the remainder of the soot from the glass. This method also helps to prevent the build up of soot on the glass. NOTE: Do not use any acidic or harsh cleaning agents to clean the glass, as they could damage the protective coating on the glass. The following page shows the sequence to remove the outer panes of glass to gain access to the handle to open the viewing window. Beech Ovens Page 110 28/07/2011 (C) RND-REC-RGO Manual (R1) Confidential and Proprietary Remove 2 top caps only with a flat screw driver Step 1 Step 3 Step 2 Remove 2 top Bolts only with 4mm Hex key Step 4 Step 5 Step 6 ¼ Turn with 6mm Hex key to open Step 7 Step 8 Step 9 Beech Ovens Page 111 RND-REC-RGO Manual (R1) 28/07/2011 (C) Confidential and Proprietary Spotlight Maintenance Normal maintenance with the oven spotlight should only ever consist of globe replacement and/or glass cleaning or replacement. For any electrical connection, alterations or maintenance always use a licensed electrician. To access the globe, remove the access panel to the spotlight and remove the cover panel to the spotlight. The spotlight body is attached to the cover panel. 1. Undo the screws holding the spotlight cover panel and remove 3. Replace with a new Globe located inside To remove the glass, remove the cover panel as above. Unscrew the glass retaining ring and slide the ring and glass out of the tube Assemble in reverse order. 2. Unscrew the end cap of the spotlight body and remove the spotlight globe Beech Ovens Page 112 RND-REC-RGO Manual (R1) 28/07/2011 (C) Confidential and Proprietary Spray Filter Maintenance Maintenance of the Spray Filter should occur regularly and in accordance with the maintenance schedule as listed above. General maintenance consists of the following: Remove and clean the cyclonic filter Clean / replace the spraying nozzles and filters Check the cool air inlet mechanics are free moving Check / replace the in-line “Y” filter/strainer Clean the damper blade and clean internals of the main body Check that the solenoid is functioning correctly Check overall condition – check for signs of water or soot leakage Do NOT remove entire nozzle assembly – hold when undoing retaining nut Remove tip of nozzle and internal strainer ONLY by undoing the retaining nut – Do NOT remove entire assembly Check Cool air make-up device flap is free moving and clean Remove and clean the Cyclonic Filter (access from above) Remove and clean “Y” strainer and check solenoid is functioning correctly Clean the Damper blade and main body internals (Access from rear panel) Beech Ovens Page 113 RND-REC-RGO Manual (R1) 28/07/2011 (C) Confidential and Proprietary Spare Parts List The following is a condensed list of spare parts for most ovens. Although it is not necessary to carry any or all spare parts, we do recommend that some of the parts mentioned below be kept as they are crucial to the ovens operation. Gas System Parts Image Item Description Brand / Type Part No. Digital Temperature Controller (Single) RKC. RexCB100 SPAREPT-1008 Digital Temperature Controller (Double) RKC. RexCB100 SPAREPT-1009 Tri-Electrode (Tube Burner) Tri-Electrode PARTGAS-1624 Tri-Electrode (Display Burner) Tri-Electrode PARTGAS-1623 Flame (Ignition) Pack Brahma 12U SPAREPT-1010 Gas Combination Valve Sit Nova 826 SPAREPT-1011 Thermocouple Type K Shielded SPAREPT-1003 Beech Ovens Page 114 28/07/2011 (C) RND-REC-RGO Manual (R1) Confidential and Proprietary Spare Parts (cont’) Gas System Parts (cont’) Image Item Description Brand / Type Part No. Tube Burner (Complete) Inspirator PARTGAS-1617 Manual Isolation Valve Generic PARTCOM-1600 Tri-Electrode leads (Blue) 1.6m 2.2m SPAREPT-1004 (1.6m) SPAREPT-1005 (2.2m) Relay Omron LY-2 SPAREPT-1006 Beech Ovens Page 115 RND-REC-RGO Manual (R1) 28/07/2011 (C) Confidential and Proprietary Spare Parts (cont’) Char Grill Parts Image Item Description Brand / Type Part No. Char Grill Bed Long (Standard 600m for models prior to July 2010) Stainless Steel 150mm wide AGRILLL-1100 Char Grill Bed Short (500mm models prior to July 2010)) Stainless Steel 150mm wide AGRILLS-1100 Char Grill Plate Standard (Models after July 2010) Stainless Steel 200mmwide SPAREPT-1050 3 Way Winged Pilot (Includes pilot jet) (Models after 2010 with spark electrodes with lead) Robert Shaw SPAREPT-1015 Char Grill Thermocouple (900mm) Robert Shaw SPAREPT-1014 Char Grill Pilot spark electrode – with lead and protective sheath Robert Shaw SPAREPT-1049 SS Pilot Tube (1200mm) Generic SPAREPT-1017 SS Pilot Tube (900mm) Generic SPAREPT-1016 Beech Ovens Page 116 28/07/2011 (C) RND-REC-RGO Manual (R1) Confidential and Proprietary Spare Parts (cont’) Char Grill Parts (cont’) Image Item Description Brand / Type Part No. Char Grill Gas Control Valve Knob (Control Knob ONLY) PEL SPAREPT-1013 Char Grill Gas Control Valve (With Control Knob) PEL SPAREPT-1012 Ribbon Burner AC19 Carmichael SPAREPT-1018 Ribbon Burner AC14 Carmichael SPAREPT-1019 Cast Iron Radiant (480mm) Carmichael SPAREPT-1020 Cast Iron Radiant (350mm) Carmichael SPAREPT-1020 Beech Ovens Page 117 28/07/2011 (C) RND-REC-RGO Manual (R1) Confidential and Proprietary Spare Parts (cont’) General Oven Parts Image Item Description Brand / Type Part No. Spotlight Globe Ultralife 12V 50W ASPOTLT-1603 Spotlight Glass (with edge Gasket) Tempered Glass ASPOTLT-1602 Viewing Window Inner Glass (with edge Gasket) Robax AVWSTND-1607 Peel Aluminium (With 1300mm wooden Handle) Aluminium AACTOOL-1602 Rake Stainless Steel AACTOOL-1600 Brass Brush Brass Bristols AACTOOL-1603 Shovel Stainless Steel AACTOOL-1601 Grill Spigot Brush Nylon AACTOOL-1604 Beech Ovens Page 118 RND-REC-RGO Manual (R1) 28/07/2011 (C) Confidential and Proprietary Spare Parts (cont’) Spray Filter Parts Image Item Description Brand / Type Part No. Spray Filter Solenoid Valve SMC VXZ2240 ASFSTND-1611 Spray Filter Spray Nozzle (32L/Hr) (Models prior to July 2010) ¼” B SS 1 BSPT ASFSTND-1613 Spray Filter Spray Nozzle (11.2l/Hr) (2 per Spray Filter) (Models after July 2010) B1/8 TT-SS + T4W-SS ASFSTND-1606 Spray Filter 1/2" Y-Strainer (In line Filter) CW617N PN20 ASFSTND-1612 Spray Filter Manual Isolation Valve 15mm Ball Valve PARTCOM-1600 Beech Ovens Page 119 28/07/2011 (C) RND-REC-RGO Manual (R1) Confidential and Proprietary General Technical Details The data plate mounted on the inside of the Gas control cabinet contains the specific information for your oven. The following information is general technical details for all ovens and related Gas types, based on an 80Mj Gas Burner. Natural Propane Town Gas Char Grill Gas Pressure at Burner Injector 1kPa (High) 2.75kPa (High) 0.6kPa (High) Natural Gas 1kPa LPG 2.75kPa Gas Pressure at Isolating Valve 1.0kPa (Min) 5.0kPa (Max) 2.75kPa (Min) 5.0kPa (Max) 0.7kPa (Min) 5.0kPa (Max) 0.7kPa (Min) 5.0kPa (Max) 2.0 m³/ Hr 0.6 m³/ Hr 3.9 m³/ Hr 1.0-3.0 m³/ Hr 0.1 m³/ day 0.1 m³/ day 0.1 m³/ day N/A Gas Consumption per Hour (approx) Timber consumed Hardwood, no Gas Lunch and Dinner Secondary air for Gas Burner 5.66 litres/sec (Equivalent to a 40cm x 40cm vent under the oven floor) Air Conditioning Heat Load <2kW Heat Load Duct Size 300mm x 300mm Square (or equivalent round) for Fan Assisted 400mm x 400mm square (or equivalent round) for Natural Draft Air Flow Required 1 Door Ovens – 700 litres/sec (2520m³/Hr) @ 130Pa Static Pressure 2 Door Ovens – 1000 litres/sec (3600m³/Hr) @ 130Pa Static Pressure The following table shows the correct jet orifice size for the standard Beech Ovens gas burners. Gas output (Mj) 50Mj 60Mj 70Mj 80Mj Char Grill 19" Natural Gas LPG (Propane) Town Gas 3.20mm 3.60mm 3.90mm 4.10mm 2.35mm 2.10mm 2.30mm 2.50mm 2.60mm 1.40mm 5.20mm 5.40mm 5.60mm N/A 3.70mm Beech Ovens Page 120 28/07/2011 (C) RND-REC-RGO Manual (R1) Confidential and Proprietary CE Specifications The following table outlines the technical details for ovens installed within the CE region. Natural Gas Country Category Nominal Pressure Heat Input Nominal Rate Injector Diameter DE 12ELL 20mBar G20: 22kW G25: 19kW 2.3m ³/Hr 3.5mm (28 gauge) AT, DK, ES, FI, IE, IT, PT, GB, SE, CH 12H 20mBar G20: 22kW 2.3m ³/Hr 3.5mm (28 gauge) BE, FR 12Er 20mBar G20: 22kW 2.3m ³/Hr 3.5mm (28 gauge) Propane DE, NL, CH, FR, ES PT, GB, CH, FR, ES 13P 50mBar G31: 18.5kW 1.44kg /Hr 2.2mm (44 gauge) 13P 37mBar G31: 18.5kW 1.44kg /Hr 2.2mm (44 gauge) Note: CH, FR and ES allow both 37 and 50mBar Timber Consumption: Hardwood 0.1m³/ day Airflow required: 700 litres / sec. Suction controlled by system damper. (Direct connect) Duct Size: Natural Draft 300mm square (900cm²) or equivalent area round. Duct Size: Fan assisted 300mm square (900cm²) or equivalent area round. Duct Material: 1.2mm galvanised or 0.9mm stainless steel (As per local regulation) Secondary Air for gas burner: 6 litres / sec (approximately) Air conditioning Heat Load: <2 kW heat load Electrical Data: 220-240 Volts 50 Hz ac 10 Amp supply with earth Beech Ovens Page 121 RND-REC-RGO Manual (R1) 28/07/2011 (C) Confidential and Proprietary Oven Materials The following section describes the most common materials used in the construction of a Beech Oven. All oven materials are safe to handle when cool. The Oven Casing is mild steel with some stainless steel components attached. Oven Legs are galvanised steel. The Oven Hearth is typically stainless steel or granite. Please check for custom options. The Gas control cabinet is stainless steel. The Gas control cabinet components are all standard CE or AS approved units (various non-ferrous metals) and standard electrical components. The Upper oven cavity is high temperature castable with ceramic wool (KA) insulation between the steel shell and castable material. The oven casing is covered with 50mm of ceramic wool insulation. The oven base is high alumina clay brick with ceramic board insulation to the steel housing. Any glass that might be incorporated is ceramic glass. (Fire-lite, Borafloat or Toughened Safety Glass) The oven transition to the flue system is galvanised steel. The Spray Filter is stainless steel. The remains of the wood fire should be handled with care. The ash left in the oven may be hot and it will be dusty. Handle with care. Debris in the Flue is soot and grease (Creosote, carbon and ash from the cooking oven). Disposal of any materials should be confirmed with a local authority as to type of disposal method suitable and permitted. Beech Ovens Page 122 RND-REC-RGO Manual (R1) ECFIA General MSDS ECFIA GENERIC MSDS HIGH TEMPERATURE INSULATION WOOLS 31 01 00 ...............According to 91/155/CEE Table of contents ..1 . . . IDENTIFICATION OF THE PRODUCT AND OF THE COMPANY ..2 . . . COMPOSITION / INFORMATION ON INGREDIENTS ..3 . . . HAZARD IDENTIFICATION ..4 . . . FIRST AID MEASURES ..5 . . . FIRE FIGHTING MEASURES ..6 . . . ACCIDENTAL RELEASE MEASURES ..7 . . . HANDLING AND STORAGE ..8 . . . EXPOSURE CONTROL / PERSONAL PROTECTION ..9 . . . PHYSICAL AND CHEMICAL PROPERTIES 10 . . . STABILITY AND REACTIVITY 11 . . . TOXICOLOGICAL INFORMATION 12 . . . ECOLOGICAL INFORMATION 13 . . . DISPOSAL CONSIDERATIONS 14 . . . TRANSPORT INFORMATION 15 . . . REGULATORY INFORMATION 16 . . . OTHER INFORMATION 28/07/2011 (C) Confidential and Proprietary Beech Ovens Page 123 RND-REC-RGO Manual (R1) 28/07/2011 (C) Confidential and Proprietary 1 . . . IDENTIFICATION OF THE PRODUCT AND OF THE COMPANY . . . Identification of the product XYZ (commercial name) contains : CALCIUM-MAGNESIUM-SILICATE (CMS) WOOL . . . Identification of the company Identify (name, address, tel, fax): - The local supplier (could be the sales office dealing with the particular customer) - The HSE Department at the head office - An emergency telephone number (optional) 2 . . . COMPOSITION/ INFORMATION ON INGREDIENTS . . . Description Ex : XYZ is a needled blanket. . . . Composition CALCIUM-MAGNESIUM-SILICATE (CMS) WOOL (SiO2 = 60% - 70%; alkali earth oxides [CaO, MgO] = 25% - 40%; ZrO2 < 10%) . . . OTHER INGREDIENTS Eventually report hazard information for other substances in the product if: - the substance is on the list of dangerous substances - the substance is subject to an occupational exposure limit - you wish to draw the attention on a particular substance This product is made of minerals, none of which is radioactive under the terms of European Directive Euratom 96/29. In use this product can become contaminated with other materials and working practices should take into account the presence of such contaminants. 3 . . . HAZARD IDENTIFICATION May cause mild mechanical irritation to skin, eyes and upper respiratory tract. 4 . . . FIRST AID MEASURES Skin : In case skin irritation rinse affected areas with water and wash gently. Eyes : In case of serious eye contact flush abundantly with water; have eye bath available. 5 . . . FIRE FIGHTING MEASURES Non combustible products. Use extinguishing media appropriate to the surrounding fire. Beech Ovens Page 124 RND-REC-RGO Manual (R1) 28/07/2011 (C) Confidential and Proprietary 6 . . . ACCIDENTAL RELEASE MEASURES Avoid creating dust. Provide workers with respirators if necessary (see section 8). Follow routine housekeeping procedures. Where possible, use a HEPA vacuum to clean up the spilled material. If sweeping is necessary, use a dust suppressant and place materials in closed containers. Do not use compressed air for clean-up. Avoid clean up procedures that could result in water pollution. 7 . . . HANDLING AND STORAGE Adapt your work practices to limit handling which can be a source of dust emission. Avoid damaging the packaging and keep closed when not in use. 8 . . .EXPOSURE CONTROL / PERSONAL PROTECTION . . . Hygiene standards and exposure limits Industrial hygiene standards and occupational exposure limits vary between countries and local jurisdictions. Check which exposure levels apply to your facility. If no regulatory dust or other standards apply, a qualified industrial hygienist can assist with a specific workplace evaluation including recommendations for respiratory protection. Examples of exposure limits applying (in October 1999) to glass fibers in different countries are given below : 3 . . . HAZARD IDENTIFICATION May cause mild mechanical irritation to skin, eyes and upper respiratory tract. 4 . . . FIRST AID MEASURES Skin : In case skin irritation rinse affected areas with water and wash gently. Eyes : In case of serious eye contact flush abundantly with water; have eye bath available. 5 . . . FIRE FIGHTING MEASURES Non combustible products. Use extinguishing media appropriate to the surrounding fire. 6 . . . ACCIDENTAL RELEASE MEASURES Avoid creating dust. Provide workers with respirators if necessary (see section 8). Follow routine housekeeping procedures. Where possible, use a HEPA vacuum to clean up the spilled material. If sweeping is necessary, use a dust suppressant and place materials in closed containers. Do not use compressed air for clean-up. Avoid clean up procedures that could result in water pollution. 7 . . . HANDLING AND STORAGE Adapt your work practices to limit handling which can be a source of dust emission. Avoid damaging the packaging and keep closed when not in use. Beech Ovens Page 125 RND-REC-RGO Manual (R1) 28/07/2011 (C) Confidential and Proprietary 8 . . .EXPOSURE CONTROL / PERSONAL PROTECTION . . . Hygiene standards and exposure limits Industrial hygiene standards and occupational exposure limits vary between countries and local jurisdictions. Check which exposure levels apply to your facility. If no regulatory dust or other standards apply, a qualified industrial hygienist can assist with a specific workplace evaluation including recommendations for respiratory protection. Examples of exposure limits applying (in October 1999) to glass fibers in different countries are given below : Germany 0.5 f/ml TRGS 900, Bundesarbeitsblatt 4/1999 France 3 1.0 f/ml or 5mg/m Circulaire DRT No 95-4 du 12.01.95 UK 3 2.0 f/ml or 5mg/m HSE - EH40 - Maximum Exposure Limit * Time weighted average numerical concentrations of airborne respirable fibers measured by the conventional membrane filter method or gravimetric concentration of inhalable dust. . . . Engineering controls Review your applications in order to identify potential sources of dust exposure. Local exhaust ventilation, dust collection at source, down draft tables, emission controlling tools and materials handling equipment can all be used to control dust generation and dispersion. . . . Personal protective equipment Wear long-sleeved, loose-fitting clothing and gloves to prevent skin irritation. Goggles or safety glasses with side shields may be worn to prevent eye irritation, especially in case of over head working. When it is not possible to reduce dust through engineering controls, employees are encouraged to use good working practices together with respiratory protective equipment (RPE). For dust concentrations below the exposure limit value, RPE is not required but FFP2 respirators may be used on a voluntary basis. For short term operations where exposures above the limit value are less than a factor of ten, use FFP2 respirators. In case of higher concentrations, please contact your supplier for advice. . . . Information and training of workers Workers should be trained on good working practices and informed on applicable local regulations. Beech Ovens Page 126 RND-REC-RGO Manual (R1) 28/07/2011 (C) Confidential and Proprietary 9 . . . PHYSICAL AND CHEMICAL PROPERTIES Odor None Melting point > 1330°C Flammability None Explosive properties None Length weighted geometric mean diameter > 1.5 µm 10 . . . STABILITY AND REACTIVITY Upon heating above 900°C for sustained periods, this amorphous material begins to transform to mixtures of crystalline phases. For further information please refer to section 16. 11 . . . TOXICOLOGICAL INFORMATION . . . Irritant properties When tested using approved methods (Directive 67/548/EEC, Annex 5, Method B4), fibers contained in this material give negative results. All man-made mineral fibers, like some natural fibers, can produce a mild irritation resulting in itching or rarely, in some sensitive individuals, in a slight reddening. Unlike other irritant reactions this is not the result of allergy or chemical skin damage but is caused by mechanical effects. . . . Respiratory toxicity CMS wools have been tested for their biopersistence using methods devised by the European Union. The biopersistence values measured exonerate CMS wools from carcinogen classification under the criteria listed in nota Q of Directive 97/69/EC. Subchronic inhalation studies on rats with CMS wools at high concentration (150 f>20µm/ml) for 90 days with follow up to one year showed neither sustained inflammation nor cell proliferation. All parameters studied returned rapidly to baseline levels on cessation of exposure. In a lifetime carcinogenicity test, rats were exposed by inhalation for two years (5 days a week, 6 hours a day) to CMS wool at 200 WHO f/ml. There was neither fibrosis nor carcinogenic response. After service, CMS wools can contain various crystalline phases including some forms of silica (see section 16). CMS samples kept at 1000°C for two weeks were not cytotoxic to macrophage-like cells at concentration up to 2 2 320µg/cm . In the same test, samples of pure crystalline quartz were significantly active at 20 µg/cm . 12 . . . ECOLOGICAL INFORMATION No adverse effects of this material on the environment are anticipated. 13 . . .DISPOSAL CONSIDERATIONS Waste from this product is not classified as ”hazardous” or ”special” under European Union regulations. Disposal is permitted at landfills licensed for industrial waste. Check for local regulations which may apply. To prevent materials becoming airborne, a covered container or plastic bagging is recommended. Beech Ovens Page 127 RND-REC-RGO Manual (R1) 28/07/2011 (C) Confidential and Proprietary 14 . . .TRANSPORT INFORMATION Not classified as dangerous goods under relevant international transport regulations. Ensure that dust is not wind blown during transport. 15 . . .REGULATORY INFORMATION . . . Classification among dangerous substances Regulatory status comes from European Directive 97/69/EC and its implementations by the Member Sates. According to Directive 97/69/EC the fiber contained in this product is a mineral wool belonging to the group of ”man-made vitreous (silicate) fibers with random orientation with alkaline oxide and alkali earth oxide (Na2O+K2O+CaO+MgO+BaO) content greater than 18% by weight”. Under Directive 97/69/EC all types of man-made vitreous (silicate) fibers are classified as ”irritant” despite the fact that testing by the appropriate EU method (B4 in annex 5 of Directive 67/548/EEC) is providing no response and would not result in irritant classification. Under criteria listed in nota Q of Directive 97/69/EC, CMS wools are exonerated from carcinogen classification because of low pulmonary biopersistence. . . . Protection of workers Shall be in accordance with several European Directives and their implementations by the Member States: (a) Council Directive 80/1107/EEC as amended by Directive 88/642/EEC ” on the protection of workers from the risks related to exposure to chemical, physical and biological agents at work ”. (b) Council Directive 89/391/EEC ”on the introduction of measures to encourage improvements in the safety and health of workers at work”. (c) Council Directive 98/24/EC ”on the protection of workers from the risks related to chemical agents at work”. . . . Other possible regulations Member States are in charge of implementing European Directives into their own national regulation within a period of time normally given in the Directive. Member States may impose more stringent requirements. Please always refer to any applicable regulation. Beech Ovens Page 128 RND-REC-RGO Manual (R1) 28/07/2011 (C) Confidential and Proprietary 16 . . .OTHER INFORMATION . . . Useful References Commission Directive 97/69/EC of 5 December 1997 adapting to technical progress for the 23rd time Council Directive 67/548/EEC on the approximation of the laws, regulations and administrative provisions relating to the classification, packaging and labeling of dangerous substances. Official Journal of the European Communities, 13 December 1997, L 343 and any Member State implementation. Council Directive 98/24/EC of 7 April 1998 on the protection of the health and safety of workers from the risks related to chemical agents at work. Official Journal of the European Communities, 5 May 1998, and any Member State implementation. . . . Precautionary measures to be taken after service and upon removal Because high concentrations of fibres and other dusts may be generated when after-service products are mechanically disturbed during operations such as wrecking, ECFIA recommends: a) control measures are taken to reduce dust emissions and b) all personnel directly involved wear an adapted respirator to minimize exposure and comply with local regulatory limits. These procedures will ensure compliance with local regulatory exposure standards for free crystalline silica. And because devitrified fibers containing silica mixed with amorphous and other crystalline phases are far less biologically active than free crystalline silica dusts, these measures will provide a high degree of protection . . . . ECFIA Web Site For more information connect to the ECFIA web site: www.ecfia.org disturbed during operations such as wrecking, ECFIA recommends: a) control measures are taken to reduce dust emissions and b) all personnel directly involved wear an adapted respirator to minimize exposure and comply with local regulatory limits. These procedures will ensure compliance with local regulatory exposure standards for free crystalline silica. And because devitrified fibers containing silica mixed with amorphous and other crystalline phases are far less biologically active than free crystalline silica dusts, these measures will provide a high degree of protection . . . . ECFIA Web Site For more information connect to the ECFIA web site: www.ecfia.org Beech Ovens Page 129 RND-REC-RGO Manual (R1) 28/07/2011 (C) Confidential and Proprietary Troubleshooting Guide To obtain the best results from your Beech Oven, please read the Installation and Operation Manual in it‟s entirety before operation. Should a fault or complication arise, please read the following Troubleshooting guide to determine a possible source and solution to the problem. If after having read this manual and followed the instructions in the Troubleshooting guide failed to resolve the problem, please contact Beech Ovens Technical Support at [email protected] Note: Always ensure that both power and gas are turned off before any troubleshooting or maintenance is carried out. In addition to having the Installation and Operation Manual in hand, Beech Ovens recommend the following tools as standard when troubleshooting: Approved Gas Pressure gauge, Multimeter, Digital (or analogue) Temperature gauge and a standard range of hand tools including wrenches, pliers and screwdrivers. The following guide is a list of the most common problems encountered when using a Beech Oven. Problem / Symptom Possible Cause 1.1 Possible gas leakage - Do NOT operate oven. 1.1.1 Refer to Gas Systems Overview. 1.1.2 Turn off main gas supply at Manual Gas Isolation Valve in Gas Control Cabinet. Contact service technician. 2.1 Gas supply problems. (For LPG, is tank near empty?) 2.2 Contamination on Tri-electrode – debris, etc. 2.3 Spark is shorting to metallic surface. 2.4 Tri-Electrode not in correct position or misaligned. 2.5 Air in Gas line. 2.6 Faulty Flame pack. 2.7 Faulty Gas valve(s). 2.8 Tri-electrode cables incorrectly fitted to Tri-electrode or flame pack 2.1.1 Check gas supply (Contact service technician). 2.2.1 Refer to Tri-electrode and Burner Maintenance. 2.3.1 Refer to Tri-Electrode/ Igniter Assembly. 2.4.1 Refer to Tri-electrode and Burner Maintenance. 2.5.1 Refer to Connection Procedures. 2.6.1 Replace Flame pack. 2.7.1 Replace Gas Valve(s). 2.8.1 Refer to Tri-Electrode/ Igniter Assembly. 1. Smell of gas near oven. 2. Burner fails to ignite – spark heard (evident) at Tri-electrode. 3. Burner fails to ignite – no spark heard under the oven (at burner) Solution / Reference chapter in Installation and Operation Manual 3.1 Gas supply problems. (For LPG, is tank near empty) 3.2 No power to control cabinet - circuit breaker in Gas Control cabinet tripped. 3.3 Tri-Electrode cables faulty/ connections dirty/ fallen off. 3.4 No power to Flame Pack. 3.5 Faulty Flame pack. 3.6 „SV‟ setting below „PV‟ on Digital Temperature Controller. 3.7 Faulty Thermocouple. 3.1.1 Check gas supply (Contact service technician). 3.2.1 Check power supply. Refer to Gas Systems Overview. 3.3.1 Refer to Connection Procedures. 3.4.1 Check power supply. 3.5.1 Replace Flame pack. 3.6.1 Refer to Digital Temperature Controller. 3.7.1 Do NOT build fire on Thermocouple. 3.7.2 Replace Thermocouple. Beech Ovens Page 130 RND-REC-RGO Manual (R1) 4. Soot deposits on roof and/or walls. 5. Burner fails to remain alight – dies after a few seconds. 6. Smoke spillage from oven mouth 7. Excessive heat in flue (over 180°C) 8. Oven won‟t get hot enough. 28/07/2011 (C) Confidential and Proprietary 4.1 Gas supply problems. (For LPG, is tank near empty) 4.2 Incorrect gas pressure setting. 4.3 Inspirator air adjustment incorrectly calibrated. 4.4 Flame misaligned in tube (impinging “touching” shroud). 4.5 Debris fallen onto burner (nozzle ports). 4.6 Leaking gas connection at burner. 4.7 Insufficient ventilation for primary air below oven. 4.8 Restriction of secondary air into the oven cavity. 4.9 Impurity in gas supply. 4.10 Incorrect jet/orifice. 4.1.1 Check gas supply (Contact service technician). 4.2.1 Refer to Flame Calibration. 4.3.1 Refer to Inspirator Calibration. 4.4.1 Check shroud location, positioned correctly in floor. 4.5.1 Refer to Tri-electrode and Burner Maintenance. 4.6.1 Refer to Connection Procedures. 4.7.1 Refer to Venting the Oven. 4.8.1 Remove restriction. 4.9.1 Check gas supply (Contact service technician). 4.10.1 Contact service technician. 5.1 Tri-electrode misaligned to flame 5.2 Tri-electrode dirty/faulty - (cracked ceramic) 5.3 Lead connection from Flame pack to Tri-electrode dirty/faulty/fallen off. 5.4 Flame pack faulty or beginning to fail 5.5 Gas supply/pressure problems. 5.6 Ventilation problem, flame being drawn under the oven floor. 5.7 Colour coded Tri-electrode cables incorrectly fitted to Tri-electrode. 5.8 Polarity of the electrical wall socket is incorrect 5.1.1 Refer to Tri-electrode and Burner Maintenance. 5.2.1 Refer to Tri-electrode and Burner Maintenance. 5.3.1 Refer to Connection Procedures. 5.4.1 Replace Flame pack. 5.5.1 Refer to Flame Calibration (Contact service technician). 5.6.1 Refer to System Balancing or www.beechovens.com 5.7.1 Refer to Tri-Electrode/ Igniter Assembly. 5.8.1 Refer to Electrical Connection in Installation manual 6.1 Incorrect flue system damper calibration. 6.2 Fan failure. 6.3 Flue blocked/ Dirty. 6.4 Wind or breeze interrupting normal operation. 6.5 Excessive smoke production. 6.1.1 Refer to System Damper Calibration. 6.2.1 Replace fan (Contact service technician). 6.3.1 Clean Flue. Refer to Oven Maintenance. 6.4.1 Refer to System Balancing or www.beechovens.com 6.5.1 Incorrect wood selection (Refer to Firing with Wood). 7.1 Incorrect system damper calibration 7.2 Fan failure. 7.3 Flue blocked/ Dirty. 7.4 Spray Filter/Flue Transition - ”Cool air make-up” problems. 7.1.1 Refer to System Damper Calibration. 7.2.1 Replace fan (Contact service technician). 7.3.1 Clean Flue. Refer to Oven Maintenance. 7.4.1 Refer to Cool Air Make-up Check. 8.1 Gas supply problems. (For LPG, is tank near empty) 8.2 Incorrect system damper calibration. 8.3 Problem with gas system temp controller. 8.4 „SV‟ setting to low on Digital Temperature Controller. 8.5 Insufficient wood fire/wood selection. 8.6 Plug door(s) incorrectly positioned. 8.7 Ventilation problem, flame being drawn under the oven floor. 8.8 Initial warm-up too short. 8.9 Wood fire built on top of Thermocouple. 8.1.1 Check gas supply (Contact service technician). 8.2.1 Refer to System Damper Calibration. 8.3.1 Refer to Gas System Overview. 8.4.1 Refer to Digital Temperature Controller. 8.5.1 Refer to Firing up to Cook / Wood Fired Ovens. 8.6.1 Refer to Plug Door Placement. 8.7.1 Refer to Oven Ventilation or www.beechovens.com 8.8.1 Refer to Firing up to Cook. 8.9.1 Move fire away from Thermocouple. Beech Ovens Page 131 RND-REC-RGO Manual (R1) 9. Gas flame turns off before „SV‟ setting is reached. 10. Gas flame remains on high fire. 11. Gas remains on low fire. 12. Gas turns off instead of going to low fire. 13. Gas flame intermittent/erratic. 28/07/2011 (C) Confidential and Proprietary 9.1 Faulty Thermocouple. 9.2 Ventilation problem, flame being drawn under the oven floor. 9.3 Faulty Digital Temperature Controller. 9.4 Flame sensor dirty/ Faulty. 9.5 Over-Temperature Sensor in flue cutting off gas supply. (Australian ovens only - AS5601 interlock) 10.1 „SV‟ setting too high on Digital Temperature Controller. 10.2 Faulty Thermocouple. 10.3 Thermocouple positioned incorrectly or fallen out of oven 10.4 Incorrect gas pressure adjustment. 10.5 Faulty Digital Controller. 10.6 Faulty Flame pack. 11.1 Gas supply problems. (For LPG, is tank near empty) 11.2 Incorrect gas pressure adjustment. 11.3 „SV‟ setting below „PV‟ on Digital Temperature Controller. 11.4 Wood fire built on Thermocouple. 11.5 Incorrect position of Thermocouple. 11.6 Faulty Flame pack. 11.7 Faulty Digital Temperature Controller. 11.8 Faulty Gas Combination valve. 12.1 Incorrect gas pressure adjustment. 12.2 „PV‟ exceeding „SV‟ temperature on Digital Temperature Controller. 12.3 Over-Temperature Sensor in flue cutting off gas supply. (Australian ovens only. AS5601 Interlock) 12.4 Faulty Digital Temperature Controller. 12.5 Faulty Gas Combination valve. 12.6 Faulty Flame pack. 12.7 Ventilation problem, flame being drawn under the oven floor. 13.1 Gas supply problems. (For LPG, is tank near empty) 13.2 Ventilation problem, flame being drawn under the oven floor. 13.3 Wood fire on top of Thermocouple. 13.4 Power supply interruptions. 13.5 Check „SV‟ setting on Digital Temperature Controller. 13.6 Inspirator air adjustment incorrectly calibrated. 13.7 Inspirator/Burner nozzle dirty. (build up of charcoal or debris) 9.1.1 Replace Thermocouple. 9.2.1 Refer to System Balancing or www.beechovens.com 9.3.1 Replace Digital Controller. 9.4.1 Refer to Tri-electrode and Burner Maintenance. 9.5.1 Refer to Interlock System – Australian markets ONLY. 10.1.1 Refer to Digital Temperature Controller. 10.2.1 Replace Thermocouple. 10.3.1 Refer to Thermocouple. 10.4.1 Refer to Flame Calibration. 10.5.1 Replace Digital Temperature Controller. 10.6.1 Replace Flame pack. 11.1.1 Check gas supply (Contact service technician). 11.2.1 Refer to Flame Calibration. 11.3.1 Refer to Digital Temperature Controller. 11.4.1 Move fire away from Thermocouple. 11.5.1 Refer to Thermocouple. 11.6.1 Replace Flame pack. 11.7.1 Replace or re-programme Digital Temp. Controller. 11.8.1 Replace Gas Combination valve. 12.1.1 Refer to Flame Calibration. 12.2.1 Refer to Digital Temperature Controller. 12.3.1 Refer to Interlock System – Australian markets ONLY. 12.4.1 Replace or re-programme Digital Temp. Controller. 12.5.1 Replace Gas Combination valve. 12.6.1 Replace Flame pack. 12.7.1 Refer to System Balancing or www.beechovens.com 13.1.1 Check gas supply (Contact service technician). 13.2.1 Refer to System Balancing or www.beechovens.com 13.3.1 Move fire away from Thermocouple. 13.4.1 Check power supply (Contact electrician). 13.5.1 Refer to Digital Temperature Controller. 13.6.1 Refer to Inspirator Calibration. 13.7.1 Refer to Tri-electrode and Burner Maintenance. Beech Ovens Page 132 RND-REC-RGO Manual (R1) 14. Fault/Reset light comes on. 15. Gas burner not turning off. 16. No lights on Gas Control cabinet (Digital Temp Controller/ Burner ON). 17. Flame leaking out from blow back chute. 18. Excessive Gas consumption. 19. Cracked upper refractory. 20. Burner flame popping loud on startup 28/07/2011 (C) Confidential and Proprietary 14.1 Gas supply problems. (For LPG, is tank near empty) 14.2 Ventilation problem, flame being drawn under the oven floor. 14.3 Tri-electrode dirty, contaminated, loose etc. 14.4 Leads to Tri-electrode faulty/fallen off. 14.5 Faulty Flame pack. 14.6 Faulty Gas Combination valve. 14.6 Air in gas lines. (refer to Connection procedures) 14.1.1 Check gas supply (Contact service technician). 14.2.1 Refer to System Balancing or www.beechovens.com 14.3.1 Refer to Tri-electrode and Burner Maintenance. 14.4.1 Refer to Connection Procedures. 14.5.1 Replace Flame pack. 14.6.1 Replace Gas Combination valve. 14.7.1 Refer to Connection Procedures. 15.1 Thermocouple faulty / fallen out. 15.2 Faulty Digital Temperature controller 15.3 Check „SV‟ setting on Digital Temperature Controller. 15.4 Faulty Flame pack. 15.1.1 Refer to Thermocouple. Replace if faulty. 15.2.1 Refer to Digital Temperature Controller. 15.3.1 Refer to Digital Temperature Controller. 15.4.1 Replace Flame pack. 16.1 Power supply problems. 16.2 Circuit breaker inside cabinet tripped. 16.3 Bulbs faulty - blown 16.1.1 Check power supply (Contact electrician). 16.2.1 Check power supply. Refer to Gas Systems Overview. 16.3.1 Replace bulbs 17.1 Incorrect System Balancing 17.2. Ventilation problem, flame being drawn under the oven floor. 17.1.1 Refer to System Balancing. 17.2.1 Refer to Oven Ventilation. 18.1 Incorrect System Damper calibration. Oven loosing heat. 18.2 Incorrect door position. 18.3 Incorrect flame calibration. 18.4 Incorrect gas pressure adjustment. 18.5 Leakage in supply line. 18.6. Ventilation problem, flame being drawn under the oven floor. 18.7 Incorrect jet /orifice 18.1.1 Refer to System Damper Calibration. 18.2.1 Refer to Plug Door Placement. 18.3.1 Refer to Flame Calibration. 18.4.1 Refer to Flame Calibration. 18.5.1 Turn off main gas supply at Manual Gas Isolation Valve in Gas Control Cabinet. Contact service technician. 18.6.1 Refer to System Balancing or www.beechovens.com 18.7.1 Contact service technician 19.1 Insufficient Preheating of the oven. 19.1.1 Refer to Preheating with Gas / Wood. 20.1 Tri-electrode misaligned to flame 20.2 Build up of charcoal or debris on burner 20.1.1 Refer to Tri-electrode and Burner Maintenance. 20.2.1 Inspect and clean burner Beech Ovens Page 133 RND-REC-RGO Manual (R1) 28/07/2011 (C) Confidential and Proprietary Index A A4 Paper Test ................................................................ 70 access panel ................................................................... 52 Adjustments for Normal use.......................................... 88 A-Frame ........................................................................ 16 Air Circulation Gap ...................................................... 19 air/gas mixture ............................................................... 80 ash disposal container.................................................... 13 Assembly....................................................................... 16 B Barometric Controller ............................................. 29, 69 Base ............................................................................... 11 blow-back chute ............................................................ 72 burner/ inspirator ........................................................... 53 C Exhaust duct design ...................................................... 27 Exhaust Fan .................................................................. 29 exhaust gas .................................................................... 25 exhaust system .............................................................. 28 Existing System ............................................................ 29 F FAULT/ RESET........................................................... 67 Fault/ Reset button .................................................. 46, 91 Finishing for the Day .................................................... 96 Firing up to Cook .......................................................... 89 fitting the insulation to the oven.................................... 19 Flame Calibration ......................................................... 75 flame characteristics...................................................... 80 flame failure .................................................................. 48 Flame Pack........................................................ 47, 48, 54 Flue Fires ...................................................................... 34 Flue Material ................................................................. 27 Flue Transition .............................................................. 21 FR nozzle burner ........................................................... 47 Full Gas ......................................................................... 43 Canopy Method ............................................................. 34 CE Specifications ........................................................ 120 ceramic wool ........................................................... 17, 18 Char-Grill .......................................................... 10, 43, 94 Combination Gas valve ................................................. 44 Combustible floors ........................................................ 13 Commissioning ............................................................. 67 Commissioning Check Sheet......................................... 84 Connection Procedures .................................................. 53 Contents ......................................................................... 3 cool air make-up device .......................................... 30, 69 Cracking ........................................................................ 86 current oven temperature ......................................... 46, 91 cyclonic filter .......................................................... 22, 30 G D I dedicated fan ................................................................. 29 dedicated flue ................................................................ 29 Digital Temperature controller ................................ 46, 91 Display burner ............................................................... 47 Disposal of ashes ............................................................. 8 Duck Oven thermocouple .............................................. 51 Inlet (supply) pressure ................................................... 76 inspection/ cleaning ports.............................................. 21 inspirator ................................................................. 53, 80 Installation Check Sheet................................................ 83 Installation Procedure ................................................... 14 Interlock System ........................................................... 24 interlock temperature controller .................................... 25 Interlock Thermocouple ................................................ 25 isolator .......................................................................... 64 E earth probe..................................................................... 48 ECFIA General MSDS ................................................ 122 electricity supply ........................................................... 64 emergency manual gas isolation valve .......................... 44 Excessive draw .............................................................. 73 Gas back-up .................................................................. 43 Gas Char Grill ............................................................... 47 gas management system ................................................ 43 General Technical Details ........................................... 119 H High Flame ............................................................. 77, 92 High Flame pressure ..................................................... 77 High volume extraction ................................................. 29 K Kaogrip ......................................................................... 18 kindling ......................................................................... 87 Beech Ovens Page 134 RND-REC-RGO Manual (R1) 28/07/2011 (C) Confidential and Proprietary L S lifting frame................................................................... 16 Lifting Positions ............................................................ 14 Lighting the burners (Char-Grill) .................................. 94 lock-out mode.......................................................... 46, 91 Low Flame .................................................................... 92 Low Flame pressure ...................................................... 78 Low volume extraction.................................................. 29 secondary air ................................................................. 72 set point temperature ..................................................... 67 shroud ........................................................................... 55 Sit Nova ........................................................................ 75 spigot ............................................................................ 18 spigot cleaning brush .................................................... 96 Spotlight Connection .................................................... 63 Spotlight Maintenance ................................................ 111 Spray Filter ............................................................. 22, 30 Spray Filter - Technical Specifications ......................... 23 Spray Filter Connection ................................................ 58 Spray Filter Maintenance ............................................ 112 sprinkler head................................................................ 34 Stainless Steel Hearth ................................................... 20 stairs .............................................................................. 13 standby mode ................................................................ 92 SV – Set point value ............................................... 46, 91 System Balancing ......................................................... 73 System Damper ....................................................... 21, 68 System Damper Calibration .......................................... 68 M Main Control Switch ............................................... 45, 90 making a fire ................................................................. 87 misting spray ................................................................. 30 mounting flange............................................................. 53 N Natural Draft ................................................................. 28 Nominal airflow required .............................................. 27 T O Optimum temperature ................................................... 89 Outlet pressure .............................................................. 77 oven materials ............................................................. 121 test gauge ...................................................................... 77 thermal input ................................................................. 43 Thermocouple ............................................................... 49 Thermocouple probe ..................................................... 55 Transportation ............................................................... 15 Tri-electrode............................................................ 48, 54 Tube Burner Ventilation ............................................... 38 P Piezo.............................................................................. 95 Piezo Battery ................................................................. 95 pizza base ...................................................................... 89 Plug Door ................................................................ 96, 97 polarity ......................................................................... 64 Power flue ..................................................................... 24 Preheating with Gas ...................................................... 86 Preheating with Wood ................................................... 87 Pressure Adjustment screws ......................................... 77 purging of the gas line ................................................... 67 PV- Present Value ................................................... 46, 91 Q quadrant adjuster ........................................................... 70 R reticulated gas supply .................................................... 56 U Upper Refractory .......................................................... 11 V vent ............................................................................... 52 Ventilation Requirement ............................................... 37 Venting the Oven .......................................................... 52 viewing window .......................................................... 109 W warranty document ....................................................... 6 Water Supply Sensor..................................................... 26 Window Installation ...................................................... 59 Window Vent Connection ............................................. 62