1
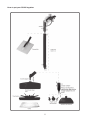
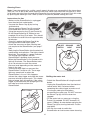
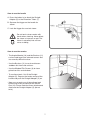
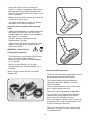
TM
Model SC300
BEFORE USE – PLEASE READ THE MANUAL
AND SAFETY INSTRUCTIONS.
Please retain for future reference.
Thank you for purchasing your Earlex SteamStation SC300,
we hope you enjoy using it.
Please read the manual carefully to get the most
out of your product.
Pack contents:
1 - SC300
2 - Jug
3 - Funnel
4 - Towel
5 - Straight Adapter
6 - Steam Cap
7 - Extension Tubes
8 - Floor Tool and Swivel Adapter (8a)
9 - Window/Tile Cleaner
10 - Angled Nozzle
11 - Brushes, Large (Brass) and Small (Nylon)
12 - Steamplate
13 - Steam Gun
• Please note that some accessories are
stored at the front of the product under
the lifting section.
• Read the instruction booklet before using
the SC300 and make sure that…
- The cable is in perfect condition.
- All packaging materials are removed from the
product.
2
• Use extra care when cleaning
>on stairs or step-ladders.
SAFETY
INSTRUCTIONS CAUTION!
• To provide continued
>protection against the risk of
>electric shock connect
to grounded socket-outlets
>only.
• Do not touch steam
>nozzle with hands when
>cleaning. Never direct
the steam at a person or pet.
>The steam is extremely hot
>and can cause scalding.
• Use only genuine
>manufacturer’s parts.
• It is recommended that a
>RCD (Residual Current
>Device) rated at 30mA is
>fitted into the mains supply
• Do not direct steam at people, >socket-outlet for added
protection against electric
>animals or at electrical
shock.
>devices.
• Be careful of overhead water
>dripping down when working
>on the ceiling.
• Do not immerse cord, plug or
>SteamStation in water or any
other liquid.
• Do not operate SteamStation
>without water in the tank.
• Do not allow SteamStation to
run unattended at any time.
• Do not drag or try to move
>boiler by pulling either the
>hose or the power cord.
• Close supervision is
>necessary when this
>SteamStation is used near
>children. Do not allow it to be
>used as a toy.
• If the cord is damaged, it must
>be replaced immediately by
>the manufacturer or its
>appointed agents to avoid a
• The SteamStation is designed >hazard.
for household use only, do not
• Keep feet and all parts of
>expose to rain.
>body away from the jet of
• Do not overfill the water tank. >steam. Do not operate
>The SteamStation contains a >machine in bare feet or when
>wearing open toe shoes or
>maximum 1.25 quarts
>(1200ml) of water. Excessive >sandals.
>filling of the water tank may
• Do not pull or carry by cord,
>cause damage or injury.
>or use cord as a handle, close
>door on cord or pull cord
• Never turn the SteamStation
over or tilt more than 45˚ when around sharp edges or
>corners. Keep cord away from
it is switched on or if it’s still
>heated surfaces.
producing steam.
3
• Unplug SteamStation when
not in use. Turn all controls off
>before unplugging from
>electrical socket-outlet.
>understand the hazards
>involved. Children shall not
>play with the SteamStation.
• The boiler becomes hot in
>use. Move only by using the
>carrying handle.
• Do not unplug by pulling on
>cord. Always grasp the plug,
>not the cord. Never handle
plug or SteamStation with wet
>hands.
• Allow to cool completely
>before emptying boiler.
• Store in a dry place. Do not
>expose SteamStation to
freezing temperatures.
• Do not stand on boiler, hose
>or steamplate.
• The SteamStation must be
>unplugged after use and
>before cleaning.
• This SteamStation can be
>used>by persons with
>reduced physical, sensory or
>mental capabilites or lack of
>experience and knowledge if
>they have been given
>supervision or instruction
>concerning use of the
>appliance in a safe way and
WARNING - Risk of injury!
CAUTION! - Steam 212˚F (100˚C) - Don’t direct at people or animals
Cleaning Fabrics:
All carpets and fabrics should be tested first before use. A number of materials and fabrics are
NOT suitable to be cleaned by steam for example: Do not use on leather, wax-polished furniture
or floors, synthetic fabrics, velvet, Dralon® or other delicate, steam-sensitive materials.
Cleaning Glass/Mirrors:
Thermal shock can shatter glass. Before cleaning glass surfaces, carefully warm the surface by
directing the steam jet on the glass from a distance not less than 6in (15cm).
Using Wallpaper Steamplate (Item 12):
Check the state of your plaster before starting work.
Steam can loosen weak, porous or poorly bonded plaster - which also loosens readily if cracked,
holed or if the steamplate is held in one position for too long after the paper is soaked.
Weak plaster can normally be detected by tapping a few areas of wall. A hollow sound indicates
that you should proceed only with extreme care - stopping immediately if you hear a cracking
sound or plaster starts to break loose.
The steam stripper is safe for drywall/plaster board surfaces but whatever the material, it is
always wise to check a small area before starting work.
4
How to put your SC300 together
5
Cleaning Floors
Note: If you stop working for a while a small amount of water may accumulate in the steam hose
after use. This is due to the steam cooling in the hose. When you switch the unit back on a short
jet of water may eject from the end of the hose after the steam trigger is pressed. Drain this water
by pressing the steam gun into a cloth (careful it may be hot) before starting your task.
Instructions for Use
• Make sure the SteamStation is unplugged
from the electrical socket-outlet.
• Unscrew the Steam Cap (6) by turning
anticlockwise.
Please note the Steam Cap (6) cannot be
>unscrewed when the unit is pressurized.
• Using the measuring Jug (2) and Funnel (3)
>fill the SteamStation up to 1200ml or two
>complete fills of Jug (2) of water. This should
>be sufficient to steam clean for approximately
>30 minutes.
• Once full, replace the Steam Cap (6) by
>turning clockwise and fasten tightly.
• Attach the accessory or floor cleaning tool
you require to the SteamStation (see page 7
>& 8).
• Now plug the SteamStation into the electrical
socket-outlet and switch on. Two lights should
illuminate. The red light is a power indicator.
The orange light indicates that the
>SteamStation is building steam pressure.
When the SteamStation is first turned on this
light will illuminate. The SteamStation takes
up to 7-8 minutes to reach the correct
pressure level depending on the amount of
water in the tank.
• Once the orange light has gone out the
SteamStation is ready to use. The orange
light may come back on when the
SteamStation is in use. If this happens,
release the safety trigger and allow the steam
pressure to build up once again. This should
take no longer than 40 seconds. If the safety
trigger is pressed when the orange light is on,
hot water may leak out from the
SteamStation.
MAX 1200ml
ON/OFF
SWITCH
ORANGE
LIGHT
RED
LIGHT
Refilling the water tank
• Switch the SteamStation off using the on/off
button.
• Unplug the SteamStation from the electrical
socket-outlet. Wait 5 minutes before
squeezing the safety trigger to make sure it
is no longer under pressure before
unscrewing the safety cap. DO NOT unscrew
the Steam Cap (6) until the steam has
>stopped.
2
3
• Fill the water tank as necessary using the
Funnel (3) provided. DO NOT exceed 1.25
>quarts (1200ml) of water before replacing the
>Steam Cap (6) by turning clockwise. Fasten
>cap tightly.
6
• You are now ready to switch the
SteamStation on and resume steam cleaning.
How to use the handle
A. Press the button in to attach the Straight
Adapter (5) or the Extension Tubes (7).
B. Squeeze the trigger on the handle for
steam.
C. Lock the trigger for constant steam.
• Do not touch steam nozzle with
hands when cleaning. Never direct
the steam at a person or pet. The
steam is extremely hot and can
cause scalding.
How to use the nozzles
• The Angled Nozzle (10) and the Brushes (11)
>can be used to get into awkward corners that
>are normally difficult to clean.
• Use the Brushes (11) to scrub and loosen
stubborn dirt from hard surfaces.
• Use the Window/Tile Cleaner (9) to clean
>grime from tiles and windows.
• To use these tools, first fit the Straight
Adapter (5). Depress the button on top of the
handle and push the Straight Adapter (5) on.
• Now you can push any of these three tools
onto the tip of the jet-nozzle of the Steam
>Gun (13). Please note that these attachments
>slide onto the Straight Adapter (5) (do not
>twist).
7
• Attach the floor brush to the Extension
Tubes (7), which snap together. Then attach
>the extension tube assembly to the Steam
>Gun (13). Ensure the Extension Tubes (7) are
>firmly connected.
• Before cleaning always remove dust from the
surface you wish to clean.
• To release the Extension Tubes (7) depress
>the button on the hose connection.
Cleaning floors & carpets with cleaning
cloth.
• While the SteamStation is switched off attach
the Towel (4) to the Floor Tool (8) via the
spring-loaded clips. Make sure the edges of
the Towel (4) are secure.
DO NOT attempt to do this while the
SteamStation is still hot.
• Never remove the Towel (4) while the safety
>trigger is released or the SteamStation is
warm to the touch.
WARNING - Risk of injury!
Fitting the Accessories
• The accessories may be fitted to the Steam
Gun (13) using Straight Adapter (5).
When fitting the Towel (4), Straight Adapter
(5) is required.
When using the Brushes (11) or highAngled Nozzle (10), Straight Adapter (5) is
>required.
Cleaning and Maintenance
When using the Floor Tool (8) use Swivel
Adapter (8a).
• Cleaning and maintenance operations should
be carried out with the SteamStation
disconnected from the power supply.
• The SteamStation should be allowed to
completely cool down before it is stored
away or cleaned.
• Clean the SteamStation and its accessories
with a slightly damp cloth only.
• Never use a cleaning product or detergent.
• To ensure that your SteamStation operates
correctly over a long period, rinse out the
water tank once a month to remove
lime-scale deposits. White vinegar solution or
>a proprietary de-scaler solution can be used
>to clean inside the water tank.
8
• There are no customer service parts for the
boiler unit, all repairs must be carried out by
a qualified person.
Instructions for Steamplate (12)
• Killing Weeds: Steam will kill weeds on
paths and patios without the use of
chemicals. You will need to steam the weeds
for 1 to 1½ minutes in order to kill them.
Steamplate (12) is used in conjunction with
Steam Gun (13) and/or fitted to Extension
Tubes (7).
CAUTION!
Note: When using this accessory it is not
necessary to wait for the orange light to go
off as there is sufficient steam pressure
available for most stripping and removal
operations (approximate continual
steaming time with full tank is 30 to 35
minutes).
Before using the Steamplate (12) with your
SC300 please check the following:
• Check the state of your plaster before starting
work (see page 4).
Note: As with all decorating work, be sure
to protect flooring and furniture with
covers.
The Steamplate (12) can be used for the
following:
• Wallpaper Stripping: (Remember to test
small area first). Hold Steamplate (12) flat
>against the wallpaper for approximately 10
>seconds.
• See page 7 for steam operation with handle.
• Now move the Steamplate (12) to the area
>immediately next to the one just steamed –
>from which the paper should now easily come
>away with a little help from a wallpaper
>scraper. Note with heavily embossed, vinyl>coated or painted papers we would suggest
>gently scoring the surface either using a
>proprietary perforator tool or the edge of a
>wallpaper scraper in a ‘criss-cross’ pattern
>with 6 inch (150mm) spacing.
• Artex® Removal: Same method as for
wallpaper removal although the steaming
time may be longer.
CAUTION! Some textured finishes may
contain asbestos which may be hazardous to
health and which are subject to licensing
controls operated by HSE (Health and safety
Executive).
• Vinyl-Floor Tile Removal: Steamplate (12)
>will need to be left on tile surface long enough
>to penetrate the adhesive. Once the adhesive
>is hot it softens and the tile can be peeled
>from the floor.
• Disinfecting Soil: To disinfect soil in seed
trays or greenhouses rake the soil to obtain a
fine surface. Leave the Steamplate (12) on
>each section for 2 to 2½ minutes which
>should ensure the steam has penetrated
>through the surface.
9
Notes
10
Notes
11
Technical data
• 2.5 metre power cord
• Water capacity - 1200ml
• Steam-up time – up to 7 minutes
depending on volume of water
• Working time – 30 minutes
• Tank material - Stainless Steel
• Voltage - 220-240V
• Frequency - 50-60Hz
• Power - 1500W
• Hose 3m
Troubleshooting
• I cannot remove the Steam Cap (6)
Make sure that you have fully de-pressurized
the boiler. See the section ‘Refilling the
water tank’ page 6 and allow to cool.
• Water comes out of the nozzle
The SteamStation creates a large amount
of steam. This may condense as water or
water droplets in the steam hose and can
be expelled when used after a period of
cooling. This is normal and not a cause for
concern.
• No steam comes out
Check that the hose has not become kinked
or blocked. Also check the power supply and
water level.
• Steam flow is erratic; sometimes it
works well, other times it does not
If you have not used distilled or deionized
water, you may have a small blockage inside
your SteamStation. Try descaling your unit.
Check all attachments are fitted correctly.
• I live in a hard water area, my
> SteamStation does not work as well
Empty the boiler after use. In hard water
areas your SteamStation may benefit from
occasional descaling. To ensure > > > > >> >
> SteamStation operates correctly over a
> long period, rinse out the water tank once a
> month to remove lime-scale desposits. White
> vinegar or a proprietary de-scaler solution >
> can be used.
EC Declaration of Conformity
We declare that the unit SC300 conforms to: LVD 2006/95/EC, EN 60335-2-54, EN 60335-1,
PAH ZEK 01.2-08, EMF EN 62233; EMC 2004/108/EC, EN 55014-1, EN 55014-2,
EN 61000-3-2, EN 61000-3-3.
Tim Hopper-Technical Director
2013 © Earlex Ltd
Made in China
M0715
01/13