1
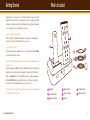
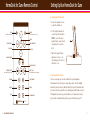
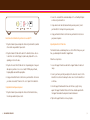
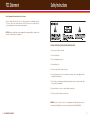
DLO | HomeDock
™
HOME ENTERTAINMENT CENTER FOR ZUNE
USER MANUAL
Contents
Getting Started
04
What's Included
05
HomeDock for Zune Remote Control
06
Setting Up HomeDock for Zune
07
Tips + Troubleshooting
11
Tech Specs
13
Service + Support
14
Warranty
15
FCC Statement
16
Safety Instructions
17
© 2007 Digital Lifestyle Outfitters
HomeDock, Digital Lifestyle Outfitters and
The DLO logo are trademarks of Digital Lifestyle Outfitters.
Zune and the Zune logo are trademarks or registered trademarks
of Microsoft Corporation in the United States and/or other countries.
All Rights Reserved
Printed in Taiwan
M54009-061221A
2 | DLO HOMEDOCK USER GUIDE
| 3
Getting Started
What’s Included
Congratulations on your purchase of the DLO HomeDock for Zune with On-TV
Navigation, the dock that lets you enjoy your Zune's music, video, photos, radio and
community in your living room. Connecting HomeDock to your home entertainment
center is a snap. We'll get you started in four easy steps.
ENTER
Step 1 - Assemble your HomeDock
Attach the HomeDock Support Stand and make the proper power, audio and video
connections to your Home Entertainment Center. See page 6.
Step 2 - Connect your Zune
Then, adjust the HomeDock Support Stand (see page 8) and press the Power Button
4
3
5
on your HomeDock Remote Control.
2
6
Step 3 - For On-TV Navigation of your Zune you'll have to set the tv out setting on
the Zune itself.
To do this, simply go to settings on the Zune's Main Menu (you may do this manually
using the Zune's ControlPPad or with the HomeDock's Remote Control). Under settings select display and then select tv out: off. When you see a pop-up window, just
hit the Enter/OK Button on your HomeDock Remote or on the Zune Control Pad.
Your Zune's interface should now appear on your television screen.
Step 4 - Now you can navigate and select music, video, radio or community using
your HomeDock Remote control.
4 | DLO HOMEDOCK USER GUIDE
HOM
ED
FOR
OCK
Z U NE
7
8
1
1 HOMEDOCK
4 REMOTE CONTROL
7 AC POWER ADAPTER
2 ADJUSTMENT SCREW
5 MINI-TO-RCA CABLE
8 POWER STATUS LIGHT
3 ZUNE SUPPORT STAND
6 AV CABLE
| 5
HomeDock for Zune Remote Control
Setting Up Your HomeDock for Zune
Assembling your DLO HomeDock
1. Remove the adjustment screw
on top of the HomeDock.
BACK
POWER
hold for main menu
turn HomeDock on or off
UP NAV
PREVIOUS MENU
ENTER
DOWN NAV
NEXT MENU/SELECT
ENTER/OK
VOLUME UP/DOWN
PLAY/PAUSE MUSIC
PREVIOUS TRACK
press and hold to rewind
2. Fit the Support Stand into the
cavity on top of the HomeDock.
NOTE: Be sure to line up the
Support Stand's cutout slot with
the adjustment screw on the
Dock.
3. Tighten the Support Stand's
adjustment screw to secure
the Stand in place. Do not overtighten the screw.
NEXT TRACK
press and hold to fast forward
Connecting HomeDock for Zune
REWIND
FAST FORWARD
There are several ways you can connect HomeDock to your existing Home
SHUFFLE
REPEAT
Entertainment Center. Generally, we recommend you connect the Left and Right
Audio Out to your stereo directly, and Video Out directly to your TV. HomeDock works
great connected solely to your home stereo, although you wouldn't be able to use On-
MUTE
LED DIM/BRIGHT
TV Navigation. If you want to use your HomeDock to select and view music, videos,
pictures, radio or community from your Zune, you need to hook it up to your TV.
H O M E D O C K FOR ZU NE
6 | DLO HOMEDOCK USER GUIDE
| 7
2. Connect the included RCA-to-mini Audio Adapter to the Left and Right Outputs
on the back of your HomeDock.
VIDEO
AUDIO
12.5V DC
USB
Basic Connection of HomeDock to your home stereo and/or TV
3. Using a mini-to-mini cable (included with most powered speakers), connect
your HomeDock to the Input on the powered speakers.
4. Using your HomeDock Remote Control turn on your HomeDock. Also turn on
your powered speakers.
1. Plug the included AC power adapter into the back of your HomeDock, and the
other end into any available AC power outlet.
Adjusting HomeDock to Fit Your Zune
2. Plug the included A/V Cable into the back of the HomeDock's base. Be sure
to match the color on the A/V plugs (red, white and yellow) with the corresponding jack color on the base.
Zune, you should adjust the HomeDock's Support Stand.
3. Plug the other end of the A/V Cable into the corresponding jacks of any available input on your home stereo receiver and/or TV. White plug-Left audio,
Red plug-Right audio and Yellow plug-Video.
1. Loosen the Support Stand Screw and slide the Support Stand as far back as it
can go.
The HomeDock can be used with many Zune cases left on. The first time you use your
4. Using your HomeDock Remote Control turn on your HomeDock. Also turn on
your home stereo and/or TV and select the correct input for the HomeDock.
Using HomeDock with powered speakers
1. Plug the included AC power adapter into the back of the HomeDock base,
then into any available AC power outlet.
Follow these steps to do so:
2. Connect your Zune by carefully lowering it onto the Zune dock connector of the
HomeDock. Be careful not to damage the Zune connector on the HomeDock or
on the Zune.
3. Slide the Support Stand toward the Zune until the Zune is gently resting
against the Support Stand Pad. The back of the Zune should be parallel with
the Support Stand and not leaning more forward or backward.
4. Tighten the Support Stand Screw to keep it in place.
8 | DLO HOMEDOCK USER GUIDE
| 9
Tips + Troubleshooting
Connecting HomeDock to your PC for use as a Desktop Dock
1. Use any standard USB 2.0 compatible A-to-B cable (not included) to connect
the HomeDock to your Windows-based home computer.
2. Once connected, the Zune software on your PC will recognize your Zune
player and update the content on the player. For more information, see the
instructions that came with your Zune.
NOTE: Your HomeDock will also charge your Zune while connected to
your computer.
I've selected a video or pictures to play on my TV but instead it's only
playing on my Zune's screen.
For On-TV Navigation of your Zune you'll have to set the tv out setting on the Zune itself.
To do this, simply go to settings on the Zune's Main Menu (you may do this using the
Zune's Control Pad or with the HomeDock's Remote Control). Under settings select
display and then select tv out: off. When you see a pop-up window, just hit the
Enter/OK Button on your HomeDock's Remote or on the Zune Control Pad. Your Zune's
interface should now appear on your television screen.
I am unable to get reception using my Zune's radio mode, what's wrong?
The Zune actually uses your headphones or ear buds as an antenna. So, in order to get
proper reception in radio mode using the HomeDock for Zune, you'll need to plug in a
pair of headphones or ear buds.
My HomeDock for Zune sounds a little distorted.
The balance of volume between your HomeDock and Stereo/TV can affect the audio
quality significantly. Adjust the HomeDock's volume or your Home Stereo/TV volume up
or down to achieve the best sound quality.
Does the HomeDock charge my Zune's battery?
Yes. The HomeDock charges and powers your Zune whenever your Zune is connected.
10 | DLO HOMEDOCK USER GUIDE
| 11
Tech Specs
Do I have to use a TV with the HomeDock?
INPUTS/OUTPUTS
Left/Right Audio: analog audio output, White plug-Left, Red plug-Right
No. The only time you need a TV is for On-TV viewing and navigation of your music,
videos, pictures, radio or community. For all other uses, the HomeDock is a musicbased, remote-controlled home docking system for your Zune that requires nothing
but a stereo or powered speakers to play your Zune's music. Of course, to get the most
out of your HomeDock, you should connect it to a TV and Home Stereo. Remember, in
order to use On-TV Navigation to select and choose your music, videos, pictures, radio
or community, you have to connect your HomeDock to your TV.
Video: composite video output, Yellow plug
Power Adapter Input: 100-240VAC, 47-63 Hz
Power Adapter Output: 10VDC, 1.5 amps max
USB-A: standard universal serial bus, USB 2.0
REMOTE CONTROL
Battery: 3V, type CR2032 or equivalent
12 | DLO HOMEDOCK USER GUIDE
| 13
Service + Support
Warranty
For more information, updates and tips, please visit our website at www.dlo.com and
click Support.
Digital Lifestyle Outfitters Limited Manufacturer’s Warranty
What This Warranty Covers. DLO (Digital Lifestyle Outfitters) warrants this product against defects in materials and workmanship. This limited warranty applies only to products manufactured by or for DLO.
What This Warranty Does Not Cover. This warranty does not apply to damage caused by: (a) accident, abuse,
misuse, misapplication, ordinary wear, improper maintenance, failure to follow instructions, or products not
manufactured by or for DLO; and (b) aftermarket services (including upgrades and expansions).
How Long This Warranty Lasts. This warranty lasts for a period of ninety (90) days from the date of original
retail purchase.
What DLO Will Do. If a defect exists, DLO will exchange the product, at its option, with a product that is new
or has been manufactured from new or serviceable used parts and that is at least functionally equivalent to
the original product. DLO will warrant a replacement product against defects in materials and workmanship
for a period of ninety (90) days from the date of replacement.
How To Get Service. In order to be eligible for this warranty, you MUST register your purchase at
www.dlo.com/register within thirty (30) days of purchasing this product. If you believe that this product is
defective in materials or workmanship, please e-mail [email protected] with a brief description of the
problem, for further instructions.
No Change To Warranty. No DLO reseller, agent or employee is authorized to make any modification, extension, or addition to this warranty.
How State Law Applies. This warranty gives you specific legal rights, and you also may have other rights that
vary from state to state, or country.
Restrictions On Implied Warranties. All implied warranties, including, without limitation, warranties of merchantability and fitness for a particular purpose, are limited in duration to the duration of this warranty. Some
states do not allow limitations on how long an implied warranty lasts, so the above limitation may not apply to
you.
Restrictions On Damages. DLO is not responsible for direct, special, incidental or consequential damages
resulting from any breach of warranty or condition or under any other legal theory (including, without limitation, lost profits; downtime; goodwill; damage to or replacement of equipment and property; failure to maintain the confidentiality of data stored on the product; and any costs of recovering, reprogramming or reproducing any program or data stored in or used with products manufactured by or for DLO). Some states and
countries do not allow the exclusion or limitation of incidental or consequential damages, so the above limitation or exclusion may not apply to you
W1000-050803-B
14 | DLO HOMEDOCK USER GUIDE
| 15
FCC Statement
Safety Instructions
Federal Communications Commission Interference Statement
This device complies with Part 15 of the FCC rules. Operation is subject to the following two conditions:
(1) This device may not cause harmful interference, and (2) this device must accept any interference
received, including interference that may cause undesired operation.
CAUTION: Changes or modifications not expressly approved by the party responsible for compliance could
void the user’s authority to operate the equipment.
IMPORTANT SAFETY INSTRUCTIONS READ BEFORE OPERATING EQUIPMENT
1. Please be sure to read these instructions.
2. Please heed all warnings.
3. Do not use this apparatus near water.
4. Clean only with dry cloth.
5. Install in accordance with the manual's instructions.
6. Do not install near any heat sources such as radiators, heat registers, stoves, or other apparatus (including amplifiers) that produce heat.
7. Protect the power cord from being pinched particularly at plugs, convenience receptacles, and the point
where they exit from the apparatus.
8. Only use attachments, accessories or cables specified by the manufacturer.
9. Refer all servicing to DLO customer service personnel.
WARNING: To reduce the risk of fire or electric shock, this apparatus should not be exposed to rain or moisture and objects filled with liquids, such as vases, should not be placed on or near this device.
16 | DLO HOMEDOCK USER GUIDE
| 17
Thanks for buying the
HomeDock for Zune.
Where your Zune lives - at home.
DIGITAL LIFESTYLE OUTFITTERS • VISIT US AT WWW.DLO.COM • ©2006 DIGITAL LIFESTYLE OUTFITTERS