1
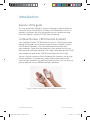
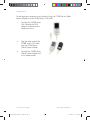
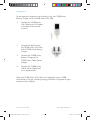
Nucleus® CR110 Remote Assistant
User Guide
195993 ISS6 CR110 User Guide 01.indd 1
8/10/2010 11:17:21 AM
Symbols
195993 ISS6 CR110 User Guide 01.indd 2
Note
Important information or advice. Can save
inconvenience.
Warning (harmful)
Potential safety hazards and serious
adverse reactions.
Could cause harm to person.
8/10/2010 11:17:35 AM
Contents
Introduction ....................................................................................................... 7
Purpose of this guide ................................................................................. 7
Cochlear Nucleus CR110 Remote Assistant .......................................... 7
Getting to know your remote assistant ....................................................... 9
Remote assistant components ................................................................ 9
Getting started.................................................................................................11
Charging and recharging your remote assistant battery ...................11
Charging your remote assistant battery for the first time ..........11
Recharging your remote assistant battery......................................11
When to recharge your remote assistant battery ........................ 12
How to recharge your remote assistant battery .......................... 13
Turning your remote assistant on and off ........................................... 18
Locking and unlocking your remote assistant keypad ....................... 19
Using your remote assistant ......................................................................... 21
Selecting your remote assistant language ........................................... 21
Pairing your remote assistant with your processor............................22
Holding and operating your remote assistant ....................................24
Using Simple and Advanced modes......................................................26
Simple mode........................................................................................26
Advanced mode ..................................................................................26
Selecting Simple or Advanced mode .............................................. 27
Home screen .............................................................................................28
Selecting programs ...........................................................................29
Increasing and decreasing volume ........................................................ 31
Increasing and decreasing sensitivity ....................................................32
Fixed volume and sensitivity setting...............................................33
Checking the status of your processor .................................................33
Using the telecoil .....................................................................................35
Using Auto Telecoil ...................................................................................36
Switching from Auto Telecoil to telecoil ........................................36
195993 ISS6 CR110 User Guide 01.indd 3
8/10/2010 11:17:35 AM
Turning an audio accessory on and off ................................................36
Understanding remote assistant indicator lights ............................... 37
Resetting your processor........................................................................ 38
Using the Hard Reset button................................................................. 38
Bilateral control ..............................................................................................39
Dual control mode ................................................................................... 41
Right or left control modes .................................................................... 41
Switching between control modes..................................................42
Adjusting settings ...........................................................................................45
Adjusting your processor settings ........................................................ 46
Locking and unlocking your processor buttons ........................... 46
Changing the telecoil and microphone mixing ratio .................. 46
Changing the audio accessory and microphone mixing ratio ...47
Setting your processor indicator light preferences ..................... 48
Enabling and disabling private tones .............................................50
Adjusting your remote assistant settings............................................. 51
Changing your remote assistant speaker volume ........................ 51
Enabling and disabling audio and visual alerts ............................. 51
Demo mode .....................................................................................................53
Caring for your remote assistant .................................................................55
Protecting your remote assistant ..........................................................55
Using the remote assistant lanyard ......................................................56
Protecting your remote assistant from water damage .....................57
Cleaning your remote assistant .............................................................58
General warnings and precautions for using your
remote assistant .......................................................................................59
Using your remote assistant to troubleshoot your processor ............... 61
Checking your processor coil..................................................................62
Other information ..........................................................................................63
Your warranty and registration form ....................................................63
195993 ISS6 CR110 User Guide 01.indd 4
8/10/2010 11:17:35 AM
Technical information ..............................................................................63
Specifications ......................................................................................63
Environmental conditions .................................................................65
Certification and applied standards ......................................................65
Equipment classification .........................................................................65
IP rating of remote assistant ............................................................65
FCC (Federal Communications Commission) and Canadian IC
compliance .......................................................................................... 66
Legal statement ........................................................................................69
Glossary ............................................................................................................ 71
Index.................................................................................................................. 75
195993 ISS6 CR110 User Guide 01.indd 5
8/10/2010 11:17:35 AM
195993 ISS6 CR110 User Guide 01.indd 6
8/10/2010 11:17:35 AM
Introduction
Purpose of this guide
This user guide helps recipients, parents and carers understand how to
use and maintain the Cochlear™ Nucleus® CR110 Remote Assistant. It
provides instructions for using the remote assistant to communicate
with the Cochlear™ Nucleus® CP810 Sound Processor.
Cochlear Nucleus CR110 Remote Assistant
Your Cochlear Nucleus CR110 Remote Assistant is a hand-held remote
control that enables you to communicate with your Cochlear Nucleus
CP810 Sound Processor. It can also receive communication from
your processor. If you have two processors, your remote assistant can
communicate with both processors. For more information on the CP810
Sound Processor, refer to the CP810 Sound Processor User Guide.
You can use your remote assistant to control the functions and settings
of your processor. It provides easy access to key information on the
status of your processor (e.g. processor battery status). You can also use
your remote assistant to troubleshoot your processor.
Figure 1: CP810 Sound Processor and CR110 Remote Assistant
© Cochlear Limited 2010
195993 ISS6 CR110 User Guide 01.indd 7
CR110 User Guide - 7
8/10/2010 11:17:35 AM
1
2
14
13
3
12
Noise
Everyday
4
11
10
5
6
9
7
8
Figure 2: Remote assistant components
8 - CR110 User Guide
195993 ISS6 CR110 User Guide 01.indd 8
© Cochlear Limited 2010
8/10/2010 11:17:45 AM
Getting to know your remote
assistant
Remote assistant components
1.
Indicator light that provides a visual indication of remote assistant function (e.g.
remote assistant battery is charging) or a problem (e.g. remote assistant is not
communicating with your processor).
2.
Upper left soft key to select a listening program or access the processor settings
menu.
3.
Toggle button to:
•
Turn telecoil (quick press) and Auto Telecoil (press and hold) on and off.
•
Turn audio accessory on and off (quick press).
4.
Lower left soft key to select a listening program, or to access the troubleshooting
guide.
5.
Cochlear key to:
•
Turn the remote assistant on and off (press and hold).
•
Return to the Home screen at any time (quick press).
•
View processor status and menus (quick press).
6.
Left directional key to decrease sensitivity or scroll left.
7.
Lower directional key to decrease volume or scroll down.
8.
USB cable socket for connecting the remote assistant USB cable.
9.
Right directional key to increase sensitivity or scroll right.
10.
Upper directional key to increase volume or scroll up.
11.
Lower right soft key to select a listening program, or to access the
troubleshooting guide.
12.
Remote assistant display (Figure 2 shows Home screen).
13.
Remote assistant keypad lock or unlock slider.
14.
Upper right soft key to select a listening program or access the remote assistant
settings menu.
© Cochlear Limited 2010
195993 ISS6 CR110 User Guide 01.indd 9
CR110 User Guide - 9
8/10/2010 11:17:45 AM
Getting to know your remote assistant
15
16
17
18
19
19
20
Figure 3: The back of the remote assistant
15.
Hole for attaching the remote assistant lanyard.
16.
Personal identification label.
17.
Remote assistant speaker.
18.
Product information label.
19.
In-built coil sensor guides.
20.
Hard Reset button to reset the remote assistant if the Cochlear key does not
work, or if the remote assistant freezes.
10 - CR110 User Guide
195993 ISS6 CR110 User Guide 01.indd 10
© Cochlear Limited 2010
8/10/2010 11:17:46 AM
Getting started
This section helps you get started with your new remote assistant. It
explains:
•
How to charge your remote assistant battery.
•
How to turn your remote assistant on and off.
•
How to lock and unlock your remote assistant keypad.
Charging and recharging your remote assistant
battery
Your remote assistant has a non-removable rechargeable battery.
Charging your remote assistant battery for the first time
Cochlear recommends that you fully charge the battery before using
your remote assistant for the first time. It may take approximately 2 to
4 hours to fully charge a completely empty battery. As the battery ages,
it may take longer to fully charge the battery.
Recharging your remote assistant battery
A fully charged battery should provide you with approximately 1 to 2
weeks of battery life. Battery life, however, may vary depending on:
•
How often and how long you use your remote assistant.
•
Whether you turn off your remote assistant when not in use.
•
Whether your remote assistant is controlling one or two
processors.
© Cochlear Limited 2010
195993 ISS6 CR110 User Guide 01.indd 11
CR110 User Guide - 11
8/10/2010 11:17:46 AM
Getting started
When to recharge your remote assistant battery
Charge the battery:
•
When the remote assistant battery status screen shows that
the battery is low. When you turn on your remote assistant,
the battery status screen displays after it displays the start-up
(Cochlear logo) screen. The less green bars you see on the battery
icon, the less charge you have. The remote assistant keypad lock/
unlock screen also indicates battery status. For more information,
see Locking and unlocking your remote assistant keypad.
•
Once a week, even if your remote assistant does not indicate that
the battery is low or empty.
It is recommended that you follow these guidelines to maximise the life
expectancy of the remote assistant battery.
Recommended temperature range for recharging the battery
To fully charge the remote assistant battery, recharge the battery at a
temperature range of 15 ºC (59 ºF) to 29 ºC (84 ºF). If the temperature
range is lower [between -2.5 ºC (28 ºF) and 15 ºC (59 ºF)] or higher
[between 29 ºC (84 ºF) and 52 ºC (126 ºF)], only 75 to 80 percent of the
battery will be charged. If the temperature is too high [over 52 ºC (126
ºF)] or too low [below -2.5 ºC (28 ºF)], the battery will not charge.
12 - CR110 User Guide
195993 ISS6 CR110 User Guide 01.indd 12
© Cochlear Limited 2010
8/10/2010 11:17:46 AM
Getting started
How to recharge your remote assistant battery
You can recharge the battery using any of the following battery charging
equipment available from Cochlear:
•
Cochlear™ Nucleus® CR100 Series Global Power Adaptor and
Cochlear™ Nucleus® CR100 Series USB Cable.
•
Cochlear Nucleus CR100 Series USB Cable attached directly to the
USB port on your personal computer.
•
Cochlear™ Nucleus® CP800 Series Battery Charger and Cochlear
Nucleus CR100 Series USB Cable. The CP800 Series Battery
Charger allows you to charge your remote assistant and your
processor rechargeable battery module/s at the same time. The
Cochlear™ Nucleus® CP800 Series Global Power Adaptor connects
the CP800 Series Battery Charger to mains power.
Ensure that you only use battery charging equipment supplied
by Cochlear to charge the remote assistant battery.
© Cochlear Limited 2010
195993 ISS6 CR110 User Guide 01.indd 13
CR110 User Guide - 13
8/10/2010 11:17:46 AM
Getting started
To recharge your remote assistant battery using the CR100 Series Global
Power Adaptor and the CR100 Series USB Cable:
1.
Connect the CR100 Series
USB Cable to the USB
socket at the base of the
remote assistant.
2.
Plug the other end of the
CR100 Series USB Cable
into the CR100 Series
Global Power Adaptor.
3.
Connect the CR100 Series
Global Power Adaptor to a
mains power outlet.
14 - CR110 User Guide
195993 ISS6 CR110 User Guide 01.indd 14
© Cochlear Limited 2010
8/10/2010 11:17:46 AM
Getting started
To recharge your remote assistant battery using your computer and the
CR100 Series USB Cable:
1.
Connect the CR100 Series
USB Cable to the USB socket
at the base of the remote
assistant.
2.
Plug the other end of the
CR100 Series USB Cable
into the USB port of your
computer.
When you connect the CR100 Series USB cable to the computer, a
'New hardware found' wizard (dialog) may display on your computer.
If you have Internet access, click 'Next' on your computer to install the
software for the Cochlear CR110 device.
If you do not have Internet access, press Cancel to dismiss the wizard.
If your computer is hibernating, in standby mode, or shuts
down while charging, the remote assistant battery will stop
charging.
© Cochlear Limited 2010
195993 ISS6 CR110 User Guide 01.indd 15
CR110 User Guide - 15
8/10/2010 11:17:58 AM
Getting started
To recharge your remote assistant battery using the CP800 Series
Battery Charger and the CR100 Series USB Cable:
1.
Connect the CR100 Series
USB Cable to the USB socket
at the base of the remote
assistant.
2.
Connect the other end of
the CR100 Series USB Cable
to the CP800 Series Battery
Charger.
3.
Connect the CP800 Series
Battery Charger to the
CP800 Series Global Power
Adaptor.
4.
Connect the CP800 Series
Global Power Adaptor to a
mains power outlet.
When the CR100 Series USB Cable is first plugged into the CP800
Series Battery Charger, a battery charging animation will appear on your
remote assistant display.
16 - CR110 User Guide
195993 ISS6 CR110 User Guide 01.indd 16
© Cochlear Limited 2010
8/10/2010 11:18:02 AM
Getting started
When the remote assistant battery is charging, the indicator light on
your remote assistant is a steady orange. Once the battery is fully
charged, the indicator light is a steady green and the battery icon on the
battery status screen displays four green bars.
Figure 4: Battery status screen showing battery is fully charged
© Cochlear Limited 2010
195993 ISS6 CR110 User Guide 01.indd 17
CR110 User Guide - 17
8/10/2010 11:18:06 AM
Getting started
Turning your remote assistant on and off
To turn on your remote assistant, press and hold the Cochlear key until
the start-up screen (Cochlear logo) appears on the display.
Figure 5: Pressing the Cochlear key
Figure 6: Start-up screen
To turn off your remote assistant, press and hold the Cochlear key until
the display turns off after displaying the Goodbye screen.
Figure 7: Goodbye screen
To save battery life, your remote assistant display goes blank after
approximately 25 seconds. To 'wake up' the display, you can press any
key on your remote assistant.
18 - CR110 User Guide
195993 ISS6 CR110 User Guide 01.indd 18
© Cochlear Limited 2010
8/10/2010 11:18:06 AM
Getting started
Locking and unlocking your remote assistant
keypad
You can lock your remote assistant keypad to prevent children from
changing the settings, or to avoid accidental key presses changing your
settings (e.g. when the remote assistant is in your handbag or pocket).
You can lock the keypad using the lock/unlock slider on the remote
assistant.
To lock the remote assistant keypad, slide the lock/unlock slider
downwards. The lock/unlock status screen displays when the keypad is
locked. This screen also shows the remote assistant battery status. You
cannot turn off your remote assistant when the keypad is locked.
To unlock, slide the lock/unlock slider upwards.
Figure 8: Locking/unlocking the remote assistant keypad
Figure 9: Remote assistant keypad locked
© Cochlear Limited 2010
195993 ISS6 CR110 User Guide 01.indd 19
Figure 10: Remote assistant keypad
unlocked
CR110 User Guide - 19
8/10/2010 11:18:16 AM
20 - CR110 User Guide
195993 ISS6 CR110 User Guide 01.indd 20
© Cochlear Limited 2010
8/10/2010 11:18:25 AM
Using your remote assistant
This section describes how to use your remote assistant. It describes:
•
How to select your remote assistant language.
•
How to pair your remote assistant with your processor.
•
How to hold and operate your remote assistant.
•
How to access and perform key functions.
•
The indicator lights on your remote assistant and what they mean.
Selecting your remote assistant language
When you turn on your remote assistant, the Language Select screen
displays if your remote assistant is not paired with your processor. This
screen allows you to select the language you wish to use.
English
Figure 11: Language Select screen
To change the language, scroll left or right using the left and right
directional keys. You can also use the lower left and lower right soft
keys.
To pair your remote assistant after changing the language, place the
coil on the back of your remote assistant. For more information, see the
following section.
© Cochlear Limited 2010
195993 ISS6 CR110 User Guide 01.indd 21
CR110 User Guide - 21
8/10/2010 11:18:25 AM
Using your remote assistant
Pairing your remote assistant with your
processor
Pairing allows your remote assistant to communicate with your
processor. If you are a bilateral user, you can pair the remote assistant
with up to two processors at the same time.
You need to pair your remote assistant if:
•
Your remote assistant is not already paired with your processor.
•
You have received a new processor.
•
You have received a second processor (bilateral user).
•
You have received a new remote assistant.
•
You have unpaired your remote assistant from your processor.
•
Your remote assistant or processor firmware version has been
updated.
To pair your remote assistant with your processor:
1.
Ensure that your processor and remote assistant are turned on.
2.
Place your coil on the back of your remote assistant, ensuring the
coil is placed within the coil sensor guides.
Figure 12: Placing the coil on the coil sensor guides
22 - CR110 User Guide
195993 ISS6 CR110 User Guide 01.indd 22
© Cochlear Limited 2010
8/10/2010 11:18:25 AM
Using your remote assistant
The coil check and pair screen displays.
+
Pair
Figure 13: Coil check and pair screen
3.
Press the lower right soft key to pair your remote assistant. On
successful pairing, you will see a confirmation screen.
A green tick ( ) on the confirmation screen indicates that the remote
assistant has been successfully paired with your processor. If your
processor is on the left side, a blue processor icon displays. If your
processor is on the right side, a red processor icon displays.
If using two processors (bilateral user), repeat steps 2 and 3 to pair your
second processor.
Once the remote assistant is paired, the Home screen displays.
If you pair a second processor to the same side, your remote
assistant unpairs your first processor and pairs the second processor.
© Cochlear Limited 2010
195993 ISS6 CR110 User Guide 01.indd 23
CR110 User Guide - 23
8/10/2010 11:18:34 AM
Using your remote assistant
Holding and operating your remote assistant
To optimise communication between your remote assistant and your
processor:
•
Hold your remote assistant in the palm of your hand in front of
you.
Figure 14: Holding the remote assistant in the palm of the hand
•
Keep your remote assistant and your processor within two meters
(approximately six feet) of each other. Operating it at a greater
distance may result in either increased delay between processor
and remote assistant response time, or loss of communication.
•
Hold or position your remote assistant on the same side of the
body as your processor (if communicating with one processor),
or between the two processors (if communicating with two
processors).
•
It is not necessary to point your remote assistant at your processor.
When your remote assistant is within operating distance of your
processor and they are communicating, the indicator light on your
remote assistant is a steady blue.
24 - CR110 User Guide
195993 ISS6 CR110 User Guide 01.indd 24
© Cochlear Limited 2010
8/10/2010 11:18:34 AM
Using your remote assistant
You will see blue indicator light flashes and the following icon on the
remote assistant display if:
•
Your remote assistant is not within operating distance of your
processor, or
•
There is interference, or
•
Your processor is not available (e.g. processor is turned off).
Figure 15: Indicates remote assistant is not within operating distance, there is
interference, or processor is not available
Sources of interference could include:
•
2.4 GHz cordless digital telephones.
•
Bluetooth devices such as hands free mobile phone kits, wireless
keyboards and wireless mice.
•
Wireless computing networks such as WiFi.
•
Game consoles with 2.4 GHz wireless links.
If you experience interference in the communication between your
remote assistant and your processor, try the following:
•
Hold your remote assistant in a different position.
•
Move away from the vicinity of any electronic equipment that may
be causing interference.
If you continue to experience interference, consult your clinician.
© Cochlear Limited 2010
195993 ISS6 CR110 User Guide 01.indd 25
CR110 User Guide - 25
8/10/2010 11:18:43 AM
Using your remote assistant
Using Simple and Advanced modes
You can operate your remote assistant in Simple or Advanced mode.
Simple mode
Simple mode allows you to do the following:
•
Select a language for your remote assistant.
•
Pair your remote assistant with your processor.
•
Change your listening program.
•
Change volume.
•
Change microphone sensitivity.
•
Turn the telecoil/auto telecoil on and off.
•
Change the Home screen display from program names to program
numbers.
•
View your remote assistant and processor status.
•
View visual alerts.
•
Reset your processor to the values set by your clinician.
•
Use Demo mode.
Advanced mode
Advanced mode allows access to the following additional features on
your remote assistant:
•
Adjust processor settings (e.g. enable private tones)
•
Adjust remote assistant settings (enable visual alerts)
•
Processor troubleshooting
26 - CR110 User Guide
195993 ISS6 CR110 User Guide 01.indd 26
© Cochlear Limited 2010
8/10/2010 11:18:43 AM
Using your remote assistant
Selecting Simple or Advanced mode
Your remote assistant is automatically in Simple mode when you turn
on your remote assistant for the first time. You can access Advanced
mode, by pressing the upper left soft key when the remote assistant
battery status screen displays.
1
2
Figure 16: Accessing Advanced mode (1) or Simple mode (2)
To switch between Advanced and Simple modes:
1.
Turn off your remote assistant and turn it back on.
2.
When the battery status screen displays, press the upper left soft
key to select Advanced mode, or the upper right soft key to select
Simple mode.
© Cochlear Limited 2010
195993 ISS6 CR110 User Guide 01.indd 27
CR110 User Guide - 27
8/10/2010 11:18:43 AM
Using your remote assistant
Home screen
The Home screen allows you to select listening programs and perform
key functions (e.g. change volume).
Up to four programs are available for your use, depending on the
number of programs enabled on your processor. Programs help you hear
better in different listening situations.
The available programs can include:
•
Everyday program: This is ideal for the typical listening situations
of everyday life.
•
Noise program: This is suitable for environments with ongoing
background noise coming from all sides.
•
Focus program: This is useful where there is significant background
noise, but the focus is on hearing what one person or a small group
of people are saying.
•
Music program: This can be used to listen to all types of music
from any audio source.
When you turn on your remote assistant, it takes you to the Home
screen after displaying the start-up screen (Cochlear logo) and the
remote assistant battery status. The Home screen displays only when
your remote assistant is paired with your processor.
28 - CR110 User Guide
195993 ISS6 CR110 User Guide 01.indd 28
© Cochlear Limited 2010
8/10/2010 11:18:43 AM
Using your remote assistant
Selecting programs
To select a program, press the soft key corresponding to the program
you want to use. For example, if you want to use the Noise program,
press the lower left soft key (see Figure 17).
Upper right
soft key
Upper left
soft key
Noise
Lower left
soft key
Everyday
Lower right
soft key
Figure 17: Soft keys for selecting a program from Home screen
© Cochlear Limited 2010
195993 ISS6 CR110 User Guide 01.indd 29
CR110 User Guide - 29
8/10/2010 11:18:44 AM
Using your remote assistant
The Home screen indicates your current program by displaying the icon
for that program. For example, if your current program is Everyday, the
icon for that program displays.
Noise
Everyday
Figure 18: Home screen displaying program icon for Everyday
To return to the Home screen at any time, press the Cochlear key.
When you turn on the telecoil or connect an audio accessory to your
processor, an icon displays next to your current program icon.
1
2
3
AUTO
Noise
Everyday
Noise
Everyday
Noise
Everyday
Figure 19: Home screen displaying icons for telecoil (1), Auto Telecoil (2) and audio
accessory (3)
Switching between program names and program numbers
If you are more familiar with program numbers (e.g. if you have
previously used a Freedom™ processor), you can press and hold the
upper left and upper right soft keys at the same time from the Home
screen to display the program numbers for your programs (e.g. If you
only have an Everyday and Noise program enabled on your processor,
these two program names will be replaced with program numbers 1
and 2).
To return the display to program names, press and hold the upper left
and upper right soft keys at the same time until the names display.
30 - CR110 User Guide
195993 ISS6 CR110 User Guide 01.indd 30
© Cochlear Limited 2010
8/10/2010 11:18:45 AM
Using your remote assistant
Increasing and decreasing volume
Volume controls your perception of loudness. You can:
•
Reduce the volume if the sound from the microphone, telecoil or
audio accessory is uncomfortably loud.
•
Increase the volume if the sound from the microphone, telecoil or
audio accessory, including your own voice, is too soft.
To increase the volume for your current program, press the upper
directional key from the Home screen.
To decrease the volume, press the lower directional key from the Home
screen.
8
3
Noise
Everyday
1
Figure 21: Orange tab on volume
scale indicates default
volume (3)
2
Figure 20: Directional keys for increasing
volume (1) and decreasing volume (2)
You can set volume between 1 and 10. The orange tab (3) on the
volume scale indicates the default volume set by your clinician. To
return to the default volume at any time, change the volume to the level
indicated by this tab.
© Cochlear Limited 2010
195993 ISS6 CR110 User Guide 01.indd 31
CR110 User Guide - 31
8/10/2010 11:18:46 AM
Using your remote assistant
Increasing and decreasing sensitivity
Sensitivity controls the softest level of sound picked up by the
microphone, telecoil or an audio accessory. You can:
•
Reduce the sensitivity of the sound to reduce background noise in
noisy situations.
•
Increase the sensitivity of the sound to hear very soft sounds in
quiet situations.
To increase the sensitivity for your current program, press the right
directional key from the Home screen.
To decrease sensitivity, press the left directional key from the Home
screen.
16
3
Noise
Everyday
Figure 23: Orange tab on
Sensitivity scale indicates default
sensitivity
1
2
Figure 22: Directional keys for decreasing
sensitivity (1) and increasing sensitivity (2)
32 - CR110 User Guide
195993 ISS6 CR110 User Guide 01.indd 32
© Cochlear Limited 2010
8/10/2010 11:18:46 AM
Using your remote assistant
You can set sensitivity between 0 and 20. The orange tab (3) on
the sensitivity scale indicates the default sensitivity level set by your
clinician. To return to the default sensitivity level at any time, change
the sensitivity to the level indicated by this tab.
Fixed volume and sensitivity setting
Your clinician can also set volume and sensitivity at a fixed level so they
cannot be changed using your remote assistant.
Checking the status of your processor
Your remote assistant allows you to check if your processor is
functioning properly. You can also check the status of the processor
battery, and the level of audio input from the microphone, telecoil or
an audio accessory. If you are using more than one source of audio
input (e.g. mix of audio accessory and microphone input), the remote
assistant indicates the level of input from the combined sources.
To view the status of your processor, press the Cochlear key from the
Home screen. The processor status screen displays only when your
remote assistant is paired with your processor.
If your processor is functioning properly, the status screen displays a
green processor icon.
Figure 24: Processor status screen indicating processor is functioning properly
© Cochlear Limited 2010
195993 ISS6 CR110 User Guide 01.indd 33
CR110 User Guide - 33
8/10/2010 11:18:47 AM
Using your remote assistant
If your remote assistant is receiving any alerts from your processor (e.g.
a coil error), a visual alert displays.
Figure 25: Coil off visual alert
If a visual alert displays, you can press one of the lower soft keys to
read more information about the problem and how to fix it. The first
processor status screen displays for a few seconds before switching to a
screen displaying battery status and audio source.
This screen shows the current processor battery status and audio input
level. The more green bars you see on the battery icon, the more charge
is left in the processor battery. The audio meter shows the current level
of audio input. The icon next to the audio meter shows the source of
audio input (e.g. microphone).
1
2
3
Figure 26: Processor battery status (1) source of audio input (2)
and level of audio input (3)
34 - CR110 User Guide
195993 ISS6 CR110 User Guide 01.indd 34
© Cochlear Limited 2010
8/10/2010 11:18:47 AM
Using your remote assistant
If your processor is using a Standard Battery Module (zinc air batteries),
an hourglass icon displays on the battery status screen for the first ten
minutes. This indicates that the processor is checking battery status.
Figure 27: Processor is checking battery status
Using the telecoil
Your processor has an in-built telecoil. The telecoil helps reduce
background noise when using the telephone, or when you are in a
roomloop or neckloop environment. Your clinician needs to enable the
telecoil feature on your processor.
If the telecoil feature is enabled, you can turn on the telecoil by pressing
the Toggle button on the remote assistant. The telecoil icon will display
next to your current program icon on the Home screen.
To turn off the telecoil, press the Toggle button again. The telecoil icon
disappears from the Home screen.
Noise
Everyday
Figure 28: Home screen with telecoil
turned on in the Everyday program
© Cochlear Limited 2010
195993 ISS6 CR110 User Guide 01.indd 35
Noise
Everyday
Figure 29: Home screen with telecoil
turned off in the Everyday program
CR110 User Guide - 35
8/10/2010 11:18:47 AM
Using your remote assistant
Using Auto Telecoil
Auto Telecoil is a feature that can be offered by your clinician. When you
enable Auto Telecoil, the telecoil automatically turns on when you use
the telephone, or when you are in a roomloop environment. The telecoil
automatically turns off when:
•
You move the telephone away from your processor (e.g. when the
telephone call ends)
•
You exit the roomloop environment.
It may take up to ten seconds for the telecoil icon to disappear from the
screen.
To enable Auto Telecoil, press and hold the Toggle button on the remote
assistant until you see the Auto Telecoil icon on the Home screen.
When your telephone call starts, the colour of the Auto Telecoil icon
changes to black, indicating that you are using the telecoil.
AUTO
AUTO
Noise
Everyday
1
Noise
Everyday
2
Figure 30: Auto Telecoil turned on (1) and in use (2)
Switching from Auto Telecoil to telecoil
To switch from Auto Telecoil to telecoil, press the Toggle button. The
telecoil icon will display on the Home screen. To turn off telecoil, press
the Toggle button again.
Turning an audio accessory on and off
To turn on and off an audio accessory connected to your processor,
press the Toggle button on the remote assistant.
36 - CR110 User Guide
195993 ISS6 CR110 User Guide 01.indd 36
© Cochlear Limited 2010
8/10/2010 11:18:48 AM
Using your remote assistant
Understanding remote assistant indicator lights
You may see the following indicator lights on your remote assistant:
Indicator lights
Steady blue
Flashing blue
Flashing orange
What they mean
The remote assistant is within
operating distance of the processor
and the remote assistant and
processor are communicating.
The processor is not communicating
with the remote assistant. For
example, they are not within
operating distance of each other, or
they are not paired.
•
A visual alert needs your
attention (e.g. a coil error).
•
The remote assistant battery is
low or empty.
•
Steady orange
Steady green
© Cochlear Limited 2010
195993 ISS6 CR110 User Guide 01.indd 37
The remote assistant firmware
may need an update.
The remote assistant battery is
charging.
The remote assistant battery is fully
charged.
CR110 User Guide - 37
8/10/2010 11:18:48 AM
Using your remote assistant
Resetting your processor
If you accidentally change a processor setting, or you wish to return to
the values set by your clinician, you can reset your processor.
To reset your processor to the values set by your clinician:
1.
Press and hold both the lower left and lower right soft keys at the
same time from the Home screen. The processor reset screen
displays.
2.
Press the lower right soft key to confirm that you want to reset
your processor.
Reset
Figure 31: Processor reset screen
Using the Hard Reset button
If the Cochlear key does not work or your remote assistant display
freezes, you can press the Hard Reset button on the back of the remote
assistant to reset your remote assistant.
Figure 32: Hard reset button on the remote assistant
38 - CR110 User Guide
195993 ISS6 CR110 User Guide 01.indd 38
© Cochlear Limited 2010
8/10/2010 11:18:49 AM
Bilateral control
If you have two implants (bilateral user), you can pair your remote
assistant with two processors. This allows you to control both
processors at the same time.
When your remote assistant is paired with two processors, the remote
assistant display is divided vertically in two on the following screens:
•
Home screen.
•
Status screens.
•
Visual alerts screen.
Noise
Everyday
Figure 33: Bilateral mode Home screen
Figure 34: Bilateral mode processor
battery status screen
Figure 35: Bilateral mode visual alerts screen
© Cochlear Limited 2010
195993 ISS6 CR110 User Guide 01.indd 39
CR110 User Guide - 39
8/10/2010 11:18:49 AM
Bilateral control
From the Home screen, you can choose one of three bilateral control
modes:
•
Dual control mode controls both processors.
1
2
Noise
Everyday
Figure 36: Bilateral control mode dual left side (1) and right side (2)
•
Left control mode* controls only your left processor.
Left side
Noise
Everyday
Figure 37: Bilateral control mode left side
•
Right control mode* controls only your right processor.
Music
Right side
Noise
Figure 38: Bilateral control mode right side
* Advanced mode only
40 - CR110 User Guide
195993 ISS6 CR110 User Guide 01.indd 40
© Cochlear Limited 2010
8/10/2010 11:18:49 AM
Bilateral control
Dual control mode
When you pair two processors, your remote assistant is automatically in
dual control mode.
In dual control mode, you can control both processors at the same time
to:
•
Change programs.
•
Change volume or sensitivity.
•
Turn on the telecoil or Auto Telecoil.
•
Connect an audio accessory.
To change these settings, both processors must be on and your remote
assistant must be within operating distance of your processors.
Changes to processor settings (e.g. changes to telecoil and microphone
mixing ratio) affect both processors, regardless of the control mode.
Right or left control modes
Sometimes you may want to change a setting on one processor only.
For example:
•
Turn on the telecoil or Auto Telecoil on the left processor only.
•
Change the volume or sensitivity on the right processor only.
© Cochlear Limited 2010
195993 ISS6 CR110 User Guide 01.indd 41
CR110 User Guide - 41
8/10/2010 11:18:50 AM
Bilateral control
Switching between control modes
To switch between control modes, press and hold the left or right
directional key.
Noise
Everyday
Noise
Everyday
Figure 39: Switching from dual control mode to left control mode
Noise
Everyday
Noise
Everyday
Figure 40: Switching from left control mode to dual control mode
Noise
Everyday
Noise
Everyday
Figure 41: Switching from dual control mode to right control mode
42 - CR110 User Guide
195993 ISS6 CR110 User Guide 01.indd 42
© Cochlear Limited 2010
8/10/2010 11:18:50 AM
Bilateral control
Noise
Everyday
Noise
Everyday
Figure 42: Switching from right control mode to dual control mode
Noise
Everyday
Noise
Everyday
Figure 43: Switching from left control mode to right control mode
Noise
Everyday
Noise
Everyday
Figure 44: Switching from right control mode to left control mode
© Cochlear Limited 2010
195993 ISS6 CR110 User Guide 01.indd 43
CR110 User Guide - 43
8/10/2010 11:18:51 AM
44 - CR110 User Guide
195993 ISS6 CR110 User Guide 01.indd 44
© Cochlear Limited 2010
8/10/2010 11:18:52 AM
Adjusting settings
You can adjust your processor and remote assistant settings to suit
your listening needs. You can change the processor settings only when
the processor is turned on and within operating distance. If the remote
assistant is paired with two processors, both processors need to be
turned on and within operating distance.
You can adjust the settings only when operating your remote assistant
in Advanced mode.
To adjust your processor or remote assistant settings:
1.
From the Home screen, press the Cochlear key. The processor
status screen displays.
2.
To access the processor settings menu, press the upper left soft
key. To access the remote assistant settings menu, press the upper
right soft key.
1
2
Figure 45: Accessing Processor settings menu (1) or
remote assistant settings menu (2)
3.
To select the processor or remote assistant setting you wish to
change, press the lower directional key until the desired settings
screen displays.
Processor settings that you change apply to all programs, regardless of
the program that is selected. When the remote assistant is paired with
two processors, all processor settings apply to both processors.
© Cochlear Limited 2010
195993 ISS6 CR110 User Guide 01.indd 45
CR110 User Guide - 45
8/10/2010 11:18:52 AM
Adjusting settings
Adjusting your processor settings
You can change the following processor settings:
•
Locking and unlocking processor buttons.
•
telecoil and microphone mixing ratio.
•
audio accessory and microphone mixing ratio.
•
processor indicator light preferences.
•
Enabling and disabling private tones.
Locking and unlocking your processor buttons
You can lock the two buttons on your processor to prevent children
from changing the settings, or to avoid accidental button presses
changing your processor settings.
Unlock
Lock
Figure 46: Processor buttons unlocked
Unlock
Lock
Figure 47: Processor buttons locked
To lock the buttons, press the lower right soft key from the lock or
unlock screen. To unlock, press the lower left soft key.
Changing the telecoil and microphone mixing ratio
Mixing allows you to combine input from more than one audio input
source (e.g. telecoil and microphones).
The telecoil and microphone mixing ratio specifies the ratio of the
telecoil input in relation to the microphone input. To focus more on the
telecoil input and reduce background sounds, increase the mixing ratio.
To hear more background sounds while using the telecoil, decrease the
mixing ratio.
46 - CR110 User Guide
195993 ISS6 CR110 User Guide 01.indd 46
© Cochlear Limited 2010
8/10/2010 11:18:52 AM
Adjusting settings
You can set the mixing ratio for the telecoil and microphone to any of
the following:
•
1:1 (50% telecoil input: 50% microphone input).
•
2:1 (67% telecoil input: 33% microphone input).
•
3:1 (75% telecoil input: 25% microphone input).
•
4:1 (80% telecoil input: 20% microphone input).
•
5:1 (83% telecoil input: 17% microphone input).
•
6:1 (86% telecoil input: 14% microphone input).
•
100% telecoil input.
When you set telecoil input to 100%, you see the letter 'T' on the
mixing ratio screen.
To focus more on the telecoil input, press the lower left soft key from
the telecoil and microphone mixing screen. To hear more background
sounds, press the lower right soft key.
T
Figure 48: Letter 'T' indicates Telecoil input is set to 100%
Changing the audio accessory and microphone mixing ratio
The audio accessory and microphone mixing ratio specifies the ratio of
audio accessory input in relation to microphone input. To focus more
on audio accessory input and reduce background sounds, increase
the mixing ratio. To hear more background sounds while using audio
accessories, decrease the mixing ratio.
© Cochlear Limited 2010
195993 ISS6 CR110 User Guide 01.indd 47
CR110 User Guide - 47
8/10/2010 11:18:52 AM
Adjusting settings
You can set the mixing ratio for an audio accessory and the microphone
to any of the following:
•
1:1 (50% audio accessory input: 50% microphone input).
•
2:1 (67% audio accessory input: 33% microphone input).
•
3:1 (75% audio accessory input: 25% microphone input).
•
4:1 (80% audio accessory input: 20% microphone input).
•
5:1 (83% audio accessory input: 17% microphone input).
•
6:1 (86% audio accessory input: 14% microphone input).
•
100% audio accessory input.
When you set audio accessory input to 100%, you see the letter 'A' on
the mixing ratio screen.
To focus more on the audio accessory input, press the lower left soft key
from the audio accessory and microphone mixing screen. To hear more
background sounds, press the lower right soft key.
A
Figure 49: Letter 'A' indicates audio accessory input is set to 100%
Setting your processor indicator light preferences
The indicator light on your processor provides a visual confirmation
when you change a processor setting, or when there is a problem with
the processor.
The processor settings menu allows you to set indicator light
preferences for your processor. For visual confirmation that the
processor is receiving sound, turn on the sound ok indicator light. For
visual confirmation of setting changes and processor problems, turn on
the alert and key press indicator light.
48 - CR110 User Guide
195993 ISS6 CR110 User Guide 01.indd 48
© Cochlear Limited 2010
8/10/2010 11:18:53 AM
Adjusting settings
To set your indicator light preferences:
1.
Select the desired indicator light settings screen (e.g. alerts and key
press indicator light settings screen).
2.
To turn on the indicator light, press the lower right soft key. To turn
it off, press the lower left soft key.
Off
On
Figure 50: Sound ok indicator light is off
Off
On
Figure 52: Alert and key press indicator
light is off
© Cochlear Limited 2010
195993 ISS6 CR110 User Guide 01.indd 49
Off
On
Figure 51: Sound ok indicator light is on
Off
On
Figure 53: Alert and key press indicator
light is on
CR110 User Guide - 49
8/10/2010 11:18:53 AM
Adjusting settings
Enabling and disabling private tones
A private tone is a sound that only the recipient hears when a setting is
changed, or when there is a problem with the processor. To hear a tone
when a setting is changed, or when there is a problem, enable processor
private tones. For silent use, disable processor private tones.
To enable private tones, press the lower right soft key from the private
tones screen. To disable private tones, press the lower left soft key.
Off
On
Figure 54: Private tones disabled
50 - CR110 User Guide
195993 ISS6 CR110 User Guide 01.indd 50
Off
On
Figure 55: Private tones enabled
© Cochlear Limited 2010
8/10/2010 11:18:53 AM
Adjusting settings
Adjusting your remote assistant settings
You can change the following remote assistant settings to suit your
needs:
•
Remote assistant speaker volume.
•
Remote assistant audio and visual alerts.
•
Remote assistant language.
Changing your remote assistant speaker volume
Your remote assistant allows you to change the volume of the sounds
associated with visual alerts and key presses.
To increase the speaker volume, press the lower right soft key from the
speaker volume screen. To decrease the volume, press the lower left soft
key.
Figure 56: Remote assistant speaker volume screen
Enabling and disabling audio and visual alerts
When your remote assistant visual alerts are enabled, an alert pops up
on your remote assistant display when there is a problem (e.g. when the
coil is off). You will also hear a sound.
If your remote assistant alerts are disabled, you will only see visual alerts
when you enter the processor status screen. To save battery power,
there are no visual alerts when your remote assistant is in standby
mode. The orange indicator light will flash when there is a problem,
even if visual alerts are disabled.
To enable alerts, press the lower right soft key from the audio and visual
alerts screen. To disable alerts, press the lower left soft key.
© Cochlear Limited 2010
195993 ISS6 CR110 User Guide 01.indd 51
CR110 User Guide - 51
8/10/2010 11:18:54 AM
Adjusting settings
Off
On
Figure 57: Remote assistant audio and
visual alerts disabled
52 - CR110 User Guide
195993 ISS6 CR110 User Guide 01.indd 52
Off
On
Figure 58: Remote assistant audio and
visual alerts enabled
© Cochlear Limited 2010
8/10/2010 11:18:54 AM
Demo mode
Demo mode allows you to familiarise yourself with the features on your
remote assistant before you start using it to communicate with your
processor.
You can familiarise yourself with bilateral (uses two processors)
advanced functions or unilateral (uses one processor) simple functions.
Demo mode will not display visual alerts, or connect audio accessories.
To enter Demo mode when your remote assistant is already paired with
your processor:
1.
Press and hold the top right and bottom left soft keys at the same
time from the Home screen. The Demo mode screen displays.
2.
To select bilateral advanced functions, press the lower left soft key.
To select unilateral simple functions, press the lower right soft key.
DEMO
2
1
Figure 59: Access bilateral advanced functions (1)
or unilateral simple functions (2)
© Cochlear Limited 2010
195993 ISS6 CR110 User Guide 01.indd 53
CR110 User Guide - 53
8/10/2010 11:18:54 AM
Demo mode
To enter Demo mode when your remote assistant is not paired, press
and hold the top right and bottom left soft keys at the same time from
the pair prompt screen. When your remote assistant is not paired, the
pair prompt screen displays if you press the Cochlear key.
Figure 60 Pair prompt screen
When using Demo mode, the word 'Demo' will display on all screens.
The indicator light on your remote assistant will also flash green, blue
and orange.
To stop using Demo mode, turn off your remote assistant and turn it
back on.
You will automatically exit Demo mode after 15 minutes of use, or if you
start pairing your remote assistant.
54 - CR110 User Guide
195993 ISS6 CR110 User Guide 01.indd 54
© Cochlear Limited 2010
8/10/2010 11:18:54 AM
Caring for your remote assistant
Protecting your remote assistant
To protect your remote assistant against impact and scratches, Cochlear
recommends that you use a protective case. The following protective
cases are available from Cochlear:
•
Cochlear™ Nucleus® CR100 Series Belt Case: You can insert the
remote assistant into the belt case and attach it to your belt. The
belt case can be rotated to adjust its position on the belt. When
you want to use your remote assistant, remove it from the belt
case.
Figure 61: Remote assistant belt case
•
Cochlear™ Nucleus® CR100 Series Leather Case: The leather case
provides you with the flexibility of either attaching the remote
assistant to your belt, or carrying it in your handbag or pocket. You
can use and charge the remote assistant while it is in the leather
case.
Figure 62: Remote assistant leather case
© Cochlear Limited 2010
195993 ISS6 CR110 User Guide 01.indd 55
CR110 User Guide - 55
8/10/2010 11:18:55 AM
Caring for your remote assistant
•
Cochlear™ Nucleus® CR100 Series Protective Case: This is a flexible
rubber case into which you can insert the remote assistant. It is
suitable for use by both children and adults, and is available in a
choice of colours. The protective case can be worn around the
neck using the remote assistant lanyard. You can use and charge
the remote assistant while it is in the protective case.
Figure 63: Protective case
When using the remote assistant while it is in a protective case,
you may notice a slight decrease in the operating range. If this
happens, either remove the remote assistant from the case when
using it, or hold the case close to your processor.
When the remote assistant is attached to your belt, certain
arm positions (e.g. arm swinging past the belt when walking)
may affect communication. If this happens, remove the remote
assistant from the case when using it.
Using the remote assistant lanyard
The Cochlear™ Nucleus® CR100 Series Lanyard allows you to wear the
remote assistant around your neck.
You can attach the lanyard to the remote assistant using the hole
located on the back of the remote assistant. When threading the
lanyard, always insert the lanyard loop through the bottom hole, which
is the hole just above the personal identification label.
56 - CR110 User Guide
195993 ISS6 CR110 User Guide 01.indd 56
© Cochlear Limited 2010
8/10/2010 11:19:07 AM
Caring for your remote assistant
Thread the lanyard as shown below:
1.
Hold the remote assistant in
one hand.
2.
Insert the lanyard loop
through the bottom hole
with the thumb and index
finger of the other hand.
3.
Insert the lanyard strap
through the lanyard loop as
shown.
4.
Pull the lanyard strap
upwards until the loop
tightens into a knot.
Components described in this section may not be available in all
countries. Please contact your clinician for more information.
Protecting your remote assistant from water
damage
Your remote assistant is protected against access of solid foreign objects
greater than or equal to 1.0 mm diameter, and failure from splashing
water (IP44 rating).
© Cochlear Limited 2010
195993 ISS6 CR110 User Guide 01.indd 57
CR110 User Guide - 57
8/10/2010 11:19:12 AM
Caring for your remote assistant
Cleaning your remote assistant
To keep your remote assistant clean, wipe its display and buttons with
a soft dry cloth. Do not use alcohol, household cleaners or abrasive
materials to clean your remote assistant.
Figure 64: Wiping the remote assistant with a soft dry cloth
If your belt case, leather case or protective case gets dirty, wipe it with a
soft dry cloth.
If your remote assistant gets wet:
1.
Turn your remote assistant off.
2.
Wipe it with a soft dry cloth.
3.
Dry your remote assistant for approximately 12 hours. It is not
recommended to use the Zephyr dry aid kit supplied with your
processor to dry your remote assistant. Do not use an oven or
microwave to dry your remote assistant.
To check if your remote assistant is still functioning, turn it on again
after it is dry. If your remote assistant no longer functions, return it to
your clinician. Cochlear cannot guarantee that it can repair a waterdamaged remote assistant.
58 - CR110 User Guide
195993 ISS6 CR110 User Guide 01.indd 58
© Cochlear Limited 2010
8/10/2010 11:19:37 AM
Caring for your remote assistant
General warnings and precautions for using your
remote assistant
•
Using your remote assistant cables in any way contradictory to
their intended purpose (e.g. wearing the USB cable around the
neck) can cause injury.
•
When operating machinery, ensure that your remote assistant
lanyard does not get caught in the machine.
•
If your remote assistant becomes unusually warm, stop using it
immediately and seek advice from your clinician.
•
Do not operate your remote assistant while driving.
•
Do not leave your remote assistant in very hot areas (e.g. in direct
sunlight, behind a window, in a car, etc.).
•
Avoid placing your remote assistant in environments where
excessive moisture and dirt can damage it (e.g. swimming pools).
•
Be careful when placing your remote assistant in a bag or pocket
with other objects as the display may scratch. You may want to
use commercially available protective films to protect the remote
assistant display from scratches.
•
When charging your remote assistant from mains power, only
use the CR100 Series Global Power Adaptor, or the CP800 Series
Global Power Adaptor (if using the CP800 Series Battery Charger).
•
Do not use excessive force when connecting your remote assistant
to the remote assistant USB cable.
•
Avoid applying unnecessary pressure to the display, keypad or back
of your remote assistant.
•
Avoid bending your remote assistant in any way.
•
Do not attempt to open or dismantle your remote assistant. If the
remote assistant is not working, return it to your clinician.
•
When your remote assistant is not in use, turn it off and store it
safely.
•
Dispose of electrical components in accordance with your local
regulations.
© Cochlear Limited 2010
195993 ISS6 CR110 User Guide 01.indd 59
CR110 User Guide - 59
8/10/2010 11:19:45 AM
60 - CR110 User Guide
195993 ISS6 CR110 User Guide 01.indd 60
© Cochlear Limited 2010
8/10/2010 11:19:45 AM
Using your remote assistant to
troubleshoot your processor
The following features on your remote assistant can help you
troubleshoot your processor:
•
Visual alerts that appear on your remote assistant display.
Figure 65: Coil off visual alert
•
Your processor status indicator.
•
The processor troubleshooting guide on your remote assistant
when operating the remote assistant in Advanced mode. You can
access the troubleshooting guide by pressing one of the lower soft
keys from the processor status screen.
For information on how to troubleshoot your processor, refer to the
CP810 and CR110 Troubleshooting Guide provided with your processor
documentation.
© Cochlear Limited 2010
195993 ISS6 CR110 User Guide 01.indd 61
CR110 User Guide - 61
8/10/2010 11:19:45 AM
Using your remote assistant to troubleshoot your processor
Checking your processor coil
Your remote assistant has an in-built coil sensor that allows you to
check if the coil connected to your processor is receiving sound signals
from your processor.
To check the coil using the coil sensor:
1.
Remove the coil from the head. Do not use the coil sensor when
the coil is on the head.
2.
Place the coil on the coil sensor guides on the back of the remote
assistant.
If the coil is receiving sound signals from your processor, the coil check
and pair screen displays. This only indicates that the coil is receiving
sound signals and does not confirm that the coil is functioning properly.
If the coil is not receiving sound signals, the coil check and pair screen
does not display.
Once you move the coil away from your remote assistant, the remote
assistant returns to its previous display.
62 - CR110 User Guide
195993 ISS6 CR110 User Guide 01.indd 62
© Cochlear Limited 2010
8/10/2010 11:19:45 AM
Other information
Your warranty and registration form
Your warranty is included in the document pack you received with your
processor.
Please complete the registration form and return to Cochlear within 30
days of receiving the product.
Technical information
The remote assistant wireless communication link operates in the 2.4
GHz ISM band using GFSK (Gaussian Frequency Shift Keying) on 10
channels. The link uses a proprietary bi-directional communication
protocol and operates over a distance of up to 2m from the CP810
processor. When interference is present, the wireless communication
link switches between the 10 channels to find a channel where the
interference least affects the operation of the link. The remote assistant
indicates via its display and light indicator when the processor is not
within operating distance, and when the link has been interrupted due
to interference. For more information, see Holding and operating your
remote assistant in this user guide.
Specifications
Physical configuration
The remote assistant comprises:
•
Custom analogue and digital integrated circuits based on a microprocessor design, with bi-directional wireless communication
capabilities.
•
Push-buttons/keys and a slider for control of processor features
and its own system features.
•
A display for indicating system status and activity.
•
A speaker for sounding an audible alert.
•
In-built coil sensor to check if the processor’s coil is receiving
sound signals from the processor.
© Cochlear Limited 2010
195993 ISS6 CR110 User Guide 01.indd 63
CR110 User Guide - 63
8/10/2010 11:19:45 AM
Other information
•
An indicator light for visual indication of system function or alert.
•
On-board battery charging circuit.
•
A temperature sensor for battery safety.
•
A mini type B USB connector for charging the device.
Materials
The remote assistant housing, including non-metallic buttons/keys, is
made of polycarbonate. The spine and metallic buttons/keys are made
of chrome plated stainless steel.
Dimensions
Length
Width
Depth
110 mm
45 mm
12 mm
Weight
The remote assistant weighs approximately 64 g.
Operating characteristics
Characteristic
Range
Wireless technology
Proprietary Low Power Bidirectional
Wireless Link
2.4 GHz
3 V to 4.2 V
4.5 V to 5.5 V
680 mAh (Internal Lithium-ion
battery)
Remote assistant on and off,
telecoil and Auto Telecoil on and
off, audio accessory on and off,
program change, processor and
remote assistant settings change
Up to 2 m
RF frequency
Operating battery voltage
Battery charging voltage
Battery capacity
Push-key functions
Wireless transmission range
64 - CR110 User Guide
195993 ISS6 CR110 User Guide 01.indd 64
© Cochlear Limited 2010
8/10/2010 11:19:45 AM
Other information
Characteristic
Range
Display
128 x 128 pixels, 1.5 inch backlit
colour LCD
Environmental conditions
Condition
Minimum
Maximum
Storage temperature
Storage relative
humidity
Operating
temperature
Operating relative
humidity
-40 ºC (-40 ºF)
0% RH
+50 ºC (+122 ºF)
90% RH
+5 ºC (+41 ºF)
+50 ºC (+122 ºF)
0% RH
90% RH
Certification and applied standards
The CR110 Remote Assistant fulfils the essential requirements listed in
Annex 1 of the EC directive 90/385/EEC on Active Implantable Medical
Devices as last amended by EC Directive 2007/47/EEC. It was approved
for CE-Mark according to Annex 2 by Notified Body 0197 in 2009.
Equipment classification
Your remote assistant is internally powered equipment Type B as
described in the international standard IEC 60601-1:1988 + A1:1991 +
A2:1995 - Medical Electrical Equipment Part 1: General Requirements
for Safety.
IP rating of remote assistant
The IP rating of the remote assistant is as described in the section
Caring for your remote assistant.
© Cochlear Limited 2010
195993 ISS6 CR110 User Guide 01.indd 65
CR110 User Guide - 65
8/10/2010 11:19:45 AM
Other information
FCC (Federal Communications Commission) and Canadian
IC compliance
This device complies with part 15 of the FCC Rules and with RSS-210 of
Industry Canada. Operation is subject to the following two conditions:
•
This device may not cause harmful interference.
•
This device must accept any interference received, including
interference that may cause undesired operation.
Changes or modifications made to this equipment not expressly
approved by Cochlear Limited may void the FCC authorization to
operate this equipment.
This equipment has been tested and found to comply with the limits
for a Class B digital device, pursuant to Part 15 of the FCC Rules. These
limits are designed to provide reasonable protection against harmful
interference in a residential installation. This equipment generates, uses
and can radiate radio frequency energy and, if not installed and used
in accordance with the instructions, may cause harmful interference
to radio communications. However, there is no guarantee that
interference will not occur in a particular installation. If this equipment
does cause harmful interference to radio or television reception, which
can be determined by turning the equipment off and on, the user is
encouraged to try to correct the interference by one or more of the
following measures:
•
Reorient or relocate the receiving antenna.
•
Increase the separation between the equipment and receiver.
•
Connect the equipment into an outlet on a circuit different from
that to which the receiver is connected.
•
Consult the dealer or an experienced radio/TV technician for help.
FCC ID number: WTOCR11000
IC ID number: 8039A-CR11000
66 - CR110 User Guide
195993 ISS6 CR110 User Guide 01.indd 66
© Cochlear Limited 2010
8/10/2010 11:19:46 AM
Other information
The symbols below are found on your processor components and
packaging.
Symbol
Meaning
See Instructions
Refer to warnings and cautions in
related user documentation
Fragile
Storage Temperature Limits
Relative Humidity Limits
IP Rating
Protected against access of solid
foreign objects greater than or equal
to 1.0 mm diameter.
Protected against failure from
temporary immersion in water.
Protected against failure from dust
penetration.
IP Rating
Protected against access of solid
foreign objects greater than or equal
to 1.0 mm diameter.
Protected against failure from
splashing water.
CE Registration Mark
Disposal - do not dispose in fire
© Cochlear Limited 2010
195993 ISS6 CR110 User Guide 01.indd 67
CR110 User Guide - 67
8/10/2010 11:19:46 AM
Other information
Disposal – dispose of electrical
components in accordance with your
local regulations
Certification - Japan
Certification - Australia
Certification - New Zealand
Tested to comply with FCC standards
Serial number
Date of manufacture
Type B Equipment
This device restricted to sale by or on
the order of a physician.
•
Mixed Sources - Product group
for well managed sources and
other controlled sources.
•
FSC certification only applies to
cardboard packaging.
Recycle
CP810 Sound Processor
Cochlear Limited
Product label information for the
sound processor.
14 Mars Road, Lane Cove
NSW 2066, Australia
Made in Australia
CR110 Remote Assistant
Cochlear Limited
Product label information for the
remote assistant.
14 Mars Road, Lane Cove
NSW 2066, Australia
Made in China
68 - CR110 User Guide
195993 ISS6 CR110 User Guide 01.indd 68
© Cochlear Limited 2010
8/10/2010 11:19:47 AM
Other information
Legal statement
The statements made in this guide are believed to be true and correct as
of the date of publication. However, specifications are subject to change
without notice.
Nucleus® cochlear implant systems are covered by one or more
international patents.
© Cochlear Limited 2010
© Cochlear Limited 2010
195993 ISS6 CR110 User Guide 01.indd 69
CR110 User Guide - 69
8/10/2010 11:19:48 AM
70 - CR110 User Guide
195993 ISS6 CR110 User Guide 01.indd 70
© Cochlear Limited 2010
8/10/2010 11:19:48 AM
Glossary
Advanced mode
Allows access to all of the features on
the remote assistant.
Bilateral control
The remote assistant communicates
with two processors at the same time.
Cochlear™ Nucleus®
A protective case for the remote
CR100 Series Belt Case
assistant that can be attached to the
belt.
Cochlear™ Nucleus®
Connects the remote assistant to
CR100 Series Global Power mains power for recharging the
Adaptor
battery.
Cochlear™ Nucleus®
Allows you to wear the remote
CR100 Series Lanyard
assistant around the neck.
Cochlear™ Nucleus®
A protective case for the remote
CR100 Series Leather Case assistant that you can either attach
to the belt, or carry in the handbag or
pocket.
Cochlear™ Nucleus®
A protective rubber case for the
CR100 Series Protective
remote assistant that is suitable for
Case
use by both adults and children.
Cochlear™ Nucleus®
Cable that connects the remote
CR100 Series USB Cable
assistant to:
•
USB port of a computer.
•
Global power adaptor.
•
Coil sensor
Hard reset button
© Cochlear Limited 2010
195993 ISS6 CR110 User Guide 01.indd 71
CP800 Series Battery
Charger.
Used to check if the coil connected
to the processor is receiving sound
signals from the processor.
Resets the remote assistant if the
Cochlear key is not working.
CR110 User Guide - 71
8/10/2010 11:19:48 AM
Glossary
Home screen
Indicator light
Left directional key
Allows access to program selection
and key settings.
Provides a visual indication of remote
assistant function status or a problem.
•
Decrease sensitivity.
•
Lower directional key
Pairing
Processor settings menu
Processor status screen
Remote assistant
Remote assistant settings
menu
Remote assistant USB
cable socket
Right directional key
•
Change settings.
Decrease volume or scroll down.
Allows the remote assistant and
processor to communicate with each
other.
Allows access and control of specific
processor settings.
Displays current processor status.
Hand-held remote control that
controls the Cochlear™ Nucleus®
CP800 Series Sound Processor.
Allows access and control of specific
remote assistant settings.
Connects the USB cable to the
remote assistant.
•
Increase sensitivity.
•
Simple mode
Soft keys
72 - CR110 User Guide
195993 ISS6 CR110 User Guide 01.indd 72
Switch between control modes.
Switch between control modes.
•
Change settings.
Allows access to day-to-day features
The four multi-function keys that are
located directly above and below the
remote assistant display.
© Cochlear Limited 2010
8/10/2010 11:19:48 AM
Glossary
Toggle button
Button on the left spine (side) of the
remote assistant that is used to:
•
Turn telecoil and Auto
Telecoil on and off.
•
Unilateral control
Unpair
Upper directional key
© Cochlear Limited 2010
195993 ISS6 CR110 User Guide 01.indd 73
Turn audio accessory on and
off.
The remote assistant communicates
with one processor.
Unpairs the remote assistant from the
processor.
Increase volume or scroll up.
CR110 User Guide - 73
8/10/2010 11:19:48 AM
74 - CR110 User Guide
195993 ISS6 CR110 User Guide 01.indd 74
© Cochlear Limited 2010
8/10/2010 11:19:48 AM
Index
A
Adjusting processor settings
changing the audio accessory and microphone mixing ratio 47
changing the telecoil and microphone mixing ratio 46
enabling and disabling private tones 50
locking and unlocking processor buttons 46
setting processor indicator light preferences 48
Adjusting remote assistant settings
changing remote assistant speaker volume 51
enabling and disabling audio and visual alerts 51
Adjusting settings 45
Advanced mode 26
Auto Telecoil
automatically turn off 36
using 36
B
Belt case
using 55
Bilateral control 39
bilateral screens 39
control modes 40–41
switching between control modes 42–43
© Cochlear Limited 2010
195993 ISS6 CR110 User Guide 01.indd 75
CR110 User Guide - 75
8/10/2010 11:19:48 AM
Index
C
Caring for your remote assistant
cleaning 58
protecting 55–57
using the Lanyard 56–57
warnings and precautions 59
Changing
audio accessory and microphone mixing ratio 47–48
indicator light preferences 48
sensitivity 32
telecoil and microphone mixing ratio 46
volume 31
Charging battery 11
charging for the first time 11
how to recharge 13–17
recharging 11
recommended temperature range for charging 12
using the CP800 Series Battery Charger and USB cable 16
using the CR100 Series Global Power Adaptor and USB cable 14
using your computer and USB cable 15
when to recharge 12
Checking
processor battery status 34
processor coil 62
remote assistant battery status 12
Cleaning the remote assistant 58
D
Decreasing
sensitivity 32
volume 31
76 - CR110 User Guide
195993 ISS6 CR110 User Guide 01.indd 76
© Cochlear Limited 2010
8/10/2010 11:19:48 AM
Index
Demo mode
stop using 54
using 53
Dirt
protection against 57
Disabling
audio and visual alerts 51
private tones 50
Display
Home screen 30
Dual control mode 41
E
Enabling
audio and visual alerts 51
private tones 50
Equipment classification 65
Everyday program 28
F
FCC compliance 66
Focus program 28
© Cochlear Limited 2010
195993 ISS6 CR110 User Guide 01.indd 77
CR110 User Guide - 77
8/10/2010 11:19:48 AM
Index
H
Hard reset button 38
Home screen 28
returning to 30
selecting programs 29
I
Increasing
sensitivity 32
volume 31
Interference
actions to take 25
sources of 25
L
Labelling symbols 67–68
Language selection 21
Lanyard
attaching 56–57
Leather case
using 55
Locking
processor buttons 46
remote assistant keypad 19
78 - CR110 User Guide
195993 ISS6 CR110 User Guide 01.indd 78
© Cochlear Limited 2010
8/10/2010 11:19:48 AM
Index
M
Mixing ratio
audio accessory and microphone 47
telecoil and microphone 46
Music program 28
N
Noise program 28
O
Operating the remote assistant
operating distance 24
P
Pairing the remote assistant 22
Processor indicator lights
setting preferences 48
Programs
Everyday 28
Focus 28
Music 28
Noise 28
selecting 29
Protecting the remote assistant 55–57
© Cochlear Limited 2010
195993 ISS6 CR110 User Guide 01.indd 79
CR110 User Guide - 79
8/10/2010 11:19:48 AM
Index
Protective case
using 56
R
Recharging battery 11
Remote assistant 7
components 9–10
dimensions 64
Home screen 28
indicator lights 37
locking and unlocking 19
materials 64
operating characteristics 64
physical configuration 63–64
selecting language 21
specifications 63–64
turning on and off 18
using 21–38
Resetting processor 38
S
Selecting programs 29
Selecting the remote assistant language 21
Sensitivity
decreasing 32
increasing 32
Simple mode 26
Switching
between bilateral control modes 42–43
80 - CR110 User Guide
195993 ISS6 CR110 User Guide 01.indd 80
© Cochlear Limited 2010
8/10/2010 11:19:48 AM
Index
T
Technical information
environmental conditions 65
specifications 63–64
Telecoil
reducing background noise 35
turning off 35
turning on 35
Troubleshooting the processor 61–62
Turning the remote assistant on and off 18
U
Unlocking
processor buttons 46
remote assistant keypad 19
Using
Auto Telecoil 36
belt case 55
Demo mode 53
lanyard 56–57
leather case 55
protective case 56
remote assistant 21–38
telecoil 35–36
the remote assistant to troubleshoot the processor 61–62
© Cochlear Limited 2010
195993 ISS6 CR110 User Guide 01.indd 81
CR110 User Guide - 81
8/10/2010 11:19:48 AM
Index
V
Visual alerts 61
Volume
decreasing 31
increasing 31
W
Warranty 63
Water
protection against damage 57
82 - CR110 User Guide
195993 ISS6 CR110 User Guide 01.indd 82
© Cochlear Limited 2010
8/10/2010 11:19:48 AM
© Cochlear Limited 2010
195993 ISS6 CR110 User Guide 01.indd 83
CR110 User Guide - 83
8/10/2010 11:19:48 AM
Nucleus is a registered trademark of Cochlear Limited.
Cochlear and the elliptical logo and Freedom are trademarks of Cochlear Limited.
The statements made in this guide are believed to be true and correct in every detail as of the date of publication. However,
specifications are subject to change without notice.
Printed in Australia
195993 ISS6 JUL10
195993 ISS6 CR110 User Guide 01.indd 84
8/10/2010 11:19:48 AM