1
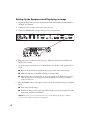
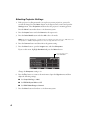
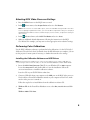
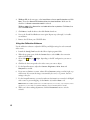
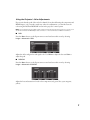
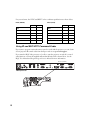
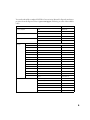
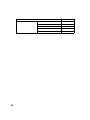
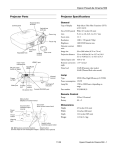
Installer Guide
Follow these instructions to set up the PowerLite® Pro Cinema 1080
projector and HQV® video processor.
For more information, see the manuals that came with these products.
Setting Up the Equipment and Displaying an Image
1. Unpack the HQV video processor and attach the serial number sticker included with it to
the HQV User Manual.
2. Connect at least one video source to the video processor.
3. Connect an HDMI cable from the video processor to the projector.
Video processor
HDMI OUT
Projector
4. Plug in the power cord for the video processor. Make sure batteries are installed in the
HQV remote control.
5. Set up the projector and turn it on as outlined below. For details, see the projector User’s
Guide.
■
Remove the protective lens pad from the projector, then remove the lens cap.
■
Make sure batteries are installed in the Epson remote control.
■
Plug in the power cord, then turn on the power switch on the back of the projector.
Once the projector is receiving power, press the On button on the Epson remote
control to turn it on.
6. Press the Pattern button on the Epson remote control, then adjust the image as outlined
below.
■
Focus and zoom the image.
■
Position the image on the screen. If possible, keep the projector level and position the
image using only the lens shift dials.
Caution: Do not try to move the lens by hand, or you may damage the projector. Always
use the lens shift dials to change the lens position.
2
When done, press the Pattern button to clear the displayed pattern.
Note: If the projector is ceiling-mounted or set up for rear-screen projection, you’ll use the
projector’s menu system to reorient the image (see step 1 on page 4). For best image quality,
avoid tilting the projector or angling it toward the screen.
7. Press the HDMI button on the remote control to select HDMI as the input source.
HDMI
button
8. Turn on the power switch on the back of the HQV video processor (above the AC power
inlet). It may take several seconds for the video processor to come on.
9. Press the ON/SETUP button on the HQV remote control to place the video processor in
Setup mode. (You see SetUp Mode on the display.)
Note: If the HQV video processor doesn’t respond to the remote control, check the remote
control’s batteries. If the batteries are good, turn off the HQV video processor and then turn it
back on using the power switch above the AC power inlet.
Press the MENU button. Then use the u and d buttons to select the output
resolution setting (“Output = xxx”). Use the l and r buttons to change the setting
to Output = 1080p 60Hz.
Press the ON/SETUP button on the remote control to exit Setup mode.
10. Make sure the projector is displaying an image. If not, turn on a connected video source
and select it by pressing the appropriate source button on the HQV remote control.
3
Selecting Projector Settings
1. If the projector is ceiling-mounted or set up for rear-screen projection, you need to
reorient the image. Press the Menu button on the Epson remote control and open the
Settings menu. Select Projection and then select the projector’s mounting position.
Press the Menu button when done to exit the menu system.
2. Press the Aspect button and select Normal as the aspect ratio.
3. Press the Color Mode button and select HD as the color mode.
Note: This sets the brightness, contrast, and color settings to 0, Skin Tone to 3, Absolute Color
Temperature to 7500K, lamp Brightness Control to High, and Auto Iris to Off.
4. Press the Gamma button and select 2.2 as the gamma setting.
5. Press the Menu button, open the Image menu, and select Sharpness.
If you see this screen, highlight Standard and press the Select button:
If you see this screen,
select Standard
Change the Sharpness setting to -3.
6. Press the ESC button to return to the main menu. Open the Signal menu and then
adjust the following settings:
■
Set Output Scaling to 100%.
■
Set EPSON Super White to Off.
■
Set HDMI Video Range to Normal.
7. Press the Menu button when done to exit the menu system.
4
Selecting HQV Video Processor Settings
1. Press the MENU button on the HQV remote control.
2. In the
Picture menu, select Aspect Ratio and set it to Full Screen.
Note: If Full Screen is not a selectable option, select the Standard setting instead. If the video
source is playing a high-definition video, you won’t be able to adjust this setting. You can play a
starndard-definition DVD or switch to a different input, such as S-video, to adjust this setting for
other sources.
3. In the
Advanced menu, select HQV Film Mode and set it to Auto.
4. Make any additional desired adjustments, following the instructions in the HQV
User Manual. For example, you may want to select appropriate noise reduction settings.
Performing Color Calibrations
Use the HQV calibration software to perform final color calibrations. See the ISF Certified
Calibration Controls Dealer Guide for details. Once the ISF calibrations are complete, you can
use the projector’s menu system, if necessary, to further fine-tune the color settings.
Installing the Calibration Software and USB Drivers
Note: These instructions explain how to connect to the HQV processor using a USB cable. To
connect using a serial or network cable, see the ISF Certified Calibration Controls Dealer Guide.
1. Insert the HQV Video Processor TX3 CD in your Windows XP or 2000 computer.
Locate the setup.exe file and double-click it to start the installation. Follow the
on-screen instructions to install the calibration software.
Leave the CD in your CD/DVD drive when done.
2. Connect a USB cable from your computer to the USB port on the HQV video processor.
You should see a Found New Hardware wizard on your computer screen. If not, make
sure the video processor is turned on.
Follow the steps below to install drivers from the calibration software CD.
3. Windows XP: At the Found New Hardware screen, select No, not this time and click
Next.
Windows 2000: Click Next.
5
4. Windows XP: At the next page, select Install from a list or specific location and click
Next. Then select Search for the best drivers in these locations. Make sure the
checkbox for Search removable media is selected.
Windows 2000: Select Search for a suitable driver for my device. Click Next, then
select CD-ROM drives.
5. Click Next to install the driver, then click Finish when done.
6. You see the Found New Hardware screen again. Repeat steps 3 through 5 to install a
second driver.
7. Remove the CD from your CD/DVD drive.
Using the Calibration Software
Use the calibration software to adjust the ISF Day and Night settings for each connected
video source.
1. Launch the Config Tool located in the Silicon Optix program folder.
2. When the program opens, click the Connect button, select USB as the connection
method, and click OK.
3. Select either
adjust.
Day or
Night, depending on the ISF configuration you want to
4. Click the tab that corresponds to the video source you want to adjust.
5. For the Input Parameters, adjust the Contrast, Brightness, Color, Hue, and
Sharpness as needed.
6. If you want to eliminate overscan, reduce all four Overscan settings to 0 (left, right, top,
and bottom). If you want the image overscanned by about 2.5 to 3 percent, leave the
settings as they are.
7. For the Output Parameters, you need to make sure the Luma is set correctly for all digital
video sources to prevent clipping. Set the Peak to 235 and the Base to 16.
Note: RGB Peak and Base parameters should be adjusted, if necessary, only with photometric
equipment. See the HQV ISF Certified Calibration Controls Dealer Guide for details.
8. When you’re done making adjustments, click the Disconnect button to exit the
software.
6
Using the Projector’s Color Adjustments
If you notice that the peak of the red color channel is low after calibrating the component and
HDMI inputs, or if you need to make any other color adjustments, you can fine-tune the
color using the RGB and RGBCMY screens in the projector’s menu system.
Note: These adjustments should be made only by a trained technician with a reference meter such
as the Photo Research PR-650 SpectraColorimeter or Konica Minolta CS-200 Chroma Meter.
TM
■
RGB
Press the Menu button on the Epson remote control and access this screen by selecting
Image > Advanced > RGB.
Adjust the offset and gain for each signal color. Use Offset to adjust the base and Gain to
adjust the peak.
■
RGBCMY
Press the Menu button on the Epson remote control and access this screen by selecting
Image > Advanced > RGBCMY.
Adjust the hue and saturation for each color component (red, green, blue, cyan, magenta,
yellow).
7
For your reference, the NTSC and HDTV color coordinate specifications are shown below.
NTSC (SMPTE)
HDTV (ATSC)
X
Y
X
Y
Red
0.630
0.340
Red
0.640
0.330
Green
0.310
0.595
Green
0.300
0.600
Blue
0.155
0.070
Blue
0.150
0.060
Cyan
0.231
0.326
Cyan
0.225
0.329
Magenta
0.314
0.161
Magenta
0.321
0.154
Yellow
0.421
0.507
Yellow
0.419
0.505
Using IR and ESC/VP21 Command Codes
If you want to program a universal remote control to work with the projector, you can obtain
a list of projector IR control codes from the Epson web site at epson.com/support.
If you want the HQV video processor to be able to turn the projector on and off or control
other functions, connect the supplied null-modem RS-232 cable as shown below. See the
HQV User Manual and Programming and Service Manual for more information.
RS-232 (SLAVE)
Video processor
Projector
8
You can download the complete ESC/VP21 Communication Manual for Epson home theater
projectors from the Epson web site at epson.com/support. Following are some of the available
codes:
Item
Command
Power ON/OFF
A/V Mute ON/OFF
A/V Mute selection
Source
change
PWR ON
OFF
PWR OFF
ON
MUTE ON
OFF
MUTE OFF
Black
MSEL 00
Blue
MSEL 01
Terminal
Signal name
Component
Component video
SOURCE 10
YCbCr
SOURCE 14
YPbPr
SOURCE 15
Auto
SOURCE 1F
PC
HDB15
SOURCE 20
RGB
SOURCE 21
Input 3 (HDMI)
HDMI
SOURCE 30
Video
Video/S-Video
SOURCE 40
Video (RCA)
SOURCE 41
S-Video
SOURCE 42
Digital video
SOURCE C0
YCbCr
SOURCE C4
YPbPr
SOURCE C5
Input 5
Color Mode
ON
Auto
SOURCE CF
Cinema Night
CMODE 05
Cinema Day
CMODE 06
Natural
CMODE 07
Vivid
CMODE 08
HD
CMODE 09
Silver Screen
CMODE 0A
9
Item
Aspect ratio
10
Command
Auto
ASPECT 00
Normal
ASPECT 20
Full
ASPECT 21
Zoom
ASPECT 22
Wide
ASPECT 25
11
Copyright Notice
All rights reserved. No part of this document may be reproduced, stored in a retrieval system, or
transmitted in any form or by any means, electronic, mechanical, photocopying, recording, or
otherwise, without the prior written permission of Epson America, Inc. This publication and the features
described herein are subject to change without notice.
Trademarks
Epson is a registered trademark and Exceed Your Vision is a trademark of Seiko Epson Corporation.
PowerLite is a registered trademark of Epson America, Inc.
General Notice: Other product names used herein are for identification purposes only and may be
trademarks of their respective owners. Epson disclaims any and all rights in those marks.
© 2007 Epson America, Inc. 1/07
12
CPD-23385