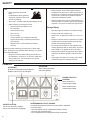
1
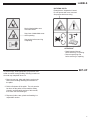
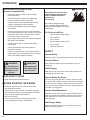
MODELS: Rev. B 07-2013 MAN C100579 SCHV-18/8.0E - S/N: SV188E00101 & UP PARTS MANUAL C100578 OPERATORS MANUAL HYDRO-DRIVE SOD CUTTER CALIFORNIA WARNING Proposition 65 Warning Diesel engine exhaust and some of its constituents are known to the State of California to cause cancer, birth defects and other reproductive harm. The engine exhaust from this product contains chemicals known to the State of California to cause cancer, birth defects or other reproductive harm. CALIFORNIA Proposition 65 Warning Battery posts, terminals, wiring insulation, and related accessories contain lead and lead compounds, chemicals known to the State of California to cause cancer and birth defects or other reproductive harm. WASH HANDS AFTER HANDLING. 2 SAFETY NOTICE !!! Unauthorized modifications may present extreme safety hazards to operators and bystanders and could also result in product damage. This symbol means: ATTENTION! BECOME ALERT! Your safety and the safety of others is involved. Schiller Grounds Care, Inc. strongly warns against, rejects and disclaims any modifications, add-on accessories or product alterations that are not designed, developed, tested and approved by Schiller Grounds Care, Inc. Engineering Department. Any Schiller Grounds Care, Inc. product that is altered, modified or changed in any manner not specifically authorized after original manufacture–including the addition of “after-market” accessories or component parts not specifically approved by Schiller Grounds Care, Inc. will result in the Schiller Grounds Care, Inc. Warranty being voided. Any and all liability for personal injury and/or property damage caused by any unauthorized modifications, add-on accessories or products not approved by Schiller Grounds Care, Inc. will be considered the responsibility of the individual(s) or company designing and/or making such changes. Schiller Grounds Care, Inc. will vigorously pursue full indemnification and costs from any party responsible for such unauthorized post-manufacture modifications and/or accessories should personal injury and/or property damage result. Signal word definitions: The signal words below are used to identify levels of hazard seriousness. These words appear in this manual and on the safety labels attached to Schiller Grounds Care, Inc. machines. For your safety and the safety of others, read and follow the information given with these signal words and/or the symbol shown above. ! DANGER indicates a hazardous situation which, if not avoided, WILL result in death or serious injury. ! WARNING WARNING indicates a hazardous situation which, if not avoided, COULD result in death or serious injury. ! CAUTION indicates a hazardous situation which, if not avoided, COULD result in minor or moderate injury. It may also be used to alert against unsafe practices or property damage. ! CAUTION used without the safety alert symbol indicates a potentially hazardous situation which, if not avoided, MAY result in property damage. MODEL NUMBER: This number appears on sales literature, technical manuals and price lists. SERIAL NUMBER: This number appears only on your machine. It contains the model number followed consecutively by the serial number. Use this number when ordering parts or seeking warranty information. 3 SAFETY Machine Preparation Operator preparation and training Read the Operation & Safety Manual • If an operator or mechanic cannot read English, it is the owner's responsibility to explain this material to them. If any portion of this material is unclear, contact your factory representative for clarification. • B ecome familiar with the safe operation of the equipment, operator controls and safety signs. Be prepared to stop the engine quickly in an emergency. Do not operate or allow another person to operate this machine if there are any questions about safety. • A ll operators and mechanics should be trained. The owner is responsible for training the users. • W ear appropriate clothing, including safety goggles or safety glasses with side shields when operating. Do not operate barefoot or wearing open sandals. Long hair, loose clothing or jewelry may get tangled in moving parts. • Wear hearing protection. • Wear safety glasses. • N ever allow underage children, unskilled or improperly trained people to operate this equipment. Local regulations can restrict the age of the operator. • K eep warning labels and this operator's manual legible and intact. Replacement labels and manuals are available from the factory. • D o not operate machine while under the influence of drugs or alcohol. • T he owner/user can prevent and is responsible for accidents or injuries occurring to themselves, other people or property. Site preparation and circumstances • Evaluate the terrain to determine how to safely perform the job. Only use accessories and attachments approved by the manufacturer. • Clear the area to be cut of objects such as rocks, toys, wire or other debris that may be thrown or get tangled in the sod cutter. • Identify and mark objects to be avoided such as sprinkler heads, stakes, water valves, etc. • B e sure the area is clear of pets and people, especially young children. Never assume they will remain where you last saw them. Stop the machine if any enter the area. • Cut sod only in daylight or in good artificial light. 4 Machine Preparation • D o not tamper with or defeat safety devices. Keep guards, shields and interlock safety devices in place and in proper working condition. They are for your protection. • K eep all fasteners such as nuts, bolts and pins well secured. • V isually inspect blade and blade bolts for wear or damage. Replace worn or damaged blades and bolts. • V erify that machine and attachments, if any, are in good operating condition. • Do not engage blade until ready to cut sod. OPERATING SAFELY In General • U se extra care when loading or unloading the machine into a trailer or truck. • U se caution when making turns and crossing roads and sidewalks. Stop blade when not cutting sod. • D o not run the engine in an enclosed area where dangerous carbon monoxide fumes can collect. • N ever leave a machine unattended. Always turn off blade and stop engine when leaving the operator position. When leaving the machine be sure the wheel drive clutch is engaged. • Use extreme caution when reversing or pulling machine towards you. Storage Safety • Stop the engine and allow to cool before storing. • Drain the fuel tank outdoors only. • S tore fuel in an approved container in a cool, dry place. • K eep the machine and fuel containers in a locked storage place to prevent tampering and to keep children from playing with them. • D o not store the machine or fuel container near heating appliances with an open flame, such as a water heater, or an appliance with a pilot light. • K eep gasoline storage area free of grass, leaves and excessive grease to reduce fire hazard. • C lean grass and debris from cutting units, drives, mufflers and engine to help prevent fires. SAFETY Starting • S tart according to instructions in this manual or on the machine. • B efore attempting to start the engine, make sure the master clutch is disengaged. • When starting the engine, make sure hands and feet are clear of the blade. • D o not change engine governor settings or overspeed the engine. Operating the engine at excessive speed can increase the hazard of personal injury. Operating On Slopes — if the machine begins to vibrate abnormally: shut off machine immediately. Inspect and make repairs as needed before restarting; — except for repairs or adjustments as specifically noted, such as for carburetor adjustment, where the engine must be running. Keep hands and feet clear of moving parts in these circumstances. • A llow the blade to come to a complete stop when stopping operation to clear blockages, unclog, inspect the machine, do maintenance or repair. • R educe the throttle setting during engine shut-down and, if the engine is provided with a shut-off valve, turn the fuel off at the conclusion of operation. Use Extra Care When Working On Slopes • D o not operate on slopes if uneasy or uncertain. Ultimate responsibility for safe operation on slopes rests with the operator. • Do not operate on steep slopes. • Keep all movement on slopes slow and gradual. • D o not cut sod near drop-offs, ditches or embankments. The machine could suddenly turn over if a wheel runs over the edge or an edge caves in. • D o not turn on slopes unless necessary, and then turn slowly and downhill when possible. • Be sure of your footing on slopes. Interrupting Operation • Before leaving the operator’s position: — Park on level ground. — Disengage the master clutch. — Shut off the engine. • D isengage the master clutch and wait until the blade stops moving then disengage the blade clutch:. — when not cutting sod; — for transport; — when crossing surfaces other than grass. • S top the engine, disengage the master clutch and wait until the blade stops moving: — before refueling; — before making blade adjustment. • S top the engine, disengage the master clutch, and disconnect the spark plug wire(s): — before clearing blockages; — before checking, cleaning or working on the machine; — after striking a foreign object. Inspect the machine for damage and make repairs before restarting; MAINTENANCE SAFETY In general • Maintain machine according to manufacturer’s schedule and instructions for maximum safety and best results. • Park machine on level ground. • Never allow untrained personnel to service machine. • Guards should only be removed by qualified maintenance technician for maintenance/service. Replace when work is complete. • Adjust or repair only after the engine has been stopped and the blade has stopped moving. • Disconnect spark plug wire(s) before doing any maintenance. • Replace parts if worn, damaged or faulty. For best results, always replace with parts recommended by the manufacturer. • Do not dismantle the machine without releasing or restraining forces which may cause parts to move suddenly. • Provide adequate support, e.g. jack stands for lifted machine or parts if working beneath. • Do not put hands or feet near or under rotating parts. • Clean up spilled oil or fuel thoroughly. • Replace faulty mufflers. • To reduce fire hazards, keep the engine, muffler, and fuel storage area free of grass, leaves, debris buildup or grease. Blades ! WARNING The sod cutter blade is sharp and can cut. Use extra caution when handling. Remove obstructions with care. Wrap the blade or wear gloves. • Only replace blade. Never straighten or weld. • Keep other persons away from blades. 5 SAFETY ! Fuel WARNING • Petrol (gasoline) and diesel fuels are flammable; petrol (gasoline) vapors are explosive. Use extra care when handling. • Store only in containers specifically designed for fuel. • When refueling or checking fuel level: • Stop the engine and allow to cool; • When practical, remove petrol (gas) powered equipment from the truck or trailer and refuel it on the ground. If equipment must be refueled on the truck or trailer, refuel from a portable container rather than a dispenser nozzle. • Keep the dispenser nozzle in contact with the rim of the fuel tank or container opening until fueling is complete. Do not use a nozzle lock-open device. Storage Safety • Do not smoke; • Refuel outdoors only; • Stop the engine and allow to cool before storing. • Use a funnel; • Drain the fuel tank outdoors only. • Do not overfill; • S tore fuel in an approved container in a cool, dry place. • If fuel is spilled, do not attempt to start the engine until the spill is cleaned up and vapors have cleared. • Replace caps on fuel containers and tanks securely. Sparks from static electricity can start fires or cause explosions. Flowing fuel can generate static electricity. To prevent static electricity sparks: • Keep fuel containers electrically grounded. Do not fill containers in a vehicle or on a truck or trailer bed with a plastic liner. Fill containers on the ground away from the vehicle. • K eep the machine and fuel containers in a locked storage place to prevent tampering and to keep children from playing with them. • D o not store the machine or fuel container near heating appliances with an open flame, such as a water heater, or an appliance with a pilot light. • K eep gasoline (petrol) storage area free of grass, leaves and excessive grease to reduce fire hazard. • C lean grass and debris from cutting units, drives, mufflers and engine to help prevent fires. LABELS ATTENTION: Read and understand Operator Manual. Replace manual if lost or damaged. ATTENTION: Wear hearing protection and safety glasses. ENGINE THROTTLE CONTROL: Move forward to increase engine speed. Move rearward to decrease engine speed. MASTER CLUTCH: Move lever forward to engage. Move lever rearward to disengage. 6 UNDERGROUND UTILITY HAZARD: Contacting underground utilities may cause leaks, explosions or electrocutions. • Check operation area for underground utilities such as electrical, gas, and water lines. • Do not operate where underground utilities are present. LABELS ROTATING PARTS: Entanglement / Amputation Hazard Do not operate with cover removed. Stop engine before servicing. Moving blades/blade arms cut/crush Hazard Stay clear of blade/blade arms while operating. Stop engine before servicing or adjusting. ATTENTION: • Read Operator Manual before servicing or repairing. • Remove spark plug wire before servicing or repairing. SET-UP To prevent injury, wear appropriate eye protection and stand clear when cutting banding. Banding is under tension and may snap back when cut. 1. Remove crate top, sides and plastic covering unit. Remove the banding attaching the Sodcutter to the pallet. 2. Roll the Sodcutter off the pallet. The unit can also be driven off the pallet, but first read the Safety, Controls, and Operation sections of this manual, then check the oil and add gas. 3. Dispose of pallet, crate, plastic and banding in a responsible manner. 7 MAINTENANCE / STORAGE Storage Instructions ! WARNING To prevent possible explosion or ignition of vaporized fuel, do not store equipment with fuel in tank or carburetor in enclosure with open flame (for example, a furnace or water heater pilot light). Daily Storage 1. Check engine oil level and air filter element daily. 2. Check oil level in gear case. Hydro gear uses 20W50 oil. 2. Start engine and run until all fuel is used from the carburetor float bowl. 3. While engine is warm, check the transmission oil and refill with the proper weight of oil corresponding to the season when the equipment will next be used. 4. Remove the spark plug and squirt a small quantity of engine oil into the cylinder. Turn the engine over a few times to distribute the oil. 5. Lubricate all lubrication fittings. 6. Clean and oil cutting blade to prevent rust. 3. Close fuel valve at bottom of fuel tank. 4. Clean cutting blade (grass, dirt, etc.). Extended Storage Before the equipment is put into storage for any period exceeding 30 days: To put equipment into operation after an extended storage: 1. Fill fuel tank with clean fresh fuel. 2. Check crankcase oil level, and start engine. 3. Check fuel system for fuel leaks. 1. Drain all fuel from fuel tank and lines (use a hose or fuel line, routed from fuel tank shut-off to proper container). INTRODUCTION Measurements Thank You U.S. units of measure are used in this manual. Thank you for purchasing the Classen Model SCHV-18E sod cutter. Serial Numbers Read This Manual Read this manual carefully to learn how to operate sod cutter correctly. Failure to do so could result in personal injury or equipment damage. This manual should be considered a permanent part of your sod cutter and should remain with it if you sell it. Warranty Write frame and engine serial numbers, plus model numbers in “Owners Record” section below. Your dealer needs these numbers when you order parts. The serial number is located on a sticker on the center section of the frame. Directions “Right Hand” and “Left Hand” sides of the sod cutter are determined by facing the back of the sod cutter as you would operate the machine. Refer to back page. OWNER’S RECORD Date Purchased___________________________________________________________________________________ Sod Cutter Model Number__________________________________________________________________________ Sod Cutter Serial Number___________________________________________________________________________ Engine Model Number______________________________________________________________________________ Engine Serial Number______________________________________________________________________________ 8 LISTS PRE-DELIVERY CHECK LIST DELIVERY CHECK LIST Check the following before you deliver the sod cutter to the customer. Review the operators manual with the customer. Explain the following: 1. Guards and shields fastened in place. 1. Schiller Grounds Care, Inc. warranty. 2. Decals fastened and legible. 2. Safe operation and service. 3. Tire pressure. 3. How to use controls. 4. Gas lever on engine turned on. 4. Operating the machine correctly. 5. All eight lubrication points greased. 5. Transporting the sod cutter. 6. 2:1 gearbox oil level. 6. Correct fuel and lubricants. 7. Engine oil level. 7. Daily and periodic inspections. 8. Air cleaner. 8. Changing oil after break-in period. 9. Touch up scratches. 9. Servicing the sod cutter regularly and correctly. 10. Chain tight. 10. Schiller Grounds Care, Inc. parts and service. 11. Engine belt tight. 11. G ive the customer the operators manual and encourage customer to read it. 12. Levers working properly. 13. All controls. DATE DELIVERED __________/__________/__________ 14. Add fuel, start engine, test run. DATE SET UP __________/__________/__________ SIGNATURE ___________________________________ NOTES:_______________________________________________________________________________ _____________________________________________________________________________________ _____________________________________________________________________________________ _____________________________________________________________________________________ _____________________________________________________________________________________ _____________________________________________________________________________________ _____________________________________________________________________________________ _____________________________________________________________________________________ _____________________________________________________________________________________ _____________________________________________________________________________________ _____________________________________________________________________________________ _____________________________________________________________________________________ _____________________________________________________________________________________ _____________________________________________________________________________________ 9 OPERATION ! PRE-OPERATION CHECK LIST (operator’s responsibility) • R eview and follow all safety rules and safety decal instructions. • C heck that all safety decals are installed and in good condition. Replace if damaged. • C heck to make sure all shields and guards are properly installed and in good condition. • C heck that all hardware is properly installed and secured. • C heck to be sure engine is free of dirt and debris. Pay particular attention to the cooling fins, governor parts and muffler. Clean air intake screen. Check air cleaner; service is necessary. • Inspect area. Remove stones or other hard objects that might cause damage. • C heck that there are no underground utilities in work area. • C heck all lubrication points and grease as instructed in manual. • P erform a functional check of the safety interlock system each time you operate the unit. If it doesn’t work, repair before using the machine. WARNING Petrol (gasoline) is extremely flammable and highly explosive under certain conditions. BE SURE to install fuel cap after refueling. Fill fuel tank with good quality, clean, unleaded regular gasoline to the level recommended by the engine manufacturer. To Check or Add Fuel: • Use a funnel to avoid spilling. • Do it outdoors. • Do not smoke. • Stop the engine; allow to cool. • Do not overfill. • Clean up spilled fuel. SAFETY Operate Safely Carefully read this manual and operate sod cutter correctly. ! WARNING ALL GUARDS MUST BE IN PLACE WHILE MACHINE IS IN OPERATION. ! Protect Children WARNING KEEP HANDS AND FEET AWAY FROM MOVING PARTS. Keep children and pets out of the area where you are cutting sod. Avoid Tipping Make sure you do not get too close to sharp drop-offs to avoid tipping sod cutter over. READ SAFETY SIGNS Operate Safely On Slopes Carefully read and follow caution stickers. You may cut sod any direction on slopes, however, make sure you do this carefully. Cutting on slopes can be dangerous. To avoid any accidents, make sure to leave yourself room to correct the problem if one arises. Always park your sod cutter on level ground. BEFORE STARTING THE ENGINE 1. B e familiar with the controls, how each functions, and what each operates. 2. C heck engine oil level. Add oil if necessary, following the engine manufacturer’s recommendations. Refer to engine manual supplied with machine. 3. Open the fuel valve. 4. F ill the fuel tank with the amount and type of fuel recommended by the engine manufacturer. Practice Safe Maintenance Keep all machine parts in good condition and fastened in place. Fix damages immediately. Replace worn or broken parts. Whenever you work on the sod cutter, disconnect spark plug wire. Start Engine Safely Make sure hands and feet are out of the way of moving parts when starting engine. 10 OPERATION ! Starting Engine WARNING When replacement parts are required, use genuine Schiller Grounds Care, Inc. parts or parts with equivalent characteristics, including type, strength and material. Failure to do so may result in product malfunction and possible injury to the operator and/or bystanders. Carbon monoxide present in the exhaust is an odorless and deadly gas. Never start or run the engine inside where exhaust fumes can collect. 1. Turn fuel cock to the “open” position. 2. Turn choke on (closed). 3. Turn ignition switch to “on”. 4. Move throttle lever on engine to half throttle position. 5. Pull recoil starter rope until engine starts. 6. After engine is warm, turn off choke (open). 7. Allow engine to run one minute before cutting sod. 8. C heck engine rpm setting before operating. DO NOT exceed 3600 rpm. Stopping Engine Provide enough fresh air to keep fumes from getting too strong. Replace any warning decal that becomes illegible immediately. 1. Turn throttle to “slow” position. ENGINE STARTING PROCEDURES OPERATING THE SOD CUTTER NOTICE: There are two locations on this engine that require oil, both the crankcase and the transmission (gearbox). Running the engine or gearbox with a low oil level can cause engine damage. Refer to the engine manual for complete engine information and recommendations. Engine Oil Level Check 1. BEFORE CHECKING ENGINE: • make certain the engine is level 2. Turn off ignition switch. Preparation 1. P olice lawn area for obstacles and debris (i.e. sprinklers, hoses, toys, etc.). Remove all items. 2. M ake sure underground sprinkler heads and other hidden obstacles are marked to prevent damage. 3. M ark other areas where sod cutting will be a problem or too risky (i.e. mud, tree roots, steep hills). • the engine switch is in the OFF position Operating • the sod cutter blade is NOT engaged 1. Start the engine. CAUTION: To avoid injury, do not place your feet or other body parts under the blade while starting the engine. • the drive wheels are disengaged. 2. Remove the filler cap/dipstick and wipe it clean. 3. Insert and remove the dipstick without screwing it into the filler neck. Check the oil level shown on the dipstick. 4. If the oil level is low, fill to the edge of the oil filler hole with the recommended oil. SAE 10W-30 is recommended for general use. Refer to engine oil recommendations in engine manual for other viscosities and information. 2. Select the correct cutting depth desired up to 2 1/2 inches. Loosen the tee handle from the depth gauge plate, located under the height adjustment bar, (#3 on illustration) and put it to the correct height setting. Tighten the tee handle. 5. Screw in the filler cap/dipstick securely. 3. Push the wheel drive transport handle (#5 on illustration) and the cutter blade speed handle (#4 on illustration) to the desired speed, toward the engine. Transmission Oil Level Check 4. Raise the main handle upward so the front nose of the sod cutter rests on the ground. 1. Check the transmission oil level with the engine stopped and in a level position. 2. Remove the filler cap/dipstick and wipe it clean. 3. Insert and remove the dipstick without screwing it into the filler hole. Check the oil level shown on the dipstick. 4. If the oil level is low, add oil to reach the upper limit mark on the dipstick. Use the same oil that is recommended for the engine, SAE 10W-30. 5. Screw in the filler cap/dipstick securely. 5. Loosen the 1/2” handle nut (#2 on illustration) and lower the height adjustment bar to rest on the depth gauge. Now tighten the 1/2” handle nut securely so it will not loosen with the vibration of the machine. 6. Go to the back of the machine and lower the handle until the cutting blade rests on the ground. You are now ready to cut sod. 7. T urn the throttle to the desired operating speed by pulling the finger throttle control (#6 on illustration) toward you. Maximum engine rpm is recommended for smooth operation. 11 OPERATION 8. A fter cutting a short distance, stop machine by letting the finger throttle control go back to its original position. Check thickness of cut and adjust if necessary. GENERAL MAINTENANCE 9. A t the end of each cutting pass, lift up on the handle bar to clear the cutting blade from the sod. Retard the throttle control and turn machine around into the position for the next cut. the following: 10. W hen finished cutting sod, reverse steps 6 through 3, leaving the wheel drive handle on for transportation. ! To keep the sod cutter in good operating condition, perform •Keep blade sharp; a sharp blade cuts cleaner, faster and more uniformly and places less load on the machine. Sharpen cutting edge on bevel or top side only. •Keep drive belt at proper tension and free of oil and dirt at all times. •Check engine oil level and air filter element daily. WARNING BLADE SHARPENING – Wear the appropriate personal protective equipment when sharpening blades. Use correct tools for sharpening or when servicing machine. •Check for loose bolts and connections. •All grease fittings are pressurized type. Use a good grade Lithium Base Grease or equivalent. Grease eccentric arms sparingly every 4 hours of service, all others daily. Wipe off all grease fittings before and after each greasing (there are a total of 8 grease fittings). •To make sure the chain on the front drive wheels is tight, you will need to remove the chain guard to check this. If tightening is required, loosen nuts and bolts on the 3/4” pillow block bearings and push the bearings toward the back of the sod cutter until chain is tight. Make sure both bearings go back evenly to keep jackshaft running even with the frame. After doing this, retighten nuts and bolts on the bearing and replace the chain guard. •Engine (refer to Honda owner’s manual). ! SAFETY WARNING DO NOT STORE GASOLINE (PETROL) UNNECESSARILY OVER LONG PERIODS OF TIME. TO PREVENT POSSIBLE EXPLOSION, STORE ONLY IN AN APPROVED “SAFE” CONTAINER. TO PREVENT EXPLOSION OF VAPORIZED FUEL, DO NOT STORE MACHINE WITH FUEL IN TANK OR CARBURETOR IN AN ENCLOSURE WITH OPEN FLAME. (EXAMPLE: FURNACE OR WATER HEATER PILOT LIGHT.) 12 TROUBLESHOOTING CHART Only on Gear Drive Models PROBLEM CAUSE REMEDY Blade will not stay in ground replaced a. Bottom of blade is rounded off a. Blade should be sharpened or Belts jump off a. Wrong type of belt b. Pulley misalignment a. Use only the special factory belt b. Realign pulley NOTES:____________________________________________________________________________________________ __________________________________________________________________________________________________ __________________________________________________________________________________________________ __________________________________________________________________________________________________ __________________________________________________________________________________________________ __________________________________________________________________________________________________ 13 SPECIFICATIONS SELF-PROPELLED WALK-BEHIND SOD CUTTER SCHV-18/8.0E - S/N: SV188E00101 & UP ENGINE Model.................................................... 4 cycle 8 H. P. Honda Model GX270 9.9 cu. in. (163 cc) Starter........................................................................... Recoil Governor.............................. 3600 RPM ± 100 RPM, no load Clutch.................................. spring loaded belt tightener type REDUCTION Engine to blade......................................................... 3.03 to1 Engine to drive wheels............................................. 57.2 to 1 WHEELS: Drive............................................ 8” (203 mm) Dia. w/knobby tread vulcanized to hub Rear................. 8 x 1.75 (203 X 45mm) semi-pneumatic tires CUTTING WIDTH: SCHV-18E......................................................................... 18” GEAR CASE Lubrication..................................................EP 140 Gear lube Capacity.........................................................31/2Pints(1.7L) Cutting depth......................................................up to 2-1/2” Blade speed....................... 1188 RPM @ 3600 engine RPM DIMENSIONS Width................................................................................. 23” Length............................................................................... 59” Height................................................................................ 35” Wheel Base....................................................................... 22” WEIGHT Dry Weights SCHV-18/8E............................................................. 355* Ibs. * Add 12 Ibs. to each above weight for CE Guards 14 EC DECLARATION OF CONFORMITY EC Declaration of Conformity The Undersigned Manufacturer: Schiller Grounds Care, Inc. 1401 Logan Street Norfolk, NE 68701 Chuck Clark Director of Operations Date: July 12, 2012 EU Authorized Representative: Earlsmere Limited Unit 18 Valley Road Station Road Industrial Estate Wombwell, Barnsley, South Yorkshire, S73 OBS UK Jim White Managing Director Date: July 12, 2012 Declare that the machine described below: Make & Type…………………………………… Classen Hydro Sod Cutter Category…………………………………………Hydro Sod Cutter Series…………………………………………….SCHV 18/8 Engine……………………………………………Honda GX270 Speed…………………………………………….High idle governor setting 3600 rpm ±100rpm Net installed power……………………………..6.3KW (8 HP) Complies with the provisions of the following European directives and Amendments and the Regulations transposing it into national law. Machinery Directive………………………………….. 2006/42/EC EMC Directive………………………………………….2004/108/EC Noise in the Environment Directive………………….2000/14/EC (Annex V) Vibration Directive……………………………………..2002/44/EC Non Road Emissions………………………………….2002/88/EC Sound: Sound levels were determined in accordance with Directives 2000/14/EC (Annex V)and 2006/42/EC. Guaranteed Sound Power Level.............................105 dB Sound Pressure...................................................... 89 dB Vibration: Hand/arm vibration was measured at the right and left operator handles per ISO 5349-1-2001 and ISO 5349-2-2001. Levels were calculated using ISO/DIS 5395-1, in accordance with 2002/44/EC. Only the highest of the left and right readings is given. Guaranteed Vibration Level....................................10.2 m/s² Intended Use and Limits: This machine is for cutting sod in grass areas grown for the purpose of harvesting sod, and general sod removal. It is intended for use on fiat areas and small slopes. Loss of control may result on steeper slopes. It is not intended for use in rocky areas. P/N C800045 REV A Schiller Grounds Care, Inc. 1028 Street Road • Southampton, PA 18966 Telephone: 1-800-366-6268 TWO YEAR LIMITED WARRANTY Effective April 1, 2007 For the period of two years from the date of purchase, SCHILLER GROUNDS CARE, INC. will repair or replace for the original purchaser free of charge, any part or parts found upon the examination of our factory authorized service station, or by the factory in Norfolk, Nebraska, to be defective in material or workmanship. All transportation charges on parts submitted for repair or replacement under this warranty shall be borne by the purchaser. This warranty does not include engines or engine parts, tires, batteries, or gearboxes that are covered under separate warranties furnished by their manufacturer or supplier, nor does it include normal maintenance parts, including but not limited to, spark plugs, points, filters, blades, and lubricants. All service under this warranty will be furnished or performed by our factory authorized service stations. There is no other expressed warranty. Implied warranties, including those of merchantability and fitness for a particular purpose, are limited to two years from the date of purchase and to the extent permitted by law, any and all implied warranties are excluded. The above remedy of repair and replacement of defective parts is the purchaser’s exclusive remedy for any defect, malfunction or breach of warranty. Liability for incidental or consequential damages under any and all warranties is excluded to the extent permitted by law. NORMAL RESPONSIBILITIES OF THE SELLER AND THE USER 1.The Distributor or Dealer is responsible for the proper assembly and preparation of the product for delivery to the end user. 2. The User is responsible for reading the Manual and Instructions. 3. The User is responsible for proper operation and maintenance as described in the manual. 4. The User is responsible for the replacement of wear items such as blades, belts, tires, batteries, etc. 5. The User is responsible for damage due to improper operation and maintenance, as well as abuse. All claims must be received by the factory 30 days after the end of the warranty period to receive warranty consideration. © 2010 Schiller Grounds Care, Inc. All Rights Reserved. 02/11 See the complete line of Turf Care Products from COMPACT AERATORS TURF SEEDERS CA-18H CA-18B TS-20H TS-20B TSS-20H TSS-20B STAND ON AERATOR SA-25 TRAILERS SPLIT DRIVE AERATORS AST TA-25D TA-17D TURF RAKES TURF AERATORS TA-19D TA-19B TA-26D RECIPROCATING AERATORS TR-20H TR-20B TRS-20H TRS-20B TR-20RH TR-20RB RA-21H RA-21B RAS-21H RAS-21B SOD CUTTERS TOW/3PT AERATORS HYDRO-DRIVE SOD CUTTERS 48RT 60RT SC-18/5.5 SC-18/8.0 SCHV-18/5.5 SCHV-18/8.0 Classen reserves the right to make changes or add improvements to its products at any time without incurring any obligation to make such changes to products manufactured previously. Classen, or its distributors and dealers, accept no responsibility for variations which may be evident in the actual specifications of its products and the statements and descriptions contained in this publication. © 2007 Schiller Grounds Care, Inc. 02/2011