1
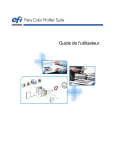
IMPORTANT SAFETY
INSTRUCTIONS READ CAREFULLY!
Read Instructions: All safety and operating instructions should be read before
the product is operated.
Retain instructions: Safety and operating instructions should be retained for
future reference.
Heed Warnings: All warnings on the product & operation instructions should
be adhered to.
Follow Instructions: All operating and use instructions should be followed.
INTRODUCTION
Congratulations on your purchase of Mirage Speaker Systems products! Proprietary
technology and high quality manufacturing will allow you to enjoy the most natural and
accurate music reproduction for many years. The advice offered in this manual is aimed at
helping you maximize and maintain peak performance, and therefore, your listening
satisfaction. Please take the time to read all of the instructions contained in this manual to
make certain your system is properly installed and functioning correctly.
LIMITED WARRANTY POLICY
WARRANTY FOR UNITED STATES AND CANADA
(SEE BACK COVER)
WARRANTY OUTSIDE OF THE UNITED STATES AND CANADA:
Product warranties may be legislated differently from one country to another. Ask
your local dealer for details of the LIMITED WARRANTY applicable in your country.
NOTE: Please retain the carton and packing material for your Mirage Speaker
Systems products to protect them in the event of a move or if they need to
be shipped to a service center. Product received damaged by a service center
that has been shipped by the end user in other than the original packaging
will be repaired, refurbished and properly packaged for return shipment at
the end user's expense.
CONTENT
BREAK-IN PERIOD
We strongly advise that you resist the temptation to play your Mirage Speaker Systems
speakers to their full capabilities until they have been properly broken in. This process
should last approximately 50 to 100 hours of music playback. This can be easily be done
by putting your compact disc player on Repeat mode, while playing a CD with awide
dynamic range at average room volume listening levels.
AMPLIFIER REQUIREMENTS
All Mirage speakers are designed to be extremely efficient. All models are designed to be
8-ohm compatible allowing playback on almost any amplifier or receiver on the market.
Most amplifiers with apower rating of 20-100 watts per channel will effectively operate
your Mirage speakers.
Warning: If an amplifier or receiver is over-driven, the resulting distortion is
actually many times greater than its rated power. Over-driven amplifier
distortion is called "Clipping", easily identified by its fuzzy, distorted sound,
and can damage any speaker. The volume control of most amplifiers and
receivers is a logarithmic type, which means that full power may be reached
with the volume control set at as little as the halfway point. Operating the
loudness, treble, or bass controls increases power output well beyond rated
levels. The warranty on your speakers is therefore void if the voice coils are
burned or damaged as a result of overpowering or clipping.
OMNICAN Speaker
/
------------- .. --
-.----
\
!
\
\
!
\
/
Hole cut-out Template
Grille Removal Tool
----------.-----------------------------------------T----------------------------------------------------
Manual
2
OMNICAN Grille
·····································--·--·········-t-.------------------
PRODUCI' / HOLE CUT-OUT DIMENSIONS
HOLE CUT-OUT DIMENSIONS:
PRODUCT DIMENSIONS:
"\
/
/
I---
~]IJf)~mm
\
/
OC-65 without back-box
-------------------------------------------------
--)
\
/
\
/
'OC-65 with back-box
"\
/
I--- R11'll~lmm
-.l
I
\
-----_._--------_._--------------------------------~--
/
/
OC-65
OC-55
----------------------------------------------------.----------------------------------------------------
9.<J"ID9.6IJmm
'-
/"
1.6·/~.6Omm
/
"\
/
I--- l.(\)ll'/l&mm - . l
\
I
/
\
/
OC-55 with back-box
OC-55 without back-box
OC-45
----------------------------------------------------------------------------------------------.--------
i
PAINTING THE GRILLE AND THE BEZEL
If you wish, you can paint the grille and the visible frame of the OMNICAN to match the
decor and design of your home. Please take precautions to avoid any paint coming into
contact with the woofer cone, the tweeter, or the OMNIGUIDE module as this could
damage thE: speaker. Follow these simple steps to paint the speaker:
1) Separate the grille from the speaker.
6.69"1175mm
OC-45
,
i
2) The separated grille can now be painted on its own.
3)
In order to paint the bezel, you should construct aprotective cylindrical cover to slide
between the frame and the speaker (into the area where the grille is usually affixed), This
protective cover can be created by overlapping the ends of apiece of paper approximately
16-inches (40cms) long.
4) After the protective cover is set in place, paint the frame, and then remove the protective
cover when the paint is dry.
NOTE: Please do not paint the black components which are hidden
underneath the grille. as they can easily be damaged. These components
would also become more visible underneath the grille when painted a
lighter color. If any holes in the grille become filled with paint. find a small
sharp tool and carefully remove the paint before completing the installation.
3
PLACEMENT / POSITIONING OPTIONS
The OMNICAN is the most unique in-ceiling speaker developed to date. Featuring Mirage's
exclusive OMNIPOLAR technology and other patent pending technological advancements,
the OMNICAN creates an unprecedented spacious soundfield. The OMNICAN distributes
sound evenly into the room, hence allowing for greater coverage and smoother blending
between speakers.
In order to achieve the best results from your new OMNICAN speaker system, it is
important to understand the fundamentals of the technology behind it. Mirage's
proprietary OMNIGUIDE module is used to reflect sound in a life-like 360 degree
dispersion pattern. It is angled to allow the OMNICAN speakers to create a slightly
forward biased soundfield. This means that a larger proportion 6f sound is directed
towards aspecific area. An arrow on the OMNIGUIDE tweeter reflector indicates this
direction. The OMNIGUIDE module can be rotated up to a maximum of 250 degrees to
simplify the fine-tuning process. The speakers will ship with the OMNIGUIDE module
oriented in the center position allowing a rotation of 125 degrees in either direction. This
center position is marked with asmall sticker on the front baffle allowing you to easily
find the center position if the OMNIGUIDE module has shifted during shipping or
installation. For further information please refer to diagram 1.
Depending on whether you are trying to create adiffused or more directional soundfield
there are two general guidelines to follow:
Diffused Soundfield: Mount the OMNICANs with the arrow on the OMNIGUIDE module
pointed towards the side or rear walls, away from the main listening area. This orientation
is particularly suited for surround sound and distributed audio applications.
Directional Soundfield: Mount the OMNICANs with the arrow on the OMNIGUIDE module
pointed towards the main listening area. This orientation is particularly suited for front
speaker applications (left, center, right) or when the OMNICANs are mounted in very large
rooms with the speakers being fairly far apart from one another.
NOTE: Additional information and tips on how to further fine-tune your
OMNICAN series speaker system can be found at
www.miragespeakers.com/v2
INSTALLATION INSTRUCTIONS
NOTE: If you are unable to install the speakers yourself, please contact an
authorized installation contractor, or your authorized Mirage Speaker
Systems retailer. Caution: Turn off all power in your audio/video system
before proceeding with your installation. Not doing so could result in
potential damage to the system.
INSTALLATION - STEP BY STEP
1) Decide on the placement of your speakers. Advanced planning in regards to the placement
of your speakers is critical. In general we recommend leaving approximately 18-24 inches
(45-60cm) of space between the speaker and the walls of the room. Please refer to the
Placement section for further information. The mounting location must be void of wall
studs or bracing. Adequate depth for the speaker to fit flush to the ceiling surface is
important.
2) Once you have determined the speaker's final mounting position, use the supplied
template and mark the cut-out on the ceiling. To mark the cut-out size, simply trace an
outline of the supplied template. (Diagram 3)
3)
Using the appropriate wall-cutting tool, accurately cut the hole into the ceiling.
(Diagram 4)
4)
Insert the speaker cable(s) from the receiver or amplifier into the wall or ceiling, and leave
enough slack in the wire so that it can hang out from the hole and allow the OMNICAN to
rotate if necessary (Diagram 5). Using the appropriate wire is essential, as your local
municipality may have certain wiring codes that must be maintained.
5)
Connect the speaker wire from the positive (RED +) terminal on the receiver to the
positive (RED+) terminal on the speaker. Connect the negative (BLACK-) terminal on the
receiver to the negative (BLACK-) terminal on the speaker. To connect the wire to the
speaker, completely push the appropriate terminal in, and insert the wire through the hole
that appears on the terminal. Release the terminal and the internal springs will hold the
wire in place. Repeat for the other terminal. NOTE: If you inadvertently reverse one of the
connections (i.e., red to black), you will notice asevere lack of bass from your system. This
is called wiring the system "Out of Phase". If this occurs, check the wiring and re-connect
as necessary. (Diagram 6)
6)
Do not pick the speaker up by the tweeter, as the Pure Titanium Hybrid Tweeter can easily
be damaged if this is done. Instead, use the frame of the speaker to hold it in place.
7)
Insert the entire speaker into the hole (Diagram 7). Rotate the OMNICAN into the desired
direction and using aPhilips screwdriver, tighten the screws attached to the dog clamps
until firm. DO NOT OVERTIGHTEN (Diagram 8and 9)
Diagram 2 shows an example of how a 5.1 home theater system could be set-up. The
circles in the diagram illustrate the direction of the sound.
If you are uncertain about the placement of the OMNICANs, you can conduct (Ivery
simple experiment to develop a better understanding of how the speakers may perform in
your room. Place the OMNICANs on the floor with the speaker and OMNIGUIDE module
facing upwards in approximately the same location as they would be when mounted in
the ceiling. Connect the speakers to a receiver (see INSTALLATION INSTRUCTIONS below)
and listen to some familiar music and/or movie tracks. You may want to listen to the
speakers while standing upright in order to increase the distance between your ea, level
and the speakers. The idea behind this is to simulate the distance between the ear-level in
your normal seating position and the speakers when mounted to the ceiling. Experiment
with some alternative placements and OMNIGUIDE rotations to get afeel for how the
OMNICANs perform in different positions. Even though this experiment is not 100%
accurate it can offer some valuable insights with regards to how the speakers may
perform in your specific room.
It is important to note that no matter how the OMNICAN is mounted; it will achieve great
performance. The above should be seen as avery general guideline on how to fine-tune
the system, and how to cope with unusually shaped rooms. We highly recommend
experimenting with different angles in order to find the perfect set-up for your room and
to enjoy the tremendous versatility of the OMNICAN series.'
4
8) Carefully remove the plastic cover that protects the Pure Titanium Hybrid Tweeter. Play
(break-in) the speakers for afew hours at normal listening levels and then experiment by
rotating the OMNIGUIDE module to determine the ideal position. Since the soundfield
created by an OMNICAN speaker is very uniform, only subtle changes in sound may be
perceived. Do not proceed with the next step until you are satisfied with the orientation of
the OMNIGUIDE, as removing the grille of the speaker can be abit tricky. (Diagram 10)
9) To reattach the grille to the speaker, work in acircular fashion, gradually fitting the grille
into the bezel. (Diagram 11)
10) In order to rotate the speaker at alater point in time, take off the grille, slightly loosen the
four screws, and rotate the OMNICAN into the desired direction.
NOTE: The OC-55 and OC-65 back-boxes can be removed if space is limited in
your installation. Asecond set of binding posts is included inside the
enclosure to allow the speakers to be easily connected. Remove the four
screws located on the back of the enclosure and follow the installation
instructions as per the above. (Diagram 12)
OUTDOOR / HIGH HUMIDITY USE:
The OMNICAN series speakers are weather resistant and can be used for under eave
mounting and in environments with relatively high humidity, such as bathrooms. However,
the below guidelines should be followed in order to ensure a long life expectancy for your
speakers:
•
When used outdoors, do not mount the speakers with the tweeter module facing upwards,
as rain could get into the speakers and damage internal components
•
Do not use speakers in very harsh conditions, such as on yachts, steam saunas or in areas
exposed to extreme heat. If in doubt about your specific application, please consult your
Mirage retailer for further information.
•
When used without aback-box, ensure that the area behind the speaker is protected from
direct water exposure (i.e. do not mount the speakers under an eave when you may have
aleaking rooD
5
IT]
~
=
rl
rr
n ~
l
11
~-: ~--~~--:
IIIIIIIIIIIIIIIIIIIIIIIIIIIIIHI - - - - - -
-~ :
6C'9':
I
I
I~
38
i
~
I~
39
-
-~-,
y
......
·"li.!" .
40
~.·1
diagrams
41
WARRANTY
GARANTIE
LIMITED WARRANTY POLICY
IN THE UNITED STATES AND CANADA
GARANTIE AUX
ETATS-UNIS ET AU CANADA
MIRAGE® warrants this product to the retail purchaser against
any failure resulting from original manufacturing defects in workmanship or
materials. The warranty is in effect for a period of: Passive Speakers: five (5) years,
Powered Subwoofers including the speaker - one (1) year from date of purchase from
an authorized MIRAGE® dealer and is valid only if the original dated bill of sale is
presented when service is required.
La societe MIRAGE® garantit cet appareil contre toute defectuosite attribuable aux
pieces d'origine et ala maind'oeuvre. Cette garantie est valide pendant une periode
de cinq (5) ans (enceinte passif) et de un (1) an (extremes-graves) a partir de la date
d'achat aupres d'un revendeur MIRAGE® agree; la garantie ne sera honoree que
sur presentation d'une piece justificative de la date d'achat.
The warranty does not cover damage caused during shipment, by accident, misuse,
abuse, neglect, unauthorized product modification, failure to follow the instructions
outlined in the owner's manual, failure to perform routine maintenance, damage
resulting from unauthorized repairs or claims based upon misrepresentations of the
warranty by the seller.
La garantie ne couvre aucun dommage subi pendant Ie transport ou imputable a un
accident, a une utilisation impropre ou abusive, a la negligence, a une modification
non autorisee, a la non-observance des instructions decrites dans Ie manuel de
I'utilisateur ou des directives d'entretien, ni aucun dommage subi par suite de
reparations non autorisees ou de reclamations fondees sur une mauvaise
interpretation des conditions de la presente garantie par Ie revendeur.
WARRANTY SERVICE
SERVICE SOUS GARANTIE
If you require service for your MIRAGE® Speaker Systems speaker(s) at any time
during the warranty period, please contact:
Dans I'eventualite ou une reparation deviendrait necessaire pendant la periode de
couverture de la garantie, communiquez avec:
1)
the dealer from whom you purchased the product(s), or
1)
Ie revendeur au pres de qui I'appareil a ete achete, ou
2)
MIRAGE® Speaker Systems SERVICE - Tel: 1 (866) 441-8208.
2)
Service MIRAGE® Speaker Systems - Tel.: 1 (866) 441-8208.
3)
Additional service centers can be found by checking the MIRAGE® Speaker
Systems website: www.mirage-speakers.com.
3)
You will be responsible for transporting the speakers in adequate packaging to
protect them from damage in transit and for the shipping costs to an authorized
MIRAGE® Speaker Systems service center or to MIRAGE® Speaker Systems. If the
product is returned for repair to MIRAGE® Speaker Systems the costs of the return
shipment to you will be paid by MIRAGE® Speaker Systems, provided the repairs
concerned fall within the Limited Warranty. The MIRAGE® Speaker Systems Warranty
is limited to repair or replacement of MIRAGE® Speaker Systems products. It does
not cover any incidental or consequential damage of any kind. If the provisions in
any advertisement, packing cartons or literature differ from those specified in this
warranty, the terms of the Limited Warranty prevail.
-
Pour connaltre I'adresse de tous nos centres de service, consultez Ie site web
d'MIRAGE® Speaker Systems a www.mirage-speakers.com.
Le proprietaire de I'appareil est responsable de son emballage et de tous frais
d'expedition a un centre de service MIRAGE® Speaker Systems agree. Si I'appareil
est expedie a MIRAGE® Speaker Systems aux fins de reparation, les frais de
reexpedition seront assumes par MIRAGE® Speaker Systems a la condition que les
reparations effectuees soient couvertes par la garantie. La garantie est limitee a la
reparation ou au remplacement des appareils fabriques et distribues par MIRAGE®
Speaker Systems. Elle ne couvre aucun dommage indirect ou consecutif de quelque
nature que ce soil. Si les conditions accompagnant toute publicite, emballage ou
documentation divergent de celles de la presente garantie, les conditions de la
presente garantie prevaudront.