1
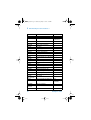
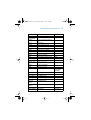
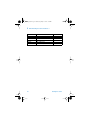
cleaning.book Page 1 Wednesday, May 22, 2002 5:16 PM
Cleaning
Procedures for
Lightwave Test and
Measurement
Equipment
Pocket Guide
Agilent Technologies
cleaning.book Page 2 Wednesday, May 22, 2002 5:16 PM
Notices
© 2002 Agilent Technologies, Inc.
No part of this manual may be reproduced
in any form or by any means (including
electronic storage and retrieval or translation into a foreign language) without prior
agreement and written consent from Agilent Technologies, Inc. as governed by
United States and international copyright
laws.
Manual Part Number
N3900-90A5J1
Edition
First Edition, May 2002
Printed in Germany
Agilent Technologies Deutschland GmbH
Herrenberger Str. 130
71034 Boeblingen
Germany
Warranty
The material contained in this document
is provided “as is,” and is subject to
being changed without notice in future
editions. Further, to the maximum extent
permitted by applicable law, Agilent
Technologies disclaims all warranties of
merchantability and fitness for a particular purpose. Agilent Technologies shall
not be liable for errors or for incidental or
consequential damages in connection
with the furnishing, use, or performance
of this document or of any of the products
to which it pertains. Should Agilent Technologies have a written contract with the
user and should any of the contract terms
conflict with these tersm the contract
terms shall control.
Technology Licenses
The hardware and/or software described
in this document are furnished under a
license and may be used or copied only in
accordance with the terms of such license.
Restricted Rights Legend
If software is for use in the performance of
a U.S. Government prime contract or subcontract, Software is delivered and
licensed as “Commercial computer software” as defined in DFAR 252.227-7014
(June 1995), or as a “commercial item” as
defined in FAR 2.101(a) or as “Restricted
computer software” as defined in FAR
52.227-19 (June 1987) or any equivalent
agency regulation or contract clause. Use,
duplication or disclosure of Software is
subject to Agilent Technologies’ standard
commercial license terms, and non-DOD
Departments and Agencies of the U.S.
Government will receive no greater than
Restricted Rights as defined in FAR
52.227-19(c)(1-2) (June 1987). U.S. Government users will receive no greater than
Limited Rights as defined in FAR 52.227-14
(June 1987) or DFAR 252.227-7015 (b)(2)
(November 1995), as applicable in any
technical data.
2
cleaning.book Page 3 Wednesday, May 22, 2002 5:16 PM
WA R NI NG
CA U TI ON
3
A WARNING notice denotes a hazard. It calls attention to
an operating procedure, practice, or the like that, if not
correctly performed or adhered to, could result in
personal injury or death. Do not proceed beyond a
WARNING notice until the indicated conditions are fully
understood and met.
A CAUTION notice denotes a hazard. It calls attention to an
operating procedure, practice, or the like that, if not correctly performed or adhered to, could result in damage to
the product or loss of important data. Do not proceed
beyond a CAUTION notice until the indicated conditions
are fully understood and met.
cleaning.book Page 4 Wednesday, May 22, 2002 5:16 PM
4
cleaning.book Page 5 Wednesday, May 22, 2002 5:16 PM
Cleaning Procedures for Lightwave Test and
Measurement Equipment Pocket Guide
1
Cleaning Procedures for
Lightwave Test and
Measurement Equipment
Safety Precautions 6
Agilent Technologies
5
cleaning.book Page 6 Wednesday, May 22, 2002 5:16 PM
1
Cleaning Procedures for Lightwave Test and Measurement
Safety Precautions
The following Cleaning Instructions contain some general
safety precautions, which must be observed during all phases
of cleaning. Consult your specific optical device manuals or
guides for full information on safety matters.
Please try, whenever possible, to use physically contacting
connectors, and dry connections. Clean the connectors, interfaces, and bushings carefully after use.
If you are unsure of the correct cleaning procedure for your
optical device, we recommend that you first try cleaning a
dummy or test device.
Agilent Technologies assumes no liability for the customer's
failure to comply with these requirements.
NOT E
Please follow the following safety rules.
Do not remove instrument covers when operating.
Ensure that the instrument is switched off throughout the
cleaning procedures.
Use of controls or adjustments or performance of procedures
other than those specified may result in hazardous radiation
exposure.
Make sure that you disable all sources when you are cleaning
any optical interfaces.
Under no circumstances look into the end of an optical device
attached to optical outputs when the device is operational. The
laser radiation is not visible to the human eye, but it can seriously damage your eyesight.
To prevent electrical shock, disconnect the instrument from
the mains before cleaning. Use a dry cloth, or one slightly
dampened with water, to clean the external case parts. Do not
attempt to clean internally.
Do not install parts or perform any unauthorized modification
to optical devices.
Refer servicing only to qualified and authorized personnel.
6
Cleaning Procedures
cleaning.book Page 7 Wednesday, May 22, 2002 5:16 PM
Cleaning Procedures for Lightwave Test and Measurement
Cleaning Procedures
7
cleaning.book Page 8 Wednesday, May 22, 2002 5:16 PM
1
8
Cleaning Procedures for Lightwave Test and Measurement
Cleaning Procedures
cleaning.book Page 9 Wednesday, May 22, 2002 5:16 PM
Cleaning Procedures for Lightwave Test and
Measurement Equipment Pocket Guide
2
Why is it important to
clean optical devices ?
In transmission links optical fiber cores are about 9 µm
(0.00035”) in diameter. Dust and other particles, however, can
range from tenths to hundredths of microns in diameter. Their
comparative size means that they can cover a part of the end
of a fiber core, and thus degrade the transmission quality. This
will reduce the performance of your system.
Furthermore, the power density may burn dust into the fiber
and cause additional damage (for example, 0 dBm optical
power in a single mode fiber causes a power density of approximately 16 million W/m2). If this happens, measurements
become inaccurate and non-repeatable.
Cleaning is, therefore, an essential yet difficult task. Unfortunately, when comparing most published cleaning recommendations, you will discover that they contain several
inconsistencies. In this pocket guide, we want to suggest
ways to help you clean your various optical devices, and thus
significantly improve the accuracy and repeatability of your
lightwave measurements.
Agilent Technologies
9
cleaning.book Page 10 Wednesday, May 22, 2002 5:16 PM
2
10
Why is it important to clean optical devices ?
Cleaning Procedures
cleaning.book Page 11 Wednesday, May 22, 2002 5:16 PM
Cleaning Procedures for Lightwave Test and
Measurement Equipment Pocket Guide
3
What materials do I need
for proper cleaning?
Standard Cleaning Equipment on page 12
Additional Cleaning Equipment on page 16
Agilent Technologies
11
cleaning.book Page 12 Wednesday, May 22, 2002 5:16 PM
3
What materials do I need for proper cleaning?
Standard Cleaning Equipment
Before you can start your cleaning procedure you need the following standard equipment:
• Dust and shutter caps
• Isopropyl alcohol
• Cotton swabs
• Soft tissues
• Pipe cleaner
• Compressed air
Dust and shutter caps
All Agilent Technologies lightwave instruments
are delivered with either laser shutter caps or
dust caps on the lightwave adapter. Any cables
come with covers to protect the cable ends from
damage or contamination.
We suggest these protective coverings should
be kept on the equipment at all times, except when your optical device is in use. Be careful when replacing dust caps after
use. Do not press the bottom of the cap onto the
fiber too hard, as any dust in the cap can scratch
or pollute your fiber surface.
If you need further dust caps, please contact
your nearest Agilent Technologies sales office
(see “Agilent Service and Support” on page 48).
Isopropyl alcohol
This solvent is usually available from any local
pharmaceutical supplier or chemist’s shop.
Results will vary depending on the purity of the
alcohol.
If you use isopropyl alcohol to clean your optical
device, do not immediately dry the surface with compressed
air (except when you are cleaning very sensitive optical
devices). This is because some of the dust and the dirt is dissolved in the alcohol and will leave behind filmy deposits after
12
Cleaning Procedures
cleaning.book Page 13 Wednesday, May 22, 2002 5:16 PM
What materials do I need for proper cleaning?
3
the alcohol is evaporated. You should therefore first remove
the alcohol and the dust with a soft tissue, and then use compressed air to blow away any remaining filaments.
If possible avoid using denatured alcohol containing additives.
Instead, apply alcohol used for medical purposes.
Never drink this alcohol, as it may seriously damage your
health.
Do not use any other solvents, as some may damage plastic
materials and claddings. Acetone, for example, will dissolve
the epoxy used with fiber optic connectors. To avoid damage,
only use isopropyl alcohol.
Cotton swabs
We recommend that you use swabs such as Q-tips or other
cotton swabs normally available from local distributors of medical and hygiene products (for example, a supermarket or a
chemist’s shop). You may be able to obtain various sizes of
swab. If this is the case, select the smallest size for your smallest devices.
Ensure that you use natural cotton swabs. Some foam swabs
will often leave behind filmy deposits after cleaning.
Use care when cleaning, and avoid pressing too hard onto your
optical device with the swab. Too much pressure may scratch
the surface, and could cause your device to become misaligned. It is advisable to rub gently over the surface using only
a small circular movement.
Swabs should be used straight out of the packet, and never
used twice. This is because dust and dirt in the atmosphere, or
from a first cleaning, may collect on your swab and scratch the
surface of your optical device.
Soft tissues
These are available from most stores and distributors of medical and hygiene products such
as supermarkets or chemists shops.
Cleaning Procedures
13
cleaning.book Page 14 Wednesday, May 22, 2002 5:16 PM
3
What materials do I need for proper cleaning?
We recommend that you do not use normal cotton tissues, but
multi-layered soft tissues made from non-recycled cellulose.
Cellulose tissues are very absorbent and softer. Consequently,
they will not scratch the surface of your device over time.
Use care when cleaning, and avoid pressing on your optical
device with the tissue. Pressing too hard may lead to scratches
on the surface or misalignment of your device. Just rub gently
over the surface using a small circular movement.
Use only clean, fresh soft tissues and never apply them twice.
Any dust and dirt from the air which collects on your tissue, or
which has gathered after initial cleaning, may scratch and pollute your optical device.
Pipe cleaner
Pipe cleaners can be purchased from tobacconists, and come
in various shapes and sizes. The most suitable one to select for
cleaning purposes has soft bristles, which will not produce
scratches.
The best way to use a pipe cleaner is to push it in and out of
the device opening (for example, when cleaning an interface).
While you are cleaning, you should slowly rotate the pipe
cleaner.
Only use pipe cleaners on connector interfaces or on
feedthrough adapters. Do not use them on optical head adapters, as the center of a pipe cleaner is hard metal and can damage the bottom of the adapter.
Your pipe cleaner should be new when you use it. If it has collected any dust or dirt, this can scratch or contaminate your
device.
The tip and center of the pipe cleaner are made of metal. Avoid
accidentally pressing these metal parts against the inside of
the device, as this can cause scratches.
Dry stick cleaner
Compressed air
Compressed air can be purchased from any laboratory supplier.
14
Cleaning Procedures
cleaning.book Page 15 Wednesday, May 22, 2002 5:16 PM
What materials do I need for proper cleaning?
3
It is essential that your compressed air is free of dust, water
and oil. Only use clean, dry air. If not, this can lead to filmy
deposits or scratches on the surface of your connector. This
will reduce the performance of your transmission system.
When spraying compressed air, hold the can upright. If the can
is held at a slant, propellant could escape and dirty your optical
device. First spray into the air, as the initial stream of compressed air could contain some condensation or propellant.
Such condensation leaves behind a filmy deposit.
Please be friendly to your environment and use a CFC-free
aerosol.
Cleaning Procedures
15
cleaning.book Page 16 Wednesday, May 22, 2002 5:16 PM
3
What materials do I need for proper cleaning?
Additional Cleaning Equipment
Some Cleaning Procedures need the following equipment,
which is not required to clean each instrument:
• Microscope with a magnification range about 50X up to
300X
• Ultrasonic bath
• Warm water and liquid soap
• Premoistened cleaning wipes
• Polymer film
• Infrared Sensor Card
Microscope with a magnification range about
50X up to 300X
A microscope can be found in most photography stores, or can be obtained through or specialist mail order companies. Special
fiber-scopes are available from suppliers of
splicing equipment.
Ideally, the light source on your microscope
should be very flexible. This will allow you to
examine your device closely and from different angles.
A microscope helps you to estimate the type and degree of dirt
on your device. You can use a microscope to choose an appropriate cleaning method, and then to examine the results. You
can also use your microscope to judge whether your optical
device (such as a connector) is severely scratched and is,
therefore, causing inaccurate measurements.
Ultrasonic bath
Ultrasonic baths are also available from laboratory suppliers or specialist mail order companies.
An ultrasonic bath will gently remove fat and
other stubborn dirt from your optical devices.
This helps increase the life span of the optical
devices.
16
Cleaning Procedures
cleaning.book Page 17 Wednesday, May 22, 2002 5:16 PM
What materials do I need for proper cleaning?
3
Only use isopropyl alcohol in your ultrasonic bath, as other solvents may cause damage.
Warm water and liquid soap
Only use water if you are sure that there is
no other way of cleaning your optical device
without causing corrosion or damage. Do
not use water that is too hot or too cold, as
this may cause mechanical stress, which
can damage your optical device.
Ensure that your liquid soap has no abrasive properties or perfume in it. You should also avoid normal washing-up liquid, as
it can cover your device in an iridescent film after it has been
air-dried.
Some lenses and mirrors also have a special coating, which
may be sensitive to mechanical stress, or to fat and liquids. For
this reason we recommend you do not touch them.
If you are not sure how sensitive your device is to cleaning,
please contact the manufacturer or your sales distributor.
Premoistened cleaning wipes
Use pre-moistened cleaning wipes as described in each individual cleaning procedure. Cleaning wipes may be used in
every instance where a moistened soft tissue or cotton swab
is applied.
Polymer film
Polymer film is available from laboratory suppliers or specialist mail order companies.
Using polymer film is a gentle method of cleaning extremely sensitive devices, such as reference reflectors and mirrors.
Infrared Sensor Card
Infrared sensor cards are available from laboratory suppliers or
specialist mail order companies.
Cleaning Procedures
17
cleaning.book Page 18 Wednesday, May 22, 2002 5:16 PM
3
What materials do I need for proper cleaning?
With the help of this card you are able to inspect the shape of
the laser light beam emitted. The invisible laser beam is projected onto the sensor card The light beam, at infrared wavelength is reflected at visible wavelengths and thus becomes
visible to the eye as a round spot.
Take care never to look into the end of a fiber or any other optical component when they are in use. This is because the laser
can seriously damage your eyes.
18
Cleaning Procedures
cleaning.book Page 19 Wednesday, May 22, 2002 5:16 PM
What materials do I need for proper cleaning?
Cleaning Procedures
3
19
cleaning.book Page 20 Wednesday, May 22, 2002 5:16 PM
3
20
What materials do I need for proper cleaning?
Cleaning Procedures
cleaning.book Page 21 Wednesday, May 22, 2002 5:16 PM
Cleaning Procedures for Lightwave Test and
Measurement Equipment Pocket Guide
4
Preserving Connectors
Listed below are some hints on how to keep your connectors
in the best possible condition.
Making Connections
Before you make any connection you must ensure that all
cables and connectors are clean. If they are dirty, use the
appropriate cleaning procedure.
When inserting the ferrule of a patchcord into a connector or
an adapter, make sure that the fiber end does not touch the
outside of the mating connector or adapter. Otherwise you will
rub the fiber end against an unsuitable surface, producing
scratches and dirt deposits on the surface of your fiber.
Dust Caps and Shutter Caps
Be careful when replacing dust caps after use. Do not press
the bottom of the cap onto the fiber as any dust in the cap can
scratch or dirty your fiber surface.
When you have finished cleaning, put the dust cap back on, or
close the shutter cap if the equipment is not going to be used
immediately.
Always keep the caps on the equipment when it is not in use.
All Agilent Technologies lightwave instruments and accessories are shipped with either laser shutter caps or dust caps. If
you need additional or replacement dust caps, contact your
nearest Agilent Technologies Sales/Service Office (see “Agilent Service and Support” on page 48).
Agilent Technologies
21
cleaning.book Page 22 Wednesday, May 22, 2002 5:16 PM
4
Preserving Connectors
Immersion Oil and Other Index Matching
Compounds
Wherever possible, do not use immersion oil or other index
matching compounds with your device. They are liable to
impair and dirty the surface of the device. In addition, the characteristics of your device can be changed and your measurement results affected.
Cleaning Instrument Housings
Use a dry and very soft cotton tissue to clean the instrument
housing and the keypad. Do not open the instruments as there
is a danger of electric shock, or electrostatic discharge. Opening the instrument can cause damage to sensitive components, and in addition your warranty will be invalidated.
22
Cleaning Procedures
cleaning.book Page 23 Wednesday, May 22, 2002 5:16 PM
Cleaning Procedures for Lightwave Test and
Measurement Equipment Pocket Guide
5
Which Cleaning Procedure
should I use ?
Agilent Technologies
23
cleaning.book Page 24 Wednesday, May 22, 2002 5:16 PM
5
Which Cleaning Procedure should I use ?
General Cleaning Procedure
Light dirt
If you just want to clean away light dirt, observe the following
procedure for all devices.
• Use compressed air to blow away large particles.
• Clean the device with a dry cotton swab.
• Use compressed air to blow away any remaining filaments
left by the swab.
Heavy dirt
If the previous procedure is not enough to clean your instrument, use one of the following procedures. Please consult
“Which cleaning procedure do I use for this optical device?” on
page 25.
If you are unsure of how sensitive your device is to cleaning,
please contact the manufacturer or your sales distributor.
24
Cleaning Procedures
cleaning.book Page 25 Wednesday, May 22, 2002 5:16 PM
5
Which Cleaning Procedure should I use ?
Which cleaning procedure do I use for this
optical device?
The chart below will allow you to select the appropriate cleaning method for your optical device. Each cleaning method contains cleaning guidelines according to the device
charactersistics. In addition, the risks of each cleaning method
are clearly outlined, along with suggested alternatives.
Where products have similar names, a wildcard * is used. So,
81000*I refers to 81000AI, 81000F!, 81000GI, and so on.
References
Procedure A: How to clean connectors, on page 29
Procedure B: How to clean optical head adapters, on page 31
Procedure C: How to clean connector interfaces, on page 32
Procedure D: How to clean bare fiber adapters and instruments
with an optical glass plate, on page 33
Procedure E: How to clean lenses and instruments with an
optical glass plate, on page 34
Procedure F: How to clean instruments with a fixed connector
interface, on page 36
Procedure G: How to clean instruments with a physical contact
interface, on page 37
Procedure H: How to clean instruments with a recessed lens
interface, on page 39
Procedure I: How to clean optical devices which are sensitive
to mechanical stress and pressure, on page 40
Procedure J: How to clean metal filters or attenuator gratings,
on page 41
Agilent Product
81000*A
Device Name
Procedure
Screwed head adapters
(old version)
B,
G-(RA)
Bare fiber adapters:
D -BA and CA
Cleaning Procedures
25
cleaning.book Page 26 Wednesday, May 22, 2002 5:16 PM
5
Which Cleaning Procedure should I use ?
Agilent Product
Device Name
Procedure
81000*B
Bare Fiber Adapters
C
81000*I
Connector Interfaces
C
G-(RI and UI)
81000BR
Reference Reflector
I
81000DF
Depolarizing Filter
J
81000UM
Universal through adapter
C
81001FF
Fixed Filter
J
81002FF
Integrating Sphere
B
81002*I
Power Meter Connector Interfaces C
81003*D
D-Shape Head Adapters
B
81003LA
Head Adapter
C
81005*A
Connector Adapters for Handhelds C
81005*I
Connector Interfaces for Handhelds C
81010BL
Lens
E
81010BS
Optical Power Splitter
F or G
81010PR
PDL Cable
A and H
81050*L
Lenses
E
81101*C
Adapter Cable (patchcord)
A
81102*C
Adapter Cable (patchcord)
A
81109AC
Adapter Cable (patchcord)
A
81113*C
Adapter Cable (patchcord)
A
81230FL
Attenuating Lens Adapter
E
81501*C
Adapter Cable (patchcord)
A
81520A/
21B/24A/25A
Optical Head
G
8153A
Lightwave Multimeter Mainframe
G, H
8153*A
Power Sensor Module
H,
G(81534A)
81542MM
LED Source Module
G
81551MM,
8155*SM
Laser Source Modules
G
8156A
Optical Attenuator
G
26
Cleaning Procedures
cleaning.book Page 27 Wednesday, May 22, 2002 5:16 PM
Which Cleaning Procedure should I use ?
Agilent Product
Device Name
5
Procedure
81610A/
1A/2A/3A/4A
Return Loss Modules
G
81610CC
Return Loss Module Calibration
Cable
G
8162*A
Optical Heads
E
81621BC
Adapter Cable (patchcord)
A
8163A
Lightwave Multimeter
E, G, H
81632A/3A/4A
Power Sensor Modules
H
81635A
Dual Power Sensor Module
G
8164A
Lightwave Measurement System
E, G, H
8164*A
Tunable Laser Source Modules
G
8165*A
Laser Source Modules
G
8166A
Lightwave Multichannel System
E, G, H
8166*A
Laser Source Modules
G
8167A/B
Tunable Laser Source
G
8168A/B/C/D/
E/F
Tunable Laser Source
G
8168*A
Tunable Laser Modules
G
8169A
Polarization Controller
G
E4340AZ
EDFA Test System
Refer to description of systemcomponents
E5526A
accessFIBER Cardcage
G
E5527D, E5528A accessFIBER CPU modules
G
E554*A, E555*A accessFIBER modules
G
E5574A
Optical Loss Analyzer
A, E
E6000C
Mini-OTDR
G
E600*A/B,
E601*A
Mini-OTDR Modules
G
E605*A/B,
E606*A
Rack OTDR
G
N3900A
Modular Network Tester
“Procedure G”
N3910A-N3922A OTDR Modules
Cleaning Procedures
“Procedure G”
27
cleaning.book Page 28 Wednesday, May 22, 2002 5:16 PM
5
Which Cleaning Procedure should I use ?
Agilent Product
Device Name
Procedure
N3940A-N3941A Optical Switch Modules
“Procedure G”
N3970A
Optical Power Meter
H
N3974A
Optical Light Source
G
N3977A
Optical Attenuator
G
N3988A
Video Microscope
E
28
Cleaning Procedures
cleaning.book Page 29 Wednesday, May 22, 2002 5:16 PM
Which Cleaning Procedure should I use ?
5
Procedure A
How to clean connectors
Cleaning connectors is difficult, as the core
diameter of a single-mode fiber is only about
9um. This generally means you cannot see
streaks or scratches on the surface. To be
certain of the condition of the surface of your
connector and to check it after cleaning, you
need a microscope.
In the case of scratches, or of dust that has
been burnt onto the surface of the connector,
you may have no option but to polish the connector. This depends on the degree of dirtiness, or the depth of the scratches. This is a
difficult procedure and should only be performed by a skilled person, and as a last
resort, as it wears out your connector.
WA R NI NG
Never look into the end of an optical cable that is
connected to an active source.
To assess the projection of the emitted light beam you can use
an infrared sensor card. Hold the card approximately 5 cm from
the output of the connector. The invisible emitted light is projected onto the card and becomes visible as a small circular
spot.
Preferred Procedure
An Optical Connector Cleaner, which ressembles a VCR cleaning tape, is a device that can be used to clean grease from the
surface of a connector.
1 Blow away any surface dust with compressed air
2 Press the button on the side of the Optical Connector
Cleaner device to ensure that a fresh strip of tape is ready.
3 Position the connector interface on the tape.
Cleaning Procedures
29
cleaning.book Page 30 Wednesday, May 22, 2002 5:16 PM
5
Which Cleaning Procedure should I use ?
4 Holding the connector interface against the tape, rotate the
interface at about 180, and then slide it across the surface
of the tape strip.
Alternative Procedure
Use the following procedure on most occasions.
1 Clean the connector by rubbing a new, dry cotton swab over
the surface using a small circular movement.
2 Blow away any remaining lint with compressed air.
Procedure for Stubborn Dirt
Use this procedure when there is greasy dirt on the connector.
1 Moisten a new cotton swab with isopropyl alcohol.
2 Clean the connector by rubbing the cotton swab over the
surface using a small circular movement.
3 Take a new, dry soft tissue and remove the alcohol, dissolved sediment and dust, by rubbing gently over the surface using a small circular movement.
4 Blow away any remaining lint with compressed air.
An Alternative Procedure
A better, more gentle, but more expensive cleaning procedure
is to use an ultrasonic bath with isopropyl alcohol.
1 Hold the tip of the connector in the bath for at least three
minutes.
2 Take a new, dry soft tissue and remove the alcohol, dissolved sediment and dust, by rubbing gently over the surface using a small circular movement.
3 Blow away any remaining lint with compressed air.
30
Cleaning Procedures
cleaning.book Page 31 Wednesday, May 22, 2002 5:16 PM
Which Cleaning Procedure should I use ?
5
Procedure B
How to clean optical head adapters
Some adapters have an anti-reflection coating on
the back to reduce back reflection. This coating is
extremely sensitive to solvents and mechanical
abrasion. Extra care is needed when cleaning these
adapters.
When using optical head adapters, periodically
inspect the optical head’s front window. Dust and
metal particles can be propelled through the
adapter’s pinhole while inserting the connector
ferrule to the receptacle. Those dirt particles collect on the head’s front window, and can lead to
wrong measurement results if not removed.
Preferred Procedure
Use the following procedure on most occasions.
1 Clean the adapter by rubbing a new, dry cotton
swab over the surface using a small circular
movement.
2 Blow away any remaining lint with compressed
air.
Procedure for Stubborn Dirt
Use this procedure when there is greasy dirt on
the adapter.
1 Moisten a new cotton swab with isopropyl
alcohol.
2 Clean the adapter by rubbing the cotton swab
over the surface using a small circular movement.
3 Take a new, dry soft tissue and remove the
alcohol, dis-solved sediment and dust, by rubbing gently over the surface using a small circular movement.
4 Blow away any remaining lint with compressed
air.
Cleaning Procedures
31
cleaning.book Page 32 Wednesday, May 22, 2002 5:16 PM
5
Which Cleaning Procedure should I use ?
Procedure C
How to clean connector interfaces
CA U TI ON
Be careful when using pipe cleaners, as the core and the bristles of the pipe cleaner are hard and can damage the interface.
Do not use pipe cleaners on optical head adapters, as the hard
core of normal pipe cleaners can damage the bottom of an
adapter.
Preferred Procedure
Use the following procedure on most occasions.
1 Clean the interface, when no lens is connected, by pushing and pulling a new, dry pipe
cleaner into the opening. Rotate the pipe
cleaner slowly as you do this.
2 Blow away any remaining lint with compressed air.
Procedure for Stubborn Dirt
Use this procedure when there is greasy dirt on
the interface.
1 Moisten a new pipe cleaner with isopropyl
alcohol.
2 Clean the interface by pushing and pulling the
pipe cleaner into the opening. Rotate the pipe
cleaner slowly as you do this.
3 Moisten a new cotton swab with isopropyl
alcohol.
4 Using a new, dry pipe cleaner, remove the
alcohol, any dissolved sediment and dust.
5 Blow away any remaining lint with compressed air.
32
Cleaning Procedures
cleaning.book Page 33 Wednesday, May 22, 2002 5:16 PM
5
Which Cleaning Procedure should I use ?
Procedure D
How to clean bare fiber adapters
Bare fiber adapters are difficult to clean. Protect from dust unless they are in use.
CA U TI ON
Never use any kind of solvent when cleaning a bare fiber
adapter as solvents can:
• damage the foam inside some adapters;
• deposit dissolved dirt in the groove, which can then contaminate the surface of an inserted fiber.
Preferred Procedure
Use the following procedure on most occasions.
1 Blow away any dust or dirt with compressed air.
Procedure for Stubborn Dirt
Use this procedure when there is greasy dirt on the adapter.
1 Clean the adapter by pushing and pulling a new, dry pipe
cleaner into the opening. Rotate the pipe cleanerslowly as
you do this.
CA U TI ON
Be careful when using pipe cleaners, as the core and the bristles of the pipe cleaner are hard and can damage the adapter.
2 Clean the adapter by rubbing a new, dry cotton swab over
the surface using a small circular movement.
3 Blow away any remaining lint with compressed air.
Cleaning Procedures
33
cleaning.book Page 34 Wednesday, May 22, 2002 5:16 PM
5
Which Cleaning Procedure should I use ?
Procedure E
How to clean lenses and instruments with an
optical glass plate
Some lenses have special coatings that are
sensitive to solvents, grease, liquid and
mechanical abrasion. Take extra care when
cleaning lenses with these coatings. Some
instruments, for example, the Agilent Technologies optical heads have an optical glass plate
to protect the sensor.
In the case of the N3988A video microscope,
do not attempt to access the internal parts of
the microscope for cleaning or for any other
purpose.
Lens assemblies consisting of several lenses are not normally
sealed. Therefore, use as little alcohol as possible, as it can get
between the lenses and in doing so can change the properties
of projection.
If you are cleaning an Optical Power Head (8162*A), please
observe the following additional check. Periodically inspect the
optical head’s front window for dust and other particles. Dust
and particles can be propelled through the optical head
adapter’s pinhole while inserting a connector ferrule to the
receptacle. Particles on the optical head’s front window can
significantly impair measurement results.
NOT E
Do not dry the lens by rubbing with cloth or other material,
which may scratch the lens surface.
Preferred Procedure
Use the following procedure on most occasions.
1 Clean the lens by rubbing a new, dry cotton swab over the
surface using a small circular movement.
2 Blow away any remaining lint with compressed air.
34
Cleaning Procedures
cleaning.book Page 35 Wednesday, May 22, 2002 5:16 PM
5
Which Cleaning Procedure should I use ?
Procedure for Stubborn Dirt
Use this procedure when there is greasy dirt on the lens.
1 Moisten a new cotton swab with isopropyl alcohol.
2 Clean the lens by rubbing the cotton swab over the surface
using a small circular movement.
3 Using a new, dry cotton swab remove the alcohol, any dissolved sediment and dust.
4 Blow away any remaining lint with compressed air.
Cleaning Procedures
35
cleaning.book Page 36 Wednesday, May 22, 2002 5:16 PM
5
Which Cleaning Procedure should I use ?
Procedure F
How to clean instruments with a fixed
connector interface
You should only clean instruments with a fixed
connector interface when it is absolutely necessary. This is because it is difficult to remove any
used alcohol or filaments from the input of the
optical block.
It is important, therefore, to keep dust caps on
the equip-ment at all times, except when your
optical device is in use.
If you do discover filaments or particles, the only way to clean
a fixed connector interface and the input of the optical block is
to use compressed air.
If there are fluids or oil in the connector, please refer the
instrument to the skilled personnel of the Agilent service team.
NOT E
CA U TI ON
Both the surface and the jacket of the attached connector
should be completely dry and clean.
Only use clean, dry compressed air. Make sure that the air is
free of dust, water, and oil. If the air that you use is not clean
and dry, this can lead to filmy deposits or scratches on the surface of your connector interface. This will degrade the performance of your transmission system.
Never try to open the instrument and clean the optical block by
yourself, because it is easy to scratch optical components, and
cause them to become misaligned.
36
Cleaning Procedures
cleaning.book Page 37 Wednesday, May 22, 2002 5:16 PM
5
Which Cleaning Procedure should I use ?
Procedure G
How to clean instruments with a physical
contact interface
Remove any connector interfaces from the
optical output of the instrument before you
begin the cleaning procedure. Cleaning
interfaces is difficult as the core diameter of
a single-mode fiber is only about 9µm. This
generally means you cannot see streaks or
scratches on the surface. To be certain of
the degree of pollution on the surface of
your interface and to check whether it has
been removed after cleaning, you need a
microscope.
WA R NI NG
Never look into an optical output, because this can
seriously damage your eyesight.
To assess the projection of the emitted light beam you can use
an infrared sensor card. Hold the card approximately 5 cm from
the interface. The invisible emitted light is projected onto the
card and becomes visible as a small circular spot.
Preferred Procedure
Use the following procedure on most occasions.
1 Clean the interface by rubbing a new, dry cotton swabover
the surface using a small circular movement.
2 Blow away any remaining lint with compressed air.
Procedure for Stubborn Dirt
Use this procedure when there is greasy dirt on the inter-face.
1 Moisten a new cotton swab with isopropyl alcohol.
2 Clean the interface by rubbing the cotton swab over the surface using a small circular movement.
Cleaning Procedures
37
cleaning.book Page 38 Wednesday, May 22, 2002 5:16 PM
5
Which Cleaning Procedure should I use ?
3 Take a new, dry soft tissue and remove the alcohol, dissolved sediment and dust, by rubbing gently over the surface using a small circular movement.
4 Blow away any remaining lint with compressed air.
38
Cleaning Procedures
cleaning.book Page 39 Wednesday, May 22, 2002 5:16 PM
5
Which Cleaning Procedure should I use ?
Procedure H
How to clean instruments with a recessed lens
interface
For instruments with a deeply recessed lens
interface (for example the Agilent Technologies
81633A and 81634A Power Sensors) do NOT follow this procedure. Alcohol and compressed air
could damage your lens even further.
Keep your dust and shutter caps on when your
instrument is not in use. This should prevent it
from getting too dirty.
If you must clean such instruments, please refer the instrument to the skilled personnel of the Agilent service team.
Preferred Procedure
Use the following procedure on most occasions.
1 Blow away any dust or dirt with compressed air. If this is not
sufficient, then:
a Clean the interface by rubbing a new, dry cotton swab
over the surface using a small circular movement.
b Blow away any remaining lint with compressed air.
Procedure for Stubborn Dirt
Use this procedure when there is greasy dirt on the interface,
and using the procedure for light dirt is not sufficient.
Using isopropyl alcohol should be your last choice for recessed
lens interfaces because of the difficulty of cleaning out any dirt
that is washed to the edge of the interface.
1 Moisten a new cotton swab with isopropyl alcohol.
2 Clean the interface by rubbing the cotton swab over the surface using a small circular movement.
3 Take a new, dry soft tissue and remove the alcohol, dissolved sediment and dust, by rubbing gently over the surface using a small circular movement.
4 Blow away any remaining lint with compressed air.
Cleaning Procedures
39
cleaning.book Page 40 Wednesday, May 22, 2002 5:16 PM
5
Which Cleaning Procedure should I use ?
Procedure I
How to clean optical devices which are
sensitive to mechanical stress and pressure
Some optical devices, such as the Agilent
81000BR Reference Reflector, which has a
gold plated surface, are very sensitive to
mechanical stress or pressure. Do not use cotton swabs, soft tissues or other mechanical
cleaning tools, as these can scratch or destroy
the surface.
Preferred Procedure
Use the following procedure on most occasions.
1 Blow away any dust or dirt with compressed air.
Procedure for Stubborn Dirt
To clean devices that are extremely sensitive to mechanical
stress or pressure you can also use an optical clean polymer
film. This procedure is time consuming, but you avoid scratching or destroying the surface.
1 Put the film on the surface and wait at least 30 minutes to
make sure that the film has had enough time to dry.
2 Remove the film and any dirt with special adhesive tapes.
Alternative Procedure
For these types of optical devices you can often use an ultrasonic bath with isopropyl alcohol. Only use the ultra-sonic bath
if you are sure that it won’t cause any damage to any part of
the device.
1 Put the device into the bath for at least three minutes.
2 Blow away any remaining liquid with compressed air. If
there are any streaks or drying stains on the surface, repeat
the cleaning procedure.
40
Cleaning Procedures
cleaning.book Page 41 Wednesday, May 22, 2002 5:16 PM
5
Which Cleaning Procedure should I use ?
Procedure J
How to clean metal filters or attenuating mesh
filters
This kind of device is extremely fragile. A misalignment of the
filter leads to inaccurate measurements. Never touch the surface of the metal filter or attenuating mesh filter.
Be very careful when using or cleaning these devices. Do not
use cotton swabs or soft tissues, as there is the danger that
you cannot remove the lint and that the device will be
destroyed by becoming mechanically distorted.
Preferred Procedure
Use the following procedure on most occasions.
1 Use compressed air at a distance and with low pressure to
remove any dust or lint.
Procedure for Stubborn Dirt
Do not use an ultrasonic bath as this can damage your device.
Use this procedure when there is greasy dirt on the device.
1 Put the optical device into a bath of isopropyl alcohol, and
wait at least 10 minutes.
2 Remove the fluid using compressed air at some distance
and with low pressure. If there are any streaks or drying
stains on the surface, repeat the whole cleaning procedure.
Cleaning Procedures
41
cleaning.book Page 42 Wednesday, May 22, 2002 5:16 PM
5
42
Which Cleaning Procedure should I use ?
Cleaning Procedures
cleaning.book Page 43 Wednesday, May 22, 2002 5:16 PM
Cleaning Procedures for Lightwave Test and
Measurement Equipment Pocket Guide
6
Additional Cleaning
Information
Agilent Technologies
43
cleaning.book Page 44 Wednesday, May 22, 2002 5:16 PM
6
Additional Cleaning Information
The following cleaning procedures may be used with other
optical equipment:
How to clean bare fiber ends
Bare fiber ends are often used for splices or, together with
other optical components, to create a parallel beam.
The end of a fiber can often be scratched. You make a new
cleave. To do this:
1 strip off the cladding.
2 take a new soft tissue and moisten it with isopropyl alcohol.
3 carefully clean the bare fiber with this tissue.
4 make your cleave and immediately insert the fiber into your
bare fiber adapter in order to protect the surface from dirt.
Preferred Procedure
There is an easy method for removing dust from bare fiber
ends
Touch the bare fiber end with Tesa® - Tape. All dust will be
removed.
How to clean large area lenses and mirrors
Some mirrors, such as those from a monochromator, are very
soft and sensitive. Therefore, never touch them and do not use
cleaning tools such as compressed air or polymer film.
Some lenses have special coatings that are sensitive to solvents, grease, liquid and mechanical abrasion. Take extra care
when cleaning lenses with these coatings.
Lens assemblies consisting of several lenses are not normally
sealed. Therefore, use as little liquid as possible, as it can get
between the lenses and in doing so can change the properties
of projection.
Preferred Procedure
Use the following procedure on most occasions.
1 Blow away any dust or dirt with compressed air.
44
Cleaning Procedures
cleaning.book Page 45 Wednesday, May 22, 2002 5:16 PM
6
Additional Cleaning Information
Procedure for Stubborn Dirt
Use this procedure when there is greasy dirt on the lens.
CA U TI ON
Only use water if you are sure that there is no other way of
cleaning your optical device without causing corrosion or damage. Do not use hot water, as this may cause mechanical
stress, which can damage your optical device.
Ensure that your liquid soap has no abrasive properties or perfume in it. You should also avoid normal washing-up liquid, as
it can cover your device in an iridescent film after it has been
air-dried.
Some lenses and mirrors also have a special coating, which
may be sensitive to mechanical stress, or to fat and liquids. For
this reason we recommend you do not touch them.
If you are not sure how sensitive your device is to clea-ning,
please contact the manufacturer or your sales distri-butor.
1 Moisten the lens or the mirror with water.
2 Put a little liquid soap on the surface and gently spreadthe
liquid over the whole area.
3 Wash off the emulsion with water, being careful to remove
it all, as any remaining streaks can impair measurement
accuracy.
4 Take a new, dry soft tissue and remove the water, by rubbing
gently over the surface using a straight movement.
5 Blow away remaining lint with compressed air.
Alternative Procedure A
To clean lenses that are extremely sensitive to mechani cal
stress or pressure you can also use an optical clean polymer
film. This procedure is time consuming, but you avoid scratching or destroying the surface.
1 Put the film on the surface and wait at least 30 minutes to
make sure that the film has had enough time to dry.
2 Remove the film and any dirt with special adhesive tapes.
Cleaning Procedures
45
cleaning.book Page 46 Wednesday, May 22, 2002 5:16 PM
6
Additional Cleaning Information
Alternative Procedure B
If your lens is sensitive to water then
1 Moisten the lens or the mirror with isopropyl alcohol.
2 Take a new, dry soft tissue and remove the alcohol,
dis-solved sediment and dust, by rubbing gently over the
surface using a small circular movement.
3 Blow away remaining lint with compressed air.
Other Cleaning Hints
Selecting the correct cleaning method is an important element
in maintaining your equipment and saving you time and money.
This Pocket Guide highlights the main cleaning methods, but
cannot address every individual circumstance.
This section contain some additional hints which we hope will
help you further. For further information, please contact your
local Agilent Technologies representative (see “Agilent Service
and Support” on page 48).
Making the connection
Before you make any connection you must ensure that all
lightwave cables and connectors are clean. If not, then use
appropriate cleaning methods.
When you insert the ferrule of a patchcord into a connector or
an adapter, ensure that the fiber end does not touch the outside of the mating connector or adapter. Otherwise, the fiber
end will rub up against something which could scratch it and
leave deposits.
Lens cleaning papers
Some special lens cleaning papers are not suitable for cleaning
optical devices like connectors, interfaces, lenses, mirrors and
so on. To be absolutely certain that a cleaning paper is applicable, please ask the salesperson or the manufacturer.
46
Cleaning Procedures
cleaning.book Page 47 Wednesday, May 22, 2002 5:16 PM
6
Additional Cleaning Information
Immersion oil and other index matching compounds
Do not use immersion oil or other index matching compounds
with optical sensors equipped with recessed lenses. They are
liable to dirty the detector and impair its performance. They
may also alter the property of depiction of your optical device,
thus rendering your measurements inaccurate.
Cleaning the housing and the mainframe
When cleaning either the mainframe or the housing of your
instrument, only use a dry and very soft cotton tissue on the
surfaces and the numeric pad. Never open the instruments as
they can be damaged.
Opening the instruments puts you in danger of receiving an
electrical shock from your device, and renders your warranty
void.
Cleaning Procedures
47
cleaning.book Page 48 Wednesday, May 22, 2002 5:16 PM
6
Additional Cleaning Information
Appendix
Agilent Service and Support
Any adjustment, maintenance, or repair of this product must
be performed by qualified personnel. Contact your customer
engineer through your local Agilent Technologies Service Center. You can find a list of local service representatives on the
Web at: http://www.agilent.com/find/assist
Or contact the test and measurement experts at Agilent Technologies. (During normal business hours)
United States
(tel) 1 800 452 4844
Canada
(tel) 1 877 994 4414
(fax) (905) 206 4120
Europe
(tel) (31 20) 547 2323
(fax) (31 20) 547 2390
Japan
(tel) (81) 426 56 7832
(fax) (81) 426 56 7840
Latin America
(tel) (305) 269 7500
(fax) (305) 269 7599
Australia
(tel) 1 800 629 485
(fax) (61 3) 9272 0749
New Zealand
(tel) 0 800 738 378
(fax) 64 4 495 8950
Asia-Pacific
(tel) (852) 3197 7777
(fax) (852) 2506 9284
48
Cleaning Procedures
cleaning.book Page 49 Wednesday, May 22, 2002 5:16 PM
Additional Cleaning Information
6
Your Notes
Cleaning Procedures
49
cleaning.book Page 50 Wednesday, May 22, 2002 5:16 PM
6
50
Additional Cleaning Information
Cleaning Procedures