1
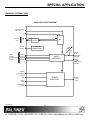
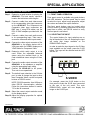
SPECIAL APPLICATION
MANUAL PART NUMBER: 400-0422-001
AP445-401
PRO AV VIDEO SCALER+
WITH
STEREO AUDIO
USER’S GUIDE
SPECIAL APPLICATION
TABLE OF CONTENTS
Page
PRECAUTIONS / SAFETY WARNINGS .............. 2
GENERAL..........................................................2
RACK-MOUNTING SAFETY GUIDELINES........2
INSTALLATION .................................................2
CLEANING.........................................................2
FCC / CE NOTICE..............................................2
ABOUT YOUR AP445-401 .................................... 3
TECHNICAL SPECIFICATIONS .......................... 3
DESCRIPTION OF AP445-401 ............................. 4
APPLICATION DIAGRAM ..................................... 5
DIAGRAM 1: TYPICAL CONFIGURATION ........5
DIAGRAM 2: INTERNAL VIEW ..........................6
INSTALLING YOUR AP445-401 ........................... 7
OPERATION .......................................................... 7
FRONT PANEL OPERATION ............................7
RS-232 CONTROL.............................................8
DESCRIPTION OF COMMANDS .......................8
SUMMARY OF COMMANDS ...........................15
TROUBLESHOOTING GUIDE ............................ 15
NO RESPONSE FROM PANEL .......................15
NO DISPLAY....................................................15
NO SOUND......................................................16
ALTINEX POLICY................................................ 16
LIMITED WARRANTY/RETURN POLICY ........16
CONTACT INFORMATION ..............................16
400-0422-001
1
SPECIAL APPLICATION
PRECAUTIONS / SAFETY WARNINGS
1
Please read this manual carefully before using your
AP445-401. Keep this manual handy for future
reference. These safety instructions are to ensure
the long life of your AP445-401 and to prevent fire
and shock hazard. Please read them carefully and
heed all warnings.
•
•
If the AP445-401 is not used for an extended
period, disconnect the adapter from the wall to
avoid fire, shock, and loss of power.
Clean only with a dry cloth. Never use strong
detergents or solvents, such as alcohol or
thinner. Do not use a wet cloth or water to clean
the unit. Do not open the unit to clean.
1.4 FCC / CE NOTICE
•
The maximum operating ambient temperature
for this unit is 35°C.
Never restrict the airflow through the devices fan
or vents.
Distribute units evenly inside the rack.
Hazardous conditions may be created by an
uneven weight distribution.
Connect the unit to a properly rated supply
circuit.
Reliable Grounding should be maintained.
•
1.2 INSTALLATION
•
•
•
•
For best results, place the AP445-401 on a flat,
leveled surface in a dry area away from dust and
moisture.
To prevent fire or shock, do not expose this unit
to rain or moisture. Do not place the AP445-401
in direct sunlight, near heaters or heat radiating
appliances, or near any liquid. Exposure to
direct sunlight, smoke, or steam can harm
internal components.
Handle the AP445-401 carefully. Dropping or
jarring can damage the unit.
Do not pull the cables that are attached to the
AP445-401.
400-0422-001
Unplug the AP445-401 adapter before cleaning.
•
Do not open the unit or power supply case, there
are high-voltage components inside.
• There are no user serviceable parts inside.
Qualified ALTINEX service personnel must
perform all service on the AP445-401.
1.2. RACK-MOUNTING SAFETY GUIDELINES
•
•
•
•
•
Do not place heavy objects on top of the
AP445-401.
1.3 CLEANING
1.1 GENERAL
•
•
•
2
This device complies with part 15 of the FCC
Rules. Operation is subject to the following two
conditions: (1) This device may not cause
harmful interference, and (2) this device must
accept any interference received, including
interference that may cause undesired
operation.
This equipment has been tested and found to
comply with the limits for a Class A digital
device, pursuant to Part 15 of the FCC Rules.
These limits are designed to provide reasonable
protection against harmful interference when the
equipment is operated in a commercial
environment. This equipment generates, uses,
and can radiate radio frequency energy and, if
not installed and used in accordance with the
instruction manual, may cause harmful
interference to radio communications. Operation
of this equipment in a residential area is likely to
cause harmful interference in which case the
user will be required to correct the interference
at their expense.
Any changes or modifications to the unit not
expressly approved by ALTINEX, Inc. could void
the user’s authority to operate the equipment.
SPECIAL APPLICATION
ABOUT YOUR AP445-401
2
TECHNICAL SPECIFICATIONS
AP445-401
Pro AV Scaler+
FEATURES/
AP445-401
DESCRIPTION
GENERAL
Input Connectors
Video, PC BYPASS
(1) 15-pin HD female
Video, S-Video
(1) 4-pin Mini-DIN
Video, Composite Video
(1) BNC female
Video, YPbPr
(3) BNC female
Audio, Stereo
(4) 3.5mm female
RS-232
(1) 9-pin HD female
Output Connectors
Video, RGBHV/YPbPr
(1)15-pin HD Female
Audio, Stereo, Unbalanced
(1) 3.5mm female
Audio, Stereo, Balanced
(1) 5-pin terminal block
Composite Video (NTSC/PAL)
Compatibility
S-Video (NTSC/PAL)
Component Video
PC BYPASS
Resolution Compatibility
VGA
640x480
WVGA
852x480
SVGA
800x600
PC
XGA
1024x768
WXGA
1280x768
SXGA
1280x1024
HDTV
480p, 567p,720p,1080i
The AP445-401 ProAVScaler+ converts Composite
Video, S-Video, and Component Video signals into
a variety of high-resolution Computer video or
Component video signals. In addition to video, the
AP445-401 has four stereo audio inputs and both
balanced and unbalanced stereo outputs.
The AP445-401 automatically detects and accepts
either NTSC or PAL video standards for
Composite and S-Video signals. The PC BYPASS
computer signal may be switched to the output via
a pass-through input.
The Component video
signals are scalable to the following output
resolutions: 480p, 567p, 720p or 1080i.
The Composite and S-Video signals may be scaled
to VGA through SXGA resolution. Additionally,
many control features allow the user access to
adjust picture brightness, contrast, color,
sharpness and hue.
Any audio source may be selected and output to a
balanced and unbalanced stereo output. The
balanced output offers volume control and is
adjustable over 16 steps of gain, whereas the
unbalanced output is set to fixed level output.
Table 1. AP445-401 General
MECHANICAL
Material
Finish
Height ( 1U )
Width ( Full Rack Wide )
Depth
Weight
Connector Panel
T° Operating
T° Maximum
Humidity
MTBF (calc.)
The AP445-401 may be controlled either using
front panel buttons or via a standard RS-232 port.
Actual control may be accomplished through a
computer control system or any other device
capable of sending ASCII control commands via a
RS-232 port. Available commands allow audio and
video input selection, image control/adjustment and
volume control.
In addition, the AP445-401
incorporates
noise
reduction
filters
and
sophisticated 3D comb filtering.
The HelpInside™ feature allows programmers to
have access to command structures and control of
the AP445-401 from any terminal. This technology
provides easier than ever control of the AP445-401
ProAVScaler+ with simple keyboard commands.
No typing of long keyboard strings is necessary.
400-0422-001
3
AP445-401
0.08”AL
Black
1.75in ( 44.5mm )
17.0in ( 431.8mm )
9.0in ( 228.6mm )
3.0 lb (1.36 kg)
Black
10°C to 35°C
0°C to 50°C
90% non-condensing
40,000 hrs
Table 2. AP445-401 Mechanical
3
SPECIAL APPLICATION
ELECTRICAL
Inputs
Video, Composite
Video, S-Video
Video, (YCbCr)
Video, PC
Audio, Stereo
Outputs
Video, Mode
Video, Analog
Video, Impedance
Video, Sync
Audio, Balanced
Audio, Unbalanced
AP445-401
ELECTRICAL
Control
Manual
RS-232
Infrared (IR), optional
NTSC/PAL, 1Vp-p, 75 ohm
1Vp-p, 75 ohm
Y = 1Vp-p, 75 ohm
Cb and Cr = 0.7Vp-p, 75 ohm
RGB (0.7Vp-p), HV (TTL)
0dBu 10 Kohm
Picture Adjustments
RGBHV or YPbPr
Output Adjustments
0.7 V p-p max.
75 Ohms
TTL (+/-)
Power
1Vp-p max
1Vp-p max
Table 3. AP445-401 Electrical
DESCRIPTION OF AP445-401
AP445-401
Front Panel Keys
Rear Panel 9-pin HD female
IR remote control transmitter
Brightness
Contrast
Color
Sharpness
Hue
Aspect Ratio 4:3 or 16:9
Digital Noise Reduction (NR)
3D Comb Filter (VCR Mode)
100-240VAC, 50-60Hz
4
FRONT VIEW
REAR VIEW
RGBHV/
Y,Pb,Pr
OUTPUT
S-VIDEO
INPUT
C-VIDEO
INPUT
PC BY PASS
AUDIO INPUT
S-VIDEO
AUDIO INPUT
Y,Pb,Pr
INPUT
PC BYPASS
INPUT
RS-232
C-VIDEO
AUDIO INPUT
YPbPr
AUDIO INPUT
400-0422-001
POWER
100-240V 50-60Hz
4
MAIN AUDIO
BALANCED STEREO OUTPUT
FIXED AUDIO
UNBALANCED STEREO OUTPUT
SPECIAL APPLICATION
APPLICATION DIAGRAM
5
DIAGRAM 1: TYPICAL CONFIGURATION
400-0422-001
5
SPECIAL APPLICATION
DIAGRAM 2: INTERNAL VIEW
AP445-401 BLOCK DIAGRAM
PUSH BUTTONS
WITH LED
IR
RS-232
9PIN
RX
TX
100~240V
50-60Hz
RS-232
TO TTL
MP
UNIVERSAL
POWER SUPPLY
S/W
GAIN
INPUT
3.5 MM
UNBALANCED
STEREO
AUDIO 1
AUDIO 2
AUDIO 3
AUDIO 4
AUDIO
SWITCHER
AUDIO
5P TB
BALANCED
STEREO
AUDIO
3.5 MM
UNBALANCE
STEREO
S-VIDEO
4 PIN, MINI DIN
C-VIDEO
BNC
SCALER
SWITCHER
Y,Pb,Pr
3 BNC
VGA BYPASS
15P HD
400-0422-001
6
OUTPUT
15P HD
VGA
SPECIAL APPLICATION
INSTALLING YOUR AP445-401
6
OPERATION
Step 1. Determine a good location for placing the
AP445-401. For best results, choose a
location that minimizes cable lengths.
7
7.1 FRONT PANEL OPERATION
Front panel control is available using push buttons
with LED indicators. The front panel may be used
to select the input, adjust image properties, adjust
the volume and select the output resolution.
Step 2. Connect a cable from each video source
to its corresponding video input connector
on the AP445-401. The Component and
Composite video input connectors are
BNC type. If using RCA cables, use the
RCA to BNC adapters provided with the
unit.
The front panel buttons may be locked using
RS-232 control. If pressing the buttons on the front
panel has no effect, use RS-232 control to verify
the front panel is not locked.
7.1.1 SELECTING THE INPUT
Step 3. Connect a cable from each audio source
to its corresponding input. Take care to
ensure the video and audio inputs match.
The control buttons for input selection are on
the left hand side of the unit. Selecting the input
will make that image available on the
RGBHV/YPbPr Output.
Step 4. Connect the video output connector of the
AP445-401 to the display device with a
VGA type cable for RGBHV displays or a
YPbPr cable for Component Video.
In order to make the input signal on the S-Video
input available on the output, press the S-VID
button. The input will be selected and the LED
will turn on.
Step 5. Determine which audio output is to be
used. Either the adjustable balanced
stereo using the terminal block or the
fixed unbalanced stereo using the 3.5mm
jack.
Step 6. Connect the audio output connector of the
AP445-401 to the speakers or amplifier
using the appropriate audio cable.
Step 7. Connect the AP445-401 to AC power.
Then unit is now operational.
Step 8. The default input selection is the S-Video
port. In order to change the input to other
than Composite Video, use the front panel
buttons or RS-232 control.
S-VIDEO
For example, press the S-VID button on the
front panel to make the S-VID input connected
to the rear of the unit active. The main
RGBHV/YCbCr output will now display the
image on the S-VID input.
NOTE: RS-232 operation: Use AVSnap or
other RS-232 communication software.
Follow the instructions defined in section
7.3 for the IN command.
Step 9. Select the correct output resolution mode
for the display device.
Step 10. Adjust the display properties for optimal
image quality.
400-0422-001
7
SPECIAL APPLICATION
7.1.2 MAKING PICTURE ADJUSTMENTS
7.2 RS-232 CONTROL
There are controls available for the following
picture properties: color, contrast, brightness,
hue and sharpness. Pressing one of these
buttons will make that property the active
control. Then, use the + and – buttons to adjust
the image.
The AP445-401 has many advanced remote
control capabilities, which are accessible through
standard RS-232 communication. The actual
controlling can be accomplished through a
computer control system or any other device
capable of sending RS-232 commands.
7.2.1 RS-232 INTERFACE
+
BRIGHTNESS
-
The RS-232 commands, for the AP445-401, are
in a simple ASCII character format.
INCREASE/
DECREASE
]” are part of the
2.
Use uppercase letters for all commands.
Commands ending in "S" will be saved into
memory. Commands not ending in "S" will still
be executed but will not be restored when the
system is reset or powered off then on.
7.1.3 CHANGING THE OUTPUT RESOLUTION
The output resolution is controlled using the
OUTPUT MODE button. Each time the button is
pressed, the next resolution is selected.
Repeatedly pressing the button will cycle
through all the available resolutions.
7.3 DESCRIPTION OF COMMANDS
The default unit ID is zero, but may be set to a
value from 0 to 99. In single unit operation,
commands may be sent without the unit
identifier. Unit ID 0 should be used for single
unit operation.
-
If multiple AP445-401’s are connected to the
same communication port, the units may be
controlled two ways. In order to control all the
units the same, commands may be sent without
the unit identifier. Commands sent without the
unit identifier will be executed by all
AP445-401’s.
OUTPUT MODE/
RESOLUTION
Individual control is accomplished by first
assigning each unit a unique ID number. Then
each unit may be controlled individually by
including the unit identifier at the end of each
command string.
7.1.4 ADJUSTING THE VOLUME
The audio gain is controlled just like the video
picture adjustments. First, press the AUDIO
button on the panel. Then, use the plus and
minus buttons to adjust the volume.
400-0422-001
Square brackets “[
command.
After processing a command, an [OK] or [ERR]
will be returned as feedback if "F" is included at
the end of a command string.
For example, press the BRIGHT button to make
the brightness setting the active function. Then
use the plus and minus buttons to increase or
decrease the brightness level as necessary.
+
1.
8
SPECIAL APPLICATION
Example:
4. [VER]
[VER]:
Executed by all VP445-103’s
connected.
[VERC1]: For Unit ID 1 Only
[VERC2]: For Unit ID 2 Only
etc…
This command displays the firmware version
and model number of the AP445-401.
Command Format: [VERCi]
Ci = Unit ID (i = # from 0 to 99)
Example:
1. [SIDn]
This command sets the ID number of the unit.
The default unit ID is zero.
Send the command [VER] and receive the
following feedback:
Command Format: [SIDn]
[AP445-401 690-0218-001]
n
AP445-401
690-0218-001
= Unit ID (n = # from 0 to 99)
Example:
= Model Number
= Firmware Version
5. [C]
Send the command [SID1] to the system. The
unit ID is now one, and “C1” must be included at
the end of each command line, as in “[VERC1]”.
This command displays the status of the
AP445-401.
2. [RSI]
Command Format: [Ci]
This command resets the unit ID to the default
value of zero.
Ci = Unit ID (i = # from 0 to 99)
Example 1:
Command Format: [RSI]
Send the command [C1] and receive feedback
showing the status of unit ID 1.
Example:
Send the command [RSI] to the system and the
new ID will be zero. As unit ID zero, commands
may be sent either with or without the unit
identifier “C0”.
Example 2:
Send the command [C0] and receive feedback
showing the status of the unit connected to the
RS-232 port regardless of its unit ID.
3. [RSN]
6. [CnS]
This command reads and then displays the ID
number of the unit.
Command Format: [RSN]
This command displays the status of the
AP445-401 with a specified unit ID and saves
the settings.
Example:
Command Format: [CnS]
The AP445-401 was set to an ID value of 3.
Send the command [RSN] and the system will
return the following feedback:
n
S
= Unit ID (n = # from 0 to 99)
= Save
Example:
[3]
The AP445-401 was previously defined as ID 3
using the [SID] command. Now, send the
command [C3S] to receive the status of the unit
and save its settings. These settings will be
recalled when the same input is selected using
the [INR] command.
400-0422-001
9
SPECIAL APPLICATION
Input: S-Video
Output Resolution: 640x480
Brightness: 24
Contrast: 40
Color: 24
Sharpness: 10
Hue: 24
Audio Volume: 32
VCR Mode
NR ON
Aspect Ration 4:3
Freeze OFF
Front Panel Unlocked
7. [STAT]
This command displays the status of the
AP445-401.
Command Format: [STAT] or [STATCi]
Ci = Unit ID (i = # from 0 to 99)
Example 1:
Send the command [STATC1] and receive
feedback showing the status of unit ID 1.
Example 2:
Send the command [STAT] and receive
feedback showing the status of the unit
connected to the RS-232 port regardless of its
unit ID.
Default
Last Saved
Last Saved
Last Saved
Last Saved
Last Saved
Last Saved
Default
Default
Default
Default
Default
Last Saved
10. [IN]
This command selects the input port on the unit
to be used as the source.
8. [STATS]
Command Format: [INyCi]
This command displays the status of the
AP445-401 and saves the settings in memory.
y = Input (y = # from 0 to 3)
0 = S-Video
1 = Composite Video
2 = PC Bypass
3 = YPbPr Video
Ci = Unit ID (i = # from 0 to 99)
Command Format: [STATS] or [STATCiS]
Example:
Send the command [STATS] and receive
feedback as in the previous example, but in this
case the settings will be saved and recalled
when the same input is selected using the [INR]
command.
Example:
Send the command [IN0] to select the S- Video
input.
11. [INR]
9. [CLR]
Command Format: [CLRCi]
This command selects the input port on the unit
to be used as the source and recalls the saved
settings.
Ci = Unit ID (i = # from 0 to 99)
Command Format: [INyRCi]
Example:
y = Resolution (y = # from 0 to 3)
0 = S-Video
1 = Composite Video
2 = PC Bypass
3 = YPbPr Video
R = Recall image property settings
Reset all parameters to factory defaults.
Send the command [CLR] to reset the unit to
the factory defaults. After reset, the status will
similar to the following depending on the input
selected:
Ci = Unit ID (i = # from 0 to 99)
400-0422-001
10
SPECIAL APPLICATION
Example:
14. [VCR]
Send the command [IN0R] to select the S-Video
input and recall the settings saved for S-Video
input. For example, any changes made to the
brightness, hue etc… that were saved are
recalled.
This command is used to toggle the 3D Comb
Filter, Y/C Separator mode between VCR and
normal.
Command Format: [VCRCi]
Ci = Unit ID (i = # from 0 to 99)
12. [MODER]
Example:
This command sets the resolution of the video
output.
If the unit is in normal mode, send the command
[VCR] to enable VCR mode. Send the
command, [VCR], again to return to normal
mode.
Command Format: [MODERnCi]
n
= Resolution (n = # from 0 to 9)
0 = VGA
640x480
1 = 480p
2 = SVGA 800x600
3 = XGA
1024x768
4 = WXGA 1280x768
5 = SXGA 1280x1024
6 = 567p
7 = 720p
8 = 1080i
9 = WVGA 852x480
15. [BRIGHTn]
This command sets the brightness level to an
absolute value.
Command Format: [BRIGHTyyCi]
yy = Level (yy = # from 00 to 48, default=24)
Ci = Unit ID (i = # from 0 to 99)
Example:
Send the command [BRIGHT12] to set the
output brightness to 12.
Ci = Unit ID (i = # from 0 to 99)
Example:
16. [BRIGHT]
Send the command [MODER2] to set the output
resolution of the unit to SVGA 800x600.
This command displays the current brightness
level and makes the brightness function active
for adjustments. See the [+] and [-] commands
for adjustment details.
13. [MUTE]
This command is used to turn the on screen
display feature on or off. If the feature is on,
setting changes for brightness, resolution etc…
will not be displayed on the screen.
Command Format: [BRIGHTCi]
Ci = Unit ID (i = # from 0 to 99)
Command Format: [MUTExCi]
Example:
x = Display (1 = OFF, 0 = ON)
Send the command [BRIGHT]. The unit will
display the current brightness level, for example
“[24]”. The brightness feature is now active and
the [+] and [-] commands may be used for
adjustment.
Ci = Unit ID (i = # from 0 to 99)
Example:
Disable the on-screen display by sending the
command [MUTE0].
17. [CONTRn]
This command sets the contrast level to an
absolute value.
400-0422-001
11
SPECIAL APPLICATION
Command Format: [CONTRyyCi]
Example:
yy = Level (yy = # from 00 to 48, default=40)
Ci = Unit ID (i = # from 0 to 99)
Send the command [COLOR]. The unit will
display the current color level, for example
“[25]”. The color feature is now active and the
[+] and [-] commands may be used for
adjustment.
Example:
Send the command [CONTR20] to set the
output contrast to 20.
21. [SHARPn]
18. [CONTR]
This command sets the sharpness level to an
absolute value.
This command displays the current contrast
level and makes the contrast function active for
adjustments. See the [+] and [-] commands for
adjustment details.
Command Format: [SHARPyyCi]
yy = Level (yy = # from 00 to 48,default=10)
Ci = Unit ID (i = # from 0 to 99)
Command Format: [CONTRCi]
Example:
Ci = Unit ID (i = # from 0 to 99)
Send the command [SHARP20] to set the
output sharpness to 20.
Example:
Send the command [CONTR]. The unit will
display the current contrast level, for example
“[20]”. The contrast feature is now active and
the [+] and [-] commands may be used for
adjustment.
22. [SHARP]
This command displays the current sharpness
level and makes the sharpness function active
for adjustments. See the [+] and [-] commands
for adjustment details.
19. [COLORn]
Command Format: [SHARPCi]
This command sets the color level to an
absolute value.
Ci = Unit ID (i = # from 0 to 99)
Command Format: [COLORyyCi]
Example:
yy = Level (yy = # from 00 to 48, default=24)
Ci = Unit ID (i = # from 0 to 99)
Send the command [SHARP]. The unit will
display the current sharpness level, for example
“[20]”. The sharpness feature is now active and
the [+] and [-] commands may be used for
adjustment.
Example:
Send the command [COLOR25] to set the
output color to 25.
23. [HUEn]
20. [COLOR]
This command sets the hue level to an absolute
value.
This command displays the current color level
and makes the color function active for
adjustments. See the [+] and [-] commands for
adjustment details.
NOTE: The Hue adjustment does not apply to
Component Video.
Command Format: [HUEyyCi]
Command Format: [COLORCi]
yy = Level (yy = # from 00 to 48, default=24)
Ci = Unit ID (i = # from 0 to 99)
Ci = Unit ID (i = # from 0 to 99)
400-0422-001
12
SPECIAL APPLICATION
Example:
Example:
Send the command [HUE12] to set the output
hue to 12.
The AP445-401 has the S-Video input selected
and the gain level is set to the maximum level of
32. Send the command [SEL] and the unit will
display “[32]” and make the gain adjustment
active. The [+] and [-] commands may now be
used to adjust the audio level. The audio level
for other inputs will not change.
24. [HUE]
This command displays the current hue level
and makes the hue function active for
adjustments. See the [+] and [-] commands for
adjustment details.
27. [MODEN]
NOTE: The Hue adjustment does not apply to
Component Video.
This command turns the Digital Noise Reduction
feature on and off.
Command Format: [HUECi]
Command Format: [MODENpCi]
Ci = Unit ID (i = # from 0 to 99)
p = Noise Reduction (0 = OFF and 1 = ON)
Ci = Unit ID (i = # from 0 to 99)
Example:
Send the command [HUE]. The unit will display
the current hue level, for example “[12]”. The
hue feature is now active. The [+] and [-]
commands may be used to adjust the hue.
Example:
Send the command [MODEN1] to turn on digital
noise reduction for the AP445-401.
28. [MODEA]
25. [VLOA]
This command sets the aspect ratio between
wide and standard formats.
This command sets the output audio level to an
absolute value. This value will apply only to the
audio output of the selected input. Each input
type has its own audio level setting.
Command Format: [MODEAmCi]
m
Command Format: [VLOAnCi]
= Aspect Ratio (m = 1 or 2)
1
= Wide 16:9
2
= Standard 4:3
n = Level (n = # from 00 to 32)
Ci = Unit ID (i = # from 0 to 99)
Ci = Unit ID (i = # from 0 to 99)
Example:
Example:
Send the command [VLOA32]. This will set the
output volume to maximum.
Send the command [MODEA1] to set the aspect
ratio to wide format on the AP445-401.
26. [SEL]
29. [FREEZ]
This command displays the current audio level
setting and makes the audio function active for
adjustment using the [+] and [-] commands.
Each input selection has its own audio gain
level.
This command is used to freeze the image
displayed on the display.
Command Format: [FREEZpCi]
Command Format: [SELCi]
p = Freeze value (0 = OFF and 1 = ON)
Ci = Unit ID (i = # from 0 to 99)
Ci = Unit ID (i = # from 0 to 99)
Example:
Send the command [FREEZ1] to freeze the
image generated by the AP445-401.
400-0422-001
13
SPECIAL APPLICATION
Example:
30. [LOCKFP]
This command locks or unlocks the front panel
buttons. If locked, pressing the buttons on the
front panel will have no effect on the AP445-401
settings.
Select the brightness command for adjustment.
The current brightness level is 24, but it is not
the optimal value. After sending the following
commands, an optimum level of 20 is obtained:
Command Format: [LOCKFPpCi]
1.
p = Lock value (0 = OFF and 1 = ON)
Ci = Unit ID (i = # from 0 to 99)
[BRIGHT]
The current brightness level is 24.
2.
[ – ] [ – ] [ – ] [ – ] or [ -4 ]
The level is now 20 and is no further
adjustments are required.
Example:
Send the command [LOCKFP1] to lock the front
panel of the AP445-401.
33. […S]
This command increments a selected property
to be adjusted from the keyboard or front panel.
This command allows a setting from a single
command to be saved at one time. Use this
command to save a single property where it is
undesirable to save all the current settings.
Command Format: [ + ] or [ +k ]
Command Format: [ ..S]
[+] = Increment level by one-step
S
[+k] = Increment level by 'k' steps
Example:
Example:
Set the brightness level to 20 and save this
setting at the same time. In order to do this,
send the command [BRIGHT20S].
31. [ + ]
Select the brightness command for adjustment.
The current brightness level is 24, but it is not
the optimal value. After sending the following
commands, an optimum level of 30 is obtained:
1.
2.
34. [HELP]
This command displays information available for
the Multi-Tasker interface commands.
[BRIGHT]
The current brightness level is 24.
Command Format: [HELPCi]
[+][+][+][+][+][+] or [ +6 ]
The level is now 30 and no further
adjustments are required.
Ci = Unit ID (i = # from 0 to 99)
Example:
In order to display the RS-232 commands
available for the AP445-401, send the command
[HELP]. The commands, along with a brief
description, will be displayed in the terminal
window.
32. [ - ]
This command decrements a selected property
to be adjusted from the keyboard or front panel.
Command Format: [ - ] or [ -k ]
[-] = Decrement level by one-step
[-k] = Decrement level by 'k' steps
400-0422-001
= Save
14
SPECIAL APPLICATION
7.5 SUMMARY OF COMMANDS
31) [ + ]
Increment by one.
1)
[SIDn]
Set ID number of the unit.
32) [ - ]
Decrement by one.
2)
[RSI]
Reset ID of the unit to 0.
33) […S]
Save one parameter.
3)
[RSN]
Return unit ID number.
34) [HELP]
Display RS-232 commands.
4)
[VER]
Display firmware version.
TROUBLESHOOTING GUIDE
5)
[C]
Display current status.
6)
[CnS]
Display/save current status.
We have carefully tested and have found no
problems in the supplied AP445-401. However, we
would like to offer suggestions for the following:
7)
[STAT]
Display current status.
8)
[STATS]
Display/save current status.
9)
[CLR]
Retrieve default settings.
10) [IN]
Select input.
11) [INR]
Select input/recall settings.
12) [MODER]
Select output resolution.
13) [MUTE]
On-screen display ON/OFF.
14) [VCR]
Toggle VCR/Standard mode.
15) [BRIGHTn]
Set Brightness level.
16) [BRIGHT]
Display/select Brightness.
17) [CONTRn]
Set Contrast level.
18) [CONTR]
Display/select Contrast.
19) [COLORn]
Set Color level.
20) [COLOR]
Display/select Color.
21) [SHARPn]
Set Sharpness level.
22) [SHARP]
Display/select Sharpness.
23) [HUEn]
Set Hue level.
24) [HUE]
8
8.1 NO RESPONSE FROM PANEL
Cause 1:
The front panel is locked.
Solution:
Connect to the AP445-401 using
standard RS-232 communication.
Check the status [STAT] and verify
the front panel is “Unlocked”. If there
is still no response, please call
Altinex at (714)-990-2300.
8.2 NO DISPLAY
Cause 1:
The source has a problem.
Solution:
Check the source and make sure
that there is a signal present and all
source connections are correct. If
the source is working and there is
still no display, see Cause 2.
Cause 2:
The correct input is not selected.
Solution:
Select the input type from the front
panel or RS-232 bus. (See RS-232
accessible commands in Section 7).
If no display is present, see
Cause 3.
Display/select Hue.
Cause 3:
Cable connections are incorrect.
25) [VLOA]
Set audio level.
Solution:
26) [SEL]
Adjust audio level.
27) [MODEN]
Noise Reduction ON/OFF.
28) [MODEA]
Aspect Ratio Wide/Standard.
Make sure that cables are properly
connected. Also, make sure that the
continuity and wiring are good. If
there is still no display present, see
Cause 4.
29) [FREEZ]
Freeze the displayed image
30) [LOCKFP]
Lock front panel buttons.
400-0422-001
15
SPECIAL APPLICATION
Cause 4:
The display has a problem.
ALTINEX POLICY
Solution:
Make sure the display has power
and is turned on. If there is still no
display, please call Altinex at
(714)-990-2300.
9.1 LIMITED WARRANTY/RETURN POLICY
Please
see
the
Altinex
website
at
www.altinex.com for details on warranty and
return policy.
8.3 NO SOUND
9.2 CONTACT INFORMATION
Cause 1:
The source has a problem.
Solution:
Check the source and make sure
that it is working at an appropriate
volume level and all source
connections are correct. If the
source is working and there is still
no sound, see Cause 2.
ALTINEX, INC
592 Apollo Street
Brea, CA 92821 USA
TEL: 714 990-2300
TOLL FREE: 1-800-ALTINEX
Cause 2:
The wrong input is selected.
WEB: www.altinex.com
Solution:
Select the video input that
corresponds to the audio input. If no
sound is present, see Cause 3.
E-MAIL: [email protected]
Cause 3:
Cable connections are incorrect.
Solution:
Make sure that the cables are
connected properly. If the S-Video
input is being used, make sure the
audio source is connected to the
S-Video audio input. Also, make
sure that the continuity and wiring
are good. If there is still no sound
present, see Cause 4.
Cause 4:
Destination
problem.
amplifier
has
a
Solution 1: Make sure that the destination
amplifier is powered. If there is still
no sound, see Solution 2
Solution 2: Set the volume of the destination
amplifier to a reasonable level. If
there is still no sound, call ALTINEX
at (714) 990-2300.
400-0422-001
9
16