1
MAGIC
CHEF
Dear Magic Chef Customer:
We're so delighted that you have selected Magic Chef as your new range, and it is my personal
pleasure to assure yon that you have made a wise purchase. Generations of good cooks have learned to
know and trust the performance and workmanship of their Magic Chef, and today we feel very strongly
our responsibility to perpetuate the outstanding reputation of our products.
Although every part, feature and system has been manufactured with care and precision, you will
not enjoy your range to the fullest extent possible unless you are prepared to use it properly. Although
our Dealer or Builder will provide basic instruction about its use, we have painstakingly prepared this
"Care and Use" manual so that you will have all necessary information right at your fingertips. We urge
you to study it carefully before you attempt to use the range; the time required to do so will more than
pay for itself in the extra success and pleasure you will derive from your range.
We want you to be a satisfied customer. No matter which model you have chosen, your Magic
Chef range will give you years of good service. If you have any questions concerning its installation or
performance, call your Magic Chef dealer. If you are not satisfied with the response you get and wish to
contact Magic Chef directly, please address your inquiry or complaint to one of the locations listed
below. In any correspondence please include the complete model and serial number of the appliance, the
name and address of the dealer from whom you purchased the range, and the date of purchase.
We want you to know also that Magic Chef fully endorses the activity of the Major Appliance
Consumer Action Panel, a non-partisan
agency which exists solely for the purpose of resolving
Consumer complaints when the dealer/manufacturer
process does not perform satisfactorily. We do
not believe that recourse to this agency will ever be necessary, but we do want you to know of its
existence if the need should ever arise.
Thank You
Magic Chef
MAYCOR
240 Edwards Street, S.E.
Cleveland,
TN 37311
615/472-3333
or
818/961-3674
Be sure to read safety
(Customers
manual
in California)
before
using range
NOTE: The features covered in this manual are for various model ranges
(For R.V. and Domestic use). Please disregard portion pertaining to features
that are not on your particular range.
2
Table
of Contents
PILOT
ADJUSTMENTS
......................
9
Top burner pilot ............................
Oven pilot .................................
Air shutter adjustment .....................
SAFETY
INSTRUCTIONS
INSTALLATION
CHECKS
.................
8
HOW
TO OPERATE
YOUR
RANGE
CONTROLS ..................................
Operating the oven control ................
Broiling, Roasting Baking .................
Using the top burners .....................
Using the timer ...........................
8
8
8
TO SAVE UNNECESSARY
SERVICE
CALLS ....................................
CARE AND CLEANING
....................
l0
11
8
8
8
FLASHTUBE
HOLD-DOWN CLIPS
INSTRUCTIONS
............................
Top burner grate removal ..................
12
13
9
9
9
PROCEDURE
FOR ORDERING
WARRANTY
..................................
3-6
...................
CONTROLS AND ADJUSTMENTS
..........
Control style I, Propane gas only, no top
burner pilot ................................
Lighting oven pilot .........................
Shut down instructions .....................
Control style 2, Propane gas only, with
integral top burner pilot ....................
Lighting pilots .............................
Shut down instructions .....................
Control style 3, adjustable for natural or L.P.
gas with integral top burner pilot ...........
Lighting pilot ..............................
Shut down instructions
.....................
9
9
9
7
PARTS
. ..
Unfortunately,
statistics prove that the home is the most unsafe place you can
be. This is even more sad because so many home accidents could have been
prevented with just a little care and thought. Become familiar with your
NEW range. It may have features with which you may not be familiar.
READ
THE CARE & USE & SAFETY
MANUAL
CAREFULLY
before USING THE RANGE. Then please follow these precautions for safe
use of the range and train the whole family to observe them too.
!
be strictly
followed
in order
to eliminate
potential
fire
and
shock
on
considerations
haz-
ard conditions.
i NOTE:
The
following
instructions
are
based
safety
14
15
General Safety Precautions For Your Range
must
9
9
9
9
9
and
]
I
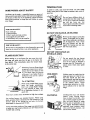
TEMPERATURE
SOME
WORDS
ABOUT
SAFETY
Accidents can be tragic -- especially
In order to cook, you must have heat. As your range
cooks, some parts of the range are going to get warm or
even hot.
because so many of
them could be prevented with a little care and judgment
I_/
basic good practices
your range,
in using
_
unwatched near the range when
it is in use or while the surfaces
are still hot from use. Let
burner grates and other surfaces
cool before touching them.
There are some
_
Do not
we hope you will follow
on the part of the user of the appliance.
FOR YOUR SAFETY
If you smell gas:
1. Open windows
2. Don't touch electrical switches
3. Extinguish any open flame
4. Immediately call your gas supplier,
,
DO
leave children
NOT
USE
RANGE
i
[|
/_l
Selection of correct flamebeight
is especially important to safety.
Adjust the burner flame so that
it is no larger than the bottom
of the pan -- any higher flame is
inefficient and can be a potential fire hazard.
_
_-_.
__
--
°
'
1
CHILDREN
.
[==_.
or melt.
range
and pans
it can
hot,
that they
shouldon not
playbe with
should not be usedabove.
as a stepstool
Avoid
to the cabinet
__
,
J
for long periods of time. Hot
fat is hazardous because it can
catch fire.
Never leave surface units unattended
permit the top burner
or the oven/broiler
secthe range to become a
area for flammable or
items which may ignite
Children must be taught that the
Use of High Flame
J
-__
Do not
section
tion of
storage
plastic
_°'_'_
_aa_'-_,,
_/\'
When using a high flame, never
_,_ / leave the range unattended.
Don't use a h_gh flame setting
_,
AS HEATER
fail
withforsuch
abuse.use and can
signed
heating
DO NOT USE RANGE
AS
STORAGE
AREA
When turning on a top burner the user must stay near
the range and make sure that the gas at the burner has
been ignited. Then immediately adjust the burner flame
to the correct size.
FLAME
_\<._ SELECTION
J
or
Never use the range as a kitchen
heater• Prolonged use for heating without adequate ventilation
can be dangerous.
Also, ovens
and top burners are not de-
!
liquid in the vicinity of this or any other appliances.
store or
use gasoline or other flammable vapors and
I Do
FORnotYOUR
SAFETY
alone
at high heat settings.
Top surface burners are attended burners. While using
them, periodic check is necessary for safe operation of top
burners. Even at low settings do not leave the burners
Always check the position of the range top control knobs
to make surefortop
burners/elements
unattended
long
periods of time. are off when you are
finished with cooking,
CLOTHING
t_._
storing items adractive to childrangein controls,
ren
cabinets and
overthator the
near
range
the
range.
_/
Clothing fires are a real kitchen
hazard.
Long, flowing sleeves
have no place in a kitchen - they
are too easily caught on pan handies, are easily ignited by range
r
way. Highly flammable clothing
especially some synthetic fabric
robes
pajamas, in can
burners andandflannel
are generally
the
also be most unsafe.
_
,
POT HOLDERS
Buy good, sturdy pot holders
and use them. Dish towels or
4. Hot Utensils
out
of
reach of
-younger
children. Never set hot pans on
a combustible surface.
burns when they are too thin or
become
entangled.
Keep pot
holders dry -- wet holders create
steam and cause burns. Keep
__
_
pot
flamesholders
when away
lifting from
or moving
open
other
utensils,substitutes can cause bad
PLASTICS
All plastics are vulnerable to
_-Let
pans coolsome
in a will
safe place
heat, hotalthough
with-
-]_______
UTENSILS
1. Type
Avoid pans
pans,
look
that
for
are
.C,:.
f
unstable
easily-grasped
handles that willstay cool. Pans
that are too heavy to move
easily when filled with food can
handles
and Incannot
and easilytwist
tipped.
choosingbe
tightened, discard the pan.
Use utensils only as intended.
This is particularly
also present a hazard.
If pan
important
for glass cookware.
Some glass cookware
should be used only in the oven; other pans areclassified
as flameware and may be used on top of the range.
GREASE
In the event of a grease fire, if
possible first cover the pan to
snuff out the fire. Do not use
_/_f_A._^,_
fire extinguisher
recommended
for kitchen use, if available, or
sprinkle
heavily
with baking
water to douse the flame. Use a
soda.
_
Grease is flammable
2. Size
size of the burner, being sure the
utensil is large enough to avoid
boil-overs or spill-overs. This will
Select the right size utensil for the
both save cleaning and prevent
accumulations
of food,
since
heavy spattering or spill-overs left
on a range can catch fire.
Never leave surface units unattended
__ _
and should
ting grease deposits colleet around
the range or in vent fans. Don't
y,
_-_-"_,_'_--a
others. higher
stand
Keep temperatures
all plastics away
than
from parts of the range which
may become warm when the
range is in use.
BROILER
at high heat settings.
the range--refrigerate
or dispose
be them
of
handled
promptly.
carefully.Let Avoid
quantities
letof hot fat -- a pan of deep fat,
leave cans of drippings around
for example -- cool before attempting to move or handle it.
__
PAN
deep fat frying. Always be certain
the pan is large enough to allow
for the volume of food to be added and for the fat to bubble up. A
deep kettle is best for this. Foods
Pan sizeis especially important in
highin water content, such as potatoes, bubble more than those
low in water content. Never leave
a deep fat frying operation unattended.
Always remove the broiler pan
from the compartment as soon as
you are finished
broiling.
It
wash and then there is no chance
that the pan and drippings will be
forgotten. Grease left in the pan
can catch fire if the oven is used
without
removing
the broiler
makes the pan much easier to
pan. In using the broiler, remember too that if meat is too
close to the flame the fat may
ignite.
OVEN USE
C_
_
_ ))
/f_/
I_'_..____
I1 __
II
3. Handles
To minimize
Do not heat an unopened
burns,
ignition
of
glass or metal container
of food
in the oven. Buildup of pressure may cause the container
due to unintentional contact with
the utensil, the handle of a utensil
should be positioned so that it is
flammable
turned
inward,
materials
and does
and not
spillage
extend
over adjacent
surface
burners,
5
to
to the range.
Always let initial rush of heat and / or steam disperse from
heated oven before placing or removing food. Do not allow
excess
burst and
spillovers
result into serious
accumulate
personal
in the
harm
oven.
and/or
Underdamage
some
conditions, these may ignite and cause an oven fire. If fire
occurs do not open the oven door. Immediately turn offthe
gas.
the oven rack out, rather than
._ Always
pothot
holder
reachinguse
intoathe
oven to
to poll
add
._--_
f
or
remove
Be sure tooven
put
racks
and food.
any removable
rack supports back into the oven
correctly after cleaning. They are
designed to lock and not tilt when
properly inserted.
Always check the position of oven
control knob to make sure oven is
off when you are finished cooking,
EYE-LEVEL
OVEN
USE
[_
DO
NOT
USE
fl
_
__J_
ALUMINUM
oo_
__
MAINTENANCE
heavy roast with drippings.
_
_
"_=_
_ _
_
_-
• Never light matches
gas are noted,
,__½
__
_.___\
_
And please don't lean on a range.
Loose fitting clothing might catch
combustion.
• Do not tamper
fire.
• Do
leave the gas burning
theirnotsize.
=_----_
_-
with the burner orifices or change
while traveling
and
lineeXpeeiallYserviceWhilestation.refueling
your vehicle at a gaso-
FOIL
_,
in the vicinity if the odors of
while using the range. Gas flame consumes oxywhich orhas
be vent
replaced
proper
i gen
A window
otherto air
should tobeassure
open slightly
• Do not leave the top burners
on without
a utensil
may cause the porcelain enamel to craze and chip.
•
If your range is equipped with a top cover,do not
leave it down with the top burners on. Turning on
the burners with the covers down could cause incomplete
combustion,
put the burnerof out.
It is
for
any length
of time.orOverheating
the grate
a hazard
• Do notusebroiler
areatostoreutensils
astheoven
burnerand pilot
may become damaged,orknocked
outofproperalignment.
SPRAYS
_e_
_
Your range must he kept clean
breaker.
grease or spill-overs which may
ignite.
and free of accumulations of
Do's and Dont's
--
is a cause of many range fires--as
well as baking problems. Use foil
only as instructed--particularly
in the broiler. Holes in the broiler
pan or the air openings in the
oven
bottom
never be
Aluminum
foil, should
used improperly,
covered with foil.
AEROSOL
2. Alwayshandlebulbwithdry
hands.
3. If light bulb should break, before changing bulb disconnect
power to the range by unplug(never
ging
from
a wet)
outlet
cloth
or by
to _emovprotect
ing fuse or throwing circuit
_%._
/f
=_
(_
,,/_/ j / _-_
_1_,,'_ _,
BULB,
1. cool.
Wait until oven and bulb are
Extreme caution is necessary
when preparing heavy food items
in an elevated oven, especially if
considerable amounts of hot fat
are involved; for example, a
OVEN
DOOR
AS
A STEPPING
STOOL
OR AS A CHAIR
_
i
TAKE THESE PRECAUTIONS:
WHEN REPLACING
OVEN LIGHT
• Use rangeonlyforcookingoperations.
Itwillwork
better and longer if treated with care and used as
intended. Do not overload.
Avoid their use near a range as
most are highly flammable.
Followinstructions
on thecontainer label,
• Do not operatea range that ispartially
disassembled or when some part is missing or broken.
6
I Make sure top burner and oven control knobs and
top pilot shut off valve ( when provided ) are all in
" OFF " position while filling the propane/butane
tanks
INSTALLATION
CHECKS
BE MADE BY USER.
TO
Do not repair or replace any part of the appliance
unless it is specifically recommended in the literature
you receive with the appliance. All servicing should
be referred to a qualified technician. Insist that
genuine Magic Chef replacement parts be used in the
repair of your appliance. If for any reason thereplacement component cannot be assembled mechanically
and/or electrically, contact the Magic'Chef service
engineer. Do not rework the component and/or
appliance wiring.
• Be sure the installation complies with Local and
National existing codes.
Electrical power supply to the range must be
disconnected
before any component
that is
attached with a screw or fastener is removed.
The installation,
adjustment, and service of this
range must be performed by a qualified gas installer
and serviceman. This is necessary to insure proper
operation and to avoid the possibility of damage to
the appliance or injury to users. Before the installer
leaves your premises, you may wish to question him
on the following points:
SAFETY PRECAUTIONS
TO BE OBSERVED
WHEN USING YOUR RANGE
Learn
Keep
the
valve
know where the main
and electric
only for cooking
and longer
if treated
disconnect
operations.
with
care
are
It will work
and
used
as
your
range
clean
and
in good
repair.
Repairs
should be done only by qualified personnel. Attempts to repair your range by others could result
in damage or hazard.
Use
preventative
children.
measures
to
avoid
injury
to
Do not leave small children unattended
near a range
when the range is in use. As children
mature
enough
to learn, instruct them in the safe,
correct
use of the range.
Remember,
some
parts
your range
is a cooking
to get hot. Train
are intended
device and
yourself
to
avoid the hot surfaces.
IMPORTANT
5. Air Shutter Adjustment.
Burner air shutter
opening to he checked and adjusted (if necessary)
forproperburnerlightingandfiamecharacteristics.
After the air shutter adjustment is made the air
shutter screw must be in place and tightened,
The California
Enforcement
Act
SAFETY
NOTICE
AND WARNING
Safe Drinking
Water and Toxic
of 1986
(Proposition
the Governor of California
65) requires
to publish
a list of
substances
known
to the State of California
to cause
cancer
or reproductive
harm,
and requires
businesses
to warn customers
of potential
exposures
to
ELECTRI-
such substances.
Users
When installing a new range or moving one to a new
location in your home, have a qualified
electrician
verify that:
of this
burning
appliance
are hereby
warned
that the
of gas can result in low-level exposure to
some
of the listed substances,
including
benzene,
formaldehyde
and soot, due primarily
to the incomplete combustion
of natural gas or liquid petroleum
(LP) fuels. Properly
adjusted
burners will minimize
incomplete
combustion.
Exposure
to_ these
substances can also be minimized by properly
venting
the burners
to the outdoors.
grounded, three-
Donotunderanycircumstances,
prong
by reading
intended. Do not overload.
4. Type of gas. There are two major types of gas
--Natural and LP (bottled gas). Appliances designed
for one gas cannot be used on the other without
some adjustments. Be sure your range is correctly
adjusted by a qualified serviceman for the type of
gas on which it is to be used.
cut or remove the third (ground)
the power cord plug.
of the range
Use range
better
operate properly.
3. Shutoff
Valve.
Have the installer show you
where the gas shutoff valve for the range is located
so that you know how and where to turn off gas to
the range,
prongreceptacles,
use
In case of future emergency,
exposed to excessive heat.
2. Venting.
Never block the vents (air openings
above and below the oven) of the range. They
provide the air that is needed for the range to
• Range circuits have adequately
correct
range gas shut-off
located.
1. Clearances.
Be sure that the installer has observed
all the instructions in the installation manual for
minimum clearances to any combustible surface,
Also, some types of wall tile may melt when
CAUTION" ALL RANGES REQUIRING
CAL SUPPLY MUST BE GROUNDED
the
Care & Use Manual.
from
?
Controls and Adjustments
NOTE: If range has not been operated for a long
period of time a longer waiting period for ignition
of the pilot may be necessary due to air in the gas
line.
I
_
'_
_ o oo#
_._
1. Be sure all valves are in
LIGHTING
OVEN
PILOT
oven
control knob should
_-.__ __
be in " OFF" position.
2. Turn on main gas supply
range. position. The
the to
"OFF"
Oven Control knob
in off position
3.
I
Lighliag oven pilot { When pilot is
located on the right side of burner.)
Lighting top pilot
b
Depress and turn control
knob to the "OVEN PILOT
ON"
position.
This will allow
located on left side of burner.)_¢--'_
4. Open oven door and light
oven
match.
small pilot
flamewith
will a be
notgas to oven pilot.
ed
at the top of the pilot
burner,
C
Oven Control knob
in Oven Pilot On position
SHUT
DOWN
SHUT
INSTRUCTIONS
lift the main top and turn pilot shut off valve handle-to
position
NOTE:
If
BURNER
PILOT(
has
been
range
not
WHEN
operate
PROVIDED
d for
TOP
OFF,.-m
\
_
_
ON__
• [_
_:5_tll_J_i_)_;_
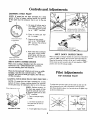
To adjust the top burner pilot, lift the main top and turn the
pilot adjustment screw with a screwdriver. The top burner
pilot flame should be about % of an inch above the lighter cup
as shown in illustration.
: Before
turning on
gas supply
to the
range
be sure all top burner control
knobs
are in the
"OFF"
position
PILOT FLA[ME LIGHTER
I. Turn on main gas supply
/
J
V
Pilot Shut Off Valve
PILOT
a long
the main
_-
BURNER
)
NOTE
screw
and turn off main gas supply.
v,_
period
longer
waitingdueperiod
of the of
pilottimemaya be
necessary
to airforin ignition
the gas
Pilot adjustment
"OFF"
Pil-t ._A_jal
ustments
When
Recreational
not in
or while
traveling,the turn
the oven Vehicle
control isknob
to use
" OFF
"
position
and turn off main gas supply,
this will turn
off the oven pilot.
TOP
INSTRUCTIONS
When pilot is
When top burner cooking is finished the control knob should be
turned to "OFF" position, the top burner pilot will remain lit.
When the Recreation Vehicle is not in use or while traveling,
When oven cooking
is finished,
turn the oven control knob to the "' OVEN PILOT
ON " position,
the oven standby
pilot will remain
lit.
LIGHTING
DOWN
2.
turnLift
pilotmain
shuttopoffpanel
valveand
to
-""_1"'_
torange
on position.
3. Touch lighted match
to pilot.
-'
I POON
FLASH TUBE
8
I
AIR
SHUTTER
ADJUSTMENT
Air shutters when provided on top
burners are to be adjusted so that
each cone of the flame is separate
and distinct and appears as illustrated. Air shutters set too far
open will cause flame to lift away
ficult
shutters
are
closed totoolight.
much Iftheair flame
will look
hazy and
the head
distinct
willdifbe
from
burner
and cone
will be
missing,
How
Your
OPERATING
ROASTING
Season meat, if desired. Place meat fat side up on
the rack in an uncovered pan. Turn oven control
knob to the desired temperature.
Most meats can
be cooked at 300-325 ° F., bat pork should be cooked
at 350 ° F. Small poultry may be cooked at 375 ° F.
for best browning. The only accurate way to tell
Primary
/
Cone
/
I
I/_N_
is with a meat thermometer.
is
inserteddoneness
intomeatof meat
portion
the roastwell
with
tip
internal
(rare,of medium,
done)
not resting in fat or against bone. Add no water:
Roast in oven to the doneness desired. No basting
is necessary.
BAKING
Make sure your oven is level, otherwise you may
have uneven baking. After turning the oven control
_
t3nerate
_'l_ange
THE
knob
the desired
temperature,
let the When
oven operate forto about
10 minutes
for preheating.
baking in one pan place it in the center of the oven. If
Controls
OVEN
Be sure thermometer
a flat cookie sheet is used, allow two inches space
between back, side, and front of oven. When glass
or very dark metals are used for baking, reduce temperature setting recommended in the _ecipe by 25 °.
CONTROL
USING
Depress and turn the oven control knob
(counter-clockwise)
THE
TOP
BURNERS
Models with top burner
ring. There is a delay of about
45 seconds before the main burner ignites. This is normal and
This control
lighter
has no pre-set
po-
k sition
the desired
flame can
be adjusted but
to any
height
between full on and off. To light
the top burners, turn the control knob left (counter-clockpilot
wise) to full on position. From
the full on position the flame
may be lowered by turning knob
back to the right (clockwise).
there is no gas escaping during
this delay. It is also normal for
the oven burner flame to cycle
to
setoff the
and desired
on, at temperature
all set temperatares except broil. This maintains a constant temperature
in
the oven.
Models without top burner pilot
Light match, turn control knob left (counter-clockwise) to the full on position, apply lighted match
immediately to the burner. Adjust the flame height
by turning the knob back toward the off position.
HELPFUL
HINTS
FOR
BETTER
COOKING
CAUTION -- DO NOT TURN CONTROL KNOB
ON AND ALLOW GAS TO ESCAPE BEFORE
LIGHTING MATCH.
BROILING
Broiling in your recreational vehicle range is very
much like broiling in your kitchen range at home.
Generally, the distance between the meat and the
burner flame regulates degree of doneness and broiling time. Set oven control knob to broil "BR" position. Place food to be broiled on broiler grille and
pan. Place pan in broiler (area directly below oven
burner). You can count on your gas range broiler
to provide smokeless, "closed-door" broiling.
USING
9
THE
TIMER
To set the 1-hour timer on models so equipped, turn
the timer dial to the right (clockwise) to the desired number of minutes. At the end of the pre-set
period a bell will sound.
NOTE: If the timer is to be set for less than 15
minutes, first turn the dial to 15 and then dial back
(counterclockwise)
to the lower setting.
What To Do To Save Unnecessary Service Calls
Covered in this section are some of the most common complaints -- their causes and
corrections. By making a few simple checks you may save the bother and expense of a
service call.
CONDITION
1.
• No gasto oven pilots
2. •
•
•
•
•
•
•
Oven slow heating up
Poor baking
Poor ignition of burners
Pilots won't stay lit
Popping sound from top burners
Carbon on pilot shield
Burner flame too low or too high
CORRECTION
A. Check and make sure oven control knob is in
"OVEN PILOT ON " position
A. These conditions may be caused by a defective
gas pressure regulator. Have the regulator tested by your gas dealer.
A. Be sure the pilots are adjusted correctly for type
of thermostat being used. See pilot adjustment
section.
3. • Oven pilots will not light or stay lit
4. • Top burners
won't light
5. • Gas smell
6. • Cake rises higher on one side
7. • Cakes burn on bottom
8.
Oven will not operate
B. Check pilot tubings: may be kinked, clogged or
leaking at fittings.
C. Have gas pressure regulator tested.
D. Be sure oven control knob is not in the "Pilot
Off" position.
A. Check and position top burners and flash tubing.
B. Check pilot flame.
C. Adjust air shutter, if equipped. See air shutter
adjustment section.
D. Clogged burner ports, clean with a toothpick.
A. Check all connections with soapy water (never use a
match or flame to check for leaks}. This should be
checked periodically in recreational vehicles as
vibrations due to travel may loosen connections.
A. Pans set too close to side of oven. Allow two
inches from side.
B. Range not level.
A. Oven too full for proper circulation (see baking
instructions).
B. Using pan with dark bottom
A. Check and make sure oven pilot is lit.
10
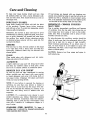
Care and Cleaning
To keep your range looking bright and new, wipe
all surfaces after use with a warm detergent solution and soft cloth. This should be done as soon as
the range cools,
If top
pound,
opened
tion. It
on the
PORCELAIN
ENAMEL
Some foods contain acid which will dull the finish
of the porcelain. Vinegar, lemon juices, tomatoes,
and milk are a few. To avoid this happening, simply
wipe-up spills immediately,
IMPORTANT:
MAIN TOPS
CHROME FINISHED
Due to certain atmospheric conditions and because
of oxidation from the top pilot, the chrome top on
Remember, the surface is glass and must be given
consideration in cleaning. Steel-wool pads, wire scourers, or gritty cleansers will scratch and wear down
the surface. Any gentle kitchen cleansing powder
or chemical grease remover will do a good job. Yet
not harm the finish,
your range may show signs of rust on the underneath side. This is especially true in areas of high
humidity and salt air areas.
To help eliminate this condition, caution should be
taken to make sure that the underneath side of the
main top is kept dry in areas of high humidity
where moisture accumulates. If you detect signs of
rust, we have found it to be helpful to spray the
underneath side with a coat of high heat tested rustolium or silicone paint.
CHROME
The best way to clean chrome surface on the range
is to wipe them with a damp cloth and then dry
thoroughly. Stubborn stains may be removed with
chrome polish.
CAUTION:
GLASS
Wipe cooled glass with detergent
Rinse and polish with soft cloth.
burners are cleaned with any cleaning corncare should be taken to see that all ports are
up with a toothpick to insure proper operais especially important that the lighter ports
side of the burner head are kept clear.
Remove top from range
and spray
well vented area.
and hot water.
ALUMINUM
A light steel-wool soap pad will bring back luster
and clean any stubborn stains or food spots. Avoid
use of lye or caustic solution on aluminum parts.
BROILER
PAN AND INSERT
As soon as food has been transferred
to serving
plates, sprinkle pan and insert with soap powder
or
and coverwill
withsteam
dampandcloth
or
wet liquid
paper detergent
towels. Drippings
loosen
while your meal is being served.
_ooo
_----
NOTE : If oven bottom is removed for cleaning or
servicing, be sure that oven bottom is locked in
place when it is put back into the range. Oven bottom can be removed for cleaning by pushing in on
both sides and lifting front to release from side
supports.
CAUTION: If a commercial oven cleaner is used
protect aluminum gas tubing, thermostat
sensing
bulb and electrical components from the cleaners.
(Masking tape is good for this.) Thoroughly rinse
oven with a solution of 1 tablespoon vinegar to 1
cup of water.
STAINLESS
STEEL MAINTOP:
looking new it should be cleaned
with stainless steel cleaner.
To keep it
periodically
11
in
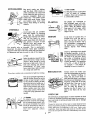
INSTRUCTIONS
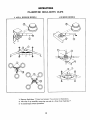
FLASHTUBE
3 AND 4 BURNER
HOLD-DOWN CLIPS
MODELS
4 BURNER
MODELS
)
1. Remove flashtubes _ from top burners ® as shown in illustration.
2. Lift clips ® up carefully removing one end at a time from flashtube
3. To install clips reverse procedure.
12
o.
INSTRUCTIONS
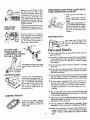
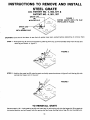
TO REMOVE AND INSTALL
STEEL GRATE
U.S. PATENT NO. 4, 593, 677 &
PATENT NO. 4, 261, 327
GRATE LEG
(B)
WITH NO CLIP
_
_
_
-_GRATE LE G-_-__'_
(A)
WITH SPRING CLIP
CAUTION:
_
'
_
SHOWS
FIGURE 1
GRATE WITH
INSTALLED
ITS CLIP
IN PLACE.
"_Q_-
_dL__v
_._.__
Care should be taken to see that all grates have been cooled before attempting
to remove them.
STEP 1 - Hold grate leg (B) (the one opposite to grate leg with clip), pull horizontally away from the clip and
raise leg as shown in figure 2.
Z
STEP 2 - Holding the grate leg (B) raise the grate vertically
spring clip snaps out of the slot.
FIGURE 2
upward as shown in figure 3 until the leg (A) with
_/J%_</_
TO REINSTALL
FIGURE 3
GRATE
Reverse step's 2 & 1. Hold grate by leg (B) and insert leg (A) with spring clip into the large slot. Bring grate to
horizontal position and pull away from the spring clip and snap locking tabs of leg (B) into the small slot.
13
< MAGIC
Dear
CHEF
Consumer:
Your recreational
vehicle range was carefully
inspected and tested before shipping.
provide you with the Limited Consumer
Protection
Warranty
set forth below•
To assure
you further
we
X
MAGIC
CHEF
RECREATIONAL
VEHICLE
RANGE
This warranty gives you specific legal rights, and you may also have other rights which vary from state to state.
Subject to the limitations
set forth, we warrant your
to the product caused by misuse, failure to maintain the unit
recreational
vehicle range under normal use and repair
properly, accident or act of God.
against defects in workmanshipLIMITED
or materialCONSUMER
for a period ofPROTECTION
4. EXCLUSIVEWARRANTY
WARRANTY•
This limited written
i
one year from date of installation•
Under this warranty we will replace anydefective
<_
part at no
warranty is the only warranty made by Magic Chef. This
limited warranty is in lieu of any other warranties
or
labor involved in the removal of the defective part and the
installation of the replacement. The replacement part assumes
cost unused
the
or expense
portionto you
of this
except
warranty,
for the costs of delivery and
This warranty applies only within the contiguous 48 states of
warranties which are limited as to duration. Magic Chef does
not authorize any person to provide any other warranty or to
assume
liabilitiesanyonfurther
the part
obligation
of Magic
in connection
Chef exceptwithfor
theimplied
sale of
this Magic Chef range.
the continental United States.
LIMITATIONS
....
I. Porcelain Enamel and Decorative
finishes. Porcelain
.
.
•
enamelIsactuallyglassfusedonsteelandwdlehtporcrazelf
not properly cared for Th s warranty does not apply to
• • ename , or other
_..,
porcelain
llnlsfles
or to scratches ".In or
•
.
•
5. LIMITATION ON IMPLIED WARRANTIES.
Implied
warranties of merchantability
or, to the extent applicable,
fitness for a particular purpose are limited to one year, the
.
_ . . . ,
.
., ,
same duration as the oaslc ilmiteu written warranty prowoeo
hereb
Somestatesdonotallowlimitationsonhowlon
an
.
. y"
. . .
g
_mplied warranty lasts, so the above hmitatmns may not
app y to you.
d_scoloration of decoratwe fimshes.
2. Consumable Items. This warranty
....
6. CONSEQUENTIAL
DAMAGES
Magic Chef shall not
.
_
."
•
be responsible Ior any consequentml damages caused oy
does not apply to light
rbeU_lbaScedr
n_IthOerceoSCuer_
tfrboeStinWh_hain_mnS_ncbeperiodically
•
3. External Factors• This warranty does not apply to damage
If the range
fails
to operate
1. Whenever
requesting
plate of your range.
properly,
service,
2. Contact
your recreational
directly
to obtain the name,
please
we ask
be sure
you
¢_
defect intherange.
Somestatesdonotallowtheexclusionor
limitation of incidental or consequential
damages, so the
above limitation or exclusion may not apply to you.
to do the following:
to give
the model
and serial
vehicle
dealer or contact
a Magic
Chef
telephone
number
and address
of your
MAYCOR
240 Edwards
Street,
S.E.
Cleveland,
TN 37311
615/472-3333
3. If our Service
Agency
does not repair your range
directly
to us, giving
us all pertinent
information
h_
_A_
numbers
Service
nearest
to operate
properly
within
so that we can assist
you.
which
Agency
Magic
are found on the rating
in your area or contact
Chef Service
Agency.
the warranty
period,
Sincerely,
MAGIC
CHEF
15
please
us
write