1
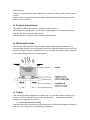
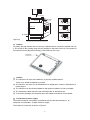
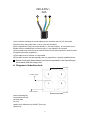
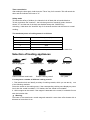
Instruction Manual of IND60T Induction Hob Model: IND60T IM IND60T_20100202 -1- Dear Customer: Thank you for purchasing the CNA induction hob. We hope it will give many years of good service. Please read this instruction manual carefully before using the hob and keep it in a safe place for future reference. z Product Introduction The IND60T induction hob caters for all kind of cooking, with its electromagnetic cooking zones, and its micro-computerised controls and multi-functions, making it the ideal choice for today's family. The induction hob is extremely user-friendly, durable and safe. z Working Principle The induction hob comprises a coil, a hotplate made of ferromagnetic material and a control system. Electrical current generates a powerful magnetic field through the coil. This produces a large number of vortices which in turn generate heat which is then transmitted through the cooking zone to the cooking vessel. z Safety This hob was specially designed for domestic use. In its constant search to improve its products, CNA reserves the right to modify any technical, programme or aesthetic aspects of the appliance at any time. 1. Protection from over-heating A sensor monitors the temperature in the cooking zones. When the temperature exceeds a safe level, the cooking zone is automatically switched off. -2- 2. Detection of small or non-magnetic items When a unsuitable size or non-magnetic pan (e.g. aluminium), or some other small item (e.g. knife, fork, key) has been left on the hob, the hob goes automatically on to standby a minute later. 3. Residual heat indicator When the hob has been operating for some time,there will be some residual heat. The letter “H” appears to warn you that it is too hot to touch the surface. 4. Auto shut down Another safety feature of the induction hob is auto shutdown. This occurs whenever you forget to switch off a cooking zone. The default shutdown times are shown in the table below: Power level The heating zone shut down automatically after 1~3 8 hours 4~6 4 hours 7~9 2 hours When the pan is removed from the cooking zone, it stops heating immediately and switches itself off after the buzzer has sounded for one minute. Warning: Anyone who has been fitted with a heart pacemaker should co nsult a doctor before using the induction hob. This hob complies with all current standards on electro-magnetic safety and in keeping with the legal requirements 89/336/CE & Directives Installation 1. Cut a hole in the worktop of the dimension shown in the diagram below. A minimum of 50 mm space should be left around the hole. The worktop should be at least 30 mm thick and made of heat-resistant material. As shown in Figure (1) 49 cm m 56 c 5 cm Figure (1) 5c m min i min i Figure (1) i min 5cm 2. It is essential that the i nduction hob is well ventilated and that the air intake and exit are not blocked. Make sure the hob is correctly installed as shown in Figure(2). -3- mini 750 mm Air exit mini 5 cm mini 5 mm mini 2 cm Air intake Figure (2) Caution: For safety, the gap between the hob and any cupboard above it should be at least 750 mm. 3. Fix the hob to the worktop using the four brackets on the base of the hob. The position of the brackets can be adjusted according to the thickness of the top. Caution: (1) The induction hob must be installed by a properly qualified person. Never try to install the appliance yourself. (2) The induction hob must not be installed above refrigerators, freezers, dishwashers or tumble dryers. (3) The induction hob should be installed so that optimum radiation of heat is possible. (4) The wall and the area above the hob should be able to withstand heat. (5) To avoid any damage, the sandwich layer and adhesive should be heat-resistant. Connection to power supply The socket should be connected in compliance with the relevant standard, to an omnipolar circuit breaker. 30 AMP minimum supply The method of connection is shown in Figure 3. -4- 220-240V~ 32A (1)If the cable is damaged or needs replacing, this should be done by an after-sales technician using the proper tools, so as to avoid any accidents. (2)If the appliance is being connected directly to the mains supply , an omnipolar circuit breaker must be installed with a minimum gap of 3 mm between the contacts. (3)The installer must ensure that the correct electrical connection has been made and that it complies with safety regulations. (4)The cable must not be bent or compressed. (5)The cable must be checked regularly and only replaced by a properly qualified person. Means for all-pole disconnection must be incorporated in the fixed wiring in accordance with the wiring rules z Diagram of induction hob: Air entry Ceramic plate Control panel 2 3 1 4 Air vent Power regulating key Control panel Air vent Ceramic plate Air entry Heating zone selection key ON/OFF Timer key System key -5- Schematic diagram of the control panel Heating zone selection key Timer key ON/OFF Power Regulating key System key Instructions for Use Preparation before using: When the power is switched on, the buzzer will sound once and all the indicators will come on for one second and then go out. The hob is now in standby mode.Place the pan in the centre of the cooking zone. Operating instructions When the ON/OFF key is pressed, all the indicators show "-". Select the power level by pressing the "+" or "-" key for the relevant hotplate. To begin with the indicator shows "5".Adjust up or down by pressing the "+" or "-" key .If you press the "+" and "-" keys simultaneously,the power setting returns to "0" and all the cooking zone switches off.See the table on Page 6 for the power specific to each cooking zone. Warning: When the ON/OFF key is pressed, the induction hob returns to standby mode if no other operation is carried out within one minute. Timing function Press the timing key and the indicator will start flashing. Then set the time for between 1 and 99 minutes, by pressing the "+" an d "-" keys. Pressing the "+" key once increases the time by one minute; pressing the "-" key once decreases the time by one minute. When the set time exceeds 99 minutes, it will automatically return to "0" minutes. If the "-" and "+" keys are pressed simultaneously, the indicator will display"0". Timer confirmation (1) Select the power level of the cooking zone and then press the "Timer" key. The timer can now be set. (2) When the timing indicator has been flashing for 5 seconds, the set time will be automatically confirmed. (3). After selecting a set time, confirm by pressing the "Timer" key. -6- Timer cancellation After setting the time again, hold down the "Timer" key for 5 seconds. This will cancel the timer and the indicator will revert to "0". Safety mode To ensure the safety of children, the induction hob is fitted with an interlock device. To lock: hold down the "Interlock" ; the hob then goes into "Interlock" mode, the timer shows "LO " and the rest of the keys are disabled except the "ON/OFF"key. Unlocking : Hold down the "Interlock" key for 2 seconds and the hob will return to normal working. The maximum power of cooking zones is as follows: Max. power (W) Heating zone 1 1500 2 2000 1500 2000 3 4 The above may vary according to the size of the pan and the material it is made from Selection of heating appliances Iron oil frying pan S tainless steel pot Enamel stainless steel kettle Iron pan Enamel cooking utensil Iron kettle Iron plate You may have a number of different cooking vessels 1. This induction hob can identify a variety of cooking vessels, which you can test by one of the following methods: Place the vessel on the cooking zone. If the corresponding cooking zone displays a power level, then the vessel is suitable. If "U" flashes, then the vessel is not suitable 2. Hold a magnet to the vessel. If the magnet is attracted to the vessel, it is suitable for use with the induction hob. Warning: The base of the vessel must contain magnetic material. It mu st have a flat bottom with a diameter of more than 12 cm. -7- z Care and Maintenance: If the power cable is damaged it should be replaced by our service agent or by another suitably qualified person. For indoor use only. Never wash the induction hob directly with water. Never have the induction hotplate to work without food inside, otherwise its operational performance may be affected. Always open sealed containers, such as cans, before heating them, otherwise they may explode. When a cooking zone has been on for a long time the surface remains hot for some time afterwards - so do not touch the ceramic surface. From time to time check that nothing (e.g. glass, paper, etc.)is obstructing the air intake beneath the induction hob. Do not leave metallic objects, such as knives, forks, spoons and lids on the hob as they may get hot. Never use the induction hob near another appliance which generates a high temperature ,such as a gas cooker or a paraffin heater. Do not store detergents or flammable materials beneath the hob. -8- If the surface of the hob is cracked , switch off the appliance to avoid any possibility of electric shocks. Do not place rough or uneven vessels on the hob, as they may damage the ceramic surface. Clean the induction hob regularly to stop foreign objects from getting into the fan and preventing the appliance from working properly. Keep children or infirm persons away from the appliance. Never let them use it unsupervised. DISPOSAL: Do not dispose this product as unsorted municipal waste. Collection of such waste separately for special treatment is necessary. This appliance is labeled in compliance with European directive 2002/96/EC for Waste Electrical and Electronic Equipment (WEEE). By ensuring that this appliance is disposed of correctly, you will help prevent any possible damage to the environment and to human health, which might otherwise be caused if it were disposed of in the wrong way. The symbol on the product indicates that it may not be treated as normal household waste. It should be taken to a collection point for the recycling of electrical and electronic goods. This appliance requires specialist waste disposal. For further information r egarding the treatment, recovery an d recycling of this product please contact your local council, your household waste disposal service, or the shop where you purchased it. NOTE: a. This appliance is not intended for use by persons (including children) with reduced physical, sensory or mental capabilities, or lack of experience and knowledge, unless they have been given supervision or instruction concerning use of the appliance by a person responsible for their safety. b. Children should be supervised to ensure that they do not play with the appliance. c. The appliance is not intended to be operated by means of an external timer or separate remote-control system. d. A steam cleaner is not to be used to clean. e. After use, switch off the hob element by its control and do not rely on the pan detector. -9- Care and Maintenance The surface of the induction hob may be easily cleaned in the following way: Type of contam-ination Method of cleaning Cleaning materials Rings and lime scale Apply white vinegar to the area, Special hob cleaner such as wipe it dry with soft cloth or use Hob Brite a commercially available product Burnt on stains Use a special scraper for ceramic Special hob cleaner such as glass to remove residue (a silicon Hob Brite product is best) Warning: Disconnect the power supply before cleaning. Avoiding banging pots and pans down on the hob. The glass surface is tough but not un-breakable. Avoid rubbing with any abrasive or with the base of the pans etc as in time this will deteriorate the markings on the top of the ceramic hob. Avoid using pans with rough or dented bases which can cause scratches to the glass surface. Place the pans in the middle of the cooking zone. Do not leave any empty pan on the heating zone. Failure Display and Inspection If any abnormality occurs, the induction hob will automatically go into protective mode and display one of the following codes: F0/F1/F2 Fan failure Contact the service company F3-F8 Temperature sensor failure Contact the service company E1/E2 Abnormal voltage in power Check if power supply is supply normal. Power on after power supply returns to normal. E3/E4 Abnormal temperature Check the pan E5/E6 Poor heat radiation in cooking zone Restart when cooking zone cools down The above table shows how to assess and check common faults. Do not dismantle the appliance yourself, otherwise you may damage the induction hob. Customer Care Service If a fault should occur, before calling After Sales Service, please do the following: -Check that the appliance is correctly connected. -Read the failure and display table above If you are still unable to resolve the problem, switch off the appliance, do not try to dismantle it, and call After Sales Service. Special Declaration The contents of this manual have been carefully checked. However, the company cannot be held responsible for any misprints or omissions. Also, any technical modifications may be included in a revised version of the manual without notice. The appearance and colour of the appliance in this manual may differ from the actual one. - 10 -