1
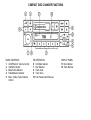
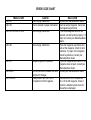
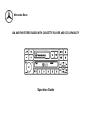
Mercedes-Benz
AM AND FM STEREO RADIO WITH CASSETTE PLAYER AND CD CAPABILITY
Operation Guide
Overview
Prepare to enjoy the many pleasures of listening to a superb sound system: the MercedesBenz AM and FM stereo radio with cassette player. This Operation Guide is designed to give
you both a quick reference of basic functions and features and a detailed description of the
system's entire range of operation. To maximize your listening satisfaction, take a few
minutes to carefully review all sections of this guide.
Note: The following instructions also include the functions of the optional dealer-installed
trunk-mounted compact disc changer.*
* Standard on V-12 models
RADIO FUNCTIONS
BASIC CONTROLS
1. On/Off Switch, Volume Control
2. Antitheft Indicator
3. Bass/Treble Selector
4. Fader/Balance Selector
5. Bass, Treble, Fader, Balance
Control
TUNING
6. AM or FM Band
7. Weather Band (WB)
8. Station Memory Buttons
9. Seek Tuning
10. Scan Tuning
11. Manual Tuning
DISPLAY PANEL
12. Band (AM/FM/WB)
13. Station Memory Location
14. Station Frequency
15. Stereo Mode
CASSETTE PLAYER FUNCTIONS
BASIC CONTROLS
1. On/Off Switch, Volume Control
2. Antitheft Indicator
3. Bass/Treble Selector
4. Fader/Balance Selector
5. Bass, Treble, Fader, Balance
Control
CASSETTE OPERATION
6. Cassette Port
7. Cassette Eject Button
8. Track Selector
9. Tape Mode Selector
10. Dolby Noise
Selector Reduction
11. Music Search
12. Tape Scan
13. Fast Forward/Rewind
DISPLAY PANEL
14. Tape Track
15. Noise Reduction Type
COMPACT DISC CHANGER FUNCTIONS
BASIC CONTROLS
1. On/Off Switch, Volume Control
2. Antitheft Indicator
3. Bass/Treble Selector
4. Fader/Balance Selector
5. Bass, Treble, Fader, Balance
Control
CD OPERATION
6. CD Mode Selector
7. Disc Selector
8. Track Seek
9. Track Scan
10. Fast Forward and Reverse
DISPLAY PANEL
11. Disc Number
12. Track Number
RADIO OPERATION
Power and Volume: The sound
system will operate with the car's
ignition switch in position 1 or 2, and
can also be activated without the
ignition key. In this condition the
radio will turn off after 1 hour to
conserve the vehicle battery. To
operate the radio, simply push the
large knob located on the left side of
the radio faceplate. To adjust the
volume, rotate the knob.
AM/FM Selection: Press the AM/
FM button until the desired band
appears in the left side of the
display. The word STEREO will
appear in the right side of the
display if the selected FM station is
broadcasting in stereo. If the
indicator flashes, it signifies that the
station is weak, and reception may
not be clear.
Weather Band: Press the WB
button to begin automatic tune-in of
the nearest available National
Oceanic and Atmospheric
Administration (NOAA) broadcasts,
which come directly from the offices
of the National Weather
Service. There are about 372 National
Weather Service stations in the
United States. A station's antenna
has a line of sight broadcast range of
about 40 miles.
If NONE appears in the display, the
radio has searched through all seven
weatherband frequencies 3 times and
could not find a sufficiently strong
signal. If you are tuned to one
weather band station but wish to
listen to another, press either the
Scan (SC), Seek or Tune button.
Please note that Weather-band
stations 1 through 6 are preset into
memory locations 1 through 6.
To change these preset locations,
refer to the "Station Memory Tuning"
section on page 4.
Scan Tuning: To automatically find
the next radio station in ascending
frequency, push the Scan (SC)
button. The radio will play the first
station it finds for eight seconds, then
scan upward to the next station,
which it will also play for eight
seconds. SC will appear in the
display. To avoid stops on marginal
stations, the radio will scan
the entire band in the least sensitive
mode first, then automatically switch
to high sensitivity and scan again.
This sequence will repeat until the
Scan (SC), Seek or Tune button is
pressed. Selecting another mode or
turning power OFF and ON again
will also cancel the Scan function.
Seek Tuning: To find and lock onto
the next station in ascending
frequency, push the right side of the
seek button. Push the left side to
lock onto the next station in
descending frequency.
Manual Tuning: To manually tune
through each possible radio
broadcast frequency in ascending
order, press the right side of the
tune button. Each possible
frequency number will appear in the
display. To manually tune through
radio stations in descending order,
press the left side of the tune button.
Station Memory Tuning: This radio
allows storing of up to six AM, FM
and weather band stations for
instant pushbutton tuning. First, tune
to a station using scan, seek, or
manual tuning. Next, depress and
hold one of the six numbered
station-memory buttons. The current
station stored in the selected
location will play. In approximately
two seconds a beep tone will be
heard through the speakers,
signaling that the new station
frequency is stored in the numbered
location you pressed. Each new
station-memory button can store
one AM, one FM and one weather
band station. The display will
indicate the storage location next to
the band selected in the left side of
the display.
Bass/Treble Control: To adjust
bass or treble response, press the
control button repeatedly
tone
until BASS or TREB appears in the
display. To increase treble or bass,
press the "+" button. To decrease,
press the "-" button. Horizontal bars
at the bottom of
the display indicate the amount of
adjustment plus or minus the center
(flat) point. To set bass or treble to
their flat settings, push the tone
button, then simultaneously press and
hold both the "-" and "+" buttons
momentarily (less than 4 seconds).
Please note that only the tone
settings for the current mode (AM,
FM, WB, Tape or CD) will be set to
flat. If you press and hold the "-" and
"+" buttons for at least 5 seconds,
both bass and treble (as well as fader
and balance) will automatically reach
the center point of their ranges and
RESET (CENTR) will appear in the
display. The volume level will also
return to a preset point.
Fader/Balance Control: To adjust
left-right speaker balance or front to
rear fader*, press the speaker button
repeatedly until FADER or BAL
appears on the display. Then press
either the "+" or "-" button to adjust
fader or balance. Horizontal bars at
the bottom of the display indicate the
amount of adjustment plus or minus
the center point.
To set fader or balance to their
center positions, push the
Fader/Balance selector, then
simultaneously press and hold both
the "-" and "+" button momentarily
(less than 4 seconds). The Fader
and Balance settings for all modes
will be set to their center positions. If
you press and hold the "-" and "+"
buttons for at least 5 seconds, leftright speaker balance, front to rear
fader (as well as bass and treble)
will automatically reach the center
point and RESET (CENTR) will
appear in the display. The volume
level will also return to a preset
point.
Antenna: The antenna extends
automatically whenever the radio is
switched on and retracts whenever
the radio or the vehicle's ignition is
switched off.
Be sure to switch the radio OFF
before entering a car wash to avoid
damage to the antenna mast.
*SL models do not have the FADER
function.
CASSETTE OPERATION
Basic Functions: To play a cassette,
turn on the radio, then insert the
cassette into its port, side 1 or A
facing up. Inserting a cassette
automatically selects the TAPE
mode. If AM, FM, WB or CD is
currently selected and a cassette is
already in the mechanism, press the
TAPE button to begin cassette
operation. The proper tape
equalization for normal or
chrome/metal tape is automatically
selected.
At the conclusion of the first side
played, the auto-reverse mechanism
will automatically begin playing the
other side of the tape.
When a tape is inserted, all dualfunction controls and displays-those
that function differently in radio and
cassette player modes-switch to the
cassette player mode.
Eject: To remove a cassette, push
the eject (EJ) button. The tape will
automatically disengage and can
then be removed f rom the
cassette port.
Ejecting a cassette switches the
system back to the last radio mode
(AM or FM) which was used prior to
TAPE.
If the ignition is turned off while a
cassette is playing, the cassette will
remain in the port. Switching the radio
ON will restart the tape.
Note: The cassette can be ejected if
the radio is OFF even if it is in a
CODE condition.
Dolby B and C Noise Reduction:
This function, which is activated by
pressing the Dolby noise-reduction
button, reduces background hiss
while playing a cassette that was
recorded using the Dolby B or the
Dolby C noise-reduction systems.
Most prerecorded cassettes indicate
which type of noise reduction was
used during recording (if any). The
display will show which system is
selected.
Rewind: Push the left side of the
Tune button to rewind the tape. Once
this function is engaged,
the tape will rewind until either the
Scan (SC), Tune or Seek button is
pressed again, or the beginning of
the side has been reached. When
rewind is selected, RWD will appear
in the display.
Fast Forward: To fast forward to
the end of a side, press the right
side of the Tune button. Once this
function is engaged the tape will fast
forward until either the Scan (SC),
Tune or Seek button is pushed
again, or the end of the side has
been reached. When fast forward is
selected, FWD will appear in the
display.
Forward Music Search/Reverse
Music Search: A cassette tape can
be automatically advanced to the
next selection by pressing the right
side of the Seek button.
SEEK ► will appear in the display.
To rewind the tape to the beginning
of the present selection, press the
left side of the seek button.
SEEK ◄ will appear in the display.
Note that a pause of at least 4
seconds must be present between
selections for the radio to recognize
the next selection.
Side Selection: Once a cassette
has been engaged, push the track
(TRK) button to switch to the tape's
other side without having to remove
and flip the cassette. Once the side
is finished, the other side will be
selected automatically.
Tape Scan: To automatically scan
the tape's selections, push the Scan
(SC) button. Each selection will play
for eight seconds, then the tape will
fast forward to the next selection,
which will also play for eight
seconds. This sequence will repeat
until either the Scan (SC), Tune or
Seek button is pressed. Selecting
another mode or turning power OFF
and ON again will also cancel the
Scan function. SC plus the track
number
will appear in the display, while the
selection is playing, and TAPE FWD
SC will appear between selections.
Maintenance Reminder: Every 30
hours of cassette operation, CLEAN
will flash in the display panel for 10
seconds accompanied by a onesecond audible warning, reminding
you to clean the tape head, pinch
rollers and capstan. The proper
cleaning cassette and instructions are
available at your authorized
Mercedes-Benz dealer.
COMPACT DISC OPERATION
If the optional dealer-installed CD
changer is connected to your
system,* it can be operated via the
same keys that control the radio and
cassette player.
The same instructions that govern
volume, tone, balance and fader in
the radio and cassette modes apply
to the CD mode as well. However,
some system functions and
procedures are exclusive to the CD
mode.
Loading the CD Magazine and CD
Changer: The CD changer is
located inside the car's trunk. Its
magazine will accept up to six discs.
Insert the discs into the magazine
compartments with the label surface
facing up, as indicated on the CD
magazine.
When the magazine is loaded, place
it into the CD changer port. An
arrow on the top surface of the
magazine indicates which end
should be inserted first. When you
feel the magazine lock.
*Standard on V-12 models.
snugly into position in the port, close
the port door.
During this procedure, the display
panel will indicate CD MAG LOAD.
The first available CD will then start to
play.
Ejecting the CD Magazine: To
eject the magazine from the CD
changer, slide open the magazine
port door. Press the magazine eject
button inside the port door and the
magazine will automatically slide
halfway out of the magazine port; you
may now remove the magazine
manually and close the port door.
To Play CDs: First, turn on the radio.
Then press the CD button.
If the CD magazine has not been
inserted into the CD changer, the
display will indicate MAG NONE. If an
empty CD magazine is inserted into
the CD changer, the display will
indicate NO CD after each magazine
compartment has been checked.
The radio will return to the last AM
or FM mode selected prior to CD.
The radio's station-recall buttons,
numbered 1 through 6, function as
CD direct disc-select buttons as
well. To play the disc in the CD
magazine's fourth compartment, for
example, press button 4.
To interrupt one disc and choose
another, press the appropriate discselector button for the disc desired.
The display will indicate CD LOAD
along with the disc number until the
newly selected disc begins playing.
Should NO CD appear in the
display, an empty compartment in
the CD magazine has been
selected. If an empty slot is selected
the FIRST TIME the magazine is
inserted, the next available disc will
be loaded.
Subsequently, NO CD will appear,
and the current disc will play.
Scan Tracks: To scan in ascending
order through the tracks on a CD,
press the Scan (SC) button. The
machine will play each track for
about eight seconds, then scan up
to the next track. SC and the track
number being played will appear in
the display. This sequence will
repeat until either the Scan (SC),
Seek or Tune button is pressed.
Selecting another mode or disc or
turning power OFF and ON again
will also cancel the Scan function.
Seek Tracks: To go directly to the
beginning of the next track in
ascending order, press the right side
of the Seek button. To return to the
beginning of the track being played,
press the left side of the Seek
button. Pressing the left side of the
button repeatedly will select tracks
in descending order. If the Seek
button is pressed during the first 10
seconds of play, the previous track
will be selected. After 10 seconds,
the currently selected track will
restart from the beginning. The
selected track number will appear in
the display.
Fast Forward/Fast Reverse: To
move rapidly forward through a track,
press the right side of the Tune
button. To move rapidly in reverse
through a track, press the left side of
the Tune button. The audible signal
can be used to gauge your progress,
and the display will indicate elapsed
time in minutes and seconds
(MM:SS).
Notes For CD System Operation:
Extreme temperatures will affect the
performance of the CD system.
However, optimum performance will
occur between 0 and 160 degrees
Fahrenheit.
If the ambient temperature exceeds
160 degrees Fahrenheit, CD TEMP
will appear on the display, and
play will stop. After 4 seconds, the
mode which was active prior to CD
will resume. CD operation will not
resume until the temperature falls
within the optimum performance
range. If the ambient temperature
drops below 0 degrees Fahrenheit,
CD TEMP
will be displayed and
flash for 8 seconds.
Play will continue, however, the CD
player will be more likely to exhibit
skipping over unusual road
conditions. The normal CD display
will re-appear after 8 seconds. If
another mode is selected and CD is
selected again, this process will
repeat if the temperature is still
below 0 degrees Fahrenheit.
Dampness on the disc surface can
be caused by changing
temperatures and may affect disc
performance, inhibiting the system's
laser from focusing and making it
impossible for it to read the contents
of a disc. As soon as relative
humidity has decreased, this
situation will correct itself, usually
within one to two hours.
Although compact discs are
specially coated for durability, they
should still be handled carefully.
Handle discs only by the edges and
avoid fingerprints, dust, scratches,
and dampness on both surfaces. Do
not label the discs or affix paper or
tape to them. After removing a disc
from the magazine, store it in its
original case.
If necessary, clean the disc with a
CD cleaning cloth, wiping radially
from the center of the disc to the
edge. Do not use solvents such as
benzene, thinner, or commercially
available cleaners intended for
analog discs.
Mistracking or skipping due to road
shock is unavoidable, and will not
damage the unit or discs.
Self-diagnostic Mode Indications:
If the CD changer detects an
operational error, it will automatically
enter its self-diagnostic mode. The
machine's analysis of the cause is
displayed in code. The chart on
page 12 lists the self-diagnostic
codes and actions you can take.
Caution: This CD player contains a
Class 1 laser unit. If the cover is
opened or damaged, there is danger
from invisible laser radiation. Do not
remove the cover. There are no parts
that can be repaired by the user. Only
qualified service technicians should
attempt internal maintenance or
repairs, including cleaning.
ANTITHEFT SYSTEM
The Mercedes-Benz AM and FM
stereo radio with cassette player
and CD compatibility is fitted with a
built-in system designed to help
render it inoperative in case of theft.
If the radio or battery is
disconnected, the radio will
automatically be disabled. To
indicate this state, the word CODE
will appear on the radio's display. To
render the radio operable again, the
correct five digit code must be
entered into the radio via its
numbered station-recall buttons. A
code is preassigned to each radio
and supplied to the owner on two
wallet-sized cards.
Receding Sequence: To recede a
radio, follow this procedure: 1. Turn
ignition key to lock position one. 2.
Turn on the radio. The word CODE
appears on the display with the
letter "C" flashing. 3. Enter the first
digit of the radio's antitheft code as
it appears on the code card. The
word CODE will
disappear and the first number that
you have entered will be displayed,
followed by four dashes 1_ _ _ _
4. Enter the rest of the five digit antitheft code. Each number will be
displayed when it is keyed in. 5.
When all five antitheft code numbers
have been correctly entered, the first
number in the code flashes, alerting
you to confirm the code. Press the
Scan (SC), Seek or Tune button to
confirm the code. Radio operation will
now resume.
Incorrect Code: If an incorrect antitheft code digit is entered, continue to
enter numbers until the five-digit code
is correctly entered and displayed. If
an incorrect code is confirmed, the
word CODE will appear again. The
system allows two more receding
attempts. After the third incorrect
attempt, the word WAIT is displayed.
A period of 10 minutes must pass and
the word CODE must again be
displayed before receding can be
successful. The radio must be left on
during this period. This measure is
meant to prevent receding of the radio
by randomly entering numbers.
If the correct antitheft code has not
been entered after nine separate
attempts-and therefore after two 10minute wait intervals-the radio will
lock for 24 hours to prevent any
further receding attempts. The radio
must be left on with the ignition key
in position 1 during this period in
order for it to reenter the code mode.
Code cards should not be stored in
the glove compartment. During
vehicle service at an authorized
Mercedes-Benz dealer, we
recommend that you leave one card
with your service advisor. Thus, if
the battery is disconnected, the
service advisor can recede the radio
before the car is returned to you.
If the car is equipped with a
Mercedes-Benz antitheft alarm
system, the alarm will sound should
the radio be removed from the
console while the alarm system is
armed. If you have difficulty
reprogramming the radio or if the
reprogramming function fails to
operate, please contact your
authorized Mercedes-Benz dealer.
ERROR CODE CHART
INDICATION
CAUSE
SOLUTION
CD E-01
CD E-02
Disc-change malfunction.
Disc is retained in player mechanism.
CD E-03 CD E-04 CD E-05
Disc-change malfunction.
CD E-06
Disc-change malfunction.
CD E-07
Magazine ejection impossible.
CD EEEEE
No communication between the radio
and the CD changer.
Read problem with CD in No. 2
compartment of CD magazine.
Consult your Mercedes-Benz dealer.
Insert an empty magazine, then press
the magazine eject button.
If the code disappears within a few
seconds, unit will function properly. If it
does not, consult your Mercedes-Benz
dealer.
Press the magazine eject button and
pull out the magazine. Check for error
indication. Try again. If the magazine
cannot be pulled out, consult your
Mercedes-Benz dealer.
Press the magazine eject button. If the
magazine does not eject, consult your
Mercedes-Benz dealer.
Consult your Mercedes-Benz dealer.
CD 2 ERROR
Remove the CD from compartment
No. 2 of the CD magazine. Check if
the disc is installed upside down or if
the surface is damaged.