1
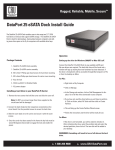
Encryption DataPort
User’s Manual
www.CRU-DataPort.com
About CRU-DataPort
Founded in 1986 and based in Vancouver, Washington, CRU-DataPort
develops and markets computer data security and storage devices. The
company’s DataPort™ brand of removable storage modules, with over
2,000,000 units installed in computers worldwide, has become the de
facto standard for Data Security, and the recognized name when it
comes to removable storage modules for government, education and
corporate IT departments. DataPorts are rated for 25,000 insertions
and include fans to protect your disk drive.
CRU-DataPort products are available through major distributors, OEMs,
VARs, and a host of resellers and systems integrators throughout the
world. For more information about CRU-DataPort, visit our website at
www.CRU-DataPort.com.
Table of Contents
About CRU-DataPort ...................................................i
Product Description ................................................... 1
Package Contents ..................................................... 2
Installation & Set-Up .................................................
Hard Disk Drive Installation ..............................
Serial ATA Cable Installation .............................
2-Bay Installation ..........................................
4-Bay Installation ..........................................
3
3
4
4
5
Operation .............................................................. 6
Fan Failure Alarm ......................................... 6
Drive Activity ............................................... 6
Trouble Shooting ...................................................... 7
Technical Support ..................................................... 8
Limited Product Warranty ................................ 8
Product Remedies .................................................... 8
Limitation of Liability .................................... 8
Material Return ....................................................... 9
General Description
The CRU-DataPort Removable Storage Module allows you to easily remove
a 3.5" hard drive from your PC, MAC, workstation or disk array subsystem.
The DataPort consists of a frame, carrier, and top and bottom covers.
The frame can be fitted into any standard 5.25" half-height drive bay.
DataPort models are available for Serial ATA, IDE and SCSI interfaces,
and may be configured with either keylocks or latches. There are also
Encryption DataPort models available in IDE interface, with several
versions of encryption key strength (40, 64, 128 and 192 bit).
About Encryption
DES (Data Encryption Standard)
The Encryption DataPort V “Plus” uses the DES or TDES algorithm to
encrypt the entire hard drive. A DES algorithm with a default 64-bit
length secret electronic key is called a cipher. DES mathematically alters
the original data with its 64-bit (or higher) length secret electronic key.
The result after DES encryption is called cipher text. A reverse DES
computation is called a decryption. However, to derive the original data
from the decryption process, one must use a correct (bit-by-bit match)
secret electronic key. If the wrong key is used to decrypt, the result
will be unintelligible.
The Encryption DataPort V “Plus” uses an NIST (National Institute of
Standards and Technology) certified DES 64-bit & TDES 128/192-bit
hardware real-time encryption & decryption engine. These algorithms
are certified to provide reliable security; at full strength it is nearly
impossible to access the encrypted data by guessing or deriving the right
TDES key. Because everything on the disk is encrypted, your data is safe
even if attackers try to boot from their own disk, or move your disk to
an unprotected machine.
The Encryption DataPort V “Plus” was designed to work with standard
DataPort V & V “Plus” frames (IDE version). Because the hardware
encryption engine is on the carrier, a carrier with an encrypted drive
can be used with existing DataPort V and V “Plus” frames that are already
installed. The carrier and Security Key (which provides the secret
electronic code) used to encrypt the hard drive can be used in multiple
DataPort V or V “Plus” frames, so that a carrier with encrypted hard
drive can be safely used in multiple PCs. Additionally, multiple users
can securely use the same PC by each having their own Encryption
DataPort V “Plus” carrier with a unique Security Key. The Encryption
DataPort V “Plus” design allows you to encrypt your data while still
retaining the mobility and security provided by your DataPort.
TDES (Triple DES)
Triple DES (TDES) is three (3) DES operations cascaded together in
sequence. On the first pass, DES encrypts the data with a secret electronic
key (key1). On the second pass, the results from the first pass are
processed with a second secret electronic key (key2). On the third pass,
the second pass result is encrypted with secret electronic key3.
Encryption DataPort Features
Congratulations on your purchase of a CRU-DataPort Encryption DataPort
V “Plus.” You now have a high-performance access control and encryption
system that will safeguard the privacy of your data. The cutting-edge
technology of the Encryption DataPort V “Plus” offers military-grade
protection. The Encryption DataPort V “Plus” has a real-time processor
that encrypts the entire disk content bit-by-bit—including the boot sector,
temp files, swap files, and operating system—without degrading
performance. The Encryption DataPort V “Plus” is totally transparent
to users; there are no commands or graphical user interfaces to contend
with. The Encryption DataPort V “Plus” is extremely fast, capable of
processing 1.6 Gigabits-per-second throughput without taking extra CPU
time and system resources. Furthermore, the Encryption DataPort V
“Plus” works with all operating systems and does not require any device
drivers.
Page 1
Page 2
Package Contents for DataPort V “Plus” Encryption
The DataPort package includes all of the necessary hardware to install
a 3.5" hard drive in a 5.25" drive bay. Before installing, verify that the
following items have been included in the package.
Quantity
Preparation for Installation
1.
To prevent data loss, read this manual thoroughly before
installing or operating the DataPort.
2.
Before touching any electrical equipment, ground yourself by
touching the metal part of your computer chassis to discharge
static electricity and help prevent any damage to your computer.
CRU-DataPort is not responsible for static discharge damage.
3.
Gather the following tools and needed items:
Description
1
DataPort V “Plus” frame assembly
1
DataPort V “Plus” carrier assembly
2
Metal covers
4
6-32 x 3/8" flat-head screws for hard drive mounting
4
M3 x 10mm Phillips pan-head screws for frame
mounting
2
Security Key for encryption (duplicate keys)
2
Key for key lock
• Phillips screwdriver
• Small flat screwdriver
• Computer Users Manual
• Hard Disk Drive (HDD) Manual to set master jumper
If any of the above items are missing or you need special parts, contact
your dealer or CRU-DataPort for instructions regarding replacement or
service. You can order additional Encryption DataPort carriers or frames
for multiple drive applications.
Figure 2 - Overview of assembly
Frame Installation
1.
Turn off the computer and disconnect the power cord from
the electrical outlet. Before working on your computer, wait
one minute for any residual energy to dissipate.
2
Remove the cover of the computer.
3.
Locate a 5.25" drive bay with external access.
4.
If the drive bay requires mounting rails, install them on the
frame. The mounting rails should be provided with your
computer system.
5.
Mount the frame assembly by inserting the frame assembly
into the 5.25" bay. Secure the frame assembly with the screws
provided.
Figure 1- Relationship of package contents
Page 3
Page 4
Hard Drive Installation
IMPORTANT! Read this before installation.
To avoid loss of data, read the following sections prior to
setting up your Encryption DataPort V “Plus.”
Warning! Always backup your data prior to any hardware
installation.
To set up the Encryption DataPort V “Plus,” you must format
your hard drive. Formatting will result in a loss of all data
on your hard disk drive. Since you are going to format your
hard disk drive you must back up any data that you wish to
keep. This should be done before installing your hard disk
drive in the DataPort.
Figure 3 - Position of frame mounting holes
6.
Connect a DC power cable to the frame. locate an available
4-pin DC power cable from the computer power supply and
plug it into the receptacle on the frame (see Figure 4).
7.
Connect the data cable to the frame.
1. Remove the carrier top and bottom covers. Use the
supplied cover removal tool or a small flat-head screwdriver
for this task.
Figure 4 - Rear view of DataPort
The frame installation is now completed.
Figure 5 - Inside view of carrier
Page 5
Page 6
2.
3.
Set the Master/Slave jumper on the drive before placing the drive
in the carrier. Consult your hard disk drive user’s manual to determine
how to jumper the hard disk drive as Master or Slave. Ensure that
the jumper on the carrier is properly set before inserting the drive
as well.
Set the jumpers on your Encryption DataPort V “Plus” carrier.
There are 3 jumper positions on your Encryption DataPort V “Plus”
carrier. The Encryption DataPort V “Plus” comes preconfigured for
“master” drives. Refer to Figure 6 for alternate configurations for
your drive.
Operation
Operation steps follow the section below on using Security Keys. Please
read the Security Key section before starting operation.
Using Security Keys
Your Encryption DataPort V “Plus” comes with Security Keys to authenticate
you as the authorized user and to enable encryption/decryption. Without
the provided Security Key, your computer will NOT be able to boot and/or
the data on the disk drive will NOT be seen. After you have set up your
Encryption DataPort, test the second key to ensure that it works correctly.
IMPORTANT!
Never insert the security key in a FireWire port!! Inserting your
security key into a FireWire port will damage the encryption key
and you will be unable to use the key, which can lead to loss of
data.
Always store the duplicate security key in a safe place!!
The Security Key contains the secret electronic key for the
DES/TDES real-time cipher engine. Without this unique secret
electronic key, you will be unable to access any data on your
encrypted hard disk drive. It is extremely important to store the
duplicate key in a safe place where it can be retrieved in case
the original key is lost.
Loss of both Security Keys will make it virtually impossible to recover
your data.
Figure 6 - Jumper positions
Note:
The bottom jumper is reserved for proprietary testing
by CRU-DataPort. If you use this jumper you will
prevent the encryption of your data.
4.
Connect the DC power cable to the drive: plug the 4-pin DC power
cable into the power connector on the drive and ensure it is fully
seated.
5.
Connect the data cable to the drive.
6.
Install the drive: place the drive in the carrier and mount the drive
using the four screws provided. Position the cables inside the carrier
assembly so that they are completely enclosed within the carrier.
7.
Tape the Temperature Control Cooling Sensor (TCCS) to the top of
the hard drive.
8.
After all of the cable connections have been checked, snap on the
top and bottom carrier covers.
Page 7
There is no “back door” on the Encryption DataPort V “Plus.” CRUDataPort does not keep any records of the random secret electronic
key stored on the Security Key, so we cannot provide a
replacement. CRU-DataPort offers a Security Key duplication
service provided you have the original Security Key and send it
to CRU-DataPort.
Every Encryption DataPort V “Plus” we ship is thoroughly tested and
meets the high-quality standards you expect from CRU-DataPort. However,
should the Encryption DataPort V “Plus” fail simply return the carrier
to CRU-DataPort. The data on the hard disk drive will not be lost as long
as you have the original Security Key.
Page 8
LED Functions
Operation steps
1.
Insert the Security Key into the key insert on the front panel
of the Encryption DataPort V “Plus.” The Security Key must
be inserted before power to the Encryption DataPort V “Plus”
is turned on.
Without the proper Security Key, your computer will NOT be
able to boot and/or the data on the disk drive will NOT be
seen.
2.
After the computer has booted up, remove the Security Key
and store it in a secure place. Removing the Security Key after
the computer has booted up will not affect the operation of
the computer.
Note:
3.
The green LED is the power LED and will light up whenever the DataPort
is turned on. The red LED is a dual-function LED. When the red LED is
continuously on at boot up it indicates an error with your Security Key.
The Security Key cannot be read and is unable to encrypt and decrypt
any data. After boot up, the red LED functions as the hard drive activity
LED.
The Security Key insert in the front of DataPort carrier
is for the Security Key only. Please note that this
insert, while mechanically identical to the IEEE-1394
FireWire, is not a FireWire interface. Please do not
attempt to connect standard FireWire products into
the Security Key insert.
Figure 7 - Front view of DataPort
Turn on the power.
The key lock on the CRU DataPort locks the carrier in place
and also serves as an ON/OFF switch for the power. Turn the key
lock 90 degrees clockwise to the ON position before turning on
the computer.
4. You must now FORMAT the disk. Formatting will prepare the disk
to be used and encrypt both the boot sector and the file
allocation table (FAT).
Fan Failure Alarm
The fan failure alarm function is a standard feature on the DataPort V
“Plus.” If the cooling fan should fail, an alarm will beep and the green
LED on the lower right corner of the DataPort LED display window will
flash indicating the fan failure.
IMPORTANT!
WARNING!
The FORMAT operation will erase everything on the disk.
Please backup your data before starting this operation.
We are not responsible for any lost data.
Formatting your hard disk drive will erase all data so please back
up anything on the drive before formatting it. With the Encryption
DataPort V “Plus,” the FORMAT operation must beperformed on the
disk regardless of whether the drive is new or old. Perform standard
FDISK or FORMAT functions as required for your operating system.
Once complete, load the operating system and other files you
require, including any files you originally backed up. (Contact CRUDataPort Technical Support if you need technical assistance for this
step.)
You have now finished the installation and your
DataPort is ready to operate.
Page 9
Read the following before removing the carrier.
Removing the DataPort carrier while the computer is operating
is not recommended. If you need to remove the carrier while
the computer is running, follow these precautions:
•
Wait until the hard drive activity light (red LED) is off and
remains off, indicating that no read/write
activity is occurring.
•
If your system uses a disk caching program, ensure
that all the data has been written to the hard drive.
•
Turn off the drive by turning the key to the OFF
(vertical) position. The power light (green LED)
will go off, indicating that the power has been cut.
Wait 10 to 15 seconds for the drive to stop spinning,
and then remove the carrier.
CRU-DataPort is not liable for loss of data. It is the user’s responsibility
to follow these important procedures to safeguard data.
Page 10
Troubleshooting
For this problem…
No power
Technical support
Check this…
• Make sure the key lock of the
DataPort is turned to the ON
position and the green power
LED light is on.
• Check the 4-pin DC power
connection both inside the
carrier and on the back of the
frame.
Security Key error
• The red activity LED is a dualfunction LED. When the red
LED is continuously on at boot
up, it indicates an error with
your Security Key. The
Security Key cannot be read
and the encryption processor
is unable to encrypt and
decrypt any data.
• Make sure you have inserted
the Security Key into the key
insert. Without the proper
insertion of the correct
Security Key, your disk drive
will not boot or will not be
seen.
• First check all of the cable
connections and the jumper
configurations.
Drive not recognized by computer
• Check the Master/Slave mode
setting on the drive.
• Ensure the carrier and frame
are fully seated and none of
the pins were bent during
carrier insertion.
• Make sure that there is not a
Security Key error indication.
Contact your dealer for technical support first. If you still need assistance,
then contact the CRU-DataPort technical support department. You can
contact CRU-DataPort’s technical support department by visiting our
web site at
URL http://www.CRU-DataPort.com, or by sending an E-mail message
to [email protected].
Limited Product Warranty
CRU-DataPort warrants the Encryption DataPort V “Plus” to be free of
significant defects in material and workmanship for a period of three
(3) years from the original date of purchase.
Product remedies
CRU-DataPort’s entire liability and the original purchaser’s exclusive
remedy for any breach of warranty, shall be, at CRU-DataPort’s option,
either (a) return of the price paid or (b) repair or replacement of the
hardware, provided that the hardware is returned to CRU-DataPort, with
a copy of the sales receipt or applicable documentation. Any replacement
hardware will be warranted for the remainder of the original warranty
period.
These remedies are void if failure of the hardware has resulted from
accident, abuse, misapplication or modification. (This will be determined
by CRU-DataPort.)
Limitation of Liability
The warranties set forth in this agreement replace all other warranties.
CRU-DataPort expressly disclaims all other warranties, including but not
limited to, the implied warranties of merchantability and fitness for a
particular purpose and noninfringement of third-party rights with respect
to the documentation and hardware. No CRU-DataPort dealer, agent or
employee is authorized to make any modification, extension, or addition
to this warranty.
In no event will CRU-DataPort or its suppliers be liable for any costs of
procurement of substitute products or services, lost profits, loss of
information or data, computer malfunction, or any other special, indirect,
consequential, or incidental damages arising in any way out of the sale
of, use of, or inability to use any CRU-DataPort product or service, even
if CRU-DataPort has been advised of the possibility of such damages. In
no case shall CRU-DataPort’s liability exceed the actual money paid for
the products at issue.
• Also, if you have multiple
Encrypted DataPorts, make
sure you are using the correct
key.
Fan failure
Page 11
• For Fan failure, contact CRUDataPort Technical Support at
800-260-9800.
Page 12