1
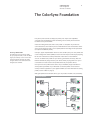
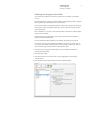
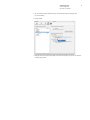
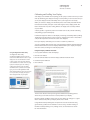
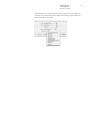
Color Management
with Mac OS X Panther
A Technology Tour
June 2004
A Technology Tour
Color Management
with Mac OS X Panther
Contents
Page 3
Making Color Work for You
Page 4
The ColorSync Foundation
Making an Inventory of Your Profiles
Obtaining and Assigning Color Profiles
Page 9
Color Workflow: The Capture Phase
Capturing Images
Managing Untagged Images
Converting to a Working Space
Page 14
Color Workflow: The Edit Phase
Calibrating and Profiling Your Display
Editing Images
Soft Proofing
Sharing Soft Proofs
Creating Hard-Copy Proofs
Page 19
Color Workflow: The Output Phase
Checking Color Before You Print
Faster Printing on a PostScript Printer
Printing to a Raster Printer
PDF/X Support
Page 22
Automating the Workflow
About AppleScript
An Automation Starter Kit
Running Scripts
Page 24
Resources
Websites
Profiling Services
Books
2
A Technology Tour
Color Management
with Mac OS X Panther
3
Making Color Work for You
As a creative professional, color is at the heart of your work. Accurate color that
matches expectations makes a dramatic difference in reducing production costs and
timetables, and in helping you generate more engaging visual products for clients.
ColorSync: End-to-end color management
Apple makes it easier to ensure that the
color you see onscreen consistently matches
the color in your final printed materials.
Apple ColorSync technology, based on the
International Color Consortium (ICC) standard
that Apple helped define, translates color
accurately from one device to another across
your workflow. When combined with other
ICC-compatible hardware and software
products and powerful color-aware Apple
computers and displays, ColorSync provides
an end-to-end color management solution.
With Mac OS X v10.3 “Panther,” Apple has removed another barrier to your creativity
by taking the color management capabilities of the Macintosh to an entirely new
level. With Panther, it is faster, easier, and more affordable than ever to achieve
consistent color.
Here’s how the advanced color management capabilities in Panther help you focus on
being as creative as possible:
• Panther takes a systemwide approach to color by integrating always-on International
Color Consortium (ICC) color management into every phase of the workflow: capture,
edit, and output. This feature ensures that the color you capture is the same color you
see onscreen and in print.
• Image Capture, an image acquisition application and framework built into Panther,
automatically embeds a profile into each image downloaded from a digital camera or
captured with a scanner, saving you time and streamlining your workflow. This process
can be further automated using AppleScript.
• With built-in soft proofing in Panther, you never have to waste another sheet of paper
or ounce of ink, and you can achieve faster turnaround times from concept to final
approval.
• Printing in Panther provides advanced previewing and output controls, enhancing color
accuracy and reducing the number of steps in your PDF workflow.
This Technology Tour will help you understand color management in Mac OS X Panther.
It will take you from “what” to “how”—providing step-by-step examples that let you put
the advanced color management capabilities of Panther into practice in your day-today work.
Combined with the exceptional processing of a Power Mac G5 and a bright, sharp,
ColorSync-aware Apple LCD display, Panther makes color management more integrated,
more automatic, and easier than ever. It’s just one more way that Apple removes the
technology barriers to creativity, so you can focus on bringing your best ideas to light.
4
A Technology Tour
Color Management
with Mac OS X Panther
The ColorSync Foundation
Every device, from scanners to displays to printers, has unique color capabilities.
Successful color management involves translating color accurately from one device
to another across your workflow.
Good color management starts with a color profile—a description of your device’s
color characteristics. You need two pieces of information: the color characteristics of the
source of your image (its input or source profile) and how the image will be reproduced
(its output or destination profile).
Choosing a default CMM
The Preferences pane of ColorSync Utility
lets you specify the CMM, or color calculation
engine, that ColorSync uses to match colors.
Apple recommends changing this setting
to Apple CMM to ensure consistent results
throughout the workflow.
ColorSync, Apple’s implementation of the ICC color standard, uses your color profiles and
a color management module (CMM) to match color from input to final output, adjusting
for the color characteristics and any limitations of each device in the workflow.
You can use default color profiles for your devices, generated at the factory. Mac OS X
Panther automatically assigns these to your devices when you plug them in. Or you or
a consultant can create custom color profiles tailored to your specific devices.
Once you have color profiles for the devices in your workflow, simply install them in
/Library/ColorSync/Profiles on your Macintosh so that the profiles can be read and
used by all of the applications in your digital workflow. (For more information on storing
profiles, see the sidebar on page 5.)
With good profiles and consistent devices, you can produce excellent color, consistently.
ColorSync Workflow
Soft Proofing
Digital Camera
Four-Color Process
Scanner
Display
Commercial Press
Drum Scanner
The Web
A Technology Tour
Color Management
with Mac OS X Panther
5
Making an Inventory of Your Profiles
With Mac OS X Panther, you can manage color well—and automatically—using default
profiles that Panther assigns. ColorSync Utility provides a central location and an intuitive means of managing all of your generic and custom profiles.
Open ColorSync Utility in
/Applications/Utilities. Click the Profiles
icon to view installed profiles.
By clicking the Profiles icon, you can see which device profiles are installed on your
system and where they are located. You already have a wealth of profiles to help you
in your workflow.
If you don’t want to use generic color profiles or the default profiles provided by device
manufacturers, you can install custom device profiles in /Library/ColorSync/Profiles.
Then run the Profile First Aid function in ColorSync Utility. Profile First Aid verifies and
repairs the format of ICC profiles installed on your Mac, making sure they conform to
the current ICC specification.
Where are profiles located?
Because Mac OS X is based on UNIX, and
because UNIX is a multiuser operating
system, you will see that some profiles
are available to individual users; others are
available to every user on the computer.
System profiles are located in
/System/Library/ColorSync/Profiles. They are
the basic, preset profiles that your system
requires for color management. You cannot
delete or modify these profiles, and it’s best
not to install profiles in this location.
Computer profiles are located in
/Library/ColorSync/Profiles. This is the
recommended place for installing new profiles. Once you’ve downloaded or obtained
new or custom profiles, copy them to
/Library/ColorSync/Profiles. These profiles are
available to anyone who uses the computer.
They can be modified and easily managed
using ColorSync Utility.
User profiles are located in
~/Library/ColorSync/Profiles. These profiles
are available only to the user logged in to
the computer.
Other profiles. Some applications and device
drivers install profiles. You shouldn’t move or
alter these profiles.
1
2
3
Try clicking a profile (1). You will see summary information about it on the right (2). The threedimensional graphic (3) represents the profile’s gamut—a visual representation of the total color
volume that a device can reproduce or display.
You can also compare how one gamut matches up with another. For instance, you
might want to match your display to your proofer. But first you want to see how the
two devices compare in terms of color gamut—where one is more red and the other
more blue, for example. Comparing the color gamuts of different devices or color
spaces using ColorSync Utility can be quite useful. For example, for editing color, it is
best to select a working space with a gamut that overreaches or matches the gamut
of the capture (input) device (see page 12, “Converting to a Working Space,” for more
information). If you do this, the color from the original image will translate into the
new space.
A Technology Tour
Color Management
with Mac OS X Panther
Try comparing the gamuts of an RGB profile and a CMYK profile in ColorSync Utility.
1. Click Generic RGB Profile.
2. Click the triangle next to Lab Plot and select “Hold for comparison.”
3. Now click Generic CMYK Profile.
The RGB profile is semitransparent, and you can see how the gamut of one device
matches up against the other.
6
A Technology Tour
Color Management
with Mac OS X Panther
7
Obtaining and Assigning Color Profiles
If you need color profiles for your devices, several sources of profiles are available.
You can:
• Download profiles from device providers’ websites. Note that these profiles are generic
factory profiles, not customized to your particular device.
• If you send your files to a professional printer for output, ask the printer for profiles of
their proofer or press. Using these profiles, you can get a clear idea of how your final
hard copy will look.
• Hire a consultant or a service to create custom profiles of the devices (scanner, display,
printer) in your workflow.
• Invest in the tools to create profiles of your devices yourself. Your investment can
range from $199 to $5000 and up.
• For more information about obtaining color profiles, see “Resources” on page 24.
If you want to fine-tune your workflow to optimize color accuracy, you will want to
use custom color profiles instead of generic or factory profiles. These steps show you
how to override a generic profile with a custom device profile.
1. Once you have custom profiles for the devices in your workflow, install them in
/Library/ColorSync/Profiles.
2. Open ColorSync Utility.
3. Click the Devices icon. You will see a list of every imaging device connected to
your Macintosh.
4. Click the device. The Current Profile is the factory or default profile.
A Technology Tour
Color Management
with Mac OS X Panther
5. To override the factory profile with your custom profile, click the triangle next
to Current Profile.
6. Choose Other.
7. Navigate to /Library/ColorSync/Profiles and select the profile you wish to use instead
of the factory profile.
8
A Technology Tour
Color Management
with Mac OS X Panther
9
Color Workflow:
The Capture Phase
Once you have created and installed profiles for the various devices in your workflow,
you can start capturing images. When you bring images onto your Macintosh, you can
greatly improve your ultimate color results with a few simple color management steps:
• Color-manage images as you capture them.
Image Capture
• Convert images to a working space.
• Manage untagged images.
Capture Phase
Capturing Images
When you bring images onto your Mac, you can immediately see the benefits of
using Mac OS X v10.3 “Panther.” New in Mac OS X is Image Capture, which is both an
integrated, systemwide framework and an intuitive application for capturing images.
Image Capture can simplify your workflow and save hours on every project.
First, Image Capture is an application (located in /Applications) that, among other things,
lets you set your preferences for capturing and tagging images. Images captured with
Image Capture are automatically color-managed.
A Technology Tour
Color Management
with Mac OS X Panther
10
In addition, Image Capture is a comprehensive framework embedded in the operating
system that can be used and accessed by any application to manage color. Image
Capture also recognizes imaging devices automatically: Plug in your camera or scanner—
or any mass storage device, such as an iPod, with a DCIM folder containing images—to
your Mac. Image Capture recognizes the device and allows you to start working in a
color-aware environment.
As you download images from your camera or scanner, Image Capture embeds the color
profile you’ve selected (factory or custom) into every image that does not already have
an existing profile.
Each image is “tagged” automatically, without any effort on your part. Image Capture
then makes the image’s color profile information available to your applications and
your system, allowing ColorSync to translate color among displays and output devices.
Because Image Capture color-manages images for you on the fly, you save hours that
were previously spent embedding profiles into each individual image.
Keep in mind that precise color control requires custom profiles. When you use custom
profiles to tag an image, ColorSync can do a better job of translating color information
from the image to other color spaces or devices.
It’s easy to change the profile that Image Capture embeds in downloaded images:
1. If you haven’t done so already, install your preferred profile in /Library/ColorSync/Profiles.
2. Connect your supported camera(s) and/or scanner(s).
3. Open the Image Capture application (/Applications/Image Capture).
4. In the window that appears, click the Options button.
5. Click the Download Options button.
6. Select your profile from the Profile pop-up menu.
A Technology Tour
Color Management
with Mac OS X Panther
11
Managing Untagged Images
At times, you might need to work with an untagged image—one that does not have
an embedded source profile.
Untagged images can include:
• Stock photography (TIFF or JPEG files)
• An image emailed to you from Windows or Mac OS 9
• Legacy artwork
• An image from the web
When you receive an untagged image, it is important that you provide the tagging
information right away. Quartz—the two-dimensional drawing engine built into
Mac OS X that creates images onscreen—requires a starting point for matching each
image’s color to your display. If an image does not have an embedded profile as a
starting point, Quartz uses a generic profile, which might not be accurate enough
for your workflow. While Panther offers the benefit of automatically color-managing
images, your color work will be more accurate if you embed custom input (source)
profiles into your images.
The point is to tag early and tag everything. It is always better to work with tagged
images than untagged images.
To check whether an image is tagged or untagged, use the Preview application
located in your Applications folder.
1. Open the image in Preview and select the Get Info command from the Tools menu.
2. Check the Embedded ICC Profile field in the Document Info window.
A Technology Tour
Color Management
with Mac OS X Panther
12
If you want to embed a specific color profile and tag your images automatically,
AppleScript is another alternative. AppleScript is an English-like scripting language
used to write files that automate the actions of your computer and the applications
that run on it.
1. Navigate to /Library/Scripts/ColorSync.
Embed chosen profile
2. Double-click the “Embed chosen profile” script.
3. Click OK.
4. Navigate to the image on your hard drive and select it.
5. Navigate to your preferred source profile and select it.
On the right is an untagged image that Quartz has matched to a display using a
generic profile. On the left is an image displayed with an appropriate custom profile.
Quartz and ColorSync can work much more accurately using custom profiles, allowing
you to work with more precise color.
Converting to a Working Space
Now that you or Image Capture have tagged captured images with an appropriate
generic or custom profile, you might need to convert your images to a working
space—an ICC profile not associated with a particular device. Using a working space
allows you to work with greater color accuracy. Because devices interpret color in a
nonuniform way, they can be unpredictable in how they translate your instructions
for changing color in an image. Working spaces allow you to work in a device-neutral
(uniform) environment that increases your control over color.
For editing color, it’s best to select a working space with a gamut that overreaches
or matches the gamut of the capture (input) device. If you do this, the color from
the original image will translate into the new space while maintaining as much of
the original color as possible. Two of the most popular working spaces are Adobe
RGB (1998), one of the best built-in spaces for print work, and sRGB, often used for
web work and work in Microsoft Windows.
A Technology Tour
Color Management
with Mac OS X Panther
13
You can write a simple automation routine in AppleScript to convert the device
profile that Image Capture embeds in your images to your preferred working space.
Here is a sample script to get you started.
1. Open the Script Editor application (/Applications/AppleScript/Script Editor).
2. Type the following in the script window:
on open these_items
tell application “ColorSyncScripting”
launch
set destination_profile to profile “Generic Gray Profile”
repeat with i from 1 to the count of these_items
set this_item to item i of these_items
match this_item to destination destination_profile
end repeat
end tell
end open
3. Click the Compile button to make sure there are no typographical errors.
4. Replace the text “Generic Gray Profile” with your chosen working space profile—for
example, “Adobe RGB (1998)”. The name inside the quotes must be the internal name
(that is, the description tag) of the installed profile. You can use the “Show profile info”
script to get this information. The script will show the “desc” (description). Use this
name in your script.
5. Save the script as an application (uncheck all options) to your hard drive.
You can also add error handling, file type checking, rendering intent setting, and
other options to your AppleScript script. See the AppleScript website or the
ColorSyncScripting dictionary (using Script Editor) for more information.
You can now select the script as the Automatic Task in Image Capture:
1. If you haven’t already, install your working space profile in /Library/ColorSync/Profiles.
2. Connect your supported camera(s) and/or scanner(s).
3. Open the Image Capture application (/Applications/Image Capture).
4. Click the Automatic Task pop-up menu and select the script you saved earlier.
Now, when images are downloaded from your camera or scanned in, Image Capture
embeds the profile chosen earlier (see page 8), writes the file(s) to disk, and then
triggers the Automatic Task to convert the color in each image to your designated
working space. Automatically, when an image lands on your hard drive, it is already
in your preferred working space and you can begin editing right away.
Note that you can also use Adobe Photoshop to convert your camera or other source
profile to your preferred working space.
A Technology Tour
Color Management
with Mac OS X Panther
14
Color Workflow:
The Edit Phase
Calibration products
For maximum accuracy in calibrating and
profiling your display or output device, you
can use a hardware calibration device such
as a colorimeter or a spectrophotometer.
Colorimeters are most often used for
calibrating displays. Spectrophotometers
are used to calibrate and profile displays,
and they are also useful for creating profiles
for output devices such as printers.
For more information on measurement
devices, visit the Macintosh Products Guide
at www.apple.com/guide.
Once you have captured your images, tagged them with an appropriate device profile,
and converted them to a working space, you can move into the edit phase. Powerful
tools and technologies built into Mac OS X Panther can assist you with a number of
important color management activities during this phase. You can:
• Calibrate and profile your display.
• Soft proof your images.
• Share your soft proofs with remote clients or colleagues.
Edit Phase
A Technology Tour
Color Management
with Mac OS X Panther
15
Calibrating and Profiling Your Display
Your display is the window into everything you do. It plays a central role in all your color
work. By calibrating your display and using a custom profile, you can trust the color you
see on your display and view and modify color in your images more accurately.
When you connect a display, your Macintosh queries it for industry-standard information. Based on this data, ColorSync creates and assigns a factory display profile. This
feature means that every Mac running Panther can display color accurately without
any user effort.
A factory profile is a good start, but for even better color results, consider calibrating
and profiling your particular display.
• A calibration sequence makes sure the display is behaving consistently before profiling.
The display is told to produce a series of colors in sequence. Each color is measured to
compare the requested color with the actual color displayed.
• Once your display is calibrated, you can create a custom ICC profile for it.
You can accomplish both of these steps using the Display Calibrator Assistant built into
Panther. Enhancements to the new Display Calibrator allow you to adjust your display
with more control, resulting in a better display profile.
Using the DigitalColor Meter utility
The DigitalColor Meter utility
(/Applications/Utilities) lets you view the
exact numeric RGB values for colors on your
display. You can use this feature to match
a color on your screen to various industry
color standards or to match colors in a page
layout. For example, if you are creating a
catalog layout and you want to match a
dominant color in a photo to some styled
type, you can use the DigitalColor Meter
utility to determine the exact color, re-create
it as a “spot color,” and apply it to type or
other design elements in your layout.
Using the Display Calibrator Assistant
1. Go to System Preferences and click Displays.
2. Click the Color button.
3. Click the Calibrate button to view the Display Calibrator Assistant screen.
4. Check the Expert Mode box.
5. Click Continue.
The onscreen directions walk you through the calibration and profiling process.
At the end, you can name and save a custom profile for your display.
Because ambient conditions and the color on your display can change, it is a good
idea to calibrate and profile your display about once a month.
Using software-based profiling tools will yield more accurate results than using
generic factory profiles. For the ultimate in color accuracy, consider investing in
hardware-assisted profiling or in a profiling service. See the “Resources” section
for more information.
A Technology Tour
Color Management
with Mac OS X Panther
16
Editing Images
Once you know you can trust what you see on your display, you can adjust the color
in your images. Choose an application that is ICC aware, such as Adobe Photoshop.
By using an ICC-aware application, you can ensure that the color information in your
image will be appropriately managed as you make changes or move the image into
the output phase of the color workflow.
Soft Proofing
Based on the Portable Document Format (PDF) 1.4 standard, Quartz is the native
Mac OS X 2D drawing engine that generates text, vector, and raster images onscreen.
Applications that use Quartz automatically support ColorSync. These applications
include Preview, Mail, and Safari—all of which come with Panther. This feature has
major implications for the color workflow, especially for soft proofing.
In Panther, Quartz has been extended with new functionality called Quartz Filters.
These filters let you manage color, create special color effects, compress images, and
produce PDF/X-3 files. They leverage the power of Quartz to control, preview, and
alter images and PDF documents. You can use Quartz Filters in ColorSync Utility to
soft proof files onscreen, or create hard-copy proofs from almost any application by
applying Quartz Filters from the Print dialog.
With Quartz Filters, you and your clients can view a proof of the image on the fly—
even if your clients don’t have an application such as Photoshop installed. When
clients open a tagged image in a built-in Mac OS X application such as Preview, Mail,
or Safari, ColorSync automatically matches the image to their displays. If you have
tagged the image with the profile for the printer, then they are viewing a soft proof
of the final output. It’s like having a virtual press printout, right on the screen. The
ability to share proofs electronically can dramatically reduce the time and cost of
color proofing cycles.
•
•
•
•
About rendering intent
The rendering intent indicates what
ColorSync should do when translating
color information from the source gamut
to the destination gamut. While color is
highly subjective, here are a few tips to
get you started:
For the most beautiful, rich color, select
Perceptual.
If you’re sending the image to a proofing
device, start with Absolute (Colorimetric).
For punchy presentation graphics, try
Saturation.
If your goal is to maintain precise color—
in a logo, for example—use Relative
(Colorimetric).
Instead of printing the image multiple times, you can “overlay” Quartz Filters onto
images to enable accurate, onscreen proofing. Here’s how you can use a Quartz Filter
to soft proof your files.
1. Open ColorSync Utility (/Applications/Utilities/ColorSync Utility).
2. Click the Filters icon in the toolbar.
3. Click the “View file with Filter” button at the bottom of the window.
4. In the Open dialog, choose the file you want to proof.
5. Click the New button below the list of filters.
6. Double-click Untitled and name the new filter.
7. Under Details, click the pop-up menu and choose Color.
8. Under Objects, leave the All checkbox checked.
9. Click the “Convert color data to” pop-up menu and select the device profile of the
device you are proofing (for example, a printing press profile, which you would have
installed earlier).
10. Click the Preview checkbox in the toolbar.
A Technology Tour
Color Management
with Mac OS X Panther
17
There is no need to click the Apply button unless you want to convert the color in
your document to the profile chosen for soft proofing. If you click Apply, you will alter
your original file, so you might want to choose Save As from the File menu and save
a copy of the document, rather than overwriting your original file.
Sharing Soft Proofs
To share a soft proof with anyone else using Mac OS X v10.3, you have a number
of options:
• Post a tagged image on a website and ask your reviewer to look at it with Safari.
• Email a single-page tagged image and have your reviewer open it in Mail, which
displays single-page images directly.
• Send a multipage, tagged image as a PDF file and instruct your reviewer to open it
in Preview.
With Quartz and Quartz Filters, feedback and sign-off are now orders of magnitude
easier and less expensive for everyone.
Creating Hard-Copy Proofs
After proofing onscreen, you can convert your soft proof to a print-ready proof and
output it on an inexpensive desktop printer. This capability allows you to produce the
equivalent of a commercial-quality contract proof, right from your desktop. And, if
you’ve acquired a profile from your commercial printer, you can rest assured that the
proof you create will closely match the final printed output.
You can generate a hard-copy proof in two ways. You can use an ICC-aware application such as Adobe Photoshop or you can go through the Print dialog to apply the
Quartz Filter you used for soft proofing to create a hard-copy file. Here’s how:
1. In your application, let’s say Preview, select Print (File > Print).
2. Click the pop-up menu labeled “Copies & Pages” and select ColorSync.
3. Click the Quartz Filter pop-up menu and choose the filter you used for soft proofing.
4. Click the Print button.
A Technology Tour
Color Management
with Mac OS X Panther
When the application sends your document to the printing system, your system will
match the color in the document first to the profile selected in the Quartz Filter and
then to the profile for your printer.
18
A Technology Tour
Color Management
with Mac OS X Panther
19
Color Workflow:
The Output Phase
The output phase of the color workflow is most often associated with printing. The
full integration of color management into Mac OS X Panther allows you to make fewer
iterations on paper to achieve the results you want. In particular, you can:
• Preview your color results before printing.
• Take advantage of faster PostScript printing.
• Manage a raster printer.
• Create PDF/X files for professional printing.
Output Phase
A Technology Tour
Color Management
with Mac OS X Panther
Late binding vs. early binding
When ColorSync matches an image from
a source profile to a destination profile, or
when you apply a Quartz Filter, the actual
data for the image is modified. Every time
this happens, some information and accuracy
is lost.
20
Checking Color Before You Print
When you select Print from the File menu, the Print dialog includes a Preview button.
One way of handling this problem is called
“late binding.” You manage the color workflow to stay in the RGB color space as long
as possible, possibly even handing RGB files
to the printer.
Another approach is called “early binding.”
In this case you convert the data as soon
as possible to the ultimate destination
color space and keep it there through
the workflow.
Choosing a late binding or early binding
scenario depends on the factors in your
particular circumstance. For example,
passing RGB files to your printer might be
an excellent choice if you know the printer
can convert RGB to CMYK with satisfactory
results. On the other hand, if you don’t know
who will do the printing, you should convert
your RGB data to CMYK in house before
sending the files out.
Clicking this button opens your print job in Preview. If the driver for your printer
is ColorSync aware, you will see an accurate soft proof of your hard-copy output
onscreen. The soft proof uses the current profile for your printer as displayed in
ColorSync Utility. See page 7 for more information about obtaining color profiles.
The color-managed soft proof you see reflects every option that you have set in
the Print pane. This feature in Mac OS X v10.3 is a major advancement for creative
professionals, and there’s nothing that touches it in any other operating system.
Faster Printing on a PostScript Printer
In Mac OS X v10.3, printing to a PostScript printer is significantly faster and more
accurate. Traditionally, the output device handled the job of matching source image
data to the printer profile. But with Panther, your Mac can accomplish this task,
matching color and converting the file before it goes to the output device. You
harness the extreme processing power of your Mac. And ColorSync is optimized for
the dual processor Power Mac G5 and can tap both processors, resulting in a boost
in throughput.
When you print to a PostScript printer from an application that uses Quartz, the Print
dialog includes additional options under ColorSync.
The Color Conversion pop-up menu gives you two choices:
• Standard. Using this default setting, ColorSync converts the profile data before
sending it to the printer. This option is generally faster and more accurate.
• In Printer. Using this option, ColorSync converts the source data to a deviceindependent color space before the print job is sent to the printer. This deviceindependent space is then matched to the printer’s color space by the printer’s
PostScript interpreter. This option should be used only when printing to highend PostScript printers that provide their own built-in color management options.
A Technology Tour
Color Management
with Mac OS X Panther
21
Printing to a Raster Printer
A raster printer is a non-PostScript printer such as an inkjet printer. There are two ways
to print color-managed files to a raster printer:
• Use Photoshop to prematch your source data to a printer profile. Choose “Print with
Preview” in Photoshop and then choose the printer profile. Turn off any color correction in the printer driver and print.
• If you are printing from an application such as Preview that does not provide prematching, ColorSync will match your source data to a printer profile. First, you’ll need
to assign a profile to your printer in ColorSync Utility (see instructions on page 7).
PDF/X Support
PDF/X is an emerging industry standard for sending documents for professional printing. PDF/X protects data from inadvertent modification during the printing process. To
create a PDF/X filter, use ColorSync Utility.
Panther supports the PDF/X-3 format, which is a more flexible version of the popular
PDF/X format. PDF/X-3 files can include RGB data or CMYK and spot color data, and
can therefore accommodate both late binding and early binding scenarios. (See the
sidebar on page 20.)
A Technology Tour
Color Management
with Mac OS X Panther
22
Automating the Workflow
The Macintosh platform provides a number of technologies and features that let you
automate routine color management tasks, freeing up your time for the creative work
and decision-making that can never be automated.
About AppleScript
AppleScript is the core automation technology built into Mac OS X, and it lets you
automate a wide variety of tasks on your Mac, including color management. An application or a technology that you can control from AppleScript is said to be scriptable.
ColorSync itself is scriptable. Also, new in Panther, aspects of Quartz are scriptable. Not
only can you automate color management operations, you can also automate imagemanipulation operations such as cropping, scaling, rotating, padding, or converting a
file type.
Using these powerful capabilities, a sample automation scenario might be:
1. Connect a camera to the computer and automatically capture JPEG images from
the camera.
2. Tag images with an appropriate device profile.
•
•
•
•
•
•
•
•
•
•
•
•
•
•
•
•
•
•
Scripts in /Library/Scripts/ColorSync
Build profile info web page
Change display profile
Embed chosen profile
Embed display profile
Embed specific profile
Extract profile
Match to chosen profiles
Match to CMYK
Match to specific profiles
Mimic PC monitor
PC to Mac Gamma
Proof CMYK on display
Proof to chosen profiles
Proof to specific profiles
Remove profile from image
Rename profile
Set profile info
Show profile info
3. Convert them to a selected working space.
4. Save them as TIFF files for editing.
For more information about AppleScript, visit www.apple.com/applescript.
An Automation Starter Kit
One way to get started using AppleScript to automate color management is to use
the ColorSync scripts provided in /Library/Scripts/ColorSync. These scripts perform
operations such as showing you an image’s profile information, embedding a profile
in an image, removing a profile from an image, or displaying information about an
embedded profile. (See the sidebar.)
These scripts are saved as droplets (self-starting applications). Simply drag an image
or a profile onto a script’s icon and the script will execute. You can also double-click a
script to run it.
You can modify and extend these scripts to meet your own needs using Script Editor.
A Technology Tour
Color Management
with Mac OS X Panther
Running Scripts
Here are some other ways you can run a color management script:
• In Image Capture, choose the script from the Automated Task pop-up menu.
• Attach the script to a folder using Folder Actions. When something related to
the folder changes—such as putting an image into the folder—the script is
triggered. For more information about Folder Actions, open Script Editor in
/Applications/AppleScript and select Script Editor Help from the Help menu.
Then search for Folder Actions.
• Place the script in a PDF Services folder in /Library. For more information about
the PDF Services folder, open Mac Help from the Help menu on the desktop and
search for PDF Workflow.
23
A Technology Tour
Color Management
with Mac OS X Panther
24
Resources
To learn more about the topics mentioned in this tour, please consult these resources.
Websites
• ColorSync: www.apple.com/colorsync
• Mac OS X: www.apple.com/macosx
• Apple displays: www.apple.com/displays
• AppleScript: www.apple.com/applescript
• Macintosh Products Guide: www.apple.com/guide
• Color Consistency and Adobe Creative Suite (PDF):
www.adobe.com/products/creativesuite/pdfs/cscolormgmt.pdf
• Adobe profiles: www.adobe.com/support/downloads
• International Color Consortium (ICC): www.color.org
Profiling Services
• www.chromix.com
• www.colormanagement.com
Books
• Real World Color Management, by Bruce Fraser, Chris Murphy, and Fred Bunting
• Real World Adobe Photoshop CS, by David Blatner and Bruce Fraser
• Mastering Digital Printing: The Photographer’s and Artist’s Guide to High-Quality Digital
Output, by Harald Johnson
• Photoshop Color Correction, by Michael Kieran
• Adobe Photoshop CS for Photographers, by Martin Evening
• Adobe Photoshop Master Class, by John Paul Caponigro
• Color Management in Mac OS X, A Practical Approach, by Joshua Weisberg
© 2004 Apple Computer, Inc. All rights reserved. Apple, the Apple logo, AppleScript, ColorSync, the ColorSync logo, iPod, Mac,
Macintosh, Mac OS, and Power Mac are trademarks of Apple Computer, Inc., registered in the U.S. and other countries. Panther,
Quartz, and Safari are trademarks of Apple Computer, Inc. Adobe and PostScript are trademarks or registered trademarks of
Adobe Systems Incorporated in the U.S. and/or other countries. Other product and company names mentioned herein may be
trademarks of their respective companies. Product specifications are subject to change without notice. This material is provided
for informational purposes only. Apple assumes no liability related to its use. June 2004 L303877A