1
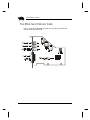
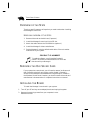
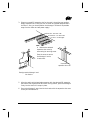
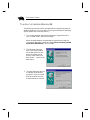
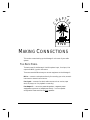
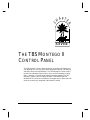
1
Turtle Beach
Montego II
User’s Guide
2
TURTLE BEACH SYSTEMS
This documentation and the accompanying software are copyright © 1999
by Voyetra Turtle Beach, Inc. All rights reserved. No part of this publication may be reproduced in any form or for any purpose without prior
written authorization from Voyetra Turtle Beach, Inc.
Turtle Beach Systems, the Turtle Beach logo, Montego II, AudioStation,
AudioView, MIDI Orchestrator, Digital Orchestrator Pro, Voyetra, the
Voyetra logo and the phrase “Multimedia Sound Specialists” are all
trademarks or registered trademarks of Voyetra Turtle Beach, Inc.
Microsoft and Windows are registered trademarks of Microsoft Corporation. DirectX is a trademark of Microsoft Corporation. Adobe and Acrobat
are registered trademarks of Adobe Systems Incorporated. Pentium is a
registered trademark of Intel Corporation.
All other trademarks are the properties of their respective companies and
are hereby acknowledged.
Use of this software is subject to the terms and conditions of the Voyetra
End-User Software License Agreement.
Voyetra Turtle Beach, Inc.
5 Odell Plaza
Yonkers, NY 10701-1406 USA
Sales and Information ............800-233-9377 (inside USA)
............914-966-0600 (outside USA)
Sales [email protected]
Information [email protected]
Fax ............914-966-1102
Website ............http://www.tbeach.com
Technical Support
Phone ............914-966-2150
Fax ............914-966-1093
Email [email protected]
3
TABLE OF CONTENTS
TABLE OF CONTENTS
3
WELCOME…
5
Remember to Register!
Our Website
THE MONTEGO II
Resource Usage
The required resources are as follows:
System Requirements
3-D Listening Mode
The Montego II Sound Card
6
6
7
7
8
8
9
10
INSTALLING THE MONTEGO II
11
Overview of the Steps
Removing the Old Sound Card
Installing the Board
12
12
12
WINDOWS 95 & 98 INSTALLATION
Before You Install the Drivers, Note…
To install the drivers in Windows 98:
To install the drivers in Windows 95:
Final Software Installation Notes
Setting the Montego II as the default Audio and MIDI device
Testing and Troubleshooting
SoundCheck®
Uninstalling the Montego II
WINDOWS NT 4.0 INSTALLATION
Before You Install the Drivers, Note …
Installing the Montego II Applications and Drivers in Windows NT 4.0
Setting the Montego II as the Default device
Troubleshooting
Uninstalling the Montego II in NT
MAKING CONNECTIONS
The Back Panel
Joystick Controller
Port Addresses
15
15
16
18
19
20
20
21
21
23
23
24
25
25
26
27
27
28
28
4
TURTLE BEACH SYSTEMS
USING THE MONTEGO II
29
Graphic EQ
Included Software
MIDI Orchestrator Plus
AudioStation 32
AudioView 32
MIDI Orchestrator 32
AudioStation Mixer
System Tray Launcher
A3D Demos
29
29
29
30
30
30
31
31
31
THE TBS MONTEGO II CONTROL PANEL
Windows 95/98 TBS Montego II Control Panel
MIDI TAB
A3D Settings Tab
A3D Demos Tab
Windows NT TBS Montego II Control Panel
MIDI TAB
33
34
34
35
36
36
36
TECHNICAL SUPPORT
39
WARRANTY AND LICENSING INFORMATION
41
Hardware Warranty
Voyetra End-User License Agreement
FCC Declaration of Conformity
Declaration of Conformity (EMC)
INDEX
42
43
45
46
47
5
WELCOME…
And thank you for choosing Turtle Beach! The ultimate in PC audio
quality is here, with the Turtle Beach Montego II PCI sound card.
Whether you’re gaming, using voice applications, listening to music or
recording your own, the Montego II handles your audio needs from start
to finish.
With your purchase of the Montego II, you’re also getting a state-of-theart software suite from Voyetra, including AudioStation 32, a multimedia
control center for organizing and playing all of your media files and CD’s.
AudioStation 32 is bundled with AudioView 32 and Midi Orchestrator 32,
two feature-packed media editors which allow you to cut, copy and paste
audio files, and re-orchestrate MIDI files. SoundCheck, a diagnostic utility
program, will analyze your system’s multimedia performance and report
any conflicts or problems you might have.
But it doesn’t end here! Your Montego II is fully upgradeable with a
variety of options, from digital inputs and outputs to expanded
synthesizer voices, to quadraphonic sound for optimum gaming. Please
visit our website at www.tbeach.com to learn more.
6
TURTLE BEACH SYSTEMS
REMEMBER TO REGISTER!
You can register by mail, fax, phone or on the Web — whichever is easiest
for you. Refer to the front of this manual or the Registration Card for
these addresses.
There are many benefits to registering your Montego II. In addition to the
warranty, you also will receive:
Update Notifications — to keep you informed of software updates and
new Voyetra/Turtle Beach products.
Upgrade Plan — to provide you with discounts on our full-featured PC
sound products.
Technical Support — You must be a registered user to receive full
technical support. To help you install your soundcard and software,
prior to registration, you will need your product ID. This number is
located on the inside cover of you’re the Montego II CD-ROM.
OUR WEBSITE
Be sure to visit the Turtle Beach website for the latest information on new
products, upgrades, technical support FAQ’s and to obtain the most recent
drivers. You will find us at www.tbeach.com.
Click the Turtle Beach website icon, in the TBS Montego II
program group, for direct access to our website.
C
7
R
PTE
A
H
ONE
THE MONTEGO II
The Montego II has many significant features, including:
A3D 2.0 positional audio
>97 dB Signal to Noise Ratio
18-bit audio converters
Headphone, 2-speaker and 4-speaker support (with upgrade)
Up to 96 Hardware accelerated DirectSound streams
MIDI and digital audio editing tools included
10 Band Graphic EQ with Digital Display
64 Hardware wavetable voices
256 Software Synth voices
RESOURCE USAGE
The Montego II, like all plug-in cards, requires certain computer resources
in order to operate. These resources are associated with specific board
functions.
8
TURTLE BEACH SYSTEMS
In Windows 95 and 98, the resources are set automatically by the
Configuration Manager, but can be adjusted using the Windows
Device Manager.
In Windows NT, the resources are configured automatically.
THE REQUIRED RESOURCES ARE AS FOLLOWS:
Two IRQs
Several I/O address ranges
Two DMAs
SYSTEM REQUIREMENTS
Computer
Processor
RAM
Hard Drive
Operating System
CD-ROM Drive
IBM PC or compatible with one available PCI
slot
Pentium 75 MHz or higher
16 MB (32MB in Windows NT)
Approximately 12 MB free space for drivers
and applications;
Windows® 95, 98
Windows® NT 4.0
A CD-ROM drive is needed for the software
and driver installations
High-quality stereo sound system, powered speakers or headphones to
properly hear the Montego II high-quality audio playback.
9
3-D LISTENING MODE
The Montego II is capable of reproducing 3D sound through two speakers
or headphones. To achieve the best 3D listening experience you must
have the appropriate listening mode selected in the Montego II Control
Panel applet. The different modes are:
Headphones: Use this selection if you are listening through headphones.
Monitor speakers: Use this selection if you are listening through speakers
placed close together.
Satellite speakers: Use this selection if you are listening through speakers
placed far apart. (Default setting)
TWO SPEAKERS VS. HEADPHONES
When using two speakers for 3-D audio, your left ear hears the sound
coming from the left speaker but also some of the sound coming from the
right speaker. The same holds true for you right ear, it also hears sounds
coming from the left speaker. This diminishes the 3-D effect.
To achieve the maximum 3D effect the use of headphones is
recommended. When using headphones the sound coming from the left
are only heard by your left ear just as the sounds coming from the right
are only the heard by your right ear. This results in a much more
immersive experience.
Please see the Control Panel section in Chapter 7 of this manual for more
details, including upgrade options for four-speaker support.
10
TURTLE BEACH SYSTEMS
THE MONTEGO II SOUND CARD
Here is a look at the Montego II sound card, to help you identify the
various connectors and ports.
C
11
R
H
APTE
TWO
INSTALLING THE
MONTEGO II
This chapter takes you through the installation process step-by-step.
If you have another sound card in your system that you are replacing with
the Montego II, remove that sound card’s drivers from your system,
physically remove that sound card if possible, and then reboot the system
to make certain no errors occur and no old sound card drivers remain. For
information on removing the sound card and its drivers, refer to the
appropriate documentation.
Note that the words “Turtle Beach” and “TBS” (Turtle Beach Systems)
are used interchangeably throughout this manual to describe drivers and
applications.
12
TURTLE BEACH SYSTEMS
OVERVIEW OF THE STEPS
There is a specific sequence of steps that you need to take when installing
the Montego II sound card.
HERE IS AN OVERVIEW OF THE STEPS:
1. Remove old sound card and drivers (if present.)
2. Install the Montego II sound card in the PCI slot.
3. Attach the audio cable to the CD-ROM drive (optional.)
4. Install the Montego II drivers and software.
5. Set the Montego II to be the default audio device if there is another
audio device in your system.
PRODUCT ID NUMBER
To install the software, you will need the Product ID
number. This number is located inside the CD-ROM case
that came with your Montego II.
REMOVING THE OLD SOUND CARD
If your system has a sound card, you will need to remove its drivers and
then if possible, physically pull out the card or disable it. Generally,
drivers can be removed in the Add/Remove Programs option, located in
the Windows Control Panel. However, you should consult the sound card
manufacturer’s documentation for complete instructions on removal.
INSTALLING THE BOARD
To install the Montego II sound card in your system:
1. Turn off your PC and any connected peripherals and unplug the system.
2. Remove the mounting screws from your computer’s cover.
Remove the cover.
13
3. Select an unused PCI expansion slot for the card. It should be near another
empty expansion slot in case you wish to install an upgrade daughtercard in
the future. Also, you should position the Montego II card as far as possible
away from the video card and power supply!
16-bit ISA slot – DO NOT USE!
8-bit ISA slot – DO NOT USE!
PCI slots – use this type!
YES!
4. Remove the selected
expansion slot cover by
unscrewing its securing screw.
Save the screw to secure
the Montego II to the
chassis later.
Unscrew the
expansion slot cover
Gently press the Montego II card
into the slot
5. Align the card’s gold-striped edge connector with the selected PCI expansion
slot socket. With a gentle back-and-forth rocking motion, press the Montego II
firmly into the slot until it snaps in place.
6. Secure the Montego II sound card to the chassis with the expansion slot cover
screw you removed earlier.
14
TURTLE BEACH SYSTEMS
INSTALLING THE CD-ROM AUDIO CABLE
The Montego II comes with an audio connector cable — one end is keyed
(MPC-2), the other is not (Sony). All CD-ROM drives that adhere to the
MPC-2 (Multimedia PC) standard have an MPC-2 jack.
Connect the MPC-2 connector to your CD-ROM drive. Then attach the
Sony connector to the Montego II.
Sony Connector
MPC-2 Connector
(keyed)
Left
Ground
Left
Ground
Ground
Right
Ground
Right
When connecting the CD-ROM audio cable, note that:
The audio cable should be plugged into the CD-ROM drive first; then
the other end of the interface should be plugged into the appropriate
connector on the Montego II sound card. Make sure that you are
plugging the audio connector into the 4-pin header labeled “CD IN.”
On the cable, “white” is “left” and “red” is “right.”
When connecting the cable to the Montego II, the red wire should be
on the right (white should be closest to the slot cover.)
The next step is driver installation and configuration.
PROCEED TO THE CHAPTER THAT APPLIES TO YOUR SYSTEM:
Windows 95 & 98 Installation
Windows NT 4.0 Installation
C
15
R
H
APTE
THREE
WINDOWS 95 & 98
INSTALLATION
Now that the hardware is installed, it is time to configure the drivers.
The Plug and Play installation process uses your system’s BIOS and the
Plug and Play features of Windows 95/98 to allocate resources for the
Montego II.
BEFORE YOU INSTALL THE DRIVERS, NOTE…
The Montego II sound card must be installed in your system. If you
have not already installed the sound card in your PC, refer to the
previous chapter for instructions.
IMPORTANT On the first boot up after physically installing the
Montego II, place the Montego II Applications CD in your CD–ROM
drive before Windows completes boot up.
16
TURTLE BEACH SYSTEMS
TO INSTALL THE DRIVERS IN WINDOWS 98:
The following outlines the driver and applications installation process for
Windows 98 drivers. (If your system is running the Windows 95 operating
system, please skip to the next section.)
1. Turn on the computer and place the Montego II Applications CD in
your CD-ROM drive if you did not already.
When the New Hardware Found dialog box reports that it sees the
Turtle Beach Montego II sound card, select Driver from disk provided
by hardware manufacturer. Then click OK.
2. The following dialog box
asks if you’d like to search
for the best driver for your
device or display a list of
drivers. Select “Search for
best drivers…” and click the
Next button.
3. The next dialog box asks you
to indicate the location of
the drivers. Click on the CDROM drive option and click
the Next button to continue.
17
4. Windows will search the
system for the correct
driver which will be
located on the CD-ROM
drive. Click next to
continue the installation.
5. The appropriate drivers for the various subsystems of the board will
install. When this is complete, the applications installation will run.
6. Follow the onscreen instructions to complete the install. Note that the
product ID can be found inside the jewel case of your applications
CD.
You should now skip the next section and proceed to the Final Software
Installation Notes section.
18
TURTLE BEACH SYSTEMS
TO INSTALL THE DRIVERS IN WINDOWS 95:
WHICH VERSION OF WINDOWS 95 DO YOU HAVE?
Microsoft issued a maintenance release of Windows 95 referred to as
OSR2. This version shipped as the stock operating system on many PCs.
If you have this version of Windows 95 then the installation screens will
look slightly different than those described below. However, the
installation will go smoothly if you simply follow the on screen
instructions and, in all cases where the system is looking for a file, just
browse to the root (drive letter only) of the Montego II CD.
1. Turn on the
computer and place
the Montego II
Applications CD in
your CD-ROM drive
if you did not
already.
When the New
Hardware Found
dialog box reports
that it sees the
Turtle Beach
Montego II sound card, select Driver from disk provided by hardware
manufacturer. Then click OK.
2. When the Install from Disk dialog box displays enter the letter of your
CD-ROM drive, or click on Browse and locate your CD-ROM drive.
Click OK.
19
At this point, the install program will check for Direct X, version
6 or later. If Direct X is already on your system the installation
will proceed. If Direct X is not installed the setup will prompt
you to install it. Simply browse to the DIRECTX folder on the
CD and follow the on-screen instructions. At the end of the
Direct X install you will be prompted to reboot. After rebooting,
you will need to open My Computer and browse to the Montego
II CD-ROM again. Double-click on “setup.” This will bring you to
the Installation Menu, where you can continue installing the
applications.
3. Windows then copies the
files from the CD. You
may be prompted to
insert your Microsoft
Windows 95 CD or floppies, as the core sound
components of the operating system may need to
be copied as well. These
include the audio codecs,
joystick drivers, the
Mixer and the Sound Recorder program.
The files are located in the WIN95 directory on your Windows 95 CDROM.
If you do not have your Microsoft Windows 95 installation CD or floppies available, you can choose Skip File for each of the Windows 95
Sound Options and install them later from the Windows 95 Control
Panel, although this is not recommended.
4. The Installation will continue, follow the on-screen instructions to
complete the install. Note that the product ID can be found inside
the jewel case of your applications CD.
5. At the end of the install you should reboot your system.
FINAL SOFTWARE INSTALLATION NOTES
At this point, the drivers should be installed and the Montego II sound
card should be functional. We recommend that you run the SoundCheck
diagnostic located in the TBS Montego II program folder to test your
system or troubleshoot any conflicts you might have.
20
TURTLE BEACH SYSTEMS
To test the system, you need to connect headphones or speakers to the
Montego’s output. For more information on hooking up speakers to the
Montego II, refer to the “Making Connections” chapter later in this Guide.
SETTING THE MONTEGO II AS THE DEFAULT AUDIO
AND MIDI DEVICE
If you have more than one sound card in your system you will need to set
the Montego II as the default audio and MIDI device.
1. In the Windows 95/98 Control Panel double-click the Multimedia icon.
2. Click on the Audio tab. Montego II Playback should be chosen for
Playback and Montego II Record should be chosen for Recording.
3. Now click on the MIDI tab.
4. The Montego II MIDI should be selected.
5. Click on OK to save any changes.
TESTING AND TROUBLESHOOTING
If the Montego II or your system is not working properly, there is probably
a resource conflict in your system. This means that two or more devices in
the system are using the same resources. Resource conflicts are fairly
typical and are a normal part of the PC hardware installation process —
and they are easily resolved.
There are several possible types of conflicts that users experience when
installing the Montego II:
Input/Output Port Address Conflict
Interrupt (IRQ) Conflict
Troubleshooting your system involves checking the current settings for
each of these common conflicts and trying new settings for the resources
that are conflicting. Note that you may need to try a number of different
resource configurations before all of the peripherals work together in your
PC.
On the rare occasion that your system locks up after installing the board,
you should re-boot the system in safe mode and remove the drivers. (The
21
process is explained below). If the problem persists, please call Turtle
Beach technical support for help in diagnosing the problem.
TO BOOT IN SAFE MODE:
1. Restart the system again.
2. When you see the message “Starting Windows 95...” press the F8
key. If you have Windows 98 press F8 after the first beep.
3. Select Safe Mode from the menu.
SOUNDCHECK®
SoundCheck provides an easy way to find and fix audio problems in your
system. If you experience any problems installing the drivers, we
recommend you run this diagnostic utility.
UNINSTALLING THE MONTEGO II
Uninstalling the Montego II is a two step process. First, the applications
must be removed, and then the drivers. If you wish to physically remove
the Montego II, do so only after the apps and drivers are removed.
Before Uninstalling be sure to close the Turtle Beach System Tray
Launcher:
Right-click on the Turtle Beach System Tray Launcher
icon located on the lower right-hand side of the
Desktop, and choose Close.
TO UNINSTALL THE APPLICATIONS AND DRIVERS:
1. From the Windows Control Panel double-click the System icon.
2. Click the Device Manager tab.
3. Double-click on Multi-function adapters.
4. Select TBS Montego II Multifunction PCI Platform and click Remove.
A dialog will display asking confirmation, Click OK.
5. From the Windows Control Panel double-click the Add/Remove
Programs icon.
22
TURTLE BEACH SYSTEMS
6. Select Montego II Applications from the list and click the Add/Remove
button.
7. Select Montego II Drivers from the list and click the Add/Remove
button.
8. Follow the on-screen prompts to complete the removal.
C
R
PTE
A
H
23
FOUR
WINDOWS NT 4.0
INSTALLATION
BEFORE YOU INSTALL THE DRIVERS, NOTE …
Your BIOS should be in non Plug-and-Play mode. For instructions on
changing the BIOS, refer to your motherboard’s manual.
The sound card must be physically installed in your system. If you
have not already installed the sound card in your PC, refer to the
“Installing the Montego II” chapter for instructions.
All other applications should be closed down. This is very important.
24
TURTLE BEACH SYSTEMS
INSTALLING THE MONTEGO II APPLICATIONS AND
DRIVERS IN WINDOWS NT 4.0
To install the Montego II applications in Window NT 4.0, run
D:\SETUP.EXE (assuming that D: is the letter of you CD-ROM drive.) This
will display a menu with different installation options.
Click on the TBS Montego II Applications Install. Follow the on-screen
instructions to install the applications. Do not restart your computer when
finished. Exit the installation menu.
After installing the applications you’ll need to install the drivers.
TO INSTALL THE MONTEGO II DRIVERS:
1. From the Windows NT Control Panel double-click the Multimedia
icon.
2. Click the Devices tab.
3. Click the Add button.
4. Select unlisted or updated driver. Click OK.
5. A dialog box appears and requests the path of the Montego II drivers
to be installed. The drivers are located in the NT directory of the
Montego II CD-ROM. Use the Browse button to navigate to the D:\NT
directory (where D: is the CD-ROM drive letter) Click OK.
6. Select the Turtle Beach Montego II driver in the dialog box. Click OK.
7. A Turtle Beach splash screen should now appear. Click the OK button.
8. Next, you’ll be prompted to restart the system. Click Restart Now.
9. After rebooting, the Montego II Start Menu window should be
displayed on your desktop with the application icons. Refer to Chapter
Six for descriptions of these applications.
25
SETTING THE MONTEGO II AS THE DEFAULT
DEVICE
If you have more than one sound card in your system you will need to set
the Montego II as the default MIDI and audio device.
1. From the Windows NT Control Panel double-click the Multimedia
icon.
2. Click on the Audio tab. TBS Montego II Playback be chosen for
Playback and TBS Montego II Record should be chosen for Recording.
3. Now click on the MIDI tab.
4. The TBS Montego II MIDI should be selected.
5. Click on OK to save any changes.
Note that you may need to be logged in as the Administrator
to make any system changes in Windows NT.
TROUBLESHOOTING
The Montego II PCI card is assigned an IRQ by the BIOS. If you are having
an IRQ conflict, you will need to go into your BIOS setup to select which
IRQ is assigned to the slot in which you installed your Montego II PCI.
Please see your motherboard manufacturer’s documentation.
TO CHECK THE RESOURCE SETTINGS FOR YOUR MONTEGO II
AND OTHER DEVICES:
1. Click on Start, then go to Programs -> Administrative Tools ->
Windows NT Diagnostics.
2. Click on the resources tab. This will display a list of some of the
devices and resources that they use.
26
TURTLE BEACH SYSTEMS
TO DISABLE OR ENABLE A DEVICE:
1. In the Windows NT Control Panel double-click on the Devices icon.
2. From here you can disable or enable individual devices. This can be
helpful when troubleshooting conflicting devices.
For more information regarding devices and resource settings please see
your Windows NT manual.
UNINSTALLING THE MONTEGO II IN NT
Uninstalling the Montego II in Windows NT is a two-step process. First,
the applications must be removed, and then the drivers. Before
uninstalling be sure to remove the Turtle Beach System Tray Launcher:
Right-click on the Turtle Beach System Tray Launcher
icon located on the lower right-hand side of the
Windows Desktop and choose Close.
TO UNINSTALL THE APPLICATIONS
1. From the Windows NT Control Panel double-click the Add/Remove
Programs icon.
2. Select TBS Montego II Applications from the list and click the
Add/Remove button.
3. If you are prompted to remove shared files, click Yes to All.
TO UNINSTALL THE DRIVERS
1. From the Windows NT Control Panel double-click the Multimedia
icon.
2. Click the Devices tab.
3. Select the TBS Montego II Audio driver and click the Remove button.
4. Restart your computer, or if you wish, shut down and remove the
Montego II sound card.
C
27
R
H
APTE
FIVE
MAKING CONNECTIONS
This section covers hooking up the Montego II to the rest of your audio
system.
THE BACK PANEL
The back panel of the Montego II has Microphone input, Line input, Line
output and MIDI/ Joystick connectors.
There are several different ways to connect equipment to the Montego II:
Mic In— connects a microphone directly for recording your voice, acoustic
instrument or acoustic sound source.
Line Input — connects line level audio sources such as a mixer, tape
deck, CD player, etc. for playback or recording.
Line Output 1 — connect to powered speakers, a separate power
amp/speaker system or to headphones directly. In a four speaker
configuration these would be the front speakers.
28
TURTLE BEACH SYSTEMS
JOYSTICK CONTROLLER
The joystick connection on the back of the Montego II also serves as a
MIDI port. The optional cable available from Voyetra Turtle Beach allows
you to have both a joystick and a MIDI keyboard connected to your
system.
If you want to connect a joystick to the Montego II, the sound card and its
drivers must be properly installed in your system.
PORT ADDRESSES
The Montego’s joystick controller uses ports 201-201.
C
29
R
PTE
A
H
SIX
USING THE MONTEGO II
GRAPHIC EQ
A 10-band graphic EQ, located in the AudioStation 32 application
provides tone control over the wave output and synth output of the
Montego II.
INCLUDED SOFTWARE
MIDI ORCHESTRATOR PLUS
MIDI Orchestrator Plus turns your multimedia PC into a complete desktop
MIDI recording studio. Create multi-track MIDI recordings of your own
music or modify pre-recorded MIDI songs. The on-screen video tutorials
show you how. Compose songs step-by-step by entering notes with a
mouse or MIDI keyboard, then edit every detail on the PC screen. You can
even print out sheet music.
30
TURTLE BEACH SYSTEMS
AUDIOSTATION 32
AudioStation® 32 integrates control of your multimedia files in one
convenient and useful location. AudioStation® 32 supports playback of
Redbook CD Audio, MIDI, WAV, DVD and Video Discs, and more. In
addition, AudioStation 32 is bundled with AudioView 32 and MIDI
Orchestrator 32, two feature-packed media editors.
AUDIOVIEW 32
AudioView 32 is a full featured digital audio recorder/editor which lets
you:
Edit WAV files using cut, paste, copy and continuously variable zoom.
Record files of virtually unlimited length directly to the hard drive.
Save and load Internet-ready compressed audio files (audio codecs
required).
Modify WAV files with sound effects: echo, reverse, fade, and more.
WAV file conversions include halve sample rate, stereo to mono and
more.
Embed WAV files by dragging icon into documents or load WAV files
by dragging file name into AudioView.
Open multiple instances to edit between several WAV files.
And much more…
MIDI ORCHESTRATOR 32
MIDI Orchestrator lets you re-orchestrate MIDI music with an intuitive
16-channel "audio mixer" style control panel. It provides a quick way to
adjust MIDI mix setting without the need for a full-featured sequencer.
View MIDI data activity and change instruments, volumes,
transposition, tempo and other song settings in 16 MIDI channels.
Single out individual instruments while playing songs.
Lengthen and shorten MIDI songs by varying the tempo while
viewing the corresponding change in song time.
31
AUDIOSTATION MIXER
AudioStation 32’s Audio Mixer provides a convenient way to view the
available mixer functions for all sources at one time.
Rack components
Balance L/R
Playback source
Volume control
SYSTEM TRAY LAUNCHER
If you selected the option during the install the yellow speaker icon in the
system tray (bottom right) should have been replaced with a Turtle Beach
Icon (Palm Tree). Left-clicking on this icon will display a master volume
slider for making quick global volume adjustments. Right-clicking on the
icon will display a menu for launching the applications in the Montego II
software suite.
A3D DEMOS
The Montego II provides A3D positional audio support which enables an
amazing three dimensional audio experience using only two speakers.
This technology is demonstrated with the programs included in the A3D
demos folder.
32
TURTLE BEACH SYSTEMS
C
33
R
H
APTE
SEVEN
THE TBS MONTEGO II
CONTROL PANEL
The TBS Montego II Control Panel allows you to configure the features of
your Montego II. It lets you easily adjust wavetable settings, A3D settings
and offers access to the A3D demos. The TBS Montego II Control Panel is
located in the Windows Control Panel, which can be accessed by clicking
Start-> Settings-> Control Panel from the Windows desktop. The TBS
Montego II Control Panel is slightly different in Windows 95/98 and
Windows NT 4.0 so be sure to reference the proper section. Note that A3D
sound is currently only supported in Windows 95 and 98.
34
TURTLE BEACH SYSTEMS
WINDOWS 95/98 TBS MONTEGO II CONTROL
PANEL
MIDI TAB
DESTINATION FOR DOS BOX MIDI OUT
This list box lets you select how MIDI is handled by programs running in
DOS boxes. There are two options.
Montego II MPU-401 - This setting sends MIDI data to an external
synthesizer attached to the MIDI port.
Montego II MIDI - This setting sends MIDI data to the internal
Montego II music synthesizer.
If you do not have an external synthesizer connected, select "Montego II
Wavetable."
WAVETABLE MODE
Wavetable mode sets the number of voices as well as the quality level of
those voices. These settings directly affect the amount of CPU utilization.
320 Voice, Pro Quality – The wavetable engine is optimized for 320
voices and premium quality. This mode has the highest CPU
utilization.
128 Voice, Game Quality – The wavetable engine is optimized for 128
voices with lower CPU utilization.
64 Voice, Pro Quality – The wavetable engine is optimized for 64
voices. CPU utilization in 64-voice mode is significantly less than that
in 320-voice mode.
DOWNLOAD BUTTON
The download button lets you select a different instrument sound bank to
be used by the Montego II’s internal synthesizer. DLS Level 1 sound
banks are supported as well as the Aureal ARL format.
35
WAVETABLE EFFECTS
The Montego II offers advanced global effects. These controls allow finetuning of the effects.
Effects Checkbox – You can disable the effects with this checkbox.
When disabled, no effects are heard even if a program or MIDI file
requests them.
Effects Selection – The effect selection dropdown box allows you to
select from a number of effect algorithms including Reverb, Delay,
Hall Reverb, Flange Distortion and more. Reverb and Chorus are the
default settings and are most useful for general MIDI playback.
Effects Sliders – These sliders increase the amount of the selected
effect over the levels set by a program or MIDI file. A zero setting
selects the same amount of chorus and reverb as set in the program
or MIDI file. Moving the sliders up increases the effects level until the
effect reaches its maximum possible level. If a program or MIDI file
sets the maximum possible reverb and chorus, the sliders have no
effect. These settings can be changed while a song is playing.
A3D SETTINGS TAB
OUTPUT MODE
The Montego II is capable of optimizing its A3D Interactive positional
audio technology for 2-speaker or headphone output. This setting lets you
select the target output. For optimum performance change target output
settings whenever you switch between speakers and headphones.
Note: To get the most out of A3D positional audio technology, fourspeaker usage is recommended. There are currently three upgrade
options for enabling 4-speaker support for the Montego II. These include
the Quadzilla, the Digital I/O upgrade and the Montego II Home Studio.
All upgrades are available on the www.tbeach.com website.
A3D SPLASH
By default, when an A3D enabled application starts up, the A3D logo
displays and an audio signature plays. You can deactivate the audio
signature and A3D logo at startup using these checkboxes. These settings
have no effect on the actual A3D sound.
36
TURTLE BEACH SYSTEMS
DISABLE DIRECTSOUND HARDWARE ACCELERATION
Some games using DirectSound do not check the hardware resources
correctly. If no sound is audible, you can disable hardware acceleration of
DirectSound with this checkbox. Applications will then use the generic,
slower and lower-quality software DirectSound drivers supplied within
DirectX.
Disabling DirectSound hardware
acceleration disables all A3D functionality.
A3D DEMOS TAB
This tab offers quick access to the A3D demos. Double-click the icons in
this window to launch an A3D demo program.
WINDOWS NT TBS MONTEGO II CONTROL
PANEL
MIDI TAB
WAVETABLE MODE
Wavetable mode sets the number of voices as well as the quality level of
those voices. These settings directly affect the amount of CPU utilization.
320 Voice, Pro Quality – The wavetable engine is optimized for 320
voices and premium quality. This mode has the highest CPU
utilization.
128 Voice, Game Quality – The wavetable engine is optimized for 128
voices with lower CPU utilization.
64 Voice, Pro Quality – The wavetable engine is optimized for 64
voices. CPU utilization in 64-voice mode is significantly less than that
in 320-voice mode.
DOWNLOAD BUTTON
The download button lets you select a different instrument sound bank to
be used by the Montego II’s internal synthesizer. DLS Level 1 sound
banks are supported as well as the Aureal ARL format.
37
WAVETABLE EFFECTS
The Montego II offers advanced global reverb and chorus effects. These
controls allow fine-tuning of the chorus and reverb effects.
Effects Checkbox – You can disable the chorus and reverb effects
with this checkbox. When disabled, no effects are heard even if a
program or MIDI file requests them.
Effects Selection – The effect selection dropdown box allows you to
select from a number of effect algorithms including, Reverb, Delay,
Hall Reverb, Flange Distortion and more. Reverb and Chorus are the
default settings and are most useful for general MIDI playback.
Effects Sliders – These sliders increase the amount of effects, such as
chorus and reverb, over the levels set by a program or MIDI file. A
zero setting selects the same amount of chorus and reverb as set in
the program or MIDI file. Moving the sliders up increases the effects
level until the effect reaches its maximum possible level. If a program
or MIDI file sets the maximum possible reverb and chorus, the sliders
have no effect. These settings can be changed while a song is playing.
38
TURTLE BEACH SYSTEMS
C
39
R
PTE
A
H
EIGHT
TECHNICAL SUPPORT
This Getting Started Guide, the SoundCheck utilities and the various help
and PDF files should be all you need to get the Montego II sound card and
the software applications working. However, if you need support, here is
how to contact us — Monday through Friday, 9am-5pm, EST.
TO CONTACT TURTLE BEACH TECHNICAL SUPPORT:
Email: [email protected]
Internet: www.tbeach.com (Visit out FAQ section!)
Phone: 914.966.2150
Fax: 914.966.1093
You can receive a list of frequently asked questions both through the web
or by emailing [email protected].
40
TURTLE BEACH SYSTEMS
IF YOU CALL:
You must be registered or have your product ID at hand.
If possible, use a telephone near your computer.
The technician might need to ask about the type of system you are
using and the additional hardware installed on the system — for
example, a synthesizer, CD-ROM drive or MIDI interface. Try to have
the manufacturers’ manuals for these peripherals at hand.
Be prepared to explain the problems you are having, what you were
doing when these problems occurred and any error messages you
have received.
41
A
WARRANTY AND
LICENSING INFORMATION
This Appendix includes the warranty for the Montego II sound card, the
Voyetra End-User License Agreement for the software suite in this
package and the FCC and EMC Declarations of Conformity.
42
TURTLE BEACH SYSTEMS
HARDWARE WARRANTY
Voyetra Turtle Beach, Inc. ("Voyetra") warrants to the original end-user
purchaser ("Purchaser") that the Turtle Beach Systems Montego II
("Product") will be free of defects in materials and workmanship for a
period of one (1) year from the date of purchase by Purchaser ("Warranty
Period").
Should a defect occur during the Warranty Period, the Purchaser must fax
a copy of the dated proof of purchase in order to obtain a Return
Merchandise Authorization ("RMA") from Voyetra. The Purchaser is
responsible for all costs incurred in returning the defective Product to and
from the authorized Voyetra service center, or to the repair facility located
at Voyetra's corporate headquarters. The Product must be returned in a
static-proof bag, similar to the one included with the original packaging. A
copy of the dated proof of purchase must be included with the defective
Product and the RMA number must be clearly indicated on the outside of
the package. All packages sent without an RMA number will be Returned
to Sender.
In the event of a defect, Purchaser's sole and exclusive remedy and
Voyetra's sole liability is expressly limited to the correction of the defect
by adjustment, repair, or replacement of the Product at Voyetra's sole
option and expense.
This warranty does not cover, and Voyetra is not responsible for, damage
caused by misuse, neglect, fire, acts of God, or unauthorized modification
of the Product or damage resulting from the use of the Product with
hardware or software programs not provided or specifically recommended
by Voyetra.
Except as specifically provided herein, there are no other warranties,
expressed or implied, including, but not limited to, any implied warranties
or merchantability or fitness for a particular purpose and in no event shall
Voyetra be liable for indirect, incidental, consequential, or other damages,
including personal injury, lost profits and damages to property arising out
of any breach of this warranty or otherwise.
All software including operating systems or applications programs are
provided on an "As Is" basis without warranty. Some states do not allow
the exclusion or limitation of incidental or consequential damages, so the
above exclusion or limitation may not apply to you. This warranty gives
you specific legal rights and you may also have other rights which vary
from state to state.
43
VOYETRA END-USER LICENSE AGREEMENT
By installing this Software you acknowledge that you have read,
understood and agree to abide by the terms and conditions of this
Agreement. If you do not agree with the terms of this Agreement,
promptly contact the seller of this Software to arrange an appropriate
remedy.
SOFTWARE LICENSE: This is a legal agreement (Agreement) between
you (either an individual or an entity) and Voyetra Turtle Beach, Inc.
(Voyetra) that sets forth the license terms and conditions for using the
enclosed software (Software) and updates of the Software. In this
Agreement, the term “Use” means loading the Software into RAM, as well
as installing it onto a hard disk or other storage device.
The Software is owned by Voyetra and is protected under United States
copyright laws as well as international treaty provisions. You must treat
the Software as you would any other copyrighted material. Voyetra retains
title and ownership of the Software. The purchase price for the Software
grants you a non-exclusive license to use one copy of the Software on a
single computer. You may make copies of the Software solely for archival
purposes. You may not make copies of any written material accompanying
the Software. You may not allow third parties to use the Software by
time-sharing, networking or any other form of multi-user participation.
You may not rent, sell, lease, sub-license, time-share or lend the Software
to a third party or otherwise transfer this License without written
permission from Voyetra. You may not decompile, disassemble, reverseengineer or modify the Software.
This Agreement is effective until terminated by the destruction of the
Software — all of the CD-ROMs and/or diskettes — and documentation
provided in this package, together with all copies, tangible or intangible.
If you fail to comply with any of the terms and conditions of this
Agreement, this License will be terminated and you will be required to
immediately return to Voyetra the Software — CD-ROMs and/or diskettes
— and documentation provided in this package, together with all back-up
copies. The provisions of this Agreement which protect the proprietary
rights of Voyetra will continue in force after termination.
LIMITED LIABILITY: You assume responsibility for the selection of the
Software to achieve your intended results, and for the installation, use
and results obtained from the Software.
44
TURTLE BEACH SYSTEMS
VOYETRA MAKES NO REPRESENTATIONS OR WARRANTIES WITH
REGARD TO THE SOFTWARE AND DOCUMENTATION, INCLUDING BUT
NOT LIMITED TO THE IMPLIED WARRANTIES OF MERCHANTABILITY
AND FITNESS FOR A PARTICULAR PURPOSE.
Voyetra shall not be liable for errors or omissions contained in the
Software or manuals, any interruption of service, loss of business or
anticipatory profits and/or for incidental or consequential damages in
connection with the furnishing, performance or use of these materials.
The Software and documentation are sold AS IS.
This Limited Warranty gives you specific legal rights and you may also
have other rights which vary from state to state. Some states do not allow
the limitation or exclusion of implied warranties or of consequential
damages, so the above limitations or exclusions may not apply to you. You
agree that this is the complete and exclusive statement of the Agreement
between you and Voyetra which supersedes any proposal or prior
agreement, oral or written, and any other communications between us
regarding the subject matter of this Agreement. This Agreement shall be
construed, interpreted and governed by the laws of the State of New York,
except the federal laws which govern copyrights and registered trademarks. If any provision of this Agreement is found unenforceable, it will
not affect the validity of the balance of this Agreement, which shall
remain valid and enforceable according to its terms.
45
FCC DECLARATION OF CONFORMITY
PRODUCT NAME: Internal PCI Sound Card
Model Number: TB400-3356-01
FCC RULES: TESTED TO COMPLY WITH FCC PART 15, CLASS B
OPERATING ENVIRONMENT: FOR HOME OR OFFICE USE
FCC COMPLIANCE STATEMENT:
This device complies with part 15 of the FCC rules. Operation is subject to the
following conditions. (1) This device may not cause harmful interference and (2)This
device must accept any interference received including interference that may cause
undesired operation.
INFORMATION TO USER:
This equipment has been tested and found to comply with the limits for a Class B
digital device, pursuant to Part 15 of FCC rules. These limits are designed to provide
reasonable protection against harmful interference in a residential installation. This
equipment generates, uses, and can radiate radio frequency energy and, if not
installed and used in accordance with the instructions, may cause harmful interference
to radio communications. However, there is no guarantee that interference will not
occur in a particular installation. If this equipment does cause harmful interference to
radio or television reception, which can be determined by turning the equipment off
and on, the user is encouraged to try to correct the interference by one or more of the
following measures:
1. Reorient or relocate the receiving antenna.
2.
Increase the separation between the equipment and receiver.
3.
Connect the equipment into an outlet on a circuit different from that to
which the receiver is connected.
4.
Consult the dealer or an experienced radio TV technician for help.
CAUTION: Changes or modifications to this unit not expressly approved by the party
responsible for compliance could void the user’s authority to operate the equipment.
PARTY RESPONSIBLE FOR PRODUCT COMPLIANCE
Turtle Beach Systems
5 Odell Plaza
Yonkers, NY 10701
Tel: (914) 966 0600
Fax: (914) 966 1102
46
TURTLE BEACH SYSTEMS
DECLARATION OF CONFORMITY (EMC)
Manufacturer’s Name:
Manufacturer’s Address:
Voyetra Turtle Beach, Inc.
5 Odell Plaza
Yonkers, NY 10701
Declares that this product:
Product Name:
Model Number(s):
Year of Manufacture:
Montego II
TB400-3356-01
1999
Conforms to the following Product Specifications:
EMC:
EN55022 (CISPR:1993) CLASS B
ENN50082-1 (1992):IEC801-2 (1981)
ENN50082-1 (1992):IEC801-3 (1984)
ENN50082-1 (1992):IEC801-4 (1988)
Supplemental Information:
The product herewith complies with the requirement to the EMC
Directive 89/336/EEC.
Title: Executive Vice President
47
INDEX
C
cable connections · 28
CD-Audio Connector · 10
CD-ROM audio cable
connecting · 14
H
Montego sound card
back panel · 27
features of · 7
installing · 11
warranty · 42
MPC-2 connector · 14
P
port addresses, joystick · 28
Product ID Number · 12
headphones · 8
R
I
I/O addresses · 8
installing the sound card · 11
overview of the steps · 12
IRQs · 8
ISA slot · 13
J
joystick controller · 28
joystick/external MIDI connector · 10
L
license agreement · 43
Line In · 10, 27
Line Out · 10, 27
M
Mic · 10, 27
MIDI/joystick · 27
RAM · 8
red wire · 14
registering your software · 6
resource usage · 7
S
S/PDIF · 10
software license agreement · 43
Sony connector · 14
speakers · 8
T
technical support · 6
contacting · 39
Turtle Beach, contacting · 2
U
Update notifications · 6
48
TURTLE BEACH SYSTEMS
W
warranty · 42
website · 2, 6
white wire · 14
Windows 3.x
installing the drivers · 23
resources · 8
Windows 95
common conflicts · 20
installing the drivers · 15, 18
resources · 8
Testing and Troubleshooting · 20
Windows NT 4.0
installing the drivers · 23