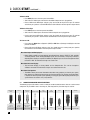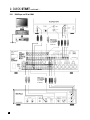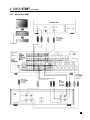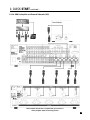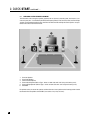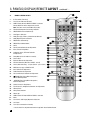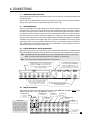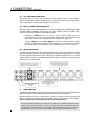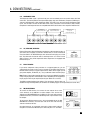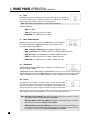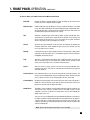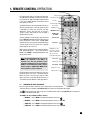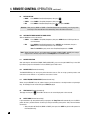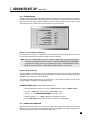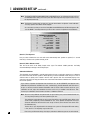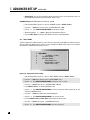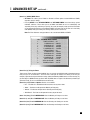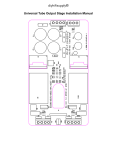
1
AVM
OPERATING MANUAL
SOFTWARE VERSION 1.1x
UPDATES: www.sonicfrontiers.com
LEARN
SSP
MAIN
ZONE2
TV
VCR
CD
DVD
SAT
AUX
1
3
2
FM/AM PRE-SETS
4
5
6
ON SCREEN
DISPLAY
TONE BYPASS
7
8
MUTE
0
9
DYN
EFFECT
ENTER
SSP OFF
LAST
SLEEP
VOL
CH/PRE-SET
INPUT
STATUS
GUIDE
EXIT
SEEK
TUNE
FRT
CTR
SELECT
SETUP
MENU
INFO
SUB/
LFE
SUR
SOURCE SEEK
TREBLE
BASS
PIP
BALANCE
SWAP
MOVE
SSP
DISC2
TAPE
FM/AM
MAIN
REC
D I RECT
DISC1
SSP INPUT SOURCES
TV
SAT
VCR
AUX
Copyright © 2000, Sonic Frontiers International. The information contained
herein may not be reproduced in whole or in part without our express written permission.
ANTHEM™ and SONICFRONTIERS™ are trade marks of SONIC FRONTIERS INTERNATIONAL.
MOTOROLA™ is a trade mark of Motorola, Inc.
PHASTLINK™is a trade mark of PHAST Corporation.
Manufactured under license from Dolby Laboratories.
“Dolby®,” “Pro Logic”, and the double-D symbol are trade marks of Dolby Laboratories.
Confidential unpublished works. Copyright 1992-1997 Dolby Laboratories. All right reserved.
Manufactured under license from Digital Theater Systems, Inc. US Pat. No. 5,451,942 and other world-wide patents issued and pending.
“DTS®” and “DTS Digital Surround®”, are trademarks of Digital Theater Systems, Inc.
Copyright 1996 Digital Theater Systems, Inc. All rights reserved.
TABLE of CONTENTS
SECTION
PAGE
1. INTRODUCTION
1
1.1 About this Manual . . . . . . . . . . . . . . . . . . . . . . . . . . . . . . . . . . . . . . . . . . . . . . . . . . . . . . . . . . . . . . . . . . 1
1.2 Receiving and Unpacking the AVM 2 . . . . . . . . . . . . . . . . . . . . . . . . . . . . . . . . . . . . . . . . . . . . . . . . . .1
1.2.1 Packing List
1
1.3 Important Safety Information . . . . . . . . . . . . . . . . . . . . . . . . . . . . . . . . . . . . . . . . . . . . . . . . . . . . . . . . . 1
1.3.1 Before Operating Your AVM 2
2
1.3.2 Outdoor Antenna Grounding
2
1.3.3 Mains Fuse Type
2
1.3.4 Supply Power Requirements
2
1.3.5 In-Use Notices
3
1.3.6 Cleaning
3
1.3.7 Servicing
3
1.3.8 Non-Use Periods
3
1.4 Packing Materials . . . . . . . . . . . . . . . . . . . . . . . . . . . . . . . . . . . . . . . . . . . . . . . . . . . . . . . . . . . . . . . . . . 3
2. QUICK START
4
2.1 Quick Start Guide . . . . . . . . . . . . . . . . . . . . . . . . . . . . . . . . . . . . . . . . . . . . . . . . . . . . . . . . . . . . . . . . . . . 4
2.2 Connector Diagrams and Descriptions . . . . . . . . . . . . . . . . . . . . . . . . . . . . . . . . . . . . . . . . . . . . . . . . 5
2.2.1-a CD Player or CD Transport to AVM 2 (Digital)
6
2.2.1-b CD Player to AVM 2 (Analog)
6
2.2.2 DVD Player and TV to AVM 2
7
2.2.3 VCR and TV to AVM 2
8
2.2.4-a AVM 2 to Amplifier and Powered Subwoofer (RCA)
9
2.2.4-b AVM 2 to Amplifier and Powered Subwoofer (XLR)
10
2.3 Surround System Speaker Placement . . . . . . . . . . . . . . . . . . . . . . . . . . . . . . . . . . . . . . . . . . . . . . . . . 11
3. PANELS / DISPLAYS / REMOTE LAYOUT
12
3.1-aFront Panel Layout . . . . . . . . . . . . . . . . . . . . . . . . . . . . . . . . . . . . . . . . . . . . . . . . . . . . . . . . . . . . . . . . . 12
3.1-bFront Panel LCD Display . . . . . . . . . . . . . . . . . . . . . . . . . . . . . . . . . . . . . . . . . . . . . . . . . . . . . . . . . . . . 13
3.2 Rear Panel Layout . . . . . . . . . . . . . . . . . . . . . . . . . . . . . . . . . . . . . . . . . . . . . . . . . . . . . . . . . . . . . . . . . . 14
3.3 Remote Control Layout . . . . . . . . . . . . . . . . . . . . . . . . . . . . . . . . . . . . . . . . . . . . . . . . . . . . . . . . . . . . . 15
4. CONNECTIONS
16
4.1 Connecting Power To The AVM 2 . . . . . . . . . . . . . . . . . . . . . . . . . . . . . . . . . . . . . . . . . . . . . . . . . . . . 16
4.2 Audio Connections . . . . . . . . . . . . . . . . . . . . . . . . . . . . . . . . . . . . . . . . . . . . . . . . . . . . . . . . . . . . . . . .
4.2.1 Digital Audio Inputs / Digital Audio Output . . . . . . . . . . . . . . . . . . . . . . . . . . . . . . . . . . .
4.2.2 Analog Audio Inputs
4.2.3 Left / Right Analog Audio Inputs
4.2.4 Direct / 6-Channel Analog Audio Input
4.2.5 Analog Audio Outputs
16
16
16
17
17
17
4.3 Video Connections. . . . . . . . . . . . . . . . . . . . . . . . . . . . . . . . . . . . . . . . . . . . . . . . . . . . . . . . . . . . . . . . .
4.3.1 Composite Video
4.3.2 S-Video
4.3.3 Component Video
17
18
18
20
4.4 I.R. Receivers. . . . . . . . . . . . . . . . . . . . . . . . . . . . . . . . . . . . . . . . . . . . . . . . . . . . . . . . . . . . . . . . . . . . . . 20
4.5 Relay Triggers . . . . . . . . . . . . . . . . . . . . . . . . . . . . . . . . . . . . . . . . . . . . . . . . . . . . . . . . . . . . . . . . . . . . . 20
4.6 AM/FM Antennas . . . . . . . . . . . . . . . . . . . . . . . . . . . . . . . . . . . . . . . . . . . . . . . . . . . . . . . . . . . . . . . . . . 20
5. FRONT PANEL OPERATION
21
5.1 Zone / Path . . . . . . . . . . . . . . . . . . . . . . . . . . . . . . . . . . . . . . . . . . . . . . . . . . . . . . . . . . . . . . . . . . . . . . . 21
5.2 Power On / Off . . . . . . . . . . . . . . . . . . . . . . . . . . . . . . . . . . . . . . . . . . . . . . . . . . . . . . . . . . . . . . . . . . . . . 21
5.3 Path Selection . . . . . . . . . . . . . . . . . . . . . . . . . . . . . . . . . . . . . . . . . . . . . . . . . . . . . . . . . . . . . . . . . . . . . 21
5.4 Master Control Knob . . . . . . . . . . . . . . . . . . . . . . . . . . . . . . . . . . . . . . . . . . . . . . . . . . . . . . . . . . . . . . . . 22
5.5 Source Selection. . . . . . . . . . . . . . . . . . . . . . . . . . . . . . . . . . . . . . . . . . . . . . . . . . . . . . . . . . . . . . . . . . . 22
5.5.1 Copying the MAIN Source to ZONE2 or REC
22
5.5.2 Down-Mixing Dolby Digital 5.1 to 2-Channel Stereo
22
5.5.3 Direct Input
23
5.5.4 FM/AM Tuner
23
5.6 Volume Control . . . . . . . . . . . . . . . . . . . . . . . . . . . . . . . . . . . . . . . . . . . . . . . . . . . . . . . . . . . . . . . . . . . . 24
5.7 Balance Control. . . . . . . . . . . . . . . . . . . . . . . . . . . . . . . . . . . . . . . . . . . . . . . . . . . . . . . . . . . . . . . . . . . . 24
5.8 Mute . . . . . . . . . . . . . . . . . . . . . . . . . . . . . . . . . . . . . . . . . . . . . . . . . . . . . . . . . . . . . . . . . . . . . . . . . . . . . 25
5.9 Bass / Treble Controls . . . . . . . . . . . . . . . . . . . . . . . . . . . . . . . . . . . . . . . . . . . . . . . . . . . . . . . . . . . . . . 25
5.9.1 Tone Bypass
25
5.10 Effects . . . . . . . . . . . . . . . . . . . . . . . . . . . . . . . . . . . . . . . . . . . . . . . . . . . . . . . . . . . . . . . . . . . . . . . . . . . . 25
5.11 Dolby Digital Dynamics . . . . . . . . . . . . . . . . . . . . . . . . . . . . . . . . . . . . . . . . . . . . . . . . . . . . . . . . . . . . . 27
5.12 LCD Display . . . . . . . . . . . . . . . . . . . . . . . . . . . . . . . . . . . . . . . . . . . . . . . . . . . . . . . . . . . . . . . . . . . . . . . 27
5.13 Status / Setup Menu . . . . . . . . . . . . . . . . . . . . . . . . . . . . . . . . . . . . . . . . . . . . . . . . . . . . . . . . . . . . . . . . 27
6. REMOTE CONTROL OPERATION
28
6.1 Powering the AVM 2 ON and OFF . . . . . . . . . . . . . . . . . . . . . . . . . . . . . . . . . . . . . . . . . . . . . . . . . . . . . 28
6.2 Path Selection . . . . . . . . . . . . . . . . . . . . . . . . . . . . . . . . . . . . . . . . . . . . . . . . . . . . . . . . . . . . . . . . . . . . . 29
6.2.1 Copying the MAIN Source to ZONE2 or REC
29
6.3 Source Selection. . . . . . . . . . . . . . . . . . . . . . . . . . . . . . . . . . . . . . . . . . . . . . . . . . . . . . . . . . . . . . . . . . . 29
6.3.1 Source Seek
29
6.4 Direct FM/AM Station Entry . . . . . . . . . . . . . . . . . . . . . . . . . . . . . . . . . . . . . . . . . . . . . . . . . . . . . . . . . . 29
6.5 Time Display . . . . . . . . . . . . . . . . . . . . . . . . . . . . . . . . . . . . . . . . . . . . . . . . . . . . . . . . . . . . . . . . . . . . . . 29
6.6 Sleep Timer . . . . . . . . . . . . . . . . . . . . . . . . . . . . . . . . . . . . . . . . . . . . . . . . . . . . . . . . . . . . . . . . . . . . . . . 29
6.7 Controlling Other Components . . . . . . . . . . . . . . . . . . . . . . . . . . . . . . . . . . . . . . . . . . . . . . . . . . . . . . . 30
6.7.1 Entering Manufacturer’s Codes
30
6.7.2 Searching For a Code
30
6.7.3 Volume Lock
30
6.7.4 Learning Function
31
Limitations on Learning
31
Teaching a Key
32
Deleting a Learned Code
32
6.8 Teaching the AVM 2 Remote Control to Touchpad Remotes . . . . . . . . . . . . . . . . . . . . . . . . . . . . . . . 32
7. ADVANCED SET-UP
33
7.1 How to Enter the Setup Menu . . . . . . . . . . . . . . . . . . . . . . . . . . . . . . . . . . . . . . . . . . . . . . . . . . . . . . . . 33
7.2 How to Navigate and Make Changes to Setup Menu Items . . . . . . . . . . . . . . . . . . . . . . . . . . . . . . . 33
7.3 How to Exit the Setup Menu . . . . . . . . . . . . . . . . . . . . . . . . . . . . . . . . . . . . . . . . . . . . . . . . . . . . . . . . . 33
7.4 Anthem AVM 2 Setup Menu . . . . . . . . . . . . . . . . . . . . . . . . . . . . . . . . . . . . . . . . . . . . . . . . . . . . . . . . . . 34
7.4.1 Rename Sources
35
7.4.2 Audio In Format–MAIN
35
7.4.3 Speaker Configuration
37
7.4.4 Listener Position
40
7.4.5 Speaker Level Calibration
40
7.4.6 Volumes
42
7.4.7 Time/Timers
43
7.4.8 Triggers /IR/ RS-232
46
7.4.9 Display/ Selection Time
48
7.4.10 Save/ Restore Settings
50
7.4.11 Lockout/ Passwords
51
8. SOFTWARE UPDATING
53
8.1 Software Version Identification . . . . . . . . . . . . . . . . . . . . . . . . . . . . . . . . . . . . . . . . . . . . . . . . . . . . . 53
8.2 Software Updating Via Your Dealer . . . . . . . . . . . . . . . . . . . . . . . . . . . . . . . . . . . . . . . . . . . . . . . . . . . 53
8.3 Software Updating via Your Computer and the Internet . . . . . . . . . . . . . . . . . . . . . . . . . . . . . . . . . . 53
Warranty
55
Appendix A – Universal Remote Control Codes
57
Specifications
60
Big Pictures of Front and Rear Panels
Inside Back Cover
1. INTRODUCTION
Thank you for purchasing the Anthem AVM 2 Surround Sound Processor.
Sonic Frontiers International (SFI) has been manufacturing high-quality, high-end audio equipment for over
a decade. In that time, SFI has built an enviable reputation for products that can recreate the passion music
lovers experience when attending a live musical performance. Sonic Frontiers and Anthem products allow
audiophiles to almost “be there” each and every time they sit and enjoy their music and surround sound
systems in the comfort of their home. SFI provides all this with the highest level of craftsmanship,
sophisticated circuit designs, superior quality parts and materials, modern intuitive ergonomics and stylish
industrial design.
The AVM 2 is a state-of-the-art three path, A/V Preamplifier / Surround Sound Processor with built-in FM/AM
Tuner. It is designed to provide high-end sound and video for both music, home theater and multi-room
applications.
1.1
ABOUT THIS MANUAL
Section 1 contains important handling and safety information on installation and maintenance. Section 2
contains a Quick Start Guide which shows you how to connect most popular components to the AVM 2 and
get up and running in a matter of minutes. Section 3 describes the Front Panel, Rear Panel and Remote
Control layouts of the AVM 2, while Section 4 describes connections in detail. To learn how to operate the
AVM 2 from the Front Panel Controls read Section 5. Remote Control operation has a few differences; they
are explained in Section 6. To fully explore all the possibilities of the AVM 2, we strongly recommend that you
go through the complete setup procedure as explained in Section 7. Future Software Updating is explained
in Section 8, followed by the Warranty, Universal Remote Control Codes and complete Specifications.
Reading this manual in its entirety will give you a complete understanding of the full array of features and
functions of this highly advanced audio/video component.
1.2
RECEIVING AND UNPACKING THE AVM 2
The AVM 2 is shipped in a reinforced shipping box. Please keep this box for any future shipment. Check that
you have received everything in the Packing List below. Report any discrepancies to your dealer as soon as
possible. Fill in and mail the Warranty Registration Card within thirty days of purchase.
1.2.1 PACKING LIST
•
•
•
•
•
•
•
•
•
1.3
AVM 2 Audio/Video Surround Sound Processor
Power Cord
AM Loop Antenna
FM Antenna
300-ohm to 75-ohm FM Antenna Adapter
Remote Control
2 ‘AA’ Batteries
Operating Manual
Warranty Registration Card
IMPORTANT SAFETY INFORMATION
• The Front Panel power switches are secondary only; they do not disconnect the AVM 2 from the AC
power line, therefore there is always voltage present inside your AVM 2. The use of an adequate
and approved surge arrester is highly recommended.
• The following safety instructions must be observed whenever the AVM 2 is operated, moved, or
serviced. Failing to comply with any of these instructions or with any precaution or warning
contained in this Operating Manual is in direct violation of the standards of design, manufacture,
and intended use of the equipment.
1
1. INTRODUCTION continued …
• Neither Anthem, Sonic Frontiers International, our agents, or any related party assume any liability
whatsoever for the user’s failure to comply with any or all of these requirements.
1.3.1 BEFORE OPERATING YOUR AVM 2
• Do not connect power to the AVM 2 if there are signs of damage to any part of its exterior surface.
• Situate the AVM 2 away from heat sources such as radiators, heat registers, stoves, or other any
appliances (including power amplifiers) that produce heat.
• Allow two inches (or more) of unobstructed air space above the ventilation slots in the top cover of
the AVM 2. Do not obstruct bottom vents by removing the rubber feet or operating the AVM 2
directly on a carpet, sofa, bed, or similar surface.
• Do not place the AVM 2 in a bookcase or component rack without adequate ventilation.
• Install the AVM 2 in a stable location. Do not mount to a wall or from a ceiling.
• Do not use the AVM 2 near water or a wet environment. Do not expose to rain or moisture.
1.3.2 OUTDOOR ANTENNA GROUNDING
• If an outside antenna or cable system is connected to the AVM 2, the antenna or cable system must
be grounded to provide some protection against voltage surges and built-up static charges. The
following diagram contains requirements according to the National Electrical Code:
Antenna Lead-In Wire
Ground Clamp
Antenna Discharge Unit
(NEC Section 810-20)
Electric
Service
Equipment
NEC: NATIONAL ELECTRICAL CODE
Grounding Conductors
(NEC Section 810-21)
Ground Clamps
Power Service Grounding
Electrode System
(NEC Art. 250, Part H)
1.3.3 MAINS FUSE TYPE
Use a 1.0 Amp 5mm slow blow fuse only. This is not a user serviceable item (see section 1.3.7).
1.3.4 SUPPLY POWER REQUIREMENTS
The AVM 2 can operate from any single phase AC power source that supplies between 105V and 130V at a
frequency of 60 Hz.
The AVM 2 uses a polarized power cord with one blade wider than the other so that it only fits into the outlet
one way. If the plug cannot be fully inserted with no blade exposed, reverse the plug and try again. If it still
does not fit, you have an obsolete outlet – contact an electrician to replace it.
2
1. INTRODUCTION continued …
To prevent risk of shock or fire, do not overload wall outlets, extension cords, or convenience receptacles.
Please note that the power transformer primary cannot be changed from a North American to a European or
Asian standard.
1.3.5 IN-USE NOTICES
• Use only the power supply cord with double insulation as supplied.
• Disconnect the power cord from the AVM 2 before connecting or disconnecting any components.
• Fuses are not a user serviceable item (see section 1.3.7).
• Do not remove the top cover.
• Do not alter or modify the AVM 2 in any way.
1.3.6 CLEANING
Unplug the AVM 2 from the wall outlet before cleaning. A regular dusting with a soft, non-abrasive cloth will
generally keep the finish of the faceplate and chassis looking new. Do not allow any liquid to come in contact
with the AVM 2; it may run onto the internal electronic circuitry and cause damage that is not covered under
warranty.
1.3.7 SERVICING
Do not attempt to open or perform any repairs to the AVM 2. There are no adjustments inside the AVM 2 that
can be made by the user, nor are there any user serviceable parts inside. Refer servicing to qualified service
personnel only.
1.3.8 NON-USE PERIODS
To prevent damage from power line surges and lightning strikes, unplug the AVM 2 from the power outlet,
outside antenna, and cable system when left unused for an extended period of time.
1.4
PACKING MATERIALS
Please retain the shipping box and all packing material. They are custom designed to prevent shipping
damage from occurring. Do not ship or transport the AVM 2 in anything other than the original box and
packing material.
3
2. QUICK START
While the AVM 2 is certainly a massive component with enough features and connections to make your head
spin, setup and operation are also very intuitive! With your AVM 2 in front of you, browse through the illustrations
in this section showing several quick system hookups. It’s as simple as following the lines in the connection
diagrams to and from each component.
All of these quick system hookup examples work with the Factory Default settings; none require the
Advanced Setup configuration. Just ‘plug & play’! However, references to the Advanced Setup section are
included to make you aware of the tremendous versatility of the AVM 2.
Even though this section makes it easy to get everything hooked up, for the best sound possible you will still have
to calibrate your system in the Setup Menu as outlined in Advanced Setup (section 7). Please do not overlook this
important system calibration procedure.
2.1
QUICK START GUIDE – Before you start, make sure all components are unplugged.
To connect a CD Player, DVD Player, TV, VCR, Amplifier(s), and Powered Subwoofer to the AVM 2:
• CD (Digital) to AVM 2 (see 2.2.1-a)
Connect the CD Player’s Digital Out (RCA-S/PDIF) to the AVM 2’s DISC2 Digital Audio-IN.
• CD (Analog) to AVM 2 (see 2.2.1-b)
Connect CD Player’s L/R Audio Out (RCA) to any analog input you wish. For this example
connect to the AVM 2’s AUX L/R Audio-IN.
• DVD Player to AVM 2 (see 2.2.2)
Video: Connect the DVD Player’s Composite Video Out (RCA) to the AVM 2’s DISC1 Composite-IN.
Audio: Connect the DVD Player’s Digital Out (RCA-S/PDIF) to the AVM 2’s DISC1 Digital Audio-IN.
• AVM 2 to TV (see 2.2.2 or 2.2.3)
Video: Connect the AVM 2’s Composite-Out / MAIN (RCA) to the TV’s Composite Video Input.
Audio: Connect the TV’s L/R Audio Out (RCA) to the AVM 2’s TV Analog Audio-IN.
• VCR to AVM 2 (see 2.2.3)
Video: Connect the VCR’s Composite Video Out (RCA) to the AVM 2’s VCR Composite-IN.
To Record: Connect the AVM 2’s Composite-Out / REC (RCA) to the VCR’s Composite Video Input.
Audio:
Connect the VCR’s Left/Right Audio Out (RCA) to the AVM 2’s VCR Analog Audio-IN.
To Record: Connect the AVM 2’s L/R Audio Out / REC (RCA) to the VCR’s Analog Audio-IN.
• AVM 2 to Amplifier(s) (see 2.2.4-a or b)
Connect the AVM 2’s Front-L, Front-R, Sur-L, Sur-R and Center (RCA or XLR) Analog AudioOut to the Power Amplifier(s)’s Front-L, Front-R, Sur-L, Sur-R and Center Audio Inputs.
Follow amplifier manufacturer’s instructions for connecting speakers.
• AVM 2 to Powered Subwoofer (see 2.2.4-a or b):
Connect the AVM 2’s Sub (RCA) Analog Audio-Out to the Powered Subwoofer’s Line/Low
Level Input (RCA).
Reconnect the power to all components and then turn them on. To turn on the AVM 2 press the POWER –
MAIN button on the front panel.
4
2. QUICK START continued …
To Watch a DVD:
• Press DISC1 Source on the front panel of the AVM 2.
• Switch the TV’s Video Input to the one that the AVM 2 Composite-Out is plugged into.
• Place a DVD into the DVD Player and press play. You should see the picture on your TV and hear
sound from your speakers. Use the AVM 2 Master Control Knob on the front panel to adjust volume.
To Watch a Video Tape:
• Press VCR Source on the front panel of the AVM 2.
• Switch the TV’s Video Input to the one the AVM 2 composite-out is plugged into.
• Insert a tape into the VCR Player and press play. You should see the picture on your TV and hear
sound from your speakers. Use the Master Control Knob on the front panel to adjust volume.
To Listen to a CD:
• Press either the DISC2 Source (Digital-In S/PDIF) or AUX Source (Analog-In Left/Right) on the front
panel of the AVM 2.
• Place a CD into the CD Player and press play. You should hear music coming from your speakers.
Use the Master Control Knob on the front panel to adjust volume.
Note about Digital and Analog Inputs:
• DISC1, DISC2 and SAT are factory default set for Digital Input, whereas TAPE, TV, VCR, and AUX
are factory default set for Analog (Left/Right) Inputs. You can however, change any of these to
either Digital or Analog as required. In addition, the Digital Input can also be changed from RCA
to Toslink or XLR. To make these changes see section 7.4.2.
Note about On-Screen Display:
• The On-Screen Display is factory default set for Composite-Out. This can be changed to
S-Video or turned off. To make these changes see section 7.4.9 menu 9.b.
Note about Your Speakers:
• The AVM 2 allows you to enter information about how many speakers you have in your system,
their relative size, and their distance from your listening position. This speaker setup information
is important in directing audio signals optimally, ensuring you get the best quality sound from your
system. Please see sections 7.4.3, 7.4.4, and 7.4.5.
2.2
CONNECTOR DIAGRAMS AND DESCRIPTIONS
The following pages of illustrations contain a variety of standard cable/connectors that are used to connect
components to your AVM 2. Here’s what they are, what they look like, and what they are used for:
RCA Black or
White
RCA Red
RCA Yellow
or Brown
Analog Left
Channel
Analog Right
Channel
Digital S/PDIF or
Composite Video
RCA Green Component Y
RCA Blue Component Pb/Cb
RCA Red Component Pr/Cr
5
1/4” Stereo Plug
3.5mm
Mono Mini Plug
5-Pin
Mini DIN
Toslink
Headphone
Relay Trigger
IR Receiver
S-Video
Digital Audio
S/PDIF
XLR Female
XLR Male
Analog Balanced Analog Balanced or
or Digital AES/EBU Digital AES/EBU
2. QUICK START continued …
2.2.1-a
CD Player or CD Transport to AVM 2 (Digital)
Amplifier(s)
2.2.1-b
NOTE: XLR or Toslink
use is OPTIONAL (see
sections 4.2.1 and 7.4.2)
CD Player to AVM 2 (Analog)
Amplifier(s)
6
2. QUICK START continued …
2.2.2
DVD Player and TV to AVM 2
NOTE: S-Video or
Component Video
use is OPTIONAL
(see sections
4.3 and 7.4.9)
Amplifier(s)
NOTE: S-Video or
Component Video
use is OPTIONAL
(see sections
4.3 and 7.4.9)
7
2. QUICK START continued …
2.2.3
VCR and TV to AVM 2
NOTE: S-Video
use is OPTIONAL
(see sections
4.3 and 7.4.9)
Amplifier(s)
NOTE: S-Video
use is OPTIONAL
(see sections
4.3 and 7.4.9)
NOTE: S-Video
use is OPTIONAL
(see sections
4.3 and 7.4.9)
NOTE:
Audio/Video
Record Out/In
Connections
are OPTIONAL
8
2. QUICK START continued …
2.2.4-a AVM 2 to Amplifier and Powered Subwoofer (RCA)
Follow amplifier manufacturer’s complete hook-up instructions to
connect amplifier outputs to matching speakers.
9
2. QUICK START continued …
2.2.4-b AVM 2 to Amplifier and Powered Subwoofer (XLR)
Follow amplifier manufacturer’s complete hook-up instructions to
connect amplifier outputs to matching speakers.
10
2. QUICK START continued …
2.3
SURROUND SYSTEM SPEAKER PLACEMENT
This illustration shows the typical speaker placement for a 6-channel surround system, also known as a 5.1
channel system, the ‘.1’ channel being the LFE (Low Frequency Effect). The Front-Left, Center, and Front-Right
speakers are directed toward the listener from the front while the Left and Right Surround speakers are positioned to the sides or behind the listener.
1.
2.
3.
4.
5.
6.
Front-Left Speaker
Front-Right Speaker
Center Channel Speaker
Surround-Left Speaker (Diffuse Type – drivers on both sides with ‘null’ facing the listening area.)
Surround-Right Speaker (Diffuse Type – drivers on both sides with ‘null’ facing the listening area.)
Subwoofer
For optimal results, the size of the speakers and the distance of each speaker to the listening position should
be entered in the Setup Menu of the AVM 2 (see sections 7.4.3, 7.4.4, and 7.4.5 )
11
3. PANELS / DISPLAY/ REMOTE LAYOUT
3.1-a FRONT PANEL LAYOUT
The front panel of the AVM 2 has the MASTER CONTROL KNOB, selection buttons, an LCD display, status indicator LED’s, and
the Headphone jack .
1
2
3
4
5
6
7
8
9
20
19
18
17
16
15
14
13
12
11
10
1 – Zone / Path Selection
10 – Status / Setup Menu (press and hold for 3 seconds)
2 – Mode / Surround Decoder Indicators
11 – Mute
3 – LCDDisplay
12 – Dolby Digital Dynamics Selection
4 – FM/AM Station Preset Selection
13 – Tone Bypass
5 – FM/AM Tuning / Setup Menu Navigation
14 – Balance Selection for Adjustment
6 – Master Control Knob (Volume, FM/AM Tune,
Function Adjustment, Setup Menu Adjustment)
16 – Front Panel Remote Control IR Sensor
7 – Speaker / Headphones Selection for
Level / Bass / Treble / Balance Adjustments
8 – Subwoofer Level / LFE Level Selection
for Adjustment
9 – Power On / Stand-By Selection (MAIN / ZONE2)
15 – Bass / Treble Selection for Adjustment
17 – Front Panel Brightness Selection
18 – Dolby Pro-Logic / Effects / 96 kHz Stereo Selection
19 – Headphone Jack
20 – Source Selection (Direct – press twice)
• See section 5 for complete information on Front Panel Operation.
12
3. PANELS / DISPLAY/ REMOTE LAYOUT
continued …
3.1-b FRONT PANEL LCD DISPLAY
Here are two examples of the Front Panel LCD Display presentations:
MAIN Display
2
1
3
5
1 –
4
Source Selection (see section 5.5).
2 –
Audio-In Format (see section 7.4.2) or Sleep Indicator if engaged (see section 6.6).
3 –
Zone / Path that the information on the display refers to (see sections 5.1, 5.3).
4 –
Volume Setting. When MAIN or ZONE2 are muted, “Muted” flashes instead of the current volume
setting (see section 5.8).
5 –
Mode / Effects (if the source is FM/AM, then the tuned station appears).
FM/AM Display
1
2
5
13
3
3
4
1 –
Source+Band. The tuner has three FM bands (FM1, FM2, and FM3) and one AM band. The number
after the selected band is the preset station (see section 5.5.4).
2 –
Mode for FM. Displays “St” when in stereo, “HB” when Hi-Blend is selected, or “Mn” when in mono
or mono is selected (see section 5.5.4).
3 –
Seek when tuning FM/AM stations (see section 5.5.4).
4 –
Zone / Path (see sections 5.1, 5.3).
5 –
Volume Setting. When MAIN or ZONE2 are muted, “Muted” flashes instead of the current volume
setting (see section 5.8).
6 –
Currently tuned FM/AM frequency to the nearest 0.1 MHz for FM and to nearest 10 kHz for AM
(see section 5.5.4).
3. PANELS / DISPLAY/ REMOTE LAYOUT
3.2
continued …
REAR PANEL LAYOUT
The Rear Panel of the AVM 2 contains all connections, such as the Audio and Video Inputs and Outputs, the FM/AM Antenna
Inputs, AC Power connection and the RS-232 port which allows upgrading of the internal operating Software as well as control
of the AVM 2 by external devices.
2
4
5
6
7
8
3
1
9
10
11
24
23
22
21
20
19
18
17
16
15
14
13
12
1
– 7 Composite Video RCAInputs
13 – RS-232 Interface Port (Bi-Directional)
2
– 7 S-Video Inputs
14 – Digital Audio RCA S/PDIF Record Output
3
– 3 Composite Video RCA Outputs
15 – 2 Digital Audio Toslink Inputs (Assignable)
4
– 3 S-Video Outputs
16 – MAIN Analog Audio RCA Output (6 Jacks)
5
– 3 IEEE 1394 Interface Port provisions*
17 – REC Analog Audio Stereo RCA Output (L/R Jacks)
6
– 2 Component Video RCAInputs (3 Jacks/ea)
18 – ZONE2 Analog Audio Stereo RCA Output (L/R Jacks)
7
– Component Video RCA Output (3 Jacks)
19 – Digital Audio AES / EBU Input (Assignable)
8
– FM and AM Antenna Inputs
20 – 7 Analog Audio Stereo RCA Inputs (L/R Jacks)
9
– PHASTLINK RJ45 Interface Port provision*
21 – 7 Digital Audio RCA S/PDIF Inputs
10 – 2 Infra Red (IR) 3.5mmInputs
22 – Analog Audio 6-Channel Direct RCA Input (6 Jacks)
11 – 3 Relay Trigger 3.5mm Outputs (Assignable)
23 – Ground Terminal
12 – MAIN Analog Audio Balanced XLR Output (6 Jacks)
24 – Power Cord Connection
• See section 4 for complete information on Rear Panel Connections.
* Interface card requires installation by a qualified dealer.
14
3. PANELS / DISPLAY/ REMOTE LAYOUT
3.3
1
REMOTE CONTROL LAYOUT
1 – IR Transmitter (front face)
continued …
2
35
3
2 – Transmission Indicator LED (red)
3 – AVM 2 Power ON when MAIN or ZONE2 is selected
Power ON/OFF for other components (see #4)
Note: This does not turn the AVM 2 off (see #31)
4
4 – Zone/Path/Component ‘Personality’ Selection
5 – FM/AM Station Preset Selection (6)
5
6 – Tone Bypass Selection
7 – Dolby Pro-Logic / Effects / 96 kHz Stereo Selection
8 – Dolby Digital Dynamics Selection
6
34
9 – FM/AM Pre-set Station Up
33
7
32
10 – FM/AM Pre-set Station Down
31
8
12 – Center Channel Selection for Adjustment
30
9
13 – Back / Exit for Setup Menu
29
14 – Subwoofer Level / LFE Level Selection
for Adjustment
28
11 – Status
15 – Setup Menu (Press & Hold for 3 seconds)
16 – Source Seek
17 – Balance Selection for Adjustment
18 – REC Path Selection (Must be in MAIN – see #4)
19 – Source Selection 8 Keys – 9 inputs (Direct – press twice)
20 – MAIN Source copy to ZONE2 or REC
10
11
27
12
26
13
25
24
14
23
15
21 – Bass Selection for Adjustment
22
22 – Treble Selection for Adjustment
21
23 – Surround Channels Selection for Adjustment
24 –
FM/AM Seek / Setup Menu Navigation /
Bass/Treble Adjustment
25 – 3
4FM/AM Tune / Setup Menu Navigation /
Balance Adjustment
20
17
19
18
26 – Select Function in Setup Menu
27 – Front Channels / Headphones Selection for Adjustments
28 – Volume Down
29 – Sleep Timer Selection
30 – Volume Up
31 – AVM 2 Power OFF when MAIN or ZONE2 is selected
32 – Mute
33 – Front Panel / LCD Display Brightness Selection
34 – On-Screen
35 – Learn (for customization of remote)
• See section 6 for complete information on operation of the Remote Control.
15
16
4. CONNECTIONS
4.1
CONNECTING POWER TO THE AVM 2
Connect the power cord to the back of the AVM 2 and then to an AC outlet with a line voltage of between 105
and 130 Volts, 60 Hz.
When turned on, the AVM 2 will have all of the same settings it had when it was last turned off, except for
Volume, which comes on at the pre-programmed setting (see section 7.4.6).
4.2
AUDIO CONNECTIONS
There are two methods of transmitting audio signals: Analog and Digital. Analog is an electrical waveform
representation of sound and requires one cable for each channel. Digital represents sound using a sequence
of numbers and requires only one cable for all channels. We recommend using digital connections wherever
possible because they have lower background noise and provide better quality than analog connections
when both formats are available. Connecting a DVD player or CD player to both the digital and analog
connectors allows listening to an analog source in ZONE2 and REC, while listening to a digital source in MAIN.
The AVM 2 accepts either analog or digital audio signals in all inputs except DIRECT, which accepts analog
audio signals only. From the factory, DISC1, DISC2 and SAT inputs are set to Digital, whereas the TAPE, TV,
VCR, and AUX inputs are set to Analog. Every audio input, except DIRECT, can be changed from the factory
setting to either Digital or Analog (see section 7.4.2).
4.2.1 DIGITAL AUDIO INPUTS / DIGITAL AUDIO OUTPUT
Digital Audio input connections are made through a 75-ohm coaxial (RCA), optical (TOS), or 110-ohm balanced
(XLR) cable. DVD Players and CD Transports are generally connected using a coaxial cable with RCA connectors.
Note: The DIGITAL REC OUT (RCA-S/PDIF) only functions with Digital Audio Input Sources (e.g. DISC1,
DISC2, or any other input source that you have set to ‘digital’, see section 7.4.2).
Note: This is also part of the independent REC Path (see Section 5.3).
The RCA (S/PDIF) connection offers the next best digital
transmission. Use these for source components with
digital RCA outputs. NOTE: An external RF demodulator
is required to interface Dolby Digital/AC-3 signals from a
Laser Disk player to the AVM 2.
For source components with optical TOSLINK
outputs only, use these TOSLINK connections.
These may also be assigned to any Input
Source, except Direct (see section 7.4.2).
The highest transmission quality is
achieved with the balanced XLR (AES/EBU)
connection. The AVM 2 provides one such
connection which may be assigned to any
Input Source, except Direct (see section 7.4.2).
To the Digital Audio IN of a Digital Recorder
(e.g. Mini Disk, CD-R, etc.)
4.2.2 ANALOG AUDIO INPUTS
Analog audio connections are made with RCA interconnect cables. Note: REC and ZONE2 require analog
audio connection unless set to ‘copy’ MAIN (see section 5.5.1).
From DVD Player
6-Channel
Audio OUT
From DVD Player
Audio OUT
From CD Player
Audio OUT
Caution for DTS:
With DTS-CD’s or DTS Laser Disks,
do not use analog connection if your
Player does not have an internal DTS
decoder, because a loud noise is
produced at the analog outputs of
the Player. Players with an internal
DTS decoder may require a change
in their setup menu to enable DTS
decoding (see Player owner’s manual).
From Tape
Audio OUT
From TV
Audio OUT
From Satellite Receiver
Audio OUT
From VCR
Audio OUT
From Auxiliary
Audio OUT
16
4. CONNECTIONS continued …
4.2.3 LEFT / RIGHT ANALOG AUDIO INPUTS
Analog audio signals pass through a pair of interconnect cables with RCA connectors – typically White or
Black for the Left Channel and Red for the Right Channel. The audio output connectors from Tape Recorders,
VCR’s, and CD Players are normally colour coded in this same manner.
4.2.4 DIRECT / 6-CHANNEL ANALOG AUDIO INPUT
DVD Players with 6-channel Analog Audio outputs can connect to the DIRECT input. EFFECTS, BASS, TREBLE
and DOLBY DIGITAL DYNAMICS are bypassed; only Volume, individual speaker level (Main, Fronts,
Surrounds, Sub), Balance and Mute are controlled by the AVM 2.
• Alternatively the DIRECT input can be used as a ‘purist’ 2-channel Analog input for any
2-channel Analog source, such as a Phono Preamplifier, Tape Recorder, or the audio output from an
external DAC, since the internal digital signal processing (DSP) stage is bypassed.
• To select the DIRECT Input, press DISC1 / DIRECT twice. Connect your source component’s outputs
to the FRT-L and FRT-R (RCA) input jacks for 2-channel operation, or use all of the input connections
for 6-channel operation. Note: The DIRECT input is for MAIN only (see sections 5.1, 5.3, 5.5.3).
4.2.5 ANALOG AUDIO OUTPUTS
The AVM 2 Single Ended (RCA) and Balanced (XLR) outputs operate concurrently providing the same audio
output signal and level. This allows the use of multiple amplifiers with different types of inputs. For example,
the FRT-R and FRT-L Balanced (XLR) outputs could connect to the Balanced (XLR) inputs of a 2-channel
amplifier while the CTR, SUR-L, and SUR-R Single Ended (RCA) outputs could connect to the Single Ended
(RCA) inputs of a 3-channel amplifier.
Single Ended RCA output connectors offer high
quality transmission. Use these outputs if your
amplifier does not have balanced XLR inputs.
To ZONE2 Amplifier
Audio IN
4.3
Balanced XLR output connectors offer the
highest transmission quality. If your amplifier
(or combination of amps) has balanced XLR
analog audio inputs, use these outputs.
To VCR, Tape Recorder or
Digital Recorder (MD, CD-R) when
recording from an Analog Source
Audio IN
VIDEO CONNECTIONS
The AVM 2 provides video inputs and switching for three formats: Composite Video, S-Video and Component
Video. The component video bandwidth supports HDTV, line doublers, and line quadruplers.
Note that video format conversion is not performed – if S-Video is used from your VCR, whenever the VCR
Source is selected, only the S-Video output on the AVM 2 will have a signal to send to your TV Monitor.
Always remember to select the matching video input on your TV Monitor/Projector.
The choice of video format depends on the type that is available on your TV Monitor / Projector. If it only
accepts Composite Video, then there is no point in connecting the S-Video or Component Video from
your DVD Player, VCR, or Satellite Receiver to the AVM 2. The Composite Video connection must be used
throughout the system, in this case. (The same applies if you use S-Video or Component, of course.)
17
4. CONNECTIONS continued …
The On-screen Display and Setup Menu are only displayed in MAIN (Zone / Path) and available when
Composite Video or S-Video connections are used. Composite Video is the factory default setting (see
section 7.4.9 menu 9.b). The AVM 2 does not provide an On-Screen Display or On-Screen Setup Menu
Display for the Component Video output.
If you are using Component Video, do the following to access the On-Screen Setup Menu Display:
• Complete all Component Video connections (see section 4.3.3).
• Connect the AVM 2 Composite or S-Video output to your TV Monitor’s Composite or S-Video input.
• Temporarily change your TV Monitor to the Composite or S-Video input whenever you wish to
access the Setup Menu (section 7).
4.3.1 COMPOSITE VIDEO
This is the oldest and most commonly used video format. It combines the black/white and colour information
for transmission on a single coaxial cable with RCA connectors. These signals must then be separated again
within the TV Monitor, resulting in some degradation of video quality.
From DVD Player 2
Video OUT
From Tape
Video Out
From TV
Video OUT
From Satellite Receiver
Video OUT
From VCR
Video OUT
From Auxiliary
Component Video OUT
From DVD Player 1
Video OUT
To ZONE2 TV Monitor or Projector
Video IN
To MAIN TV Monitor
or Projector
Video IN
To VCR or Tape Video IN
4.3.2 S-VIDEO
The S-Video signal is split into two parts (chrominance and luminance) and transmitted over a multiconductor cable with S-Video connectors (5-pin Mini DIN), resulting in better video quality.
From DVD Player 2
Video OUT
From Tape
Video Out
From TV
Video OUT
From Satellite Receiver
Video OUT
From VCR
Video OUT
From Auxiliary
Component Video OUT
From DVD Player 1
Video OUT
To ZONE2 TV Monitor or Projector
Video IN
To VCR Video IN
To MAIN TV Monitor
or Projector
Video IN
18
4. CONNECTIONS continued …
DVD Player, Satellite Receiver, and TV Connections with AVM 2 as Video Input Selector
NOTE: S-Video or
Component Video
use is OPTIONAL
(see sections
4.3 and 7.4.9)
Amplifier(s)
NOTE: S-Video or
Component Video
use is OPTIONAL
(see sections
4.3.2, 4.3.3 and
7.4.9)
Connect Power Amplifiers
as outlined in fig 2.2.4 (a or b)
Toslink can be
connected to TOS2
(optional – see section
4.2.1 and 7.4.2)
NOTE: S-Video
use is OPTIONAL
(see section 4.3.2)
19
NOTE:
Component Video
use is OPTIONAL
(see sections
4.3.3 and 7.4.9)
4. CONNECTIONS continued …
4.3.3 COMPONENT VIDEO
The Component Video signal is split into three parts and transmitted over three coaxial cables with RCA
connectors. This format produces the highest video quality. Only some TV Monitors, Projectors, DVD Players,
and most HDTV Decoders utilize Component Video. The AVM 2 has two preassigned Component Video
inputs, one for DISC1 and one for SAT. Note that all 3-wire connections must be made (Y, PR/Cr, PB/Cb).
Component-In and Component-Out are compatible with HDTV and all other 3-wire component video formats.
From DVD Player
Component Video OUT
4.4
From Satellite Receiver
Component Video OUT
To MAIN TV Monitor
or Projector
Component Video IN
I.R. (INFRA RED) RECEIVERS
External IR repeaters allow the Remote Control to be used from other locations in
your home. Once a repeater is wired to a selected room, it can be connected to
one of the AVM 2’s I.R. RECEIVER inputs with 3.5mm mono mini plugs via a ‘data
box’. This eliminates the need for what is commonly known as a ‘flasher’ for the
AVM 2. ‘Flashers’ may still be required for other components not equipped with
IR Receiver Inputs.
4.5
RELAY TRIGGERS
If your other components have provisions for a triggered power-on, you can
automatically turn them on with a push of a button on the AVM 2 Front Panel or
Remote Control. Connect a trigger output from the AVM 2 to the trigger input of
your power amplifier, TV Monitor, etc., using a cable with 3.5mm mono mini plugs.
Note: Trigger3 is designed to provide the extra cur rent (up to 200 mA) required by
relays in larger projectors and motorized screens. Depending on the equipment, a
larger gauge of wire may be required (consult your dealer for assistance).
3.5mm Mini Plug
The AVM 2 provides flexible trigger options. From the factory, all the triggers are
disabled. Through the Setup Menu, the conditions for enabling triggers can be specified (see section 7.4.8).
4.6
FM/AM ANTENNAS
To connect the FM antenna, first connect the two antenna wires to the
screw terminals of the 300-ohm to 75-ohm adapter. Then connect the
adapter to the FM ANTENNA-IN on the AVM 2. If your local cable company
provides FM service, connect the cable directly to this input instead of using
the adapter.
300-ohm to 75-ohm Adapter
To connect the AM loop antenna, press the spring-loaded tabs of the AM
ANTENNA-IN connector, insert the bare ends of the wire from the loop
antenna and release the tabs.
Once both antennas are connected, move each of them around until best
reception is found. For the FM antenna, this will usually be in a “T” formation.
20
5. FRONT PANEL OPERATION OF THE AVM 2
This section will familiarize you with operating the AVM 2 from the Front Panel keypad buttons. Section 6
outlines how to operate the AVM 2 from the Remote Control.
5.1
ZONE / PATH
The AVM 2 is best understood as a product that contains two components (or ‘personalities’) in one chassis.
• It is first of all a state-of-the-art Music and Home Theater Preamp/Surround Sound Processor (SSP)
and Tuner designed to provide exceptional high-end performance (MAIN) with a completely
independent record path selector (REC).
• It is also a high-end Whole House Entertainment Control Center that allows you to direct and adjust
the output of a variety of source components to other rooms in your home (ZONE2).
ZONE / PATH best describes how this tremendous flexibility of the AVM 2 is arranged. Simply think of
ZONE / PATH as a the method of controlling each of the AVM 2’s operating personalities, in any combination you
wish – both its “Music & Home Theater SSP” personality, or its “Control Center for Other Room(s)” personality.
5.2
POWER ON/OFF
When turned on, the AVM 2 will have all of the same settings it had when it was last turned off, except for
Volume – which comes on at the pre-programmed value (see section 7.4.6).
• MAIN ON: There are various of ways of switching MAIN ON:
- Press MAIN in the POWER group (fig. right).
- Press MAIN in the ZONE / PATH group (fig. below).
- If ZONE2 is OFF, press any SOURCE, FM/AM preset (1 through 6), or TUNE
to immediately power-up MAIN.
• MAIN OFF: Press MAIN in the POWER group.
• ZONE2 ON: Press ZONE2 in the POWER group or in the ZONE / PATH group.
• ZONE2 OFF: Press ZONE2 in the POWER group.
• REC ON: Press REC in the ZONE / PATH group. MAINwill turn on simultaneously. The Front Panel
Display will show REC Path information and, without any further changes, it will revert to MAIN after
a few seconds (see highlighted notation in section 5.3).
• REC OFF: Press MAIN in the POWER group. This turns off MAIN and REC simultaneously.
5.3
PATH SELECTION
The Path facility routes SOURCES to the MAIN Path, ZONE2 Path or RECORD Path.
• MAIN Path: As the name suggests, the MAIN Path routes the Audio / Video Sources connected to
the AVM 2 to your Main listening/viewing room. The MAIN Path has Video outputs for your MAIN
TV Monitor and 6-channel (5.1) Analog Audio outputs to drive MAIN amplifiers.
• ZONE2 Path: Allows you to simultaneously route any Audio / Video
Source to other listening/viewing rooms in your home. The chosen
source in the ZONE2 Path can be either the same or different from the
source selected in the MAIN Path. The ZONE2 Path has Video outputs
for a ZONE2 TV Monitor and 2-channel Analog Audio outputs to drive
ZONE2 Amplifier(s). You can only listen to Analog Inputs or a ‘copy’
of the MAIN digital or analog source (see section 5.5.1).
• REC Path: Allows you to simultaneously record Audio / Video sources independently of what is
selected in the other paths. For example, while watching a DVD in the MAIN Path, you could play a CD
in ZONE2, and record an FM program in the REC Path. Alternatively, if recording is of no concern, the
REC Path output can be connected to a Receiver and Speakers to create a third listening zone. REC will
also route a selected digital source to the digital REC OUT, however the digital REC OUT will not provide
any output if the REC selected source is analog. As with ZONE2, REC only operates with an analog input
or by ‘copying’ MAIN (see section 5.5.1).
Note: The REC Path output level is fixed. If it is being used as REC-Zone3, an Integrated Amp or similar
device is required to control the volume. (REC Path controls both Digital and Analog REC OUTS).
21
5. FRONT PANEL OPERATION continued …
The AVM 2 automatically returns to MAIN a few seconds after an adjustment is made in either ZONE2, REC,
or HEADPHONE*. This is designed to prevent accidents. Say, for example someone enters the MAIN room
and turns up the volume – if the AVM 2 stayed in ZONE2, then the ZONE2 volume would increase, not the
MAIN Volume. Since the person adjusting the volume doesn’t hear any change, chances are they would just
keep turning it up and wonder what’s wrong, until something potentially ‘bad’ happens in ZONE2. If you’ve
seen “The Party” and remember the hilarious scene where Peter Sellers messes with the console, you
probably understand. The time-out value can be changed in the Setup Menu (see section 7.4.9 menu 9.c).
* Except when MAIN is off or HEADPHONE is set to ‘Mute’ the
MAIN speakers (see section 7.4.3 menu 3.h)
5.4
MASTER CONTROL KNOB
Although it looks like a mere volume control, the MASTER
CONTROL KNOB is actually much more. It operates many
functions of the AVM 2, including Level / Bass / Treble and
Balance Adjustments, FM/AM Tuning, Effects Selection and
Setup Menu Adjustments. From this point in the Manual, the
MASTER CONTROL KNOB will be refer red to extensively.
5.5
MASTER
CONTROL KNOB
SOURCE SELECTION
The AVM 2 can accommodate up to eight external sources plus
the built-in AM/FM Stereo Tuner.
The sources as listed on the front panel are: DISC1 / DIRECT,
DISC2, TAPE, FM/AM, TV, SAT, VCR, and AUX. You can also
rename these sources, which will then change the name on the
AVM 2’s LCD and On-Screen Displays (see section 7.4.1).
5.5.1 COPYING THE MAIN SOURCE TO ZONE2 or REC
This unique copy feature allows the output from the MAIN Source (e.g. DVD, CD, etc.) to also be directed to
ZONE2 and REC for both Analog and Digital Sources. For example, with only a Digital audio input connected
to the AVM 2, a CD Player could be playing in MAIN and the same audio output would be provided to ZONE2.
This way, you can listen to the same music in ZONE2 as you are playing in MAIN, or record the same music
in REC that you are playing in MAIN, all using the AVM 2’s internal high-end DAC for each copied Path.
Whenever you have selected a MAIN Source (Analog or Digital), that Source can be copied as follows:
• ZONE2: Press and hold ZONE2, and then press MAIN. (This will also work in reverse.)
• REC: Press and hold REC, and then press MAIN. (This too will work in reverse.)
When MAIN is copied, the display reads “–MAIN–> ZONE2” or “–MAIN–> REC” after the selected source,
along with the information normally displayed for ZONE2 or REC (see highlight at the beginning of section 7.4.2).
Note: Other adjustments made to MAIN such as Bass, Treble, and Channel Balance are not copied.
5.5.2 DOWN-MIXING DOLBY DIGITAL 5.1 TO 2-CHANNEL STEREO
The Center and Surround Channels can be mixed into the Left and Right Channels for the ZONE2 and REC
outputs. This can either be done by the DVD Player itself or by the AVM 2:
• DVD Player Down-mix: If the Left/Right (L/R) analog outputs from your DVD Player are connected
to an AVM 2 Source’s Analog Inputs, but the Audio-In Format for that source is set to Digital (i.e.
DISC1 – see section 7.4.2), the AVM 2 will route this L/R analog audio signal to ZONE2 whenever the
ZONE2 Path and that Source are selected (this also applies to REC). The Center and Surround
22
5. FRONT PANEL OPERATION continued …
Channels are downmixed to L/R 2-channel stereo by the DVD Player.
Note: If you are doing this, the digital output from your DVD Player must still remain connected to
the AVM 2, otherwise MAIN will not receive the digital signal to provide 6-channel (5.1) output.
• AVM 2 Down-mix: If you are not using the Left/Right (L/R) analog outputs from your DVD Player (or
if they are not available), the AVM 2 will do the 2-channel down-mix whenever you copy MAIN
Source to the ZONE2 Path or REC Path (see section 5.5.1). The Center and Surround Channels are
downmixed to L/R 2-channel stereo by the AVM 2.
5.5.3 DIRECT INPUT
DISC1 has an additional input for 6-channel DIRECT Analog Audio. When the DIRECT input is used all digital
signal processing stages such as Bass, Treble, Effects and Dolby Digital Dynamics are bypassed. Only the
Volume, individual speaker level (Main, Fronts, Surrounds, Sub), Balance and Mute can still be controlled.
For the most part, the DIRECT input is intended for DVD Audio Players. If unused for 6-channel audio, the
Front-Left and Front-Right inputs can be used as a ‘purist’ 2-channel Analog input for MAIN.
To access the DIRECT Analog Audio input, press DISC1 / DIRECT twice. The video signal from DISC1 will still
be routed to the MAIN Composite, S-Video, and Component outputs. The DIRECT input cannot be selected for
ZONE2, REC, or HEADPHONE outputs.
5.5.4 FM/AM TUNER
The AVM 2 has a built-in FM/AM tuner, which is common to all Paths. The station that
is selected in either MAIN, ZONE2, or REC is automatically shared with all other Paths.
Finding a Station
The band is selected by pressing FM/AM. To manually tune a radio station, press TUNE and rotate the Master
Control Knob. To automatically seek the next station, press 3SEEK or SEEK4.
To scan and listen to all available radio stations for a few seconds, press and hold 3SEEK or SEEK4 for about
a second. The ‘3Sk ’ or ‘ Sk4’ indicator on the display will change to ‘3Prv ’ or ‘ Nxt4’. To stop scanning,
press one of the 3SEEK4buttons to return to Seek mode, or press TUNE to return to manual tuning mode.
Press TUNE a second time to restore the regular functions and display (the TUNE function does not time out).
Presets
18 FM and 6 AM stations can be stored in the AVM 2. The
presets are divided into four banks of six. These are
accessed by repeatedly pressing FM/AM. The display will
show that you are cycling through ‘FM1’, ‘FM2’, ‘FM3’, ‘AM’. When you are in a bank you can store the currently
tuned radio station to a preset by simply pressing and holding one of the six preset keys (1 through 6) for about
a second. You can even do this while scanning for stations. The lower line of the LCD display briefly flashes
once the station is stored. To recall a preset, select the bank and then press the respective preset key.
ST / HiB / M
If FM reception is weak, switching a station out of the stereo mode can reduce
or eliminate unwanted hiss and noise. Press ST / HiB / M to change the mode
from Stereo (St) to Hi-Blend (HB) or Mono (Mn). Hi-Blend offers an alternative
to Mono, offering decreased noise without the complete loss of stereo – it decreases hiss and noise by
reducing some stereo separation only at higher frequencies. Press repeatedly to cycle through ‘St’, ‘HB’, ‘Mn’.
23
5. FRONT PANEL OPERATION continued …
5.6
VOLUME CONTROL
In MAIN the AVM 2 can control the volume of all speakers simultaneously, and the level of individual
speakers or pairs of speakers. ZONE2 and HEADPHONE volumes are also controlled separately.
Note: Always make certain you are in the Zone / Path that you want to adjust before making any
Volume or Level changes. The LCD display shows the current setting – MAIN, ZONE2, or
HPHONE. To change press MAIN or ZONE2 (Zone / Path), or FRONTS twice (must be in MAIN).
Note: To adjust the Level / Bass / Treble / Balance of individual speakers or speaker groups, first select
the speaker(s) to adjust, and then rotate the Master Control Knob.
To change MAIN Volume or Level, check to see that the LCD display reads MAIN, then adjust as follows:
• All Speakers Simultaneously: This is the default position, simply adjust.
• Fronts Only: Press FRONTS, then adjust. This changes Left, Center, and Right speakers simultaneously.
• Center Only: Press CENTER, then adjust.
• Surrounds Only: Press SURROUNDS, then adjust.
• Subwoofer Only: Press SUB, then adjust. Pressing SUB twice allows you to reduce the level of the
LFE (Low Frequency Effect) output from a DVD, DTS-CD, or DTS Laser Disk while leaving the bass
derived from the other channels at their original levels. Some of these discs exhibit prodigious
levels of bass, and may need the use of this feature.
• The AVM 2 automatically memorizes the individual SUB level settings for each of six different
modes – Dolby Digital, Dolby Pro Logic, DTS, MPEG, Stereo, and DIRECT. This unique feature lets
you adjust the SUB level of a CD (Stereo), to one setting, then play a DVD movie and adjust the
SUB level to a different setting. Play the CD again and the SUB level returns to the previous CD
(Stereo) setting. This eliminates the need to constantly adjust subwoofer level for music vs.
movies. It also allows adjustment for subwoofer level differences in various surround sound
modes.
Note: When listening in Stereo (CD, FM/AM, etc.) with Front Speakers set to ‘Large’, the Subwoofer
must be set to ‘Super’ for it to receive bass information and function (see section 7.4.3 menu 3.d).
To change ZONE2 Volume:
• ZONE2: Press ZONE2 (Zone / Path), then adjust. Since ZONE2 has L/R stereo outputs only, the Fronts,
Center, Surrounds, and Sub buttons do not function.
To change HEADPHONE Volume:
• HEADPHONE: Check that the LCD display reads MAIN, press FRONTS twice, then adjust. If you
prefer, MAIN can be set to mute when headphones are used (see section 7.3.3 menu 3.h).
5.7
BALANCE CONTROL
This allows you to make the L/R speakers louder or quieter than each other.
To change the Balance of:
• MAIN – Fronts and Surrounds Simultaneously: Press BAL, then adjust.
• MAIN – Fronts L/R Only: Press FRONTS, press BAL then adjust.
• MAIN – Surrounds Only: Press SURROUNDS, press BAL then adjust.
• ZONE2: Press ZONE2 (Zone / Path), press BAL, then adjust. Since ZONE2 has L/R stereo outputs only,
Fronts, Center, Surrounds, and Sub do not function.
• HEADPHONE: Press FRONTS twice, press BAL, then adjust.
24
5. FRONT PANEL OPERATION continued …
5.8
MUTE
When MUTE is pressed, the audio output to the Zone / Path shown on the LCD display is
silenced. The volume shown is replaced by “Muted”. Press MUTE again, or rotate the
Master Control Knob to adjust the volume, and sound will return.
Note: MAIN, ZONE2 and HEADPHONE can all be muted independently.
To MUTE or UNMUTE:
• MAIN: Press MUTE.
• ZONE2: Press ZONE2 (Zone / Path), press MUTE.
• HEADPHONE: Press FRONTS twice, press MUTE.
5.9
BASS / TREBLE CONTROLS
MAIN, Fronts+Center, Surrounds, ZONE2, and HEADPHONE all have independent
Bass and Treble adjustments. (Note: DIRECT bypasses Bass/Treble Controls.)
To change the BASS and/or TREBLE of:
• MAIN – All Speakers Simultaneously: Press BASS or TREBLE, then adjust.
• MAIN – Fronts+Center: Press FRONTS or CENTER, press BASS or TREBLE, then adjust.
• MAIN – Surrounds: Press SURROUNDS, press BASS or TREBLE, then adjust.
• ZONE2: Press ZONE2 (Zone / Path), press BASS or TREBLE, then adjust.
• HEADPHONE: Press FRONTS twice, press BASS or TREBLE, then adjust.
5.9.1 TONE BYPASS
TONE BYPASS temporarily disables BASS and TREBLE. To enable them again,
press either BASS or TREBLE.
TONE BYPASS operates in MAIN, ZONE2 and HEADPHONE. Be certain you are in the Zone / Path that you
want to affect before pressing the TONEBYPASS button. The LCD display shows the current setting – MAIN,
ZONE2, or HPHONE. To change press MAIN, ZONE2 (Zone / Path), or FRONTS twice (must be in MAIN).
5.10
EFFECTS
The Dolby Pro Logic decoder in the AVM 2 takes analog or digital encoded
2-channel source material and decodes it into Dolby Pro Logic surround sound.
Other 2-channel stereo source material can use the AVM 2’s simulated effects that
also use all speakers to create a variety of surround sound acoustic environments.
Each Source keeps its own setting – what you select stays with that source only. You can therefore set the
VCR to ‘Dolby Pro Logic’ while the FM/AM Tuner can be set to ‘Hall’ and CD set to ‘Club’.
Note: DVD Digital 5.1 Source Material: The AVM 2 automatically decodes and outputs 5.1 surround
sound (Dolby Digital, DTS, MPEG). Effects are not available.
DVD Digital Dolby Pro Logic Source Material: The AVM 2 automatically decodes and outputs
Dolby Pro Logic surround sound. Effects are not available.
VCR Analog Dolby Pro Logic Source Material: With analog, there is no ‘flag’ to tell the AVM 2 that
this is Dolby Pro Logic encoded material. Dolby Pro Logic must therefore be ‘turned-on’ manually
by selecting it in the Effects options. Other Surround Effects are available.
25
5. FRONT PANEL OPERATION continued …
To select an Effect, press EFFECT and rotate the Master Control Knob:
None (Off):
Disables all Effects. Disables Dolby Pro Logic decoding for all analog source
material, even if it is Dolby Pro Logic encoded.
Dolby Pro Logic:
Enables Dolby Pro Logic decoding for all source material, whether it is encoded
or not. This mode should always be used on Dolby Pro Logic encoded VCR tapes.
Since Dolby Pro Logic is the most popular encoding format for VCR movies, we
recommend leaving the VCR Source in this setting.
Hall:
Simulates a medium-large concert hall by adding a longer reverberation time.
The performers are heard from a greater distance. Ideal for classical orchestral
music and light orchestral music, such as that found on many film soundtrack
albums. Generally sounds a bit muddy on rock or pop.
Theater:
Simulates what you would hear in the front rows of a medium size theater with
relatively unobtrusive reverb. Suitable for opera, rock, easy listening, and any
music you might hear in a theater.
Stadium:
A prominent slap echo, coming largely from the surrounds gives a lively effect,
especially on solo instruments. This is unsuitable for speech as the echo destroys
intelligibility, but perfect for rock.
Club:
Simulates a small intimate club setting with a moderate amount of reverb that
does not destroy clarity. Can be used for jazz, cabaret, disco to simulate a small
venue, classical chamber music, and solo instrumental music.
Church:
Gives the sense of a large, spacious area with a very long reverberation time.
Suited to organ music, choral music and New Age. Not meant to be used with
most other material.
5 Channel Stereo: Left and Right output is also sent to the Surround Left and Right channels. The
Center channel and Subwoofer receive a combination of both. Useful for playing
music at parties so that it can be heard equally in all parts of the room.
5 Channel Mono:
Combines the Left and Right channels and sends the same signal to all speakers.
Similar to 5 Channel Stereo, except that the Front and Surround channels no
longer have separate Left and Right information.
96 kHz Stereo:
The AVM 2 is fully capable of receiving 24-bit audio with a 96 kHz sampling rate.
The purpose of this setting is to allow the bass and treble controls, and the
subwoofer crossover, to operate accurately when sources with 24-bit/96 kHz
digital outputs are in use.
Two such sources are DVD Audio, and upsampled CD. DVD Audio, a new format,
has higher resolution and improved sound over conventional CD. An upsampler is
a device used with a regular CD transport that converts the normal 44.1 kHz
sampling rate to 96 kHz, and the word length from 16-bit to 24-bit, to improve the
sound of standard CD’s.
Note: When in 96 kHz Stereo, other Effects are not available.
26
5. FRONT PANEL OPERATION continued …
5.11
DOLBY DIGITAL DYNAMICS
This feature only applies to certain Dolby Digital DVD’s. It allows you to control the
difference between the softest and loudest passages. Please note that some
Dolby Digital DVD titles do not provide dynamic scaling, and selecting one of the
following three settings will have no effect. You can cycle through the settings by
repeatedly pressing
DYNAMICS:
Normal:
This setting reproduces the full dynamic range of the recording.
Reduced:
This setting allows the quieter parts to be heard more easily so that the overall volume
can be reduced. It works by raising the level of quieter sounds and/or reducing the
level of louder sounds, depending on the DVD producer’s choice.
Late Night:
Reduces the softest-to-loudest difference even further. The quietest passages can be
heard even more easily, allowing the overall volume to be even further reduced.
Therefore, all of the program can be easily heard without having to hear sudden loud
passages.
5.12 LCD DISPLAY
The intensity of the LCD display and LED indicators can be changed. Repeatedly
pressing DISPLAY changes the setting to High, Medium, Low, or Off.
Note: When DISPLAY is set to Off, the LCD backlight goes off but the display characters are still visible
to allow you to see current operating information.
Note: To make the display and LED indicators less obtrusive, at all settings except High the LCD display
and LED indicators may automatically dim a few seconds after the AVM 2 is left at rest. They may
both immediately ‘wake-up’ again when any operation is performed.
The High, Medium, and Low intensities and the Front Panel Wake-up can be modified, as can the time-to-rest
when the display will dim (see section 7.4.9).
5.13 STATUS / Setup Menu
This button has two functions: It displays information regarding current Software,
settings, and modes of operation. It also lets you access the Setup Menu.
Press and Release: Automatically steps through each display screen showing the following status information:
• Day, time, and Software version.
• Input Format: Which channels are receiving information from the selected source.
• Listen Format: Which channels are producing output (depends on Input Format and Effect settings).
• Surround Effect: Which Effect is selected.
• Dolby Digital Dynamics: Normal, Reduced, Late Night or Not Available (NA)
• MAIN Tone: Enabled or Bypassed.
• MAIN Sleep Mode: Enabled or Disabled.
• MAIN Timer Mode: Enabled or Disabled.
When in ZONE2, pressing STATUS displays information related to ZONE2 only.
Press and Hold for a few seconds to enter the Setup Menu. Pressing Back (ST/HiB/M) lets you escape.
Please read section 7 before exploring the Setup Menu.
WARNING: If you do explore the Setup Menu, do not enter passwords without reading section 7 first.
27
6. REMOTE CONTROL OPERATION
IR Transmitter
Dr. Jekyll and Mr. Hyde, as you may know, were two
very different personalities, even though they were
the same person. Well, the AVM 2 Remote Control
is the host to NINE different personalities! (All of
them ‘good’, of course.)
The AVM 2 Universal Learning Remote Control has
all of the same functions as the front panel keys and
is operated in a similar way, but there are some
differences. Please take the time to read this
section to fully understand all that the AVM 2
Remote Control can do.
The keys labeled in this illustration show those that
have a different method of operation from their front
panel counterparts. Those shown in bold italics
indicate keys that are unique to the Remote Control
and not found on the Front Panel. For a detailed
layout diagram see section 3.3.
Before we get started, we have to give the remote a
little attitude adjustment – set the ‘personality’ to
MAIN. Press MAIN in Zone/Path/Component near
the top of the remote.
Power ON
Red Indicator LED
Learn Key
Zone/Path/Component
(‘Personality’)
FM/AM Presets
FM/AM Direct Entry
FM/AM Presets
UP / DOWN
SSP Power OFF
Sleep Timer
• FM/AM Seek / Tune
• Level / Bass / Treble /
Balance Adjustments
• Effects Selection
• Setup Menu Navigation
Note: The Zone/Path/Component keys do not
transmit any commands to the AVM 2, or
anywhere else. They only determine where
subsequent commands are sent. For example, if
ZONE2 is selected followed by VOL+, then the
volume changes in ZONE2 while MAIN and all
other components remain unaffected.
Source Seek
SSP REC Path
Time Display
MAIN Source Copy
SSP Input Sources
Did we forget to mention the batteries? They go in
by taking off the rear cover – remember polarity.
Down the road, if the keys don’t light up when
they’re pressed, and the red LED blinks twice, it’s
an indication that the batteries need replacement.
6.1
POWERING THE AVM 2 ON AND OFF
Because separate power commands are a requirement in custom multi-zone
and home theater installations, two different keys are used to turn the AVM 2 ON and OFF.
The
power key in the top right corner turns the AVM 2 Power ON. The red SSP OFF key in towards the
middle turns the AVM 2 Power OFF.
The AVM 2 can be turned ON and OFF as follows:
• MAIN ON – Press MAIN in Zone/Path/Component, then press
.
• MAIN OFF – Press MAIN in Zone/Path/Component, then press SSP OFF.
• ZONE2 ON – Press ZONE2 in Zone/Path/Component, then press
.
• ZONE2 OFF – Press ZONE2 in Zone/Path/Component, then press SSP OFF.
28
6. REMOTE CONTROL OPERATION continued …
6.2
PATH SELECTION
• MAIN
– Press MAIN in Zone/Path/Component, then press
• ZONE2 – Press ZONE2 in Zone/Path/Component, then press
• REC
– Press MAIN in Zone/Path/Component, press
.
.
, then press SSP REC.
Short Cut: After pressing MAIN or ZONE2 in Zone/Path/Component ‘personality’, pressing any other
active key in that selected Path will automatically switch the AVM 2 to that Path.
6.2.1 COPYING THE MAIN SOURCE TO ZONE2 OR REC
Select a MAIN Source first and then for:
• ZONE2 – Press ZONE2 in Zone/Path/Component, then press MAIN Source in SSP Input Sources
near the bottom.
• REC
– Press MAIN in Zone/Path/Component, press SSP REC near the bottom, then press
MAIN Source in the SSP Input Sources near the bottom.
Note: The SSP REC key only works when Zone/Path/Component is in MAIN.
Note: While all Analog Sources are simultaneously available to MAIN, ZONE2 and REC, this unique
copy function is the only way to direct a MAIN Digital Source to ZONE2 or REC.
6.3
SOURCE SELECTION
After selecting the desired Path (MAIN, ZONE2, MAIN+REC), press one of eight SOURCE keys in the SSP
Input Source group near the bottom. To access DIRECT, press DISC1 twice.
6.3.1 SOURCE SEEK (Remote Control Only)
The SOURCE SEEK keys are an easy way to find the active sources. The 7 8 keys go to the previous and
next active source while the 4 key advances one source at a time.
6.4
DIRECT FM/AM STATION ENTRY (Remote Control Only)
When using the FM/AM Tuner, the station frequency can be entered as a four-digit number using the digit
keys. For example, to tune into 98.3 FM, press SELECT, 0, 9, 8, 3.
6.5
TIME DISPLAY (Remote Control Only)
To display the time press
6.6
. The AVM 2 will return to its normal display after a few seconds.
SLEEP TIMER (Remote Control Only)
If you would like to go sleep while listening to program, the Sleep Timer will automatically turn the AVM 2
power off after a preselected time. So when you find yourself falling asleep at the ‘tube’, take the Remote
Control and:
• Select the desired Zone/Path (MAIN or ZONE2), then press the SLEEP key (which will operate for
that Zone/Path only).
29
6. REMOTE CONTROL OPERATION continued …
• The first SLEEP keystroke always resets the timer to 30 minutes. Additional keystrokes then cycle
as follows: first=30, second=60, third=90, fourth=Disabled.
• Once set, the time remaining appears as the number following ‘Zzz’ in the display.
6.7
CONTROLLING OTHER COMPONENTS
The AVM 2 Remote Control can be set up to control your TV, DVD Player, CD Player, VCR, Satellite Receiver,
and a second TV. It contains a very extensive set of Remote Control codes from many different
manufacturers, which can be entered to virtually duplicate another Remote Control. Alternatively, the
learning function can be used to customize each key.
6.7.1 ENTERING MANUFACTURER’S CODES
In Appendix A at the back of this manual you will find the manufacturer’s codes available for programming
the AVM 2 remote. For new models, get the latest list of codes at www.sonicfrontiers.com. To enter a code:
1. Press the Zone/Path/Component key (e.g. DVD).
2. Press and hold LEARN until the LED flashes twice.
3. Enter the four-digit code from Appendix A. The LED should blink twice.
Codes can only be used with their respective Zone/Path/Component key. That is to say, a VCR code can
not be programmed in the DVD Zone/Path/Component key.
6.7.2 SEARCHING FOR A CODE
If a code for your component is not listed in Appendix A:
1. Turn the component on (e.g. TV).
2. Press the matching Zone/Path/Component key (e.g. TV).
3. Press and hold LEARN until the LED flashes twice.
4. Press 9, 9, 1.
5. Aim the remote towards the TV, and alternate between pressing
and TV.
6. Stop once the TV turns off. Immediately press and release LEARN to lock the code.
7. If, for future reference, you want to know what the code is, press and hold LEARN until the LED
flashes twice and then press 9, 9, 0, 1. Wait 3 seconds and count the number of flashes. The number
of flashes represent the first digit (i.e. 3 flashes = 3, no flash = 0). Next, press 2 for the second digit,
3 for the third digit, and 4 for the fourth digit, and count the number of flashes each time. Record this
code number for future reference in Appendix A.
6.7.3 VOLUME LOCK
After entering a code for your TV or Satellite Receiver, you may find it inconvenient to switch the
Zone/Path/Component buttons back and forth when you alternate between say, changing channels on your
TV and adjusting the volume of MAIN (AVM 2). Not to worry, the Volume Lock feature takes care of this.
When engaged, the volume keys adjust MAIN volume, regardless of which Zone/Path/Component is
selected. You can then leave your Zone/Path/Component selection in TV – you no longer have to press MAIN
first to adjust the volume of the AVM 2.
In the following example, MAIN volume is locked onto every Zone/Path/Component selection except ZONE2.
30
6. REMOTE CONTROL OPERATION continued …
To Engage Volume Lock for MAIN:
1. Press and hold LEARN until the LED flashes twice.
2. Press 9, 9, 3.
3. Press MAIN.
At this point, the Volume and Mute buttons now control MAIN, no matter which of the eight
Zone/Path/Component selections the Remote Control is in. However, since this may not be desirable, any
individual Zone/Path/Component selection can be unlocked.
To Disengage Volume Lock for ZONE2, and re-engage the ZONE2 Volume Control:
4. Press ZONE2.
5. Press and hold LEARN until the LED flashes twice.
6. Press 9, 9, 3.
7. Press VOL .
The Volume and Mute keys now control MAIN for every Zone/Path/Component selection except for ZONE2.
You may continue to unlock other Zone/Path/Components one at a time. To unlock all Zone/Path/Components
at once and restore the default setting, press VOL+ instead of VOL in step 7.
6.7.4 LEARNING FUNCTION
The AVM 2 Remote Control has the ability to learn the command of an individual key from almost any other
remote control. When a new command is programmed onto a key, the original command is still available by
pressing LEARN before pressing the key. We’ll call this the Layer-1 method.
If the original command of a particular key is used more than the learned command, it might be better to
program the learned command in Layer-2. This means that when a taught key is pressed, the original
command functions as always, and the learned command is accessed by pressing LEARN before pressing
the key. In essence, this is the reverse of the Layer-1 method.
The learned commands are retained in the Zone/Path/Component selection into which they were
programmed. For instance, if the 3456 navigation keys are programmed into the DVD selection,
they won’t perform the learned command if another Zone/Path/Component is selected.
Limitations on Learning
Before getting to the learning procedure, please read these limitations so that success can be optimized:
• Some codes are not learnable. This includes multi-frequency codes, some high frequency codes,
and other unusual formats.
• All keys, with the exception of the Zone/Path/Component keys and LEARN, can be taught.
• Typically, the memory allows up to 24 keys to be taught.
• The Remote can learn only one code per key. It can not be taught a sequence of several keystrokes
on one key.
• In general, we recommend that you do not teach the Record key. The Record key, almost always,
requires a double key press (Rec+Pause or Rec+Play). The double key press will be lost when the
Record key is involved in most learning operations. This lack of consistency does not always allow
for proper function and is best avoided.
• During a learning event, the Source Remote and the AVM 2 Remote should be 1 to 2 inches apart,
and the IR transmitters of the two Remotes should be aligned with each other.
31
6. REMOTE CONTROL OPERATION continued …
• The placement of the IR transmitter in the Source Remote may make it difficult to correctly align the
two Remotes.
• Source Remotes that contain a beam-focusing lens may require more than one attempt at
successful alignment.
• The learning process should be conducted in an area where there is a low level of IR emission. High
levels of natural light or fluorescent lighting could interfere with a learning event.
• The maximum carrier frequency is 135 kHz.
Teaching a Key
To initiate the learning operation, follow these steps:
1. Point the Source Remote and AVM 2 Remote at each other (to be ready for step 5).
2. Press and hold LEARN until the LED flashes twice.
One long blink indicates low battery or faulty memory. The Remote will not go into learn mode if either
of these conditions exist.
3. Press 9, 7, 5, then the desired Zone/Path/Component key.
To place the command in Layer-1, follow step 4a. To place the command in Layer-2, follow step 4b:
4a. Press the key to be taught. Proceed to step 5.
4b. Press LEARN (don’t hold), then press the key to be taught.
5. The LED flashes rapidly. Within 4 seconds, press and hold the teaching key on the Source Remote
until the LED flashes twice. The LED will go out while it receives a signal from the Source Remote.
One long blink appearing during this step indicates a learning failure, which could mean:
• Bad Capture (try again).
• Memory Full (delete another command).
• Unlearnable Code.
6. Repeat steps 4a or 4b and 5 as often as desired (up to the maximum limit of memory or 24 keys).
7. Wait 10 seconds to exit the learning mode automatically.
Deleting a Learned Command from a Key
To delete a learned command on one key, you can either overwrite it with a new code on the same key, or
use the following delete sequence:
1. Press and hold LEARN until the LED flashes twice.
2. Press 9, 7, 6, the Zone/Path/Component key, the key to be deleted, the key to be deleted again.
To erase all learned commands in all Zone/Path/Component keys, press and hold LEARN until the LED flashes
twice and then press 9, 8, 0.
6.8
TEACHING THE AVM 2 REMOTE CONTROL TO TOUCHPAD REMOTES
Some keys on the AVM 2 Remote, such as VOL+, VOL , and Setup Menu (SUB/LFE), have press and hold
commands as well as regular press and release commands. The ‘press and hold’ command of a key is
exactly the same as the ‘press and release’ command of that key, repeated as long as the key is held. You
must program your aftermarket Touchpad to loop or repeat a ‘press and release’ command to turn it into a
‘press and hold’ command. The methods of doing this vary with the model – contact the touchpad
manufacturer for more information.
32
7. ADVANCED SET-UP
The SETUP MENU enables you to access the basic and advanced settings for the AVM 2. In other words,
this is where all the user definable operating characteristics / calibrations / customized configurations are
entered.
You can only gain access to the Setup Menu with the ZONE / PATH set to MAIN.
For optimum performance and enjoyment, it is crucial that your AVM 2 be properly set up.
For ease of viewing, use of the On-Screen display is strongly recommended whether accessing the Setup
Menu from the Remote Control or Front Panel. Both the On-Screen and Front Panel displays are synchronized.
Please note that parts of the Setup Menu contain more lines than the On-Screen display can show on one
screen – use Remote Control 65 keys (Front Panel ‘Down’ / ‘Up’ ) to scroll through them.
Illustrations throughout this section show the On-Screen display menus. The Front Panel LCD display of the
AVM 2 has similar information fields.
The factory default is set to Composite Video because it is the most commonly available video input. To
use S-Video for your On-Screen display instead, temporarily connect the AVM 2 to your TV Monitor’s
Composite Video input, or use the AVM 2 Front Panel display to enter the Setup Menu. Navigate to
DISPLAYS/SELECTION TIME. It allows you to change the On-Screen Output (see section 7.4.9).
Note: Component Video connections to your TV Monitor do not provide an On-Screen display. You must
then have an additional Composite or S-Video connection to your TV Monitor (and switch your TV
Monitor inputs) or use the Front Panel display to configure the Setup Menu of the AVM 2.
On the Front Panel refer to the italicized labeling above or below the keys. Note: The On-Screen menu line
that is highlighted in red on your TV screen is the one that is currently active.
7.1
HOW TO ENTER THE SETUP MENU from:
• Remote Control: Press and hold the Setup Menu (SUB/LFE) key for 3 seconds.
• Front Panel:
7.2
Press and hold the STATUS/‘Setup Menu’ button for 3 seconds.
HOW TO NAVIGATE AND MAKE CHANGES TO SETUP MENU ITEMS from:
• Remote Control: Use the 56 keys to scroll through menus.
Press SELECT to choose a menu item.
Use the 56and 34keys to to change the settings within the menu item.
Press EXIT to return to previous item or menu.
• Front Panel:
7.3
Press ‘Up’ and ‘Down’ to scroll through menus.
Press ‘Select’ to choose a menu item.
Rotate the MASTER CONTROL KNOB to
change the settings within the menu item.
Press ‘Back’ to return to previous item or
menu.
HOW TO EXIT THE SETUP MENU from:
• Remote Control: Press EXIT repeatedly to get to ‘Setup Menu’, then press EXIT once more to exit.
• Front Panel:
33
Press ‘Back’ repeatedly to get to ‘Setup Menu’, then press ‘Back’ once more to exit.
7. ADVANCED SET-UP continued …
Note: The last change made to a Setup Menu item will always be the “entered” result. If you make a
change to a Setup Menu item and then decide you don’t want it to change after all, you must go
back to that Setup Menu item and adjust it back to the original setting.
7.4
ANTHEM AVM-2 SETUP MENU
With your TV Monitor connected as described at the beginning of this section, enter the Setup Menu as
described in section 7.1. Your On-Screen display will show the following information:
ANTHEM AVM 2 SETUP MENU
1.
2.
3.
4.
5.
6.
7.
8.
9.
10.
11.
RENAME SOURCES
AUDIO IN FORMAT–MAIN
SPEAKER CONFIGURATION
LISTENER POSITION
SPEAKER LVL CALIBRATION
VOLUMES
TIME/TIMERS
TRIGGERS / IR / RS-232
DISPLAYS / SELECTION TIME
SAVE / RESTORE SETTINGS
LOCKOUT / PASSWORDS
Note: Due to the On-Screen character size, your monitor will not show more than 8 sub-menu entries
at one time. To view any remaining sub-menu entries, simply scroll 6 (‘Down’) to show any
remaining menu items. In this section, the manual will always show all available sub-menu
items for each section.
Follow the navigation instructions as outlined in section 7.2 to locate and make changes to Menu items.
For Example: Let’s say you want to set the actual distance from speaker(s) to the listening position (section
7.4.4). Here is what you would do: (Note: Front Panel keystrokes are indicated in brackets.)
• Enter the Setup Menu (section 7.1).
• Press the 6 (‘Down’) key until you reach “4. LISTENER POSITION”.
• Press SELECT (‘Select’). This will bring up the “4. LISTENER POSITION” Submenu.
• Use the 65 (‘Down’ / ‘Up’) keys to scroll to the speaker(s) that you want to change.
• Use the 34 keys (MASTER CONTROL KNOB) to change the distance.
• Press the EXIT (‘Back’) key to leave the submenu and return to the Setup Menu.
34
7. ADVANCED SET-UP continued …
7.4.1 RENAME SOURCES
ThE Rename Sources Setup Menu lets you change the factory assigned name that is displayed when
selecting a Source. Those that are renamed will then appear that way throughout all Setup Menus and
display screens during normal operation.
Source names can be up to six characters long. You have the following characters available:
• A, B, C….Z, a, b, c….z, <blank>, 0, 1, 2….9.
1.
RENAME SOURCES
a.
b.
c.
d.
e.
f.
g.
h.
DISC1 : DISC1
DIRECT : DIRECT
DISC2 : DISC2
TAPE : TAPE
TV : TV
SAT : SAT
VCR : VCR
AUX : AUX
RENAME SOURCES Example: Rename DISC2 to ‘CD’.
• Enter the Setup Menu (section 7.1). Go to ‘1. RENAME SOURCES’ and press SELECT (‘Select’).
• Press the 6 (‘Down’) key until you reach “c. DISC2:DISC2”.
• Press SELECT (‘Select’). The first character ‘D’ will be highlighted in red.
• Use the 56 keys (MASTER CONTROL KNOB) to change characters. Change the first one to ‘C’.
• Press the 4 (‘Down’) key to move to the next character. Change it to ‘D’.
• Use the 34 (‘Up’ / ‘Down’) keys to move to each remaining character. Change to ‘<blank>’.
• When finished press SELECT (‘Select’) and then 65 (‘Down’ / ‘Up’) to go to another Source, or...
• Press the EXIT (‘Back’) key to leave the submenu and return to the Setup Menu.
7.4.2 AUDIO IN FORMAT–MAIN
The Audio Input Format–MAIN Menu lets you assign a Digital or an Analog input format for each Source.
2.
a.
b.
c.
d.
e.
f.
g.
h.
i.
35
AUDIO IN FORMAT–MAIN
DISC1 :
DIRECT :
DISC2 :
TAPE :
FM/AM :
TV:
SAT:
VCR :
AUX :
Digital...
Anlg Only
Digital...
Analog...
Analog...
Analog...
Digital...
Analog...
Analog...
RCA
+0.0 dB
RCA
+0.0 dB
+0.0 dB
+0.0 dB
RCA
+0.0 dB
+0.0 dB
7. ADVANCED SET-UP continued …
Audio In Format–MAIN Selections apply to the MAIN Path only. If you have selected Digital for a given
source and connected the digital output from your source component, you can still use the Analog
Inputs for that same source – these will then be available for other Paths (ZONE2, REC). This
arrangement allows greater operating flexibility.
For example, say you had both DISC1 and DISC2 set to DIGITAL, the digital output of a CD Player
CONNECTED to DISC2, the analog output of the same CD Player also to DISC2, and the digital output of
a DVD Player to DISC1. You can then use either the Analog or Digital output of the CD player as follows:
Select MAIN (Zone / Path) and DISC2 (Source) and play a CD. Copy the MAIN Source to ZONE2 (section
5.5.1) and you will also hear the AVM 2’s high-end CD sound in ZONE2. Now you want to watch a DVD
and therefore switch MAIN to DISC1. Because MAIN is copied to ZONE2, the DVD’s sound will also be
directed to ZONE2, but you still want to hear the CD in ZONE2. The solution? Press ZONE2 (Zone / Path)
and DISC2 and the CD sound returns to ZONE2... How? Through the analog inputs connected from the
CD Player to DISC2.
Audio In Format–MAIN Also Allows For Two Other Adjustments:
• If Digital is selected: Assign the Type of digital connection (RCA, TOS1, TOS2, or XLR).
• If Analog is selected: Adjust Levels. This allows the matching of source levels to each other, so that
there are no large changes in volume as you change sources.
If a source is playing while you are making the Analog Level adjustment, you will notice a Vertical
Bar Graph to the left of the –dB setting. In the On-Screen display, if this Bar Graph changes from
Green to Pink you have gone into an overload condition. Adjust the level down until the display turns
back to Green. It is good practice to set this even lower (especially if using sine wave test signals)
by as much as –9dB, to provide greater headroom and lower any potential for clipping distortion.
You can set the level within the range of –95.5 dB and +31.5 dB.
Note: DIRECT and FM/AM are analog only – digital inputs are not available for these sources.
Before making changes or adjustments in this menu, have all connected source components playing
similar music material. Then, as you switch through each highlighted source, you will hear that
component play. This lets you know that each component is correctly connected to the AVM 2, and it
also allows for easy comparative level adjustments of analog sources.
AUDIO IN FORMAT–MAIN Example #1: Change DISC2 Digital Input Type from ‘RCA’ to ‘Toslink1’ (TOS1).
• Make sure DISC2 source component is connected to TOS1 and playing.
• Enter the Setup Menu (section 7.1). Go to ‘2. AUDIO IN FORMAT–MAIN’ and press SELECT (‘Select’).
• Press the 6 (‘Down’) key until you reach “c. DISC2: Digital... RCA”.
• Press SELECT (‘Select’). ‘RCA’ will be highlighted in red.
• Use the 56 keys (MASTER CONTROL KNOB) to change to ‘TOS1’ (sound will now be heard).
• When finished, press SELECT (‘Select’) and then 65 (‘Down’ / ‘Up’) to go to another Source, or...
• Press the EXIT (‘Back’) key to leave the submenu and return to the Setup Menu.
AUDIO IN FORMAT–MAIN Example #2: Adjust the DIRECT source Analog Level.
• Make sure DIRECT source component is connected to Analog Inputs and playing.
• Enter the Setup Menu (section 7.1). Go to ‘2. AUDIO IN FORMAT–MAIN’ and press SELECT (‘Select’).
• Press the 6 (‘Down’) key until you reach “b. DIRECT: Anlg Only... +0.0dB”.
• Press SELECT (‘Select’). ‘+0.0dB’ will be highlighted in red.
• Use the 56 keys (MASTER CONTROL KNOB) to change the Level (keep the Bar Graph green).
• When finished, press SELECT (‘Select’) and then 65 (‘Down’ / ‘Up’) to go to another Source, or...
• Press the EXIT (‘Back’) key to leave the submenu and return to the Setup Menu.
36
7. ADVANCED SET-UP continued …
7.4.3 SPEAKER CONFIGURATION
The Speaker Configuration Setup Menu allows you to enter information about how many speakers you have
in your system and their relative size. Here you will also set up the Bass Management for your whole system.
Note: This is an important setup that you must perform in order to optimally direct all audio information
and achieve high quality sound reproduction from your system.
3.
a.
b.
c.
d.
e.
f.
g.
h.
SPEAKER CONFIGURATION
L/R FRONTS : Large
L/R SURROUNDS : Small
CENTER : Small
SUBWOOFER : Super
CROSSOVER FREQ : 80 Hz
CENTER EQ : No
TV SIZE FOR EQ : 42-54 in
HPHONE MUTE SPK : No
Entering information about the size of your speakers will enable the AVM 2 to control bass information so
that it is not lost or distorted by smaller speakers, which may be unable to reproduce large amounts of bass.
• Speaker Size Choices are (menu 3.a-c): ‘None’, ‘Small’ and ‘Large’.
• Small or Large: As a general guide, bookshelf or satellite speakers that are less able to reproduce
bass are considered ‘Small’. Floorstanding or big bookshelf speakers with either a big single woofer
or multiple smaller woofers are considered ‘Large’.
• Set L/R FRONTS first, then L/R SURROUNDS, CENTER and finally SUBWOOFER.
Note: Some combinations are not allowed such as setting the L/R FRONTS to ‘Small’ and SURROUNDS
to ‘Large’. The AVM 2 automatically changes these settings to prevent unallowed combinations.
(menu 3.c-d) No Center Channel or Subwoofer:
• If you do not have a Center Channel speaker or Subwoofer you must let your AVM 2 system know.
Set CENTER to ‘None’ and / or SUBWOOFER to ‘No’. The AVM 2 will then route Center Channel and
bass information to the L/R FRONT speakers.
Bass Management:
The AVM 2 contains a sophisticated Bass Management system which will route bass information in the most
appropriate way, based on your speaker size, to ensure the best sound performance possible.
(menu 3.d) Subwoofer Settings:
• ‘No’
All bass is routed to L/R FRONTS which are automatically set to ‘Large’.
• ‘Yes’
Extracts the bass from all speaker(s) set to ‘Small’ and routes it to the SUBWOOFER. In
addition, bass present in the ‘.1’ LFE (Low Frequency Effects) channel in 5.1 Dolby Digital /
DTS encoded material is routed to the SUBWOOFER.
• ‘Super’ Extracts LFE bass, copies bass from speakers set to ‘Large’, or extracts bass from
speakers set to ‘Small’, and routes this combined bass signal to the SUBWOOFER and
‘Large’ L/R FRONT and SURROUND speakers.
Note: When playing standard analog signals or PCM program material, such as CD, with your Front
speakers set to ‘Large’ and the Subwoofer set to ‘Super’, you will require an external low-pass
crossover for your subwoofer. Most self-powered subwoofers have one built-in.
37
7. ADVANCED SET-UP continued …
Dolby Configuration Flowchart:
The following Flow Chart summarizes all of the speaker combinations and subwoofer settings the AVM 2
supports for accurate DOLBY signal processing:
Dolby Configuration Notes:
•
If SURROUNDS are set to ‘None’, the L-Surround channel is directed to the L-Front channel, and
the R-Surround channel is directed to the R-Front channel (except in Dolby Pro Logic mode).
•
If CENTER is set to ‘None’, the center channel is directed to the L/R Fronts (this is also
known as Phantom Mode).
•
With respect to the LFE channel, if the SUBWOOFER is set to ‘No’, the LFE channel is directed to
‘ L a rge’ L/R Front and Surround speakers; if set to ‘Yes’, the LFE channel is directed to the
Subwoofer only; if set to ‘Super’, the LFE channel is directed to the Subwoofer and ‘Large’ L/R
Front and Surround speakers.
(menu 3.e) Crossover Frequency:
Crossover Frequency sets the lower limit of frequencies directed to any speaker set to ‘Small’, and the upper
limit of frequencies that are extracted and directed to the SUBWOOFER.
Using the 34 keys (MASTER CONTROL KNOB) choose a frequency within the 60Hz – 160Hz range that
approximates the low frequency capability of the speakers in your system. Doing so will provide the best
blend between the subwoofer and the other speakers in your system. Since bass is most dependent on your
specific room acoustics, we recommend some experimentation with this adjustment to achieve best results.
(menu 3.f) Center EQ:
When a Center speaker is installed in furniture or on top of a TV (as is often the case), its frequency response
will change and this may affect the clarity of speech.
• With CENTER EQ set to ‘Yes’, the frequency response of the Center Channel output will slightly
change to help make voices sound “clearer”.
38
7. ADVANCED SET-UP continued …
(menu 3.g) TV Size For EQ :
This is used to determine the magnitude of the Center EQ change. The sizes provided offer an easy-to-use
general guideline. Since room/TV/furniture acoustics vary, you may wish to experiment to determine which
setting is actually the best for you. Do the following listening test and determine which sounds the clearest:
when listening to the center channel dialogue of 2 to 3 different DVD soundtracks. (In some situations,
leaving the Center EQ off completely may sound better. Let your ears be the final judge!)
• Select the TV size category that is one higher than what you are using, and then listen. (The size
categories are: 18” - 30” / 30”- 42” / 42”- 54” / 54”- 66” / 66”- 78”.)
• Repeat, dropping one size category at a time.
• Leave the size setting in the category that provides the clearest dialogue, regardless of whether or
not the size actually matches your TV.
(menu 3.h) Hphone Mute Spk:
This determines whether or not the MAIN speakers turn off when a Headphone plug is inserted:
• ‘Yes’
Will mute the MAIN speakers (only). The Front Panel LCD display will then read “HPHONE”
instead of “MAIN” to indicate that adjusting Volume, Bass, Treble, and Balance will affect
HEADPHONE only – MAIN settings remain unaffected while headphones are inserted.
• ‘No’
MAIN speakers will continue to play when headphones are inserted. (To make headphone
adjustments see sections 5.6 to 5.9.1.)
SPEAKER CONFIGURATION Example #1: Change CENTER to ‘Large’.
• Enter the Setup Menu (section 7.1). Go to ‘4. SPEAKER CONFIGURATION’ and press SELECT (‘Select’).
• Press the 6 (‘Down’) key until you reach “c. CENTER: Small”.
• Use the 34 keys (MASTER CONTROL KNOB) to change to ‘Large’. (Note: This change will only be
possible whenever L/R FRONTS are set to ‘Large’ and L/R SURROUNDS are set to ‘None’ or ‘Large’
(see configuration chart on page 38).
• When finished press 65 (‘Down’ / ‘Up’) to go to another Menu Item, or...
• Press the EXIT (‘Back’) key to leave the submenu and return to the Setup Menu.
SPEAKER CONFIGURATION Example #2: Change HPHONE MUTE SPK to ‘Yes’.
• Enter the Setup Menu (section 7.1). Go to ‘3. SPEAKER CONFIGURATION’ and press SELECT (‘Select’).
• Press the 6 (‘Down’) key until you reach “h. HPHONE MUTE SPK: No”.
• Use the 34 keys (MASTER CONTROL KNOB) to change to ‘Yes’.
• When finished press 65 (‘Down’ / ‘Up’) to go to another Menu Item, or...
• Press the EXIT (‘Back’) key to leave the submenu and return to the Setup Menu.
39
7. ADVANCED SET-UP continued …
7.4.4 LISTENER POSITION
The Listener Position Setup Menu lets you enter the distance from each speaker to the listening area. Ideally,
speakers should be placed at a similar distance so that their sound arrives at the listening area at the same
time. Since this is not always possible, the AVM 2 can insert a delay for speakers that are closer; this will
allow sound from each speaker to arrive at the listening area at the same time.
4.
a.
b.
c.
d.
e.
f.
g.
h.
LISTENER POSITION
UNITS :
LEFT FRONT :
CENTER :
RIGHT FRONT :
RIGHT SURROUND :
LEFT SURROUND :
SUBWOOFER :
AUDIO GROUP DELAY:
ft
12.0 ft
12.0 ft
12.0 ft
8.0 ft
8.0 ft
12.0 ft
0 ms
(menu 4.a-g) Units and Distance Adjustment:
First choose the units you want to use (feet/meters). Then enter the distance from your primary listening area
to each speaker (0-99 ft in 0.5 ft increments or 0-99 m in 0.2 m increments).
Note: If you are using Dipole (Diffuse) Surrounds, no delay is required since sound produced by dipoles
is already in the reverberant domain acoustically. To set RIGHT SURROUND and LEFT SURROUND
so that they have no delay, enter the same distance that you have set for RIGHT FRONT and LEFT
FRONT (use the larger distance if RIGHT FRONT and LEFT FRONT are not the same).
(menu 4.h) Audio Group Delay:
Using line doublers / quadruplers, etc. causes a video delay which means that you will hear sound slightly
ahead of the video picture. The Audio Group Delay will delay sound to all channels simultaneously by up to
84 milliseconds to compensate for this video delay.
The audio group delay required will vary by manufacturer – please check the owner’s manual of your
particular doubler / quadrupler for recommended settings.
LISTENER POSITION Example: Change RIGHT FRONT to ‘9.5 ft’.
• Enter the Setup Menu (section 7.1). Go to ‘4. LISTENER POSITION’ and press SELECT (‘Select’).
• Press the 6 (‘Down’) key until you reach “d. RIGHT FRONT: 12.0 ft”.
• Use the 34 keys (MASTER CONTROL KNOB) to change to ‘9.5 ft’.
• When finished press 65 (‘Down’ / ‘Up’) to go to another Menu Item, or...
• Press the EXIT (‘Back’) key to leave the submenu and return to the Setup Menu.
7.4.5 SPEAKER LEVEL CALIBRATION
Speaker Level Calibration allows you to match the relative output level of each speaker at the listening
position. For best results leave one of the FRONT speakers set to +0.0dB and then adjust the levels of the
other speakers until they match (i.e. they have the same loudness).
40
7. ADVANCED SET-UP continued …
Note: The FRONTS, CENTER, SURROUNDS, SUB, and BALANCE buttons on the Remote Control and Front
Panel DO NOT affect settings in this menu, but rather allow adjustment of program material as may
be required (section 5.6).
Note: The Speaker Configuration (section 7.4.3) must be done before the Speaker Level Calibration
since any speaker set to ‘None’ will be skipped.
As a convenience, when you are in the Setup Menu both MAIN Volume and Mute still operate. Be
sure that MAIN is unmuted, otherwise you will not hear sound in the Speaker Level Calibration.
5.
a.
b.
c.
d.
e.
f.
g.
h.
SPEAKER LVL CALIBRATION
TEST SEQUENCE : Off
NOISE REF LEVEL : - 9.0 dB
LEFT FRONT : +0.0 dB
CENTER : +0.0 dB
RIGHT FRONT : +0.0 dB
RIGHT SURROUND : +0.0 dB
LEFT SURROUND : +0.0 dB
SUBWOOFER : +0.0 dB
(menu 5.a) Test Sequence:
Lets you select whether the test noise will travel automatically from speaker to speaker (in 2 second
intervals), or choose each speaker manually, or Off.
(menu 5.b) Noise Reference Level:
Sets the master level of the Dolby shaped noise signal. The default –9.0dB generates the Dolby
recommended output voltage at the analog outputs.
Subwoofer Calibration:
The subwoofer noise bandwidth is specially designed to give you a meaningful comparison of subwoofer
bass level to the levels of other speakers. When adjusting, increase Subwoofer Level until you can hear it
and then lower it slightly until it “blends” with the other speakers. We also recommend playing music
containing a lot of bass to help you find the most natural overall tonal balance between the subwoofer and
the rest the speakers.
If you choose a Speaker Configuration that also directs bass to the L/RFRONTS, the Speaker Level
Calibration will provide the subwoofer test noise, simultaneously, to both Subwoofer and L/R Fronts to
let you set the bass balance between Subwoofer and L/R Fronts. With the level control on your
subwoofer set to ‘0’, adjust the subwoofer test noise so that it is just audible in the L/R Fronts. Then
increase your subwoofer’s level control to achieve a suitable bass balance.
Note: Since this setup calibrates all speaker levels for your listening area, use the Remote Control and
sit in the primary listening chair when performing this test.
This calibration may be done by ear or by using a Sound Pressure Level (SPL) meter. When using
an SPL meter, temporarily set the Subwoofer to ‘Yes’ in the Speaker Configuration menu (L/R
Surrounds and Center will have to be set to ‘Large’ or ‘None’) so that the test noise comes from
the Subwoofer only.
The test noise is pre-shaped to mimic the average music spectrum. The optimal SPL meter setting
is ‘flat’, but ‘B-’ or ‘C-weighting’ may also be used.
41
Even if using an SPL meter always check by ear, and when in doubt trust your ears to set final levels.
7. ADVANCED SET-UP continued …
(menu 5.a) PROCEDURE FOR ‘AUTO’ TEST SEQUENCE:
• Enter the Setup Menu (section 7.1). Go to ‘5. SPEAKER LVL CALIBRATION’ and press SELECT (‘Select’).
• Use the 34keys (MASTER CONTROL KNOB) to set TEST SEQUENCE to ‘AUTO’.
• Press the SELECT (‘Select’) key to start the automatic sequence.
• As each speaker plays, use the 34 keys (MASTER CONTROL KNOB) to adjust its loudness
relative to other speakers. Once set, the sequence will automatically advance to the next speaker
for adjustment. It will then continue to cycle speaker by speaker to allow you to fine tune all levels.
• Press the EXIT (‘Back’) key to stop the automatic sequence.
(menu 5.a) PROCEDURE FOR ‘MANUAL’ TEST SEQUENCE:
• Enter the Setup Menu (section 7.1). Go to ‘5. SPEAKER LVL CALIBRATION’ and press SELECT (‘Select’).
• Use the 34 keys (MASTER CONTROL KNOB) to set TEST SEQUENCE to ‘MANUAL’.
• Press the 65 (‘Down’ / ‘Up’) keys to go from speaker to speaker.
• As each speaker plays, use the 34 keys (MASTER CONTROL KNOB) to adjust its loudness
relative to other speakers.
• Press the EXIT (‘Back’) key to stop the manual sequence and set TEST SEQUENCE to ‘OFF’.
7.4.6 VOLUMES
This setup menu allows you to define the power-on volume settings.
6.
a.
b.
c.
d.
e.
f.
g.
VOLUMES
MAIN ON VOLUME :
MAIN MAX VOLUME :
ZONE2 ON VOL :
ZONE2 MAX VOL :
HPHONE ON VOL :
HPHONE MAX VOL :
VOLUME SPEED :
-40.0 dB
+10.0 dB
-40.0 dB
+10.0 dB
-20.0 dB
+10.0 dB
Slow
(menu 6.a-f) MAIN / ZONE2 / HEADPHONE Volume Settings:
• Power-On Volume: Whenever you turn MAIN or ZONE2 on, all conditions remain the same as when
they were last turned off, except Volumes. This avoids any potential ‘surprises’ of not knowing what
volume someone had set when they last turned MAIN or ZONE2 off, and then having the power-on
volume be either too loud or quiet. You can set independent volumes for MAIN-ON, ZONE2-ON and
HEADPHONE-ON. Then when you turn MAIN on, ZONE2 on, or plug in your headphones, the volume
for each will come on at the known levels you have set.
• Maximum Volume: These settings allow you to individually limit the maximum volume of MAIN,
ZONE2 or HEADPHONE to avoid damaging your equipment and/or your ears. This can also serve as
a Parental Volume Control feature.
• The range of settings available for MAIN is from –95.5 dB to +31.5 dB in steps of .5 dB, and for
ZONE2 and HEADPHONE, the range is from –70.0 dB to +10.0 dB in 1.25dB steps. Remember that the
ON setting can not be set higher than MAX setting.
42
7. ADVANCED SET-UP continued …
• Volume Speed: This sets how quickly the volume changes for each ‘turn-of-the-knob’ or press of
the Remote Control Volume keys. Choose either ‘Slow’ or ‘Fast’.
VOLUMES Example: Set ZONE2 Maximum Volume to ‘+5.0 dB’.
• Enter the Setup Menu (section 7.1). Go to ‘6. VOLUMES’ and press SELECT (‘Select’).
• Press the 6 (‘Down’) key until you reach “d. ZONE2 MAX VOL: +10dB”.
• Use the 34 keys (MASTER CONTROL KNOB) to change to ‘+5.0 dB’.
• When finished press 56 (‘Down’ / ‘Up’) to go to another Menu Item, or...
• Press the EXIT (‘Back’) key to leave the submenu and return to the Setup Menu.
7.4.7 TIME / TIMERS
The time and date, plus 4 different timers are set in this menu. The timers in the AVM 2 are similar to an alarm
clock, but allow two different timer settings for each of MAIN and ZONE2. Menu items 7.d to 7.f will be
described first, followed by timer options, 7.a to 7.c.
7.
a.
b.
c.
d.
e.
f.
TIME/TIMERS
ALLTIMERS : Disabled
SET MAIN TIMERS
SET ZONE2 TIMERS
TIME FORMAT: 12 Hr
CURRENT TIME: 12 : 00 AM
CURRENT DAY: Sunday
(menu 7.d-f) Setting Current Time and Day:
• Enter the Setup Menu (section 7.1). Go to ‘7. TIME / TIMERS’ and press SELECT (‘Select’).
• Press the 6 (‘Down’) key until you reach “d. TIME FORMAT: 12 Hr”.
• Use the 34 keys (MASTER CONTROL KNOB) and choose ‘12 Hr’ or ‘24 Hr’.
• Press the 6 (‘Down’) key to go to “c. CURRENT TIME: 12:00 AM”.
• Press SELECT (‘Select’). ‘12’ will be highlighted in red.
• Use the 56 keys (MASTER CONTROL KNOB) to set the cur rent hour. Continuing through ‘12’ will
advance the AM/PM settings.
• Press the 4 (‘Down’) key. ‘00’ minutes will be highlighted.
• Use the 56 keys (MASTER CONTROL KNOB) to set current minutes.
• Press the SELECT (‘Select’) or EXIT (‘Back’) key to go back to the menu line.
• Press the 6 (‘Down’) key to go to “f. CURRENTDAY: Sunday”.
• Use the 34 keys (MASTER CONTROL KNOB) to set the current day.
43
7. ADVANCED SET-UP continued …
(menu 7.a-c) MAIN / ZONE2 Timers:
• All Timers: This allows you to ‘Enable’ or ‘Disable’ all Timer options for both MAIN and ZONE2,
regardless of their settings.
• Pressing SELECT on the ‘SET MAIN TIMERS’ and ‘SET ZONE2 TIMERS’ menu items brings up their
individual submenus. These allow you to set MAIN and ZONE2 to turn on automatically and
separately in the ways and times you specify. You could, for example, wake up with an FM station
or your favorite CD playing in your bedroom (ZONE2), and later have the TV news on in the family
room (MAIN) when you sit with your morning coffee (see also section 7.2).
Note: The Timer Submenu setup procedure is the same for both MAIN and ZONE2.
7b-c SET MAIN (ZONE2) TIMERS
a.
TIMER1 OPTIONS : Off
b.
T1 WEEKDAY ON : 8.00 AM
c.
T1 WEEKDAY OFF : 11.00 PM
d.
T1 WEEKEND ON : 10.00 AM
e.
T1 WEEKEND OFF : 11.00 PM
f.
TIMER2 OPTIONS : Off
g.
T2 WEEKDAY ON : 8.00 AM
h.
T2 WEEKDAY OFF : 11.00 PM
i.
T2 WEEKEND ON : 10.00 AM
j.
T2 WEEKEND OFF : 11.00 PM
k.
SELECT SOURCE : Last Stn
l.
AUTO-ON VOLUME : -60.0 dB
m.
VOLUME OPTIONS : Auto-on
(menu 7.b-c/a-j) Using the Timers:
There are two Timers to allow greater flexibility. You can not only set individual week and weekend auto-on
times, but you can set them twice – once for Timer1 and again for Timer2. This allows you to have, for
example, separate morning and afternoon settings and do the following: MAIN comes on in the morning (T1),
you manually turn MAIN off when you leave. With T2, MAIN comes on again in the afternoon just before you
get home. Finally, T2 can turn off MAIN at the end of the day.
(menu 7.b-c/a or f) Timer1 or 2 Options: Choices are as follows:
• ‘Off’ – The Auto-On is disabled and will not come on at any time or date.
• ‘Week’ – The Auto-on will operate for Monday to Friday only.
• ‘Wkend’ – The Auto-on will operate for Saturday and Sunday only.
• ‘Wk+Wkend’ – The Auto-on will operate for every day of the week.
(menu 7.b-c/b or g) T1 or T2 WEEKDAY ON: Sets the Monday to Friday turn-on time.
(menu 7.b-c/c or h) T1 or T2 WEEKDAY OFF: Sets the Monday to Friday turn-off time.
(menu 7.b-c/d or i) T1 or T2 WEEKEND ON: Sets the Saturday and Sunday turn-on time.
(menu 7.b-c/e or j) T1 or T2 WEEKDAY OFF: Sets the Saturday and Sunday turn-off time.
44
7. ADVANCED SET-UP continued …
menu 7.b-c/k) Select Source:
Allows you to select the source that will play when either Timer1 or Timer2 turns a Zone / Path On. All sources
are available (even your favorite FM/AM station). Be sure that your selected source and power amplifier are
turned on, or will be at the Timer turn-on time – if your components are equipped with trigger inputs, you can
set an AVM 2 Trigger to turn them on (see section 7.4.8).
The sources available for Timer turn-on are: TV, SAT, VCR, AUX, DISC1, DIRECT, DISC2, TAPE, and Last Stn
(the tuner setting when AVM 2 was last turned off). For example, to select a Source for the ZONE2 Timer:
• Enter the Setup Menu (section 7.1). Go to ‘7. TIME/TIMERS’ and press SELECT (‘Select’).
• Press the 6 (‘Down’) key until you reach “c. SET ZONE2 TIMERS”.
• Press SELECT (‘Select’). The ‘7c. SET ZONE2 TIMERS’ Submenu will appear.
• Press the 6 (‘Down’) key until you reach “k. SELECT SOURCE”.
• Use the 34 keys (MASTER CONTROL KNOB) to change to desired Source Component.
• Press the EXIT (‘Back’) key to leave this submenu and return to TIME / TIMERS menu.
If you selected ‘Last Stn’ as your Timer turn-on source, you can leave it set to the last station you were
listening to, or choose one of your preset stations. For example, to have the Zone / Path Timer turn-on to a
Preset Station, do the following from the ‘k. SELECT SOURCE’ menu line (above):
• Use the 34 keys (MASTER CONTROL KNOB) to change to ‘Last Stn’.
• Press SELECT (‘Select’) to highlight ‘Last Stn’.
• Use the 56 keys (MASTER CONTROL KNOB) to change to desired FM/AM Preset. These
will scroll from ‘AM 1-1’ to ‘AM 1-6’ to ‘FM1-1’ through to ‘FM3-6’ and back to ‘Last Stn’.
• Press the SELECT or EXIT (‘Back’) key to go back to the menu line.
(menu 7.b-c/l) Auto-On Volume:
Sets the Volume that will play when Timer1 or Timer2 turns the Power-On.
(menu 7.b-c/m) Volume Options:
Choose whether you want the Volume to come on immediately at the ‘AUTO-ON’ Volume setting or ‘RAMPUP’ to that setting. With Ramp-Up the volume starts at the minimum volume for that Zone / Path and slowly
increases until the ‘Auto-On Volume’ setting is reached.
TIME / TIMERS Example: Change ZONE2, TIMER2 to come on Weekdays at 7:35 AM.
• Enter the Setup Menu (section 7.1). Go to ‘7. TIME/TIMERS’ and press SELECT (‘Select’).
• Press the 6 (‘Down’) key until you reach “c. SET ZONE2 TIMERS”.
• Press SELECT (‘Select’). The ‘7c. SET ZONE2 TIMERS’ Submenu will appear.
• Press the 6 (‘Down’) key to reach “f. TIMER2 OPTIONS: Off”.
• Use the 34 keys (MASTER CONTROL KNOB) to change to ‘Week’.
• Press the 6 (‘Down’) key until you reach “g. T2 WEEKDAY ON: 8:00 AM”.
• Press SELECT (‘Select’). The hour is now in red, press the 56 keys (MASTER CONTROL KNOB )
to set the hour to ‘7’ AM. (Continuing through ‘12’ will advance the AM/PM settings.)
• Press the 4 (‘Down’) key. ‘00’ minutes will be highlighted.
• Use the 56 keys (MASTER CONTROL KNOB) to set the minutes to ‘35’.
• Press the EXIT (‘Back’) key to leave this submenu and return to TIME / TIMERS menu.
45
7. ADVANCED SET-UP continued …
7.4.8 TRIGGERS / IR / RS-232
Three Trigger Outputs are provided on the back of the AVM 2. These allow you to remotely turn other
components on or off, such as Power Amplifier, CD Changer, Video Projector, etc. To have their power On/Off
controlled by the AVM 2, simply connect a Trigger output from the AVM 2 to the Trigger input of the other
component. For components that do not have a trigger input, use a triggerable power bar (see your dealer).
The Triggers menu allows you to determine the criteria by which other components are turned on or off.
There is a quarter of a second delay between each trigger to minimize momentary line voltage drops caused
by switching on too many devices at the same time.
• Trigger1 and Trigger2: Provides standard trigger outputs of 12 volts with up to 50mA, suitable for
typical source components and most amplifiers.
• Trigger3: Provides a standard trigger output of 12 volts with up to 200mA source current, suitable
for motorized projector equipment and very high power amplifiers.
• All 3 Triggers: Require a mono 3.5mm mini plug to the AVM 2, and usually the same at the
component end.
8.
a.
b.
c.
d.
e.
f.
g.
h.
i.
TRIGGERS / IR / RS-232
ALL TRIGGERS :
SET TRIGGER 1
SET TRIGGER 2
SET TRIGGER 3
FRONT IR :
REAR IR :
BAUD RATE :
FLOW control :
RS-232 TX STATUS ON :
Disabled
Enabled
Enabled
19200
None
No
(menu 8.a) All Triggers:
Allows you to ‘Enable’ or ‘Disable’ all Trigger options for MAIN and ZONE2, regardless of their settings. You
can also select ‘RS-232 Ctrl’ which allows external control over the Enable / Disable condition for all triggers.
(menu 8.b-d) SET TRIGGER 1, 2, 3:
When you select Trigger 1, 2, or 3 the following control chart appears for each trigger:
8b. SET TRIGGER 1(2or3) SOURCES
M Z2 R
M Z2
PWR ON - FM/AM DISC1
- - TV
DIRECT
SAT
DISC2
- - VCR
TAPE
- - AUX
-
R
-
46
7. ADVANCED SET-UP continued …
Under each of the three AVM 2 Zones / Paths, MAIN (M), ZONE2 (Z2), and RECORD (R), a variety of Sources
are available to choose from to set the Triggers.
In the Control Chart, you will notice that there are 27 available Sources (27 dashes), that could be used to
activate that particular Trigger.
For Trigger 1, 2, or 3 to activate, simply enter that Trigger’s Control Chart and replace the ‘-’ with an ‘*’ for the
sources that you wish.
For Example: From the following Trigger Control Chart – TRIGGER 2 will activate whenever the MAIN Zone / Path
is set to the DISC1 Source. This will supply an output of 12 volts with up to 50mA at the Trigger2 output.
8c. SET TRIGGER 2 SOURCES
M Z2 R
PWR ON - FM/AM
DISC1
* - TV
DIRECT
SAT
DISC2
- - VCR
TAPE
- - AUX
M
-
Z2
-
R
-
(menu 8.e-f) FRONT IR and REAR IR Settings:
Allows you to ‘ENABLE’ or ‘DISABLE’ the IR Receiver located at the front, or the IR Input located at the back
of the AVM 2. This is useful when an IR repeater, connected to the AVM 2 rear IR Input, has to be located in
the same room as the AVM 2. In such a case you may have two IR signals being received by the AVM 2 - One
from the Remote Control and one from the repeater on the rear. The problem is that rear signal is delayed,
which may confuse the IR Receivers’ control circuits. Disabling the Front IR in this case solves the problem.
At times, the IR signal may still find its way to the internally mounted rear IR Receiver via the vents in the top
cover. This could also cause confusion for the AVM 2. If this input is not used, simply Disable the Rear IR
Receiver to solve any possible problems.
Note: If the red Indicator LED on your Remote Control flashes when you press an active key, but the
AVM 2 does not respond, it may be because the FRONT IR was changed to ‘DISABLED’. If this has
occurred it can only be Enabled again by using the AVM 2 Front Panel buttons to enter the Setup
Menu – go to TRIGGERS/IR/RS-232 (menu 8), then go to FRONT IR (menu 8.e) and change the
setting back to ‘ENABLED’.
(menu 8.g-h) Baud Rate and Flow Control:
The Baud Rate (adjustable from 1200 to 115200 bps), and Flow Control (‘RTS’, ‘CTS’ or ‘NONE’), allow for
configuring the serial port communication parameters. This is normally for use by the factory and
dealer/installers only.
(menu 8.i) RS-232 TX Status ON Settings:
Echoes front panel and remote control commands, status changes, and control information through the
RS-232 port. This is normally for use by the factory and dealer/installers only.
47
7. ADVANCED SET-UP continued …
TRIGGERS / IR / RS232 Example: Activate Trigger1 and 2 when MAIN is turned ON with TV as the Source.
• Enter the Setup Menu (section 7.1). Go to ‘8. TRIGGERS/IR/RS-232’ and press SELECT (‘Select’).
• Upon entering this menu item, “8a. ALL TRIGGERS: Disabled” will be highlighted in red.
• Use the 34 keys (MASTER CONTROL KNOB) to change to ‘Enabled’.
• Press the 6 (‘Down’) key to go to “b. SET TRIGGER 1”.
• Press SELECT (‘Select’).
• Use the 65 (‘Down’ / ‘Up’) keys to go to ‘TV’.
• Press SELECT (‘Select’).
• Use the 65 keys (MASTER CONTROL KNOB) to change the ‘-’ to ‘*’.
• Press the EXIT (‘Back’) key twice to leave this submenu.
• Press the 6 (‘Down’) key to go to “c. SET TRIGGER 2”.
• Press SELECT (‘Select’).
• Use the 65 (‘Down’ / ‘Up’) keys to go to ‘TV’.
• Press SELECT (‘Select’).
• Use the 65 (‘Down’ / ‘Up’) keys to change the ‘-’ to ‘*’.
• Press the EXIT (‘Back’) key to leave the submenu and return to the Setup Menu.
7.4.9 DISPLAYS / SELECTION TIME
This Setup Menu allows you to configure both the On-Screen display, Front Panel display and Selection Time.
9.
a.
b.
c.
d.
e.
f.
g.
h.
i.
DISPLAYS/ SELECTION TIME
ON-SCREEN : Enabled
ON-SCREEN OUT : Composite
SELECTION TIME : 5 s
ON-SCREEN POS’N : Bottom
Z2 INFO ON MAIN OS : Yes
FRT PANEL-HI : 15
FRT PANEL-MED : 12
FRT PANEL-LOW : 8
FP WAKE-UP : Up 1
(menu 9.a) On-Screen:
‘Bypassed’ turns the On-Screen display OFF; ‘Enabled’ turns it ON. If you choose ‘Bypassed’, you will have
to rely solely on the Front Panel display.
(menu 9.b) On-Screen Out:
With the On-Screen ‘Enabled’ you will then have to choose which output the On-Screen display will be
directed to, either ‘Composite’ or ‘S-Video’. If you have the Video Output of the AVM 2 connected to the
Composite Video Input of your TV Monitor, choose ‘Composite’. If you have the Video Output of the AVM 2
connected to the S-Video Input of your TV Monitor, choose ‘S-Video’.
48
7. ADVANCED SET-UP continued …
Note: The On-Screen display is not available for Component Video.
Note: If you have connected and selected ‘Composite’ for ON-SCREEN OUT and afterwards change it
to ‘S-Video’, the Setup Menu will immediately disappear because doing so has actually
‘disconnected’ the On-Screen display from your TV Monitor. If this has occurred, immediately
press the4key (MASTER CONTROL KNOB) to return to ‘Composite’. You can also correct this
using the AVM 2 Front Panel keys to enter the Setup Menu – go to DISPLAY / SELECTION TIME
(menu 8), then ON-SCREEN OUT (8.b) and change back to ‘Composite’. (Of course the same would
occur if you were connected to S-Video and changed to Composite.)
(menu 9.c) Selection Time:
After a key is used on either the Front Panel or Remote Control (e.g. Vol, etc.) and the ‘Selection Time’ has
elapsed, the On-Screen displayed text will disappear and the Front Panel display will go dim. You can change
this Selection Time; choose from ‘1 to 30 s’ or ‘Always On’. This selection time also applies to how long
ZONE2, REC or HEADPHONE information remains displayed before returning to MAIN display information.
(menu 9.d) On-Screen Pos’n:
This allows you to position the On-Screen display to reduce the chance of it interfering with the on-screen
display positions of other video components (e.g. Satellite Receiver or a TV Monitor’s own display, etc.).
Choose from: ‘Bottom’, ‘Mid’, or ‘Top’.
(menu 9.e) Z2 Info On MAIN OS:
Lets you select whether or not the On-Screen display will show ZONE2 information whenever ZONE2
adjustments are made. If ZONE2 is set up to use the Remote Control (with an IR repeater, etc. – consult
dealer), you may not want to see ZONE2 adjustment someone is making while you are perhaps watching a
DVD. At other times, when you are making adjustments to ZONE2 in the same room as the AVM 2 you may
want to see the ZONE2 information displayed.
(menu 9.f-i) Front Panel Display Adjustments:
• Brightness: Simultaneously adjusts the intensity level of the LCD display and LED indicators. Three
separate adjustments can be made – HI, MED and LOW. Use HI to set the daytime level, MED for
the evening level and LOW for the nighttime level. The DISPLAY key cycles through these settings.
As you make brightness adjustments, the LCD display and LED’s change immediately to allow you
to see the result of the setting.
• FP Wake-up: After the Front Panel has dimmed, it may immediately wake-up to a brighter level when
you press any active key (e.g. Vol, etc.). You may choose to have the Front Panel display wake-up at
one brightness level higher than the dimmed level, or at the highest level. Choose ‘1 UP’ or ‘HI’.
DISPLAY/SELECTION TIME Example: Change the ON-SCREEN OUT to ‘S-Video’.
• Enter the Setup Menu (section 7.1). Go to ‘8. DISPLAY/SELECTION TIME’ and press SELECT (‘Select’).
• Press the 6 (‘Down’) key until you reach “b. ON-SCREEN OUT: Composite”.
• Use the 34 keys (MASTER CONTROL KNOB) to change to ‘S-Video’.
• When finished press 65 (‘Down’ / ‘Up’) to go to another Menu Item, or...
• Press the EXIT (‘Back’) key to leave the submenu and return to the Setup Menu.
49
7. ADVANCED SET-UP continued …
7.4.10 SAVE / RESTORE SETTINGS
The AVM 2 enables you to save the entire setup configuration, except for the time and day. Two separate
save files are provided: SAVE USER SETTINGS and SAVE INSTALLER SETTINGS. If your dealer does the
setup, they can SAVE their setup configuration to their own INSTALLER file. You may also decide to make
further setup adjustments – SAVE those settings separately to your own USER file. FM/AM Tuner presets are
also saved separately in USER SETTINGS and INSTALLER SETTINGS.
Once saved, if someone makes any unwanted changes to the settings of your AVM 2, rather then go through
the entire setup configuration again, you can quickly and easily RESTORE either the dealer’s INSTALLER
settings or your USER settings. FM/AM Tuner presets that were saved in USER SETTINGS or INSTALLER
SETTINGS will also be restored.
The original FACTORY DEFAULTS can also be RELOADED at any time to reset the AVM 2 back to the original
factory settings. Individual speaker level, balance and bass/treble adjustments described in sections 5.6, 5.7,
and 5.9 will be reset to 0 dB. Surround effect settings described in section 5.10 will be reset to ‘None’.
Note: The first time you plug in the AVM 2’s AC power cord, the factory defaults are automatically
loaded and active.
10.
a.
b.
c.
d.
e.
SAVE/ RESTORE SETTINGS
SAVE USER SETTINGS
RESTORE USER SETTINGS
SAVE INSTALLER SETTINGS
RESTORE INSTALLER SET’NS
RELOAD FACTORY DEFAULTS
(menu 10.a, 10.c) Save Settings:
You can Save Settings with or without the use of a Password. Passwords are very easy to set up (see section
7.4.11) and will protect both USER and INSTALLER files from being changed by anyone other than whomever
has the Password. New SAVES will overwrite the previously saved file. The AVM 2 will prompt you to confirm
that you want to over-write currently saved settings. Press the EXIT (‘Back’) key at any time to abort a save.
(menu 10.b, 10.d-e) Restore or Reload Settings:
You may RESTORE USER SETTINGS, INSTALLER SETTINGS, or RELOAD FACTORY SETTINGS at will. The
AVM 2 will prompt you to confirm that you want to replace the current settings. Press the EXIT (‘Back’) key
at any time to abort a restore.
SAVE / RESTOREExample #1: ‘SAVE USER SETTINGS’.
Note: FM/AM Tuner presets will also be saved in USER SETTINGS.
• Enter the Setup Menu (section 7.1). Go to ‘10. SAVE/RESTORE SETTINGS’ and press SELECT (‘Select’).
• Upon entering this menu item, “10a. SAVE USER SETTINGS” will be highlighted in red.
• Press SELECT (‘Select’). You will be asked to confirm that you want to over-write current settings.
• Use the 34 keys (MASTER CONTROL KNOB ) and change to ‘Yes’. If you are using a Password,
you will be asked for it. Use the 1 – 6 keys to enter your Password. The On-Screen display message
will then say ‘Saving Successful’, the Front Panel display says ‘Done!’.
• When finished press 65 (‘Down’ / ‘Up’) to go to another Menu Item, or...
• Press the EXIT (‘Back’) key to leave the submenu and return to the Setup Menu.
50
7. ADVANCED SET-UP continued …
SAVE / RESTORE Example #2: ‘RESTORE INSTALLER SETTINGS’.
Note: FM/AM Tuner presets that were saved in INSTALLER SETTINGS will also be restored.
• Enter the Setup Menu (section 7.1). Go to ‘10. SAVE/RESTORE SETTINGS’ and press SELECT (‘Select’).
• Press the 6 (‘Down’) key until you reach “d. RESTORE INSTALLER SET’NS”.
• Press SELECT (‘Select’). You will be asked to confirm that you want to restore installer settings.
• Use the 34 keys (MASTER CONTROL KNOB) to change to ‘Yes’ and press SELECT (‘Select’).
On-Screen display message will then say ‘Saving Successful’, the Front Panel display says ‘Done!’.
• When finished press 65 (‘Down’ / ‘Up’) to go to another Menu Item, or...
• Press the EXIT (‘Back’) key to leave the submenu and return to the Setup Menu.
SAVE / RESTORE Example #3: ‘RELOAD FACTORY DEFAULTS’.
Note: The current time, FM/AM Tuner presets, and surround effect settings (section 5.10) will be
retained. Individual speaker level, balance, and bass/treble adjustments (sections 5.6, 5.7, and
5.9) will be reset to 0 dB.
• Enter the Setup Menu (section 7.1). Go to ‘10. SAVE/RESTORE SETTINGS’ and press SELECT (‘Select’).
• Press the 6 (‘Down’) key until you reach “e. RELOAD FACTORY DEFAULTS”.
• Press SELECT (‘Select’). You will be asked to confirm that you want to ‘reload factory settings’.
• Use the 34 keys (MASTER CONTROL KNOB) to change to ‘Yes’ and press SELECT (‘Select’).
On-Screen display message will then say ‘Saving Successful’, the Front Panel display says ‘Done!’.
• When finished press 65 (‘Down’ / ‘Up’) to go to another Menu Item, or...
• Press the EXIT (‘Back’) key to leave the submenu and return to the Setup Menu.
7.4.11 LOCKOUT / PASSWORDS
Passwords can be used to protect the Saved User and Installer settings. Once you have set a password, it
can also be used as a Lockout to prevent all Setup Menu settings from being changed by anyone other than
those who have Passwords.
11.
a.
b.
c.
LOCKOUT/PASSWORDS
SET SETUP MENU LOCKOUT
SET USER PASSWORD
SET INSTALLER PASSWORD
(menu 11.a) Set Setup Menu Lockout:
You must enter a User or Installer Password before the Lockout feature can be used. When set to ‘Yes’ this
prevents anyone without a Password from entering the Setup Menu. When you attempt to enter the Setup
Menu, you will be asked for your Password – either the USER or INSTALLER Password must then be entered
before you will be allowed to continue.
51
7. ADVANCED SET-UP continued …
(menu 11.b-c) Set User or Installer Password:
When setting the USER or INSTALLER Password, you will be asked to enter a four digit number. Pick one that
you will be able to easily remember. To enter that number use the 1 – 6 keys on the Remote Control or the
1 – 6 FM/AM Preset buttons on the Front Panel. You can also change an existing password by first entering
the old one, and then entering (and confirming) a new one.
LOCKOUT/PASSWORDS Example #1: ‘SET USER PASSWORD’.
• You must first enter USER or INSTALLER Password.
• Enter the Setup Menu (section 7.1). Go to ‘11. LOCKOUT/PASSWORDS’ and press SELECT (‘Select’).
• Press the 6 (‘Down’) key to go to “b. SET USER PASSWORD”.
• Press SELECT (‘Select’). You will be asked to enter a four digit number. Use the 1 – 6 keys to do so.
If you are changing your Password you will be asked to enter your old Password first. You will also
be asked to confirm your new Password (re-enter your new Password).
• When finished press 65 (‘Down’ / ‘Up’) to go to another Menu Item, or...
• Press the EXIT (‘Back’) key to leave the submenu and return to the Setup Menu.
LOCKOUT/PASSWORDS Example #2: ‘SET SETUP MENU LOCKOUT’.
• Enter the Setup Menu (section 7.1). Go to ‘11. LOCKOUT/PASSWORDS’ and press SELECT (‘Select’).
• Upon entering this menu item, “10a. SET SETUP MENU LOCKOUT” will be highlighted in red.
• Press SELECT (‘Select’). You will be asked to enter your Password. Enter either the USER or
INSTALLER Password will work. Use the 1 – 6 keys to do so.
• Use the 34 keys (MASTER CONTROL KNOB) to change to ‘Yes’ or ‘No’.
• Press SELECT (‘Select’) or EXIT (‘Back’).
• When finished press 65 (‘Down’ / ‘Up’) to go to another Menu Item, or...
• Press the EXIT (‘Back’) key to leave the submenu and return to the Setup Menu.
LOCKOUT/PASSWORDS Example #3: ‘CLEARING THE USER PASSWORD’.
• Enter the Setup Menu (section 7.1). Go to ‘11. LOCKOUT/PASSWORDS’ and press SELECT (‘Select’).
• Press the 6 (‘Down’) key to go to “b. SET USER PASSWORD”.
• Press SELECT (‘Select’). You will be asked to enter your old Password. Use the 1 – 6 keys to do so.
• When asked for your new Password press the 4 (‘Down’) key four times. You will also be asked to
confirm your new Password, press the 4 (‘Down’) key four times again. Message will then say
‘User Password Removed’.
• When finished press 65 (‘Down’ / ‘Up’) to go to another Menu Item, or...
• Press the EXIT (‘Back’) key to leave the submenu and return to the Setup Menu.
52
8. SOFTWARE UPDATING
The operational characteristics of the AVM 2 are controlled by a Software program that resides in Flash
Memory. The Software is easily upgradeable through the RS-232 port on the Rear Panel. The new Software
Update can be installed by downloading a new Installer and support files from our web site. Afterwards,
connect the AVM 2 to your computer’s serial port in order to transfer the file.
Note: All saved USER, and INSTALLER Settings and Passwords are retained and not overwritten by the
Software updates!
8.1
SOFTWARE VERSION IDENTIFICATION
If you want to know the Software Version you have in your AVM 2, press the STATUS key. The Front Panel
display will look something like this:
Please contact your dealer, or visit the AVM 2 page on our web site at www.sonicfrontiers.com, to find the
latest Software Version, and any owners manual updates that go along with new versions.
8.2
SOFTWARE UPDATING VIA YOUR DEALER
To do this, you will have to take your AVM 2 to your Authorized Anthem Dealer. To save yourself time and
trouble, please remember to call your dealer first to find out if you should get the latest Software Version,
and then arrange a time to install the update.
Note: Your dealer may charge for this service.
8.3
SOFTWARE UPDATING VIA YOUR COMPUTER AND THE INTERNET
To update the Software through your computer, you will need the following:
• Access to the Internet.
• Serial cable – straight wired, with one end DB9 male for the AVM 2, and the other, DB9 female or
DB25 female for your computer.
Note: Typically, a cable length of up to 100 feet (33 meters) will work for a long distance connection
to your computer. You may also install this cable permanently to the AVM 2, enabling easy future
updates, without the need to disconnect the AVM 2 from your system.
Computer System Requirements:
PC:
• Win9x or Win2000.
• 1 Meg free space on the hard drive.
• Serial Com port (COM1 to COM4). The software will automatically detect the COM port being used.
MAC: • MacOS 7.6.1 or higher with 32 Meg of RAM.
• 3 Meg free space on the hard drive.
• Adapters for serial cable – please see information included with the Software update.
53
8. SOFTWARE UPDATING continued …
To Download the Software Update to Your AVM 2:
1. First of all, find out which Software Version you currently have by pressing the Status button on the
Front Panel of your AVM 2.
2. Go to the AVM 2 page on the SONIC FRONTIERS web site (www.sonicfrontiers.com) and locate the
latest AVM 2 Software Version Update. Compare it to your Software Version. Proceed only if your
version is a lower number (indicating that it is older).
3. With a PC do the following:
a) Using your computer’s mouse, right click on the download icon. You will then be asked where
to save a file called ‘AVM 2 Software Update.exe’ – save it to your computer’s desktop.
b) Once complete, click on the downloaded file on your desktop and it will self-extract to a folder
called ‘AVM 2 Software Update’. You may be asked where to save this folder – save it to your
desktop also. You may then delete (recycle bin) the ‘AVM 2 Software Update.exe’ file.
4. With a MAC do the following:
a) Using your computer’s mouse, double click on the download icon. You will then be asked
where to save a file called ‘AVM 2 Software Update.sit’ – save it to your computer’s desktop.
b) Once complete, it will immediately self-extract to a folder called ‘AVM 2 Software Update,’
which will be placed on your desktop. You may then delete (trash) the AVM 2 S o f t w a re
Update.sit file.
5. Ensure that your current AVM 2 Setup configuration is saved (see section 7.4.10).
6. Turn your AVM 2 off and disconnect the power cord to prevent the possibility of a static discharge
when the serial port is connected. Your tuner presets, speaker level settings, bass/treble, etc. are
automatically written to memory if the line voltage is disconnected or during a power failure.
7. Using the serial cable (and adapters for MAC), connect your computer to the AVM 2 to via the 9-pin
female RS-232 port on the Rear Panel. Updating does not require moving the AVM 2 or
disconnecting it from your system, as long as you can connect your computer to the RS-232 port.
8. The AC power cord of the AVM 2 must then be plugged back in, but MAIN or ZONE2 power does
not have to be turned on.
9. Open the AVM 2 Software Update folder. The ‘Read Me First’ file lists software changes for this
Version and outlines the most current instructions on how to load the Software Upgrade into your
AVM 2.
10. Click (PC) or double click (Mac) on the file called AVM 2 Version 1.xx. Install in the AVM 2 Software
Update folder. Click on the Install Upgrade Now button. In a few minutes the install and verification
will be completed. The AVM 2 will then turn itself OFF for a forced re-boot.
11. Once complete you may disconnect the serial cable from the Rear Panel if you wish.
12. Turn on the AVM 2 and adjust the current time (see section 7.4.7 menu 7.e).
13. Restore Settings? You do not need to Restore or Recall any settings after the Update procedure. The
AVM 2 will retain the settings that were in use before the Update. You will, however, have to adjust
the Current Time, since the internal clock is not active while the AVM 2 is unplugged or while the
Update procedure is in progress. See section 7.4.7, setup menu 7.e, to adjust the Current Time.
54
WARRANTY
CANADA & USA
Sonic Frontiers International (SFI) warrants to the purchaser that each Anthem AVM 2 is free from defects
in workmanship and materials, during normal use and service, for a period of five (5) years from the date of
sale. To receive this warranty, the original purchaser must complete the enclosed Warranty Registration
Card and mail it to SFI within thirty (30) days from the date of purchase. During the warranty period, SFI will
repair or replace any defective components parts free of charge. Warranty applies to the original purchaser
only; it is not transferable.
If a problem or defect is discovered in your Anthem AVM 2, please contact your Authorized Anthem Dealer.
It is the Dealer’s responsibility to determine the nature of the problem and arrange for the appropriate
replacement parts, or the return of the AVM 2 to SFI. A Return Authorization (RA) number must be obtained
in advance from SFI’s Service Department before any product can be returned to SFI for any reason:
Telephone:
Fax:
E-mail:
905-829-3838 ext. 240 (9 AM - 5 PM EST, voice mail 24 hrs.)
905-829-3033
[email protected]
The RA Number must be clearly visible on the outside of the shipping carton for SFI to accept the return.
Product shipped to SFI without a RA Number will be refused and returned to the sender, freight collect.
Product shipped to SFI for repair must have shipping and insurance prepaid by the original purchaser, packaged in the original packing carton and material and should be accompanied by a written description of the
defect. To receive service under warranty, an accompanying copy of the original sales receipt is required.
Product repaired under warranty will be returned shipping and insurance prepaid by SFI (within North
America only). All other repairs are subject to charges for labor, parts, return shipping, and insurance. SFI
will accept no responsibility for any damage occurring to an AVM 2 that is shipped in any type of packing
carton and material other than the original packing carton and material.
This warranty is void if the product has been operated or handled other than in accordance with the instructions in this Operating Manual or otherwise abused, misused, damaged by accident or neglected in transport, tampered with, modified, or repaired by anyone other than SFI or an authorized SFI service center.
Regular maintenance is not covered by this warranty. If inspection by SFI discloses that the repair required
to the product is not covered by this warranty, regular repair charges shall apply.
Additional freight charges to markets outside of Canada and USA will apply.
Disclaimer of Liability
Under no circumstances does Sonic Frontiers International assume liability or responsibility for injury or
damages sustained in the use or operation of this product, or for damages to any other products connected to it.
In no event shall SFI, its agents, representatives, or employees, be responsible for any incidental or consequential damages. Some jurisdictions do not allow limitations of incidental or consequential damages, so this
exclusion may not apply to you.
SFI reserves the right to make design changes or improvements to this product without any obligation to
revise prior versions. All specifications are subject to change without notice.
On the expiration of the warranty period all liability of SFI in connection with the product shall terminate.
This warranty constitutes the only warranty applicable to products sold by SFI. No other warranty or condition, statutory or otherwise, expressed or implied, shall be imposed upon SFI, nor shall any representation
made by any person, including a representation by a representative or agent of SFI, be effective to extend
the warranty coverage provided herein.
55
WARRANTY continued …
Frequently Asked Warranty Questions
What is the FLOOR MODEL Warranty?
Display products sold by an Authorized Sonic Frontiers / Anthem Dealer are covered under the same warranty terms, except that the warranty period commences at the date of the dealer invoice, not the customer’s
invoice, and cosmetic flaws, if there are any, are excluded.
Is there a Warranty on TRADE-INS?
The balance of the warranty can be transferred on used product only if the product is traded in at an
Authorized Sonic Frontiers / Anthem Dealer, who may resell the product with the remaining warranty if it is
cosmetically acceptable, in perfect working condition, and has not been internally or externally altered in
any way. The Dealer must call SFI to provide the serial number of such a product so that the warranty may
be registered to the new owner.
What is the USED EQUIPMENT WARRANTY?
The standard SFI warranty is not valid for used product purchased from a non-authorized dealer or private
sale. However, a 3-year warranty for used equipment is available for purchase from SFI. For details, visit
www.sonicfrontiers.com or contact SFI’s Service Department.
INTERNATIONAL
Outside of Canada and USA, warranty coverage terms are set and maintained by the Authorized Sonic
Frontiers International / Anthem Distributor, not SFI. Exact terms and conditions may vary. Sonic Frontiers
International (SFI) will provide warranty replacement parts to the original purchaser of the product, via the
distributor, for a period of five (5) years, via surface mail. Additional courier freight charges will apply.
56
APPENDIX A - UNIVERSAL REMOTE CONTROL CODES
The following is a list is codes at time of printing. For newer models not listed you can get the latest list of codes from
our web site at: www.sonicfrontiers.com. Note: Codes can only be used with their respective Zone/Path/Component
key. That is to say, a VCR code can not be programmed in the DVD Zone/Path/Component key. To enter a code:
1. Press the Zone/Path/Component key (e.g. DVD).
2. Press and hold LEARN until the LED flashes twice.
3. Enter the four-digit code. The LED should blink twice.
Setup Codes for TV’s:
AOC
Admiral
Aiko
Akai
Alaron
Ambassador
America Action
Ampro
Anam
Audiovox
Baysonic
Belcor
Bell & Howell
Bradford
Brockwood
Broksonic
CXC
Candle
Carnivale
Carver
Celebrity
Cineral
Citizen
Concerto
Contec
Craig
Crosley
Crown
Curtis Mathes
Daewoo
Daytron
Denon
Dumont
Dwin
Electroband
Emerson
Envision
Fisher
Fujitsu
Funai
Futuretech
GE
Gibralter
GoldStar
Gradiente
Grunpy
Hallmark
Harley Davidson
Harman/Kardon
Harvard
Hitachi
Infinity
Inteq
JBL
JCB
JVC
KEC
KTV
Kenwood
LG
LXI
Logik
57
0030, 0019
0093, 0463
0092
0030
0179
0177
0180
0751
0180
0451,0180, 0092, 0623
0180
0019
0154, 0016
0180
0019
0236, 0463
0180
0030, 0056
0030
0054
0000
0451, 0092
0060, 0030, 0056, 0039,
0092
0056
0180
0180
0054
0180, 0039
0047, 0054, 0154, 0051,
0451, 0093, 0060, 0030,
0145, 0056, 0016, 0039,
0166, 0466, 1147, 1347
0451, 0019, 0039, 0092,
0623, 0624
0019
0145
0017, 0019
0720, 0774
0000
0154, 0236, 0463, 0180,
0282, 0178, 0019, 0179,
0039, 0177, 0623, 0624
0030
0154
0179
0180, 0179, 0171
0180
0047, 0051, 0451, 0093,
0282, 0178, 0021, 0135,
1147, 1347
0017, 0030, 0019
0030, 0178, 0019, 0056
0053, 0056
0180, 0179
0178
0179
0054
0180
0145, 0056, 0151
0054
0017
0054
0000
0053
0180
0180, 0030, 0039
0030, 0019
0056
0047, 0054, 0154, 0156,
0178
0016
Luxman
MGA
MTC
Magnavox
Majestic
Marantz
Matsushita
Megatron
Memorex
Midland
Minutz
Mitsubishi
Motorola
Multitech
NAD
NEC
NTC
Nikko
Onwa
Optimus
Optonica
Orion
Panasonic
Penney
Philco
Philips
Pilot
Pioneer
Portland
Prism
Proscan
Proton
Pulsar
Quasar
RCA
Radio Shack
Realistic
Runco
SSS
Sampo
Samsung
Samsux
Sansei
Sansui
Sanyo
Scimitsu
Scotch
Scott
Sears
Semivox
Semp
Sharp
Shogun
Signature
Sony
Soundesign
Squareview
Starlite
Supreme
Sylvania
Symphonic
0056
0150, 0030, 0178, 0019
0060, 0030, 0019, 0056
0054, 0030, 0179
0016
0054, 0030
0250
0178, 0145
0154, 0250, 0463, 0150,
0178, 0056, 0016
0047, 0017, 0051, 0039,
0135
0021
0093, 0150, 0178, 0019
0093
0180
0156, 0178, 0166
0030, 0019, 0056
0092
0030, 0178, 0092
0180
0154, 0250, 0166
0093, 0165
0236, 0463, 0179
0051, 0250
0047, 0156, 0051, 0060,
0030, 0178, 0021, 0019,
0056, 0039, 0135, 1347
0054, 0463, 0030, 0145,
0019
0054
0030, 0019, 0039
0166
0019, 0039, 0092
0051
0047
0178, 0466
0017, 0019
0051, 0250, 0165
0047, 0051, 0093, 0019,
0090, 0135, 1047, 1147,
1247, 1347
0047, 0154, 0165, 0180,
0030, 0178, 0019, 0056,
0039
0154, 0165, 0180, 0030,
0178, 0019, 0056, 0039
0017, 0030, 0603
0180, 0019
0030, 0039
0060, 0030, 0178, 0019,
0056
0039
0451
0463
0154
0019
0178
0236, 0180, 0178, 0019,
0179
0047, 0054, 0154, 0156,
0178, 0179, 0056, 0171
0180
0156
0093, 0165, 0039
0019
0016
0000
0180, 0178, 0179
0171
0180
0000
0054, 0030
0171
TMK
Tandy
Technics
Technol Ace
Techwood
Teknika
Telefunken
Toshiba
Totevision
Vector Research
Victor
Vidikron
Vidtech
Wards
White Westinghouse
Yamaha
Zenith
0178, 0056, 0177
0093
0051, 0250
0179
0051, 0056
0054, 0180, 0150, 0060,
0019, 0179, 0056, 0016,
0039, 0092
0056
0154, 0156, 0060
0039
0030
0053
0054
0178, 0019
0054, 0165, 0030, 0178,
0021, 0019, 0179, 0056,
0016
0463, 0623, 0624
0030, 0019
0017, 0463, 0016, 0092
VCR’s:
Admiral
Adventura
Aiko
Aiwa
Akai
America Action
American High
Asha
Audiovox
Beaumark
Bell & Howell
Brocksonic
Broksonic
CCE
Calix
Canon
Carver
Cineral
Citizen
Colt
Craig
Curtis Mathes
Cybernex
Daewoo
Denon
Dynatech
Electrohome
Electrophonic
Emerex
Emerson
Fisher
Fuji
Funai
GE
Garrard
Go Video
GoldStar
Gradiente
HI-Q
Harley Davidson
Harman/Kardon
Harwood
Headquarter
Hitachi
Hughes Net. Sys.
JVC
Jensen
KEC
0048, 0209
0000
0278
0037, 0000
0041
0278
0035
0240
0037
0240
0104
0209
0184, 0121, 0209, 0002
0072, 0278
0037
0035
0081
0278
0037, 0278
0072
0037, 0047, 0240, 0072,
0271
0060, 0035, 0041, 0162
0240
0045, 0278
0042
0000
0037
0037
0032
0037, 0184, 0000, 0121,
0043, 0209, 0002, 0278
0047, 0104
0035, 0033
0000
0060, 0035, 0048, 0240
0000
0526
0037, 0038
0000
0047
0000
0081, 0038
0072
0046
0000, 0042, 0041
0042
0067, 0041
0041
0037, 0278
APPENDIX A - REMOTE CONTROL CODES continued …
KLH
Kenwood
Kodak
LXI
Lloyd’s
Logik
MEI
MGA
MGN Technology
MTC
Magnasonic
Magnavox
Magnin
Marantz
Marta
Matsushita
Memorex
Minolta
Mitsubishi
Motorola
Multitech
NEC
Nikko
Noblex
Olympus
Optimus
Orion
Panasonic
Penney
Pentax
Philco
Philips
Pilot
Pioneer
Profitronic
Proscan
Protec
Pulsar
Quarter
Quartz
Quasar
RCA
Radio Shack
Radix
Randex
Realistic
Runco
STS
Samsung
Sanky
Sansui
Sanyo
Scott
Sears
Semp
Sharp
Shintom
Shogun
Singer
Sony
Sylvania
Symphonic
TMK
Tatung
Teac
Technics
Teknika
Thomas
Toshiba
Totevision
Unitech
Vector
Vector Research
Video Concepts
0072
0067, 0041, 0038
0035, 0037
0037
0000
0072
0035
0240, 0043
0240
0240, 0000
0278
0035, 0039, 0081, 0000,
0149
0240
0035, 0081
0037
0035, 0162, 0454
0035, 0037, 0048, 0039,
0047, 0240, 0000, 0104,
0209, 0046, 1162, 1262
0042
0048, 0067, 0043
0035, 0048
0000, 0072
0104, 0067, 0041, 0038
0037
0240
0035
0037, 0048, 0104, 0162,
0454, 1062, 1162, 1262
0184, 0209, 0002
0035, 0162, 0225, 0454,
1162
0035, 0037, 0240, 0042,
0038
0042
0035, 0209
0035, 0081
0037
0067
0240
0060
0072
0039
0046
0046
0035, 0162, 0454, 1162
0060, 0035, 0048, 0240,
0042, 0149
0000
0037
0037
0035, 0037, 0048, 0047,
0000, 0104,
0046
0039
0042
0240, 0045
0048, 0039
0000, 0067, 0209, 0041,
0271
0047, 0240, 0104, 0046
0184, 0045, 0121, 0043
0035, 0037, 0047, 0000,
0042, 0104, 0046
0045
0048
0072
0240
0072
0035, 0032, 0000, 0033
0035, 0081, 0000, 0043
0000
0240
0041
0000, 0041
0035, 0162
0035, 0037, 0000
0000
0045, 0043
0037, 0240
0240
0045
0038
0045
Videosonic
Wards
White Westinghouse
XR-1000
Yamaha
Zenith
0240
0060, 0035, 0048, 0047,
0081, 0240, 0000, 0042,
0072, 0149
0209, 0278
0035, 0000, 0072
0038
0039, 0000, 0209, 0033
TV/VCR Combos:
American High
Brocksonic
Colt
Curtis Mathis
Daewoo
Emerson
Funai
GE
Hitachi
HQ
Lloyds
MGA
Magnavox
Magnin
Memorex
Mitsubishi
Orion
Panasonic
Penney
Quasar
RCA
Sansui
Sanyo
Sears
Sharp
Sony
Symphonic
Zenith
0035 (TV - 0051)
0002, 0294
0072
0035 (TV - 0051)
0278
0002, 0294, 0479
0000
0035 (TV - 0051),
0060 (TV - 0047),
0048 (TV - 0093),
0240
0035 (TV - 0051),
0000
0000
0000
0240
0081 (TV - 0054),
0035 (TV - 0051),
0000
0240
0037,
0162 (TV - 0250)
0048 (TV - 0093)
0002, 0294, 0479
0035 (TV - 0051),
0162 (TV - 0250)
0035 (TV - 0051),
0240,
0162 (TV - 0250)
0035 (TV - 0051),
0162 (TV - 0250)
0060 (TV - 0047),
0035 (TV - 0051),
0048 (TV - 0093)
0000, 0479
0240
0000, 0037
0048 (TV - 0093)
0032 (TV - 0000)
0000
0000
Cable Converters:
ABC
Allegro
Archer
Bell & Howell
Century
Citizen
Comtronics
Contec
Eastern
Emerson
Everquest
Focus
Garrard
Gemini
General Instrument
GoldStar
Goodmind
Hamlin
Hitachi
Hytex
Jasco
Jerrold
Memorex
Movie Time
NSC
Oak
Optimus
Panasonic
0003, 0008, 0014, 0017,
0007, 0011, 0013
0153, 0315
0153, 0797
0014
0153
0153, 0315
0040
0019
0002
0797
0015,0040
0400
0153
0015
0476, 0276, 0011, 0810
0144, 0040
0797
0020, 0259, 0009, 0034
0011
0007
0015, 0153, 0315
0003, 0012, 0476, 0276,
0014, 0015, 0011, 0810
0000
0063
0063
0019, 0007
0021
0000, 0107, 0021
Paragon
Philips
Pioneer
Popular Mechanics
Pulsar
Quasar
RCA
Radio Shack
Recoton
Regal
Regency
Rembrandt
Runco
SL Marx
Samsung
Scientific Atlanta
Signal
Signature
Sprucer
Starcom
Stargate
Starquest
TV86
Teleview
Tocom
Toshiba
Tusa
Unika
United Artists
Universal
Viewstar
Zenith
Zentek
0000
0153
0144, 0533
0400
0000
0000
0021
0015, 0315, 0797, 0883
0400
0020, 0259
0002
0011
0000
0040
0144, 0040
0008, 0477, 0017, 0877
0015, 0040
0011
0021
0003, 0015
0015, 0040, 0797
0015
0063
0040
0012, 0013
0000
0015
0153
0007
0153, 0191
0063
0000, 0525
0400
Satellite or DBS Receivers:
AlphaStar
Chaparral
Echostar
Expressvu
General Instrument
HTS
Hitachi
Hughes Net. Sys.
JVC
Jerrold
Magnavox
Memorex
Next Level
Panasonic
Philips
Primestar
RCA
Radio Shack
Realistic
Sony
Star Choice
Toshiba
Uniden
Zenith
0772
0216
0775
0775
0627, 0361, 0869
0775
0819
0749
0775
0627, 0361
0724, 0722
0724
0869
0701
0724, 0722
0627, 0361
0566, 0143, 0392, 0855
0869
0052
0639
0869
0790
0724, 0722, 0052
0856
CD Players:
Aiwa
Burmester
California Audio Lab
Carver
DKK
Denon
Emerson
Fisher
Garrard
Genexxa
Harman/Kardon
Hitachi
JVC
Kenwood
Krell
LXI
Linn
MCS
MTC
Magnavox
Marantz
0157, 0124
0420
0029
0157, 0179, 0437
0000
0003, 0873
0305
0179, 0174
0420, 0393
0032, 0305
0157, 0173
0032
0072
0028, 0037, 0190, 0681,
0826
0157
0305
0157
0029
0420
0157, 0305
0029, 0157, 0180
58
APPENDIX A - REMOTE CONTROL CODES continued …
Mission
NSM
Nikko
Onkyo
Optimus
Panasonic
Parasound
Philips
Pioneer
Proton
QED
Quasar
RCA
Realistic
Rotel
SAE
Sansui
Sanyo
Scott
Sears
Sharp
Sherwood
Sony
Soundesign
Tascam
Teac
Technics
Victor
Wards
Yamaha
Yorx
0157
0157
0174
0101, 0868
0000, 0032, 0179, 0305,
0037, 0420, 0145, 0468,
0437
0029, 0303
0420
0157, 0626
0032, 0305, 0468, 0244
0157
0157
0029
0179, 0305, 0053, 0764
0179, 0420, 0180
0157, 0420
0157
0157, 0305
0179
0305
0305
0037, 0180, 0861
0180
0000, 0185, 0490
0145
0420
0420, 0393, 0174, 0180
0029, 0303
0072
0157, 0053
0036, 0187
0461
DVD Players:
Harman/Kardon
JVC
Kenwood
Magnavox
Mitsubishi
Onkyo
Panasonic
Philips
Pioneer
Proscan
RCA
Samsung
Sony
Technics
Theta Digital
Toshiba
Yamaha
Zenith
0582
0558
0534
0503
0521
0503
0490
0503, 0539
0525, 0571
0522
0522
0573
0533
0490
0571
0503
0490, 0545
0503, 0591
LDPlayers:
Denon
Mitsubishi
NAD
Pioneer
Sony
0059
0059
0059
0059
0193, 0201
Cassette Decks:
Aiwa
Carver
Denon
Harman/Kardon
JVC
Kenwood
Magnavox
Marantz
Onkyo
Optimus
Panasonic
Philips
Pioneer
Sansui
Sony
Technics
Victor
Wards
Yamaha
59
0029, 0197
0029
0076
0182, 0029
0244, 0273
0070
0029
0029
0135, 0282
0027, 0220
0229
0029
0027, 0220, 0099
0029
0243, 0170, 0291
0229
0273
0027
0097, 0094
Stereo Tuners or Receivers:
ADC
Adcom
Aiwa
Akai
Capetronic
Carver
Casio
Clarinette
Curtis Mathes
Denon
Emerson
Fisher
Garrard
Harman/Kardon
JBL
JVC
Kenwood
Koss
LXI
Linn
Lloyd’s
MCS
Magnavox
Marantz
Modulaire
NAD
Nakamichi
Onkyo
Optimus
Panasonic
Penney
Philips
Pioneer
Quasar
RCA
Realistic
Sansui
Sanyo
Scott
Sharp
Sherwood
Sony
Soundesign
Teac
Technics
Victor
Wards
Yamaha
Yorx
Zenith
0531
0616
0158, 0189, 0121, 0405
0224
0531
0189, 0008, 0042, 0360
0195
0195
0080
0004
0424
0042, 0219, 0360
0463, 0424
0110, 0189, 0891
0110
0074
0027, 0186, 0042, 0077
0424
0181
0189
0195
0039, 0346
0531, 0189, 0195, 0391
0039, 0189
0195
0320
0097, 0347
0135
0531, 0670, 0186, 0042,
0177, 0181, 0219, 0738,
0801, 1023
0039, 0309
0195
0189, 0391
0531, 0014, 0150, 0630,
0080, 1023
0039
0531, 0054, 0346, 0360,
0530
0195, 0163, 0181
0189, 0346
0219, 0801
0163, 0322
0186
0491, 0502
0158, 0168, 0474
0670
0463, 0163
0039, 0309, 0208
0074
0158, 0014, 0189, 0080,
0054
0176, 0186
0195
0857
Stereo Amplifiers:
Aiwa
Carver
Curtis Mathes
Denon
Harman/Kardon
JVC
Linn
Magnavox
Marantz
Panasonic
Philips
Pioneer
Sony
Technics
Victor
Wards
Yamaha
0406
0269
0300
0160
0892
0331
0269
0269
0269
0308
0269, 0892
0013, 0300
0220, 0689
0308
0331
0013
0354
Home Automation:
GE
Lutron
One For All
Radio Shack
Security System
0240
0597
0167
0240
0167
Universal X10
X10
0167
0167
DBS Audio Services:
Aiwa
Fisher
Harman/Kardon
JBL
JVC
Jerrold
RCA
Scientific Atlanta
Sony
Starcom
0010, 0159, 0404
0052
0477
0477
0073
0459, 0520
0056
0460
0010, 0159
0459
Video Accessories:
Archer
GC Electronics
Jebsee
Rabbit
Radio Shack
TeleCaption
0160
0160
0160
0081
0160
0171
SPECIFICATIONS
PREAMPLIFIER SECTION
Input Impedance
Direct . . . . . . . . . . . . . . . . . . . . . . . . . . . . . . . . . . . . . . . . . . . . . . . . . . . . . . . . . . . . . . . . . . . . 25 kΩ
All Others . . . . . . . . . . . . . . . . . . . . . . . . . . . . . . . . . . . . . . . . . . . . . . . . . . . . . . . . . . . . . . . . . 20 kΩ
Output Impedance
Main-RCA. . . . . . . . . . . . . . . . . . . . . . . . . . . . . . . . . . . . . . . . . . . . . . . . . . . . . . . . . . . . . . . . . 300 Ω
Other-RCA. . . . . . . . . . . . . . . . . . . . . . . . . . . . . . . . . . . . . . . . . . . . . . . . . . . . . . . . . . . . . . . . . . 51 Ω
XLR . . . . . . . . . . . . . . . . . . . . . . . . . . . . . . . . . . . . . . . . . . . . . . . . . . . . . . . . . . . . . . . . . . . . . . 600 Ω
Rated Input . . . . . . . . . . . . . . . . . . . . . . . . . . . . . . . . . . . . . . . . . . . . . . . . . . . . . . . . . . . . . . . . . . . . . 2.0 Vrms
Maximum Input
Direct . . . . . . . . . . . . . . . . . . . . . . . . . . . . . . . . . . . . . . . . . . . . . . . . . . . . . . . . . . . . . . . . . . 3.3 Vrms
Others. . . . . . . . . . . . . . . . . . . . . . . . . . . . . . . . . . . . . . . . . . . . . . . . . . . . . . . . . . . . . . . . . . 5.3 Vrms
Rated Output . . . . . . . . . . . . . . . . . . . . . . . . . . . . . . . . . . . . . . . . . . . . . . . . . . . . . . . . . . . . . . . . . . . . 2.0 Vrms
Maximum Output . . . . . . . . . . . . . . . . . . . . . . . . . . . . . . . . . . . . . . . . . . . . . . . . . . . . . . . . . . . . . . . . 5.3 Vrms
Headphone Output. . . . . . . . . . . . . . . . . . . . . . . . . . . . . . . . . . . . . . . . . . 100 mW into 32 Ω @ 0.2% THD+N
Volume Range
Main . . . . . . . . . . . . . . . . . . . . . . . . . . . . . . . . . . . . . . . . . . . . . . . . . . . . . . . . . -95.5 dB to +31.5 dB
Zone2 & Headphone . . . . . . . . . . . . . . . . . . . . . . . . . . . . . . . . . . . . . . . . . . . . -70.0 dB to +10.0 dB
Volume Resolution
Main . . . . . . . . . . . . . . . . . . . . . . . . . . . . . . . . . . . . . . . . . . . . . . . . . . . . . . . . . . . . . . . . . . . . . 0.5 dB
Zone2 & Headphone. . . . . . . . . . . . . . . . . . . . . . . . . . . . . . . . . . . . . . . . . . . . . . . . . . . . . . . 1.25 dB
Crossover
High-Pass Slope (Small Speaker Setting) . . . . . . . . . . . . . . . . . . . . . . 12 dB/octave (2nd order)
Low-Pass Slope (Subwoofer). . . . . . . . . . . . . . . . . . . . . . . . . . . . . . . . . 24 dB/octave (4th order)
Crossover Frequency (Adjustable) . . . . . . . . . . . . . . . . . . . . . . . . . . . . . . . . . . . . . . . . . 60-160 Hz
Controls
Bass Center Frequency . . . . . . . . . . . . . . . . . . . . . . . . . . . . . . . . . . . . . . . . . . . . . . . . . . . . . 200 Hz
Treble Center Frequency . . . . . . . . . . . . . . . . . . . . . . . . . . . . . . . . . . . . . . . . . . . . . . . . . . . . . 2 kHz
Range . . . . . . . . . . . . . . . . . . . . . . . . . . . . . . . . . . . . . . . . . . . . . . . . . . . . . . . . . . . . . . . . . +/- 12 dB
Channel Separation (at 20 kHz). . . . . . . . . . . . . . . . . . . . . . . . . . . . . . . . . . . . . . . . . . . . . . . . . . . . . . . 58 dB
Crosstalk Between Inputs (at 20 kHz). . . . . . . . . . . . . . . . . . . . . . . . . . . . . . . . . . . . . . . . . . . . . . . . . . 78 dB
MAIN (RCA & XLR)
Frequency Response
Direct Inputs . . . . . . . . . . . . . . . . . . . . . . . . . . . . . . . . . . . . . . . . . . . . . 20 Hz to 20 kHz +0, -0.2 dB
All Other Analog Inputs . . . . . . . . . . . . . . . . . . . . . . . . . . . . . . . . . . . . 20 Hz to 20 kHz +0, -0.4 dB
Digital Inputs. . . . . . . . . . . . . . . . . . . . . . . . . . . . . . . . . . . . . . . . . . . . . 20 Hz to 20 kHz +0, -0.3 dB
THD+N @ Rated Input & Output
Direct Inputs. . . . . . . . . . . . . . . . . . . . . . . . . . . . . . . . . . . . . . . . . . . . . . . . . . . . . . . . . . . . . . . 0.01%
All Other Analog Inputs. . . . . . . . . . . . . . . . . . . . . . . . . . . . . . . . . . . . . . . . . . . . . . . . . . . . . . 0.02%
Digital Inputs . . . . . . . . . . . . . . . . . . . . . . . . . . . . . . . . . . . . . . . . . . . . . . . . . . . . . . . . . . . . . . 0.02%
60
SPECIFICATIONS continued …
IMD (CCIF) @ 15 kHz & 16 kHz
Direct Inputs. . . . . . . . . . . . . . . . . . . . . . . . . . . . . . . . . . . . . . . . . . . . . . . . . . . . . . . . . . . . . . 0.001%
All Other Analog Inputs. . . . . . . . . . . . . . . . . . . . . . . . . . . . . . . . . . . . . . . . . . . . . . . . . . . . . 0.002%
Digital Inputs . . . . . . . . . . . . . . . . . . . . . . . . . . . . . . . . . . . . . . . . . . . . . . . . . . . . . . . . . . . . . 0.001%
S/N ref. 2.0 Vrms A-weighted
Direct Inputs. . . . . . . . . . . . . . . . . . . . . . . . . . . . . . . . . . . . . . . . . . . . . . . . . . . . . . . . . . . . . . . 98 dB
All Other Analog Inputs. . . . . . . . . . . . . . . . . . . . . . . . . . . . . . . . . . . . . . . . . . . . . . . . . . . . . . 96 dB
Digital Inputs . . . . . . . . . . . . . . . . . . . . . . . . . . . . . . . . . . . . . . . . . . . . . . . . . . . . . . . . . . . . . . 96 dB
ZONE2
Frequency Response . . . . . . . . . . . . . . . . . . . . . . . . . . . . . . . . . . . . . . . . . . . . . . 20 Hz to 20 kHz +0, -0.2 dB
THD+N (at Rated Input & Output) . . . . . . . . . . . . . . . . . . . . . . . . . . . . . . . . . . . . . . . . . . . . . . . . . . . . . 0.08%
IMD (CCIF at 15 kHz & 16 kHz). . . . . . . . . . . . . . . . . . . . . . . . . . . . . . . . . . . . . . . . . . . . . . . . . . . . . . . . 0.08%
S/N Ratio (ref. 2.0 Vrms A-weighted) . . . . . . . . . . . . . . . . . . . . . . . . . . . . . . . . . . . . . . . . . . . . . . . . . . 97 dB
FM TUNER SECTION
Sensitivity
50dB S/N. . . . . . . . . . . . . . . . . . . . . . . . . . . . . . . . . . . . . . . . . . . . . . . . . . 13 dBµ typ., 25 dBµ max.
IHF. . . . . . . . . . . . . . . . . . . . . . . . . . . . . . . . . . . . . . . . . . . . . . . . . . . . . . . 10 dBµ typ., 20 dBµ max.
Signal to Noise Ratio
Mono. . . . . . . . . . . . . . . . . . . . . . . . . . . . . . . . . . . . . . . . . . . . . . . . . . . . . . . 75 dB typ., 65 dB max.
Stereo . . . . . . . . . . . . . . . . . . . . . . . . . . . . . . . . . . . . . . . . . . . . . . . . . . . . . . 69 dB typ., 60 dB max.
Distortion
Mono . . . . . . . . . . . . . . . . . . . . . . . . . . . . . . . . . . . . . . . . . . . . . . . . . . . . . . . . 0.2% typ., 1.0% max.
Stereo. . . . . . . . . . . . . . . . . . . . . . . . . . . . . . . . . . . . . . . . . . . . . . . . . . . . . . . . 0.3% typ., 1.5% max.
Stereo Separation . . . . . . . . . . . . . . . . . . . . . . . . . . . . . . . . . . . . . . . . . . . . . . . . . . . . 40 dB typ., 25 dB min.
Adjacent Channel Selectivity (+/- 400 kHz). . . . . . . . . . . . . . . . . . . . . . . . . . . . . . . . 70 dB typ., 60 dB min.
Frequency Response . . . . . . . . . . . . . . . . . . . . . . . . . . . . . . . . . . . . . . . . . . . . . . . . 20 Hz to 15 kHz +/- 1 dB
AM TUNER SECTION
Sensitivity (20 dB S/N) . . . . . . . . . . . . . . . . . . . . . . . . . . . . . . . . . . . . . . . . . . . . . . 49 dBµ typ., 56 dBµ max.
Signal to Noise Ratio. . . . . . . . . . . . . . . . . . . . . . . . . . . . . . . . . . . . . . . . . . . . . . . . . . 50 dB typ., 43 dB min.
Distortion. . . . . . . . . . . . . . . . . . . . . . . . . . . . . . . . . . . . . . . . . . . . . . . . . . . . . . . . . . . . . 0.7% typ., 2.0% max.
One Signal Selectivity (+/- 10 kHz). . . . . . . . . . . . . . . . . . . . . . . . . . . . . . . . . . . . . . . 24 dB typ., 18 dB min.
Frequency Response (0 dB ref. 600 Hz) . . . . . . . . . . . . . . . . . . . . . . . . . . . . . . . . 40 Hz to 4 kHz +0, -13 dB
VIDEO SECTION
Bandwidth
Composite & S-Video . . . . . . . . . . . . . . . . . . . . . . . . . . . . . . . . . . . . . . . . . . . . . . 6 MHz +/- 0.3 dB
Component . . . . . . . . . . . . . . . . . . . . . . . . . . . . . . . . . . . . . . . . . 30 MHz +/- 0.4 dB, 50 MHz -3 dB
All video inputs and outputs are 75 Ω, 1.5 Vp-p, and work with either NTSC or PAL / SECAM signals
according to factory setting. Component inputs and outputs work with any standard requiring
bandwidth up to 30 MHz, including Component-RGB, HDTV, line doublers, and line quadruplers.
61
SPECIFICATIONS continued …
DIGITAL AUDIO
All digital audio inputs and outputs are to S/PDIF electrical (75 Ω, 0.5 Vp-p), S/PDIF optical (Toslink), or
AES / EBU (110 Ω, 5 Vp-p) standards as appropriate.
Processor . . . . . . . . . . . . . . . . . . . . . . . . . . . . . . . . . . . . . . . . . . . . . . . . . . . . . . . Motorola 56362 @ 108MHz
Audio Converters
Analog to Digital. . . . . . . . . . . . . . . . . . . . . . . . . . . . . . . . . . . . . . . . . . . . . . . . . . . . Crystal CS5396
Digital to Analog. . . . . . . . . . . . . . . . . . . . . . . . . . . . . . . . . . . . . . . . . . . . . . Burr-Brown PCM1728
CONTROL
RS-232 Connection. . . . . . . . . . . . . . . . . . . . . . . . . . . . . . . . . . . . . . One DB-9F connector (straight-wired)
RS-232 Port Configuration . . . . . . . . . . . Baud rate (1200, 2400, 4800, 9600, 19200, 38400, 57600, 115200),
8 data bits, 1 stop bit, no parity bits, flow control (RTS, CTS, NONE).
Trigger Outputs
Trigger 1, 2 . . . . . . . . . . . . . . . . . . . . . . . . . . . . . . . . . . . . . . . . . . . . . . . . . . . . . . . 50 mA @ 12 VDC
Trigger 3 . . . . . . . . . . . . . . . . . . . . . . . . . . . . . . . . . . . . . . . . . . . . . . . . . . . . . . . . 200 mA @ 12 VDC
Sequential Delay . . . . . . . . . . . . . . . . . . . . . . . . . . . . . . . . . . . . . . . . . . . . . . . . . . . . . . . . . . 250 ms
DIMENSIONS
Width
. . . . . . . . . . . . . . . . . . . . . . . . . . . . . . . . . . . . . . . . . . . . . . . . . . . . . . . . . . . . 17 1/4 inches (43.8 cm)
Height (including feet). . . . . . . . . . . . . . . . . . . . . . . . . . . . . . . . . . . . . . . . . . . . . . . . . . 5 7/8 inches (14.8 cm)
Depth (not including volume knob and rear panel jacks) . . . . . . . . . . . . . . . . . . . . 11 1/2 inches (29.2 cm)
Weight . . . . . . . . . . . . . . . . . . . . . . . . . . . . . . . . . . . . . . . . . . . . . . . . . . . . . . . . . . . . . . . . 23.7 lbs. (10.8 kg)
MISCELLANEOUS
Supply Voltage . . . . . . . . . . . . . . . . . . . . . . . . . . . . . . . . . . . . . . . . . . . . . . . . . . . . . . . . 105-130 V, 60 Hz only
Power Consumption . . . . . . . . . . . . . . . . . . . . . . . . . . . . . . . . . . . . . . . . . . . . . . . . . . . . . . . . . . 80 VA or less
Fuse
. . . . . . . . . . . . . . . . . . . . . . . . . . . . . . . . . . . . . . . . . . . . . . . . . . . . . . . . . . 1.0 Amp 5mm slow blow
62
THE BIG PICTURE FRONT PANEL
THE BIG PICTURE REAR PANEL
D E S I G N E D A N D M A N U FA C T U R E D B Y S O N I C F R O N T I E R S I N T E R N A T I O N A L
2 7 9 0 B R I G H T O N R O A D , O A K V I L L E , O N TAR I O , C A N A D A L 6 H 5 T 4 T E L : ( 9 0 5 ) 8 2 9 - 3 8 3 8 F A X : ( 9 0 5 ) 8 2 9 - 3 0 3 3
So n i c Fr o n t i e rs c a n b e r e a c h e d 9 : 0 0 a m t o 5 : 3 0 p m ( E . S . T. ) o r 2 4 h o u r s a d a y b y f a c si m i le
E-MAIL: [email protected]
INTE RNE T: w ww . s o n i c f ro n t i e r s . c o m / A N T H E M