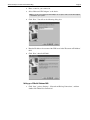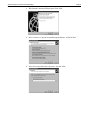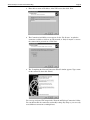
1
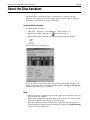
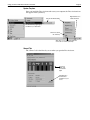
Diva 2430 ADSL Modem
User’s Guide
www.eicon.com
Fourth Edition (March 2001)
206-362-04
Diva and Eicon are either registered trademarks or trademarks of Eicon Networks Corporation.
Microsoft, Windows, and Windows NT are either registered trademarks or trademarks of
Microsoft Corporation in the United States and/or other countries.
Adobe and Acrobat are either registered trademarks or trademarks of Adobe Systems Incorporated
in the United States and/or other countries.
Apple and Macintosh are trademarks of Apple Computer, Inc. in the United States and/or other
countries.
IBM is a registered trademark of IBM Corporation in the United States and/or other countries.
All other brand and product names are trademarks or registered trademarks of their respective
owners.
Changes are periodically made to the information herein; these changes will be incorporated into
new editions of the publication. Eicon Networks Corporation may make improvements and/or
changes in the products and/or programs described in this publication at any time.
If you have comments on this manual or the products it describes, address them to:
Eicon Networks Corporation
Attention: Technical Publications
9800 Cavendish Blvd.
Montreal, Quebec
Canada H4M 2V9
Eicon Networks Corporation may use or distribute whatever information you supply in any way it
believes appropriate without incurring any obligations to you.
Eicon Networks Corporation is a business unit of i-data international a-s.
Copyright © 1999-2001 Eicon Networks Corporation. All rights reserved, including those to
reproduce this publication or parts thereof in any form without permission in writing from Eicon
Networks Corporation.
2
Contents
Introduction ...............................................................................................................................4
Introducing the Diva 2430 ADSL Modem................................................................................................................. 5
Package Contents .................................................................................................................................................... 6
Setup .......................................................................................................................................... 7
Overview .................................................................................................................................................................. 8
Connecting Microfilters ............................................................................................................................................ 9
USB Setup ............................................................................................................................................................. 10
Ethernet Setup ....................................................................................................................................................... 15
Optional: Install the Diva Assistant......................................................................................................................... 18
LAN Setup.............................................................................................................................................................. 20
Configuring Settings via the Web Interface............................................................................................................ 22
TCP/IP Setup ......................................................................................................................................................... 26
Troubleshooting...................................................................................................................................................... 31
Using your Diva 2430 ..............................................................................................................33
About the Diva Assistant ........................................................................................................................................ 34
Indicator Lights....................................................................................................................................................... 37
Resetting the Device .............................................................................................................................................. 38
Web-based Configuration Interface....................................................................................... 39
Overview ................................................................................................................................................................ 40
Starting the Web-based Configuration Interface .................................................................................................... 41
Saving and restoring configuration files ................................................................................................................. 43
Upgrading Firmware............................................................................................................................................... 44
Resetting to Factory Defaults ................................................................................................................................. 46
Advanced Topics..................................................................................................................... 47
Security .................................................................................................................................................................. 48
Virtual Private Networking...................................................................................................................................... 53
Specifications and Regulatory Information ..........................................................................58
Specifications ......................................................................................................................................................... 59
Regulatory Information........................................................................................................................................... 62
Index ......................................................................................................................................... 67
Page 3
Introduction
In This Section
Introducing the Diva 2430 ADSL Modem.................................................................5
Package Contents ........................................................................................................6
Page 4
Introduction: Introducing the Diva 2430 ADSL Modem
Page 5
Introducing the Diva 2430 ADSL Modem
The Diva 2430 ADSL Modem provides fast access to the Internet via ADSL and is
perfect for home users and small office / home office users. It is easy to set up and has
many features that will help you get the most out of your ADSL line.
The following provides a brief overview of the many features of the Diva 2430.
Setup and Configuration Features
• Easy to Set Up: Installation is a simple and straightforward procedure. You will be
up and running in just a few minutes.
• Web-base Configuration: If configuration is required, the Diva 2430 settings can
be changed using a web browser.
ADSL and Network Features
• Support for Full-rate and G.Lite ADSL: The Diva 2430 is an ADSL (Asymmetric
Digital Subscriber Line) device supporting transfer of up to 8 Mbps. Two popular
versions of ADSL are built in to the Diva 2430, Full-rate and G.Lite.
Full-rate (G.992.1 and T1.413 Issue 2) has a maximum download rate of 8 Mbps and
a maximum upload rate of 820 Kbps. G.Lite (G.992.2) has a maximum download
rate of 1.5 Mbps and a maximum upload rate of 512 Kbps.
Both Full-rate and G.Lite on the Diva 2430 can work with or without a splitter. See
Package Contents on page 6 for more information on how Internet access is
provided via ADSL.
• ATM Support: The Diva 2430 supports up to eight simultaneous virtual circuit (VC)
connections.
• DHCP Support: The computers connected to the Diva 2430 must be configured as
DHCP clients. The Diva 2430 then passes on DHCP requests to your provider’s
DHCP server, but can also assign IP addresses if your provider’s DHCP server is not
available.
Hardware Features
• USB and Ethernet Ports: The Diva 2430 can connect to your computer through
either a USB port or an Ethernet port. Setup via either port is simple and easy. You
can also connect the Diva 2430 to an Ethernet hub, giving all computers on the
network access to the Internet.
• Simultaneous Port Usage: The USB and Ethernet ports can be used simultaneously.
You can connect one computer to the Ethernet port and another to the USB port, and
both devices can access the ADSL line when needed or exchange data between the
two local computers.
• Upgradable Firmware: The Diva 2430’s firmware (a set of software instructions
that tells the device how to operate) is stored in flash memory on the device. This
makes it easy to upgrade the firmware should it become necessary to do so.
Introduction: Package Contents
Page 6
Package Contents
Your package should contain the following.
Diva 2430
Ethernet Cable (Yellow)
USB Cable
ADSL Phone Cable
Power Adapter
CD-ROM
Quickstart
Microfilters*
Phone Adapter
(where required)
In certain countries, a
phone adapter is provided
to enable you to connect
your Diva 2430 to the
telephone outlet standard
for your region.
*Microfilters may or may not be included with your package. If your ADSL line does
not use a splitter, microfilters must be connected to all analog devices to reduce
background noise. Contact your provider for more details.
Setup
In This Section
Overview.......................................................................................................................8
Connecting Microfilters ..............................................................................................9
USB Setup ..................................................................................................................10
Ethernet Setup ...........................................................................................................15
Optional: Install the Diva Assistant.........................................................................18
LAN Setup..................................................................................................................20
Configuring Settings via the Web Interface............................................................22
TCP/IP Setup .............................................................................................................26
Troubleshooting .........................................................................................................31
Page 7
Setup: Overview
Page 8
Overview
This chapter explains how to connect the Diva 2430 to a single computer or to a local
area network.
Connecting to Both Ports
Once you connect a computer to either the USB or Ethernet port, you can connect a
second computer to the unused port without reconfiguring the device. However, to
ensure proper operation, connect only one computer and verify that the device is
working correctly before connecting a second computer.
Hardware Requirements
Connection Type
Requirements
Computer via
USB port
• An available USB Port.
• Windows® 98, Windows 2000, or Windows Me. The
Diva 2430 does not support USB for Windows 95,
Macintosh®, or other systems.
Computer via
Ethernet port
• Any computer and operating system capable of supporting a
10BASE-T Ethernet card and the TCP/IP protocol.
• A 10BASE-T Ethernet network interface card, properly
installed and configured to use the TCP/IP protocol. Consult
the documentation that came with your card for instructions
on how to do this. A 100 Mbps Ethernet card can only be
connected to the Diva 2430 if it supports auto-sensing.
• TCP/IP communications protocol installed and configured.
In addition, the normal Windows setup includes the installation of the Diva Assistant.
The Diva Assistant software is a Windows-only application that facilitates the
management of the Diva 2430. To install and run this software you will need an
IBM®-compatible 486 or Pentium-based computer equipped with a CD-ROM drive,
running Microsoft® Windows 95 or later.
Software Requirements
The Diva 2430 is configured using a web browser. Minimum requirements are
Netscape 4.0 or Internet Explorer 4 (or later versions). An installer for Internet Explorer
is included on the Diva 2430 CD-ROM for computers running Windows.
(Windows NT® 4.0 requires SP3 or later, available at http://www.microsoft.com/.)
Setup: Connecting Microfilters
Page 9
Connecting Microfilters
Before installing the Diva 2430, be sure to install microfilters on all telephone devices,
if required. Contact your ADSL provider if you are unsure if microfilters are needed
for your installation.
About Microfilters
A microfilter is a small device designed to reduce interference between ADSL signals
and your regular telephone signals.
The use of microfilters is only required if your ADSL modem and your telephone
devices share the same wiring. This is known as ‘splitterless’ ADSL. Without
microfilters, ADSL may cause background noise on your phone, Additionally, ADSL
data transfer may be interrupted by phone calls.
If microfilters are required, you must install one on each telephone device that shares
the same wiring as the ADSL signals, including telephones, answering machines, and
fax machines.
If your installation uses a splitter, it should not be necessary to use microfilters as
ADSL data is carried on separate wiring up to the point of entry to your location.
Your package may or may not include a microfilter. If you are unsure as to how to
connect the microfilter, or whether or not one is necessary, contact your
ADSL provider.
Connecting the Microfilters
To install the microfilter, plug your phone into the microfilter, then plug the microfilter
into your telephone jack, as shown below.
You must use one microfilter per telephone device in your location. Do not install a
microfilter on the cable that connects your ADSL device to the telephone jack.
Setup: USB Setup
Page 10
USB Setup
Note: The USB port can only be used with systems running Windows 98,
Windows 2000, or Windows Me.
If you are using Windows 98, Windows 2000, or Windows Me, you have the option of
connecting the device to your computer’s USB port. This is described in the following
procedure.
Once set up, you can then connect a second computer that supports Ethernet to the
Diva 2430’s Ethernet port. To ensure a smooth installation, first install a computer
using one port only, to make sure the device is working properly.
Note: The Diva 2430 does not support USB under Windows 95, Macintosh, or other operating
systems. For these systems, see Ethernet Setup on page 15.
Setup involves the following steps:
Step 1: Connect the Cables ................................................................... 11
Step 2: Install USB Drivers................................................................... 12
Step 3: Test Internet Access.................................................................. 14
Setup: USB Setup
Page 11
Step 1: Connect the Cables
Consult the following diagram when connecting the cables. Do not connect one
computer to both ports on the device.
ADSL
Cable
USB
Cable
Power
Adapter
Procedure
Leave your computer on during the installation. Once you connect the Diva 2430 to
your computer, Windows will automatically detect the device and request device
driver information, which is provided on the Diva 2430 CD-ROM.
You may be required to insert your Windows installation CD-ROM during installation.
1.
Insert the Diva 2430 CD-ROM into your CD-ROM drive.
2.
Connect the Diva 2430 to an electrical outlet using the power adapter. The power
connector is labelled
on the Diva 2430.
3.
Connect the Diva 2430 to your ADSL telephone outlet (RJ11) using the supplied
ADSL cable. The ADSL port is labelled
on the Diva 2430.
When you first connect the ADSL cable, the ADSL light on the front panel will
flash to indicate that the Diva 2430 is attempting to establish an ADSL connection.
When the ADSL light stops flashing and stays on, the ADSL connection has been
established. If the ADSL light continues to flash, the Diva 2430 is having difficulty
establishing the ADSL connection.
Note: Do not install a microfilter between the Diva 2430 and the telephone jack.
Microfilters, if necessary, are for use between regular telephone devices and telephone
jacks only.
4.
Connect the flat end of the USB cable into any available USB port on your computer,
then plug the other end into the Diva 2430’s USB port. The USB port is labelled
on the Diva 2430.
5.
Once the USB cable is connected, Windows recognizes the device. See Step 2:
Install USB Drivers on the following page to continue.
Setup: USB Setup
Page 12
Step 2: Install USB Drivers
1.
Once the USB cable is connected, the ‘New Hardware Found’ window appears,
followed by the ‘Add New Hardware Wizard’ window.
2.
Click ‘Next’ to begin.
3.
Select ‘Search for the best driver for your device’ then click ‘Next’.
Select this option
4.
Select ‘Specify a location’ and clear other options.
Clear these options
Select this option
Setup: USB Setup
Page 13
5.
Click ‘Browse’ and go to the ‘USB’ folder on the Diva 2430 CD-ROM.
• If you are using Windows 98, select ‘WIN98’.
• If you are using Windows 2000, select ‘WIN2000’.
• If you are using Windows Millennium Edition, select ‘WINME’.
6.
Click ‘OK’, then click ‘Next’. Windows identifies the driver as an ‘Eicon Diva 2430
Adapter’.
7.
Click ‘Next’ to begin installation of the driver.
Note: You may be asked to insert your Windows installation CD-ROM while the driver is
being installed. If a version conflict is reported (a file being copied is older than an existing
file), it is recommended that you keep the existing file.
8.
Once installation is complete, click ‘Finish’.
If you are asked to restart your computer, do so.
9.
To continue, go to Step 3: Test Internet Access on the following page.
Setup: USB Setup
Page 14
Step 3: Test Internet Access
The Diva 2430’s default settings may already grant you Internet access. Try accessing
an external web site using your browser, such as the Diva 2430 web site at:
http://www.eicon.com
• If successful, you do not need to change any settings.
• If you receive a ‘page not found’ or similar error, reboot your computer and try again.
Your computer may not have acquired an IP address from your provider’s DHCP
server the first time you installed the device; rebooting will force a new request.
• Internet access from some providers may require that you install PPP over Ethernet
(PPPoE) software (not included with the Diva 2430). Contact your provider for more
information.
• If you still cannot access the Internet, you will need to inspect the Diva 2430’s
configuration settings. This procedure is described in Configuring Settings via the
Web Interface on page 22. As most settings depend on the provisioning of your
ADSL line, you should contact your ADSL provider to determine what the settings
should be.
Setup: Ethernet Setup
Page 15
Ethernet Setup
The procedure in the following section describes how to set up the Diva 2430 using
any system equipped with an Ethernet card and capable of communicating via the
TCP/IP protocol. This includes Windows, Macintosh, and Linux. This procedure
assumes your Ethernet card is installed according to the manufacturer’s instructions.
In This Section
Step 1: Connect the cables .................................................................... 16
Step 2: Test Internet Access.................................................................. 17
Setup: Ethernet Setup
Page 16
Step 1: Connect the cables
Consult the following diagram when connecting the cables. Do not install one
computer to both ports on the device.
ADSL
Cable
Ethernet
Cable
(yellow)
Power
Adapter
Procedure
1.
Connect the Diva 2430 to an electrical outlet using the power adapter. The power
connector is labelled
on the Diva 2430.
2.
Connect the Diva 2430 to your ADSL telephone outlet (RJ11) using the supplied
ADSL cable. The ADSL port is labelled
on the Diva 2430.
When you first connect the ADSL cable, the ADSL light on the front panel will
flash to indicate that the Diva 2430 is attempting to establish an ADSL connection.
When the ADSL light stops flashing and stays on, the ADSL connection has been
established. If the ADSL light continues to flash, the Diva 2430 is having difficulty
establishing the ADSL connection.
Note: Do not install a microfilter between the Diva 2430 and the telephone jack.
Microfilters, if necessary, are to be installed between regular telephone devices
and telephone jacks only.
3.
Connect the Diva 2430 to the Ethernet card on your computer using the supplied
yellow Ethernet cable. The Ethernet port is labelled
on the back of the
Diva 2430.
If properly connected to your computer, the Diva 2430 Ethernet status light (on the
front panel) should light up.
4.
Verify that you have configured your computer to act as a DHCP client (see TCP/IP
Setup on page 26 for more information). Restart your computer, if necessary, to
force the settings to take effect.
5.
To continue, go to Step 2: Test Internet Access on the following page.
Setup: Ethernet Setup
Page 17
Step 2: Test Internet Access
The Diva 2430’s default settings may already grant you Internet access. Try accessing
an external web site using your browser, such as Eicon Networks’s site at:
http://www.eicon.com
• If successful, you do not need to change any settings.
• If you receive a ‘page not found’ or similar error, reboot your computer and try again.
Your computer may not have acquired an IP address from your provider’s DHCP
server the first time you installed the device; rebooting will force a new request.
• Internet access from some providers may require that you install PPP over Ethernet
(PPPoE) software (not included with the Diva 2430). Contact your provider for more
information.
• If you still cannot access the Internet, you will need to inspect the Diva 2430’s
configuration settings. This procedure is described in Configuring Settings via the
Web Interface on page 22. As most settings depend on the provisioning of your
ADSL line, you should contact your ADSL provider to determine what the settings
should be.
Setup: Optional: Install the Diva Assistant
Page 18
Optional: Install the Diva Assistant
The Diva Assistant provides convenient access to the web-based configuration
interface via the Windows system tray and also includes online help and utilities. The
Diva Assistant also provides status information for the device. However, you are not
required to use this software in order to access the Internet through your ADSL line.
Note: The Diva Assistant is very useful when setting up the Diva 2430 on a LAN.
In particular, the Diva Assistant will detect the device over the LAN and ask if you
want to change its LAN IP address. For more information, see LAN Setup on
page 20.
Procedure
1.
You must restart your computer once installation is complete. It is suggested that
you quit all running applications.
2.
Insert the Diva 2430 CD-ROM into your computer’s CD-ROM drive. The setup
program should start automatically.
Note: If the setup program does not start on its own, double-click ‘My Computer’ on your
desktop, double-click your CD-ROM drive, then double-click the ‘SETUP.EXE’ file.
3.
From the ‘Welcome’ screen, click ‘Installation’, then click ‘Diva Software’.
4.
The Diva 2430 Setup Wizard starts.
Setup: Optional: Install the Diva Assistant
Page 19
5.
Click ‘Next’ and follow the onscreen instructions.
6.
In the ‘Installation Complete’ window, click ‘Finish’.
7.
After you click ‘Finish’, you will see a message stating that you must restart your
computer before launching the software. Click ‘Yes’.
You may encounter problems with the Diva Assistant if you do not restart your
computer after installation.
Restarting also forces your computer to request a new IP address, which is supplied
by your provider or the device itself. Without the new IP address, you will not be
able to communicate with your device.
8.
Once you restart, the Diva Assistant icon will appear in the system tray. To start the
software, double-click on this icon. For more information on using the Diva
Assistant, see About the Diva Assistant on page 34.
Setup: LAN Setup
Page 20
LAN Setup
Installing the Diva 2430 on an existing LAN can be extremely simple, or quite
challenging, depending on the complexity of your existing LAN setup. To help you
successfully integrate the Diva 2430 into your setup, this section provides important
points to keep in mind when setting up on a LAN.
However, due to the wide range of networking equipment and topologies that are in
use worldwide, your configuration needs may fall outside the strategy presented here.
In this case, you should contact your network administrator, or other support person to
help you with your installation.
Install using a single computer recommended
Before installing the Diva 2430 on your LAN, it is recommended that you configure
the device using a single non-networked computer. This lets you verify that your
ADSL line is functioning and that you are able to successfully communicate with the
Diva 2430. This also lets you easily change the device IP address if required.
DHCP Server
The Diva 2430 has a built-in DHCP server. When you drop the Diva 2430 into a LAN,
the Diva 2430 senses if another DHCP server exists and de-activates its own DHCP
services. To-reactivate the DHCP server, disable the other server and reset the
Diva 2430.
Cables
To connect the Diva 2430 to a network hub, you need to use a standard,
straight-through Ethernet cable (sold separately). The yellow cable included with your
package is a crossover cable and is used for connecting the Diva 2430 directly to a
computer.
PPPoE Software
If you need to use a PPP over Ethernet client for accessing the Internet, the PPPoE
client must be installed on each computer that requires access.
Changing the LAN IP address
If your LAN uses static IP addressing, or if you are using an existing DHCP server,
you must assign the Diva 2430 a unique IP address before connecting the device to the
LAN. Ensure that this IP address is not going to be assigned to another network
Setup: LAN Setup
Page 21
device. The LAN IP address is changed through the web interface. If you have a
computer on your LAN that is using Windows 95 or later, you can also use the Diva
Assistant.
Diva Assistant
The Diva Assistant (for Windows 95 or later) can detect the
Diva 2430 over a LAN and can change the LAN IP address for
you, without having to change your own IP address settings.
Follow these steps:
1.
2.
3.
4.
5.
Web Interface
Connect the Diva 2430 to your LAN using a straight-through
cable (sold separately).
Install the Diva Assistant (see Optional: Install the Diva
Assistant on page 18).
Restart your computer.
Right-click on the Diva Assistant icon that appears in the
system tray.
Select ‘Network Wizard’ and follow the onscreen
instructions.
For all computers, you can also use the web interface to change
the LAN IP setting.
1.
Temporarily change the TCP/IP settings on your computer
so that it is set to the IP address 192.168.l.2.
2.
Access the web interface (see Starting the Web-based
Configuration Interface on page 41).
3.
Click ‘System Settings’.
4.
Enter a new IP address in the ‘LAN IP Address’ field.
5.
Click ‘Save’.
Note: Once you click ‘Save’, you will lose contact with the
device. This is normal.
6.
Return your TCP/IP settings back to the way their original
state.
7.
To re-access the web interface, click ‘File’, ‘Open’ in your
web browser, then enter the new IP address.
Your computer must be on the same subnet as the Diva 2430 in
order to communicate through TCP/IP. For example, if the new
device IP address is 192.100.1.1, your computer must be set to
192.100.1.x, with x being any number from two to 255.
However, if your computer is set to acquire its IP address
dynamically from a DHCP server, you need only restart your
computer (or reset the IP address manually using ‘winipcfg’
with Windows 9x or ‘ipconfig/renew’ for Windows 2000/NT).
The Diva 2430 will assign the new address.
Setup: Configuring Settings via the Web Interface
Page 22
Configuring Settings via the Web Interface
The Diva 2430’s settings can be changed via the web-based configuration interface.
These configuration menus are accessed via a web browser.
Editing your configuration settings may not be necessary if the settings on the
Diva 2430 are already compatible with the ADSL network to which you are
connected. To test if you now have Internet access, try accessing an external web site
using your browser. For example, you could try accessing Eicon Networks’s web site
at the following URL:
http://www.eicon.com
If you are not able to bring up an external web page, you may need to change the
Diva 2430’s settings. However, the setting changes you make must correspond with
your provider’s network. Contact your provider for this information before making
any changes.
Logging into the Web-based Configuration Interface
1.
If you installed the Diva Assistant, launch the software, click the ‘Tools’ tab, then
click ‘Configure’.
If you do not have access to the Diva Assistant, start your web browser and click
‘File’, ‘Open’. Type 192.168.1.1 and click ‘OK’.
Note: The IP address 192.168.1.1 is the default IP address for the Diva 2430. If you have
changed the IP address, you must use the new address.
Setup: Configuring Settings via the Web Interface
2.
Page 23
The ‘Log in’ page appears. Click ‘Log in’ to see the main menu. (By default the
Diva 2430 has no password.)
Note: If you cannot access the ‘Log in’ page, see Troubleshooting on page 31.
3.
The main menu appears.
To access any of the configuration menus, click on the links below the
‘Administration’ bar.
Using the Configuration Menus
• Each configuration menu has a ‘Save’ button. For the ‘ADSL’, ‘System’, and
‘Security’ menus, the changes you make become active once you click ‘Save’.
However, for changes made in the ‘ATM’ menu to take effect, you must also reset
the device by clicking ‘Reset’.
• If you click ‘Cancel’, you are returned to the main menu, and any changes you made
to settings without saving are lost.
• Click ‘Reset Form’ to return all settings in the current page to the values they had
when you initially opened the page.
• To access online help, click on a setting’s name. A help window will appear with a
description of that setting.
Setup: Configuring Settings via the Web Interface
Page 24
• If this is the first time you have configured the device, you may need to wait up to
one minute (after making changes) before being able to access the Internet. This is
because your computer may have initially been assigned its network settings from
the Diva 2430, when the ADSL line was down and your provider’s server was not
available. If, after a minute, it is still not working, reboot your computer in order to
force a new DHCP request.
The following pages contain brief descriptions of each menu. Click on a setting name
for more information on that particular setting.
ATM Settings
The ‘ATM Settings’ menu allows you to edit the Virtual Channel (VC) connection
parameters. When you first open this menu, VC1 is displayed. The default settings
should work for the ADSL network to which you are connected; however, these
settings are the first to check if you are having problems connecting to the Internet.
To change a VC, select a VC number from the drop down menu at the top left of the
window. For a VC to be used, the ‘Enable this VC’ option must be checked.
Note: If you are not able to access the Internet, check that your VC settings match your
provider’s specifications.
Once you save your changes, you must reset the device (by clicking the ‘Reset’ button
on the main menu) for the new settings to take effect. (For other menus, settings take
effect immediately upon saving.)
If this is the first time you have configured the device, you may need to wait up to one
minute before being able to access the Internet. This is because your computer may
have initially been assigned its network settings from the Diva 2430, as the ADSL line
was down and your provider’s server was not available. If, after a minute, it is still not
working, reboot your computer in order to force a new DHCP request.
Setup: Configuring Settings via the Web Interface
Page 25
ADSL Settings
This menu allows you to choose the ADSL mode (‘G.lite’ or ‘Multimode’). It is
recommended that you keep the mode set to ‘Multimode’ as this includes attempts to
negotiate ‘Full-rate (G.992.1)’, ‘G.Lite (G.992.2)’, and ‘ANSI T1.413’.
The new settings take effect immediately upon clicking ‘Save’.
The two settings pages you just visited are the only two that affect access to the
Internet. If you still cannot access the Internet, see Troubleshooting on page 31.
Setup: TCP/IP Setup
Page 26
TCP/IP Setup
To be able to communicate with the Diva 2430 via Ethernet, your computer must have
TCP/IP installed and configured to act as a DHCP client. This allows your computer
to acquire its IP address and other settings from your provider’s DHCP server
dynamically.
The following procedures describe how to set your TCP/IP settings for Windows 95,
Windows 98, Windows NT 4.0, Windows 2000, and Macintosh (Mac OS 8). For other
platforms, consult the documentation for your operating system.
• Windows 95/98 ......................................................................................................27
• Windows NT 4.0....................................................................................................28
• Windows 2000 .......................................................................................................29
• Macintosh (Mac OS 8 or later) ............................................................................30
Setup: TCP/IP Setup
Page 27
Windows 95/98
The following procedure describes how to verify and install TCP/IP on Windows 95 or
Windows 98. If TCP/IP is already installed on your system, go to Configuring
TCP/IP (below). Note that if you have more than one adapter installed on your
system, you will have to use the adapter that is in use by the Diva 2430.
Procedure
1.
Click ‘Start’, ‘Settings’, ‘Control Panel’.
2.
Double-click the ‘Network’ icon. The ‘Network’ dialog box appears. By default,
the ‘Configuration’ tab is displayed.
• If ‘TCP/IP’ is not listed for your network adapter in the ‘Components’ list, go to
Installing TCP/IP (below).
• If ‘TCP/IP’ is listed for your network adapter in the ‘Components’ list, then the
protocol is already installed. Go to Configuring TCP/IP (below).
Installing TCP/IP
1.
Click ‘Add’. The ‘Select Network Component Type’ dialog box appears.
2.
Select ‘Protocol’, then click ‘Add’. The ‘Select Network Protocol’ window appears.
3.
In the ‘Manufacturer’ box, select ‘Microsoft’.
In ‘Network Protocols’, select ‘TCP/IP’.
4.
Click ‘OK’. Once installation is complete, you are returned to the Network window.
5.
Do not click the ‘OK’ button yet; next you will verify your TCP/IP settings.
Go to Configuring TCP/IP (below).
Configuring TCP/IP
1.
In the list of components, select ‘TCP/IP’ for your network card, then click
‘Properties’. The ‘TCP/IP Properties’ dialog box appears.
2.
Click the ‘IP Address’ tab and select ‘Obtain an IP address automatically’. This
defines your machine as a DHCP client.
3.
Click the ‘WINS Configuration’ tab and select ‘Use DHCP for WINS Resolution’.
4.
Click the ‘Gateway’ tab and remove all existing gateways.
5.
Click the ‘DNS Configuration’ tab and select ‘Disable DNS.’ This instructs your
computer to obtain DNS server information via DHCP.
6.
Click ‘OK’, then click ‘OK’ again.
Note: You may be asked to insert your original Windows installation CD-ROM.
7.
Click ‘Yes’ when prompted to restart your system.
Setup: TCP/IP Setup
Page 28
Windows NT 4.0
The following procedure describes how to install TCP/IP on Windows NT 4.0.
If TCP/IP is already installed on your system, see Configuring TCP/IP (below). Note
that if you have more than one adapter installed on your system, you will have to use
the adapter that is in use by the Diva 2430.
Procedure
1.
Click ‘Start’, ‘Settings’, ‘Control Panel’.
2.
Double-click the ‘Network’ icon. The Network dialog box appears.
3.
Click the ‘Protocols’ tab.
• If ‘TCP/IP’ is not listed, go to Installing TCP/IP (below).
• If ‘TCP/IP’ is listed, then the protocol is already installed. Go to Configuring
TCP/IP (below).
Installing TCP/IP
1.
From the ‘Protocols’ tab, click ‘Add’.
2.
Select ‘TCP/IP protocol’ as your network protocol, then click ‘OK’.
3.
Click ‘Yes’ to use DHCP.
4.
When prompted, insert the original Windows NT installation CD and enter d:\i386
(where d: is the drive letter of your CD drive), and click ‘Continue’.
5.
Do not click the ‘OK’ button yet; next you will verify your TCP/IP settings.
Go to Configuring TCP/IP (below).
Configuring TCP/IP
1.
Click the ‘Protocols’ tab.
2.
Select ‘TCP/IP protocol’, then click ‘Properties’.
3.
Select ‘Obtain an IP address from a DHCP server’.
4.
Click the ‘DNS’ tab. Delete any DNS addresses are configured.
5.
Click ‘OK’.
6.
Restart your computer if requested to do so.
Setup: TCP/IP Setup
Page 29
Windows 2000
Windows 2000 automatically created a network adapter profile (named ‘Local Area
Connection’ by default) when the adapter was installed. However, the TCP/IP protocol
is not installed by default. You must check if this profile has the Internet Protocol
(TCP/IP) installed and properly configured. Note that if you have more than one
adapter installed on your system, you will have to use the adapter that is in use by the
Diva 2430.
Procedure
1.
Click ‘Start’, ‘Settings’, ‘Network and Dial-up Connections’, then ‘Local Area
Connection’. (Note the name of this connection may be different as it can be changed
by the user.) The status window for this adapter is displayed.
2.
Click ‘Properties’. The properties window for this adapter is displayed.
• If ‘Internet Protocol (TCP/IP)’ is not listed in the ‘Components’ list, go to
Installing TCP/IP (below).
• If ‘Internet Protocol (TCP/IP)’ is listed in the ‘Components’ list, then the protocol
is already installed. Go to Verifying TCP/IP Settings (below).
Installing TCP/IP
1.
Click the ‘Install’ button. The ‘Select Network Component Type’ window appears.
2.
Select ‘Protocol’ and click ‘Add’. A list of available protocols appears.
3.
Select ‘Internet Protocol (TCP/IP)’ then click ‘OK’. Once the installation is
complete, you are returned to the properties window.
4.
Do not click the ‘Close’ button yet; next you will verify your TCP/IP settings.
Continue with Verifying TCP/IP Settings (below).
Verifying TCP/IP Settings
1.
Select ‘Internet Protocol (TCP/IP)’, then click ‘Properties’.
2.
The settings should be ‘Obtain an IP address automatically’ and ‘Obtain DNS server
automatically’.
3.
Click ‘OK’, then ‘OK’ again, then click ‘Close’.
4.
Restart your computer if requested to do so.
Setup: TCP/IP Setup
Page 30
Macintosh (Mac OS 8 or later)
TCP/IP is installed by default with your Mac OS. If it is not in the Control Panels
folder, reinstall it from your System Installation CD.
Procedure
1.
From the Apple menu, select ‘Control Panels’.
2.
Select ‘TCP/IP’.
3.
Set ‘Connect via’ to ‘Ethernet’.
4.
Set ‘Configure’ to ‘Using DHCP Server’.
5.
Close the TCP/IP control panel.
6.
Click ‘Yes’ to save the changes.
It is not necessary to restart your computer after making these changes.
Setup: Troubleshooting
Page 31
Troubleshooting
I can’t access the Internet.
• Make sure all cables are connected properly.
• If the power light is not on, verify that the power cable is connected properly.
• If the ADSL light is not blinking, verify that the phone cable is connected properly.
• Make sure your TCP/IP settings are correct. See TCP/IP Setup on page 26.
• Some providers require that you use PPPoE software to establish a connection with
the network. Contact your provider for more information.
• Press the ‘Reset’ button on the device once quickly.
• Make sure you have rebooted your computer after the ADSL light has come on and
has stopped flashing.
• Verify the VC settings using the configuration interface (see Configuring Settings
via the Web Interface on page 22).
I can’t access the web-based configuration interface.
• Make sure you have rebooted your computer.
• Make sure your TCP/IP settings are correct. See TCP/IP Setup on page 26.
• The device IP address can be changed; verify that you are using the correct IP address
if connecting through a browser. Ask your administrator or service provider for more
information.
• Try to ping the device IP address (the default is 192.168.1.1). (Windows users can
use the command PING 192.168.1.1; Macintosh users will have to acquire a
third-party PING program such as MacTCP Watcher.)
If you receive a reply, your TCP/IP settings are correct, but your web browser may
not be configured properly. Make sure that it is configured to use the LAN and not
a dial-up connection, and that it is not set to use a proxy server. Instructions for
Internet Explorer and Netscape Navigator are provided below.
Internet Explorer: Click ‘View’, ‘Internet Options’, then click the ‘Connection’ tab.
Verify that the option ‘Connect to the Internet using a local area network’ is enabled,
and that the proxy server option is disabled. Click ‘OK’ and retry.
Netscape Navigator: These settings are located in different places in different
versions of Netscape Navigator. Depending on your version, click ‘Options’,
‘Network Preferences’, then ‘Proxies’, and verify that ‘No Proxies’ is selected. Or,
click ‘Edit’, ‘Preferences’, ‘Advanced’, then ‘Proxies’, and ensure that the option
‘Direct Connection to the Internet’ is enabled. Click ‘OK’ and retry.
• If your Diva 2430 is connected to a LAN, the device may be working properly but
may not be accessible across the LAN. This is because the Diva 2430 needs to be on
the same subnet as the computer you are using to access it. For example, if the
Diva 2430 is assigned the IP address 192.168.1.1, your computer should also be
assigned 192.168.1.#. In most cases the Diva 2430 is still accessible even if it is on
a different subnet, but it is not true for all networks. In this case, the only solution is
to connect the Diva 2430 directly to a computer in order to access the web-based
configuration interface.
Setup: Troubleshooting
Page 32
• If your Diva 2430 is connected to a LAN, make sure it is the only device with the IP
address 192.168.1.1. To verify, ping the address 192.168.1.1. If you get a reply,
disconnect the Diva 2430 from your LAN and ping 192.168.1.1 again. If you still
get a reply, you have two devices on the same LAN with the same IP address. In this
case you will have to change the IP address of the other device, remove the other
device from the LAN, or temporarily connect the Diva 2430 directly to a computer
(outside of the LAN).
The power light is blinking red.
• Press the Reset button on the device to resolve the problem.
• If the power light continues to blink, hold down the Reset button for 15 seconds to
reset the device to factory defaults.
• If the light continues to blink red, contact your service representative.
Using your Diva 2430
In This Section
About the Diva Assistant ..........................................................................................34
Indicator Lights .........................................................................................................37
Resetting the Device ..................................................................................................38
Page 33
Using your Diva 2430: About the Diva Assistant
Page 34
About the Diva Assistant
The Windows Diva Assistant provides a convenient way to manage your Diva
Assistant. The following is a brief description of how to use the software. For more
information, consult the Diva Assistant online help.
Launching the Diva Assistant
To launch the Diva Assistant:
• Click ‘Start’, ‘Programs’, ‘Diva 2400 Series’, ‘Diva Assistant’; or,
• Double-click the Diva Assistant icon
in the system tray; or
• Double-click the Diva Assistant icon that was installed onto your desktop.
The following dialog should appear:
If you see the device information in the ‘General Tab’ (device name, IP address, etc.),
the Diva Assistant is able to communicate with the device. See Step 3: Test Internet
Access on the following page to continue.
Notes
• The Diva Assistant’s system tray icon will only appear in the system tray once you
have restarted your computer.
• Online help is available from the ‘Help’ menu. You can also access context-sensitive
help by press Shift-F1, then clicking on a field or button.
• If the Diva Assistant is unable to find the Diva 2430, check that your cables are
connected properly and that you have restarted your computer. See Troubleshooting
on page 31 for more information.
Using your Diva 2430: About the Diva Assistant
Page 35
System Tray Icon
Once you install the Diva Assistant and restart your computer, the Diva Assistant icon
will appear in the system tray.
Launches the Diva Assistant.
Right click this icon to
activate this menu.
The Diva Assistant program group
is installed on your ‘Start’ menu.
Click here to launch
the online help.
Click ‘Close’ to close the Diva Assistant and
remove the icon from the system tray.
General Tab
The ‘General’ tab is the first tab you see when you open the Diva Assistant.
Reports the
status of the
front indicator
lights.
Click ‘Refresh’ to
fetch the latest
information on your
device.
Using your Diva 2430: About the Diva Assistant
Page 36
Performance Tab
This tab displays information
about incoming and outgoing
bandwidth usage.
You can drag the performance
windows onto the desktop.
Tools Tab
Starts the web-based
configuration interface using
your default browser.
Lets you upgrade your Diva 2430’s
firmware.
Diagnostic Log Tab
The Diagnostic Log
displays the messages
sent by the the Diva 2430.
Double-click on an entry to
get more information on a
particular entry.
Using your Diva 2430: Indicator Lights
Page 37
Indicator Lights
The lights on the front of the device reflect the status of the Diva 2430.
ADSL Light
• Solid Green: An ADSL connection has been established. This
does not mean you can access the Internet (you may need to
install PPPoE software to do so).
• Flashing Green: The Diva 2430 is attempting to establish an
ADSL connection.
• Off: The ADSL cable is not connected properly. Verify your
cable connections. Also, verify that you have not connected
a microfilter to the ADSL cable. If this light stays off, ADSL
may not yet be available on your line. Contact your ADSL
provider.
Receive (Down Arrow) and Transmit (Up Arrow) Lights
• Flashing: Data is being transmitted or received via the ADSL
connection.
• Off: Data is not being transmitted or received via the ADSL
connection.
USB Light
• Solid Green: The USB cable is properly connected and the
operating system is configured to use the device.
• Off: The cable is not connected properly or the operating
system is not configured for this device. This light may also
go off if your computer is put in low power ‘sleep’ mode.
Ethernet Light
• Solid Green: The Ethernet cable is connected properly and
the Ethernet link is functioning.
• Off: The Ethernet cable is not connected properly.
Power Light
• Solid Green: The unit is on and working correctly.
• Off: The power supply is not connected.
• Red: Press the ‘Reset’ button to see if it resolves the problem.
If the power light continues to blink, hold down the Reset
button for 15 seconds to reset the device to factory defaults.
If the light stays red, contact your service representative.
Using your Diva 2430: Resetting the Device
Page 38
Resetting the Device
Normal Reset
To do a normal reset, press the ‘Reset’ button on the side of the device. (For some
models, this button is located on the bottom of the device.)
A normal reset ‘reboots’ the device. Your settings are left intact.
You can also use the ‘Reset’ button found in the main menu of the web configuration
interface.
Reset Settings to Factory Defaults
This procedure resets the device settings to the factory defaults.
Warning: You will lose all configuration settings.
To reset to factory defaults, hold down the ‘Reset’ button for about 15 seconds. The
Power light will turn red after the first five seconds, and after a total of 15 seconds, the
Power light will turn green again, indicating the reset is complete.
Note: This procedure will return the default IP address of the Diva 2430 to 192.168.1.1. If you
changed the IP address of the Diva 2430 from this default setting, you will need to use the
default IP address 192.168.1.1 to access the configuration menu.
Boot Monitor Mode
If you hold the ‘Reset’ button down for five seconds and then let go of the button, the
Diva 2430 enters ‘Boot Monitor’ mode. This mode is used for advanced installation
and troubleshooting purposes.
Press the ‘Reset’ button once more to return the device back to normal operation.
Note: The device is not accessible via USB when in boot monitor mode, or when the device
experiences a fault condition (power light turns red). To access the device under these
circumstances (to get a memory dump, for example), it is necessary to connect the device via
the Ethernet port.
Web-based Configuration Interface
In This Section
Overview.....................................................................................................................40
Starting the Web-based Configuration Interface ...................................................41
Saving and restoring configuration files..................................................................43
Upgrading Firmware ................................................................................................44
Resetting to Factory Defaults ...................................................................................46
Page 39
Web-based Configuration Interface: Overview
Page 40
Overview
The Diva 2430 uses your ordinary telephone line to provide an ADSL connection to
your Internet Service Provider or corporate network.
Many options and settings are set to default values that give good results for most
cases. For optimal performance, or to define a custom setup, you must manually adjust
the configuration of the Diva 2430.
To change these settings, the Diva 2430 offers a web-based configuration interface.
This interface, accessible with most modern Internet browsers, gives you an easy way
to manage the configuration of the Diva 2430 and perform other tasks like viewing
status and updating your system firmware.
This chapter explains how to access the web-based configuration interface and gives
step-by-step instructions for some common tasks.
Web-based Configuration Interface: Starting the Web-based Configuration Interface
Page 41
Starting the Web-based Configuration Interface
Only one user can access the web-based configuration interface at a time.
Procedure
1.
If you installed the Diva Assistant, double-click the icon in the Windows system
tray, click the ‘Tools’ tab, then click ‘Configure’.
If you do not have access to the Diva Assistant, start your web browser and click
‘File’, ‘Open’. Type 192.168.1.1 and click ‘OK’.
Note: The IP address 192.168.1.1 is the default IP address for the Diva 2430. If you have
changed the IP address, you must use the new address.
2.
You will see the ‘Log In’ page.
3.
Enter the system password, if required, and click ‘Log In’.
By default, there is no password.
Web-based Configuration Interface: Starting the Web-based Configuration Interface
Page 42
4.
The Diva 2430 then displays the ‘Main Configuration’ menu.
5.
Click on any of the links in the ‘Administration’ section to change settings.
‘Save’, ‘Reset Form’, and ‘Cancel’ Buttons
• Each configuration menu has a ‘Save’ button. For the ‘ADSL’, ‘System’, and
‘Security’ menus, the changes you make become active once you click ‘Save’.
However, for changes made in the ‘ATM’ menu to take effect, you must also reset
the device by clicking ‘Reset’.
• If you click ‘Cancel’, you are returned to the main menu, and any changes you made
to settings without saving are lost.
• Click ‘Reset Form’ to return all settings in the current page to the values they had
when you initially opened the page.
• To access online help, click on a setting’s name. A help window will appear with a
description of that setting. Brief information on each setting can also be found in
Configuring Settings via the Web Interface on page 22.
• If this is the first time you have configured the device, you may need to wait up to
one minute (after making changes) before being able to access the Internet. This is
because your computer may have initially been assigned its network settings from
the Diva 2430, as the ADSL line was down and your provider’s server was not
available. If, after a minute, it is still not working, reboot your computer in order to
force a new DHCP request.
‘Reset’ and ‘Logout’ buttons on the main menu
Changes you make to most settings take effect immediately after you click ‘Save’.
However, you must reset the device when you make changes to ATM settings. To reset
the device, click the ‘Reset’ button located on the main menu, or press the Reset
button on the device itself. When you click ‘Logout’, you close the web-based
configuration interface and are presented with the ‘Login’ page. The ‘Display System
Log’ button will show the most recent log entries.
Getting Help
Context-sensitive help is available for each parameter. Click the parameter name to
display its description.
Web-based Configuration Interface: Saving and restoring configuration files
Page 43
Saving and restoring configuration files
The web-based configuration interface makes it easy to save and restore configuration
settings on the Diva 2430. This is useful for backup purposes or if you intend to
maintain several different configurations.
When you save the configuration settings, they are stored in a file on your computer.
Note: Configuration settings are not lost when upgrading the firmware to a newer version.
However, configuration settings may not be saved if you load an older firmware on the device.
For more information on upgrading firmware, see Upgrading Firmware on page 44.
Procedure
1.
From the Main Menu, click ‘Configuration’.
The ‘Configuration maintenance’ page appears.
• Click ‘Backup’ to save your configuration settings to a file on your computer.
• To restore a configuration, click ‘Browse’ to select the configuration file, then
click ‘Restore’.
• To reset the device back to factory defaults, click the ‘Reset factory settings’
button.
Web-based Configuration Interface: Upgrading Firmware
Page 44
Upgrading Firmware
The Diva 2430 contains special software, called firmware, that controls its operation.
The firmware is stored in flash memory, which allows it to be replaced by uploading a
new version.
Note: Configuration settings are not lost when upgrading the firmware to a newer version.
However, configuration settings may be lost if you upload an older firmware on the device.
The Diva 2430 CD contains firmware that may be more recent than the version
currently installed on your Diva 2430. In addition, Eicon Networks posts the latest
Diva 2430 firmware on its web site. An added benefit of visiting the Eicon Networks
web site is that you can register your purchase.
Backing up Configuration Files
If you wish, you can create a backup of your configuration settings before updating
your firmware. See Saving and restoring configuration files on page 43.
To backup your configuration, click ‘Configuration’ from the main menu, then click
‘Backup’.
Opening to the Firmware Maintenance Page
From the main page, click ‘Firmware’ from the main menu. The Diva 2430 displays
the ‘Firmware Maintenance’ page.
Retrieving Firmware from the Eicon Networks Web Site
Note: To acquire new firmware from the Eicon Networks web site as described below, your
connection to the Internet must be already set up and working properly.
To retrieve new firmware from the Eicon Networks web site, click the ‘Visit’ button.
This points your web browser to the Diva 2430 firmware upgrade page on the Eicon
Networks web site.
Web-based Configuration Interface: Upgrading Firmware
Page 45
Uploading New Firmware
1.
From the ‘Firmware’ page, click the ‘Browse’ button.
2.
Select the new firmware file.
If you downloaded new firmware, point to the file you downloaded from the Eicon
Networks web site. A firmware file is also located in the ‘Firmware’ folder on the
CD-ROM that came with your Diva 2430.
3.
Click the ‘Upgrade’ button to upload the firmware to the Diva 2430.
This may take a few minutes. Do not turn off or unplug the device during this time.
When complete, the Diva 2430 is automatically reset to activate the new firmware.
There is no need to click the ‘Reset’ button on the ‘Main Configuration’ menu.
Web-based Configuration Interface: Resetting to Factory Defaults
Page 46
Resetting to Factory Defaults
Resetting the Diva 2430 to factory defaults will erase all your configuration settings,
including the system password. You may want to consider backing up your current
configuration, as explained in Saving and restoring configuration files on page 43,
before you reset to factory defaults.
Note: You can also reset to factory defaults using the Reset button on the device itself. See
Resetting the Device on page 38.
Procedure
1.
From the main page, click ‘Configuration’. The ‘Configuration maintenance’ page
appears.
2.
Click ‘Reset factory settings’.
Note: This procedure will return the default IP address of the Diva 2430 to 192.168.1.1. If you
changed the IP address of the Diva 2430 from this default setting, you will lose contact with
the web configuration interface after the reset is completed. To get back to ‘Main Configuration’
menu, enter 192.168.1.1 in your browser’s URL field and press Enter.
Advanced Topics
In This Section
Security.......................................................................................................................48
Virtual Private Networking ......................................................................................53
Page 47
Advanced Topics: Security
Page 48
Security
Connecting your computer to the Internet or a remote corporate network creates a
wide range of benefits but also exposes your computer to certain risks. To safeguard
your data and systems, the Diva 2430 provides security features.
For starters, access to the device is not allowed through your ADSL line.
This section explains how to configure security features for optimal protection.
Automatic Log Out................................................................................ 49
System password.................................................................................... 50
Disable Inbound Server Requests ........................................................ 51
IP Traffic Only ....................................................................................... 52
Advanced Topics: Security
Page 49
Automatic Log Out
The Diva 2430 applies an automatic time-out to configuration sessions. When a
configuration session is idle for more than the time-out value, the Diva 2430
automatically logs the user out. This reduces the risk of unauthorized persons taking
advantage of a logged-in computer that has been left unattended. The time-out values
cannot be configured and are set as follows:
• If you are using the web interface, the time-out is 30 minutes.
• If you are using Telnet, the time-out is 5 minutes.
Note: Changes that have not been saved are lost when the configuration session is terminated
in this manner.
Advanced Topics: Security
Page 50
System password
The Diva 2430 provides a system password that restricts access to the web-based
configuration and command line interfaces. This ensures that configuration changes
can only be made by authorized personnel.
By default, no password is defined.
Setting a Password
1.
From the main page, click ‘Security’.
2.
Enter the password in the ‘Login Password’ and ‘Repeat Login Password’ fields.
3.
Click ‘Save’. The changes take effect immediately.
Erasing the system password
To erase the system password, open the ‘Security Settings’ menu, delete the password
in both password fields, then click ‘Save’. The next time you log in you will not need
to enter a password.
Advanced Topics: Security
Page 51
Disable Inbound Server Requests
This option drops all incoming server requests from the ADSL line addressed to a
well-known port (less than 1024). This effectively blocks requests for the most
common servers (such as HTTP, FTP, Telnet, etc.).
By default, this option is not checked.
Enabling this Option
1.
From the main page, click ‘Security’.
2.
Make sure ‘Disable Inbound Server Requests’ is checked.
3.
Click ‘Save’. The changes take effect immediately.
Advanced Topics: Security
Page 52
IP Traffic Only
If checked, only IP traffic is accepted or sent, and other network traffic (such as IPX or
Appletalk) is dropped. Enabling this option can improve the performance of your
network.
By default, this option is not checked.
Enabling this Option
1.
From the main page, click ‘Security’.
2.
Make sure ‘IP Traffic Only’ is checked.
3.
Click ‘Save’. The changes take effect immediately.
Advanced Topics: Virtual Private Networking
Page 53
Virtual Private Networking
A virtual private network (VPN) is an interconnection between two networks that uses
the PPTP (point-to-point tunneling protocol). By using the Internet to transport data, a
VPN can eliminate long distance charges associated with traditional dial-up solutions.
Since PPTP provides a secure connection, network security is not compromised.
If you are using Windows 95, Dial-Up Networking 1.3 (available from Microsoft’s
web site at http://www.microsoft.com) is required to create a VPN. Do not install
DUN 1.3 on Windows 98, Windows NT 4.0, Windows 2000, or Windows Me, as a
VPN adapter is included with these operating systems; however, it may not be
installed (see below).
Before you Begin
Before you begin creating the VPN:
1.
Make sure your Internet access is working properly.
2.
Contact the administrator of the network you want to attach to and obtain the
following:
• the IP address or host name of the VPN server
• A user name and password for each user that will be connected to the VPN
Setting up a VPN with Windows 95 or Windows 98
1.
Create a new connection. To do this, double-click ‘My Computer’, double-click
‘Dial-Up Networking’, then double-click ‘Make New Connection’. You will see
the following dialog box.
Advanced Topics: Virtual Private Networking
2.
Enter a name for your connection.
3.
Select ‘Microsoft VPN Adapter’ as the device.
Page 54
Note: If you do not see ‘Microsoft VPN Adapter’ as an option, make sure the VPN adapter
is installed on your system.
4.
Click ‘Next’. You will see the following dialog box.
5.
Enter the IP address or host name of the VPN server in the ‘Host name or IP Address’
field.
6.
Click ‘Next’, then click ‘Finish’.
Setting up a VPN with Windows 2000
1.
Click ‘Start’, point to ‘Settings’, ‘Network and Dial-up Connections’, and then
double-click ‘Make New Connection’.
Advanced Topics: Virtual Private Networking
Page 55
2.
The Network Connection Wizard opens. Click ‘Next’.
3.
Select ‘Connect to a private network through the Internet’ and click ‘Next’.
4.
Select ‘Do not dial the initial connection’ and click ‘Next’.
Advanced Topics: Virtual Private Networking
Page 56
5.
Enter the host name or IP address of the VPN server, then click ‘Next’.
6.
The Connection Availability screen appears. Select ‘For all users’ to make the
connection available to all users on your network, or ‘Only for myself’ to reserve
the connection for personal use. Click ‘Next’.
7.
The ‘Completing the Network Connection Wizard’ window appears. Type a name
for the connection, then click ‘Finish’.
You can copy and paste VPN setups in the ‘Network and Dial-up Connections’ folder.
You can then rename the connections and modify settings. By doing so, you can easily
create different connections to multiple hosts.
Advanced Topics: Virtual Private Networking
Page 57
Dialing the VPN
To connect to the VPN, double-click the connection you just created. When prompted,
enter your user name and password and click ‘Connect’. You will see a Dial-Up
Networking dialog box, showing the details of your connection.
Note: The bps value reported by this dialog box is your LAN Ethernet speed.
Specifications and Regulatory Information: Virtual Private Networking
Page 58
Specifications and Regulatory Information
In This Section
Specifications..............................................................................................................59
Regulatory Information ............................................................................................62
Specifications and Regulatory Information: Specifications
Page 59
Specifications
General Specifications
Packaging Contents
• Diva 2430 ADSL Modem
• Diva 2430 CD-ROM (includes Diva Assistant software, documentation in PDF and
HTML formats, and bonus third-party software)
• Installation Guide
• USB cable
• Ethernet crossover cable (RJ45)
• ADSL telephone cable (RJ11) for connecting your ADSL line
• External power supply
• Microfilters (optional) (for connection to existing telephone devices)
• Telephone cable adapter (optional) (if required in your region)
Hardware Features
•
•
•
•
•
•
•
USB port
Ethernet port (RJ45) (10 Mbps)
ADSL port (RJ11)
Power jack
Reset button
Flash memory for storage of firmware for easy upgrade
LED status indicators
LED Status Indicators
•
•
•
•
•
•
Power
Ethernet
USB
ADSL Receiving
ADSL Transmitting
ADSL Status
Power Supply
• External AC wall mount adapter providing 15VDC / 800 mA
• Power consumption: 6 Watts maximum
• Self-powered (does not draw power from USB connector)
Environmental Requirements
• Operating temperature: 0° C to +50° C
• Storage temperature: -20° C to +70° C
• Relative humidity: 5% to 95% (non-condensing)
Approvals and certifications
• FCC Part 15 Class B, EN55022 Class B, ICES-003 (emissions)
•
Mark (European Union)
• Safety: CSA 950/US
• Immunity: EN55024
Specifications and Regulatory Information: Specifications
Page 60
Software and Firmware Specifications
Installation Features
• Easy access to configuration pages via a web browser
• Auto detection of common problems (connection not possible, incorrect
configuration, etc.)
Administration Features
•
•
•
•
•
•
•
•
Web-based interface (accessed via a web browser)
Command line interface (accessed via Telnet)
File configuration (accessed via TFTP)
Diva Assistant (Windows only) located in the system tray
Password protection (Web and CLI)
Simple firmware upgrade procedure
Firmware upgrade (via Web, CLI, and Diva Assistant)
Configuration update and backup (to local drive) (via web, CLI, and Diva Assistant)
ADSL Features
• Full-rate (G.992.1 and T1.413 Issue 2), providing a maximum of 8 Mbps downstream
and 820 Kbps upstream (can be used with or without a splitter)
• G.Lite (G.992.2), providing a maximum of 1.5 Mbps downstream and 512 Kbps
upstream (can be used with or without a splitter)
• Splitterless operation requires the use of microfilters for any normal analog device,
include telephones, answering machines, and fax machines
• G.994.1 (G.hs) (DSL handshaking)
• ANSI T1.413 Issue 2 compliant
• Interleaved and fast-path ADSL channels
• Interoperable with ITU and ANSI standards-based DSLAM
Bridging Features
•
•
•
•
•
•
•
IEEE 802.1d transparent learning bridge
Dynamic learning of up to 2000 addresses
Spanning tree algorithm
MAC filtering
Bridge MIB
Compatible with RFC2516 PPPoE frames
RFC 1483B
IP Services
•
•
•
•
•
IP, IP over Ethernet, IP over IEEE 802 Networks
DHCP client and server
TFTP client and server
Telnet server
HTTP server
Security
• IP Filtering
• Ethernet Filtering
• Password protection
ATM Features
•
•
•
•
•
•
•
•
•
•
•
AAL5 (ATM Adaptation Layer 5)
VC Multiplexed
LLC Encapsulation
UNI 3.0, 3.1
F4/F5 OAM Cells (ATM Loopback)
Precise Peak Cell Rate Traffic Shaping on a per VC basis
Up to 8 active VCs
VPI Address Range 0-255
VCI Address Range 0-65535
UBR
CBR
Page 61
Specifications and Regulatory Information: Regulatory Information
Page 62
Regulatory Information
• Regulatory Information for the United States ...................................................63
• Regulatory Information for Canada ...................................................................65
• Regulatory Information for the European Union..............................................66
Specifications and Regulatory Information: Regulatory Information
Page 63
Regulatory Information for the United States
Warning: Changes or modifications to this unit not expressly approved by Eicon Networks
Corporation could void the user's authority to operate the equipment.
Declaration of Conformity
We:
Eicon Networks Corporation
2155 Chenault Drive, Suite 503
Carrollton, Texas USA 75006
1-800-80-EICON
(972) 417-5500
Fax: (972) 417-5610
Declare under our sole legal responsibility that the products listed below to which this
declaration relates, are in conformity with Part 15 of the FCC Rules. Operation is
subject to the following two conditions:
(1) This device may not cause harmful interference, and
(2) This device must accept any interference received, including interference that may
cause undesired operation.
Note: This equipment has been tested and found to comply with the limits for a Class B digital
device, pursuant to Part 15 of the FCC Rules. These limits are designed to provide reasonable
protection against harmful interference in a residential installation. This equipment generates,
uses and can radiate radio frequency energy and, if not installed and used in accordance with
the instructions, may cause harmful interference to radio communications.
However, there is no guarantee that interference will not occur in a particular
installation. If this equipment does cause harmful interference to radio or television
reception, which can be determined by turning the equipment off and on, the user is
encouraged to try to correct the interference by one or more of the following
measures:
• Reorient or relocate the receiving antenna.
• Increase the separation between the equipment and receiver.
• Connect the equipment into an outlet on a circuit different from that to which the
receiver is connected.
• Consult the dealer or an experienced radio/TV technician for help.
FCC Part 68 Notice
This unit complies with Part 68 of the FCC rules. On the bottom of this equipment is a
label that contains, among other information, the FCC registration number. If
requested, this information must be provided to the telephone company.
An FCC compliant telephone cord and modular plug is provided with this equipment,
designed to be connected to the telephone network or premises wiring using a
compatible modular jack which is Part 68 compliant.
This equipment cannot be used on telephone company-provided coin service.
Connection to party line service is subject to state tariffs.
Specifications and Regulatory Information: Regulatory Information
Page 64
If this equipment causes harm to the telephone network, the telephone company will
notify you in advance that temporary discontinuance of service may be required. If
advance notice isn't practical, the telephone company will notify the customer as soon
as possible. Also, you will be advised of your right to file a complaint with the FCC if
you believe it is necessary.
The telephone company may make changes in its facilities, equipment, operations, or
procedures that could affect the operation of the equipment. If this happens, the
telephone company will provide advance notice in order for you to make the necessary
modifications in order to maintain uninterrupted service.
If trouble is experienced with this equipment, please contact us for repair and warranty
information. If the trouble is causing harm to the telephone network, the telephone
company may request you to remove the equipment from the network until the
problem is resolved.
Safety Notice
Use certified class 2 power supply with this equipment.
Specifications and Regulatory Information: Regulatory Information
Page 65
Regulatory Information for Canada
NOTICE: The Industry Canada label identifies certified equipment. This certification
means that the equipment meets certain telecommunications network protective,
operational and safety requirements. Industry Canada does not guarantee the
equipment will operate to the user’s satisfaction.
Before installing this equipment, users should ensure that it is permissible to be
connected to the facilities of the local telecommunications company. The equipment
must also be installed using an acceptable method of connection. In some cases, the
company’s inside wiring associated with a single line individual service may be
extended by means of certified connector assembly (telephone extension cord). The
customer should be aware that compliance with the above conditions may not prevent
degradation of service in some situations.
Repairs to certified equipment should be made by an authorized Canadian
maintenance facility designated by the supplier. Any repairs or alterations made by the
user to this equipment, or equipment malfunctions, may give the telecommunications
company cause to request the user to disconnect the equipment.
For their own protection, users should ensure that any electrical ground connections of
the power utility, telephone lines and internal metallic water pipe system are
connected together. This precaution is particularly important in rural areas.
Warning: Users should not attempt to make such connections themselves, but should contact
the appropriate electric inspection authority, or electrician, as appropriate.
This Class B digital apparatus complies with Canadian ICES-003.
Cet appareil numérique de la classe B est conforme à la norme NMB-003 du Canada.
Safety Notice
Use certified class 2 power supply with this equipment.
Specifications and Regulatory Information: Regulatory Information
Page 66
Regulatory Information for the European Union
This equipment displays the
Mark to show that it has been tested and found to be in
full compliance with the requirements of the Radio & Telecommunications Terminal
Equipment, EMC and Low Voltage Directives (1999/5/EC, 89/336/EEC and
72/23/EEC).
Safety Status: TNV-3
No voltages within this equipment exceed SELV voltages. The DSL port has TNV-3
Safety Status and all other interconnection points and ports are SELV.
This equipment draws power from an external power supply which has been
separately approved. It does not draw power from the USB port of your computer.
Power Consumption
The user must ensure that the total power drawn by the host computer and all
peripherals drawing power from it, including internally installed cards, does not
exceed the capability of the host power supply unit. Maximum power consumption of
the unit is stated in the section Specifications on page 59.
Index
Page 67
Index
Page 68
A
U
Advanced Topics 47
Automatic Log Out 49
Upgrading the Diva 2430 Firmware 44
USB Setup for Windows 98/200 10
Using your Diva 2430 33
C
Configuration Files 43
V
Virtual Private Networking (VPN) 53
D
Disable Inbound Server Requests 51, 52
Diva Assistant, About 34
Diva Assistant, Installation 18
F
Factory Defaults 44
Features 5
Firmware, upgrading 44
H
How ADSL Works 6
I
Indicator Lights 37
Installing on an Existing LAN 20
Installing the Diva Assistant (Windows Only) 18
Introducing the Diva 2430 5
Introduction 4
L
LAN Installation 20
P
Package Contents 6
R
Regulatory Information 62
Resetting the Device 38
Resetting to Factory Defaults 44
S
Saving and restoring configuration files 43
Security 48
Setup 7
Specifications 59
Specifications and Regulatory Information 58
System password 50
W
Web-based Configuration Interface 39