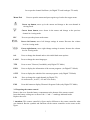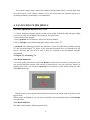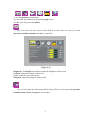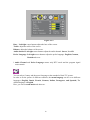
1
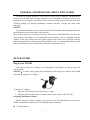
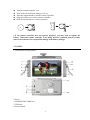
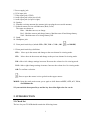
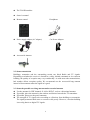
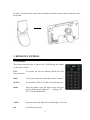
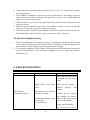
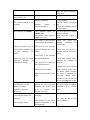
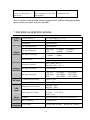
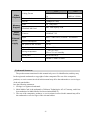
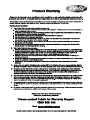
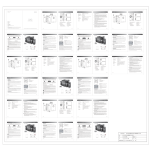
深圳市安科讯实业有限公司
印刷要求:
颜色:黑色双面印刷
材质: 80克书纸
尺寸:130x180mm
装订方式:骑马钉
料号:2.01.011.0487
制作:
校对:
审核:
批准:
肖小燕
10" (26cm) Portable TV and Photo Frame
T2102B-User Manual
Should you encounter any problems, please
contact the help line before you return this
product back to the place of purchase.
Contact our Toll Free Warranty
Support Help Line
1300 366 144
Email: [email protected]
Visit our web site for FAQ’s or request for
service
www.awa.com.au
Warning!Important Notes on Safety
Before you use this product, please read carefully the corresponding parts about the signs on the
product you have bought and keep it properly for future reference.
Warning
Electric shock, do not open
Note: In order to reduce electric shock,
please do not take off the cover.
There is no component inside that users can
maintain. 。
Please ask qualified maintenance personnel
to conduct maintenance.
This sign indicates that there
is dangerous high voltage
inside, and it is dangerous to
contact any component inside
the product in any form.
This sign prompts you to pay
attention to the attached
important notes on the
operation and maintenance of
the product.
z The notches and holes inside the cabinet, on the back and at the bottom of the cabinet are
designed to provide necessary ventilation.
z In order to ensure the reliable operation of this television and to prevent it from getting
overheated, do not stop or cover these notches and holes.
- Do not cover the notches and holes with cloth or other materials.
- Do not put this television on bed, sofa, carpet, or on the surface of other similar object, in
order to avoid causing the blockage of the notches and holes.
- Do not put this television in a limited space, such as bookcase or embedded cupboard
unless there is proper ventilation conduction.
- Do not put this television in a limited space, such as bookcase or embedded cupboard
unless there is proper ventilation conduction.
-Please keep an interval of 10cm (4 inch) between this product and the wall.
-In the process of use, this television may get slightly hot, and this is the normal condition and
does not indicate that any failure occurs to it.
z Do not put this television near or above electric heater or heating plate, or a place with direct
sunlight.
z Do not put heat-generation articles such as candle, ashtray, incense, flammable materials or
explosive materials near this product.
z Do not place any container containing water on this television, which will lead to fire hazard or
electric shock.
z Do not expose this television in the rain or somewhere near water (such as somewhere near
bathtub, water basin, water trough in a kitchen or laundry pool, damp basement, or near
swimming pool). If this television gets wet accidentally, please immediately unplug the power
adapter, turn off the power switch of this television, and then contact the authorized distributor
of this television for help. When cleaning the television, please use dry and soft cloth that does
not contain any volatile material. Before cleaning, please make sure to unplug the power
adapter and turn off power switch of this television.
z Do not overload socket on the wall, extended electric line or convenient socket, which will lead
to fire hazard or electric shock.
z The power adapter should be laid in a position where it will not be trodden or be extruded by
objects above or near it, and special attention should be paid to the electric lines at plug,
convenient socket and the television lead-out.
z To better protect this television in thunder weather, unattended status or when it is unused for a
long time, please remove the plug, and disconnect the antenna or the connection of the cable
system. In this way, damage of the television in a thunder or when surge appears in power line
can be prevented.
z Connect the power adapter to the front of AC socket. Please make sure that the output voltage
of the AC socket complies with the input voltage of the power adapter of this television.
z Do not insert any metal object into the holes of this television. Otherwise it may lead to the
danger of electric shock or the damage of the television.
z In order to avoid electric shock, do not contact the inside of this television. Only qualified
technical personnel can open of the cover of this television.
z Please make sure to insert the power adapter firmly into the socket. When disconnecting the
power adapter connection, please make sure to hold the outer cover of the power adapter, and
then unplug the power adapter from the socket.
z If this television fails to operate normally, especially when it gives out abnormal sound or emits
unusual odor, please immediately unplug the power adapter and turn off the power switch of
this television, and then contact the authorized distributor or service center of this television.
z If this television is to be left unused for a long time or you leave home (especially when a child,
elder or a disabled person is left at home alone), make sure to unplug the power adapter from
the socket and turn off the power switch. If the remote controller is to be left unused for a long
time, please take out the batteries and put it in a cool and dry place. The accumulated dust may
make the input end of the power adapter emit sparks and heat or age in insulation, thereby
causing electric shock, creepage or fire hazard.
z There are rechargeable batteries within the television. If the television is to be left unused for a
long time, please make sure to conduct charge, discharge on the television once every three
months.
z Avoid dropping the remote controller.
z When the television is moved to a warm environment from a low-temperature environment, in
order for the dew within the television to fully volatilize and become dry, the television should be
left unused for a period of time before powering on and turning it on.
We strongly recommend you to use the original power adapter of our company.
z If the product is to be installed in an environment with much dust, high temperature or low
temperature, high humidity and chemical materials, and in airport or railway station where the
product is to be used 24 hours a day, please contact the authorized service center. Otherwise,
the display may be seriously damaged, and the product may be seriously damaged.
z Please do not allow any child to play with this product.
z Please store the accessories in a place that children cannot get near or reach.
z Please do not put the product in an unstable position, such as rolling frame, slant ground or
position influenced by external vibrations.
z Do not make the product fall or lashed. If this product is damaged, please disconnect the power
adapter, turn off the power switch, and contact the service center.
z This television has a LCD; please do not press the screen at discretion to avoid causing screen
breakage.
z Refer to description provided by manufacturer: For color LCD screen, the defect of 0.01% of
pixels is allowed, so please understand that when finding related phenomenon..
z The quality of the received image and sound of this product is related to the local signal and use
environment. If the receiving performance is found to be not so ideal, an outdoor antenna is
recommended.
z This product is hot-swappable. However, it is suggested to power off this product before
plugging/unplugging your memory card, to protect the memory card or other devices.
Precautions for Displaying Still Image
Static image may cause perpetual damage to the television screen.
z Avoid displaying static image on LCD flat panel for over 2 hours as this may cause remnant
shadow to the screen.
This remnant shadow is also called Screen burn.
To avoid this type of remnant image shadow, please lower the luminance and contrast of the
screen when displaying still image.
When watching LCD TV program in 4:3 format, there may be traces left on brims of images
displayed on the right and left sides and in the middle due to different light emissions.
The damage caused by the above-mentioned factors is out of the scope of warranty.
CONTENT
GENERAL INFORMATION ABOUT THE T2102B............................................................................................. 1
QUICK GUIDE ......................................................................................................................................................... 1
PLUG IN YOUR T2102B.......................................................................................................................................... 1
PREPARING THE REMOTE CONTROL ...................................................................................................................... 1
1. PANELS................................................................................................................................................................. 2
1.1 FRONT PANEL AND SIDE PANELS...................................................................................................................... 2
1.2 FRONT PANEL TOUCH KEYS DEFINITION .......................................................................................................... 3
2. INTRODUCTION ................................................................................................................................................. 3
2.1 CHECK LIST ...................................................................................................................................................... 3
2.2 ABOUT TRANSMISSION .................................................................................................................................... 4
2.3 ABOUT THE PORTABLE RECEIVING ANTENNA AND ACCESSORIAL ANTENNA .................................................. 4
2.4 CONNECTING THE T2102B TO THE TV ........................................................................................................... 5
2.5 CONNECTING THE ACCESSORIAL ANTENNA AND THE EXTERNAL ANTENNA................................................... 5
2. 6 INSTALLING STAND......................................................................................................................................... 5
3. REMOTE CONTROL........................................................................................................................................... 6
3.1 DEFINITION ...................................................................................................................................................... 6
3.2 PREPARING THE REMOTE CONTROL ................................................................................................................. 7
4. NAVIGATING WITH MENUS........................................................................................................................... 8
4.1 BASIC OPERATION METHODS OF TV SET ......................................................................................................... 8
4.2 DIGITAL TV AND ANALOG TV ........................................................................................................................ 8
4.2.1 Menu summarize..................................................................................................................................... 8
4.2.2 Menu definition ....................................................................................................................................... 8
4.2.3 Special Features at the DTV mode....................................................................................................... 16
4.3 AUDIO AND VIDEO INPUT ............................................................................................................................... 16
4.4 CONNECT TO PC ............................................................................................................................................ 17
4.5 MULTIMEDIA ................................................................................................................................................. 17
5. MAINTENANCE................................................................................................................................................ 20
5.1 HANDLING YOUR T2102B ............................................................................................................................. 20
5.2 CONSIDERATIONS ABOUT THE SCREEN .......................................................................................................... 20
5.3 CLEANING RECOMMENDATIONS .................................................................................................................... 21
5.4 CARE THE POWER SOURCE ............................................................................................................................. 21
5.5 CARE BATTERY .............................................................................................................................................. 21
5.6 ABOUT THE HEADPHONE USING..................................................................................................................... 22
6. TROUBLESHOOTING ...................................................................................................................................... 22
7. TECHNICAL SPECIFICATIONS ..................................................................................................................... 24
GENERAL INFORMATION ABOUT THE T2102B
T2102B is a portable digital TV set; it can be used in a car or outdoor. Throughout this
manual you will notice that everyday operation of your T2102B is based on a series of user
friendly on-screen displays and menus. These menus will help you get the most from your
T2102B, guiding you through installation, channel selection, viewing and many other
functions.
NOTICE:
Using the buttons on the remote control can perform all functions. But using the buttons on
the front panel can perform some of the functions.
This product support several types of memory cards such as SD/MMC/MS, since there are
many memory card brands, it is recommended to test whether a card is compatible with this
product. (Note; this product does not support illegal cards) If the card is inserted correctly
and the startup picture is displayed but the card fails to read, it is recommended that you shut
down and restart the unit or reformat the card before writing files onto it.
QUICK GUIDE
Plug in your T2102B
You can use either an AC adapter or a rechargeable Li-ion battery as a power source for
your T2102B.
NOTICE!: To ensure safety, please do not arbitrarily replace the power adapter, the T2102B
only with the supplied AC adapter.
To use the AC adapter:
1. Plug one end of the power cord into the AC outlet.
2. Plug the cable attached to the AC adapter into the DC in port on the T2102B.
Preparing the Remote Control
Before using the remote controller, you need to insert the supplied battery in order to
enable communication between the T2102B and remote controller.
z
To insert battery:
1
z
z
z
z
z
Turn the remote controller over.
Press in the tab and lift the battery cover up.
Insert the supplied battery into the remote controller.
Align the battery cover to the remote controller.
Press down until the cover clicks into place.
OPEN
PUSH
! If the remote controller does not operate properly, you may need to replace the
battery. When the remote controller is not being used for extended periods of time,
remove the batteries to avoid possible damage from battery leakage.
1. PANELS
1.1 Front panel and side panels
1.Screen
2. SD/MMC/MS CARD jack
3. USB jack
4. Power switch
2
5. Power supply jack
6. VGA input jack
7. Video input jack (CVBS)
8. Audio input jack (white port is left)
9. Audio input jack (red port is right)
10. Speaker
11. Portable receiving antenna (the antenna jack can plug the accessorial antenna)
12. Infrared remote receiver and Indicators (Red, Green)
The states are shown as:
Blue – Machine turn on, no charge
Red – Machine turn on and charge battery, Machine turn off and charge battery
Null – Machine turn off or charge battery full.
13. Stand
14. Headphone jack
15. Front panel touch keys (include CH+, CH-, VOL+, VOL-, OK,
, and MODE)
1.2 Front panel touch keys definition
CH+: Move up in the menus and change to the next channel in viewing mode.
CH-: Move down in the menus and change to the previous channel in viewing mode.
VOL+ Move left /change settings in menus. Decrease the volume level in viewing mode.
VOL-: Move right /change settings in menus. Increase the volume level in viewing mode.
OK: To confirm a selection
: Press to open the menus /exit to go back to the topper menus.
MODE: Open the mode main menu; press again to shift between DTV, ATV, AV, VGA,
and Multimedia.
! If you touch the front panel keys and the key show blue light color for a wait.
2. INTRODUCTION
2.1 Check list
The box for your T2102B should contain the following items:
3
z
The T2102B machine
z
Owner’s manual
z
Remote control
Headphone
z
Power supply adapter (AC adapter)
Car Power Adapter
z
Accessorial Antenna
2.2 About transmission
Buildings, mountains and the surrounding terrain can block Radio and TV signals.
Depending on whether the receiver is located in a valley, behind a mountain or in a concrete
building, the quality of reception may vary considerably. As with most other transmissions,
bad weather affects reception quality. We recommend use the accessorial long antenna
instead of short antenna when the signal isn’t good.
2.3 About the portable receiving antenna and accessorial antenna
z
z
z
z
Use the antenna for UHF channels 21-69 for DVB-T, such as a directional antenna.
If possible, place the antenna by the window and directed towards the TV transmitter.
If possible, please use the power antennas.
The strength of TV signal varies according to reflections from buildings or mountains.
The signal penetrates thick stone or concrete walls poorly. However, a wooden building
is not a big barrier to digital TV signals.
4
2.4 Connecting the T2102B to the TV
z
z
Connect the T2102B AV input socket for video and audio.
Connect the T2102B Headphone jack to the TV audio input socket for sound.
2.5 Connecting the accessorial antenna and the external antenna.
Align the telescopic antenna plug
with the antenna jack on the TV
set, and just plug in until its end.
If you use the external antenna,
unplug the telescopic antenna plug,
plug the attached antenna plug into
the antenna jack on TV set.
2. 6 Installing Stand
Insert the front end of the support
to the slot on the back cover, and then rotate
the base as illustrated in bottom, until the
support is locked properly.
5
In order to storage remote control more expedient, insert the remote control to the slot on the
back stand.
3. REMOTE CONTROL
3.1 Definition
This section describes how to operate the T2102B using the buttons
on the remote control.
FAV
To operate the favorite channels (DVB and ATV
Function mode)
Mute
Press once to turn the sound off/on (mute/ unmute).
16:9/4:3
Screen switch. (DTV ATV and AV Function mode)
Mode
Press this button open the mode menu and press
again to shift between Digital TV ,Analogue TV,
AV ,VGA and Multimedia.
AUTO
Start auto search (At Digital TV and Analogue TV mode)
Ok
To confirm a selection.
6
Or to open the channel list Menu. (At Digital TV and Analogue TV mode)
Menu /Exit
Press to open the menus and press again to go back to the topper menu.
Cursor up button, move up in the menus and change to the next channel in
viewing mode.
Cursor down button, move down in the menus and change to the previous
channel in viewing mode.
PIC
Press to open the picture mode menu.
Cursor left button, move left /change settings in menus. Decrease the volume
level in viewing mode.
Cursor right button, move right /change settings in menus. Increase the volume
level in viewing mode.
0~9
Press to change the channel and to select individual menu options.
LANG
Press to change the menu languages.
TTX
Press to enter Teletext (if available) (only Digital TV Mode)
INFO
Press to display the information of the current programs. (At Digital TV Mode)
S.TIT
Press to display the subtitle of the current programs. (only Digital TV Mode)
L/R
Press to change the sound channel (At Digital TV)
Or audio mode ( At ATV, AV and VGA mode).
EPG
Press this button to display Electronic Program Guide (only Digital TV Mode)
3.2 Preparing the remote control
Remove the cover from the battery compartment at the bottom of the remote control.
Insert the battery, taking care to observe the “+”and “–” markings indicated inside.
Replace the cover.
! Attention: This remote controller’s figure maybe different to the remote controller what
you obtained. But the symbols and functions on the remote controller are the same as this
figure.
7
The remote control range is 4M or less within a±45°horizontal and ±5°vertical angle from
the remote sensor. If the remote’s battery is low, the remote may not function properly, so
replacing the battery immediately is recommended.
4. NAVIGATING WITH MENUS
4.1 Basic operation methods of TV set
1. Connect with power supply and turn on the power switch. In normal status, the power light
is red. If you only use the battery power supply, the light is blue.
2. Pull out telescopic antenna.
3. Press up/down cursor buttons to choose the desired channel.
4. Press left/right cursor buttons adjust the sound volume of the TV
! Attention: The following describes the functions of your T2102B while watching Analog
TV and terrestrial digital TV. Some of the functions described here are dependent on the
Service Provider and can only be used if they are included in the transmitted program
information.
4.2 Digital TV and analog TV
4.2.1 Menu summarize
You can open the main menu by pressing Menu key at the remote control or front panel. You
can perform different settings enter menus at current mode. And you can press mode key
display mode menu, you can press up/down cursor buttons to select mode which you want
with OK button enter.
Display menu by pressing the Menu button; press the menu button again to go back to the
topper menu.
When menus are displayed, you can move the folders in horizontal directions with left/right
cursor buttons.
4.2.2 Menu definition
The Main menu includes following menu icons:
8
,
,
,
,
,
.
To use the up/down cursor buttons
You can enter the submenu list by pressing right cursor.
Exit the menu list by pressing Menu.
:
You can select how the picture mode shall be sorted. There are four sort mode
(personal, standard, dynamic and soft.) are used here.
Figure 4.2.1
Brightness:Left/right cursor buttons adjust the brightness of the screen.
Contrast: adjust the contrast of the screen.
Color: adjust the color of the screen.
Sharpness: adjust the sharpness of the screen.
:
You can select how the audio mode shall be sorted. There are five sort mode (personal,
standard, music, movie and sports.) are used here.
9
Figure 4.2.2
Bass:Left/right cursor buttons adjust the bass of the screen.
Treble: adjust the treble of the screen.
Balance: adjust the balance of the screen.
Audio channel: Left/right cursor buttons adjust the audio channel: Stereo, L and R
Prefer Language: Left/right cursor buttons adjust the prefer language: English, German,
Danish and so on.
! Audio Channel and Prefer Language menus only DTV mode and the program signal
must contain.
:
You can select Country and the menu Language at the standard of local TV system..
In order to fit the person of different countries, the menu language can be set to different
languages (English, Dutch, French, German, Italian, Portuguese, and Spanish) The
default language is English.
Here, you can set zoom mode and other too.
10
Figure 4.2.3
Menu Language: Left/right cursor buttons adjust the screen: English, Dutch, French,
German, Italian, Portuguese, Spanish .
Zoom Mode: Left/right cursor buttons adjust the screen: 16:9, 4:3
Battery Information: right cursor buttons enter the battery information.
! IF the Machine charge battery, the Battery Information menu can’t select.
Select Country: Left/right cursor buttons adjust the screen: Germany, French, Poland,
Portugal, Russia and so on
Restore Default: Press the Left/right cursor buttons to enter next step, and press OK key
to come back the factory default.
Antenna Power: Left/right cursor buttons adjust the screen: on, off
! Zoom Mode only operated in DTV, ATV and AV mode.
If the machine turn on and used the outside power supplied or charge battery, the battery
icon hide whenever on or off.
If use the power antenna, please press the Left/right cursor buttons to ON.
: (Only DTV mode)
Under the Time Setting menu, you can set the time zone here in order to correct current time
zone where you are.
11
Figure 4.2.4
! Clock setting menu only DTV mode,
: (Only DTV mode)
To open this menu you will be asked to enter your access code. From the factory the access
code is set to 0000. After set, the access code has to be entered before you can watch locked
channels and change the password.
Figure 4.2.5
:( Under the DTV mode)
12
Under the search menu, when you want to search for channels, a channel search procedure
can be performed in different ways at Automatic Search and Manual Search. And you can
edit favorite or skip channel lists in this menu.
If you edit channel favorite list ON, Press the FAV button can display the favorite List.
If you edit channel skip list ON, Press the CH+ or CH- don’t choose the channel.
DTV program: press the Left/right cursor buttons adjust the screen: DTV or RADIO
If you choose the DTV, current channel only the video program
If you choose the RADIO, current channel only the radio program
!if you current program is only the radio or video, and you want watch each other,
please change the menu list.
Figure 4.2.6
Under the Program Search menu, Use right cursor button enter the submenu:
Figure 4.2.7
13
The TV list may contain a lot of channels. To sort your own lists you can make it easier to
handle channels by LCN, number and name.
Under the DTV mode you can edit the personal channel list.
Press the OK button, open the channel list icon, then press the right cursor button again into
the sub-menu ,so you can write a number what you want order, then ago order list be
changed.
Figure 4.2.8
:( Under the ATV mode)
Figure 4.2.9
Program Search menu under the ATV mode only add color system and sound system
submenu.
Color System: Left/right cursor buttons adjust the screen: AUTO, PAL, SECAM
14
Sound System: Left/right cursor buttons adjust the screen: BG, DK, I, L
! If the Program List menu does not exist . The system will automatically start the first time
installation.
Figure 4.2.10
Press OK button to select YES;
Figure 4.2.11
Press OK button to select Country at the standard of local TV system .and Press CH+/CHbuttons to select other items. Set Language menu and Time Zone too.
! The region item is decided by the signal of different country’s broadcasting companies.
15
4.2.3 Special Features at the DTV mode
Electronic Program Guide (EPG)
Pressing EPG key will open the EPG page. In the EPG you will find information about the
programs for the current day and for the following seven days. (Provided that this
information is included in the channel transmission from the distributor)
You may also select the type of program you want information about, like Movie, Sports or
Music.
TELETEXT
Pressing TTX key will open a TTX page, if TTX is transmitted for that channel. Select TTX
pages using the TTX buttons on the remote control.
You can also quickly move to the different page options shown on any page by pressing
cursor left/right.
Sometimes a TTX page may contain sub-pages. When sub-pages are available, they are
numbered on the lower part of the screen. To view a sub page, press OK when no page
numbers have been highlighted. Move to the different sub-pages with cursor left/right.
! The program signal must contain EPG and TTX date.
4.3 Audio and video input
First just inset the plug of the external video cord into yellow jack, and left audio plug into
the white port and right audio plug into the red port.
Press the MODE key to the AV mode, the screen display video play and music.
Figure 4.3.1
! Attention: in the AV and VGA mode the operate menu have a little difference
compare with DTV and ATV mode.
16
4.4 Connect to PC
Just inset the connect cord to the VGA port of PC, and tighten the screws to keep good
contact, then plug the other end of the cord to the VGA port of the TV set and tighten the
screws as the same.
Then turn the mode to VGA, the screen display as the monitor.
! Attention: The VGA mode only support Standard is 640*480 60Hz and 800*600 60Hz.
Figure 4.4.1
4.5 Multimedia
! Attention: Make sure the memory card into the right slot. If the card is improperly inserted,
it may not function properly.
Press Mode key at the remote control or front panel, and Press CH+/CH- buttons to select
multimedia, press OK button enter.
You can enter the icon by pressing OK key and pressing MENU key to go back to the topper
Menu interface.
Figure 4.5.1
17
When you select memory equipment display reading fulfil, you can enter the icon by
pressing OK key.
Music: At the function select interface, use the VOL+/VOL- to move the cursor to
icon and press OK key enter.
Figure 4.5.2
In the music play interface, choose the file and press OK key playing. And press VOL+ key
to music control submenu. Press menu key to return main interface.
Figure 4.5.3
Photo: At the function select interface, use the VOL+/VOL- to move the cursor to
icon and press OK key enter.
Press CH+/CH- buttons to move the cursor to picture and press OK key enter, during the
picture view mode, press VOL+ key to photo control submenu. And then play the pictures
which in current directory automatically.
18
Figure 4.5.4
Movie: At the function select interface, use the VOL+/VOL- to move the cursor to
icon and use the CH+/CH- to choose the file and press OK key playing.
In the video play interface, choose the file and press OK key playing. During movie playing,
Press VOL+ key to video control submenu, and use the VOL+/VOL- to choose the preview
or next file. And press MENU to return main interface.
During the movie playing, press PIC button, you can adjust the color, bright, and so on.
And press the 16:9/4:3 button you can change the movie size small screen or full screen.
!movie playing default is full screen.
Figure 4.5.5
19
5. MAINTENANCE
5.1 Handling your T2102B
1. Do not drop the machine or heavy objects on top of the T2102B
2. Do not place the machine in a location subject to: Heat sources, such as radiators or air
ducts,
3. Direct sunlight, Excessive dust, Moisture or rain, Mechanical vibration or shock, Strong
magnets or speakers that are not magnetically shielded, Ambient temperature of more
than 35 oC or less than 5 oC and High humidity.
4. Do not place electronic equipment near the machine. The electromagnetic field of the
machine may cause a malfunction.
5. Provide adequate air circulation to prevent internal heat from building up. Do not place
the machine on porous surfaces such as rugs or blankets, or near material such as curtains
or draperies that may block its ventilation slots.
6. The machine uses high-frequency radio signals and may cause interference to radio or
TV reception. If this occurs, relocate the machine a suitable distance away from the set.
7. Use only specified peripheral equipment and interface cables; otherwise, problems may
occur.
8. Do not use cut or damaged connection cables.
9. If the machine is brought directly from a cold location to a warm one, moisture may
condense inside the machine, In this case, allow at least one hour before turning on the
machine, if any problems occur, unplug the machine and contact an authorized Service
Centre. To find the nearest centre or agent, visit the online support Web site.
10. Make sure you disconnect the power cord before cleaning the machine.
5.2 Considerations about the screen
1.
2.
3.
4.
5.
6.
Please read the details of this guidebook before using, and store safely in case use
another day.
You may see tiny black points and/or bright points (red, blue, or green) that continuously
appear on the LCD. LCD has a very few (0.01%) unlit pixels and always lit pixels. You
may also see distortion in colours or brightness depending on your perspective. This is a
normal result of the manufacturing process and does not indicate a malfunction.
The LCD is manufactured using high-precision technology, do not apply a strong shock
or drop it. Do not disassemble or refit yourself.
Do not exert pressure on LCD screen. The LCD that is made from glass may be broken
by pressure.
Do not place your LCD in a location subject to direct sunlight or excessively high
temperature. This may cause a malfunction.
Do not place your LCD in a location subject to mechanical vibrations or in an unstable
location.
20
7.
Do not place use a moist cloth to wipe the LCD. Liquid may cause a malfunction if it
leaks into your LCD.
8. Do not place or drop any object onto the LCD. Also, do not apply any force to the LCD.
If the liquid leaves out, please use soap and clean water to clean.
9. If you bring your LCD from a cold location to a warm one, moisture may condense on
the LCD. In such a case, wipe off the moisture before using your LCD. It is
recommended to use tissue papers to wipe off the moisture. If the LCD surface is still not
warm enough, moisture may condense again. Leave LCD until its surface is warmed up
to the ambient temperature. Do not use alcohol, gas or chemistry reagent to wipe.
10. Close LCD after use or during in malfunction. Please switch off power in case safe.
11. If you have any questions, please contact our company.
5.3 Cleaning recommendations
1.
2.
3.
To clean the cover, take care the machine is disconnected.
Do not use scented hydrocarbons or chloride solvents. Such products may attack the
plastics used in the construction of the cover. The cover should be cleaned by means of a
light solution of detergent and water applied with a soft cloth. Dry thoroughly before
using the system again.
Do not used for the cleaning of the front panel, alcohol or its derivatives, these products
can attack the mechanical properties of the materials and diminish their useful time of
life.
5.4 Care the power source
1. Refer the online specifications to check the power operation of your machine.
2. Do not share the AC outlet with other power-consuming equipment, such as a
photocopier or shredder.
3. You can purchase a power strip with a surge protector. This device prevents damage to
the machine caused by sudden power surges, in an electrical storm.
4. Do not place heavy objects on the power cord.
5. To disconnect the cord, pull it out by the plug.
6. Unplug the machine from the AC outlet if you are planning to not use the machine for a
long time.
7. Make sure that AC outlet is easily accessible.
8. When the AC adapter is not used, unplug it from the AC outlet.
9. Use the AC adapter supplied with the machine or authorized products. Do not use any
other AC adapter as it may cause a malfunction.
5.5 Care battery
1. Battery life is shorter in a cold environment. This is due to decreased battery efficiency at
low temperatures.
21
2. Charge the batteries at temperatures between 10 oC to 30 oC. Low temperatures require a
long charging time.
3. This machine is designed to operate only with special batteries. The battery design for
only professional or Service Provider can open. Do not open or try to disassemble the
battery cover on the back yourself.
4. While the battery is in use or being charged, the battery pack heats up. This normal and is
not cause concern.
5. When the battery indicated iron on the screen flashes or when you have not used the
battery for a long time, you need to recharge the battery.
6. If the battery power is still low after charging it, the battery may be reaching the end of its
life and should be replaced. Please contact your dealer or Service Provider.
5.6 About the headphone using
1. Do not use headphones while driving, cycling, or operating any motorized vehicle. It may
create a traffic hazard and is illegal in some areas. It can also be potentially dangerous to
play loud music while walking, especially at pedestrian crossings.
2. Avoid using headphones at high volume. Hearing experts advise and against continuous,
loud and extended play. If you experience a ringing in your ears, reduce the volume or
discontinue use.
6. TROUBLESHOOTING
Problem
The LED does
not light up/is not lit.
Possible causes
What to do
Check that the mains cable
is plugged into the power
socket
Mains cable is not conn- Make sure the battery is
ected.
installed properly and
charged.
The battery isn’t installed
or need to recharge.
Reattach the AC adapter
and reinstall the battery,
Condensed fluid may cause and press the power button
the machine
to turn on the machine.
to malfunction.
Do not use the machine
for at least one hour if
22
The screen is close and Battery exhausted.
power LED is on.
Battery exhausted.
The remote control is not
working.
Remote
control
incorrectly aimed
Don’t display the subtitle
there are some condensed
fluids in it.
Change battery.
is
The program signal no
subtitle date
The subtitle don’t open or
signal too weak
The aerial is not properly
connected to the machine.
When the machine tries to The aerial is not correctly
find and store channels you directed towards the transget the message “No mitter.
signal”
The aerial is not suitable
When only very few of the for digital channels.
expected
number
of
channels are found.
The signal is too weak for
the connected aerial.
During the channel
searching process, the
buttons or remote
controller’s keys are
insensitive.
Can’t play the music file
correctly
Can’t play the video.
Change battery.
Aim the remote control at
box.
Check that nothing blocks
the front panel.
Try press the S.TIT button
open the subtitle.
Make sure the signal is
good
Check the aerial installation
including
its
connections.
Check that the aerial is
directed towards the transmiters.
Check that digital transmissions are available in
the area.
If things does not work out
There are no terrestrial
as they should, let the local
TV dealer check whether
digital transmissions in the the aerial is intended for
area.
receiving digital transmissions or not. If not you
have to exchange the aerial.
Since the channel searching
process use a lot of system Try press buttons or remote
resource, the system scan controller’s keys several
keys or buttons will times.
become very slow.
The file is damaged or code Change the right files.
is wrong
The max bit-rate of the
The format of the video video is 8Mbps.
doesn’t compatible or file
has damaged.
23
Picture or video doesn’t
full screen
The resolution of the files
not suitable
Change the files
Note: If you have tried all of the actions suggested above, without solving the problem,
please contact your dealer or Service Provider.
7. TECHNICAL SPECIFICATIONS
LCD
Panel
LCD Model Size
Active area
Resolution
10.1-inch Digital TFT LCD
219.6(W) ×131.76(H) mm
800*RGB x480
RF input impedance
75Ω imbalance
RF input Frequency
VHF High: 177.5MHz ~226.5MHz
UHF:
474MHz ~ 858MHz
Digital
television RF input level range
Demodulation
Supported systems
Analogue RF input impedance
television
AV input
Photo
Playback
Audio
Playback
OFDM 2K and 8K, QPSK
16QAM, 64QAM
PAL-D/K、B/G、I、
SECAM-D/K、B/G、L
75Ω imbalance
RF input Frequency
VHF Low: 48.25MHz ~ 160.25MHz
VHF High: 168.25MHz ~ 456.25MHz
UHF:
464.25MHz ~ 863.25MHz
CVBS input level range
1.0Vp-p/75Ω
Supported CVBS systems
PAL,NTSC,AUTO
640*480 60Hz
800*600 60Hz
H SYNC;3.3~5.0Vp-p
V SYNC;3.3~5.0Vp-p
RGB: 1Vp-p
Supported VGA Format
VGA
input
-20dBm~-78dBm
VGA input level range
Format
JEPG(EXIF,JFIF,baseline sequential DCT)
Max. resolution
12 Mega-pixel
File Format
(Sample Rate 44.1kHz Bit Rate32k-320kbps)
24
Video
Playback
Memory
Support
Insert
Battery
External
power
supply
Max. resolution
Bit rate
Video
Audio
AVI (MPEG4 ASP (Level AUDIO
5))
(MP2,AC3,PCM)
720 x 560
≤4Mbps(In Cards)
USB
2.0(only Host)
Coding Format
SD/MMC/MS Card
Max. card capacity 2GB
Connect
3000Ma/h 7.4V
input
100V~240V±10%, 50~60Hz 0.55AMAX
Power consumption
≤18W
DC power to the T2102B
9V 2A
Operating temperature
0°C to +40°C
Storage temperature
-20°C to +65°C
25% to 75% rel. humidity
Front panel
Dimensions (w×d×t)
Seven touch keys
286mm×178mm×39.5mm
Trademark Statement
The product names mentioned in this manual only serve for identification, and they may
be the registered trademarks or copyright of other companies.The rest of the companies,
products, or service names involved in this manual may all be the trademarks or service logos
of the relevant holders
here the following statement:
1. SD logo is a registered trademark.
2. Multi Media Card is the trademark of Infineon Technologies AG of Germany, and it has
been authorized to Multi Media Card Association(MMCA)
3. The rest of the companies, products, or service names involved in this manual may all be
the trademarks or service logos of the relevant holders.
25
Company Statement
• Our company hereby promises to users that the warranty period of our T2102B series
products shall be valid within 12 months starting from the date of purchase (the warranty
period of the batteries within the television shall be 6 months), and our company shall be
responsible for providing free maintenance and repair for failures caused by non-human
factors in normal use, and our company shall provide maintenance for failures exceeding the
warranty period or caused by human factors, and shall charge the expenses of repair materials
and related expenses.
• Our company shall not bear any responsibility for any damage or loss resulting from
failing to operate the television according to the operation manual.
• Our company shall not bear any responsibility for any loss or claim for compensation
caused by the use of this product by a third party.
• The product specifications and information mentioned in this manual are for reference
only, and the contents shall be subject to updating at any time without further notice.
26