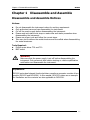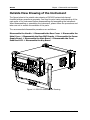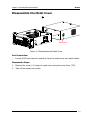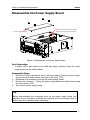
1
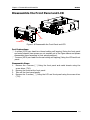
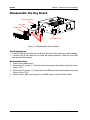
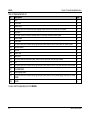
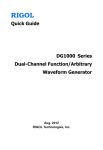
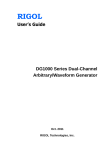
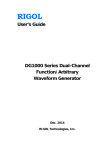
RIGOL Service Guide DG1000 Series Dual-channel Function/Arbitrary Waveform Generator Aug. 2013 RIGOL Technologies, Inc. RIGOL Guaranty and Declaration Copyright © 2013 RIGOL Technologies, Inc. All Rights Reserved. Trademark Information RIGOL is a registered trademark of RIGOL Technologies, Inc. Publication Number SGB06101-1110 Notices RIGOL products are protected by patent law in and outside of P.R.C. RIGOL reserves the right to modify or change parts of or all the specifications and pricing policies at company’s sole decision. Information in this publication replaces all previously corresponding material. RIGOL shall not be liable for losses caused by either incidental or consequential in connection with the furnishing, use or performance of this manual as well as any information contained. Any part of this document is forbidden to be copied or photocopied or rearranged without prior written approval of RIGOL. Product Certification RIGOL guarantees this product conforms to the national and industrial standards in China as well as the ISO9001:2008 standard and the ISO14001:2004 standard. Other international standard conformance certification is in progress. Contact Us If you have any problem or requirement when using our products or this manual, please contact RIGOL Technologies, Inc. E-mail: [email protected] Website: www.rigol.com DG1000 Service Guide I RIGOL Safety Requirement General Safety Summary Please review the following safety precautions carefully before putting the instrument into operation so as to avoid any personal injuries or damages to the instrument and any product connected to it. To prevent potential hazards, please use the instrument only specified by this manual. Use Proper Power Cord. Only the power cord designed for the instrument and authorized by local country could be used. Ground The Instrument. The instrument is grounded through the Protective Earth lead of the power cord. To avoid electric shock, it is essential to connect the earth terminal of power cord to the Protective Earth terminal before any inputs or outputs. Observe All Terminal Ratings. To avoid fire or shock hazard, observe all ratings and markers on the instrument and check your manual for more information about ratings before connecting. Use Proper Overvoltage Protection. Make sure that no overvoltage (such as that caused by a thunderstorm) can reach the product, or else the operator might expose to danger of electrical shock. Do Not Operate Without Covers. Do not operate the instrument with covers or panels removed. Use Proper Fuse. Please use the specified fuses. Avoid Circuit or Wire Exposure. Do not touch exposed junctions and components when the unit is powered. Do Not Operate With Suspected Failures. If you suspect damage occurs to the instrument, have it inspected by qualified service personnel before further operations. Any maintenance, adjustment or replacement especially to circuits or accessories must be performed by RIGOL authorized personnel. Keep Well Ventilation. Inadequate ventilation may cause increasing of temperature or damages to the device. So please keep well ventilated and inspect the intake and fan regularly. II DG1000 Service Guide RIGOL Do Not Operate in Wet Conditions. In order to avoid short circuiting to the interior of the device or electric shock, please do not operate in a humid environment. Do Not Operate in an Explosive Atmosphere. In order to avoid damages to the device or personal injuries, it is important to operate the device away from an explosive atmosphere. Keep Product Surfaces Clean and Dry. To avoid the influence of dust and/or moisture in air, please keep the surface of device clean and dry. Electrostatic Prevention. Operate in an electrostatic discharge protective area environment to avoid damages induced by static discharges. Always ground both the internal and external conductors of the cable to release static before connecting. Handling Safety Please handle with care during transportation to avoid damages to buttons, knob interfaces and other parts on the panels. DG1000 Service Guide III RIGOL Safety Terms and Symbols Terms in this Manual. These terms may appear in this manual: WARNING Warning statements indicate the conditions or practices that could result in injury or loss of life. CAUTION Caution statements indicate the conditions or practices that could result in damage to this product or other property. Terms on the Product. These terms may appear on the Product: DANGER WARNING CAUTION indicates an injury or hazard may immediately happen. indicates an injury or hazard may be accessible potentially. indicates a potential damage to the instrument or other property might occur. Symbols on the Product. These symbols may appear on the product: Hazardous Voltage IV Please Refer to Manuals Protective Earth Terminal Chassis Ground Test Ground DG1000 Service Guide RIGOL Contents Guaranty and Declaration .......................................................................... I Safety Requirement .................................................................................. II General Safety Summary ............................................................................ II Safety Terms and Symbols ......................................................................... IV Chapter 1 Disassemble and Assemble ................................................. 1-1 Disassemble and Assemble Notices ........................................................... 1-1 Outside View Drawing of the Instrument ................................................... 1-2 Disassemble the Handle ........................................................................... 1-3 Disassemble the Rear Cover ..................................................................... 1-4 Disassemble the Metal Cover .................................................................... 1-5 Disassemble the Rear BNC Boards............................................................. 1-6 Disassemble the Power Supply Board ........................................................ 1-7 Disassemble the Main Board ..................................................................... 1-8 Disassemble the Front Panel and LCD ........................................................ 1-9 Disassemble the Key Board .................................................................... 1-10 Assemble Procedures ............................................................................. 1-11 Chapter 2 Troubleshooting&Maintenance ........................................... 2-1 Troubleshooting ...................................................................................... 2-1 Maintenance ........................................................................................... 2-2 System Maintenance ......................................................................... 2-2 Replaceable Parts List........................................................................ 2-3 Warranty .......................................................................................... 2-5 General Care and Cleaning ................................................................. 2-6 DG1000 Service Guide V Chapter 1 Disassemble and Assemble RIGOL Chapter 1 Disassemble and Assemble Disassemble and Assemble Notices Notices: Do not disassemble the instrument unless for working requirement. Only authorized personnel can disassemble the instrument. Cut off the power supply before disassembling the instrument. Please wear anti-static wrist strap or make other anti-static precaution when disassembling the instrument. Please use proper tools and follow the correct steps. Take care not to deform the metal structure and be scuffed when disassembling the metal structures. Tools Required: Phillips screw driver T20 and T10 BNC socket WARNING Make sure that the power supply is cut off before disassembling the instrument. Only personnel with relative training or relative qualification certification can disassemble the instrument. Explanation: DG1000 series dual-channel function/arbitrary waveform generator consists of two models (DG1022 and DG1022A). In this manual, DG1022 is taken as an example for illustration and the contents are also applicable to DG1022A. DG1000 Service Guide 1-1 RIGOL Chapter 1 Disassemble and Assemble Outside View Drawing of the Instrument The figure below is the outside view drawing of DG1000 series dual-channel function/arbitrary waveform generator. You need to get a basic understanding of the main parts of the instrument before disassembling and assembling the instrument. When disassembling or assembling the instrument, please follow the procedures and take care not to scratch the surfaces of the parts. The recommended disassemble procedures are as follows. Disassemble the Handle Disassemble the Rear Cover Disassemble the Metal Cover Disassemble the Rear BNC Boards Disassemble the Power Supply Board Disassemble the Main Board Disassemble the Front Panel and LCD Disassemble the Key Board Figure 1-1 DG1000 Outside View Drawing 1-2 DG1000 Service Guide Chapter 1 Disassemble and Assemble RIGOL Disassemble the Handle Handle Figure 1-2 Disassemble the Handle Disassemble Step: Grasp the handle by the sides, pull outward and lift the handle up to disassemble it. DG1000 Service Guide 1-3 RIGOL Chapter 1 Disassemble and Assemble Disassemble the Rear Cover Rear Cover ① ① Figure 1-3 Disassemble the Rear Cover Part Explanation: ① 2 screws (M4*8 pan head torx machine) fixing the rear cover and the metal chassis. Disassemble Steps: 1. 2. 1-4 Remove the 2 screws (①) fixing the rear cover and metal chassis using the screw driver (T20). Take off the rear cover gently (pay attention to the direction of the letters on the rear cover when assembling). DG1000 Service Guide RIGOL Chapter 1 Disassemble and Assemble Disassemble the Metal Cover ① Metal Cover Figure 1-4 Disassemble the Metal Cover Part Explanation: ① 1 screw (M4*8 pan head torx machine) fixing the metal cover and metal chassis. Disassemble Steps: 1. 2. Remove the screw (①) fixing the metal cover using the screw driver (T20). Take off the metal cover gently. DG1000 Service Guide 1-5 RIGOL Chapter 1 Disassemble and Assemble Disassemble the Rear BNC Boards Rear BNC Boards ① Figure 1-5 Disassemble the Rear BNC Boards Part Explanation: ① 4 BNC nuts. Disassemble Steps: 1. Remove the 4 BNC nuts (①) using the BNC socket. 2. Take out the 2 BNC boards from the chassis and remove the two 10 pin cables connecting the main board respectively. Tip: There are two rear BNC boards and each contains 2 BNC connectors. When assembling, please first install the lower rear BNC board and then the upper one. When assembling, first insert the 10 pin cable of the BNC board into the main board; then, pass the BNC board through the BNC fixed plates and the metal chassis from inside the metal chassis and fix the BNC board from the outside using BNC nuts. 1-6 DG1000 Service Guide RIGOL Chapter 1 Disassemble and Assemble Disassemble the Power Supply Board ① ① ① ① Power Supply Board The position of the screw fixing the power supply ground wire Figure 1-6 Disassemble the Power Supply Board Part Explanation: ① 4 screws (M3*6 pan head torx bi-metal flat spring machine) fixing the power supply board and the metal chassis. Disassemble Steps: 1. Remove the screw (as marked out in the figure above) fixing the power supply ground wire and metal chassis using the screw driver (T20). 2. Disconnect the connecting wires on the power supply board. 3. Remove the 4 screws (①) fixing the power supply board and metal chassis using the screw driver (T20). 4. Take out the power supply board. Tip: Before disconnecting the connecting wires on the power supply board, pay attention to the connection methods and positions of the connecting wires to avoid incorrect connection when assembling. DG1000 Service Guide 1-7 RIGOL Chapter 1 Disassemble and Assemble Disassemble the Main Board ① ① ① ① Main Board ① ① Figure 1-7 Disassemble the Main Board Part Explanation: ① 6 screws (M3*6 pan head torx bi-metal flat spring machine) fixing the main board and metal chassis. Disassemble Steps: 1. Disconnect the connecting wires on the main board. 2. Remove the 6 screws (①) fixing the main board and metal chassis using the screw driver (T10). Tip: It is recommended that you do not disassemble the main board unless for special needs. Before disconnecting the connecting wires on the main board, pay attention to the connection methods and positions of the connecting wires to avoid incorrect connection when assembling. 1-8 DG1000 Service Guide RIGOL Chapter 1 Disassemble and Assemble Disassemble the Front Panel and LCD ① ② ② ① ② LCD Front Panel Figure 1-8 Disassemble the Front Panel and LCD Part Explanations: ① 4 screws (M3*8 pan head torx thread cutting self tapping) fixing the front panel and metal chassis (two screws are not marked out in the figure above and please disassemble them according to their actual positions). ② 3 screws (M3*8 pan head torx thread cutting self tapping) fixing the LCD and front panel. Disassemble Steps: 1. Remove the 4 screws (①) fixing the front panel and metal chassis using the screw driver (T10). 2. Remove the knobs at the front panel. 3. Take off the front panel gently. 4. Remove the 3 screws (②) fixing the LCD and front panel using the screw driver (T10). DG1000 Service Guide 1-9 RIGOL Chapter 1 Disassemble and Assemble Disassemble the Key Board Front USB Board ② Key Board Rubber Keys ② Front BNC Board ① Figure 1-9 Disassemble the Key Board Part Explanations: ① 6 screws (M3*6 flush head torx machine) fixing the key board and metal chassis. ② 2 screws (M3*6 pan head torx bi-metal flat spring machine) fixing the front USB board and metal chassis. Disassemble Steps: 1. Take off the rubber keys. 2. Remove the 6 screws (①) fixing the key board and metal chassis using the screw driver (T10). 3. Remove the 2 screws (②) fixing the front USB board and metal chassis using the screw driver (T10). 4. Remove the 2 BNC nuts fixing the front BNC board using the BNC socket. 1-10 DG1000 Service Guide Chapter 1 Disassemble and Assemble RIGOL Assemble Procedures The assemble procedures are the reverse of the disassemble procedures. Check whether the cables are correctly connected and whether all the screws are installed after each step of assemble. You are recommended to follow the order and method introduced above when disassembling and assembling the instrument to avoid damage to the instrument due to improper operation and to save your time. DG1000 Service Guide 1-11 Chapter 2 Troubleshooting&Maintenance Chapter 2 Troubleshooting&Maintenance Troubleshooting The commonly encountered failures of DG1000 and their solutions are listed below. When you encounter those problems, please solve them following the corresponding steps. If the problem persists, please contact RIGOL. 1. The screen is still dark (no display) after power on: (1) (2) (3) (4) 2. Check whether the power is correctly connected. Check whether the power switches at the front and rear panels are really on. Restart the instrument after finishing the above inspections. If it does not work correctly, please contact RIGOL. The settings are correct but no waveform is generated: (1) Check whether the BNC cable is correctly connected to the signal output terminal. (2) Check whether the BNC cable can work correctly. (3) Check whether the Output button is turned on. (4) After the above inspections, press Utility System Setting PowOn Latest and restart the instrument. (5) If it still does not work correctly, please contact RIGOL. DG1000 Service Guide 2-1 RIGOL Chapter 2 Troubleshooting&Maintenance Maintenance System Maintenance In order to ensure the performance and prolong the service life of the instrument, please follow the recommendations below. 1. Get a full understanding of the performance and basic operating method of the instrument before using it. 2. In order to ensure the measurement accuracy and the service life of the instrument, the instrument should be used and stored in places away from dust, shock, moisture, magnetic field and static; besides, the instrument should be placed in places where it will not be exposed to sunlight for long periods of time. 3. Do not operate the instrument when failure occurs. In this situation, you need to first solve the failure. Besides, regular test and calibration should be performed to ensure the accuracy of the performance. 4. Arrange the instrument properly after you finish the operation of the instrument. 5. Keep the relative accessories of the instrument properly for future use. 2-2 DG1000 Service Guide RIGOL Chapter 2 Troubleshooting&Maintenance Replaceable Parts List (20) (19) (18) (16) (17) (15) (1) (2) DG1000 Service Guide (3) (4) (5) (6) (7) (8) (9) (10) (11) (12) (13) (14) 2-3 RIGOL Table 2-1 No. (1) (2) (3) (4) (5) (6) (7) (8) (9) (10) (11) (12) (13) (14) (15) (16) (17) (18) (19) (20) Chapter 2 Troubleshooting&Maintenance Replaceable Parts List Description Knob Front Panel Rubber Keys M3*8 pan head torx thread cutting self tapping screws, used to fix the LCD and front panel Key Board M3*6 flush head torx machine screws, used to fix the key board and metal chassis Metal Chassis Main Board M3*6 pan head torx bi-metal flat spring machine screws, used to fix the main board and metal chassis Rear BNC Board BNC Nut Metal Cover Rear Cover M4*8 pan head torx machine screws, used to fix the rear cover and the metal chassis LCD M3*6 pan head torx bi-metal flat spring machine screws, used to fix the front USB board and metal chassis Front USB Board Power Supply Board M3*6 pan head torx bi-metal flat spring machine screws, used to fix the power supply board and the metal chassis Handle Qty. 1 1 1 4 1 6 1 1 6 2 4 1 1 2 1 2 1 1 4 1 You can order the replaceable parts from RIGOL. 2-4 DG1000 Service Guide Chapter 2 Troubleshooting&Maintenance RIGOL Warranty RIGOL warrants that its products mainframe and accessories will be free from defects in materials and workmanship within the warranty period. If a product is proven to be defective within the respective period, RIGOL guarantees the free replacement or repair of products which are approved defective. To get repair service, please contact with your nearest RIGOL sales and service office. RIGOL does not provide any other warranty items except the one being provided by this summary and the warranty statement. The warranty items include but not being subjected to the hint guarantee items related to tradable characteristic and any particular purpose. RIGOL will not take any responsibility in cases regarding to indirect, particular and ensuing damage. DG1000 Service Guide 2-5 RIGOL Chapter 2 Troubleshooting&Maintenance General Care and Cleaning General Care: Do not store or leave the instrument in where the instrument will be exposed to direct sunlight for long periods of time. Cleaning: Clean the instrument regularly according to its operating conditions. To clean the exterior surface, perform the following steps: 1. Disconnect the instrument from all power sources. 2. Clean the loose dust on the outside of the instrument with a lint- free cloth (with a mild detergent or water). When cleaning the LCD, take care to avoid scarifying it. CAUTION To avoid damages to the instrument, do not expose them to liquids which have causticity. WARNING To avoid injury resulting from short circuit, make sure the instrument is completely dry before reconnecting to a power source. 2-6 DG1000 Service Guide