1
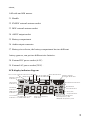
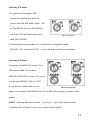
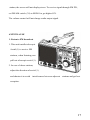
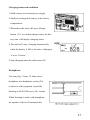
TRA-2350P INSTRUCTION MANUAL è un marchio depositato di Roadstar S.A. - Svizzera Tutti diritti riservati Table of Contents SPECIAL FEATURES AND FUNCTIONS........................................2-3 COSMETIC AND FUNCTIONS GUIDELINE..................................4-8 POWER SUPPLY METHOD............................................................9-11 POWER ON/OFF UNIT..... .................................................................12 SELECTION BAND............................................................................ 13 SEACHING STATION....................................................................14-16 SPECIAL FUNCTION.........................................................................16 ANTENNA USE………..................................................................17-19 TIME SETTING….......................................................................... 20-21 ALARM TIMER AND SLEEP TIMER.......................................... 22-25 OTHER FUNCTION .......................................................................26-28 INTRODUCTION FOR SPECIAL FEATURE................................29-30 SPECIFICATIONS................................................................................31 1 SPECIAL FEATURES AND FUNCTIONS Built in MCU, can control and display station frequency ,local/world time, battery capacity and signal strength. Built in 8 pieces standalone high quality ICs and MOSFETs and make this unit features high sensitivity, strong interference-free, low background noise and small distortion etc. FM: 87.00-108.00MHz, MW: 520 -1710 kHz, (10k step), 522-1620 kHz (9k step) SW 1: 1711-10010kHz, SW 2: 9990-19999 kHz SW 3: 20000-29999 kHz. Install FM and SW external antenna jack to proceed with long distance receiving and connect to local cable FM. MW sets exclusive 500 ohms external air/ground connector, can improve the sensitivity of MW with external antenna and ground wire. FM accuracy 10kHz,AM accuracy 1kHz. Install AM IF output, can use for extending other functions of AM broadcast, for example: CW, SSB (single side band), DRM (digital radio mondial) SSTV (slow scan TV ) etc. AM uses dual conversation PLL technology to get excellent anti-image rejection, SW>40DB£MW > 60DB Built in FET equalizer and mixer, MW built -in digital track tuning technology, 2 SW built-in anti strong signal interference technology, so AM features very good interference-free ability. Special setting selectable wide/narrow IF band width, also adjust RF gain to get best reception according to the strength or weak of broadcast signal to get best reception. Tuning knob can control tuning station frequency.. Double time buzzer, alarm, snooze, program sleep time function. Button hint sound select, key lock feature Listen to FM stereo station with headphone. The user can shut down FM stereo to get higher Signal to Noise according to listening to station.. Built in L/R channel output connector, can take this unit as a tuner, connecting to speaker amplifier to better sound quality. Built in 5 inch speaker and BTL audio amplifier ,standalone tweeter, woofer tuning knob to meet the user's different tone requirements. The backlit LCD can select manually, temporary or permanent lighting two different lighting methods, button backlight can be control by button operation. Multiple power supply method, external 230V AC and 6-9V DC, 4 x R20 size and 4 x AA alkaline or rechargeable batteries, also features charging . 3 4 COSMETIC AND FUNCTIONS GUIDELINE 1 : Telescopic aerial, listening to FM/SW stations, extend and tilt telescopic aerial, adjust it to a upright positions to obtain best reception. 2 :Snooze button £ in alarm mode, press this button to confirm the snooze mode in five minutes, Press and hold down this button to confirm the button hint sound on/off, if the button hint sound is on, press any buttons, the hint sound will be heard. 3 :LCD screen, display time, frequency, battery capacity and signal strength etc. 4 :Night light button, fast press these buttons will light for 8 seconds, press and hold down the buttons for lighting all the time, press the button and the light become dim when the light is on. 5 :Stop button of tuning knob £ when listening, press this button and tuning knob cannot tune any frequency. 6 :Slow button of tuning knob £ when listening, press this button and tuning knob can increase or decrease frequency at slow step (FM 10kHz, AM 1kHz) 7 :Fast button of tuning knob, when listening, press this button and tuning knob can increase or decrease frequency at fast step (FM 100kHz,SW 5kHz,MW 9kHz or 10kHz) 8 :Power/ Sleep button £ Power on or off the unit, setting sleep time . 5 8 :Local/world time button, press this button to display local/world time, press this 9: Button for 5 second sto display electronic time shifting. This unit has two time format selection. The default is local time when the unit is reset. 10 :Key lock button, short, quick press this button to start this function, other buttons are not valid except light button; press this button for a long time to cancel.. 11 :Key light switch ,set the switch ON and the button light will last for 8 seconds, this function is suitable for using at night. 12 :Local/DX button, suitable for receiving strength or weak signals in different conditions. 13:Ext./Int. antenna selector, select external or internal antenna according to different conditions. 14 :Hour button. when adjusting time, used for hour adjustment and increasing, press and hold down for 5 seconds to confirm 12/24 hour format shift. 15 :Minute button, when adjusting time, used for minute adjustment and increasing. 16 :Alarm set button, available in displaying timer A/B mode, can set alarm buzzer, timing turn-on or cancel alarm setting. 17:Time button, press and hold down for a long time to confirm the time 6 adjustment, press this button to display electronic clock when listening. 18 :Timer B button, press and hold down this button for a long time to confirm alarm B adjustment. Press this button to display timer B when listening.. 19 :Timer A button, press and hold down this button for a long time to confirm alarm A adjustment. Press this button to display timer A when listening. 20 :Fast frequency increasing button, when receiving FM frequency at 1000kHz step; receiving MW frequency at 100KHz step; Receiving SW frequency will work as meter band. 21 :Charger button, when the unit is off, press this button to confirm the charging. 22 :Reset hole, use for reset the unit operation. 23 :Tuning knob, use for time and frequency adjustment. 24 :Volume knob. 25 :Bass knob. 26 :Treble knob 27 :MW/SW gain control knob, adjust this knob to obtain best reception when listening to MW/SW band.. 28 :Stereo headphone jack ㄛ listen to FM stereo station 29 :MW/SW1/SW 2/SW 3 band selector, turn this selector to obtain the desired band. 30 :FM/AM band switch, push this switch to select the desired FM mono, FM 7 stereo, AM wide and AM narrow. 31 :Handle 32 :FM/SW external antenna socket 33 :MW external antenna socket 34 :AM IF output socket 35 :Battery compartment 36 :Audio output connector 37 :Battery size selector, the battery compartment has two different battery grooves, can put two different size batteries. 38 :External DC power socket (6-9V) 39 :External AC power socket(230V) . LCD display indicator diagram Ex t . Po we r indic a t o r St e re o indic at o r r B indic at o r Ke y lo c k ind ic at oTime r St at io n sig nal Sleep indicator Ti mer A indicator st re ng t h ind ic at o r Ba t t e ry me t e r indic at o r T imer A SW ba nd indic at o r Ster eo T imer B 2 3 4 5 Wo rld t ime indic a t o r Wo rld t ime zo ne indic a t o r FM band indic at o r M W ba nd indic at o r Lo c al t ime indic at o r 1 2 / 2 4 hr am o r p m fo rma t indic at o r 0 1 Slo w,fa st , st o p indic a t o r Time o r fre que nc y indic at o r Fre que nc y unit indic a t o r FM fre que nc y unit MW/ SW fre que nc y unit 8 POWER SUPPLY METHOD 1.Battery 1.This unit can select D or AA size battery to supply power, after putting battery in the compartment (35) ,push battery selector switch (37) to the correct position. 2.This unit features battery meter and automatically power off the unit when the power is unsufficient. Putting new battery, the screen will display the icon. 3. If the battery meter displays and flash, it indicates the unit will power off automatically after a few minutes and need to change new battery. 4. Change new battery for 2 seconds, the battery meter will become icon 9 NOTE: 1.Do not mix old and new battery along. 2.Please pull out battery to avoid the battery leakage and damage inside components when unused for a long peroid. 3.After changing battery or disconnect external power, the clock can maintain 10 minutes, so you have enough time to change new battery. 2. AC Power When connecting AC plug to external socket (39) the unit is operated by AC power. The power is off accidently or plug is loose from wall outlet, the built-in battery will supply power automatically. 10 3. External wall DC power supply (not included) When connecting DC plug to DC jack (38) , the unit is operated by DC power, the power is off accidently or the plug is loose from wall outlet, the built-in battery will supply power automatically. Please use specified DC power supply, voltage : 6-9V,current ¡500mA, the central polarity of plug is negative ( ). Or the unit or DC power supply may be damaged, even serious contingency. 11 POWER ON/OFF UNIT 1.Power ON unit Press power/sleep button (8) the screen will display “60” and icon, the unit will power off automatically after 60 minutes If changing sleep timing , press Power/Sleep button (8) one by one£ the digit in the screen will change utill the desired time. The display “ON” indicates the unit will turn on all the time. 2. Adjust VOLUME Turning volume knob (24) to increase or decrease volume; 3.Adjust treble or bass tone use treble knob (26) or bass knob (25) to get your favorite sound quality. 12 Selecting FM band 1.In general, if listening to FM station through built-in speakers, please shift FM/AM band switch (30) to FM MONO, because FM MONO has better S/N and interferenc e-free than FM STEREO. 2.If listening through earphone or external stereo amplifier, adjust FM/AM (30) switch to FM ST , so you can listen to FM stereo stations. Selecting AM band In general, turn FM/AM switch (30) to AM narrow band. Then adjust MW/SW1/SW2/SW3 switch (29), select you desired MW,SW1,SW2 or SW3. If you feel the sound quality is not good, you can adjust FM/AM switch (30) to AM wide band to get better sound quality. NOTE: 1.Setting AM narrow band”, can receive more clear station sound; 2.Setting AM wide band”, can receive better sound quality. 13 SEARCHING STATION Listening to the radio, press fast or slow button can select fast or slow search also use fast tuning button to get your desired station. You can confirm the best tuning effect according to signal strength icon or accurate frequency and actual hear feeling. Note, this unit apply for PLL, can fix frequency excursion problem. 14 1. When the radio is turned on ,press slow button (6) ,display “SLOW” at this time, turn tuning knob to increase and decrease frequency, the step is FM 10kHz, MW 1kHz, SW 1kHz. 2. When the radio is turned on, press fast button (7), display “FAST” , turn tuning knob to increase or decrease frequency, the step is FM 100kHz, MW 9 kHz 9K step or 10KHz 10K step SW 5KHz. 3.When the radio is turned on, press STOP button (5) , display “STOP” the tuning knob will be locked. 4 . When the radio is turned on, press fast frequency increasing button (20). For FM and MW band, the step is FM 1000KHz, MW 100KHz; for SW band, changing by meter band form.. MW/SW gain control Receiving MW, adjust MW/SW gain control knob (27) to ”MAX, the sensitivity is the best. If the signal is strong, may cause signal overload, the sound will distorted, at this time, adjust this knob anti-clockwise to solve overload and distortion problem. If there exists serious electronic magnet interference in this environment, suitable to adjust MW/SW gain control knob (27) (see 15 left) to reduce the sensitivity and interference. AM Local/DX selector This unit is installed Local/DX switch (12), the main purpose is to overcome strong signal interferes with MW station (12), i n general, set Local/DX switch (12) to DX. If encounter strong signal FM station, VHF TV,BP pager and UHF signal interference, set switch (27) to local .In the mean time, adjust MW/SW gain control knob to control any interferences effectively. AUDIO Output This unit is installed L/R output connector, convenient (36) to connect to external stereo amplifier. Listening to FM stereo program, set FM/AM switch (30) to ST, at this time, the screen will display stereo icon. If the signal is too weak or not stereo 16 station, the screen will not display stereo. To receive signal through FM DX, set FM/AM switch (30) to MONO to get higher S/N. The volume control will not change audio output signal. ANTENNA USE 1. Listen to FM broadcast 1. This unit installs telescopic Aerial (1) to receive FM stations, when listening, can pull out telescopic aerial (1) . 2. In case of dense stations, adjust the direction of aerial (1) and shorten it to avoid interferences between adjacent stations and get best reception. 17 2. Listening to MW broadcast This unit receives MW broadcast with ferrite bar inside unit, has great effection with directions. Suggest to adjust the unit's placement to get best reception. 3. Listening to SW broadcast When listening to SW stations, pull out telescopic aerial and keep it vertical to get best reception. 18 4. External FM/SW antenna This unit is installed external FM/SW antenna jack (32) (FM 75 Ohm SW 50 O hm), can connect outdoor antenna, at this time, set antenna switch (13) to External place .In FM mode, can proceed with long distance signal receiving (short for FM DX), also connect to local cable FM (call for CABLE FM). 5. External MW antenna This unit is installed 500 Ohm external MW antenna jack ( 33), please connect external antenna as shown right. 6. AM IF Output This unit is built in AM IF output (34), output AM 455KHz IF signal, can use for extending other functions of AM band, for example: SSB (single side band), DRM (digital radio mondial), SSTV (slow scan TV) etc.(Refer to the details of related documents). 19 TIME SETTING Select and adjust local/word time, 12/24 hour format. Select local/word time 1.Press Local/world time button (9), will display local or world time. 2.Press and hold down local/world time button (9) for 5 seconds the screen will flash, in this time, the display mode of time will be changed. Adjust local time 1.Press time set button (17) till the time display is flasing. 2.Press Hour button to (14) confirm hour adjustment, press and hold down it to adjust hour, turn tuning knob (7) left or right to increase or decrease hour value. 3.Press Minute button (15) to confirm minute adjustment, press and hold down this button to adjust minute function, turn tuning knob left or right to increase or decrease minute value. 4.Press time set button (17) again to confirm the time adjustment. 20 Adjust world time 1.Press world/Local time button (9) to select display world time. 2.Press time set button (17) till the time display is flashing. 3.Press Hour button (14) to increase hour value, press Minute button (15) to decrease minute value, turn tuning button left or right to increase or decrease hour value. 12/24 hour format selection 1. Press Hour button (7) for 5 seconds to enter 12/24 hour format selection, when display 12 hour format, the screen will display “AM” or “PM” icon. 21 Setting dual timer 1.Press Timer A button (19), “TIMER A” will flash. 2.Press Timer B button (18), “TIMERB” will flash. Adjust dual timer 1.Press timer A button (19) or timer B button (18) until the time is flashing. 2.Press Hour button (14) to adjust hour, press and hold down hour button (14) to increase hour value. Tune tuning knob (7) left or right to increase or decrease hour value. 3.Press Minute button (15) to adjust minute, press and hold down this button to increase minute, tune tuning knob (7) left or right to increase or decrease minute value. 22 4.Press timer A button (18) or timer B button (19) again to confirm the time adjustment. ALARM TIMER AND SLEEP TIMER Setting alarm timing 1. Press Timer A button (19), will display timer A, in the mean time, press alarm set button (16) will display or 2.Press timer B button (18) will display timer B, in the mean time, press alarm set button (16) will display 3. or . indicates buzzer timer is activated. indicates the turn-on timer is activated. Alarm setting buzzer, power on function 1. When the buzzer timer is activated, if the desired time is due, the unit will buzzer reminding for 3 minutes. 2. When the turn-on timer is activated, if the desired time is due, the unit 23 will turn on reminding for 60 minutes. In timing buzzer, timing turn -on mode, the or will be flashing. Setting snooze/button hint sound In alarm timing buzzer and timing turn-on mode, press snooze button (2) to power off buzzer or unit temporarily. This means the snooze function is working, the screen will display or icon and flash. After 5 minutes, the buzzer will work again, if nobody operates it, the buzzer will shut down automatically after 3 minutes or the unit will power off after one hour. The snooze function can repeat 4 times, Press snooze button (2) in the fifth time to cancel alarm timing status. Press snooze button for 2 seconds, will start button (2) hint sound, then press any button , can hear hint sound 24 Sleep Function The adjustment method for this function as shown: Press power/sleep button (8) the screen will display “90” and icon. At the same time, the digit in the screen will change as shown below: If stopping at digit “30” ,the unit will turn off automatically after 30 minutes. If stopping at ON , indicates staying turn on, will not display icon at this time. 25 OTHER FUNCTION Backlight Operation This unit features LCD and button lighting functions. LCD backlight: 1) Temporary lighting: press light button (11) one time, the screen will light for 8 seconds and then turn off. 2) Permanent lighting: press and hold down light button for 2 seconds, the light stay lighting, if turning off light or lasting lighting function, press light button again. Button backlight : 1. Set light button (11) ON. 2.Press any button and back-light will last for 8 seconds; 3.This function is only used for dark night, it had better set night button OFF to save power. 26 Charging terms and conditions 1.Shall connect to external power supply. 2.Shall put rechargeable battery in the battery compartment. 3.When the radio turns off£ press Charge button (21) to confirm charge status, the battery icon will display charging status. 4.The until will stop charging automatically when the battery is full or the time of charging is over 12 hours. 5.Stop charging when the radio turns ON.. Headphones You can plug 3.5mm 32 ohms stereo headphone into headphone socket (28) to listen to radio programs, especially listening to Hi Fi FM stereo (30) station. When listening to radio with headphone, the speaker will cut off automatically. 27 To set FM/AM switch (30) to ST, can listen to FM stereo station. There sets up MW step selector in the battery compartment, can select 9K/10K£If selected 10K,MW range£ 520-1710 kHz. If selected 9K,MW range£522-1620 kHz. Note: this selection is available after reset. Reset Operation This unit is built in MCU, when happen the following issues: no display, no press function, display misorder, key control abnormity, receiving station abnormity etc. Please follow up the below operations to resume the unit: insert into RESET hole with one sharp objects eg. Toothpick and press it OK. 28 INTRODUCTION FOR SPECIAL FEATURES TRA-2350P features the following several special functions -AM width/narrow bandwidth selectivity -MW/SW gain adjustment -MW/SW local/DX switch -FM stereo/mono selectivity Please refer to the following details,you can enjoy these features. they will bring you exceptional listening effects. 1.AM width/narrow bandwidth selectivity. The bandwidth of width band is about +/- 10 kHz the bandwidth of narrow band is +/-5 kHz . When listening to MW and SW strong signal stations, use the bandwidth selectivity to get best reception. When the adjacent station is mixed into ongoing stations you are listening to, shall push FM/AM band switch to AM narrow band (30) to avoid adjacent station's inter ference. 2.MW/SW gain adjustmen Because the strength or weakness of AM signal (especial SW) has a big difference, when found the gap of station sound is too big during the receiving, exceeding the range of AGC, at this time ,can adjust MW/SW gain control button (27) manually to get the best reception. 29 3. MW/SW local/DX switch When listening to AM band in bad environment, and heard distorted FM sound, VHF TV,BP pager sound from speaker, or not heard the above sound, but feel the background noise is big, at this time, you can push local/DX switch (12) to local position, to restrain the interference and remove background noises. If the receiving environment is good, no interference, set the switch to DX.. 4. FM stereo/mono selectivity In general, listen to FM stereo station through built-in speaker because FM mono station has better S/N and anti-interference features. If connecting to external amplifier or listening to stations with headphone, push AM/ FM switch to FM ST position, then you can listen to FM stereo station.. 30 SPECIFICATION 1 .Frequency range: FM 87.00 ~ 108.00 MHz MW 522 - 1620 kHz Step 9K 520 - 1710 kHz Step 10K SW 1 1711- 10010 kHz SW 2 9990- 19999 kHz SW 3 20000 - 29999 kHz 5. Image Rejection: FM > 46dB MW > 60dB SW > 40 2. Display Accuracy: FM 10kHz AM 1kHz 7. Power Supply: Battery 4 x D size or 4 x AA Alkaline batteries 3. S/N Sensitivity: FM > 3 uV MW > 0.15mV/m SW > 30Uv 4. AM Single Signal Selectivity: Wide Band > 40dB Narrow Band > 60dB 6 AC power output without: distortion > 2500mW External DC External AC 6-9V 230V 50Hz 8. Internal Speaker 9. Headphone 8 ohms 5W ¦3.5mm 32 ohms 10.Size 185X290X70mm Correct Disposal of This Product (Waste Electrical & Electronic Equipment) This marking shown on the product or its literature, indicates that it should not be disposed with other household wastes at the end of its working life. To prevent possible harm to the environment or human health from uncontrolled waste disposal, please separate this from other types of wastes and recycle it responsibly to promote the sustainable reuse of material resources. Household users should contact either the retailer where they purchased this product, or their local government office, for details of where and how they can take this item for environmentally safe recycling. Business users should contact their supplier and check the terms and conditions of the purchase contract. This product should not be mixed with other commercial wastes for disposal. 31