1
Programming
Tumble Dryer
UniLinc Control
Refer to Page 4 for Model Identification
TMB1276C
TMB1276C
Keep These Instructions for Future Reference.
(If this machine changes ownership, this manual must accompany machine.)
www.comlaundry.com
Part No. 70444801R3
July 2011
Table of
Contents
Introduction.........................................................................................
Model Identification .............................................................................
Nameplate Location..............................................................................
4
4
4
Preliminary Information....................................................................
About the Control .................................................................................
Power Failure Recovery...................................................................
Communications ..............................................................................
Audit Information ...........................................................................
IR Communications Menu ...............................................................
IR Communications Error Menu .....................................................
Restore to Factory Defaults ............................................................
Entering Program Mode...................................................................
5
5
5
5
5
6
6
6
6
UniLinc Identification ........................................................................
Operational Keypad ..............................................................................
Operation Modes ..................................................................................
General Modes of Operation............................................................
Power-up Mode................................................................................
Idle Mode .........................................................................................
Run Mode.........................................................................................
Rapid Advance Mode ......................................................................
Pause Mode ......................................................................................
Error Mode.......................................................................................
Communication Mode .....................................................................
Cool Down Mode.............................................................................
End of Cycle Mode ..........................................................................
Extended Tumble Mode...................................................................
Reversing Mode (reversing models only)........................................
Entering Diagnostic Mode From Idle Mode ....................................
7
7
8
8
8
8
8
8
8
8
8
8
9
9
9
9
Machine Cycle Definition and Operation.........................................
Machine Cycle Operation .....................................................................
Time Dry Cycle................................................................................
Auto-Dry Cycle................................................................................
Moisture Dry Cycle (if equipped)....................................................
Rotation Sensor Equipped Machines....................................................
Cycle Menu...........................................................................................
To Start a Cycle ...............................................................................
Run Menu .............................................................................................
Contrast/Backlight Menu......................................................................
Close Door Menu..................................................................................
Run Diagnostic Menu ...........................................................................
Temp and Moisture Menu ....................................................................
Cycle Stopped Menu.............................................................................
Error Menu............................................................................................
Open Door Menu ..................................................................................
Clean Lint Screen Menu .......................................................................
Load Sensed Menu ...............................................................................
Service Moisture Sensor Menu.............................................................
10
10
10
10
10
10
10
11
12
13
13
14
15
16
16
17
17
17
17
© Copyright 2011, Alliance Laundry Systems LLC
All rights reserved. No part of the contents of this book may be reproduced or transmitted in any form or by any
means without the expressed written consent of the publisher.
70444801
© Copyright, Alliance Laundry Systems LLC – DO NOT COPY or TRANSMIT
1
Menu Navigation.................................................................................
The UniLinc..........................................................................................
Menu to Menu Navigation ...............................................................
Screen to Screen Menu Navigation..................................................
Menu Navigation with Parameters...................................................
Cycle Name and Banner Editing......................................................
Display Screen Maps ............................................................................
System Menu Map Tree...................................................................
Run Menu Map Tree ........................................................................
Service Menu Map Tree...................................................................
18
18
18
18
18
18
19
19
20
20
Programming UniLinc ....................................................................... 21
System Menu ........................................................................................ 21
Save Changes Menu ............................................................................. 21
2
Program Menu ....................................................................................
Program Menu ......................................................................................
Modify Cycle ........................................................................................
Available Characters ........................................................................
Cycle, Segment and Step Programming Flow Diagram.......................
Modify Cycle Segment Menu Navigation .......................................
22
22
22
23
24
24
Global Setup ........................................................................................
Global Setup Menu ...............................................................................
Language Menu ....................................................................................
Date/Time Menu...................................................................................
Banners Menu.......................................................................................
Rapid Advance Menu ...........................................................................
Audio Menu ..........................................................................................
Miscellaneous Menu.............................................................................
Ignition Retry Menu .............................................................................
Temperature Menu................................................................................
Reverse Cylinder Menu (if equipped) ..................................................
Cool Down Menu .................................................................................
Moisture Menu (if equipped)................................................................
Factory Defaults Menu .........................................................................
25
25
25
26
26
27
27
28
28
29
29
30
30
31
Diagnostics...........................................................................................
Diagnostic Menu...................................................................................
Test Menu .............................................................................................
Test Cycle Menu ..............................................................................
Test Cycle Chart ..............................................................................
Inputs Outputs Menu........................................................................
Alarms Menus.......................................................................................
Machine ID Menu.................................................................................
32
32
32
32
33
34
35
35
Machine Errors...................................................................................
PDA Communications Error.................................................................
Network Communications Error...........................................................
Open Thermistor Error .........................................................................
Shorted Thermistor Error......................................................................
Stove and Cabinet Limit Errors ............................................................
36
36
36
36
36
36
© Copyright, Alliance Laundry Systems LLC – DO NOT COPY or TRANSMIT
70444801
Auto Ignition Retry (Gas Models Only)...............................................
Air Flow Switch Errors.........................................................................
Airflow Switch Sensed Closed While Not In Run Mode ................
Airflow Switch Does Not Close After Cycle Started ......................
Airflow Switch Bounces During A Running Cycle.........................
Rotation Sensor Error ...........................................................................
Moisture Sensor Error...........................................................................
Fan Motor Contactor Error ...................................................................
Fan Motor Centrifugal Switch Error.....................................................
DIP Switch/Harness Index Mismatch Error .........................................
37
37
37
37
37
37
38
38
38
38
Laundry Management........................................................................ 39
Laundry Management Menus ............................................................... 39
Maintenance ........................................................................................
Service Schedule Menu ........................................................................
Daily Menu (Service).......................................................................
Monthly Menu (Service)..................................................................
Quarterly Menu (Service) ................................................................
Bi-Annual Menu (Service)...............................................................
40
40
40
40
41
41
Cycle Charts ........................................................................................ 42
70444801
© Copyright, Alliance Laundry Systems LLC – DO NOT COPY or TRANSMIT
3
Introduction
Model Identification
Information in this manual is applicable to these
models:
Gas
UA025L
UA025N
UA030L
30 Pound
UA030N
UA035L
35 Pound
UA035N
UA050L
50 Pound
UA050N
UA055L
55 Pound
UA055N
UA075L
75 Pound UA075N
UT075L
UA120L
120 Pound
UA120N
UA170L
170 Pound
UA170N
Steam/Thermal Oil
UT025L
UT025N
UT030L
UT030N
UT035L
UT035N
UT050L
UT050N
UT055L
UT055N
UT075N
UTF75L
UTF75N
UT120L
UT120N
UT170L
UT170N
25 Pound
Electric
UU025L
UU025N
UU030L
UU030N
UU035L
UU035N
UU050L
UU050N
UU055L
UU055N
UU075L
UU075N
UT025S
UU025S
UT025E
UU025E
UT030S
UU030S
UT030E
UU030E
UT035S
UU035S
UT035E
UU035E
UT050S
UT050T
UU050S
UU050T
UT050E
UU050E
UT055E
UU055E
UT075S
UT075T
UU075S
UU075T
UB075E
UT075E
UU075E
UU120L
UU120N
UU170L
UU170N
UT120S
UT120T
UT170S
UT170T
UU120S
UU120T
UU170S
UU170T
Not Applicable
Not Applicable
Not Applicable
Includes models with the following control suffixes:
UO – UniLinc OPL
RU – reversing UniLinc OPL
Nameplate Location
The nameplate is located on the back of the machine
and is programmed in the UniLinc Control. To access
Machine ID Menu through the control:
1. Press and hold
, then
keypads at the same time.
, then
2. Press the
highlighted.
keypad until Diagnostic is
3. Press the
keypad.
4. Press the
highlighted.
keypad until Machine ID is
5. Press the
keypad.
Always provide the machine’s serial number and
model number when ordering parts or when seeking
technical assistance. Refer to Figure 1.
Model:
UT030NUOG2K0W01
Serial #:
1107002759
Install Date:
07/01/2011
Machine Type:
30
Control SN:
11410113
Front End SW:
1
Display SW:
1
Node Number:
250
Machine ID
TMB1332R
Figure 1
4
© Copyright, Alliance Laundry Systems LLC – DO NOT COPY or TRANSMIT
70444801
Preliminary Information
About the Control
Audit Information
The UniLinc control on the tumbler is an advanced,
graphical, programmable computer that lets the owner
control most machine features by interacting with the
control.
The control collects and stores audit information,
which can be accessed with a PDA, PC or network.
Refer to the following list for some of the available
audit information. Refer to UniLinc PC and PDA
Application User Instructions.
UniLinc allows the owner to program custom cycles,
run diagnostic cycles, and retrieve audit and error
information.
Tumblers shipped from the factory have default cycles
and other settings built in. The owner can change the
default cycle or any cycle.
IMPORTANT: It is extremely important that the
tumbler has a positive ground and that all
mechanical and electrical connections are made
before applying power to or operating the tumbler.
Power Failure Recovery
If a cycle is in progress when the power fails, and if
the power outage lasts three or more seconds, the cycle
is lost and cannot be resumed when power recovers. If
the power outage lasts less than three seconds, the
control will resume the cycle when the power
recovers.
• Total Number of Individual Cycle Counters
• Last 25 Machine Cycles
• Service History
• End of Cycle to Loading Door Open Time
• End of Cycle to Start of Next Cycle Time
• Total Number of Machine Cycles
• Total Number of Operating Minutes
• Power Failure Audit Data
The PDA, PC or network can receive audit and
program data from the control, and send programming
data and diagnostic commands to the control. Refer to
UniLinc PC and PDA Application User Instructions
for additional information.
Some of the above listed audit data is available
manually. Refer to Laundry Management section.
Communications
The control has the ability to communicate with a
PDA and a laptop with an IrDA device running the
UniLinc software. Devices such as PDAs and laptops
that are IrDA capable (able to transmit information to
machine) that have been tested and approved for use
with the UniLinc software can be used as a tool for
managing the machine.
The control will also accept communication with a
network which allows the control to be linked to a
personal computer. This network link allows an owner
to program, collect data and run diagnostics on any
machine. For detailed information on network
communications, refer to the network instructions.
70444801
© Copyright, Alliance Laundry Systems LLC – DO NOT COPY or TRANSMIT
5
Preliminary Information
IR Communications Menu
Medium (M) Temperature = 160 (°F)
Low (L) Temperature = 140 (°F)
Very Low (VL) Temperature = 120 (°F)
Cool Down Temperature = 100 (°F)
Cool Down Time = 2 (minutes)
Rapid Advance = Disabled
Multi-Segment Cycles = Disabled
LCD Backlight ON/OFF = On
Banner # 1 = Blank
PHM1003R
Banner # 2 = Blank
Daylight Saving = Enabled
Figure 2
The IR Communications Menu displays while the
control is communicating with a PDA. The control
will jump back to the previous page when the
communication is complete.
Key Pad Audio = Enabled
IR Communications Error Menu
Clean Lint Screen Reminder = Off
End of Cycle Audio = Low (5 seconds)
End of Cycle External Signal = Enabled (5 seconds)
Display Limit Errors = Disabled
Manual Diagnostics = Enabled (accessable via PC and
PDA only)
*Manual Programming = Enabled (accessable via PC
and PDA only)
**Reverse Cylinder Rotate Time = 120 (seconds)
**Reverse Cylinder Stop Time = 6 (seconds)
**Advanced Reversing = OFF
Invalid Data
***Advanced Options for Moisture Dry = Disabled
PHM1004N
Figure 3
The IR Communications Error Menu displays after the
control had an error communicating with a PDA. The
control will return to previous page after 3 seconds.
Restore to Factory Defaults
When the user selects Restore All Cycles And Global
Settings To Factory-Defaults, the control resets all of
the default values. The control also resets Machine
Cycles #1 through #41. The control will also reset the
following to factory-defaults:
***Display Moisture Sensor Error = Disabled
*If manual programming is disabled, programming
changes to UniLinc can only be made with an external
communication device. Refer to UniLinc PC and
PDA Application User Instructions.
**Only available on units equipped with reversing
feature.
***Only available on units equipped with moisture
sensing feature.
Refer to Factory Defaults, Menu section for
information on Restoring Factory Defaults.
Entering Program Mode
Default Global Settings
Language = English
1. Press and hold
, then
, then
to
enter the System Menu. Select Program to enter
programming options.
Ignition Retries = 3
Temperature Units = Fahrenheit (°F)
High (H) Temperature = 190 (°F)
6
© Copyright, Alliance Laundry Systems LLC – DO NOT COPY or TRANSMIT
70444801
UniLinc Identification
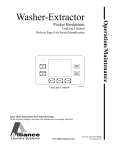
Operational Keypad
The control includes seven keypads. These functions
are available to the operator and are intended to
control and manage operation of the tumbler. Refer to
Figure 4 and Table 1.
TMB1276C
Figure 4
Keypad
LCD/UP ARROW
Description
Press to move the cursor on display and to edit programming values. Also, press
while in Cycle Menu or Run Menu to change to the Contrast Adjust/Backlight
Menu. Also, press with
and
to enter System Menu.
DOWN ARROW
Press to move the cursor on display and edit programming values.
LEFT ARROW
Press to move the cursor on display.
BACK
Press to move back to the previous display menu. Also, press with
and
to enter System Menu.
RIGHT ARROW
Press to move the cursor on display. Press while running a cycle to get to Run
Diagnostic Menu.
Press to stop and abort a machine cycle during Run Mode. Also press with
STOP/ON/OFF
START/ENTER
and
to enter System Menu. When in Cycle Programming Menu,
press to turn segments and cycles on and off.
Press to start or rapid advance a machine cycle during Run Mode. Also, press to
save edited programming values when used in programming menus.
Table 1
70444801
© Copyright, Alliance Laundry Systems LLC – DO NOT COPY or TRANSMIT
7
UniLinc Identification
Operation Modes
General Modes of Operation
In the Cool Down segment, pressing the
keypad
will decrease the remaining time by one minute.
The control enters this mode at power-up. After the
control completes operation in the Power-up Mode it
will enter Idle Mode. The display is blank during
Power-up Mode.
When the cycle is completed, the audit counter, Total
Rapid Advance Cycles is incremented rather than the
Total Machine Cycles audit counter. In addition this
cycle is recorded in the audit list “Last 25 Machine
Cycles Completed”. If the Rapid Advance Option is
disabled preventing a manual Rapid Advance, the user
may still execute a Rapid Advance using the PDA or
PC. Refer to UniLinc PC and PDA Application User
Instructions for additional information on using a
PDA or PC to Rapid Advance a cycle.
Idle Mode
Pause Mode
The control is ready for operation in Idle Mode.
Control can display different menus depending on user
input (keypad press, opening or closing the loading
door, or PDA communication). If there is no user input
for one minute, control will turn off the LCD
backlight. The control will light when there is user
input. If there is no user input for 10 minutes, the
display will go blank.
If
keypad is pressed or the loading or lint door is
opened while in Run Mode, control enters Pause
Mode.
If the control is in Idle Mode, Cycle Menu is
displayed, loading and lint door closed, and the
keypad is pressed, control will enter Run Mode.
Error Mode
In each mode of operation, the user may press keypads
or communicate with the control to change the
displayed menu.
Power-up Mode
Run Mode
If the door is opened then closed, the control will
prompt the user to press
to resume the cycle.
If
is pressed while already in Pause Mode, the
control will enter End of Cycle Mode.
This mode will be entered to display all fatal machine
errors.
Communication Mode
The Control enters Run Mode during a cycle. The
Display shows machine cycle time remaining, the
current cycle type, segment, temperature, and
graphical indicators. Loading and lint doors are closed
during Run Mode. Press
keypad to stop cycle
and enter Pause Mode. Press
keypad to enter
Run Diagnostic Menu. Control enters Pause Mode if
loading or lint door opens. Press
to Rapid
Advance.
Rapid Advance Mode
If the Rapid Advance Option is enabled, the user can
advance a running machine cycle by pressing the
keypad. In a Time Dry cycle, pressing the
keypad will decrease the remaining time by one
minute. Pressing and holding the
keypad will
decrease the remaining time by four minutes per
second until the end of the cycle.
This mode is entered whenever the control is
communicating with a PDA or a network. Refer to
UniLinc PC and PDA Application User Instructions.
Cool Down Mode
The control enters the Cool Down Mode after the heat
segment of the cycle is completed or fatal error occurs.
The control turns the heater off and for steam heated
units turns the damper motor on. The cool down
segment will end once the cool down temperature has
been reached or the programmed cool down time
expires, which ever happens first.
In the Auto-Dry and Moisture Dry cycles, pressing the
keypad will advance the cycle to the next
enabled segment. Note that Auto-Dry cycles only have
one programmable segment.
8
© Copyright, Alliance Laundry Systems LLC – DO NOT COPY or TRANSMIT
70444801
UniLinc Identification
End of Cycle Mode
Reversing Mode (reversing models only)
The control enters End of Cycle Mode after the cool
down segment is finished. The display will show a
graphic prompting the user to open the loading door. If
the door has not been opened or a keypad has not been
pressed after two minutes, the machine will enter
Extended Tumble Mode. This mode is exited when the
or
keypad is pressed.
door is opened or a
The control will then return to Idle Mode.
Models equipped with the reversing feature will rotate
in the forward direction, pause, rotate in the reverse
direction and then pause for programmable times and
segments of the cycle. Factory default reversing rotate
time is 120 seconds and reversing stop time is 6
seconds for all cycles with reversing enabled.
Extended Tumble Mode
The Extended Tumble Mode has two portions. The
Anti-Wrinkle Tumble is entered two minutes after the
cycle has ended if the door is not opened. The cylinder
will tumble for 30 seconds every two minutes for up to
one hour.
Entering Diagnostic Mode From Idle Mode
When entered from the Idle Mode, the control will be
running a test selected by the user via keypad presses
or communication with a device. The diagnostic tests
available from the Idle Mode are the Test Cycle and
Inputs Outputs Menus.
If the door hasn’t been opened and no keys have been
pressed one hour after the Anti-Wrinkle Tumble has
ended, the control increments the Anti-Wrinkle Time
Exceeded audit counter and enters Delayed Tumble.
The cylinder will tumble for two minutes every 60
minutes for up to 18 hours.
70444801
© Copyright, Alliance Laundry Systems LLC – DO NOT COPY or TRANSMIT
9
Machine Cycle Definition and Operation
There are 41 machine cycles that can be selected and
run. Machine cycles can be modified or made
“unavailable” by manually editing them in Modify
Cycle Menu or by using the PDA or network to
download a modified machine cycle into the control.
Machine cycles cannot be deleted, but can be made
“unavailable” so that they are not visible from the
Cycle Menu. New machine cycles cannot be created,
but existing machine cycles that have been edited to be
“unavailable” may be re-edited to be available again.
Rotation Sensor Equipped
Machines
Machine Cycle Operation
Cycle Menu
When a cycle is run, the control runs the cycle
segment by segment in a sequence. First the control
examines the Cycle Type chosen to determine if it is a
Time Dry, Auto-Dry or Moisture Dry (if equipped)
cycle type. Then the first segment is examined to see if
it is programmed to “On” or “Off”. If the segment is
programmed to “Off”, control skips to the next
segment.
At the start of some machine cycles, the control
displays a Total Remaining Cycle time. This time is
taken from the machine cycles as they are
programmed. The Total Remaining Cycle Time begins
to count down as soon as the cycle is started.
On machines equipped with a rotation sensor, the
control monitors the rotation sensor to verify the
cylinder is rotating. The control calculates the
cylinder’s RPM. If the RPM drops to zero while the
cylinder is supposed to be rotating, the control will
advance to the Cool Down segment of the cycle and an
error message will be displayed.
For Technical Service
Distributor ABC
1-800-555-5555
Cycle41:Five
Minute Low
Cycle01:
Towels
Cycle02:
Sheets Blend
Cycle Menu
Time Dry Cycle
TMB1301R
In this type of cycle, the control will regulate the
temperature and time duration as programmed for the
cycle chosen.
Auto-Dry Cycle
If this type of cycle is selected, the control determines
the cycle time based on the temperature and dryness
level programmed for the cycle chosen.
Figure 5
The Cycle Menu is the first menu displayed by the
control after power-up. The Cycle Menu allows the
user to select one of the 41 machine cycles. Machine
cycles that are turned off will not be displayed on the
Cycle Menu. As a default, the last run cycle will be
displayed in the center, highlighted position. The
factory default cycle will be Cycle01.
Moisture Dry Cycle (if equipped)
In this type of cycle, the control checks the
programmed material type, programmed target
moisture content, programmed temperature and the
data received from the moisture sensing system to
achieve the desire results.
10
© Copyright, Alliance Laundry Systems LLC – DO NOT COPY or TRANSMIT
70444801
Machine Cycle Definition and Operation
To Start a Cycle
1. Press the
Press any keypad to clear the menu and return to the
Cycle Menu.
or
keypad to change cycles.
2. Press the
keypad to move the cycle in the
right most menu box to the center, highlighted
position.
3. Press the
keypad to move the cycle in the
left most menu box to the center, highlighted
position.
4. Moving the
and
keypads allows the
selected cycle to scroll through the center,
highlighted position.
5. Press
to start selected cycle.
NOTE: Press and hold
or
keypad to
make highlighted area move rapidly.
NOTE: If door is not closed when the
keypad
is pressed, display will jump to the Close Door
Menu.
Optional settings are performed by either pressing a
keypad or by a combination of keypad presses:
• Press the
keypad to jump control to the
Contrast Adjust/Backlight Menu.
• Press the
keypad to enter the Service Menu.
• Press and hold
, then
enter the System Menu.
, then
to
A Banner is displayed above the Cycle Selections in
the Cycle Menu. If Banner 1 and Banner 2 are
programmed, Banner 1 displays for ten (10) seconds
and Banner 2 displays for ten (10) seconds. If only one
Banner is programmed it will be the only one shown.
Refer to Banner Menu Section.
During communication with the PDA or network, all
menus enter IR Communications Menu.
Every night at midnight the control will enter Service
Menu if the machine is in idle mode on the Cycle
Menu.
When a keypad is pressed or the door is opened or an
IR communication takes place, the control will turn
the LCD contrast on and the backlight back on (if
programmed).
Control will also enter specific service sub-menu for
that day.
Bi-Annual Menu displays on the last day of June and
December.
Quarterly Menu displays on the first day of the month
for January, April, July and October.
Monthly Menu displays on all other first days of the
month.
Daily Menu displays on all other days.
70444801
© Copyright, Alliance Laundry Systems LLC – DO NOT COPY or TRANSMIT
11
Machine Cycle Definition and Operation
Run Menu
Run Menu provides cycle and segment information
while the machine is operating. Refer to Figure 6.
1
2
3
4
10
Cycle01: Towels
Time Dry
Segment01
6
7
180 F
5
8
30:00
Run Menu
9
TMB1302R
TMB1302R
1
2
3
4
5
6
Cycle Number and Name
Cycle Type (and Material Type for Moisture
Sensing Models)
Segment (Number or Cool Down)
Programmed Temperature
Graphical Temperature Indicator (Actual)
Basket Animation
7
8
9
10
Heat / No Heat Indicator
Menu Indicator
Cycle Time Remaining (or Cycle Progress
Indicator for Auto-Dry Cycle Type and Moisture
Sensing Models)
Reversing Enabled / Disabled
Figure 6
The Run Menu cannot be navigated by manipulating
the arrow keypads. Press
keypad to rapid
advance the cycle.
The Run menus include the Run Menu, the Run
Diagnostic Menu, and the various sub-screens of the
Run Diagnostic Menu. Press the
keypad to jump
to the Run Diagnostic Menu.
12
Press the
Run menus.
keypad to stop the cycle in any of the
When the
keypad is pressed, the display will
jump to the Cycle Stopped Menu. Refer to Operation
Modes section for more detail.
© Copyright, Alliance Laundry Systems LLC – DO NOT COPY or TRANSMIT
70444801
Machine Cycle Definition and Operation
Contrast/Backlight Menu
Contrast
Close Door Menu
Backlight
Contrast / Backlight Menu
TMB1303R
PHM1008R
Figure 8
Figure 7
Press the
keypad from Cycle Menu or Run Menu
to enter the Contrast Adjust/Backlight Menu. The
Contrast Adjust/Backlight Menu allows the user to
adjust contrast and turn the backlight on or off.
The Close Door Menu displays when loading door or
lint door on the machine is open and needs to be
closed.
Close door or press the
Menu.
keypad to return to Cycle
Press the
or
keypad to highlight “Contrast”
or “Backlight” menu items.
Once the menu item has been selected, press the
or
keypad to change contrast. The backlight is
either on or off and will have a factory default of on.
Press the
keypad to enter the previous page.
If the Contrast Adjust/Backlight Menu is selected from
the Run Menu and the
keypad is pressed, the
cycle is stopped.
70444801
© Copyright, Alliance Laundry Systems LLC – DO NOT COPY or TRANSMIT
13
Machine Cycle Definition and Operation
Run Diagnostic Menu
Temp and
Moisture
While machine is running, press the
enter Run Diagnostic Menu.
Inputs and
Outputs
Press the
,
,
or
keypad to
navigate the menu. Refer to Diagnostics section for
more description of these menus.
Press the
The
Alarms
Machine ID
keypad to
keypad to choose selection.
keypad will stop the cycle.
If the
keypad is pressed, display enters Run
Menu. If nothing is selected for 15 seconds, the
display will return to Run Menu.
Run Diagnostic Menu
TMB1304R
Figure 9
The Run Mode Diagnostic Menu allows user to access
diagnostic information of the cycle currently running.
The menu contains temperature and moisture, inputs
and outputs, alarms, and machine ID.
14
© Copyright, Alliance Laundry Systems LLC – DO NOT COPY or TRANSMIT
70444801
Machine Cycle Definition and Operation
Temp and Moisture Menu
1
2
3
Cycle01: Towels
Moisture Dry: Cotton
Segment01
5
Actual
05:00
Temp
Moisture
Custom
155 F
35%
Save
4
11
Program
160 F
7%
7
6
9
8
Run Menu
TMB1305R
10
TMB1305R
1
2
3
4
5
6
7
Cycle Number and Name
Cycle Type and Material Type (Moisture
Sensing Models only)
Segment (Number or Cool Down)
Segment Time Elapsed
Actual Temperature
Programmed Temperature
Actual Moisture Content (Moisture Sensing
Models only)
8
9
10
11
Programmed Moisture Content (Moisture
Sensing Models only)
Menu Indicator
Cycle Progress Indicator / Cycle Time
Remaining
Save Current Moisture as Target (Moisture
Sensing Models only) or Save Elapsed Time
as Total Cycle Time (Time Dry Cycles)
Figure 10
A sub-menu of the Run Diagnostic Menu, the Temp
and Moisture Menu is used to display detailed
operating data and, if enabled, allow the user to change
the programmed temperature, time or moisture of a
currently running cycle. The top portion of the display
contains the same information listed in the Run Menu
detailing Cycle, Number and Name, Cycle Type,
Material Type and Segment.
Press
keypad to enter Run Mode Diagnostic
Menu. Press
keypad to pause/stop the cycle, the
control will enter Cycle Stopped Menu. Press the
keypad to advance the cycle one segment.
Press
or
keypads to highlight programmed
temperature, moisture/dryness, time or custom save.
Press the
or
keypads to edit the selected
value of temperature, moisture, dryness or time. All
changes take effect immediately, but don’t change the
saved cycle.
On Moisture Sensing models, pressing
while
Custom Save is highlighted will set the current actual
moisture as the new programmed moisture for the
running cycle. The current cycle will then advance to
the Cool Down segment and the control will return to
Run Menu.
While running a Time Dry cycle, pressing
while
Custom Save is highlighted will set the total elapsed
cycle time as the new programmed total cycle time.
The current cycle will then advance to the Cool Down
segment and the control will return to Run Menu.
70444801
© Copyright, Alliance Laundry Systems LLC – DO NOT COPY or TRANSMIT
15
Machine Cycle Definition and Operation
Cycle Stopped Menu
Error Menu
Cycle Stopped
Fan Motor Contactor
Error
Press START Key to Resume
Press STOP Key to Abort Cycle
Press STOP Key to Abort Cycle
TMB1357R
Figure 11
TMB1307R
Figure 13
The Cycle Stopped Menu will be displayed in Pause
Mode. Press
to resume the cycle or
to
abort the cycle and go to the Open Door Menu.
The Error Menu will be displayed as a result of an
error during a cycle, the Test Cycle or while on the
Cycle Menu.
If a fatal error occurs during a cycle, the Error Menu
display will alternate with the Run Menu every three
seconds until
is pressed or the Cool Down is
complete.
Cycle Stopped
Extended Tumble in 0:50
Cabinet High Limit
Error
Press BACK Key to Exit
TMB1341R
Figure 12
The Cycle Stopped Menu will display an error, if one
occurs, at the end of a cycle or when
is pressed.
The time remaining until Extended Tumble will be
displayed. Press
to exit to go to Open Door
Menu or open the door to go to the Cycle Menu.
16
© Copyright, Alliance Laundry Systems LLC – DO NOT COPY or TRANSMIT
70444801
Machine Cycle Definition and Operation
Open Door Menu
Load Sensed Menu
Extended Tumble in 0:50
Is the machine basket empty?
Yes
No
TMB1364R
Figure 16
TMB1340R
Figure 14
The Open Door Menu is displayed from the Run Menu
prior to a completed cycle. The time until Extended
Tumble is shown at the top of the display.
Open the door or press the
return to the Cycle Menu.
or
keypad to
Clean Lint Screen Menu
The Load Sensed Menu will show from the Cycle
Menu only after eleven minutes of Idle Mode, without
user interaction, having consistently sensed a load for
that entire period. The menu prompts to the operator to
indicate whether the machine basket is empty. No is
highlighted by default. If the user presses the
keypad while No is selected, the control will
return to the Cycle Menu. If the user selects Yes, the
control will display the Service Moisture Sensor
Menu.
Service Moisture Sensor Menu
Clean Lint Screen
Service Moisture Sensor Soon
Press BACK Key to Exit
Press BACK Key to Exit
TMB1308R
TMB1365R
Figure 15
Figure 17
The Clean Lint Screen Menu is displayed from the
Open Door Menu only after globally programmed
number of cycles have been completed. Press
to
return to the Cycle Menu
The Service Moisture Sensor Menu will show from the
Load Sensed Menu indicating to the operator that the
Moisture Sensor System may need service soon. The
menu also instructs the user that the
keypad may
be pressed to return to the Cycle Menu.
70444801
© Copyright, Alliance Laundry Systems LLC – DO NOT COPY or TRANSMIT
17
Menu Navigation
The UniLinc
Cycle Name and Banner Editing
The front-end control allows the user to control
machine operation and programming by pressing
keypads to select options on the display menus and by
navigating between display menus.
This Edit Mode is used when a cycle name must be
modified or a banner created. The highlighted box is
moved over the editable item and the
keypad is
pressed. The mode can be verified by seeing the first
character in the item with a blinking underscore
underneath. The character can then be changed by
using the
and
keypads. To enter a space or
The user can navigate the control in the following
Menu to Menu Navigation
The
,
,
and
keypads are used to
select the desired menu. Once the menu is selected, the
keypad is used to enter that menu. The
keypad allows the user to return to the previous menu.
ways.
Screen to Screen Menu Navigation
In Screen to Screen Navigation, the
or
keypad are used to go from one menu page to the next
(i.e., moving from Alarms [1 of 3] Menu to Alarms
[2 of 3] or Alarms [3 of 3] menus), if a menu cannot fit
entirely on the same page. The Laundry Management
Menu uses this navigation method. Cycle
programming also uses this method.
delete a character, press the
keypad.
The Cycle Name can contain the capital letters “A”
through “Z”, small letters “a” through “z”, the
numbers “0” through “9”, and special characters. The
user can go forward to the next character in the item
by using the
keypad. Press the
keypad to
go backward a character. If the first character in the
item is selected and the
keypad is pressed, the
cursor will go to the last character of the item. Thus,
the cursor will move only within the item when the
horizontal keypads are pressed.
Press the
or
keypad to exit the Edit Mode.
Menu Navigation with Parameters
Another type of menu is a menu with modifiable
parameters. The
and
keypads are used to
navigate through the screens. The
and
keypads are used to change the valve of the
highlighted item.
An example is the Temperature Menu under Global
Setup. The menu items are positioned vertically, but
the
and
keypads are used to navigate
through the different items while the
keypads are used to adjust the values.
18
and
© Copyright, Alliance Laundry Systems LLC – DO NOT COPY or TRANSMIT
70444801
Menu Navigation
Display Screen Maps
Refer to the following charts for maps of all of the
display menus.
System Menu Map Tree
Cycle Menu
Close Door Menu
System Menu
Run Menu
Service Menu
Contrast/ Backlight Menu
Laundry Management
Menus (1-3)
...
Program Menu
...
Modify Cycle Menu
Global Setup Menu
Cycle Setup Menu
Diagnostic Menu
Language Menu
Cycle Segment Menu
Cycle Cool Down Menu
Date/ Time Menu
Test Menu
Test Cycle
I/O Menu
Banners Menu
Rapid Advance Menu
Alarms Menu (1-3)
Audio/ Ext Signal Menu
Machine ID Menu
Miscellaneous Menu
Ignition Retry Menu
Temperatures Menu
Reverse Cylinder Menu
Save Changes Menu
(After all Step Menus
and Global Menus
except Factory
Defaults)
Cool Down Menu
Moisture Menu
Factory Defaults Menu
TMB1358R
TMB1358R
Figure 18
70444801
© Copyright, Alliance Laundry Systems LLC – DO NOT COPY or TRANSMIT
19
Menu Navigation
Run Menu Map Tree
Cycle Menu
System Menu
Run Menu
Run Diagnostic Menu
...
Contrast/Backlight Menu
Service Menu
Close Door Menu
...
Temp and Moisture Menu
Run I/O Menu
Run Alarms Menus (1-3)
Contrast/Backlight Menu
Machine ID Menu
Cycle Stopped Menu
Open Door Menu
Clean Lint Screen Menu
Error Menu
TMB1310R
TMB1310R
Figure 19
Service Menu Map Tree
Cycle Menu
System Menu
Run Menu
...
Contrast/Backlight Menu
Service Menu
...
Close Door Menu
Daily Menu
Monthly Menu
Quarterly Menu
Bi-Annual Menu
TMB1311R
Figure 20
20
© Copyright, Alliance Laundry Systems LLC – DO NOT COPY or TRANSMIT
70444801
Programming UniLinc
System Menu
Program
Save Changes Menu
Diagnostic
Save Changes?
Yes
Laundry
Management
No
System Menu
PHM1021R
TMB1312R
Figure 22
Figure 21
The System Menu allows the user to access: cycle
programming, diagnostics and laundry management.
While on the Cycle Menu press and hold
then
, then
,
to enter the System Menu.
The System Menu is a submenu of the Cycle Menu.
The navigation of the System Menu is different from
the Cycle Menu. In the Cycle Menu, the highlighted
text box was stationary. In the System Menu, the
ARROW keypads control the location of the
highlighted text box. Text will remain at the same
location but the highlighted box will move when the
,
,
, and
keypads are pressed.
Press the
keypad to enter selected menu.
Press the
screen.
keypad to return to the Cycle Menu
70444801
The Save Changes Menu is used to confirm
programming changes when modifying a cycle or the
values of the Global Settings. The Save Changes
Menu will default to Yes. Using
the
or
keypad will move the cursor
between Yes or No. Press the
keypad to make a
selection. Once the
keypad is pressed, the
display will either return to the Modify Cycle Menu or
the Global Setup Menu depending in which submenu
the display was in.
© Copyright, Alliance Laundry Systems LLC – DO NOT COPY or TRANSMIT
21
Program Menu
Program Menu
The Modify Cycle Menu is used to program the
cycles.
The Cycle Number will be highlighted when the
Modify Cycle is first displayed.
Press the
selections.
Modify Cycle
Global Setup
keypad to change cycle
The cycle can be turned on and off by pressing
the
keypad. If the cycle is turned off, the Cycle
Name will display “Off” and the user will not be able
to make any changes to the cycle.
Press the
keypad to make the highlighted box
move to the cycle name to the right of the cycle
number.
Program Menu
PHM1022R
Figure 23
In System Menu, select Program and press
.
To program cycles, select Modify Cycle and
press
.
To change properties that will affect the machine
globally, select Global Setup (i.e., language displayed,
Cool Down Temperature) and press
.
Press the
or
keypad to return to System Menu.
Modify Cycle
Cycle01: Towels
Time Dry
Reversing: Global
Yes
Cycle Reversing
120 s
Rotate Time
6
Stop Time
s
Modify Cycle
Press the
keypad from Cycle Number to make
the display jump to the Modify Cycle Cool Down
Menu.
NOTE: All cycle numbers have to be scrolled
through even though they may be shut off.
Figure 25 illustrates the flow of the cursor during
the programming of a cycle.
To edit a cycle name, select the cycle name and press
the
keypad.
The first character of the Cycle Name will have a
blinking underscore underneath to display it is ready
for editing. Use the
and
keypads to select
the different characters. After the desired character has
been selected, press the
keypad to save the
character and move to the next character. The user
may press the
keypad to go back a character.
Pressing the
keypad when located on the first
character will take the user to the last character, which
may be a blank space. Continue pressing the
keypad to move to desired character. The blinking
underscore is under the last character and the
keypad is pressed, the blinking underscore will move
to the first character.
Press the
keypad to exit edit mode.
TMB1313R
Figure 24
22
© Copyright, Alliance Laundry Systems LLC – DO NOT COPY or TRANSMIT
70444801
Program Menu
NOTE: Refer to Table 2 for a chart of available
letters, numbers and symbols.
Cycle Type can be modified by pressing the
In general, press the
or
Press the
or
keypad to change
keypad to modify the reversing values
if available. Press
value.
or
or
to change
After the Segment Menu, press the
keypad to
move to the Cool Down Segment Menu.
keypad to move to Material Type (if
available). Press the
the value.
keypad to navigate
the various Segments and
their parameters.
keypad while Cycle Type is highlighted.
Press the
or
keypad to change the
Press the
keypad to move highlighted box to the
first Segment Number. While the Segment Number is
highlighted, the Segment Number can be turned on or
off by using the
keypad. If turned off, all sub
programming steps will become inaccessible. Segment
01 can’t be turned off.
If the current Cycle Type is Moisture Dry and the
global programming Advanced Options for Moisture
Dry is enabled, pressing
from the last segment
menu will send control to the Advanced Options
Menu. Another
keypad press will then go to the
Cool Down Segment Menu.
At any time, press the
Save Changes Menu.
keypad to jump to the
Available Characters
A
B
C
D
E
F
G
H
I
J
K
L
M
N
O
P
Q
R
S
T
U
V
W
X
Y
Z
a
b
c
d
e
f
g
h
i
j
k
l
m
n
o
p
q
r
s
t
u
v
w
x
y
z
0
1
2
3
4
5
6
7
8
9
!
"
#
$
%
&
'
(
)
*
+
,
-
.
/
:
;
<
=
>
?
@
[
\
]
^
_
`
{
|
}
~
€
‚
ƒ
„
…
†
‡
ˆ
‰
Š
‹
Œ
Ž
‘
’
“
”
•
–
—
˜
™
š
›
œ
ž
Ÿ
¡
¢
£
¤
¥
¦
§
¨
©
ª
«
¬
-
®
¯
°
±
²
³
´
µ
¶
·
¸
¹
º
»
¼
½
¾
¿
À
Á
Â
Ã
Ä
Å
Æ
Ç
È
É
Ê
Ë
Ì
Í
Î
Ï
Ð
Ñ
Ò
Ó
Ô
Õ
Ö
×
Ø
Ù
Ú
Û
Ü
Ý
Þ
ß
à
á
â
ã
ä
å
æ
ç
è
é
ê
ë
ì
í
î
ï
ð
ñ
ò
ó
ô
õ
ö
÷
ø
ù
ú
û
ü
ý
þ
ÿ
Table 2
70444801
© Copyright, Alliance Laundry Systems LLC – DO NOT COPY or TRANSMIT
23
Program Menu
Cycle, Segment and Step
Programming Flow Diagram
Cycle01: Towels
Time Dry
Segment01:
Cycle01: Towels
Auto Dry
Segment01:
160 °F
30 m
Temperature
Time
Segment Reversing
No
Modify Cycle
Yes
120 s
Rotate Time
6
Stop Time
s
Modify Cycle
Temperature
H
Target Moisture
0
Segment Reversing
Time Past Target
0
m
%
No
Modify Cycle
Moisture Dry Segment Options
Cycle Number
No
Segment Reversing
Cycle01: Towels
Moisture Dry: Cotton
Advanced Options:
Modify Cycle
Modify Cycle Main Menu
H
0
Auto-Dry Segment Options
Cycle01: Towels
Moisture Dry: Cotton
Segment01:
Cycle Reversing
Dryness Level
Modify Cycle
Time Dry Segment Options
Cycle01: Towels
Time Dry
Reversing: Global
Temperature
Moisture Dry Advanced Options
Cycle Name
Segment #1
Options
Time Dry
Moisture Dry
Material Type
Cycle
Reversing Options
(If available)
Segment #2 - 5
Options (If enabled)
Segment #1 Options
Auto-Dry
Cool Down Options
(If Heat Cycle)
Cycle01: Towels
Time Dry
Cool Down: Global
100 °F
2 m
Temperature
Time
Segment Reversing
No
Modify Cycle
TMB1370R
Cool Down Options
TMB1370R
Figure 25
Modify Cycle Segment Menu Navigation
Modify Cycle Segment Menus are a subgroup of the
Modify Cycle Menu and the navigation is very similar
to the navigation of the Modify Cycle Menu. When a
segment menu is first displayed, the segment name
will be highlighted. While the segment name is
highlighted, it can be toggled on or off by pressing
the
keypad. If the segment is toggled from OFF
to ON, then the last programmed parameters will be
displayed.
24
NOTE: The reversing features will not be available
if the unit is not equipped with that option.
Press the
keypad to move to the next segment.
Press the
or
keypad to change the value.
© Copyright, Alliance Laundry Systems LLC – DO NOT COPY or TRANSMIT
70444801
Global Setup
Global Setup Menu
Language Menu
Language
Date / Time
Banners
Rapid
Advance
Audio / Ext
Signal
Misc
Ignition
Retry
Temps
Cool Down
Moisture
Reverse
Cylinder
English
Español
Italiano
Français
Deutsch
Portuguese
Factory
Defaults
Global Setup
Language Menu
TMB1359R
PHM1037R
Figure 26
Figure 27
The Global Setup Menu allows the user to make
changes to global properties of the machine. Use
the
,
,
, and
keypads to navigate
The Language Menu is used to select the language
displayed. The user can choose English, Spanish,
Italian, French, German or Portuguese.
the menu. Select a menu item by pressing the
Press the
,
,
or
keypad to move
the highlighted box through the different selections.
English is the default language.
keypad. Press the
Menu.
keypad to enter the Program
NOTE: Menus related to cycle operation are the
only menus that will display in the chosen language
if English is not selected. All System Menu submenus will remain in English.
Press
to select a language. The Save Changes
Menu will display.
Press
or “No”.
Press the
or
to move highlighted box to “Yes”
keypad to return to Global Setup
Menu. If no changes were made, press the
keypad to return to Global Setup Menu.
70444801
© Copyright, Alliance Laundry Systems LLC – DO NOT COPY or TRANSMIT
25
Global Setup
Date/Time Menu
Banners Menu
Current Date
Banner #1
01 / 19 / 2011
Day of Week
Wednesday
Banner #2
09 : 24
Daylight Saving
No
Local Time
Banners
PHM1047R
Date / Time
Figure 29
TMB1342R
The Date/Time Menu is used to set the date, day of the
week, time, and daylight saving option.
The Banners Menu is used to create or modify the
banners that are displayed while the machine is on the
Cycle Menu. The banners are displayed at the top of
the screen.
Press
and
keypads to move the
highlighted box through the different items in the
menu. Once the item is highlighted, the value can be
changed by using the
and
keypads. The
The banners are created or modified using the Edit
Mode. Refer to Program Menu, Modify Cycle section.
Use the
or
keypad to highlight the
Save Changes Menu will display. Use
or
to move highlighted box to “Yes” or “No”.
edit. Pressing the
Figure 28
different lines and press the
Changes Menu. Use
Press the
keypad to return to Global Setup
Menu. If no changes were made, press the
or
keypad to return to Global Setup Menu.
The control’s Clock will automatically adjust for leapyear. The control may be programmed for automatic
daylight saving adjustment. If the Daylight Saving
option is disabled, no adjustment takes place. If it is
enabled, on the second Sunday in March, the time will
spring forward from 2:00 AM to 3:00:00 AM. On the
first Sunday in November, the time falls back from
2:00:00 AM to 1:00:00 AM.
keypad to save the
keypad will jump to the Save
or
to move
highlighted box to “Yes” or “No”. Press the
keypad to return to Global Setup Menu. If no changes
were made, press the
or
keypad to return
to Global Setup Menu.
Daylight Saving can be enabled or disabled by moving
highlighted box to Daylight Saving and
pressing
or
to Yes or No. The Save
Changes Menu will display. Use
or
to
move highlighted box to “Yes” or “No”. Press
keypad to return to Global Setup Menu. If no changes
were made, press
or
keypad to return to
Global Setup Menu. The factory-default value for
daylights saving is enabled.
26
© Copyright, Alliance Laundry Systems LLC – DO NOT COPY or TRANSMIT
70444801
Global Setup
Rapid Advance Menu
Audio Menu
Key Pad
Enable the Rapid Advance
Feature During Cycle Operation?
On
End of Cycle
Yes
Volume:
No
Low
Time:
5
s
5
s
External Signal
No
Enable:
Rapid Advance
Time:
Audio / Ext Signal
TMB1343R
TMB1316R
Figure 30
The Rapid Advance Menu has the option of whether
the user will be able to rapid advance through
segments while the machine is operating. Press
,
or
keypad to change the
the
,
selection. All the keypads have the same effect and
will toggle the selection between on or off. Press
the
or
keypad to jump to the Save Changes
Menu. Use
or
to move highlighted box to
“Yes” or “No”. Press
keypad to return to Global
Setup Menu. If no changes were made, press
the
or
keypad to return to Global Setup
Menu.
Figure 31
The Audio/External Signal Menu sets the audio
options of the keypad audio feedback, the beeper
volume and the External Signal.
Press the
and
keypads to move the
highlighted box through the different items in the
Audio Menu.
Once the item is highlighted, press the
keypads to change the value. Press the
and
or
keypad to return to the Save Changes Menu if
changes were made.
Press the
or
keypad to move highlighted
box to “Yes” or “No”. Press
keypad to return to
Global Setup Menu. If no changes were made,
press
or
keypad to return to Global Setup
Menu.
70444801
© Copyright, Alliance Laundry Systems LLC – DO NOT COPY or TRANSMIT
27
Global Setup
Miscellaneous Menu
Ignition Retry Menu
Multi-Segment Cycles
No
Number of Cycles Between
Lint Screen Reminders
Off
Display Limit Errors
No
Miscellaneous
Number of Retries
3
Ignition Retry
TMB1360R
TMB1318R
Figure 32
Figure 33
The Miscellaneous Menu allows the user to set
whether or not multi-segment cycles may be
programmed, the number of cycles between lint screen
reminders and display limit errors. Disabling Display
Limit Errors will prevent any limit error from being
displayed on the Cycle Stopped Menu. Press the
The Ignition Retry Menu sets the option of how many
retries the machine will attempt before a heater error
occurs. The user will be able to select a value from one
(1) to five (5).
and
keypads to move the highlighted box
through the different items in the Miscellaneous
Menu. Press the
or
keypad to change
selections.
Press the
or
balance retries.
keypad to change number of
Press the
keypad to jump to the Save
Press the
or
keypad to jump to the Save
Changes Menu. Use
or
to move
highlighted box to “Yes” or “No”.
Press the
keypad to return to Global Setup
Menu. If no changes were made, press
or
keypad to return to Global Setup menu.
28
or
Changes Menu. Press the
or
keypad to
move highlighted box to “Yes” or “No”.
Press the
keypad to return to Global Setup menu.
If no changes were made, press
to return to Global Setup Menu.
© Copyright, Alliance Laundry Systems LLC – DO NOT COPY or TRANSMIT
or
keypad
70444801
Global Setup
Temperature Menu
High (H)
Medium (M)
Low (L)
Very Low (VL)
Units
Temperatures
Reverse Cylinder Menu (if
equipped)
190 °F
160 °F
140 °F
120 °F
°F
Rotate Time
120
S
6
S
Stop Time
No
Advanced Reversing
Reverse Cylinder
TMB1361R
TMB1320R
Figure 34
Figure 35
The Temperatures Menu allows the user to set global
temperatures for High, Medium, Low, Very Low and
what unit of measure to display them in. These
temperature ranges are restricted to those allowed by
Auto-Dry configurations for a given machine capacity.
Press
and
keypads to move the highlighted
box through the different items in the menu. Once the
item is highlighted, press the
and
keypads
to change the values.
Press the
or
Changes Menu.
Use
or
or “No”.
Press the
keypad to jump to the Save
to move highlighted box to “Yes”
The Reverse Cylinder Menu allows the user to set the
rotate and stop time for Reverse Cylinder action and
cycle specific rotate time, stop time and Advanced
Reversing. Rotate and Stop Times valid for a heat
cycle are those available through global Reverse
Cylinder parameters. If Advance Reversing is enabled,
the user will be able to view and edit cycle specific
reversing parameters within Cycle Programming.
Refer to Figure 24.
The
and
keypads are used to move the
highlighted box through the different items in the
Reverse Cylinder Menu. Once the item is highlighted,
the value can be changed by using the
and
keypads. Pressing the
keypad to return to Global Setup
keypad
will jump to the Save Changes Menu. Use
Menu. If no changes were made, press the
or
or
Press the
keypad to return to Global Setup Menu.
or
to move highlighted box to “Yes” or “No”.
keypad to return to Global Setup menu.
If no changes were made, press the
or
keypad to return to Global Setup Menu.
70444801
© Copyright, Alliance Laundry Systems LLC – DO NOT COPY or TRANSMIT
29
Global Setup
Cool Down Menu
Moisture Menu (if equipped)
100 °F
2 m
Temperature
Time
Advanced Options for
Moisture Dry
Display Moisture Sensor
Error
Cool Down
No
Yes
Moisture
TMB1321R
TMB1362R
Figure 36
Figure 37
The Cool Down Menu gives the user the option to
setting the Cool Down Target Temperature and Time.
The
or
keypads are used to move the
highlighted box between the two items in the Cool
Down Menu. Once the item is highlighted, the value
can be changed using the
and
keypads.
Pressing the
or
keypad will jump to the
Save Changes Menu. Press
or
to move
highlighted box to “Yes” or “No”. Press the
keypad to return to Global Setup Menu. If no changes
were made, press the
or
keypad to return to
Global Setup Menu.
The Moisture Menu allows the user to enable or
disable Advanced Options for Moisture Dry (only
available on units equipped with moisture sensing
feature) and Display Moisture Sensor Error. Enabling
Advanced Options for Moisture Dry allows users to
program Time Past Target which is the added number
of minutes of heat time past the cycle target moisture
level while in Cycle Programming.
With Display Moisture Sensor Error option enabled,
the control will allow the Moisture Sensor Error to be
displayed in the event that one occurs. Press the
and
keypads to move the highlighted box. Press
the
or
Press the
keypad to change selections.
or
keypad to jump to the Save
Changes Menu. Use
or
to move
highlighted box to “Yes” or “No”.
Press the
keypad to return to Global Setup
Menu. If no changes were made, press
or
keypad to return to Global Setup Menu.
30
© Copyright, Alliance Laundry Systems LLC – DO NOT COPY or TRANSMIT
70444801
Global Setup
Factory Defaults Menu
Audio Only
Temperatures
Only
Banners Only
All Additional
Global Settings
! WARNING !
Restore all cycles and global
settings to factory defaults?
No
Yes
Restore All Cycles and Global
Settings to Factory Defaults
Factory Defaults
Factory Defaults
PHM1054R
TMB1323R
Figure 38
The Factory Defaults Menu is used to set parameters
in the software back to the factory default. Several
parameters can be set individually back to the factory
settings and all Cycles and Global settings can be
restored. The individual parameters that can be set
back to the factory settings are the Audio settings,
Temperature settings, Banners, and additional Global
settings.
Press the directional keys to navigate through the
screen. Press the
keypad to make a selection. A
confirmation screen appears asking if you are sure you
want to restore the settings. Use
or
to
move highlighted box to “Yes” or “No”. “No” is
selected by default. Press the
keypad to return to
Global Setup Menu. If no changes were made, press
the
or
keypad to return to Global Setup
Menu.
Figure 39
The Factory Defaults Second Confirmation Menu is to
ensure that the factory defaults do not get accidentally
reset. Press the
keypad to abort and the display
will then show the Factory Defaults Menu.
Once the
keypad is pressed in any Confirmation
Screen, the Save Changes Menu displays to confirm
the programming changes. Use
or
to
move highlighted box to “Yes” or “No”. Press
the
keypad to return to Global Setup Menu.
The All Additional Global Settings Menu is used to
restore the global settings to the factory defaults.
The Reset All Factory Defaults Confirmation Menu is
used to confirm that the global programming
parameters and Cycle #1-41 are to be set back to
factory defaults. If “Yes” is selected the display will
jump to the Factory Defaults Second Confirmation
Menu.
70444801
© Copyright, Alliance Laundry Systems LLC – DO NOT COPY or TRANSMIT
31
Diagnostics
Diagnostic Menu
The Test Menu provides features for manufacturing
and customer service testing. The highlighted box is
moved horizontally and vertically using the
and
keypads. Press the
keypad to select the menu choice.
Alarms
Test
Press the
keypad to return to Diagnostic Menu.
The screen will display “Diagnostics Are Disabled” if
the manual diagnostics have been programmed off.
Diagnostic test commands via PDA and network will
still function.
Machine ID
Test Cycle Menu
Diagnostic Menu
TMB1325R
TMB1325R
Figure 40
The Diagnostic Menu contains Test, Alarm and
Machine ID Menus. The menus contain specific
diagnostic information and manufacturing data for the
machine. The
,
,
and
keypads
position the highlighted box. Press the
select the menu choice.
keypad to
The Test Cycle Menu is used to run several test steps
as well as a ten-minute cycle. Step 01 keypad test
requires the user to press each keypad. Step 02 Door
Status shows whether the loading and lint doors are
open or closed. Press any key to advance. Step 03
Screen Test shows four screens that test the LCD
screen. Press any key to advance through each of the
four test steps.
The Test Cycle Menu for Test Steps 4-13 is shown in
Figure 42.
Outputs:
Press the
keypad while in the Diagnostic Menu
to return to System Menu.
DM FM FW RV
Test Menu
HT
EA
IR
Intputs:
DR
LD AFS FCRS FCLS CL SL1 SL2
IL
RS DIP1 DIP2 DIP3 DIP4 DIP5 DIP6 DIP7 DIP8
Diagnostics Are Disabled
Temp:90 F
RPM:0
Moisture:1%
Step04: Temp Index - 50, 75 -170 (12)
Inputs and
Outputs
Test Cycle
PRESS
Test Cycle
TMB1424R
Figure 42
Test Menu
TMB1326R
TMB1326R
Figure 41
32
It is similar to the Inputs/Outputs Menu except that the
test step is shown at the bottom of the display and a
key press prompt message is shown in the lower right
corner. Press
to advance through the steps. Refer
to Table 3 for more details of each step. Press
terminate the test.
© Copyright, Alliance Laundry Systems LLC – DO NOT COPY or TRANSMIT
to
70444801
Diagnostics
Test Cycle Chart
STEP
1
2
3
4
5
6
7
8
9
Test Cycle Step
Display
Description
STEP ADVANCE
Keypad Test Step
“Press Each Key To Advance” Advance after all keypads
are pressed.
Loading and Lint Door
Test Step
“Door Status”
Press any keypad.
Display Test Step
“Press Any Key To Advance
Through Screen Test”
Press any keypad.
Display Test Step #1
Screen is blank
Press any keypad.
Display Test Step #2
Horizontal Bars
Press any keypad.
Display Test Step #3
Horizontal Bars (inverted)
Press any keypad.
Display Test Step #4
Screen is black
Press any keypad.
Machine Temperature
Index Display Test
Temperature index harness
value
Press
keypad.
Machine Capacity
Capacity size of machine
Press
keypad.
DIP switch status will be
shown.
Heat Source
Type of heat machine is
configured for
Press
keypad.
DIP switch status will be
shown.
Reversing Motor Present
Will show if machine is
equipped for reversing
Press
keypad.
DIP switch status will be
shown.
Rotation Sensor Present
Will show if machine is
equipped for rotation sensor
Press
keypad.
DIP switch status will be
shown.
Moisture Sensor Present
Will show if machine is
equipped for moisture sensor
Press
keypad.
DIP switch status will be
shown.
Moisture Sensor Test #1
Runs test for short in moisture Press any keypad.
sensor circuit
Press
Moisture Sensor Test #2
Runs test for resistance to
expected moisture level
Press any keypad.
Press
Ten Minute Cycle
Runs a ten-minute normal
cycle
Press
Audio Signal Test
Audio signal sounds for five
seconds
Automatically
10
11
12
13
COMMENTS
keypad.
to restart test.
This step will be skipped
if machine is not
equipped for moisture
sensor.
to restart test.
This step will be skipped
if machine is not
equipped for moisture
sensor.
Any errors encountered are
displayed.
Table 3
70444801
© Copyright, Alliance Laundry Systems LLC – DO NOT COPY or TRANSMIT
33
Diagnostics
Inputs Outputs Menu
Abbreviations for the Inputs and Outputs are defined
in the following table:
Inputs
Outputs:
DM FM FW RV
HT
EA
IR
Intputs:
DR
LD AFS FCRS FCLS CL SL1 SL2
IL
RS DIP1 DIP2 DIP3 DIP4 DIP5 DIP6 DIP7 DIP8
Temp:180 F
RPM:25
Inputs Outputs
Moisture:30%
30:29
DR
Loading Door
LD
Lint Door
AFS
Airflow Switch
FCRS
Fan Motor Contactor Switch
FCLS
Fan Motor Centrifugal Switch
CL
Cabinet High Limit
SL1
Store 1 High Limit
SL2
Store 2 High Limit
TMB1425R
Figure 43
When the Inputs Outputs Menu is accessed through
the Diagnostic Menu, the user can manually turn on
outputs. The user can scroll through the outputs using
any of the arrow keys, the cursor is indicated by
flashing the active output on the screen. The user must
“setup” the outputs to be turned on. The
keypad
is used to select individual outputs to be turned on or
off. After the
keypad is pressed the control will
turn the selected outputs on and display the text
“RUNNING”. The outputs cannot be selected until
the
keypad is pressed. The text “RUNNING” is
no longer displayed. The screen will still show the
selected outputs on the screen and the user can again
select outputs to be turned on or off. If the
or
keypad is pressed at any time during this test,
the control will turn off all outputs if the test is running
or return to the previous screen if the test is not
running.
If the Inputs Outputs Menu is accessed through the
Run Diagnostic Menu (pressing the
keypad
during a running cycle) the menu shows only what is
turned on and off as the cycle runs. Refer to Figure 43.
IL
Ignition Lockout
RS
Rotation Sensor
DIP1
Dip Switch 1
DIP2
Dip Switch 2
DIP3
Dip Switch 3
DIP4
Dip Switch 4
DIP5
Dip Switch 5
DIP6
Dip Switch 6
DIP7
Dip Switch 7
DIP8
Dip Switch 8
Temp
Temperature
RPM
Rotations per Minute
Moisture
Moisture Level
Outputs
DM
Damper Motor
FM
Fan Motor
FW
Forward Contactor
RV
Reverse Contactor
HT
Heater
EA
External Alarm
IR
Ignition Reset
Table 4
34
© Copyright, Alliance Laundry Systems LLC – DO NOT COPY or TRANSMIT
70444801
Diagnostics
Alarms Menus
ALARM COUNTS
C01: S02 Cabinet High Limit
12/05 03:34
C02: S05 Heat
11/29 15:55
C38: S01 Fan Motor Contactor
08/14 07:27
C07: S04 Open Thermistor
06/28 18:24
C01: Scd Open Thermistor
04/08 08:05
The Alarms Menu contains three screens of
information. On the first screen, Alarms (1 of 3), the
eight most recent alarms will contain Cycle Number,
Segment Number, Alarm Type, and the Date/Time of
the Alarm.
The second screen, Alarms (2 of 3), alarm counts list 1
through 8. Alarm counts consist of how many times a
specific alarm has occurred.
The third screen, Alarms (3 of 3), is a continuation of
the alarm counts 9 through 16.
Press the
Alarms (1 of 3)
TMB1400R
Figure 44
or
keypad to navigate to the
different screens in the Alarms Menu. Press the
keypad to go from screen 1 to screen 3. The actual
menus are informational only and cannot be navigated.
Press the
keypad to return to display to
Diagnostic Menu or the Run Diagnostic Menu.
Machine ID Menu
ALARM COUNTS
Air Flow Switch 1
Count:
0
Air Flow Switch 2
Count:
0
Serial #:
Air Flow Switch Bounce
Count:
0
Install Date:
Model:
Cabinet High Limit
Count:
1
Machine Type:
Stove 1 High Limit
Count:
0
Control SN:
Stove 2 High Limit
Count:
0
Open Thermistor
Count:
2
Short Thermistor
Count:
0
UT030NUOG2K0W01
1107002759
07/01/2011
30
11410113
Front End SW:
1
Display SW:
1
Node Number:
250
Alarms (2 of 3)
TMB1330R
Machine ID
Figure 45
TMB1332R
Figure 47
ALARM COUNTS
Fan Motor Contactor
Count:
1
Fan Motor Centrifugal Sw
Count:
0
ICM Lockout Alarm
Count:
1
Heat
Count:
1
Rotation
Count:
0
Moisture Sensor
Count:
0
IR
Count:
5
Network
Count:
18
The Machine ID Menu provides several different types
of manufacturing and machine information that can be
useful to the user and technician. The Machine ID
Menu cannot be navigated. Pressing the
keypad
will return to Diagnostic Menu or the Run Diagnostic
Menu.
Alarms (3 of 3)
TMB1363R
Figure 46
70444801
© Copyright, Alliance Laundry Systems LLC – DO NOT COPY or TRANSMIT
35
Machine Errors
The control displays and logs errors as they occur.
When the control senses the error condition, the audit
counter for that error increases by one. The control
saves the time and date of the last eight (8) errors that
have occurred. Following is a list of possible errors:
PDA Communications Error
These errors may occur during communications.
When an error occurs, the display indicates the error
message on the control for a few seconds. When a
PDA communication error occurs, the audit counter
Total Bad IR Communications is incremented, the
hour, date, and year of the event are saved, and the
error code is saved. An active machine cycle is not
affected when there is an error during PDA
communications and this error information is not
stored in the Last Eight Alarms Menu.
Network Communications Error
Network errors may occur during communication with
a network. When a network communication error
occurs, the audit counter Total Bad Network
Communications is incremented, the hour, date,
month, and year of the event are saved, and the error
code is saved. This error is not saved in the Last Eight
Alarms Menu and has no affect on an active machine
cycle.
Open Thermistor Error
Any time the control senses a temperature less than 0
°F after the first three minutes of an active cycle, the
control will go to Cool Down, display this error
message, and then turn on the audio signal. The
control will continue to display the error message until
any of the keypads are pressed, the Cool Down portion
of the cycle has ended, and the temperature reading is
greater than 0°F. Press any keypad to stop audio
signal. Once all three occur, the control will return to
the Idle Mode. This error will cause the corresponding
Open Thermistor Audit Counter to be incremented and
is saved in the Last Eight Alarms Menu.
36
Shorted Thermistor Error
Any time the control senses a temperature greater than
210 + 4 °F during an active cycle, the control will
enter the Cool Down portion of the cycle, display this
error message, and turn on the audio signal. The
control will continue to display the error message until
any of the keypads are pressed, the Cool Down portion
of the cycle has ended, and the temperature reading is
less than 210 °F. Press any keypad to stop audio signal.
Once all three occur, the control will return to the Idle
Mode. This error will cause the corresponding Shorted
Thermistor Error Audit Counter to be incremented and
is saved in the Last Eight Alarms Menu.
Stove and Cabinet Limit Errors
There are up to two Stove Limit thermostats and one
Cabinet Limit thermostat on the machine. While the
heat relay is on, if the stove temperature or cabinet
temperature reaches the high temperature for the
particular limit thermostat, the heater will turn off
automatically and the control will continue the cycle
with no heat until the limit thermostat resets. Once the
control reaches the End of Cycle the control will
display the appropriate error message, if programmed
to do so, and sound the audio signal. The control will
continue displaying the error message until the control
returns to Idle mode.
The control will increment the appropriate stove or
cabinet error counter and record the error in the Last
Eight Alarms Menu.
NOTE: On some models the stove and cabinet limit
thermostats need to be manually reset. The
remainder of the cycle will be run with no heat. On
these models, the thermostat(s) must be reset prior
to cycling power or the control will return back to
Error Mode.
© Copyright, Alliance Laundry Systems LLC – DO NOT COPY or TRANSMIT
70444801
Machine Errors
Auto Ignition Retry (Gas Models
Only)
Airflow Switch Does Not Close After Cycle
Started
If the Ignition Control Module (ICM) fails to ignite the
gas valve the ICM will send an ICM Lockout Alarm to
the control. When the control receives the ICM
Lockout Alarm it will increment the ICM Lockout
Alarm audit counter. When the error becomes fatal
(user input needed to restart the machine) the control
will increment the Heat Error audit counter and record
the Heat Error in the Last Eight Alarms Menu.
If the airflow switch does not close within 5 seconds
of the start/re-start of a cycle, the control will go to the
Cool Down portion of the cycle, display an error
message and sound the audio alarm. Once the Cool
Down portion of the cycle ends, the control will
continue to display the error message until the power
is cycled to the machine or the
keypad is
pressed. When this error occurs, the Airflow Switch 2
error counter will be incremented and the error will
also be saved to the Last Eight Alarms Menu.
If the ICM needs to be manually reset, when the
control receives the ICM Lockout Alarm it will
display the Cycle Stopped Menu with text prompting
the user to press the
keypad to reset the ICM.
The user can continue to reset the ICM until there are
no more programmable retry attempts (factory default
is 3) or the gas ignites. On machines equipped with an
ICM that does not need to be manually reset, when the
control receives the ICM Lockout Alarm it will turn
the heat relay off for twenty (20) seconds and then turn
it back on to try and ignite the gas. The control will
continue to try and ignite the gas until there are no
more programmable retry attempts (factory default is
3) or the gas ignites. If the ICM fails to ignite the gas
on the last attempt the control will start the Cool Down
portion of the cycle, display the heat error message
and sound the audio signal. When the Cool Down
portion of the cycle ends the control will continue to
display the error message until power is cycled to the
machine or a user presses the
keypad.
Airflow Switch Bounces During A
Running Cycle
If the airflow switch is open for at least one second,
the heat will be turned off and will remain off until the
switch is observed closed for at least 5 seconds (it is
flagged as an airflow switch bounce). If there are 5
airflow switch bounces within 5 minutes the control
will go to the Cool Down portion of the cycle, display
an error message and sound the audio signal. When the
Cool Down portion of the cycle ends, the control will
continue displaying the error message until power is
cycled or a user presses the
keypad. When this
error occurs, the Airflow Switch Bounce Error will be
incremented and the error will also be saved to the
Last Eight Alarms Menu. The Airflow Switch Bounce
counter will be incremented for every instance of an
airflow switch bounce.
Air Flow Switch Errors
Rotation Sensor Error
The control will flag an Airflow Switch Error under
several conditions. Airflow Switch Errors will be
processed differently depending upon what state the
machine was in when the error was detected.
If the machine is equipped with a rotation sensor, the
control will constantly monitor the input and calculate
the cylinder’s rpm. If the rpm drops to zero while the
cylinder is supposed to be spinning, the control will go
to the Cool Down portion of the cycle. The control
will display an error message and sound the audio
signal. Once the Cool Down portion ends, the control
will continue to display the error message until power
is cycled to the machine or the correct keypad is
pressed. This error will increment the Rotation Sensor
Error counter and will be saved in the Last Eight
Alarms Menu.
Airflow Switch Sensed Closed While Not
In Run Mode
If an airflow switch is sensed closed 30 seconds after
entering Idle Mode, or End of Cycle Mode, the control
will display an error message until power is cycled or
the error clears. The cycle will not start and all user
inputs will be ignored. If the error does clear, the
control will go back to its previous mode of operation.
When this error occurs the Airflow Switch 1 error
counter will be incremented and the error will also be
saved to the Last Eight Alarms Menu.
70444801
© Copyright, Alliance Laundry Systems LLC – DO NOT COPY or TRANSMIT
37
Machine Errors
Moisture Sensor Error
Fan Motor Centrifugal Switch Error
While in Idle Mode and on the Cycle Menu, the
control will begin to monitor the moisture sensor input
after one minute without user input. If the moisture
sensor circuitry detects a load present signal read
consistently (every second) for a ten minute period
without user input, the control will declare, if
programmed to do so, a load sensed. If at any time
during this sensing period, user input is detected or the
control determines that there is no load present, it
resets the load detected counter. After this ten minute
period with a consistent load sensed, the control
queues the Load Sensed Menu to display. When user
interaction is sensed, the display will wake and show
the Load Sensed Menu prompting the user to answer
whether the machine is currently empty. If the operator
selects No, the control returns to the Cycle Menu. If
the operator selects Yes, the control will increment the
Moisture Sensor Error counter and record the error in
the queue of the last eight machine errors and display
the Service Moisture Sensor Menu, instructing the
operator to service the moisture sensor soon and press
the
keypad to return to the Cycle Menu. The
Load Sensed prompt will only appear once a day,
unless machine power is cycled. If the control is idle,
with the Load Sensed Menu queued, and a Service
Schedule Reminder is then queued as well, when
detecting user interaction, the control will first display
the appropriate Service Schedule Menu and then
display the Load Sensed Menu after a key has been
pressed.
If the control attempts to turn on the fan motor and the
fan motor contactor is sensed closed but the Fan Motor
Centrifugal Switch fails to close, the control will go
into the Cool Down portion of the cycle, display an
error message and turn on the audio signal. Once the
Cool Down portion of the cycle ends, the control will
continue displaying the error message until power is
cycled or the
keypad is pressed. This error will
increment the Fan Motor Centrifugal Switch error
counter and will be saved in the Last Eight Alarms
Menu.
DIP Switch/Harness Index Mismatch
Error
On power up the control reads the Temperature Index
Harness value and compares that with the value of
switch 1, switch 2 and switch 3 on the DIP switch
configuration. If the result is an invalid setup the
control will not enter Idle mode and instead enter Error
Mode. The control will ignore all user inputs and
display an error message. The machine must be
powered down and the correct temperature index
harness must be installed and/or the DIP switch
configuration must be corrected.
Fan Motor Contactor Error
If the control attempts to turn on the heater relay and
the control does not sense that the Fan Motor
Contactor is closed, the control will go to the Cool
Down portion of the cycle, display an error message
and turn on the audio signal. Once the Cool Down
portion of the cycle ends, the control will continue
displaying the error message until power is cycled or
the
keypad is pressed. This error will increment
the Fan Motor Contactor Error counter and will be
saved in the Last Eight Alarms Menu.
38
© Copyright, Alliance Laundry Systems LLC – DO NOT COPY or TRANSMIT
70444801
Laundry Management
Laundry Management Menus
The Laundry Management Menu contains three
screens. The Laundry Management 1 Menu displays
total cycle counts, total run hours, total heat hours,
total number of rapid advance cycles, total number of
cycles aborted, average End of Cycle to Door Open
Minutes, average End of Cycle to Run Mode Minutes
and total number of times anti-wrinkle was exceeded.
The Laundry Management 2 Menu shows user the
number of times cycles 1 through 24 have been run.
Laundry Management 3 Menu shows the number of
times cycles 25 through 41 have been run and the
number of Heat Relay cycles (Heat). Press the
keypad to move from screen to screen.
CYCLE COUNTS
CY01:
0
CY09:
0
CY17:
0
CY02:
0
CY10:
0
CY18:
0
CY03:
0
CY11:
0
CY19:
0
CY04:
0
CY12:
0
CY20:
0
CY05:
0
CY13:
0
CY21:
0
CY06:
0
CY14:
0
CY22:
0
CY07:
0
CY15:
0
CY23:
0
CY08:
0
CY16:
0
CY24:
0
Laundry Mgmt. (2 of 3)
PHM1065R
Press the
keypad in any of the Laundry
Management Menus to enter System Menu.
Figure 49
CYCLE COUNTS
SUMMARY
Total Cycle Counts: 10009
Total Run Hours: 7507
Total Heat Hours: 7007
Total Number Of Rapid Advance Cycles: 600
Total Number Of Cycles Aborted: 450
Avg Cycle End to Door Open Minutes: 5
Avg Cycle End to Run Mode Minutes: 30
Anti-Wrinkle Time Exceeded: 5
CY25:
10009
CY33:
0
CY41:
CY26:
0
CY34:
0
Heat:
CY27:
0
CY35:
0
CY28:
0
CY36:
0
CY29:
0
CY37:
0
CY30:
0
CY38:
0
CY31:
0
CY39:
0
CY32:
0
CY40:
0
TMB1344R
TMB1333R
70444801
10090
Laundry Mgmt. (3 of 3)
Laundry Mgmt. (1 of 3)
Figure 48
0
Figure 50
© Copyright, Alliance Laundry Systems LLC – DO NOT COPY or TRANSMIT
39
Maintenance
Service Schedule Menu
Daily Menu (Service)
Daily Maintenance Reminders:
1. Inspect the area surrounding dryers, remove all
combustible materials, including lint.
2. Check cylinder for foreign objects to avoid
damage to clothing and equipment.
3. Clean lint from lint compartment and screen to
maintain proper airflow and avoid overheating.
Daily
Monthly
Quarterly
Bi-Annually
Service Schedule Menu
Service Schedule
TMB1334R
Figure 51
Press
from Cycle Menu to enter Service
Schedule Menu. The Service Schedule Menu provides
a user with a time based service reminder list. The list
is broken up into “Daily”, “Monthly”, “Quarterly” and
“Bi-Annually” Menus. Press
,
or
keypad to navigate to
the
,
a menu item. Press the
selected. Press the
Menu.
keypad when menu is
keypad to return to Cycle
TMB1335R
Figure 52
The Daily Menu contains all daily service reminders
that need to be performed. Press the
keypad to
return to the Service Menu.
Monthly Menu (Service)
Monthly Maintenance Reminders:
1. Remove lint and debris from inside exhaust duct
to maintain proper airflow and avoid overheating.
2. Carefully wipe any accumulated lint off the
cabinet high limit thermostat and thermistor,
including perforated cover. Lint buildup will act
as an insulator, causing machine to overheat.
3. Clean lint and debris buildup from blower to
maintain proper airflow, to avoid overheating and
prevent possible vibration.
Service Schedule
TMB1336R
Figure 53
The Monthly Menu contains all monthly service
reminders that need to be performed. Press the
keypad to return to the Service Menu.
40
© Copyright, Alliance Laundry Systems LLC – DO NOT COPY or TRANSMIT
70444801
Maintenance
Quarterly Menu (Service)
Bi-Annual Menu (Service)
Quarterly Maintenance Reminders:
Bi- Annual Maintenance Reminders:
1. Use a vacuum to clean air vents on drive motors.
2. Use a vacuum to clean lint from rear limit
thermostat cover.
3. Check flow of combustion and ventilation air.
4. Check belt tension and condition. Replace worn
or cracked belts.
1. Check mounting hardware for any loose nuts,
bolts, or screws.
2. Check gas steam connections for leakage.
3. Check loose electrical connections.
4. Remove all front panels and vacuum.
5. Check cylinder and front panel seals.
6. Inspect cabinet and inner panels for any damage,
replace or repair as needed.
7. Clean burner tubes of any lint buildup.
Service Schedule
Service Schedule
TMB1338R
TMB1337R
Figure 54
The Quarterly Menu contains all service reminders
that need to be performed four times a year.
Press the
70444801
keypad to return to Service Menu.
Figure 55
The Bi-Annual Menu contains all service reminders
that need to be performed twice a year. Press the
keypad to return to Service Menu.
© Copyright, Alliance Laundry Systems LLC – DO NOT COPY or TRANSMIT
41
Cycle Charts
Cycle
Material
Target Moisture
Cycle Name
Cycle Type
Reversing
Temperature
No
Type
or Time
1
Towels
Moisture Dry
Cotton
OFF
190°F/88°C
1%
2
Sheets Blend
Moisture Dry
Bedding
ON
160°F/71°C
5%
3
Sheets Cotton
Moisture Dry
Bedding
ON
190°F/88°C
5%
4
Sheets Blend Iron
Moisture Dry
Bedding
ON
160°F/71°C
20%
5
Sheets Cotton Iron
Moisture Dry
Bedding
ON
190°F/88°C
20%
6
Duvet Cotton
Moisture Dry
Bedding
ON
190°F/88°C
5%
7
Duvet Blend
Moisture Dry
Bedding
ON
160°F/71°C
5%
8
Napkins Synthetic
Moisture Dry
Synthetic
OFF
140°F/60°C
3%
9
Napkins Blend
Moisture Dry
Blend
OFF
160°F/71°C
3%
10 Napkins Synthetic Iron
Moisture Dry
Synthetic
OFF
140°F/60°C
20%
11 Napkins Blend Iron
Moisture Dry
Blend
OFF
160°F/71°C
20%
12 Napkins Cotton Iron
Moisture Dry
Cotton
OFF
190°F/88°C
20%
13 Uniform Perm Press
Moisture Dry
Synthetic
OFF
140°F/60°C
5%
14 Uniform Cotton
Moisture Dry
Cotton
OFF
190°F/88°C
5%
15 Aprons Blend
Moisture Dry
Blend
OFF
160°F/71°C
3%
16 Aprons Cotton
Moisture Dry
Cotton
OFF
190°F/88°C
5%
17 Sweaters
Moisture Dry
Delicate
OFF
120°F/49°C
15%
18 Rayon
Moisture Dry
Delicate
OFF
120°F/49°C
20%
19 Silk
Moisture Dry
Delicate
OFF
120°F/49°C
20%
20 Wool
Moisture Dry
Wool
OFF
140°F/60°C
15%
21 Perm Press
Moisture Dry
Synthetic
OFF
140°F/60°C
5%
22 Cotton
Moisture Dry
Cotton
OFF
190°F/88°C
5%
23 Denim
Moisture Dry
Cotton
OFF
190°F/88°C
7%
24 Handwash
Moisture Dry
Delicate
OFF
120°F/49°C
15%
25 Drapery
Moisture Dry
Delicate
ON
120°F/49°C
15%
26 30 Minute High
Time Dry
n/a
OFF
190°F/88°C
30 minutes
27 30 Minute Med
Time Dry
n/a
OFF
160°F/71°C
30 minutes
28 30 Minute Low
Time Dry
n/a
OFF
140°F/60°C
30 minutes
29 30 Minute No Heat
Time Dry
n/a
OFF
n/a
30 minutes
30 15 Minute High
Time Dry
n/a
OFF
190°F/88°C
15 minutes
31 15 Minute Med
Time Dry
n/a
OFF
160°F/71°C
15 minutes
32 15 Minute Low
Time Dry
n/a
OFF
140°F/60°C
15 minutes
33 15 Minute No Heat
Time Dry
n/a
OFF
n/a
15 minutes
34 10 Minute High
Time Dry
n/a
OFF
190°F/88°C
10 minutes
35 10 Minute Med
Time Dry
n/a
OFF
160°F/71°C
10 minutes
36 10 Minute Low
Time Dry
n/a
OFF
140°F/60°C
10 minutes
37 10 Minute No Heat
Time Dry
n/a
OFF
n/a
10 minutes
38 5 Minute High
Time Dry
n/a
OFF
190°F/88°C
5 minutes
39 5 Minute Med
Time Dry
n/a
OFF
160°F/71°C
5 minutes
40 5 Minute Low
Time Dry
n/a
OFF
140°F/60°C
5 minutes
41 5 Minute No Heat
Time Dry
n/a
OFF
n/a
5 minutes
n/a = not applicable
- All cycles include a 2 minute, 100°F (38°C) cool down
- All cycles with reversing on rotate for 120 seconds and pause for 6 seconds
- Cool down and reversing settings can be changed from what is pre-programmed from the factory
- If machine does not have the moisture sensing option, the moisture sensing cycles in the table above are automatically
changed to Auto-Dry cycle type with Dryness Level 0 (zero)
42
© Copyright, Alliance Laundry Systems LLC – DO NOT COPY or TRANSMIT
70444801