1
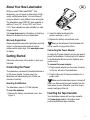
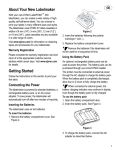
To insert the tape cassette
1. Press and release the tape cassette cover to
open the label compartment. See Figure 3.
4. Insert the cassette with the tape and ribbon
positioned between the print head and pinch
roller. See Figure 5.
Remove
cardboard insert
CLICK!
Figure 3
Figure 5
The first time you use the labelmaker,
remove the protective cardboard insert from
between the print head and pinch roller. See
Figure 3.
5. Press firmly until cassette clicks into place.
6. Close the tape cassette cover and press A to
turn on the power.
= 6 mm
= 9/12 mm
Select tape
cassette size
You can select from a number of different language
options. By default, the language is set to English.
The language option you choose determines the
default units of measure (inches or millimeters) and
the character set that is available.
To select a language
1. Press
+
.
2. Use the arrow keys to select the language you
want and press
.
Language
Figure 4
2. Set the cassette switch for the size of the label
cassette that you are inserting. See Figure 4.
A notch in the cassette fits over the switch when
the cassette is in the correct position.
3. Make sure the tape and ribbon are taut across
the mouth of the cassette and that the tape
passes between the guideposts. If necessary,
turn the spool clockwise to tighten the ribbon.
4
Selecting a Language
Printing Your First Label
You are now ready to print your first label.
To print a label
1. Enter text to create a simple label.
2. Press
.
3. Use the cutter lever to cut the label.
Congratulations! You have printed your first label.
Continue reading to learn more about the options
available for creating labels.
1,2...n