1
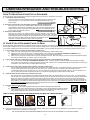
The World’s Most Loved Way To Polish CYCLO DUAL HEAD ORBITAL POLISHER MODELS 5, 5-Pro, 5C, 5C-Pro, 6CE AND 6CE-Pro INSTRUCTION MANUAL CONTENTS SAFETY INSTRUCTIONS .................................................................................................................... 1 DETAILING BASICS ............................................................................................................................. 3 CYCLO POLISHER SET-UP ................................................................................................................ 4 GUIDE TO CTI PRO PAINT CARE™ CHEMICALS & CTI METAL POLISH .............................. 5 GUIDE TO GENUINE CYCLO ACCESSORIES ............................................................................... 6 MACHINE OPERATING INSTRUCTIONS ....................................................................................... 8 USER MAINTENANCE & TROUBLESHOOTING ......................................................................... 10 TECHNICAL SPECIFICATIONS ...................................................................................................... 12 PARTS DIAGRAMS AND LISTING .................................................................................................. 13 APPLICATION AND ACCESSORIES QUICK GUIDE ................................................................. 15 Cyclo Toolmakers, Inc., 14320 Longs Peak Court, Longmont, CO 80504-9698 USA Phone: +1-303-485-1990, Fax: +1-303-723-8680, www.cyclotoolmakers.com 1 © Cyclo Toolmakers, Inc., 2014 Rev2014.04.09 ® This instruction manual is furnished with each Cyclo Model 5, 5-Pro, 5C, 5C-Pro, 6CE & 6CE-Pro Electric Dual Head Orbital Polisher. The entire manual should be read carefully before using the Cyclo Dual Head Orbital Polisher and retained for future reference. SAFETY INSTRUCTIONS GENERAL SAFETY RULES WARNING: Read all instructions. Failure to follow all instructions listed below may result in electric shock, fire and/or serious injury. The term “power tool” in all the warnings listed below refers to your mains-operated (corded) power tool or battery–operated (cordless) power tool. WARNING WARNING Practice safety requirements. Work alert, have proper attire, and do not operate tools under the influence of alcohol or drugs. Read and understand tool manual before work starts to reduce risk of injury to operator, visitors, and tool. WARNING WARNING Ear protection to be work when exposure to sound exceeds the limits of applicable federal, state, or local statutes ordinances and/or regulations. Eye protection must be worn at all times. Eye protection to conform to ANSI Z87.1. WARNING WARNING To avoid accidental starting, unplug the cord when the tool is not being used, when changing accessories, and when adjusting or cleaning tools. Respiratory protection to be used when exposed to contaminants that exceed the applicable threshold limit values required by law. SAVE THESE INSTRUCTIONS Work Area a) b) c) Keep work area clean and well lit. Cluttered and dark areas invite accidents. Do not operate power tools in explosive atmospheres, such as in the presence of flammable liquids, gasses or dust. Power tools create sparks which may ignite the dust or fumes. Keep children and bystanders away while operating a power tool. Distractions can cause you to lose control. Electrical Safety a) Power tool plugs must match the outlet. Never modify the plug in any way. Do not use any adapter plugs with earthed (grounded) power tools. Unmodified plugs and matching outlets will reduce risk of electric shock. b) Avoid body contact with earthed or grounded surfaces such as pipes, radiators, ranges and refrigerators. There is an increased risk of electric shock if your body is earthed or grounded. c) Do not expose power tools to rain or wet conditions. Water entering a power tool will increase the risk of electric shock. d) Do not abuse the cord. Never use the cord for carrying, pulling or unplugging the power tool. Keep cord away from heat, oil, sharp edges or moving parts. Damaged or entangled cords increase the risk of electric shock. e) When operating a power tool outdoors, use an extension cord suitable for outdoor use. Use of a cord suitable for outdoor use reduces the risk of electric shock. f) Guard against electrical shock. It is recommended to use this tool on a GFI (Ground Fault Interrupter) or RCD (Residual Current Device) protected circuit with a rated residual current of 30 mA or less. Personal Safety a) Stay alert, watch what you are doing, use common sense when operating a power tool. Do not use a power tool while you are tired or under the influence of drugs, alcohol or medication. A moment of inattention while operating power tools may result in serious personal injury. b) Use safety equipment. Always wear eye protection. Safety equipment such as dust mask, non-skid safety shoes, hard hat, or hearing protection used for appropriate conditions will reduce personal injuries. c) Avoid accidental starting. Ensure the switch is in the off-position before plugging in. Carrying power tools with your finger on the switch or plugging in power tools that have the switch on invites accidents. d) Remove any adjusting key or wrench before turning the power tool on. A wrench or key left attached to a rotating part of the power tool may result in personal injury. e) Do not overreach. Keep proper footing and balance at all times. This enables better control of the power tool in unexpected situations. f) Dress properly. Do not wear loose clothing or jewelry. Keep your hair, clothing and gloves away from moving parts. Loose clothes, jewelry or long hair can be caught in moving parts. g) If devices are provided for the connection of dust extraction and collection facilities, ensure these are connected and properly used. Use of these devices can reduce dust-related hazards. Power Tool Use and Care a) Do not force the power tool. Use the correct power tool for your application. The correct power tool will do the job better and safer at the rate for which it was designed. b) Do not use the power tool if the switch does not turn it on and off. Any power tool that cannot be controlled with the switch is dangerous and must be repaired. c) Disconnect the plug from the power source and/or the battery pack from the power tool before making any adjustments, changing accessories, or storing power tools. Such preventive safety measures reduce the risk of starting the power tool accidentally. d) Store idle power tools out of the reach of children, and do not allow persons unfamiliar with the power tool or these instructions to operate the power tool. Power tools are dangerous in the hands of untrained users. e) Maintain power tools. Check for misalignment or binding of moving parts, breakage of parts and any other condition that may affect the power tool’s operation. If damaged, have the power tool repaired before use. Many accidents are caused by poorly maintained power tools. f) Keep cutting tools sharp and clean. Properly maintained cutting tools with sharp cutting edges are less likely to bind and are easier to control. 1 g) Use the power tool, accessories and tool bits etc. in accordance with these instructions and in the manner intended for the particular type of power tool, taking into account the working conditions and the work to be performed. Use of the power tool for operations different from those intended could result in a hazardous situation. a) Have your power tool serviced by a qualified repair person using only identical replacement parts. This will ensure that the safety of the power tool is maintained. Service Safety Warnings Common for Polishing Operations. a) This power tool is intended to function as a polisher only. Read all safety warnings, instructions, illustrations and specifications provided with this power tool. Failure to follow all instructions listed below may result in electric shock, fire and/or serious injury. b) Operations such as sanding, grinding, wire brushing, or cutting off are not recommended to be performed with this power tool. Operations for which the power tool was not designed may create a hazard and cause personal injury. c) Do not use accessories which are not designed and recommended by the tool manufacturer. Just because the accessory can be attached to your power tool, it does not assure safe operation. d) The rated speed of the accessory must be at least equal to the maximum speed marked on the power tool. Accessories running faster than their rated speed can break and fly apart. e) The outside diameter and the thickness of your accessory must be within the capacity rating of your power tool. Incorrectly sized accessories cannot be adequately guarded or controlled. f) The arbor size of wheels, flanges, backing pads or any other accessory must properly fit the spindle of the power tool. Accessories with arbor holes that do not match the mounting hardware of the power tool will run out of balance, vibrate excessively and may cause loss of control. g) Do not use a damaged accessory. Before each use inspect the accessory such as backing pad for cracks, tear or excess wear. If power tool or accessory is dropped, inspect for damage to install an undamaged accessory. After inspecting and installing an accessory, position yourself and bystanders away from the plane of the rotating accessory and run the power tool at maximum no-load speed for one minute. Damaged accessories will normally break apart during this test time. h) Wear personal protective equipment. Depending on application, use a face shield, safety goggles or safety glasses. As appropriate, wear dust mask, hearing protectors, gloves and workshop apron capable of stopping small abrasive or workpiece fragments. The eye protection must be capable of stopping flying debris generated by various operations. The dust mask or respirator must be capable of filtrating particles generated by your operation. Prolonged exposure to high intensity noise may cause hearing loss. i) Keep bystanders a safe distance away from work area. Anyone entering the work area must wear personal protective equipment. Fragments of workpiece or of a broken accessory may fly away and cause injury beyond immediate area of operation. j) Hold power tool by insulated gripping surfaces only when performing an operation where the cutting accessory may contact hidden wiring or its own cord. Cutting accessory contacting a “live” wire may make exposed metal parts of the power tool “live” and shock the operator. k) Position the cord clear of the spinning accessory. If you lose control, the cord may be cut or snagged and your hand or arm may be pulled into the spinning accessory. l) Never lay the power tool down until the accessory has come to a complete stop. The spinning accessory may grab the surface and pull the power tool out of your control. m) Do not run the power tool while carrying it at your side. Accidental contact with the spinning accessory could snag your clothing, pulling the accessory into your body. n) Regularly clean the power tool’s air vents. The motor’s fan will draw the dust inside the housing and excessive accumulation of powdered metal may cause electrical hazards. o) Do not operate the power tool near flammable materials. Sparks could ignite these materials. p) Do not use accessories that require liquid coolants. Using water or other liquid coolants may result in electrocution or shock. Kickback and Related Warnings Kickback is a sudden reaction to a pinched or snagged rotating wheel, backing pad, brush or any other accessory. Pinching or snagging causes rapid stalling of the rotating accessory which in turn causes the uncontrolled power tool to be forced in the direction opposite of the accessory’s rotation at the point of the binding. For example, if an abrasive wheel is snagged or pinched by the workpiece, the edge of the wheel that is entering into the pinch point can dig into the surface of the material causing the wheel to climb out or kick out. The wheel may either jump toward or away from the operator, depending on direction of the wheel’s movement at the point of pinching. Abrasive wheels may also break under these conditions. Kickback is the result of power tool misuse and/or incorrect operating procedures or conditions and can be avoided by taking proper precautions as given below. a) Maintain a firm grip on the power tool and position your body and arm to allow you to resist kickback forces. Always use auxiliary handle, if provided, for maximum control over kickback or torque reaction during start up. The operator can control torque reactions or kickback forces, if proper precautions are taken. b) Never place your hand near the rotating accessory. Accessory may kickback over your hand. c) Do not position your body in the area where power tool will move if kickback occurs. Kickback will propel the tool in a direction opposite to the wheel’s movement at the point of snagging. d) Use special care when working corners, sharp edges etc. Avoid bounding and snagging the accessory. Corners, sharp edges or bounding have a tendency to snag the rotating accessory and cause loss of control or kickback. e) Do not attach a saw chain, woodcarving blade, or toothed saw blade. Such blades create frequent kickback and loss of control. WARNING: When using electric tools, basic safety precautions should always be followed to reduce the risk of fire, electric shock, and personal injury, including but not limited to the following: Grounding Instructions a) The Cyclo Polisher should always be electrically grounded while in use to protect the operator from electric shock. This tool is equipped with an approved three-conductor cord and three-prong grounding type plug to fit the proper grounding type receptacle. The green or green/yellow conductor wire in the cord is the grounding wire. NEVER CONNECT THE GREEN OR GREEN/YELLOW WIRE TO A LIVE TERMINAL. If there is any doubt as to whether the wall receptacle is properly grounded, you should have it checked by a qualified electrician. WARNING: DO NOT UNDER ANY CIRCUMSTANCES CUT OR REMOVE THE THIRD (GROUND) PRONG FROM THE POWER CORD PLUG. 2 Extension Cord a) With the Cyclo Polisher, use only three-wire extension cords that have three-prong grounding type plugs and three-pole receptacles that accept the tool's plug. Replace or repair damaged cords. When using this tool at a distance from the power source, a three conductor grounding type extension cord of ADEQUATE SIZE must be used for safety and to prevent the loss of power and overheating. Extension Cord Length Size of Wire in Cord 0-100 feet (0-30 m) 18 AWG (0.75mm2) 101-250 feet (30–76 m) 16 AWG (1.0 mm2) Motor a) Your Cyclo Polisher is powered by a sturdy motor. Be certain your power supply agrees with that shown on the name plate (a.c. means alternating current). Variance in your power supply’s voltage may result in loss of power and overheating. This tool is factory tested. Built into the motor of the Model 6CE is a thermal circuit interrupt. This device will open the power circuit if the motor windings exceed 120 – 130 C. It is not resettable, and if it the protector is activated, the motor field (stator) may have to be replaced. If it will not operate, check electric supply for blown fuses; check plug and electrical receptacle for proper contact. Additional Safety Instructions: a) Do not Abuse Cord. Do not force sharp bend in cord, especially where it exits the handle and particularly when curling cord for storage. b) Maintain Tool with Care. Keep the tool clean for better and safer performance. Follow instructions for lubricating and changing accessories. Inspect cord periodically and, if damaged, have repaired by a Cyclo Toolmakers service facility. Inspect extension cords periodically and replace if damaged. Keep handles dry, clean, and free from oil and grease. Using compressed air, blow dry the bearings under the heads or pads, and blow away dirt or lint inside the motor case. This should only be performed with the power cord disconnected and with proper eye protection. c) Keep Work Area Clean. Cluttered areas and benches invite injuries. d) Use the Right Tool. Do not force a small tool or attachment to do the job of a heavy-duty tool. e) Use Proper Support. Ensure that you have provided proper support for the work piece. A loose work piece may be propelled by the tool if not supported or fixed in place. f) Check Damaged Parts. Before further use of tool, a guard or other part that is damaged should be carefully checked to determine whether it will operate properly and perform its intended function. Check for alignment of moving parts, binding of moving parts, breakage of parts, mounting, and any other condition which may affect the tools operation. A guard or other part that is damaged should be properly repaired or replaced by an authorized Cyclo Toolmakers service center unless otherwise indicated elsewhere in this instruction manual. Have defective switches replaced by a Cyclo Toolmakers service center. Do not use tool if switch does not turn tool on and off. g) Handles Should Remain Insulated. Do not operate the tool without the properly insulated handles. NOTE: If shrink wrap insulation on the rear metal handle is damaged or is removed at the time of repair, it must be replaced before the tool is put back into service. The proper precut length is available from Cyclo Toolmakers or your dealer. When re-installing, be sure not to cover any part of the “1” or “0” (on/off) indicators embossed in the aluminum handle. h) Use only Cyclo Toolmakers Recommended Products. The use of accessories or attachments other than those recommended in these operating instructions may present a risk of personal injury. i) Use of Residual Current Device is Recommended. The use of residual current device with a rated residual current of 30 mA or less is recommended. In the United States and Canada, a residual current device is also known as a ground fault circuit interrupter (GFCI), ground fault interrupter (GFI) or an appliance leakage current interrupter (ALCI). In Australia they are sometimes known as "safety switches" or simply "RCD" and in the United Kingdom they can be referred to as "trips" or "trip switches." DETAILING BASICS This section presents the basic steps involved in vehicle detailing, much of which is accomplished without your Cyclo polisher. More instructions on polisher operation are provided later in this manual. Washing a) b) c) d) e) f) Soap. To wash the vehicle and remove old wax or polish, use cold or warm water and a dishwashing detergent. A standard detergent usually requires 1-2 ounces per gallon of water. If you do not wish to remove existing wax, then use a car washing soap that has a neutral pH, making it “wax-friendly.” This describes most “car wash” soap products. Sponges, mitts and more. It is important to use an appropriate washing device. This includes wash mitts and sponges made from foams, wool and other materials. Advancements in detailing tools include specific types of products designed for easy wheel cleaning, safe, yet aggressive bug removal, and a gentle wash while providing a comfortable fit. They need to be easy to use and assuredly not scratch the surface. Application tips. Use a mitt or sponge that holds the car wash solution. The more solution the mitt or sponge can hold, the more lubricating soapy water you can get onto the surface to be cleaned. Lubrication created by soapy water helps prevent dirt from scratching the surface while being cleaned. Start up high -- away from most of the grit and grime. Rinse your mitt or sponge out frequently. You do not want to rub grit into the paint and cause swirls or scratches. Prepare two 5 gallon buckets by filling one half-full with the soap-and-water wash solution and the other bucket three-quarters full with clear rinse water. Rinse before and after you wash. Rinse the vehicle thoroughly, starting at the top and working your way down. Pre-rinsing is an important step and should not be skipped. Then wash the vehicle, then rinse again. Do it in the shade. Washing and most other detailing work should be preformed out of direct sunlight. Avoid rapid evaporation which can create hard water spots. Do not allow chemicals to dry on painted surfaces or trim pieces. Environment. Make sure that you are practicing good environmental stewardship. Use appropriate cleaners on paints, wheels and metals. Follow all applicable guidelines for water containment. Utilize as little water as necessary and never leave a water hose running when not in use. Claying a) b) c) Cyclo Autoscrub System - clay bar alternative, clay bars and optional use. Cyclo Toolmaker’s Autoscub pads, like clay bars, are used to remove paint over-spray, tree sap, airborne contaminants and industrial fallout from painted surfaces. Autoscrub pads and clay also work well on glass, plastics and many metals. This is an optional step performed before polishing. When hard paint contaminants are present, claying with Cyclo Autoscrub pads or detailing clay first, then polishing, can save time over polishing only. Paint surface check. Use a plastic sandwich bag or any type of thin plastic bag as a tool to inspect the painted surface. Using a clean plastic bag with your fingers or hand inside, run your finger tips across the painted surface. Be careful not to drag any loose debris. The plastic increases the sensitivity of your fingertips to contaminants. Your paint may feel clean and smooth to the bare hand’s touch, but with a plastic bag over your hand, it is a different story! The bumps and roughness you may feel are contaminants and pollutants that need removed for a show car finish. After using Cyclo Autoscrub or detailing clay, the surface will be as smooth as glass and ready for polishing. Application tips. Wash entire surface with a mild detergent, rinse, then dry. Work in shaded area.Mist the work area generously with CTI Pro Paint Care Lubricant and Quick Detail Spray then use the Cyclo Autoscrub Pads on polisher at medium or high speed setting. Make 1-2 Cyclo polisher passes with a moderately quick pace and only light pressure. Evaluate the surface for smoothness and repeat as necessary. When 3 d) e) contaminants and imperfections are lifted, mist again, then wipe dry with a microfiber or soft towel. Rewash vehicle to completely remove residue then polish. We recommend Cyclo's lines of CTI Pro Paint Care and CTI One Pass Express products. When using clay bars, glide across the area. We recommend that you work in a consistent direction – not cross hatching. Move the clay bar back and forth, and you will begin to feel it cleaning the surface. When claying entire vehicles, it is best to begin at the top and then work your way to the lower areas. Inspect the clay bar often and remove large contaminants that could scratch. When the clay bar becomes dirty you can switch to the clean side or knead the clay to extend its use. Continue the process around the entire vehicle until all painted surfaces, glass, chrome, metal pieces and coated wheels have been clayed. Then the painted surface will be smooth and ready for polishing and waxing. Special tips and guidelines. You can save time by claying after the final wash rinse, while the surface is still wet. Never allow a clay bar to drop on the ground. It would be nearly certain to pick up a scratching hazard; if so contaminated, it should be discarded. Cyclo Autoscrub pads may be rinsed clean and re-used. It is important that you work on the vehicle in a shaded area, away from direct sunlight. Re-rinse. Re-rinse or re-wash the vehicle if necessary to clean up after claying. Drying a) Dry thoroughly. The vehicle should be completely dry before polishing and waxing. Scratches can easily be imparted when substandard towels are used for drying. Discarded household towels should never be used to dry a vehicle. They can scratch the surface and produce lint. There are several professional quality tools including microfiber towels, drying air blowers, water blades, chamois and available to reduce drying time. What Is Polishing - It Is Important That You Do Not Just Wax a) Your paint’s appearance is dependent on being well polished to a highly reflective, smooth finish. Polishing removes oxidation, old wax buildup and other contaminants while cleaning, leveling and shining your paint. Polishing can smooth the edges of larger imperfections and even remove light scratches. Polishing is important to prepare the surface for protecting with a sealant or wax. b) It is important to remove all of the oxidation, wax buildup and contaminants before applying a wax or sealant. You do not want to seal in the contaminants. Profile image of paint with scratches in and oxidation and pollutants on the clear coat. Swirls, Scratches and Other Defects Removal Profile image of a) Swirls and holograms are imperfections in paint appearance caused by thousands of paint with various microscopic scratches in the clear coat. These scratches can be the result of polishing scratches. with a high speed buffer, dirt and sand in the air, rough drying towels and car wash and snow removal brushes. The removal of swirls and holograms is accomplished by removing the fine scratches. Your Cyclo polisher does this with the right combination of liquid compounds, polishes and pads and the correct technique. b) If a scratch catches your fingernail then it’s likely too deep to remove. Polishing the scratched area is still recommended. However, do so with the idea that you are attempting to make the defect less noticeable but not to remove it entirely. Some scratches and swirl marks are too deep to safely remove. Attempting to do so may result in buffing through the top layer of paint or clear coat and permanent damage. Always test in an inconspicuous area. c) Severe scratch and defect removal requires advanced training and the correct combination of detailing liquid compounds and polishes, pad selection and high speed rotary buffer application. We do not recommend cutting or compounding paint with a high speed rotary buffer without prior experience. CYCLO POLISHER SET-UP Determine the Intended Application and Appropriate Attachment System Configuration for Your Application a) Polishing/Waxing/Buffing/Deoxidation/Cutting/Compounding/Swirl Removal Automotive paints and gel coats on cars, buses, boats, RVs, aircraft, and more. ProGuard™ Orbital Backing Plates or heads with Rubber Pad Holders. b) Metal Polishing Aluminum, stainless steel and chrome. ProGuard Orbital Backing Plates or heads with Rubber Pad Holders. c) Scrubbing Carpets/Upholstery/Fabrics Interior and exterior applications. Scrub brushes, ProGuard Orbital Backing Plates with foam pads and pad covers or Head Assemblies with Rubber Pad Holders with foam pads and pad covers. d) Other Miscellaneous Applications. Hockey arena boards: FastCut™ Discs on ProGuard Orbital Backing Plates or Head Assemblies with Rubber Pad Holders. Tile and grout cleaning: Scrub brushes. Headlight restoration: ProShine™ Discs & Interface pads on ProGuard Orbital Backing Plates or Head Assemblies with Rubber Pad Holders. e) Refer to the application chart (on the back cover) for additional information and product application suggestions. Backing Plates and Attachment Alternatives a) b) c) ProGuard Orbital Backing Plates (79-112x2) Featuring a low profile for improved control and a non-marking bumper for safe operation. The advanced design features a strong-gripping hook field, provides faster pad centering and is perfect for quick and easy pad changes. For use with 72- series foam and wool pads. Rubber Pad Holders (79-101x2) Durable, long-lasting Rubber Pad Holders fit directly over the Cyclo Polisher Head Assemblies to hold 72- Series pads via Velcro hook face. Head Assemblies (60-055) The original set-up for Rubber Pad Holders or foam and wool bonnets (71- series foam and wool pads permanently attached to a rubber boot). Rubber Pad Holders fit directly over the Head Assemblies. 4 d) e) Scrubbing Brushes (76-810x4, 76-830x4, 76-840x4 and 76-870x4) Genuine Cyclo scrubbing brushes have integral connectors which screw directly into the Cyclo Polisher replacing the heads. By simply attaching two Cyclo Brushes you can clean carpet, upholstery, tile, grout and more. ProShine Interface Pad (72-920x2) Cushion backing plate for ProShine abrasive discs. Interface pads improve performance by allowing the sanding disc. Configure the Vibration Elimination System (VES)™ Counterweights on Your Polisher. a) b) c) d) e) f) When new, your polisher will have Cyclo Toolmakers’ exclusive VES counterweight system but may have no VES weighted insert installed. You will need to install the appropriate weighted insert then install whichever attachment you will be using: ProGuard OBP, Rubber Pad Holders or Brushes. With power cord not connected, lay the polisher upside-down on your lap, a bench or other flat surface. Determine the attachment system configuration that you intend to use (see section 1 above) Select the appropriate VES weighted insert from the table below. Thread the weighted insert into the counterweight and hand tighten using the 7/32” L-hex key (included). IMPORTANT! Tighten VES weighted insert firmly by attaching the 5/8” flat wrench (included) to the counterweight’s threaded nut style fitting, and turn counterclockwise until you make contact with the L hex key. Use the flat wrench pivoting on hex wrench to prevent counterweight from turning while tightening the weighted insert. Turn the L hex key clockwise to tighten VES weighted insert firmly. Do not overtighten. Attachment System: ProGuard™ Orbital Backing Plates Carpet And Scrub Brushes Rubber Pad Holders or Bonnets over Head Assemblies Description (part #): 6.5g Weight, Blue (20-072) 18.75g Weight, Silver, 1 Stripe (20-076) 32g Weight, Yellow, 2 Stripes(20-078) Weighted Insert (Top And Side Views) Table 1: Adjustable VES Counterweight Application Table Why Low Vibration Is Important: Operators face significant risk of muscle, joint and nerve damage caused by the hand-arm vibration of many power tools. By reducing the amount of vibration you can reduce muscle and joint fatigue as well as the potential risk for permanent damage, as described in the ISO 5349-1:2001 standard, Mechanical vibration -- Measurement and evaluation of human exposure to hand-transmitted vibration. Cyclo Toolmakers’ machines are designed to minimize vibration. Attaching ProGuard Orbital Backing Plates, Head Assemblies, Quick Connect Adapters, Scrub Brushes, and other accessories. a) Lay the polisher upside-down on your lap, a bench or flat surface. You may also use the cardboard insert removed from inside the polisher box to support polisher and hold it in place. b) Fit the flat wrench around the hex nut-like adapter part of the counterweight. c) Hold the counterweight nut with the flat wrench (see left hand in diagram), and thread the attachment clockwise. into the counterweight nut (see right hand). d) Do not over-tighten but use a firm grip for a hand tightening. Repeat the installation procedure for the other side. Guide to CTI Pro Paint Care™ Chemicals & CTI Metal Polishes Detailing Polishes and Products Selection – CTI Pro Paint Care™ Line and Other Leading Professional Products Cyclo products are specifically formulated for the speed, action, and weight of the Cyclo Polisher. While many other professional grade machine-application polishes are also proven to give satisfactory results, the manufacturer’s recommendation for superior results are the field-proven Genuine Cyclo CTI products and Genuine Cyclo Accessories. For additional information on use and application of other leading professional quality polishes and products, please visit our website’s support section at www.cyclotoolmakers.com. Selection of the appropriate detailing chemical is essential for proper results. Many polishes can remove light scratches, and there are products specifically designed to remove swirl-marks and holograms. There are more aggressive products and it is important to understand the difference between a polish, wax and sealant. When using these products, read all instructions carefully and we recommend that you always use the least aggressive product and pad combination necessary for your finish condition. a) b) c) CTI Pro Paint Care Heavy Compounding Gel – Removes scratches, heavy oxidation, orange peel, acid rain damage and other defects. Aggressive cutting and compounding polish for use on any surface. CTI Pro Paint Care Light Compounding Liquid – Eliminates hairline scratches and oxidation. Leaves a smooth surface ready for polishing. Follow with our CTI 1 Pass Express™, then our Protective Sealant (Pro Paint Care Polish and Protective Sealant) or Finishing Wax. CTI Pro Paint Care Polish and Swirl Remover – Specially formulated to remove swirls, holograms, light scratches and oxidization. It is the perfect follow-up to Cyclo's CTI Pro Paint Care Light Compounding Liquid. It does not contain sealants and should be followed with our CTI Pro Paint Care Finishing Wax and/or Protective Sealant. 5 d) e) f) g) CTI Pro Paint Care Protective Sealant – Our Polish and Protective Sealant is a highly protective sealant that will give your surface up to 6 months of durable protection and brilliant gloss. Shows your paint’s original new car shine. Use on all painted and gel coat surfaces. CTI Pro Paint Care Finishing Wax: This easy to apply cream wax will give your surface excellent UV protection and incredible brilliant gloss. Shows your paint’s original new car shine. Use on all painted and gel coat surfaces. CTI Pro Paint Care CTI 1 Pass Express™ – Safely removes swirls, haze, light scratches, mild oxidation and surface contaminants while restoring depth and brilliance. Use in a one-pass application for express polish and seal. Optionally follow with CTI Protective Sealant or CTI Finishing Wax to lock-in the new car shine. Excellent on all painted surfaces, gel coats and clear coats. CTI Pro Paint Care Lubricant and Quick Detail Spray – Provides the necessary slick surface for the Autoscrub pads or for a clay bar to glide on. It is specially formulated for streak-free surface perfection in the sun or shade when used as a spray polish. Metal Polishes and Sealants – CTI Metal Polishes and Sealants Line and Other Leading Professional Products Cyclo products are specifically formulated for use with the Cyclo Polisher and though some machine application type polishes may give satisfactory results, we recommend that for the BEST results only the laboratory and field tested Genuine Cyclo Accessories and products be used with the Cyclo Polisher. For additional information on use and application of other leading professional quality polishes and products, please visit our website’s support section at www.cyclotoolmakers.com. a) b) CTI Metal Polish Free FliteTM Cleaner-Polish – With one easy step this aggressive rubbing compound removes corrosion, oxidation and surface film while also leaving a polished finish that is absolutely stunning. For quality that meets high government standards for its aircraft, insist on Free Flite Cleaner-Polish for your stainless steel, aluminum, billet parts, chrome and virtually every metal that needs polishing. CTI Metal Polish Free FliteTM Protective Sealant – Specially formulated to bond to bare metal, allowing you to deoxidize the surface and effortlessly remove finishing scratches. Plus, its protective coat helps prevent further oxidation. Great for chrome. Use after Free-Flite Cleaner-Polish to seal and lengthen protection interval. CTI Pad Care™ Products – CTI Pad Care pad cleaning products dissolve compounds and polishes, removes build-up that can destroy pads. Excellent for bio-friendly wheel and tire cleaning. a) CTI Pad Care High Concentrate – Our concentrated formula is ready for dilution with water and use with a spray applicator. Dilute then spray directly onto each pad or brush for deep cleaning. Or, mix with warm water to soak pads and scrub brushes after use. b) CTI Pad Care Cleaner With Spray Applicator – Convenient and ready for use. No mixing necessary. Simply spray each pad, brush or other accessory 3 to 4 times for a deep cleaning. Dissolve embedded polishes and compounds, remove wax build-up and pollutants to extend the life of pads. Perfect for clean and care of scrub brushes as well. Guide to Genuine Cyclo Accessories The following information will assist you in selecting the appropriate accessory for use with the Cyclo Polisher. For additional tips and application guides, please refer to the application chart included on the back cover of this manual. Pad Selection Guide – Genuine Cyclo Pads Detailing pads – are composed of either high tech foams or wool and synthetic fiber blends. These pads can be used for restoration and defect removal, polishing, applying waxes and sealants as well as final buffing. Each pad type serves a specific function in the detailing process. You will want to match the appropriate pad with the type of detailing liquid compound, polish, wax or sealant. Foam pads – are made from specially designed synthetic polymer foams with small, uniformly shaped cells that may be either open or closed. The smaller cells in open-cell foams are less aggressive in their polishing characteristics. As the cell size increases so does the pads ability to carry detailing liquids and therefore the its level of aggressiveness. Closed cell and stiffer foams work well in polishing harder paints or for more assertive compounding. Open cell foams can wick the lighter liquid elements from polishing liquids, altering their characteristics. Wool pads – are made from a variety of natural wools and synthetic fibers. The yarn blend may also be twisted or not, and the fiber may be treated to have more or fewer barbs. For an aggressive action, our non-twisted 50:50 poly/wool pad is best. Twisted wool can transport more compound, and that increases aggressive when used with an aggressive compound. Pad Type Bonnets Velcro White Foam Finishing Pad Blue Foam Polishing Pad Green Foam Polishing Pad Yellow Foam Cutting Pad Orange Foam Polishing & Compounding Pad Yellow Foam Scrubbing Pad The Original Cyclo Cutting White Wool Pad Yellow Medium Cutting Wool Pad 71-110x2 72-110x4 72-115x4 72-120x4 72-135x4 72-145x4 72-160x4 72-455x4 72-435x4 a) b) 71-120x2 71-135x2 71-145x2 71-160x2 71-455x2 The numbering system for each family of Genuine Cyclo accessories indicates relative aggressiveness, considering all physical characteristics of the materials. Note the last two digits in all cases. In our part numbering system, a 72-145 foam pad is more aggressive than our 72-120 foam pad. A 72-445x4 is more aggressive than a 72-435x4 wool pad. The hundreds digit (i.e. the “4” in 71-415x2 or the “1” in 72-145x4 indicated material, such as foam, or wool. The relative aggressiveness digits (last 2) do not compare across different materials. That is, one cannot make an inference comparing a -415 (wool accessory) to a -145, -120, -110 or other 100 series (foam accessories) The number after x denotes the packaged quantity meaning72-435x4 is a box of 4 Yellow Medium Cutting Wool pads with Velcro. Scrubbing/Bug& Tar Removal Yellow Foam Scrubbing Pad i. Open cell, premium quality – Foam Bonnet (71-160x2), Velcro Pad (72-160x4) ii. Recommended applications: Bug Removal • Paint Deox • Paint Compound • Paint Scratch Removal • Metal Polish/Cleaner iii. Scrubs away hard to remove materials such as bugs, tar, and sap. Also used as a more aggressive deoxidizer. Cutting/Compounding/Deoxidation/Swirl Removal Original Cyclo Cutting Wool – Bonnet (71-455x2), Velcro Pad (72-455x4) i. Natural wool and polyester blend ii. Recommended applications: Metal Polish/Cleaner • Paint Deox • Paint Compound • Paint Swirl Removal iii. The preferred multipurpose wool/poly pad, used for metal polishing and aggressive paint compounding. This pad is excellent for removing swirl marks and scratches. Orange Foam Compounding & Polishing Pad – Bonnet (71-145x2), Velcro Pad (72-145x4) i. Closed cell, premium quality 6 Recommended applications: Paint Polish/Cleaner • Paint Deox • Paint Compound • Metal/Chrome Polish An exceptional, all-in-one cleaning and polishing pad. This high density pad has the power to remove lights scratches and polish the surface. Yellow Foam Cutting Foam Pad – Bonnet (71-135x2), Velcro Pad (72-135x4) i. Closed cell, premium quality ii. Recommended applications: Paint Polish/Cleaner • Paint Deox • Paint Compound • Paint Scratch Remover iii. A firm, versatile pad that can be used on everything from compounding and scratch removal to applying paint cleaners and polishes. Yellow Wool Medium Cutting Pad – Velcro Pad (72-435x4) i. 50% wool, 50% acrylic ii. Recommended applications: Paint Polish/Cleaner • Paint Deox • Paint Compound • Metal/Chrome Polish iii. An exceptional, all-in-one cleaning and polishing pad. This pad has the power to remove light scratches and polish the surface. Cleaning/Polishing/Deoxidation Green Foam Polishing Pad– Bonnet (71-120x2), Velcro Pad (72-120x4) i. Open cell, 60 pores per inch ii. Recommended applications: Sealant • Paint Polish • Paint Cleaner • Metal Sealant iii. A more aggressive pad than our white or blue pads. The pore density makes it perfect for polishing and removing light oxidation for a stunning shine. Blue Foam Polishing Pad – Velcro Pad (72-115x4) i. Open cell, 70 pores per inch ii. Recommended applications: Paint/Metal Sealant • Paint Polish • Paint Cleaner • Final Wax Application & Buff iii. The perfect pad for light polishing on any surface. Use with wax and polish for a fine gloss finish or to remove swirl marks. Wax/Sealant Application White Foam Finishing Pad – Bonnet (71-110x2), Velcro Pad (72-110x4) i. Open Cell, 100 pores per inch ii. Recommended applications: Extreme Shine • Final Wax Buff • Wax Application • Sealant • Metal Sealant iii. This superfine pad is used in final buffing, after polishing with other pads. Final Wax Buff White Foam Finishing Pad – Bonnet (71-110x2), Velcro Pad (72-110x4) Microfiber Suede Pad Cover i. Ultra soft microfiber ii. Recommended applications: Extreme Shine iii. An ultra-soft cover used for final touches. Removes all surface residue. ii. iii. c) d) e) Genuine Cyclo Scrub Brush Selection Guide Your Cyclo polisher is also a scrubber. Fitted with Genuine Cyclo brushes, its action mimics the motion of hand-scrubbing. By simply attaching two Cyclo Brushes to the machine you can clean carpet, upholstery, boat decks, tile, grout and more. The orbiting motion of the Cyclo machine brushes combined with the brushes’ high quality bristling safely cleans leather, fabric, upholstery and carpets. Each brush kneads, scrubs and vibrates loose any soil or debris. The brushes do not spin, an action that could damage fabrics and carpet. Brushes are available in four varieties, and each brush is made of durable nylon bristles modified for specific applications. Use our CTI Pad Care Pad Cleaner products your favorite carpet or upholstery shampoo with the Cyclo brush to remove tough stains from your vehicle, RV or home. Scrub Brush Type Product Number Gray Ultra Soft Upholstery Brush 76-810x2 Aqua Soft Carpet Brush 76-830x2 White Standard Carpet Brush 76-840x2 Black Scrub Brush 76-870x2 a) Upholstery, Fine Carpets, Fine Interiors Gray Ultra Soft Upholstery Brush – 76-810x2 i. Flexible bristles, flagged (ends) for softness and water-carrying capacity. ii. Recommended applications: Ideal for use on headliners, leather, and other fragile upholstery iii. Natural fiber fine carpets b) Fine Carpets, Durable Carpets, Auto & RV Carpets & Upholstery Aqua Soft Carpet Brush – 76-830x2 i. Recommended applications: Perfect for most auto and interior carpets and standard upholstery c) Auto & RV Carpets & Interiors, Tile & Grout, Durable Carpets White Standard Carpet Brush – 76-840x2 i. Recommended applications: The white brush is designed for more vigorous cleaning of floor mats; more durable carpets d) Tile & Grout, Truck Bed Liners, Heavy Scrubbing Black Scrub Brush – 76-870x2 i. Recommended applications: cleaning tile and stone floors, pick-up truck bed liners Cyclo Autoscrub System – Clay Bar Alternative With the dual action of the Cyclo Polisher you can safely and effectively remove paint over spray, water spots, tree sap, rail dust and other bonded surface contaminants from the surface of automotive paint, glass, moldings and plastic. Requires the use of CTI Pro Paint Lubrication & Quick Detail Spray. Autoscrub Pad Type Medium grade (yellow) Fine Grade (blue) a) Product Number 72-340x2 72-320x2 Moderate Surface Decontamination Autoscrub Medium Grade (yellow) – 72-340x2 i. Recommended applications ii. 7 Ideal for removing heavier contamination buildup. Perfect for older vehicles b) Light Surface Decontamination Autoscrub Fine Grade (blue) – 72-320x2 i. Recommended applications ii. Ideal for removing light contamination build-up. Perfect for newer vehicles Genuine Cyclo Pad Covers Each pad cover has a specific function in the detailing process. May be used for applying polish, cleaning interior surfaces, buffing wax, or adding that final touch to bring paint and interiors to a gorgeous shine. The pad covers fit snugly over foam pads with a durable elastic cuff. For additional tips and application guides, please refer to the application chart included on the back cover of this manual. Pad Cover Type Product Number Microfiber Suede Pad Cover 73-515x4 Microfiber Terry Pad Cover 73-530x4 Cotton Terry Pad Cover 73-550x4 a) Extreme Shine Microfiber Suede Pad Cover – 73-515x4 i. Recommended applications ii. Ultra-soft and ideal for removing surface residue iii. Buff out for extreme shine b) Final Wax Buff Microfiber Terry Pad Cover – 73-530x4 i. Recommended applications ii. The preferred cover for applying polish and buffing wax iii. Its hooked fibers remove surface residue. c) Upholstery Cotton Terry Pad Cover – 73-550x4 i. Recommended applications ii. Perfect for cleaning interior surfaces and for buffing, polishing iii. Drying exterior surfaces Genuine Cyclo Discs Genuine Cyclo ProShine (cushioned abrasive “Micro-Mesh”) discs and Fastcut Discs (non-woven scrubbing discs similar to a soft Scotch-Brite) are handy for scratch removal and floor and board cleaning. ProShine Discs require a 72-920 ProShine™ Interface Pad that fits between a Velcro attachment system (Rubber Pad Holders or ProGuard Orbital Backing Plates. Type Product Numbers ProShine Abrasive Discs in grades of 1500, 2400, 4000, 6000, 8000, 12000 72-701x4, 72-702x4, 72-704x4, 72-706x4, 72-708x4 & 72-712x4 Fastcut 600 Grit Disc 74-660x10 a) Deep Scratch Removal ProShine Discs 1500-4000 (72-701x4 - 72-704x4) i. Recommended applications: Discs are ideal for removing scratches and use water as a lubricant for discs. Start with 1500 or 2400 and you should be able to switch over to light compounding liquids after 4000. Requires interface pad # 72-920. b) Light Scratch Removal ProShine Discs 2400-12000 (72-702x4 – 72-712x4) i. Recommended applications: Discs are ideal for removing light paint or plexiglass scratches. Use soapy water or detailing spray as a lubricant for discs. Start with 2400 or 4000 grade disc on one head of the polisher and just use a Green Foam Polishing Pad or Blue Foam Light Polishing Pad on the opposite head to minimize amount of sanding area and impact. Once sanded, you should be able to switch over to light compounding, swirl remover or polish after application of 6000 or higher grade or discs. Requires interface pad p/n 72-920. c) Aggressive Surface Scrubbing and Cleaning Fastcut 600 Grit Disc (74-660x10) i. Use Fastcut discs for scrubbing floors, tile, showers, hockey arena boards (puck marks); excellent for removing bugs from wing leading edges, auto bumpers and more. Machine Operating Instructions Your Cyclo Polisher has two heads rather than the single head common on other orbital-motion tools. As soon as the Cyclo Polisher is placed on a working surface and powered on, orbital “hand-rubbing” action takes place. Each sides reactive forces from its polishing or scrubbing is counteracted by the opposite side. Therein lies the secret of the tool’s ability to do many different types of jobs that could not be done with a single head orbital or a rotary tool. The two heads move in a circular motion without forced spinning and are timed and weighted to balance away vibration forces. All the energy from the motor is directed to the polishing or scrubbing action, and none returned to vibrating the user. IMPORTANT POLISHER OPERATION INFORMATION:–EXCESSIVE PRESSURE DOES NOT IMPROVE PERFORMANCE AND MAY DAMAGE THE POLISHER’S TRANSMISSION. The hand-like action of the polisher’s heads prevents surface damage regardless of the pressure applied. Move the machine slowly. You need not be afraid of burning, gouging, or swirling the surface. General Polishing Instructions a) After you have placed the pads or bonnets on your Cyclo Polisher, connect the tool to the power supply. b) Apply a small amount of the proper polish or compound to each pad, just enough to spread across and fully cover the pad. c) Place the Cyclo Polisher, pad side down on the surface, move the tool around before turning it on in order to distribute the polish within the pad over the surface. 8 d) e) f) g) Turn on the tool and move it back and forth and side to side in a latticed pattern across an area approximately 2’ x 2’ in size. Use the first 20-30 seconds to further evenly spread the liquid detailing product. Then slow down. Grip both handles of the polisher, and using only light or moderate pressure - letting the action and the weight of the tool do the work - move the polishing heads across the area at a very slow comfortable speed. Deoxidize or polish the entire car in this manner. When you have finished, you can remove any powdery or lubricant residue left by your liquid products using a microfiber towel. You may also use white foam pads or bonnets, or microfiber or terry pad covers to removing any remaining residue. If the residue does not wipe off easily, the surface is still not clean, repeat steps 2-5 as necessary. As the pads become fully impregnated with polish or oxidized paint, they should be removed and washed. Never keep polish in pads overnight. Additional pad care information is included below. Pad Care Instructions. IMPORTANT INFORMATION: Clean pads are important to perfect polishing. Cleaning your pads well and before they dry will extend their life. Use Genuine Cyclo CTI Pad Care – Pad Cleaner (84-404, 84-406) or a mild detergent and warm water. DO NOT WASH PADS IN GASOLINE OR SOLVENTS. For maximum life, be sure to clean pads, bonnets, and pad covers after each use. To clean, spray CTI Pad Cleaner on the pad face, work in, and let soak in a container of water-diluted Pad Cleaner. After soaking, rinse out, and if clean, place the items back on the Cyclo Polisher and run for a few seconds. Allow the action of the machine to shake excess water from the pad. You may also just squeeze dry (do not twist or wring). Then allow to air dry. The pads and bonnets should be cleaned as soon as possible after use, and do not allow compounds to dry in pads. The wool fiber pads should also be washed with CTI Pad Cleaner and then run through with a brush. Pads and other accessories can also be machine washed in warm water and tumble dried in a clothes dryer. General Scrubbing Instructions a) Begin by vacuuming the loose debris and materials from the area to be scrubbed. b) Pre-treat the area with Cyclo CTI Pad Care – Pad Cleaner or an alternative carpet cleaning agent or enzyme c) With scrub brushes installed on the Cyclo machine, connect the tool to the power supply. For additional information on the installation of scrub brushes, please refer to the CYCLO POLISHER SET-UP section of this document. d) Place the Cyclo machine, brush side down on the surface. e) Turn on the tool and move it back and forth and side to side in a latticed pattern. f) Grip both handles of the polisher, and using only light or moderate pressure - letting the action and the weight of the tool do the work - move the polishing brushes across the area at a comfortable speed. g) When you have finished, you can wipe down the treated areas with an absorbent towel. If you have an extractor or wet vacuum, lightly wet the area and extract the water. h) As the brushes become impregnated with loose fibers, they should be removed, combed out and cleaned. General Pad Cover Instructions a) Disconnect from power source. Lay the polisher with heads facing up on your lap, a bench or flat surface. You can use the insert removed from inside the polisher box to support polisher and hold it in place. b) Attach pads or bonnets onto the Cyclo Polisher. It is common to use the Green Polishing, Yellow Cutting or Orange Compounding and Polishing Foam Pads or a wool pad. c) Stretch the pad cover’s elastic ring over the foam. Make sure that you have completely covered the foam pad. The elastic band should be place so as not come in contact with each other when running. The Pad Cover will completely cover the foam (or wool) pad. d) Rotate each head to ensure that the Pad Covers do not contact each other. If the Pad Covers contact each other continue to smooth out the covers over the pads to remove any wrinkles in the material and to ensure that elastic bands are not making contact. e) Connect the tool to the power supply. f) For use in final buff and exterior detailing, follow the General Polishing Instructions above. g) For use on interiors and upholstery, please refer to the General Scrubbing Instructions above Attaching Rubber Pad Holders and Bonnets to Head Assemblies: a) Disconnect from power source. Lay the polisher with heads facing up on your lap, a bench or flat surface. b) Take pad holder or bonnet and turn it completely inside-out. c) Center the inside-out pad holder or bonnet onto the head assembly. d) Flip one edge of pad holder or bonnet over the head assembly using your thumbs to stretch it over the head. e) Rotate pad and stretch the other half of the pad holder or bonnet over the head assembly. f) Use your thumbs to center the pad holder or bonnet over the head for an even fit. g) Complete for both head assemblies. 9 USER MAINTENANCE AND TROUBLESHOOTING Below are instructions on care and maintenance of your polisher. You can also visit our website at www.cyclotoolmakers.com for tutorials and video instructions on proper tool care and maintenance. How To Maintain Your Cyclo Polisher Oil here Be sure the polisher is disconnected from the electrical supply before any inspection or maintenance is performed. 1) Lubricate the upper motor bearing After every eight hours of use, lubricate the upper motor bearing by placing 3 drops of light machine oil (e.g. 3-in-1 oil) in the center of the bronze bushing found at the top of the motor housing. 2) Clean your tool of dirt, fiber, and other debris by blowing it out with compressed air. Every eight hours of use, or as conditions warrant, blow out the motor housing with compressed air to clean out any accumulated dust or dirt. If the tool is being used to clean carpets, be sure to blow out the motor housing after every use. If tool should get wet, be sure to blow dry the underside of the tool. 3) Inspect your carbon brushes. Every forty hours of use, or as conditions warrant, The carbon brushes in your polisher are Compressed Air wear items and periodically will need to be replaced (after 50 to 150 hour of use). The carbon brushes that are used in your polisher will shut off the polisher when they need to be replaced. Refer to the images in Table 2 (below) for examples of good and worn parts. Since brushes are wear items, we recommend that you keep a spare set of brushes. Compressed Air Remove cap If Your Cyclo Polisher Fails to Run Be sure the polisher is disconnected from the electrical supply before any inspection or maintenance is performed. The motor is only for the voltage specified on the nameplate. Voltage should not vary more than 10% over or under the voltage shown on the nameplate. Although the Cyclo Polisher is built to last a lifetime, it can encounter problems from heavy wear and tear. All problems are repairable, and can most often be repaired by a mechanically inclined technician or user 1) If your polisher fails to run, unplug it from the outlet or power source. a) Check your power cord plug for bent prongs that could be preventing proper contact with the outlet. b) Check your power cord for areas of worn or cracked insulation. If any of these are noted, DO NOT CONTINUE TO OPERATE the tool. IMMEDIATELY contact Cyclo Toolmakers or your dealer to have your tool repaired and serviced. c) Check your source of power for blown fuses or open circuit breakers in the line. Also verify that your power source is providing adequate voltage and current to safely operate your polisher. Use a volt meter if able. 4) If your polisher starts to arc, experiences a loss in torque, runs hot to the touch or has stopped during operation: Turn off your polisher and DO NOT CONTINUE TO OPERATE the tool. Continuing to use your tool may cause further damage by creating a short circuit in the motor windings. Unplug your polisher from the outlet or power source, and proceed through the following steps or contact Cyclo Toolmakers or your dealer to have your tool repaired and serviced: 5) Clean your tool of dirt, fiber, and other debris by blowing it out with compressed air. This is recommended maintenance for every 8 hours of operation or as conditions warrant. Pay particular attention to the area around the carbon brushes’ contact with the motor, just inside the top of the motor cover. If tool is being used on carpets or with wool pads/bonnets, it is recommended to blow out your tool after every use. If the tool should get wet, also blow out the underside of the tool. If the tool has gotten wet, you may need to allow the tool to completely dry before you are able to completely blow out all the fibers and other debris. 6) Check the carbon brushes, brush holder and brush holder caps. The carbon brushes in your polisher are wear items and periodically will need to be replaced (after 50 to 150 hour of use). The carbon brushes that are used in your polisher will shut off the polisher when they need to be replaced. Never operate your polisher with chipped or cracked brush holder caps. Refer to the images to the right for examples of good and worn parts. You may also refer to the “Instructions for Inspecting and Replacing the Brushes and Brush Holders” at www.cyclotoolmakers.com for instructions on removing, inspecting and replacing the brushes and brush holders in your polisher as well as inspecting and cleaning your brush holder caps. Since brushes are wear items, we recommend that you keep a spare set of brushes. Please note that some specialty tools are required for replacing the brush holders. It is recommended that you have Cyclo Toolmakers or your dealer perform this service. Inspection of the brush holder caps. a) WARNING: Never operate the polisher with chipped or otherwise damaged brush holder caps. b) Be sure the power cord is disconnected. Using a screwdriver, remove the damaged brush holder cap and the carbon brush and spring, with a cotton Q-tip wipe the threads on the inside of the brush holder clean of any foreign matter, replace the carbon brush and spring and screw on a new brush cap. 7) TABLE 2: VISUAL INSPECTION OF THE CARBON BRUSH HOLDERS AND CARBON BRUSHES Good Brush Holder 8) Bad Brush Holder (photos and illustration) – Look for scarring or marking on the surface of the carbon brush holder. These may be electrical shorts. New Carbon Brush Good Brush Holder Cap Bad Brush Holder Cap Worn/Bad Brush – too short to use If the previous steps have not enabled you to determine the problem, please return your polisher to Cyclo Toolmakers or your dealer for a complete diagnosis. Follow the return instructions on the next page! ANY OTHER SERVICING SHOULD BE PERFORMED BY THE FACTORY OR AN AUTHORIZED CYCLO SERVICE CENTER. 10 Additional Maintenance and Service Information Lubrication: This tool was properly lubricated at the factory and, when new, is ready to use. The gears should be inspected after approximately 400 hours of use. If necessary, re-lubricate with Texaco Multifax #2 or equivalent. Timing: The secret of the operation of your Cyclo Polisher lies in the fact that the two heads are timed exactly 1/2 turn apart. This is necessary for the balanced operation of the tool. If the machine is disassembled, use the following procedures to insure proper timing of the heads. 1) Turn the tools main case upside down, with the motor case, cover plate, and idler gear removed. Move the two heads together as close as possible. Then, put a heavy rubber band around the side of the two heads to keep them together. 2) Turn the tool right side up and carefully replace the idler gear without moving the drive gears. Now, pack the recessed well in back of the idler gear with lubricant. Also, lubricate the metal shafts in the center of each gear. 3) Reassemble the cover plate and motor case and remove the rubber band. Bearings: The bearings in the counterweights will loosen slightly with continued long use. This actually improves the action of the tool by allowing the heads to tilt slightly and follow a contoured surface better. These bearings should not be considered defective until they become objectionably noisy at which time the entire polisher should be sent to an authorized Cyclo service center for repair. Heads: The head assemblies (0.75” thick black neoprene discs) and ProGuard Orbital Backing Plates of the polisher will wear out gradually with use. The head assemblies (60-055) should be replaced when they no longer hold the rubber pad holder or polishing bonnets firmly in position. Simply turn the polisher upside down (so the twin heads are facing up), and rest the polisher on a counter or on your lap. Slide the 5/8” flat wrench between the head and the counterweight. With the wrench in one hand and the head in the other, twist the head counterclockwise until the threaded shaft is completely clear of the nut. Oil the nut threads slightly, and reverse the above procedure to attach new heads or other attachment system. Be sure to screw the head of brush straight into the counterweight nut. Do not cross-thread. If the shaft seems to be screwing into the nut with difficulty, back it out and start over again. Be sure to tighten the heads or brushes snugly into the nut. CYCLO TOOLMAKERS, INC. ONE-YEAR* LIMITED WARRANTY CYCLO TOOLMAKERS, INC. WARRANTS this machine to the original purchaser to be free from material or workmanship defects for a period of ONEYEAR* from the date of purchase but no longer than two-years from date of manufacture. Our obligations under this warranty are expressly limited to replacement or repair of such parts as we determine to be defective and the labor required for installations. Our obligation is limited to performing repairs in our U.S. factory location (address below). Your Cyclo dealer may provide local services at its own option. If you ship your product to us for repair and your claim for service is covered by this warranty, we will pay the return freight cost to places within the 48 contiguous United States, but not to other locations. Conditions resulting from misuse, negligence, alterations, accidents, damage caused by improper use of chemicals, repair by unauthorized parties, or “wear and tear” from normal usage, are not covered. Disassembly of the tool may also void this warranty. This warranty does not cover damage to machine occurring in shipment, nor damage caused by alterations, fire, accidents, force majeure, misuse or abuse. To invoke coverage under this warranty you, the (end user purchaser), must provide proof of purchase (sales receipt) when requesting warranty service. We recommend that only Genuine Cyclo accessories be used with this machine. Our products are specifically designed, formulated and tested for product capability. This warranty is in lieu of all other warranties, expressed or implied, and we do not assume any other liability in connection with the sale of this product. No claim for consequential damage shall be allowed. *-Model 5-Pro carries a three-year warranty term. Helpful Tips for Storing Your Cyclo Polisher Save Your Box: Your Cyclo Polisher was sent to you in a special container designed for safe storage. We recommend that you keep this box for storing your Cyclo Polisher. You will also want to use this box in case you need to send your machine back to the factory for service. Cord Wrapping: Do not wrap the cord around the rear handle of the polisher. Sharp bends in the cord will damage it. Sending Your Cyclo Polisher In For Repair: Please attach a note answering the following questions: o Is your tool under warranty? (Enclose proof of purchase in order to be covered) o Would you like an estimate, or a repair? If you would like your tool immediately repaired, please indicate that Cyclo Toolmakers, Inc. has permission to make repairs costing up to $100. We can only repair your tool if you have provided us with your credit card information. For all repairs costing over $100, Cyclo will contact you to confirm the price before making any repairs. o What is wrong with your tool? Please include a complete description of the problem, the conditions under which the polisher failed or is operating incorrectly o Please also include all your contact information, $15 for US domestic return shipping address and phone numbers, and your email address so that you can be contacted with a resolution or estimate to repair your polisher. There will be no charge for product failures covered by our warranty. If your tool is not claimed within 30 days after repair quotation (when not in warranty), your tool will be disposed of. If $15 was included for return shipping, we will return the polisher to the address given. Repair labor is $55/hour in early 2014. It can take up to 2 weeks or longer after receipt to provide an estimate or repair. Send repairs to: Cyclo Toolmakers, Inc. ATTN: Service Dept. 14320 Longs Peak Court, Longmont, CO 80504-9698 U.S.A. (verify address at our website) 11 Disposal and Recycling information: EU countries only Do not dispose of electric power tools in the household waste! In accordance with the European Directive 2002/96/EG on Waste Electrical and Electronic Equipment and transposition into national law, used electric power tools must be collected separately and recycled in an environmentally responsible manner. USA and other non-EU countries Do not dispose of electric power tools in the household waste! You may return your used polisher to Cyclo Toolmakers, Inc to be recycled in an environmentally friendly manner. Technical Specifications Power Supply Nominal Current Output Model 5, Model 5-Pro : 115 V a.c., 60 Hz, 2.0A .35 h.p. (.23kW) Model 5C, Model 6CE: 230 V a.c., 50 Hz 1.0A .35 h.p. (.23kW) Speed 5 & 5C: 2800 to 3200 RPM Speed 5-Pro, 5C-Pro: 650 to 3200 RPM Speed 6CE n0 = 3200/min Speed 6CE-Pro n0 = 650 to 3200/min Weight: 6.5 lbs (2.9 kg) Pad or Bonnet Capacity 2 x 4” (2 x 100 mm) diameter Motor: Alternating current, Universal, Semi-Enclosed 24-bar commutator Electric Cord: Model 5 - 9.5' long, Non-Marking 16 AWG/3 SJTOW THE APPEARANCE OF YOUR CYCLO POLISHER Model 5-Pro - 9.5' long, Non-Marking 16 AWG/3 SJTOW Model 5C, Model 5C-Pro - 2.5 m long, Non-Marking 3x 3G1mm2 Model 6CE,Model 6CE-Pro - 2.5 m long, Non-Marking, 3x 3G1mm2 Housing: Heavy-duty cast aluminum Orbital Stroke Length 5/8 in. (16 mm) Sound Pressure (LpA): 82.5 dBA (uncertainty 0.57 dBA) Sound Powel (Lw): 94.1 dBA (uncertainty 0.57 dBA) Hand-Arm Vibration: 1.27 m/sec^2 (uncertainty 0.17 m/sec^2) Testing Labs: Intertek ETL SEMKO for CE EMC and Safety (per EN 60745-1, -2,-3) and S&V Solutions for noise (ISO 15744 and EN 0745) and hand-arm vibration (ISO 20643 and EN/ISO 28927) JOIN ORBIT CLUB TODAY Join the Cyclo Toolmakers’ Orbit Club and you’ll receive preferred customer discounts, special news, usage tips, and exclusive members-only offers. Simply go online and provide us with your email address. Just visit the Cyclo website at www.cyclotoolmakers.com and click the Orbit Club link to sign up. Then, you’ll be the first to receive: • Performance tips to increase productivity • News and events to improve your business • Special offers and product news We look forward to seeing you there! 12 Each of our Cyclo Polishers are hand crafted with the same superior level of quality and workmanship. As all handmade items will vary slightly, we cannot guarantee that each polisher will be identical with every other one of our polishers. You may notice light sanding or buffing marks in the hand-finished aluminum castings. These are all marks of an authentic Cyclo Toolmakers tool. Naturally, Cyclo Toolmakers, Inc. will replace or repair material or workmanship defects. Refer to the Cyclo Toolmakers Warranty for further information. CYCLO POLISHER PARTS DIAGRAMS Note: Model 5C-Pro and 6CE-Pro include items (42 and 43) Model 5, 5C, 5-Pro & 5C-Pro, 6CE Parts and Wiring Diagrams Model 6CE Wiring Highlight Model 5 & 5C Wiring Highlight 13 CYCLO TOOLMAKERS, INC. DUAL HEAD ORBITAL POLISHER PARTS LIST Indicator Part Number Number Description 12-560 1 Handle, Plastic Front, Polisher 50-010 2 Needle Bearing 11-080 3 Short Shoulder Bolt for Retaining Cover Plate 10-021 4 Metal Cover Plate, Model 5-Pro & Model 5C-Pro 20-190 5 Screw, Handle Retaining 60-010 6 Nylon Drive Gear, Connects to Counterweight 60-020 7 Nylon Idler Gear (Center Gear) 10-011 8 Main Gear Case , Model 5-Pro, Model 5C-Pro and Model 6CE-Pro 22-160 9 Washer, Lock, Star 20-500 10 Screw, Metal Housing Retaining 22-520 11 Nut For Front Shoulder Bolt 50-040 12 Bearing, Main Drive Gear 20-180 13 Screw, Main Bearing Retaining 60-035 14 VES™ Counterweight Assembly (with bearing) 60-055 15 Head Assembly (connects to 60-035-a Counterweight Assembly) 10-040 16 Motor Case, Models 5, Model 5-Pro, Model 5C or Model 5C-Pro 51-705 17 Oiler Felt for Bronze Bearing 50-020 18 Bronze Bushing 30-525 19 Brush Holder Caps 30-500 20 Carbon Brush, Contoured Spring, and Dead Stop 30-515 21 Carbon Brush Holder 21-020 22 Screw, Brush Holder Retaining 30-300 23 Field 115V, 60Hz Model 5 and Model 5-Pro 20-020 24 Screw, Rear Handle 22-010 25 Split Lock Washer For Field Retaining Screw 20-100 26 Screw, Field Retaining 30-200 27 Armature, 115V, 60Hz Model 5 and Model 5-Pro 20-080 28 Screw, Motor Bearing Hold 50-030 29 Bearing, Lower Motor 51-710 30 Lock Ring for Pinion Gear 30-010 31 Switch, Single Pole, Single Throw, 230V, Model 5 and 5C 31-800 32 Crimp-on Wire Connector 20-060 33 Screw, Grounding 31-000 34 Power Cord Assembly, U.S.A. Standard. 30-020 35 Switch, Speed Controller, 110 VAC, Model 5-Pro Only 30-030 36 Wire, lead, tinned, 18 AWG 99-900 37 Shrink Wrap, Rear Handle BLACK for Model 5, 5C, 6CE only 20-072, 076, 078 39 VES Weighted Inserts Please refer to page 5 for additional information 30-320-GR 40 Field, 230V - 50Hz, Model 5C, 5C-Pro, 6CE and 6CE-Pro 30-220-GR 41 Armature, 230V - 50Hz, Model 5C, 5C-Pro, 6CE and 6CE-Pro 30-025 42 Switch, Speed Controller,250VAC for Model 5C-Pro and 6CE-Pro 31-210 43 Wire, lead, tinned, 20 AWG for Model 5C, 5C-Pro, 6CE and 6CE-Pro 31-025 44 Power Cord Assembly, European CE Standard 99-902 45 Shrink Wrap, Rear Handle, Blue for Model 5-Pro, 5C-Pro and 6CE-Pro 30-030 47 Noise Suppression Capacitor 30-040 48 RFI Power Line Filter 10-020 49 Metal Cover Plate, Model 5 and 5C Model Only 10-010 50 Main Gear Case Model 5, Model 5C and Model 6CE 10-045 51 Motor Case, Model 6CE and 6CE-Pro IMPORTANT INFORMATION: –GR armatures work with –GR fields only, and standard armatures work with standard fields only. Do not mix types. When ordering parts please specify Polisher Model Number, Part Number and Part Description; provide serial number if not sure which version of part is required. Send orders to your Cyclo Toolmakers dealer. If you need information on a dealer in your area, please visit our website at www.cyclotoolmakers.com. Entire contents ©2005-2014 Cyclo Toolmakers, Inc. All rights reserved. CYCLO, ORBIT CLUB, PROGUARD, VES, FASTCUT, CTI PRO PAINT CARE, CTI PAD CARE, CTI 1 PASS EXPRESS, FREE FLITE and Cyclo Toolmakers, Inc logo are registered and unregistered trademarks of Cyclo Toolmakers, Inc. VELCRO is a registered trademark of Velcro USA and its affiliated companies. Autoscrub is a trademark of Total Import Solutions, Inc. LOOK FOR THE SPACE-AGE BODY WITH THE ORBITING HEADS. Polisher configuration, including tapered conical motor housing, dual heads, and t-grip handle, is a registered design trademark of Cyclo Toolmakers, Inc. 14 15