1
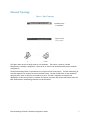
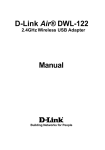
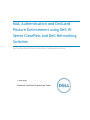
MAC Authentication and OnGuard Posture Enforcement using Dell WSeries ClearPass and Dell Networking Switches Dell Networking W-Series ClearPass Configuration Guide Colin King Network Solutions Engineering Team This document is for informational purposes only and may contain typographical errors and technical inaccuracies. The content is provided as is, without express or implied warranties of any kind. © 2013 Dell Inc. All rights reserved. Dell and its affiliates cannot be responsible for errors or omissions in typography or photography. Dell™, the Dell logo, PowerConnect™, Force10™ , and PowerEdge™ are trademarks of Dell Inc. Intel®, Pentium®, Xeon®, Core® and Celeron® are registered trademarks of Intel Corporation in the U.S. and other countries. Microsoft®, Windows®, Windows Server®, Internet Explorer®, MS-DOS®, Windows Vista® and Active Directory® are either trademarks or registered trademarks of Microsoft Corporation in the United States and/or other countries. Other trademarks and trade names may be used in this document to refer to either the entities claiming the marks and names or their products. Dell disclaims proprietary interest in the marks and names of others. August 2013| Rev 1.0 Dell Networking W-Series ClearPass Configuration Guide 2 Dell Networking W-Series ClearPass Configuration Guide 3 Contents Executive Summary ...................................................................................... 6 Introduction ............................................................................................... 6 Network Topology ........................................................................................ 7 Applicable Hardware and Software Versions ......................................................... 8 Dell W-Series ClearPass ............................................................................................... 8 Dell Networking Switches ............................................................................................ 8 MAC Authentication with W-ClearPass and Dell Networking 7024P Switch ...................... 8 Dell Networking 7024P Configuration .............................................................................. 9 Add a RADIUS Server .............................................................................................. 10 Enable Authentication and configure the port ............................................................... 11 Dell Networking ClearPass Configuration ........................................................................ 13 Adding Network Authenticator .................................................................................. 13 Create a Static Host List .......................................................................................... 14 Configuring a Network Policy .................................................................................... 15 Testing MAC Authentication ....................................................................................... 19 MAC Authentication Conclusion ................................................................................... 20 OnGuard posture enforcement with Dell Networking 7024P Switch ............................. 21 Dell Networking 7024P Configuration ............................................................................ 21 Enable Authentication and configure the port ............................................................... 22 SNMP Configuration ................................................................................................ 23 Dell Networking ClearPass Configuration ........................................................................ 23 Enter a user into the Local Users database ................................................................... 24 Configuring an OnGuard Network Policy ....................................................................... 25 Configuring a Wired 802.1x Policy .............................................................................. 31 Testing OnGuard Posture Configuration ......................................................................... 35 OnGuard Configuration Conclusion ............................................................................... 36 Appendix A ............................................................................................... 37 Dell Networking 55xx Series Switches............................................................................ 37 Dell Networking 55xx Series Firmware ......................................................................... 37 MAC Authentication Configuration for 55xx Series Switch ................................................... 37 Dell Networking W-ClearPass MAC Authentication Configuration ......................................... 39 OnGuard posture enforcement with Dell Networking 55xx Switch ......................................... 39 Dell Networking W-ClearPass MAC Authentication Configuration ......................................... 39 Dell Networking W-Series ClearPass Configuration Guide 4 Figures Figure 1. Basic Topology ................................................................................................. 7 Figure 2. MAC Authentication Configuration Flowchart ............................................................ 9 Figure 3. MAC Authentication 7024P Switch - RADIUS Server Configuration .................................. 11 Figure 4. MAC Authentication 7024P Switch - Authentication Configuration ................................. 12 Figure 5. MAC Authentication ClearPass - Adding Network Authenticator .................................... 13 Figure 6. MAC Authentication ClearPass – Create Static Host List .............................................. 14 Figure 7. MAC Authentication ClearPass – Configuring a Network Policy Service ............................ 15 Figure 8. MAC Authentication ClearPass – Configuring Authentication Method and Source ................ 16 Figure 9. MAC Authentication ClearPass – Configuring Roles .................................................... 18 Figure 10. MAC Authentication ClearPass – Configuring Enforcement ......................................... 19 Figure 11. OnGuard Configuration Flowchart ...................................................................... 22 Figure 12. OnGuard 7024P Switch – Authentication Configuration ............................................. 23 Figure 13. OnGuard ClearPass – Adding Local User ................................................................ 25 Figure 14. OnGuard ClearPass – Web-Based Authentication Service ........................................... 26 Figure 15. OnGuard ClearPass – Authentication Source .......................................................... 26 Figure 16. OnGuard ClearPass - Roles ............................................................................... 27 Figure 17. OnGuard ClearPass – Adding New Posture Policy ..................................................... 28 Figure 18. OnGuard ClearPass – Posture Policy Main Tab ........................................................ 29 Figure 19. OnGuard ClearPass – Enforcement Policy .............................................................. 31 Figure 20. Wired 802.1x ClearPass – Service Configuration ...................................................... 32 Figure 21. Wired 802.1x ClearPass – Authentication Types ...................................................... 33 Figure 22. Wired 802.1x ClearPass – Roles .......................................................................... 34 Figure 23. Wired 802.1x ClearPass – Enforcement................................................................. 35 Figure 24. Appendix A, 5524P Dot1x Global Settings ............................................................. 38 Figure 25. Appendix A, 5524P Dot1x Interface Settings, MAC Only............................................. 38 Figure 26. Appendix A, 5524P Dot1x Interface Settings, 802.1x only .......................................... 39 Dell Networking W-Series ClearPass Configuration Guide 5 Executive Summary The Dell Networking W-Series ClearPass platform is a powerful access control appliance for use with wired or wireless networking. W-ClearPass is highly optimized for use with wireless access using the WSeries controllers and APs as the network access devices. In addition to wireless network access control, W-ClearPass can service authentication requests from Dell Networking wired switches. The combination of W-ClearPass, W-Series Controllers, and Dell Networking switches provides a complete solution for network access control. Administrators with devices that do not support 802.1x (printers, cameras, IP phones) will learn the authentication method used with Dell switches for MAC authentication and how to configure the corresponding W-ClearPass services. Administrators can also learn how to use the OnGuard client within W-ClearPass to ensure all PCs connected directly to Dell switches are screened for health compliance. Introduction This configuration guide details the steps required to configure both MAC Authentication and OnGuard posture enforcement using Dell Networking switches. The W-ClearPass Policy Manager will be the centerpiece for all RADIUS credentials and network access authentication decisions for devices accessing the network through the Dell Networking switch. Dell Networking W-Series ClearPass Configuration Guide 6 Network Topology Figure 1. Basic Topology The figure above shows the setup used for this document. The printer is used for the MAC Authentication example configuration, while the PC is used for the OnGuard heath posture example configuration. The Dell Networking 7024P is representative of a typical closet access switch. The Dell Networking WClearPass appliance is normally located in the Data Center. The Dell 7024P switch is also capable of supplying PoE+ power to devices connected to its ports. This PoE+ capability can simplify the deployment of devices like Phones, Cameras, and similar corporate devices that will benefit from the MAC Authentication methodology described in this document. Dell Networking W-Series ClearPass Configuration Guide 7 Applicable Hardware and Software Versions The examples in this document are validated on the following HW and SW versions: • Dell W-Series ClearPass SW v6.0.2 • Dell Networking 7024P firmware v5.1.0.1 Dell W-Series ClearPass Dell W-Series ClearPass SW v6.0.2 Configuration for the ClearPass appliance is the same for the latest version released during the publishing of this document, ClearPass v6.1.2. No changes to the MAC Authentication feature were implemented in this later version. The OnGuard client application was upgraded to include a VPN client in ClearPass v6.1.2. The VPN feature and its configuration will not affect the behavior or configuration of the methodology described in this document. Dell Networking Switches Dell Networking 7024P – firmware v5.1.0.1 The following Dell Networking branded switches contain the same firmware base and can be substituted for the 7024P used in this example. Dell Networking switches: 8132, 8164, 8132F, 8164F, 7024, 7048, 7024P, 7048P, 7024F, 7048R, 7048R-RA, 8024, 8024F, M6220, M6348, M8024, M8024-k NOTE: Dell Networking Switches not included in the list above could have behaviors that would require some modification to the methods used in the example configurations below, however the methodology and mechanisms are similar and can therefore be applied with minor changes. See Appendix A for information on how to use Dell 55xx switches. MAC Authentication with W-ClearPass and Dell Networking 7024P Switch The use of MAC Authentication is mainly used for devices such as printers, cameras, and IP phones that do not support 802.1x authentication and require the use of MAC Authentication. The configuration example in this guide will only detail the basic setup of both the W-ClearPass Policy Manager and the Dell Networking 7024P switch. Network administrators may also want to configure specific VLANs to restrict traffic to the type needed for the device being placed on the 7024P switch port. The assignment of VLANs based on successful authentication is not covered in this document. Dell Networking W-Series ClearPass Configuration Guide 8 Figure 2. MAC Authentication Configuration Flowchart Dell Networking 7024P Configuration The following configuration steps start from a switch that has been configured to be an access switch with no network security settings in place. Basic settings outlined in the Quick Start Guide have been completed. Dell Networking W-Series ClearPass Configuration Guide 9 Add a RADIUS Server Navigate to System > Management Security > RADIUS > RADIUS Server Configuration Click on Add Input IP address of the ClearPass appliance into RADIUS Server Host Address Change RADIUS Server Name to an appropriate name Click Apply Click on Detail Choose the IP address from the RADIUS Server Host Address drop down list Click on the checkbox located in the Secret field. Enter a secret key to be used with the ClearPass appliance. Choose Enable from the dropdown list in the Primary Server field Click on Apply Save your configuration to the running configuration (disk icon at the upper right of the GUI) Dell Networking W-Series ClearPass Configuration Guide 10 Figure 3. MAC Authentication 7024P Switch - RADIUS Server Configuration Enable Authentication and configure the port Navigate to Switching > Network Security > Dot1x Authentication > Authentication Under Global Parameters, choose Enable from the dropdown list in the Administrative Mode field Identify the port to be used for MAC Authentication Under Interface Parameters, choose the port number from the dropdown list in the Interface field Choose Mac-based from the dropdown list and check the MAB box in the Admin Interface Control field All other fields can remain default Repeat the above for any other ports requiring MAC Authentication Dell Networking W-Series ClearPass Configuration Guide 11 Figure 4. MAC Authentication 7024P Switch - Authentication Configuration There are likely other ports on the switch that do not require Authentication. For those ports at this time it is recommended to force the port interface into Authorized mode. Under Interface Parameters, choose the port number from the dropdown list in the Interface field Choose Authorized from the dropdown list in the Admin Interface Control field All other fields can remain default Repeat the above for all ports requiring access without Authentication NOTE: Administrators can edit multiple ports at one time by using the Show All configuration page under Authentication. Click Apply Save your configuration to the running configuration This completes the steps required for Mac Authentication on the Dell Networking 7024P. For additional information and CLI examples, please refer to the Dell Networking 7000 Series Switch User’s Configuration Guide. Dell Networking W-Series ClearPass Configuration Guide 12 Dell Networking ClearPass Configuration The following configuration steps start from a ClearPass appliance that has been setup according to the basic configuration outlined in the Dell Networking W-ClearPass Policy Manager 6.0 Quick Start Guide. It’s assumed that all Subscription IDs and licensing has been enabled for the product. Adding Network Authenticator Navigate to Configuration > Network > Devices Click on Add Device in the upper right hand corner Under the Device tab, input the following: Enter a descriptive name in the Name field Enter the IP address of the 7024P switch in the IP or Subnet Address field Enter the same secret used previously in the RADIUS Shared Secret field Enter the same secret again in the Verify field Choose IETF from the dropdown list in the Vendor Name field Click Save Figure 5. MAC Authentication ClearPass - Adding Network Authenticator Dell Networking W-Series ClearPass Configuration Guide 13 Create a Static Host List The Static Host List will be the repository for the MAC Addresses allowed onto the network. All devices using MAC Authentication will need to have their MAC addresses input into this list. Navigate to Configuration > Identity > Static Host Lists Click on Add Static Host List at the upper right of the GUI Enter a descriptive name in the Name field Enter a description in the Description field Choose List in the Host Format field Choose MAC Address in the Host Type field Add as many addresses into the list as desired at this time. Addresses can be added at any time Click on Save In this example “AllowedMacAddresses” is used as the Static Host List name. Figure 6. MAC Authentication ClearPass – Create Static Host List Dell Networking W-Series ClearPass Configuration Guide 14 Configuring a Network Policy Navigate to Configuration > Start Here Choose MAC Authentication Under the Service tab, input and change the following: Enter a descriptive name in the Name field Enter a description in the Description field Under Service Rules, remove all default conditions by clicking on the trash icon to the right of each condition Add a new condition by clicking on Click to add… and choosing the following: o Type – Radius:IETF o Name – Calling-Station-Id o Operator – BELONGS_TO_GROUP o Value – AllowedMacAddresses (descriptive name from example) Click on the disk icon next to the condition to save Click on Next at the bottom right to move to the Authentication tab Figure 7. MAC Authentication ClearPass – Configuring a Network Policy Service Dell Networking W-Series ClearPass Configuration Guide 15 Under the Authentication tab, input and change the following: Highlight [MAC AUTH] and remove it from the Authentication Methods list From the dropdown menu, --Select to Add--, choose [EAP MD5] Highlight [Endpoints Repository] [Local SQL DB] and remove it from the Authentication Sources list Click on Add new Authentication Source Enter a descriptive name in the Name field (for this example “static list Mac auth” is used) Enter a description in the Description field From the dropdown menu, Type, choose Static Host List Click on Next to move to the Static Hosts Lists tab From the dropdown menu, choose the static host list previously created (for this example AllowedMacAddresses was previously created) Click Next and then Save to move back to the Authentication tab From the dropdown menu in Authentication Sources, --Select to Add--, choose static list Mac auth [Static Host List] (this is the source that was just created) Click on Next at the bottom right to move to the Roles tab Figure 8. MAC Authentication ClearPass – Configuring Authentication Method and Source Dell Networking W-Series ClearPass Configuration Guide 16 Under the Roles tab, input and change the following: Click on Add new Role Mapping Policy Enter a descriptive name in the Policy Name field Enter a description Leave the Default Role as [Guest] Click on Next to move to the Mapping Roles tab Click on Add Rule Click on Click to add… within the Conditions window From the dropdown menu under Type, choose Authentication From the dropdown menu under Name, choose Source From the dropdown menu under Operator, choose EQUALS From the dropdown menu under Value, choose static list Mac auth Click on the disk icon to save the condition From the dropdown menu within the Actions window, choose [Employee] NOTE: the [Employee] role is a default value used to simplify this example. Admins should define and use specific roles for their deployment. Click on Next to move to the Enforcement tab Dell Networking W-Series ClearPass Configuration Guide 17 Figure 9. MAC Authentication ClearPass – Configuring Roles Under the Enforcement tab, input and change the following: Click on Add new Enforcement Policy Enter a descriptive name in the Name field Enter a description in the Description field Ensure RADIUS is selected for the Enforcement Type From the dropdown menu under Default Profile, choose [Deny Access Profile] Click on Next to move to the Rules tab Ensure Select first match is selected for Rules Evaluation Algorithm Click on Add Rule under Conditions Click on Click to add… From the dropdown menu under Type, choose Tips From the dropdown menu under Name, choose Role From the dropdown menu under Operator, choose EQUALS From the dropdown menu under Value, choose [Employee] Click the disk icon to save the condition Dell Networking W-Series ClearPass Configuration Guide 18 From the dropdown menu for Profile Names, --Select to Add--, choose [RADIUS] [Allow Access Profile] Click on Save Click on Next to move to the Summary tab Figure 10. MAC Authentication ClearPass – Configuring Enforcement Click on Save to move to the Reorder Services page ClearPass evaluates the Services created from the top of the list to the bottom. There are many default services that come configured with the base install. These default services will not interfere with this example. The Mac authorization service that was just created can be left at the bottom of the service order list. Click on Save to complete the configuration Testing MAC Authentication Connect any device not configured to use 802.1x (example - printer) to the switch port configured for MAC Authentication MAB. Ensure the MAC address of the device is in the static host list that is configured in the above example. Dell Networking W-Series ClearPass Configuration Guide 19 Within the Dell Networking 7024P GUI, administrators can see the status of all authentications and can see if a port is currently authorized. For the Port Access Log, navigate to Switching > Dot1x Authentication > Monitoring Mode > Port Access Control History Log. ClearPass has an extensive Access Tracker which logs all the steps corresponding to Authentication, Authorization and Enforcement. It is very useful in identifying which service it’s identifying to categorize the request, and what issues it has during the authentication. The Access Tracker can be located by navigating to Monitoring > Live Monitoring > Access Tracker. MAC Authentication Conclusion Many of the settings in the above example are simplified for the purpose of providing a basic configuration an administrator can build upon. The settings shown are not intended to fully protect the network in all environments. The default MAC Authentication method within ClearPass will not successfully recognize the authentication request from the Dell Networking switch. The unique ClearPass setting that is described above is the use of EAP-MD5 as the Authentication method, with a source of a Static Host List. The use of this method, along with strict enforcement policies on the switch, will effectively secure and allow the proper traffic for devices that do not support 802.1x. Dell Networking W-Series ClearPass Configuration Guide 20 OnGuard posture enforcement with Dell Networking 7024P Switch OnGuard is a SW module within ClearPass used to determine the health of a device. Network administrators may want to enforce devices being connected to the network to have certain health related conditions met before access is granted. Typical conditions include the presence of an antivirus SW with updated virus definitions. Other conditions could involve a check on the state of the firewall. For the purposes of this document, the posture of the device is directly referencing its health. The persistent client for OnGuard has the ability to detect changes in the posture of a device and change its access status in the network. Although the Dell Networking switch does not support RADIUS CoA, it can still use OnGuard to check heath at the initial authentication request when connecting to the network. Additionally, the persistent OnGuard client can monitor a PC and revoke access to the network after any failed periodic health check. Dell Networking W-Series products support RADIUS CoA in addition to Radius VSA (Vendor Specific Attributes), which can be used in conjunction with ClearPass for all available features when connected wirelessly. This example will perform a basic health check to see if the PC has its firewall enabled or turned off. If the firewall is not enabled on the PC, it will remove access to the network. To read more on heath related conditions that OnGuard can interrogate on devices, see the latest Dell Networking WClearPass Policy Manager User Guide. Dell Networking 7024P Configuration OnGuard uses HTTPS to send posture information to the ClearPass appliance. For OnGuard to use HTTPS, it must have access to the network. If a customer requires 802.1x authentication on the wired switch, a separate 802.1x authentication must be used prior to the OnGuard posture check. In this example, an 802.1x PEAP-EAP-MSCHAPv2 authentication is completed first. A separate WebAuth service must be setup with posture checks to use the OnGuard agent. To ensure a non-compliant device is not admitted back to the network, it’s recommended that 802.1x be enabled on the access port to the Dell Networking 7024P switch. If the port is left in Authorized mode, and the heath issue is not corrected, the device will be bounced from the network during each periodic heath check. This example builds upon the previous MAC Authentication example. The configuration of the RADIUS server and their shared secrets are not repeated in this section. The steps to setup the RADIUS server on both the switch and ClearPass are the same. Please reference the steps in the previous example to enable the switch to be an authenticator by adding an external RADIUS server (ClearPass). Dell Networking W-Series ClearPass Configuration Guide 21 Figure 11. OnGuard Configuration Flowchart Enable Authentication and configure the port Dell Networking W-Series ClearPass Configuration Guide 22 Navigate to Switching > Network Security > Dot1x Authentication > Authentication Under Global Parameters, choose Enable from the dropdown list in the Administrative Mode field NOTE: The enable authentication step above was completed in the previous MAC Authentication example. Identify the port to be used for wired authentication with OnGuard Under Interface Parameters, choose the port number from the dropdown list in the Interface field The default setting when enabling 802.1x on the switch in the Admin Interface Control field is Automode. Confirm that Automode is set All other fields can remain default. Repeat the above for any other ports requiring this setting. Figure 12. OnGuard 7024P Switch – Authentication Configuration SNMP Configuration By default, SNMPv2 is enabled on the switch and the ClearPass appliance. No changes to the default settings are required to enable the SNMP bounce of the switch port upon an OnGuard failure action. If the administrator requires SNMP traps for monitoring of the networks, enable SNMP and configure the community strings per the Dell Networking 7000 Series Switch User’s Configuration Guide. Dell Networking ClearPass Configuration Dell Networking W-Series ClearPass Configuration Guide 23 The following configuration steps start from a ClearPass appliance that has been setup according to the basic configuration outlined in the Dell Networking W-ClearPass Policy Manager 6.0 Quick Start Guide. It’s assumed that all Subscription IDs and licensing has been enabled for the product. This example builds upon the previous MAC Authentication example. The configuration of the RADIUS server and their shared secrets are not repeated in this section. The steps to setup the RADIUS server on both the switch and ClearPass are the same. Please reference the steps in the previous example to enable the switch to be an authenticator by adding an external RADIUS server (ClearPass). The OnGuard service within ClearPass uses a web authentication, which can support either a username/password or certificate based login. This allows for the OnGuard service to use the same method to sign into the ClearPass appliance as the authentication method used to access the network. In this simplified example, the method used for both authentication and OnGuard is a username and password. Examples of databases supported include Active Directory, LDAP, and generic SQL. For this example the local user database within ClearPass will be used. Enter a user into the Local Users database Navigate to Configuration > Identity > Local Users Click on Add User Enter a User ID , Name, Password, and Verify Password Keep the Enable User box checked From the dropdown menu under Role, choose [Employee] Click Add Dell Networking W-Series ClearPass Configuration Guide 24 Figure 13. OnGuard ClearPass – Adding Local User Configuring an OnGuard Network Policy Navigate to Configuration > Start Here Choose Web-Based Authentication Enter a descriptive name in the Name field Enter a description in the Description field Click on the Posture Compliance check box under More Options Dell Networking W-Series ClearPass Configuration Guide 25 Figure 14. OnGuard ClearPass – Web-Based Authentication Service Click Next to move to the Authentication tab From the dropdown menu under Authentication Sources, choose [Local User Repository] [Local SQL DB] Figure 15. OnGuard ClearPass – Authentication Source Click Next to move to the Roles tab Click on Add new Role Mapping Policy Enter a descriptive name in the Policy Name field Enter a description in the Description field Leave the Default Role as [Guest] Click Next to move to the Mapping Rules tab o Click on Add Rule o From the dropdown menu under Type, choose Authorization:[Local User Repository] o From the dropdown menu under Name, choose Role_Name Dell Networking W-Series ClearPass Configuration Guide 26 o From the dropdown menu under Operator, choose EXISTS o Click the disk icon to save the condition o From the dropdown menu under Actions, Role Name, choose [Employee] Click Next to move to the Summary tab Click Save to save the new Role Mapping Policy and to move back to the Service configuration Figure 16. OnGuard ClearPass - Roles Click Next to move to the Posture tab Click Add new Posture Policy Enter a descriptive name in the Policy Name field Enter a description in the Description field Leave the Posture Agent as OnGuard Agent Choose the appropriate Host Operating System (this example uses Windows) Click Next to move to the Posture Plugins tab o Check the checkbox for ClearPass Windows Universal System Health Validator o Click on Configure o Choose the appropriate version of OS (this example uses Windows 7) o Check the checkbox Enable checks for Windows 7 (may not be required for other OS brands) o Choose the Firewall selection from the list under the OS o Check the checkbox “A firewall application is on” o Uncheck both the Auto Remediation and (Uncheck to allow any product) checkboxes o Click Save Click Next to move to the Rules tab o Click Add Rule Dell Networking W-Series ClearPass Configuration Guide 27 o From the dropdown menu under Select plugin Checks, choose Fails one or more SHV checks o Check ClearPass Windows Universal System Health Validator checkbox o From the dropdown menu under Posture Token, choose QUARANTINE (20) o Click on Save o Click Add Rule o From the dropdown menu under Select plugin Checks, choose Passes all SHV checks o Check ClearPass Windows Universal System Health Validator checkbox o From the dropdown menu under Posture Token, choose HEALTHY (0) o Click on Save Click on Next to move to the Summary tab Click on Save to save the Posture policy and move back to the Service configuration Figure 17. OnGuard ClearPass – Adding New Posture Policy Dell Networking W-Series ClearPass Configuration Guide 28 Figure 18. OnGuard ClearPass – Posture Policy Main Tab Click Next to move to the Enforcement tab Click on Add new Enforcement Policy Enter a descriptive name in the Name field Enter a description in the Description field Choose WEBAUTH as the Enforcement Type Click on Add new Enforcement Profile From the dropdown menu under Template, choose Agent Enforcement Enter a descriptive name in the Name field (example- Agent Healthy Profile) Enter a description in the Description field Click Next to move to the Attributes tab Two attributes are auto populated From the dropdown menu under Attribute Value - Message, type a welcome message to be displayed Click the disk icon to save the attribute Click Next to move to the Summary tab Click on Save to move back to the Enforcement policy Click on Add new Enforcement Profile From the dropdown menu under Template, choose Agent Enforcement Dell Networking W-Series ClearPass Configuration Guide 29 Enter a descriptive name in the Name field (example – Agent Unhealthy) Enter a description in the Description field Click Next to move to the Attributes tab Delete the two auto populated attributes Click on Click to add… From the dropdown menu under Attribute Name, choose Bounce Client From the dropdown menu under Attribute Value, check the checkbox Click the disk icon to save the attribute Click on Click to add… From the dropdown menu under Attribute Name, choose Message From the dropdown menu under Attribute Value, type a message to indicate client is unhealthy Click the disk icon to save the attribute Click Next to move to the Summary tab Click on Save to move back to the Enforcement policy From the dropdown menu under Default Profile choose the healthy profile that was just created. (This example uses [Agent] Agent Healthy Profile) Click on Next to move to the Rules tab Click on Add Rule Click on Click to add… From the dropdown menu under Type, choose Tips From the dropdown menu under Name, choose Role From the dropdown menu under Operator, choose EQUALS From the dropdown menu under Value, choose [Employee] Click the disk icon to save the condition Click on Click to add… From the dropdown menu under Type, choose Tips From the dropdown menu under Name, choose Posture From the dropdown menu under Operator, choose EQUALS From the dropdown menu under Value, choose QUARANTINE (20) Click the disk icon to save the condition From the dropdown menu under Enforcement Profiles, Profile Names, choose the unhealthy profile that was just created. (This example uses [Agent] Agent Unhealthy) Dell Networking W-Series ClearPass Configuration Guide 30 Click the disk icon to save the condition Click on Save Click on Next to move to the Summary tab Click on Save to save the Enforcement policy and move back to the Service configuration Figure 19. OnGuard ClearPass – Enforcement Policy Clink on Next to move to the Summary tab Click on Save to move to the Reorder Services page ClearPass evaluates the Services created from the top of the list to the bottom. There are many default services that come configured with the base install. These default services will not interfere with this example. The Mac authorization service that was just created can be left at the bottom of the service order list. Click on Save to complete the Web-Auth configuration Configuring a Wired 802.1x Policy The next service to be configured is the standard 802.1x service. This service will authenticate the device by request from the 7024P switch. Once the device passes authentication with the 7024P switch, it will automatically step to the OnGuard health check service that was just configured above. Navigate to Configuration > Start Here Click on 802.1x Wired Enter a descriptive name in the Name field Enter a description in the Description field Remove the 2nd service rule with the name Service-Type Dell Networking W-Series ClearPass Configuration Guide 31 Click on Click to add… From the dropdown menu under Type, choose Radius:IETF From the dropdown menu under Name, choose User-Name From the dropdown menu under Operator, choose EXISTS Click the disk icon to save the rule Figure 20. Wired 802.1x ClearPass – Service Configuration Click on Next to move to the Authentication tab Under the Authentication Methods, EAP FAST, EAP TLS, and EAP TTLS can be removed. Under Authentication Sources, from the dropdown menu –-Select to Add--, choose [Local User Repository] [Local SQL DB] Dell Networking W-Series ClearPass Configuration Guide 32 Figure 21. Wired 802.1x ClearPass – Authentication Types Click on Next to move to the Roles tab Click on Add new Role Mapping Policy Enter a descriptive name in the Name field Enter a description in the Description field Click on Next to move to the Mapping Rules tab Click on Add Rule Click on Click to add… From the dropdown menu under Type, choose Authorization:[Local User Repository] From the dropdown menu under Name, choose Role-Name From the dropdown menu under Operator, choose EXISTS Click the disk icon to save the rule From the dropdown menu under Role Name, choose [Employee] Click on Save Click on Next to move to the Summary tab Click on Save to move back to the service configuration Dell Networking W-Series ClearPass Configuration Guide 33 Figure 22. Wired 802.1x ClearPass – Roles Click on Next to move to the Enforcement tab Check the checkbox for Use Cached Results Click on Add new Enforcement Policy Enter a descriptive name in the Name field Enter a description in the Description field From the dropdown menu under Default Profile, choose [Deny Access Profile] Click on Next to move to the Rules tab Click on Add Rule Click on Click to add… From the dropdown menu under Type, choose Tips From the dropdown menu under Name, choose Posture From the dropdown menu under Operator, choose EQUALS From the dropdown menu under Value, choose QUARANTINE (20) Click the disk icon to save the condition From the dropdown menu under Profile Names, --Select to Add--, choose [RADIUS] [Deny Access Profile] Click on Save Click on Add Rule Click on Click to add… From the dropdown menu under Type, choose Tips From the dropdown menu under Name, choose Role From the dropdown menu under Operator, choose EQUALS From the dropdown menu under Value, choose [Employee] Click the disk icon to save the condition Dell Networking W-Series ClearPass Configuration Guide 34 From the dropdown menu under Profile Names, --Select to Add--, choose [RADIUS] [Allow Access Profile] Click on Save Click on Next to move to the Summary tab Figure 23. Wired 802.1x ClearPass – Enforcement Click on Save to move back to the service configuration Click on Next to move to the Summary tab Click on Save to move to the Reorder Services page On the Reorder Services page, ensure this wired 802.1x service is placed before the OnGuard WebAuth service configured in the previous section Click on Save to complete the configuration Testing OnGuard Posture Configuration The OnGuard persistent client application is downloaded directly from the ClearPass application. The easiest method to access the .exe or .msi is to locate the download link within the management GUI. ClearPass administrators can navigate to the following location: Administration > Agents and Software Updates > OnGuard Settings Ensure the Wired checkbox under Agent Customization, Managed Interfaces is checked From the dropdown menu under Mode, choose Authenticate with health checks Download the application, transfer it to the test PC, and install prior to trying to access the network. Once OnGuard is installed, ensure the OnGuard process is started. Also ensure that the test PC can support 802.1x on its LAN interface. (For Windows 7, administrators can start the Wired Auto Config service by opening and locating it within services.msc on the Standard tab). Ensure the Local Area Connection Authentication settings are properly configured. For this example Microsoft: Protected Dell Networking W-Series ClearPass Configuration Guide 35 EAP (PEAP) is used, uncheck Validate server certificate, use method Secured password (EAP-MSCHAP v2) and uncheck Automatically use my Windows logon name and password. When connecting to the network, Windows will ask for a username and password. Enter the credentials that are located in the Local User database created within ClearPass for this example. Once connected to the network, the OnGuard application will also ask for a username and password. These credentials are the same credentials located in the Local User database. Within the Dell Networking 7024P GUI, administrators can see the status of all authentications and can see if a port is currently authorized. For the Port Access Log, navigate to Switching > Dot1x Authentication > Monitoring Mode > Port Access Control History Log. ClearPass has an extensive Access Tracker which logs all the steps corresponding to Authentication, Authorization and Enforcement. It is very useful in identifying which service it’s identifying to categorize the request, and what issues it has during the authentication. The Access Tracker can be located by navigating to Monitoring > Live Monitoring > Access Tracker. There is also an OnGuard Activity list located in Monitoring > Live Monitoring > OnGuard Activity to monitor all OnGuard clients. OnGuard Configuration Conclusion Many of the settings in the above example are simplified for the purpose of providing a basic configuration an administrator can build upon. The default Web-based authentication service within ClearPass will successfully prevent unhealthy clients from accessing the network. The example above will result in a client that is restricted from all network access until the health issue is fixed. Administrators can further design their network access capabilities to include a remediation VLAN or Quarantine network. This will allow the PC to have minimal access to network resources and enable an IT administrator remote access to remediate the system. Further configuration or a new service to detect the quarantined state and place it in the remediation VLAN would be required. The client may also be required to physically reconnect the device after waiting for 2-3 minutes before retrying the authentication to allow any cached failure state to be cleared out. Additional information on configuring VLANs with Dell switches can be found in their respective User’s Configuration Guide. The Dell Networking 7024P used in the above example has the following chapters with useful VLAN information: Configuring Port and System Security, and Configuring VLANs. ClearPass provides VLAN attributes to the switch via the Enforcement Policy within the service. Additional information on enforcement can be found in the Dell Networking W-ClearPass Policy Manager User Guide. The Enforcement chapter in the user guide contains the applicable VLAN information. Dell Networking W-Series ClearPass Configuration Guide 36 Appendix A Dell Networking 55xx Series Switches Dell Networking 55xx Series switches have different features and use a different firmware base than the switches detailed above. Due to the feature and behavior differences, the configuration of the Dell Networking 55xx switch will be different. Dell Networking 55xx Series Firmware The following firmware version is used in the configuration information below: System firmware version 4.1.0.10 The Hardware applicable to the firmware above is: Dell Networking 5524/5548/5524P/5548P MAC Authentication Configuration for 55xx Series Switch The 55xx series switch uses the same EAP-MD5 authentication method to facilitate the MAC authentication with MAB. The main difference is a requirement to enable a Guest VLAN for MAC-based authentication methods. Details on the requirements for the types of authentication can be found in the Dell Networking 5500 Series System User Guide. Similar to the examples in the main document, the configuration steps below are limited to a basic setup to show the behavior and methodology of the configuration. Administrators should configure their access policies and user roles as outlined in their own network security policy. This appendix is not a step by step guide. Screenshots in the figures are summary screens of final configurations used in the validation. Switching > Network Security > Dot1x Authentications > Port Based Authentication Global Dell Networking W-Series ClearPass Configuration Guide 37 Figure 24. Appendix A, 5524P Dot1x Global Settings Switching > Network Security > Dot1x Authentications > Port Based Authentication Interface Settings: Edit Figure 25. Appendix A, 5524P Dot1x Interface Settings, MAC Only Dell Networking W-Series ClearPass Configuration Guide 38 Dell Networking W-ClearPass MAC Authentication Configuration The configuration for W-ClearPass does not change from the example shown in the main body of this document. The same service and its setup can be used for the MAC Authentication with MAB. OnGuard posture enforcement with Dell Networking 55xx Switch The Dell Networking 55xx Series Switch behaves in a very similar manner for 802.1x PEAP-EAPMSCHAPv2 authentication. The standard settings are shown in the following figure. Figure 26. Appendix A, 5524P Dot1x Interface Settings, 802.1x only Dell Networking W-ClearPass MAC Authentication Configuration The configuration for W-ClearPass does not change from the example shown in the main body of this document. The same service and its setup can be used for both the 802.1x Wired and Web-Auth services. Dell Networking W-Series ClearPass Configuration Guide 39