1
Step G - Sanitize, Test and Purge System (cont.)
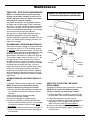
PRESSURE TEST THE SYSTEM
NOTE: Complete the sanitizing procedures on the
preceding page before pressure testing.
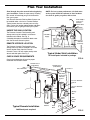
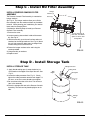
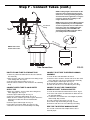
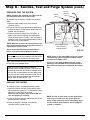
Kitchen
Faucet
To pressure test the system, complete the following
steps.
Reverse
Osmosis
Faucet
1. Open the water supply valve to the Reverse
Osmosis system.
2. Purge air from the house plumbing by opening several house faucets. Close faucets when water runs
smooth, with no spurting.
3. Pressure will start to build in the RO system. In
about 2 hours check all fittings and connections.
Check for water leaks. Fix leaks if any are found. If
problems exist, refer to the troubleshooting chart or
call the toll free number below).
Storage
Tank
NOTE: When the system is first pressurized, water
may ''spurt'' from the faucet air gap hole until air is
expelled from the RO system.
HOT
COLD
Water Supply Shutoff
Valve to Reverse
Osmosis System
Please review the following operating features
before using your Reverse Osmosis system:
You will not have filtered water immediately. It may
take several hours to fill the storage tank and create
maximum flow from the Reverse Osmosis faucet.
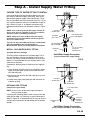
Tee, Feed
Adapter
FIG. 25
NOTE: Codes in the state of Massachusetts require
installation by a licensed plumber and do not permit the use of saddle valves.
Water Pressure from the Reverse Osmosis faucet will
be less than your standard faucet.
If you live in the state of Massachusetts, review
plumbing code 248-CMR of the Commonwealth of
Massachusetts before proceeding with the installation.
Water will run to the drain while the Reverse
Osmosis system is producing water, even if you are
not drawing water from the Reverse Osmosis faucet.
You may hear a small quantity of water going to the
drain at times when water is not being used. This is
normal. Water going to the drain will automatically
shut off when the storage tank is full.
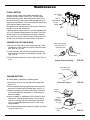
PURGING THE SYSTEM
To purge the system, complete the following steps.
1. Open the Reverse Osmosis Faucet and let water
flow through the system for a 24 hour period. Water
flow will be a slow trickle at this time.
NOTE: Do not consume water from the RO system until purging is complete.
NOTE: As with all other water system applications,
leaks may occur. Because the system pressure
builds slowly, leaks may not be immediately apparent. Recheck for leaks 24 hours after purging the
system is complete.
2. Close the Reverse Osmosis faucet after the 24 hour
purging period is complete.
3. When the purging is finished, your Reverse
Osmosis system is ready for use.
16