1
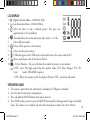
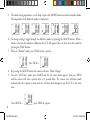
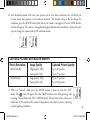
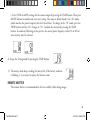
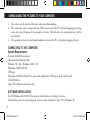
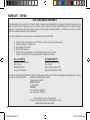
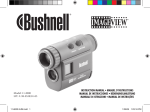
Model: 78-7348
LIT. #: 98-0448/06-04
78-7348 1LIM.indd 1
6/17/04 9:48:17 AM
Congratulations on your purchase of a Bushnell ImageView spotting scope. Before using the product,
please read the instructions contained in this manual and take time to familiarize yourelf with the
different parts and features of the product.
CAMERA OPERATION INSTRUCTIONS
BUTTON DESCRIPTIONS
The MODE button has three functions:
1. Power on: Press and hold button until the camera turns on. When the camera is connected to your
PC via the USB cable provided, the camera will power on automatically.
2. Power off: While the camera is on, press and hold the button until camera turns off. If camera has
not been used or if a button has not been pressed for over 2 minutes, the camera will automatically
power off to save battery life. If the camera is connected via the USB cable, it will not power off
except when PC is turned off.
3. Mode change: Press this button rapidly to change modes.
The SNAP button has two functions:
1. Take a picture: Press this button to take a picture when the camera is on. (But not in the PC mode
or mode change.
2. Select: In “Mode Change”, press this button to confirm the function.
1
78-7348 1LIM.indd 2
6/17/04 9:48:17 AM
LCD DISPLAY
1.
High Resolution Mode = 1280x1024 Pixels
2.
Low Resolution Mode = 1024x768 Pixels
3.
Select the timer to take a delayed picture. This gives you
approximately a 10-second delay.
This mode allows you to take short movie clips, saved as “.avi” files.
4.
5.
Selects different modes.
6.
Deletes all the pictures in the memory.
7.
Deletes the last picture taken.
8.
USB mark appears when USB cord is connected between the camera and the PC.
9.
Battery mark keeps track of the battery life left.
10.
a. Picture Number-- This area will show the number of pictures in the memory.
b. SET-- select Hq (high quality)/Lq (low quality) mode, STO (Mass Storage)/ PCC (PC
Cam)
mode, 50Hz/60Hz frequency
c. FUL--When the memory is full, the display will show “FUL” and alarm will sound.
OPERATION GUIDE
1. The camera is powered by two AAA batteries (included) or USB power (included).
2. Insert the battery into battery compartment.
3. Press and hold the MODE button until camera turns on.
4. Press SNAP to take a picture, or press the MODE button quickly to change mode settings as described
above. The camera is set at infinity and will not be focused on an object closer than 100 feet.
78-7348 1LIM.indd 3
2
6/17/04 9:48:18 AM
5. The mode setting operation is a cycle loop, so press the MODE button to switch to another mode.
The loop order of the different modes is shown here:
6. To change settings, toggle through the different modes by pressing the MODE button. When a
mode is selected, the indicator symbol on the LCD will appear. You can then select that mode by
pressing the SNAP button.
7. When in “Normal” mode, press SNAP to take a picture.
Press SNAP->
8. By pressing the MODE button the camera will enter “Mode Change”.
9. To select “Self-Timer” mode, press MODE and the self -timer mark appears, then press SNAP
and the camera will take a picture after a 10 second delay. The camera exits self-timer mode
automatically after capture is done and the self-timer mark disappears on the LCD at the same
time.
3
Press MODE->
78-7348 1LIM.indd 4
press SNAP to capture.
6/17/04 9:48:20 AM
10. Low Resolution mode, will cause your pictures to be of a lower resolution, but will allow you
to store many more pictures in the camera’s memory. The default setting is Hi. To change the
resolution, press the MODE button until you see the “mode” icon appears. Press the SNAP button,
and Lo will appear. The camera is changed from high resolution to low resolution. Repeat the same
steps to change the camera back to Hi resolution mode.
CAPTURED PICTURES WITH BUILT-IN MEMORY:
Pixels (Resolution)
1280X1024(Hi)
1024X768(Lo)
Image Quality
High quality (HQ)
Low quality (LQ)
High quality (HQ)
Low quality (LQ)
Captured Picture Quantity
Up to 40 pictures
Up to 55 pictures
Up to 55 pictures
Up to 85 pictures
11. When in “Normal” mode press the MODE button 3 times to enter the “AVI”
mode. The
icon will appear. Press the SNAP button to start AVI capturing, and
counting. The resolution for AVI is 320X240 pixels. The memory of the camera can
hold from 40-70 seconds of live action. It depends on what objects you are capturing
and the lighting conditions.
78-7348 1LIM.indd 5
4
6/17/04 9:48:20 AM
12. To delete all pictures in the camera’s memory, select the “Delete All” mode. This
represented by the trash can icon. Press the SNAP button to confirm. The picture
number will then blink. You will hear a tone that becomes higher as the pictures are
deleted. Once complete, the picture number will reset to possible captured numbers.
13. If the “delete Last” icon appears, the display will show the following: Press SNAP
to delete the last picture in the camera’s memory. The picture number will be
automatically increased after deletion is done.
14. Press the MODE button until SET mode appears on the LCD. Press SNAP to enter
Setting mode. To change the setting of image quality (default setting is High), Storage/PC
Cam (default setting is Storage), 50 Hz/60 Hz frequency (default setting is 60 Hz).
a. Select the image quality at Hq (High quality) or Lq (Low quality) by pressing the
SNAP button. Then press the MODE button to confirm and enter next setting.
b. Select the STO (Mass Storage) or PCC (PC CAM) mode by pressing the SNAP button. Then
press MODE button to confirm and enter next setting.
5
78-7348 1LIM.indd 6
6/17/04 9:48:21 AM
c. Select 50 Hz or 60 Hz settings for the camera output by pressing the SNAP button. Then press
MODE button to confirm and enter next setting. The camera’s default mode is the “60” mode,
which matches the power frequency for the United States. To change to the “50” mode, press the
SNAP button until the “60” changes to “50”. Confirm the selection by pressing the SNAP
button. To avoid any flickering on the picture, the correct power frequency (either 50 or 60) for
your country must be selected.
d. Escape the Setting mode by pressing the SNAP button.
15. The battery mark keeps tracking the battery life. If the battery indicator
is blinking, it is necessary to replace the batteries soon.
REMOTE SHUTTER
The remote shutter is recommended for the best stability while taking images.
6
78-7348 1LIM.indd 7
6/17/04 9:48:22 AM
DOWNLOADING THE PICTURES TO YOUR COMPUTER
1. The camera can be detached for more convenient downloading.
2. The camera has a mass storage function. When connected to the PC without changing any setting,
a new disc icon will appear in the computer interface. Click the icon, the captured pictures will be
seen directly.
3. The captured pictures can also be downloaded and saved in the PC via the photo imaging software.
CONNECTING TO THE COMPUTER
System Requirements:
Pentium 166MMX minimum
(Recommended Pentium 266)
Windows 98 / Me / Windows 2000 / XP
Minimum 32MB of RAM
USB port
Minimum 200MB of Hard Drive space with additional 65 MB space for IE and DirectX
CD-ROM driver
Super VGA Monitor and video card
SOFTWARE INSTALLATION
For OS Windows Me/2000/XP, no need to install software, just plug in and use.
Load software prior to connecting your camera to your computer if your OS is Windows 98.
7
78-7348 1LIM.indd 8
6/17/04 9:48:22 AM
To load software insert CD into your CD-ROW drive and it will self-start. The CD contains the Roxio
Photo Suite software as well as the drivers that will allow your computer to recognize your camera.
Follow the “On Screen” instructions. If your computer does not have an auto play function and will not
automatically run CDs, open the CD in the “My Computer” window and click on the “autorun.exe”.
After driver are successfully installed, click on “Roxio Photo Suite ”to install the photo imaging
software.
WARNING: Make sure you download any picture from your camera before
you remove the batteries from the camera.
Follow the instructions on the software to successfully download and save the pictures on your computer.
An installation screen will automatically guide you through the installation process.
© 2004 Roxio Inc. All Rights Reserved. Photosuite is a registered trademark of Roxio
© Windows is a trademark of Microsoft Corporation.
Specifications and designs are subject to change without notice.
8
78-7348 1LIM.indd 9
6/17/04 9:48:22 AM
WARRANTY / REPAIR
TWO-YEAR LIMITED WARRANTY
Your Bushnell® product is warranted to be free of defects in materials and workmanship for two years after the date of purchase. In the
event of a defect under this warranty, we will, at our option, repair or replace the product, provided that you return the product postage
prepaid. This warranty does not cover damages caused by misuse, improper handling, installation, or maintenance provided by someone
other than a Bushnell Authorized Service Department.
Any return made under this warranty must be accompanied by the items listed below:
1)
2)
3)
4)
5)
A check/money order in the amount of $10.00 to cover the cost of postage and handling
Name and address for product return
An explanation of the defect
Proof of Date Purchased
Product should be well packed in a sturdy outside shipping carton, to prevent
damage in transit, with return postage prepaid to the address listed below:
IN U.S.A. SEND TO:
Bushnell Performance Optics
Attn.: Repairs
8500 Marshall Drive
Lenexa, Kansas 66214
IN CANADA SEND TO:
Bushnell Performance Optics
Attn.: Repairs
25A East Pearce Street, Unit 1
Richmond Hill, Ontario L4B 2M9
For products purchased outside the United States or Canada please contact your local dealer for applicable warranty information. In Europe
you may also contact Bushnell at:
BUSHNELL Performance Optics Gmbh
European Service Centre
MORSESTRASSE 4
D- 50769 KÖLN
GERMANY
Tél: +49 (0) 221 709 939 3
Fax: +49 (0) 221 709 939 8
This warranty gives you specific legal rights.
You may have other rights which vary from country to country.
©2004 Bushnell Performance Optics
9
78-7348 1LIM.indd 10
6/17/04 9:48:22 AM
NOTES
10
78-7348 1LIM.indd 11
6/17/04 9:48:22 AM
www.bushnell.com
©2004 Bushnell Performance Optics
78-7348 1LIM.indd 12
6/17/04 9:48:23 AM