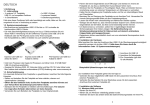
1
Instruction Manual
MD 90046
HDD2Go -External
Hard Disk
With USB 2.0 Connectivity
(Backward USB 1.1 Compatible)
Copyright © 2005
All rights reserved.
This manual is protected by Copyright.
MEDION® owns the Copyright.
Trademarks:
MS-DOS® and Windows® are registered trademarks of Microsoft®.
Pentium® is a registered trademark of Intel®.
Other trademarks are the property of their respective owners.
We reserve the right to make technical changes without prior notice.
Table of Contents:
Safety instruction ................................................................... 1
Safety and installation .......................................................... 1
Electromagnetic compatibility/ Conformity with norms............... 2
Cleaning ............................................................................. 3
Recycling and disposal.......................................................... 3
Data security ...................................................................... 3
Introduction .......................................................................... 4
What’s included ................................................................... 4
System requirements ........................................................... 4
Setting up ............................................................................. 5
Connecting the cables .......................................................... 5
Installing the hard disk .........................................................
Before you install your hard disk .........................................
Partitioning programs ........................................................
Partitioning the drive .........................................................
Formatting the drive ..........................................................
Choosing between NTFS, FAT, and FAT32 .............................
6
6
6
6
6
7
Deleting hard disks from the system....................................... 9
Customer service ..................................................................10
Requirements for optimal performance: .................................10
Troubleshooting ...............................................................11
Do you require additional support? .....................................11
WARRANTY...........................................................................12
Liability limitations ..............................................................12
Copying this manual............................................................12
ii
SAFETY INSTRUCTION
SAFETY AND INSTALLATION
Please read this chapter carefully and observe all listed notes. This will
ensure reliable operation and long life expectancy of your product. Keep
these instructions with your product at all times. The proper set up, use
and care can help extend the life of your product. In the event that you
transfer ownership of this product, please provide these instructions to
the new owner.
A person who is experienced in repairing and upgrading PCs must
only perform changing the hard disk.
Should you not possess the necessary qualifications, call in a
technician.
Hard disks are extremely fragile. Never drop or shake the hard drive this could irreversibly damage the data on the hard disk. Be especially
careful when transporting the hard disk. We provide no warranty
for this type of damage.
Follow the user guide for your PC.
Only use the hard disk with the original power supply unit. The
socket must be located near the equipment and be easy to reach.
If the power adapter plug is pulled out, the external hard disk will
be disconnected from the mains.
Do not insert any objects through the slits and openings into
the interior of the hard disk. This could lead to a short circuit
or even cause a fire.
Never open the hard disk casing. If you do so, the hard disk will
no longer be covered by the warranty.
Do not let children play unattended with electrical devices.
Children cannot always recognise the possible danger or hazard of
electrical products.
The hard disk is not designed for use in commercial applications/situations.
After transportation (especially in a cold environenment),
wait until the equipment is at room temperature before turning it
on. If there is a large difference in temperature or humidity, damp
can build up through condensation and cause an electrical short
circuit.
In order to avoid damage from a fall, place the hard disk on a stable and level surface that does not vibrate.
SAFETY INSTRUCTION
1
Keep your hard disk and all connected equipment away from
damp and avoid dust, heat and direct sunlight in order to prevent operational problems.
The slits and openings in the hard disk are for air circulation. Do not
cover these openings, as this could lead to overheating.
For additional safety, we recommend using power connection
through a power surge protection unit in order to protect your
equipment from power surges and lightning strikes.
The voltages and interfaces used in the equipment are in line with
the low voltage protection guidelines set out in EN60950. Connections to other equipment may only be made using similar interfaces with low voltage protection in accordance with EN 60950.
Please use our Service Centre if you have any technical problems
with your hard disk. If repairs are needed, please use exclusively
our authorised service partners.
ELECTROMAGNETIC COMPATIBILITY/ CONFORMITY
WITH NORMS
This device fulfils the requirements of electromagnetic compatibility and
electrical safety of the following norms:
EN 55022
Information technology equipment - Radio disturbance
characteristics - Limits and methods of measurement
EN 55024
Information technology equipment - Immunity characteristics - Limits and methods of measurement
EN 61000-3-2
Electromagnetic compatibility (EMC) - Limits for harmonic current emissions (equipment input current up
to and including 16 A per phase)
EN 61000-3-3
Electromagnetic compatibility (EMC) - Limitation of
voltage changes, voltage fluctuations and flicker in
public low-voltage supply systems, for equipment with
rated current <= 16 A per phase and not subject to
conditional connection
EN 60950
Safety of information technology equipment
On connecting the hard disk, you must keep to the guidelines for
electromagnetic compatibility.
Make sure that it is located at least one meter away from sources
of high frequency and magnetic disturbance (TVs, speakers, mobile telephones, etc.) in order to avoid operational problems and
data loss.
2
ENGLISH
CLEANING
As a rule, it is not necessary to clean the equipment. Before cleaning, always
pull out the plug and all connection cables.
Caution! This equipment does not include any parts that need
servicing or cleaning.
Make sure that the hard disk casing does not get dirty. Do not use
any solvents, corrosive or gaseous cleaning products.
RECYCLING AND DISPOSAL
This device and its packaging was produced mostly from materials which
can be disposed of in an environmentally friendly manner and be professionally recycled.
After its use this device will be taken back and recycled or use will be
made of its useful material, if it is returned in a condition corresponding
to its intended use.
Parts not usable will be properly disposed of.
DATA SECURITY
Every time you update your data make back-up copies on an external
storage medium. There is no liability assumed for data loss or damage to
data storage units, and no claims can be accepted for damages resulting
from the loss of data or consequential losses.
SAFETY INSTRUCTION
3
INTRODUCTION
WHAT’S INCLUDED
Please check to ensure that your product is complete and inform us within 14
days of purchase if anything is missing. The following should be included with
the hard drive:
External 3.5” hard disk in compact casing
USB 2.0/1.1 connection cable
Power supply unit (AC adapter)
Instruction manual & warranty card
SYSTEM REQUIREMENTS
Computer
Processor
Operating system
Working memory
Connection
4
PC/AT compatible computer
Pentium class above 200 MHz
Windows®2000/ME/XP
32 MB or more
USB 2.0 & USB 1.1 Standard
ENGLISH
SETTING UP
CONNECTING THE CABLES
Connect the external hard disk to your computer using a free USB 2.0
interface. (You can also connect the hard disk to computers to a USB 1.1
interface. The speed of transmission is then somewhat slower.)
(Rear view)
AC Adapter Input Jack
USB Cable Input Jack
1. Start your computer and wait until Windows® has been fully loaded.
2. Connect the USB connection cable to the USB input jack at the rear
of the external hard disk.
3. Connect the other end of the connection cable to a USB interface of
the computer.
4. Now connect the AC adapter to an appropriate socket that can easily
be reached. Plug the power adapter plug into the corresponding
socket in the hard disk.
5. The operating indicator (blue diode) will light up as soon as the hard
drive is connected to a source of electricity.
6. With Windows® ME/2000/XP the hard disk is now automatically recognised and connected.
Â
NOTE: Your drive has already been set up in production.
It will not be necessary to reformat or repartition it.
SETTING UP
5
INSTALLING THE HARD DISK
Â
NOTE: Your drive has already been set up in production.
It will not be necessary to reformat or repartition it.
Â
CAUTION! Partitioning or formatting a disk drive deletes
data. We assume no responsibility for lost data.
BEFORE YOU INSTALL YOUR HARD DISK ...
We would like to remind you once again that when installing the new
hard disk some programs are used that could cause your data to be irreversibly lost if used incorrectly.
Â
Make a backup of all your data and check that the recovery procedure works.
PARTITIONING PROGRAMS
With Windows® 2000/XP use the data media management help program in order to install the hard disk. You can find the program in the
computer management.
With some operating systems you must have administration rights to
install a hard disk.
With Windows® ME the hard disk is installed with the DOS program
FDISK. Look under help in Windows for detailed information on using this
program.
PARTITIONING THE DRIVE
Partitioning a drive divides the space into different areas that can be accessed as separate logic drives (with letters C:, D:, E: etc.). Read the
operating system manual to find out to partition hard drives.
FORMATTING THE DRIVE
In order to remove data from the hard disk, the partitions must be formatted.
Â
CAUTION! You must be totally sure about which drive letter to enter so that you don’t format a drive that contains
data you wish to keep.
You can carry out the partitioning using Windows® Explorer (right click on
the drive and select format).
Read which formatting options you have in the next section.
6
ENGLISH
CHOOSING BETWEEN NTFS, FAT, AND FAT32
When you use Windows XP and Windows 2000 you can choose between
three file systems for disk partitions: NTFS, FAT, and FAT32. Use the
information below to compare the file systems. NTFS is the recommended file system for the following reasons:
NTFS is more powerful than FAT or FAT32, and includes features required
for hosting Active Directory as well as other important security features.
You can use features such as Active Directory and domain-based security
only by choosing NTFS as your file system.
It is easy to convert partitions to NTFS. The Setup program makes conversion easy, whether your partitions used FAT, FAT32, or the older version of NTFS. This kind of conversion keeps your files intact (unlike formatting a partition). If you do not need to keep your files intact and you
have a FAT or FAT32 partition, it is recommended that you format the
partition with NTFS rather than convert from FAT or FAT32. Formatting a
partition erases all data on the partition and allows you to start with a
clean drive.
Whether a partition is formatted with NTFS or converted using the convert command, NTFS is the better choice of file system. (For more information about Convert.exe, after completing Setup, click Start, click Run,
type CMD, and then press ENTER. In the command window, type help
convert and then press ENTER.)
In order to maintain access control on files and folders and supportlimited accounts, you must use NTFS. If you use FAT32, all users will
have access to all files on your hard drive, regardless of their account
type (administrator, limited, or standard.)
NTFS is the file system that works best with large disks. (The next best
file system for large disks is FAT32.)
There is one situation in which you might want to choose FAT or FAT32
as your file system. If it is necessary to have a computer that will sometimes run an earlier version of Windows and other times run Windows XP,
you will need to have a FAT or FAT32 partition as the primary (or startup) partition on the hard disk. Earlier versions of Windows cannot access
a partition if it uses the latest version of NTFS. The two exceptions are
Windows 2000 and Windows NT 4.0 with Service Pack 4 or later. Windows NT 4.0 with Service Pack 4 or later has access to partitions with the
latest version of NTFS, but with some limitations: It cannot access files
that have been stored using NTFS features that did not exist when Windows NT 4.0 was released.
SETTING UP
7
For anything other than a situation with multiple operating systems,
however, the recommended file system is NTFS.
Â
Important: Once you convert a drive or partition to
NTFS, you cannot simply convert it back to FAT or FAT32.
You will need to reformat the drive or partition, which will
erase all data including programs and personal files on
the partition.
The following table describes the compatibility of each file system with
various operating systems.
NTFS
FAT
FAT32
A computer running Windows
XP or Windows 2000 can access files on an NTFS partition.
A computer running Windows
NT 4.0 with Service Pack 4 or
later might be able to access
some files. Other operating
systems allow no access.
Access is available
through MS-DOS,
all versions of
Windows, Windows
NT, Windows
2000, Windows
XP, and OS/2.
Access is available
only through Windows 95 OSR2,
Windows 98, Windows Millennium
Edition, Windows
2000, and Windows
XP.
The following table compares disk and file sizes possible with each file
system.
NTFS
Recommended minimum volume size is
approximately 10
megabytes (MB).
Volumes much larger
than 2 terabytes (TB)
are possible. Cannot
be used on floppy
disks.
File size limited only
by size of volume.
8
FAT
FAT32
Volumes from size up
to 4 gigabytes (GB).
Does not support domains.
Volumes from 512 MB
to 2 TB. In Windows
XP, you can format a
FAT32 volume up to
32 GB only. Does not
support domains.
Maximum file size is 4
Maximum file size is 2
GB.
GB.
ENGLISH
DELETING HARD DISKS FROM THE SYSTEM
Depending on the operating system, the external hard disk must be disconnected before it can be deleted. This is usually the case for Windows
2000. Read how this works in the help files of your operating system.
1. Disconnect the hard disk from the operating system if necessary.
2. Now pull out the plug and disconnect all the connection cables from
the external hard disk.
Â
Caution: While accessing the hard disk, the hard disk
must not be deleted or turned off. This can lead to data
loss.
Â
You can see that data is being transmitted when the LED
display flashes blue. When the LED display is constantly blue, no data is being transmitted. However,
you should make sure that all files that you have opened
from the hard disk (documents, etc.) have been closed
again before you delete or turn off the hard disk.
SETTING UP
9
CUSTOMER SERVICE
REQUIREMENTS FOR OPTIMAL PERFORMANCE:
1. A PC/Notebook that is running stable and trouble-free
2. A correctly installed operating system
3. Cables correctly connected to the hard disk
4. Regular execution of the Windows® defragmenter and scandisk
programs to remove sources of error and increase the system performance.
Defragmenting your hard drive can take some time (several hours even on
a fast PC), and you cannot use your PC during this time. It's advised that
you leave your PC defragmenting over night. To defragment your drive in
Windows 2000/XP:
1. Close down all applications and disable your virus scanner if possible. Also switch off any screensavers.
2. Click Start and then Programs->Accessories->System Tools>Disk Defragmenter
3. Select a drive and click Analyze.
4. Defragment if it is recommended.
ScanDisk is not present in Windows XP. Instead, use Check Disk. To start
Check Disk:
1. Open My Computer, right-click a drive, and then click Properties.
2. On the Tools tab, under Error-checking, click Check Now
Sometimes Defragmenter or Scandisk works on 10% or 30% of a hard
drive and might get stuck. This is usually caused by Windows programs
running in the background. If this happens, you can prevent force Windows to not run automatic background programs. To run ScanDisk or
Defrag successfully:
1. Go to Start->Run and type 'msconfig' in the Open: box.
2. On the General tab, uncheck all items listed under Selective
Startup (make sure that Selective Startup is selected).
3. Hit apply and OK and restart Windows. This starts Windows with
only the basics running; Insures nothing will interfere with ScanDisk and Defragmenter.
4. Run ScanDisk and Defrag.
5. Go to Start->Run and type ‘msconfig’ in the Open: box. Select
Normal Startup.
6. Restart Windows.
10
ENGLISH
TROUBLESHOOTING
PROBLEM: Windows stops responding when I disconnect the external
hard drive.
ANSWER: This may occur because Windows is trying to access a file that
is on external hard drive. Make sure that none of the files on the disk are
open when you unplug the drive. Be sure to stop the drive before disconnecting the power or adapter cable to prevent any data loss.
PROBLEM: Your computer might not recognise the external hard disk
drive.
ANSWER: Restart your computer.
PROBLEM: The hard drive does not seem to have as much storage capacity as I allocated.
ANSWER: Check that your operating system and file system support the
desired amount.
PROBLEM: ScanDisk reports an unrecoverable error.
ANSWER: The Scandisk program tests drives for errors. If ScanDisk
finds a problem and is unable to fix it, there may be a problem with the
hard disk
DO YOU REQUIRE ADDITIONAL SUPPORT?
If the suggestions in the previous section have not solved your problem,
please contact the hotline. We will try and help you over the telephone.
However, before you contact the MEDION Australia Help Desk, please
have the following information available:
-
How is your computer configured?
-
What additional peripherals do you use?
-
What messages, if any, appear on your screen?
-
What software were you using when the error occurred?
-
What steps have you already undertaken to solve the problem?
-
If you have already been given a customer number, please have this
available.
CUSTOMER SERVICE
11
WARRANTY
The sales receipt serves as proof of first purchase and should be kept in a safe
place. It is required should you need to make use of the warranty.
If the product is passed onto another user, then they shall be entitled to warranty
services for the remaining period of the warranty. The receipt of purchase as well
as this declaration should be passed on to the new user.
We warranty that this equipment is in perfect working order and from a technical
point of view it complies with the description in the enclosed documentation. Upon
production of the receipt, the remaining period of warranty shall pass on from the
original parts to the respective replacement parts. If you hand in this equipment to
make use of the warranty, you must remove any programs, data and removable
storage media. Products, which are sent with accessories, will be replaced without
accessories. The warranty obligation does not apply in the case of the problem
being caused by an accident, a catastrophe, vandalism, misuse, incorrect use,
ignoring the safety and maintenance regulations, changes by software, viruses or
another piece of equipment or accessory or by other modifications not approved
by the manufacturer. This limited warranty declaration replaces all other warranty
of express or implied nature. This includes the warranty of saleability or the suitability for a certain purpose but is not limited to this. In some countries the exclusion of implied warranty is not permissible upon principle. In this case the validity
of all express and implied warranty is limited to the warranty period. Once this
period has expired, all warranty become invalid. In some countries limiting the
period of validity for implied warranty is not permitted, so that the above limitation
does not come into force. If you have any questions with regard to these warranty
conditions, please contact us.
LIABILITY LIMITATIONS
The contents of this manual are subject to unannounced changes caused by technical progress. Manufacturer and sales shall not be responsible for any damages,
which have been caused as a result of omissions or errors in the information, provided in this manual.
Under no circumstances MEDION and its subsidiaries shall be liable for any of the
following:
1.
2.
3.
Claims made against you by third parties based on loss or damage.
Loss or damage to your media, recordings or data.
Economic follow-on damage (including lost profit or savings) or associated
damage even in the case that we have been informed of the possibilities of
this type of damage.
In some countries the exclusion or limitation of accompanying or follow-on damage is not legally accepted so the above limitations do not come into force.
COPYING THIS MANUAL
This document contains legally protected information. All rights reserved. Copying
in mechanical, electronic and any other form without the written approval of the
manufacturer is prohibited.
12
ENGLISH