1
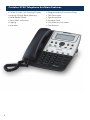
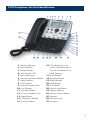
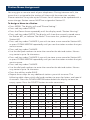
1
Caller ID / Type II Set
Instruction Manual
CORTELCO 2740 Four-Line Telephone /
Table of Contents
Why VoiceManagerSM with Cortelco Phones?......................................................... 2
Cortelco 2740 Telephone Set Main Features.......................................................... 3
Telephone Set Part Identification.............................................................................. 4
Quick Setup — Multi-Phone Configuration.............................................................. 5
Station Number Assignment..................................................................................... 5
Station Name Assignment......................................................................................... 6
Line Configuration/Type............................................................................................ 7
Ringer Configuration/Ring Timing........................................................................... 8
Distinctive Ring........................................................................................................... 9
System Privacy........................................................................................................... 10
Placing an Intercom Call.......................................................................................... 10
Features and Buttons................................................................................................ 11
Conference Button................................................................................................... 12
Page Button............................................................................................................... 13
Flash/Mute Buttons................................................................................................... 14
Speaker/Redial Buttons............................................................................................ 15
Hold Button............................................................................................................... 16
Call Transfers............................................................................................................. 17
Headset...................................................................................................................... 18
Memory Settings....................................................................................................... 18
VoiceManager — Most Frequently Used Features................................................. 20
VoiceManager — Feature Descriptions................................................................... 21
Voice Portal................................................................................................................ 22
Voice Mail.................................................................................................................. 22
Appendix A — Menu Tree......................................................................................... 23
Memory Setting — Time/Date Set — Advanced Setting Options......................... 25
Appendix B — Batteries............................................................................................ 26
Appendix C — Troubleshooting Guide................................................................... 27
2
Cortelco 2740 / Four-line Telephone / Caller ID / Type II Set
Why VoiceManagerSM with Cortelco Phones?
• Total cost of ownership savings with Cox
• Total flexibility to meet your business needs
• One vendor to call to support voice and equipment needs
• Cox Business VoiceManager has more features than most phone systems
• VoiceManager features are NETWORK-BASED
- Can be accessed from anywhere (Voice Portal and My Account control)
- Most features can be controlled from the sets with /# codes
- Customer benefits from feature upgrades on VoiceManager Platform
- Our strongest feature solutions are:
- Business Continuity
- Personal Mobility
*
3
Cortelco 2740 Telephone Set Main Features
• Caller ID with Call Waiting Display
• Internal Phone Book Memory
• Hold/Redial/Mute
• Voice Mail Indication
• Paging
• Intercom
4
• Programmable Distinctive Ring
• Toll Restriction
• Speakerphone
• Headset Jack
• Five Memory Locations
• Conference
2740 Telephone Set Part Identification
1 Memory Buttons
2 Menu Button
3 Delete Button
4 Multi-Angle LCD
5 Message Lamp
6 Review Up/Down Button
7 Select Button
8 Calls Button
9 Directory/Logo Strip
10 Line Buttons
11 Intercom Button
12 2.5 mm Headset Jack
13 Page Button
14 Conference Button
15 Transfer Button
16Flash Button (use to
access VoiceManagerSM
Transfer/Hold/Music on
Hold Features
17 Mute Button
18 Headset Button
19 Redial Button
20 Hold Button
21 Dial Button
22 Volume Up Button
23 Speaker Button
24 Volume Down Button
25Speaker
26 Handset Jack
27Handset
5
Quick Setup — Multi-Phone Configuration
• Up to sixteen (16) Cortelco 2740 sets can be multi-phone configured.
Line 1 MUST be common on all phones.
• Multi-Phone Line Configuration: Remaining three lines can be common,
private or unconnected.
• Connect telephones to wall jacks with provided twisted pair, four-wire
modular line cords: one modular cord for Lines 1 and 2 and a second
for Lines 3 and 4.
• The Cortelco 2740 four-line phone will perform best when using the
VoiceManager Complete Feature package.
• Install three AAA batteries.
Quick Setup
When setting up a Cortelco 2740, here are the features you may need
to program.
Station Number Assignment
Each station (telephone) must be assigned a unique station ID number.
The 2740 telephones WILL NOT function correctly until a station number is
assigned. Line 1 must be common to all phones for station naming to work
properly. To assign a number to a station:
• Press MENU. The display will read “Phone Setting.”
• Press the soft key under ENTER. The display will show the currently assigned
station number.
• Press the soft key under CHANGE repeatedly, until the desired station is
displayed. The choices are Station #01 through Station #16.
• Press MENU to exit.
• NOTE: One phone in the system must be set as Station #01 in order for all
the system features to function. Certain features can only be programmed
at Station 01 and will only function at Station 01.
6
Station Name Assignment
You may give a name to each of your telephones. During intercom calls, the
name that is assigned to the station will show with the extension number.
Please note that it may take up to 24 hours for all stations to be updated with a
name change. Station names MUST be assigned at Station 01.
To Assign a Name to a Station
• Press MENU. The display will read “Phone Setting.”
• Press soft key under ENTER.
• Press the Down Arrow repeatedly until the display reads “Station Naming.”
• Press soft key under ENTER. The display will show the currently stored name
for Station #01, or indicate “No Name” if no name has yet been given to
Station #01.
• Press soft key under CHANGE if you wish to store a new name for Station #01,
or press DOWN ARROW repeatedly until you see the station number that you
want to name.
• Press soft key under CHANGE.
• Use the dial-pad numbers to enter the name for the desired station. Names
may contain up to 16 characters.
• Press soft key under CHANGE if you wish to store a new name for Station #01,
or press DOWN ARROW repeatedly until you see the station number that you
want to name.
• Press soft key under CHANGE.
• Use the dial-pad numbers to enter the name for the desired station. Names
may contain up to 16 character.
• Press the soft key under SAVE.
• Repeat these steps for any additional stations you wish to name. The
following table shows which dial-pad numbers to press for letters and special
characters. Press the DOWN ARROW button below the display to leave an
empty space. Press the DELETE button to make corrections.
.
,
.
(
)
2
A
B
C
3
D
E
F
i
4
G
H
I
0
,
-
‘
&
2
a
b
c
3
d
e
f
4
g
h
1
5
j
k
l
5
J
K
L
6
m
n
o
6
M
N
O
7
p
q
r
s
7
P
Q
8
t
u
v
8
T
U
V
9
w
x
y
z
9
W
X
*
*
#
#
1
R
S
Y
Z
7
Line Configuration/Type
While Line 1 must be shared at all stations, Lines 2, 3 or 4 may be unconnected,
common, or may be connected to private lines.
Common Lines Shared
This is the factory setting for all lines. This setting assumes that the phone
number is connected to the same telephone line position at all stations.
Private
Use this setting at any telephone line position that is connected to a different
telephone number than the corresponding line at the other stations. For
example, you may connect your private telephone number to Line 4 at your
station instead of connecting your station to the common Line 4. In this
example, you would set Line 4 at your station as PRIVATE.
Unconnected
Use this setting at any telephone that may not have all lines physically connected.
How to Adjust the Line Configuration Type
• Press MENU. The display will read “Phone Setting.”
• Press soft key under ENTER.
• Press the DOWN ARROW repeatedly until the display reads
“Line Connections.”
• Press soft key under ENTER. The display will show the line connection
setting for Line 2.
• Press the soft key under CHANGE repeatedly, until the desired line
connection setting for Line 2 is displayed. The choices are:
- L2: Common (Factory Setting)
- L2: Private
- L2: Unconnected
• Press the soft key under NEXT to see the current setting for Line 3.
• Repeat above steps to change for the other lines.
• Press MENU to exit.
8
Ringer Configuration
The ringers for each outside line are controlled individually at each telephone.
There are three possible settings for each line ringer:
Ringer On
• The line will ring normally.
Delayed Ring
• The line will start ringing after the first 20 seconds. This is useful if all phones are answered at a central location.
Ringer Off
• The line will not ring. In all these cases, the line indicators will flash to signal
an incoming call.
• You can always answer a ringing line, whether or not it is ringing audibly at
your telephone by pressing the flashing line button.
Ring Timing
• Press MENU. The display will read “Phone Setting.”
• Press soft key under ENTER.
• Press the DOWN ARROW repeatedly until “Ringer Settings” appears
in the display
• Press soft key under ENTER. The display will show the current ringer setting
for Line 1.
• Press the soft key under CHANGE repeatedly until the desired ringer setting
for Line 1 is displayed. The choices are:
- L1 Ringer: ON (factory setting)
- L1 Ringer: DELAY
- L1 Ringer: OFF
• Press the soft key under DOWN ARROW to see the current ringer
setting for line
• Repeat above steps to change the ringer setting for Lines 2 to 4.
• Press MENU to exit.
9
Distinctive Ring
All lines are initially set to ring with ring sound number one. Each outside line
may be assigned one of seven other distinctive ringer tones. This can be used
to easily identify a ringing phone.
Assigning Distinctive Ring to One or More Numbers
• Press MENU. The display will read “Phone Setting.”
• Press the DOWN ARROW repeatedly until “Distinctive Ring” appears
in the display.
• Press soft key under ENTER. The display will show the distinctive ring setting
for Line 1.
• Press the soft key under CHANGE repeatedly, until the desired distinctive ring
setting for Line 1 is displayed.
• Press the DOWN ARROW to see the current setting for Line 2, and repeat
above steps to change the settings for Lines 2 to 4.
• Press MENU to exit.
Note: When a Distinctive Ring setting is displayed, it may be heard by pressing
the soft key under CHANGE.
Automatic Line Selection
The 2740 set will automatically select an outside line or the intercom line
whenever the handset is lifted or the SPEAKER button is pressed. To choose
which line will be automatically selected:
• Press MENU. The display will read “Phone Setting.”
• Press the soft key under ENTER.
• Press the DOWN ARROW repeatedly until Auto Seize appears in the display.
The display will show the current auto seize setting.
• Press the soft key under CHANGE repeatedly until the desired setting is
displayed. The choices are: L1, L2, L3, L4 or INTCM.
• Press MENU to exit.
Note: An incoming call will be selected automatically when the handset is lifted
or the SPEAKER or HEADSET button is pressed regardless of the automatic line
selection choice. To select a non-ringing line, the desired LINE button must be
pressed before lifting the handset. If the chosen line is in use, the telephone
will automatically select the next available line.
10
System Privacy
Call Privacy prevents stations from joining existing calls. Call privacy can be
released during a call by pressing the CONFERENCE button. The default
setting for Call Privacy is ON. Call Privacy is set at Station #01 for the entire
system. This choice does not appear on any phone except Station #01. Call
Privacy only applies to outside calls. Intercom calls always have Call Privacy.
To Change the Privacy Setting at Station #01
• Press MENU. The display will read “Phone Setting.”
• Press the DOWN ARROW repeatedly until “Advanced Setting” appears
in the display.
• Press the soft key under ENTER.
• Press DOWN ARROW repeatedly until “System Privacy” appears in the display.
• Press the soft key under ENTER. The display will show the current Call
Privacy setting.
• Press the soft key under CHANGE to toggle the privacy setting between
Y and N.
• Press MENU to exit.
Note: It may take five minutes or more for this change to be made in all phones
in the system.
Intercom Call
Placing an Intercom Call
1. Press Intercom button.
2. Dial station number (example: 01).
3. Intercom call will be placed to the station dialed.
Placing a Group Intercom Call
1. Press Intercom button.
2. Press Conference button two times.
3. Group Intercom call will be placed.
11
Features and Buttons
Intercom: Call other phones by dialing their station number. Intercom calls can
be answered “hands-free” via speakerphone.
Paging: Page one or all users through the speaker in their telephones.
Transfer: Answer a call and transfer it to any phone in the system.
Flash: Use to transfer calls inside or outside of phones in the system, place
calls on hold, or access music on hold (or use VoiceManager Personal Call
Manager Feature).
Phone Status: See at a glance which phone lines are in use.
Up to 4 Lines: Access four phone lines at the touch of a button. Place a call on
hold and switch to another line.
Three-Way Conference: Press Flash to put first caller on hold, dial second
number then press Flash to connect all three parties.
Large Backlit LCD: Shows number dialed, clock, calendar, extension in use
indication and full caller ID information.
Call Timer: Every call is automatically timed in minutes and seconds.
Headset Jack: 2.5mm headset jack/Plantronics headset suggested.
Redial: Redial five most recent calls; view the date, time and duration.
Do Not Disturb (DND): Silences ringers and prevents intercom calls. Also
available through VoiceManger Personal Call Manager.
Toll Restriction: Restricts specific numbers and prevents unauthorized calls.
Also available through VoiceManger Personal Call Manager.
Call Privacy On/Off: Prevents others from joining or listening to your call.
Auto Line Selection: Automatically select a given line for outbound calls.
Memory Dialing: 40 personal directory dial numbers. Also available through
VoiceManger Personal Call Manager.
Nonvolatile Memory: All memory numbers and feature settings are retained
even with no electrical power or battery.
Adjustable Volume: Separate controls for handset, speakerphone and
headset.
Caller ID: All four lines show caller ID from service provider.
Caller ID on Call Waiting: All four lines show caller ID from service provider
on a call waiting.
Caller ID List: Caller ID information from last 50 calls automatically stored and
dialed with one touch.
Message Waiting Indication (MWI): Missed calls/messages in mailbox.
Supports service Stutter dial tone.
Private Line: Certain lines can appear only on certain phones.
Distinctive Ring: Assign a unique ring sound to your phone.
Additional Features: Battery backup, dual line status indicators, flash, hold,
mute, ringer control, pre-dialing, wall mountable, hearing aid compatible.
12
Conference Button
The 2740 allows Conference calls with two other parties. These may be either
two outside lines or one outside line and one intercom line. Conference is also
available through VoiceManager Personal Call Manager.
Outside Calls
• Make or answer a call.
• Press HOLD.
• Make or answer a call on another line.
• When the second call is connected, press the CONFERENCE button.
The lines are immediately conferenced.
• Hang up to end the conference call. To disconnect one of the conference.
parties, press the LINE button for the other party.
Outside Call with Intercom Station
• Place an intercom call to the desired station. The outside call is automatically
placed on hold.
• After the person at the other station answers, press the CONFERENCE button
to create a conference call.
• Hang up to end the conference call. The person at the other station may
remain connected to the outside line.
• If the system Call Privacy is OFF, another intercom station may join a call
by pressing the appropriate LINE button.
• Pressing HOLD during a conference call will place both lines on hold.
The conference call can be re-established by first pressing one of the
LINE buttons and then pressing CONFERENCE.
Note: This feature only works between U2740 — four-line phones.
13
Page Button
Paging allows announcements to be made to other 2740 stations in the system.
The speakerphone is automatically activated when making a page. Pages can
be made using the speakerphone or the handset.
Single Page
• Press PAGE.
• Dial the two-digit station number of the station to be paged.
• After the paging tone sounds, speak toward the telephone or lift the handset
and make the announcement.
All Page
The All Page feature enables announcements to be made through all of the
other 2740 stations. When an All Page is made, a double paging alert tone will
sound followed by the page. All Page will not be heard at stations in use or
stations set to DO NOT DISTURB or Page Block. To perform an All Page:
• Press PAGE twice.
• After the paging tone sounds, speak toward the telephone or lift
the handset and make the announcement.
Blocking Pages
• Press MENU. The display will read “Phone Setting.”
• Press soft key under ENTER.
• Press the DOWN ARROW repeatedly until “Intercom Prefs” appears
in the display.
• Press soft key under ENTER.
• Press DOWN ARROW repeatedly until “Pages: Allowed” appears in the display.
• Press the soft key under CHANGE to select between Pages ALLOWED and
Pages BLOCKED.
• Press MENU to exit.
14
Page Button (cont’d.)
Answering Pages
Single Page A page directed to a particular station may be answered only at
that station. To answer a page, lift the handset, press SPEAKER or HEADSET
or press the flashing INTERCOM button. This will create a private intercom
conversation.
All Page An All Page may be answered from any phone in the system, even
one that is busy on an outside line, has DO NOT DISTURB set or has blocked
pages. Press the flashing INTERCOM button to answer an All Page. This will
create a private intercom conversation.
Flash Button
Flash
Press FLASH button to provide a line break to access services such as ThreeWay Calling, Call Waiting, or VoiceManager features such as music on hold and
call transfer.
Steps to Use with Call Waiting Service:
1. While having a conversation, another party calls and you hear a tone.
2. Press FLASH once and release. The first conversation is placed on hold and
the second call can be answered.
3. Press FLASH again and release. You may speak to the first caller again and
the second call is placed on hold.
Mute Button
The Mute feature disables the telephone microphone so the 2720 set user
cannot be heard by the distant party. The Mute feature works with both the
handset and the speakerphone. It silences only the 2740 user. The distant party
can still be heard.
To activate this feature, press MUTE. The MUTE indicator will light. Then to
cancel this feature, press MUTE again and the MUTE indicator will turn off.
Mute is also cancelled by hanging up, selecting another line or switching from
speakerphone to handset during a call.
15
Speaker Button
Making and Answering Calls
When the handset is lifted, the 2740 will automatically select a line based on
the automatic line selection setting. The 2740 will automatically select a ringing
line if the handset is lifted during ringing.
To use the speakerphone to make or answer a call or a page, press the
SPEAKER button instead of lifting the handset. This will select the line in the
same manner as the handset described above. To override the automatic
line selection. Press the desired LINE button instead of pressing the SPEAKER
button. The 2740 will then be connected to that line on the speakerphone.
To switch from handset to speaker during a call, press the SPEAKER button
and hang up the handset. To switch to handset from speaker, lift the handset.
Note that whenever the SPEAKER indicator is on, the handset may be hung up
without disconnecting the call.
Redial Button
To Redial the Last Number Dialed
• Go off-hook by lifting the handset, pressing SPEAKER, pressing HEADSET or
by pressing the desired LINE button.
• Press REDIAL.
To Redial Any of the Last Five Numbers Dialed
The Redial feature enables viewing or redialing of any of the last five telephone
numbers dialed. This also shows the time, date and duration of each call.
• With the phone on-hook and idle, press REDIAL. The display will show the
last number dialed, the time and date of the call, and its duration.
• Press the right arrow button under the display repeatedly to scroll through
a list of the last five numbers dialed along with the time, date and duration.
• Go off-hook at any time to dial the displayed number.
16
Hold Button
Placing a Call on Hold
To place an outside call on HOLD, press HOLD. To take the call off hold, press
the line button of the line on hold. While a caller is on hold, the handset can be
hung up without disconnecting the call.
When a call is on hold, it can be removed from hold by any telephone
connected to that line simply by accessing the line. If a call remains on hold
after two minutes, your 2740 set will alert you.
Note: Intercom calls CANNOT be put on HOLD.
Note: To activate VoiceManager music on hold, use the FLASH button.
Making a Call on Another Line
To make a call on a second line while having a conversation, press HOLD to
place your first call on hold and then press another LINE button. A call may now
be made on the second line. Press the first LINE button to return to the first call.
This will disconnect the second call.
To keep the second call, it must be placed on hold before returning to the first
call. This can be done multiple times during a call.
Answering a Call on Another Line
If there is an active call on one line and a call comes in on another line, the
incoming line lamp will flash and the 2740 will sound a double ring every 15
seconds. If the incoming line is set to ringer off, the double ring will not sound.
The incoming call may be answered by pressing the flashing LINE button. This
will disconnect the original call unless it is placed on HOLD.
17
Call Transfers
Attended Transfer
• Place an intercom call to the desired station. The outside call is automatically
placed on hold.
• When the intercom party answers, announce that a call is being transferred
• Press the TRANSFER button to complete the transfer. Press the LINE button
to return to the outside call and abort the transfer.
“Cold” Transfer – (transfer a call without announcing to the recipient)
1. Answer call.
2. Ask caller to hold.
3. Press “FLASH.”
4. Once you have a second dial tone, dial second number.
5. Wait for receiving handset to ring.
6. Hang up.
7. Call is transferred.
“Warm” Transfer – (transfer a call, announcing caller before transferring)
1. Answer call.
2. Ask caller to hold.
3. Press “FLASH.”
4. Once you have a second dial tone, dial second number.
5. Wait for receiving party to answer call.
6. Announce to receiver that you are transferring a call.
7. Hang up.
8. Call is transferred.
18
Headset
The 2740 is equipped with a 2.5mm headset jack and a built-in headset
amplifier, along with a dedicated HEADSET button.
To use this feature, plug a telephone headset into the headset jack. There is
no need to buy a headset with a separate amplifier. The headset can be used
to make or answer an outside call, an intercom call or a page. Simply press
HEADSET instead of lifting the handset.
To make a headset call on a particular line, press the desired line button to
connect to that line on the speakerphone. Then, press HEADSET to toggle to
the headset. Press HEADSET again to hang up. Plantronics wireless or wired
headset is recommended.
Memory Settings
Memory Features
The 2740 can store up to 45 numbers in its memory. Five numbers can be
stored into one-button Memory Locations, which are dialed by pressing a
memory button. Forty numbers can be stored into personal Directory locations,
which are dialed by pressing “#” followed by the arrow buttons.
Storing a Hyphen into Memory
To store a hyphen into memory while saving a number into memory, press
PAGE. Each press of PAGE will insert a hyphen. Hyphens are only for ease of
reading. They make no difference in dialing.
Storing a Flash into Memory
To store a flash while saving a number into memory, press FLASH. These can
be used to access features from a PBX. Each press of FLASH will insert a 600millisecond (or other default time) flash. These will be shown as an “f” in the
display.
Storing One of the Last Five Numbers into Memory
To store a dialed number into memory, press REDIAL. You may then press UP
or DOWN key to scroll through the last five numbers dialed. Press the Memory
Location key or the Directory key (#) and press YES to save or NO to cancel
when the desired number is displayed.
19
Memory Settings (cont’d.)
Storing a Caller ID into Memory
To store a caller ID number into memory, press CALLS. Then press the UP and
DOWN key to select a Caller ID number to save. Press the Memory Location
key or the Directory key (#) and press YES to save or NO to cancel when the
desired number is displayed.
To Store Caller ID Calls
• Press MENU. The display will read “Phone Setting.”
• Press the soft key under ENTER.
• Press Down Arrow repeatedly until “Caller ID Store” appears in the display
and then press the soft key under ENTER.
• Press CHANGE to change the setting for Line 1.
• Press DOWN ARROW to view and change the settings for Lines 2-4.
To Store a Memory Dial Number
• Press MENU. The display will read “Phone Setting.”
• Press DOWN ARROW until “Memory Setting” appears in the display.
• Press the soft key under ENTER. The display will read “Select Location.”
• Press the Memory button where the number is to be stored. The display
will show the currently stored number or indicate “Empty Location.”
• Press the soft key under ENTER to store a new number.
• Dial the desired telephone number, up to 32 digits.
• Press the soft key SAVE.
• The 2740 can store up to five numbers that can be dialed automatically
with the press of a memory button.
To Store a Personal Directory Dial Number
• Press MENU. The display will read “Phone Setting.”
• Press DOWN ARROW until “Memory Setting” appears in the display.
• Press the soft key under ENTER. The display will read “Select Location.”
• Press #. The display will read “Empty Location” or indicate that the personal
directory is full.
• Press the soft key under ENTER to store a new number.
• To change a number, press DOWN ARROW repeatedly until the desired entry
is displayed then press CHANGE.
• Dial desired telephone number.
• Press the soft key under NEXT. The display will show the currently stored
name or indicate “No Name.”
20
Memory Settings (cont’d.)
• Press the soft key under ENTER to store a new name. Use the dial pad and
the soft keys to enter a name.
• Press the soft key under SAVE.
VoiceManager — Most Frequently Used Features
SM
Feature Access Codes list the star codes for services that you have. To
activate a service, hit the “*” key and the number followed by the “#” key.
Some require additional information such as a phone number, but you are
prompted for that information.
You cannot change your feature access code.
*72 Call Forwarding Always Activation
*73 Call Forwarding Always Deactivation
*90 Call Forwarding Busy Activation
*91 Call Forwarding Busy Deactivation
*92 Call Forwarding No Answer Activation
*93 Call Forwarding No Answer Deactivation
*67 Calling Line ID Delivery Blocking per Call
*31 Calling Line ID Delivery Blocking – Persistent Activation
#31 Calling Line ID Delivery Blocking – Persistent Deactivation
*65 Calling Line ID Delivery per Call
*69 Call Return
*43 Call Waiting Persistent Activation
#43 Call Waiting Persistent Deactivation
*70 Cancel Call Waiting
*57 Customer Originated Trace
*78 Do Not Disturb Activation
*79 Do Not Disturb Deactivation
*22 Flash Call Hold
*66 Last Number Redial
*68 Call Park
*88 Call Park Retrieve
*98 Call Pickup
21
VoiceManager — Feature Descriptions
SM
Call Forward Activation:
1. Lift telephone handset. Press the assigned code (ex. *72).
2. Enter phone number to which calls will be forwarded.
3. Replace telephone handset. The Call Forwarding Always service is on.
Call Forward Deactivation:
1. Lift telephone handset. Press the assigned code (ex. *73).
2. Replace telephone handset. The Call Forwarding Always service is off.
For Call Forward Always, Busy and No Answer, use above.
Call Forwarding No Answer Activation: (*92)
Route incoming calls to another number or voice mail whenever you are
unable to answer your extension.
Call Forwarding No Answer Deactivation: (*93)
Call Pickup: (*98)
Allows a user to answer any ringing extension within their group from their own
phone. The group administrator defines group member.
Call Park: (*68)
Allows a user to hold a call and retrieve it from any extension within the group.
Call Park Retrieve: (*88)
Allows a user to retrieve a call parked from any extension.
Do Not Disturb Activation: (*78)
All incoming calls are referred to a message that says, “The number you have
dialed is not taking calls at this time.” Callers are provided an option to go to
voice mail.
Do Not Disturb Deactivation (*79)
22
Voice Portal
Access the VoiceManager Voice Portal from any phone. The Voice Portal allows
you to make changes to your call forwarding and initiate outbound calls that
appear to originate from your office.
First Time Setup
1. Initial setup must be done from your VoiceManagerSM telephone line.
2. Dial 9999# to reach the Voice Portal from your office.
3. When prompted, set up your pass code and record your name.
4. Follow the prompts to set up call forwarding, change your status manager
or initiate a call.
Voice Mail
Your initial setup must be done from your Cox Telephone line. If you have
Caller ID block on your line, you will need to press * 6 7 prior to dialing
the number to disable this feature for the initial setup call.
Initial Setup
1. From your office phone associated with voice mail, dial the voice mail access number for your area (see below).
2. Follow the prompts. When prompted for your password, enter your
temporary password, which is “269266” or “COXCOM”.
3. After entering your temporary password, you will hear a greeting “Welcome
to your mailbox...”. Follow the prompts for a step-by-step tutorial to
personalize your voice mail box and create a new password.
Creating Your Password
Once you begin the tutorial, you will be prompted to create your own
password. Your password can be between four to seven digits in length.
Try to create a new password that is easy to remember, but not easily
guessed by others.
Take these steps to avoid unauthorized users from entering your mailbox.
1. Avoid using repetitive numbers (4444, 99999) or sequential numbers (12345, 2468).
2. Avoid using the last four digits of your phone number.
3. Change your password regularly.
Voice Mail Access Numbers
480-699-6245602-795-6245
623-322-6245928-252-6245
Tucson – 520-702-7000
Benson – 520-720-6245
Casa Grande – 520-235-6245
Sierra Vista – 520-335-6245
23
Appendix A — Menu Tree
Menu Option
Submenu
Station #
N
Y (Yes)/N (No)
L1 Ringer
On
On/Delay/Off
L2 Ringer
On
On/Delay/Off
L3 Ringer
On
On/Delay/Off
L4 Ringer
On
On/Delay/Off
Y
Y (Yes)/N (No)
Intcm
Handsfree
Ring/Voice/Handsfree
Pages
Allowed
Allowed/Blocked
L2
Common
Common/Private/Unconnected
L3
Common
Common/Private/Unconnected
L4
Common
Common/Private/Unconnected
Off Hook Ring
Intercom Pref
Line Type
Auto Seize
Distinctive Ring
Area Codes
24
Available Options/Comment
None
Do Not Disturb
Ringer Settings
Default
L1
L1/L2/L3/L4/Intcm
L1: Ring Sound #
1
1, 2, 3, 4, 5, 6, 7, 8
L2: Ring Sound #
1
1, 2, 3, 4, 5, 6, 7, 8
L3: Ring Sound #
1
1, 2, 3, 4, 5, 6, 7, 8
L4: Ring Sound #
1
1, 2, 3, 4, 5, 6, 7, 8
Home Code
None
Three Digits
Local Code 1
None
Three Digits
Local Code 2
None
Three Digits
Local Code 3
None
Three Digits
Local Code 4
None
Three Digits
Local Code 5
None
Three Digits
Local Code 6
None
Three Digits
1 Plus 7 Code 1
None
Three Digits
1 Plus 7 Code 2
None
Three Digits
1 Plus 7 Code 3
None
Three Digits
1 Plus 7 Code 4
None
Three Digits
1 Plus 7 Code 5
None
Three Digits
Appendix A — Menu Tree
Menu Option
Telco VMWI
Caller ID Store
Toll Restriction
Submenu
Default
Available Options/Comment
1 Plus 7 code 6
None
Three Digits
VMWI: Line
Line 1
Line 1, Line 2, Line 3, Line 4, Off
VMWI: Type
FSK
FSK/Stutter
L1 CID Store
On
On/Off
L2 CID Store
On
On/Off
L3 CID Store
On
On/Off
L4 CID Store
On
On/Off
Set Restriction 1
Enter 1234 to access programming
Set Restriction 2
Set Restriction 3
Set Restriction 4
Set Restriction 5
Set Allowed 1
Set Allowed 2
Set Allowed 3
Set Allowed 4
Set Allowed 5
Line Restriction L1
Normal/Restricted
Line Restriction L2
Normal/Restricted
Line Restriction L3
Normal/Restricted
Line Restriction L4
Normal/Restricted
Station Naming
Set at Station 01 for each
of 16 Stations
Hold Remind
Off
Centrex Prefix
Prefix
Message Lamp
RESTE
CIDCW
End of List
Off/30s/1 min/2 min
Up to Seven Digits
High Sens
High Sens/Off/Low Sens
EXIT
25
Memory Setting — Time/Date Set — Advanced Setting Options
Memory Setting Menu
Menu Option
Submenu
Default
Available Options/Comment
Select Location
Empty Location
After M1, M2, M3, M4 or M5
is pressed
Directory
After # is pressed
Time/Date Set
Menu Option
Submenu
Default
Available Options/Comment
Time:
(13:44)/(HH:MM)
AM/PM:
AM/PM
Date:
(01/01/00)/(MM/DD/YY)
Advanced Setting Option
Menu Option
Submenu
Erase Memory
Memory Dial
Default
Available Options/Comment
Erase Settings
26
Erase Toll Rest
Enter Code:
Headset Type
Hst:
(01/01/00)/(MM/DD/YY)
2.5mm
2.5mm/Handset
Flash Time:
600mms
600ms/1s/100ms/300ms
Hold Drop
30 min
30 min/5 min/15 min
Hold Release
Off
Off/On
Station #
Normal
Normal/Locked
Loop Detect
48V
48V/24V/12V/Off
Tone/Pulse
Tone
Tone/Pulse
System Privacy
Y
Y (Yes)/N (No) This option only at
Station 01
Appendix B — Batteries
The 2740 uses AC power from a standard wall outlet. As long as the telephone
is connected to a wall outlet, it will operate using the AC power. The 2740 uses
three AAA batteries for backup power. These batteries fit into a compartment
on the base of the telephone.
The phone display has a battery symbol on the upper right whenever the
batteries are low and need replacing or when no batteries are installed.
Battery Replacement
a.Make sure the AC cord is attached to the telephone and to a working
electrical outlet.
b.Turn the telephone over.
c. Remove the desk pedestal/wall mount bracket if attached.
d.Remove battery door cover by using the tip of a ballpoint pen, paper clip,
or similar object to release the battery door tab.
e.Remove the old batteries.
f. Insert three new AAA size alkaline batteries. Note that we recommend
ONLY alkaline batteries.
g.Close the battery cover.
Power Failure Operation
If AC power is disconnected or there is a power failure, the 2740 switches
to battery operation for approximately two hours. When the power is
restored, the telephone automatically switches back to AC power and
resumes normal operation.
If the batteries are missing or low on power when AC power is lost, the
telephone will not function. However, all feature settings ard memory
numbers will be maintained.
Note: It is recommended to always have at least one standard telephone
connected so communicaitons can be maintained during a power failure.
27
Appendix C — Troubleshooting Guide
Problem
Solution
No Display or Lamps
Make sure that the power transformer is plugged into an
electric socket not controlled by a wall switch.
No Dial Tone
Check all line connections. If possible, check your jack wiring
by testing a non-system telephone at the jack in question. If a
standard telephone does not work, then the local telephone
company lines or your house wiring may be causing the
problem.
The LEDs are Flashing
and the Display reads
“Station #??”
Press soft key “Change” to assign this telephone a station
number.
There is no dial tone
on the handset, but the
speakerphone works.
Replace the handset from another 2740 telephone. If this
solves the problem, then contact Technical Support for
assistance.
The intercom does not work.
The problem may be with your installation. Make sure that the
lines are installed correctly and that Line 1 is common on all
system telephones.
or
The telephone does not
allow the status of other
telephones.
or
There is a delay in getting
dial tone.
or
The telephone remains on
hold after the call is picked
up at another station.
28
The cause of this problem may be from outside interference.
Disconnect Line 1 at the cable terminal. If this solves the
problem, then the interference is coming from the telephone
company.
This problem may also be caused by DSL microfilters. Never
connect a line that has a DSL circuit on Line 1.
The problem may be caused by one defective telephone.
Disconnect one instrument at a time to determine if a
particular telephone is causing the problem.
Crosstalk or other
interference.
The most common cause of crosstalk is the use of flat cable.
Be sure to use supplied line cords. You must use twisted-pair
line cords.
The line LED flashes when
a call comes in, but the
telephone does not ring.
Make sure that the ringer is on and that “Do Not Disturb” is
off.
The telephone does not
operate during a power
outage.
Make sure that fresh AAA batteries are installed in base.
The battery icon stays lit in
display.
Make sure that fresh AAA batteries are installed in base.
You cannot join a telephone
call already in progress.
The Call Privacy feature prevents another 2740 or 2750 from
interrupting a call in progress. If you don’t want Call Privacy in
your system, then go into system programming on Station 01
and turn it off.
The telephone line status
indications stay lit, even
though the line is not in use.
If this line is not connected, then program it as unconnected.
If this line is connected and you have dial tone, then adjust
loop voltage detector setting.
Report Trouble
For help, please call Cox Business Customer Care at 623-3222000.
29
coxbusiness.com
Customer Care – 623-322-2000
Please refer to the Cortelco Owner’s Instruction Manual that came with your
phone for Important Safety Instructions, FCC Information, Telephone Repair
and Limited Warranty Information.
Service and features not available in all areas. Some features may incur local usage charges in certain markets.
Long distance rates will vary. Telephone modem equipment required. Modem uses electrical power to operate
and has backup battery power provided by Cox if electricity is interrupted. Telephone service including access
to e911 services will not be available during an extended power outage or if modem is moved or inoperable.
Telephone services are provided by Cox Arizona Telcom, LLC. ©2011 CoxCom Inc., d/b/a Cox Communications
Phoenix, Inc. All rights reserved.
30