1
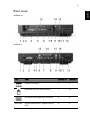
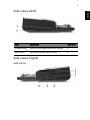
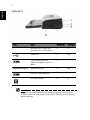
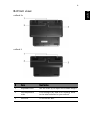
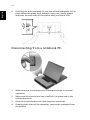
Acer ezDock II/II+
User's Guide
Copyright © 2006 Acer Incorporated.
All Rights Reserved.
Acer ezDock II/II+ User's Guide
First issue: July, 2006
Changes may be made periodically to the information in this publication without obligation
to notify any person of such revisions or changes. Such changes will be incorporated in new
editions of this manual or supplementary documents and publications. This company makes
no representations or warranties, either expressed or implied, with respect to the contents
hereof and specifically disclaims the implied warranties of merchantability or fitness for a
particular purpose.
Record the model number, serial number, purchase date, and place of purchase information in
the space provided below. The serial number and model number are recorded on the label
affixed to your computer. All correspondence concerning your unit should include the serial
number, model number, and purchase information.
No part of this publication may be reproduced, stored in a retrieval system, or transmitted, in
any form or by any means, electronically, mechanically, by photocopy, recording, or otherwise,
without the prior written permission of Acer Incorporated.
Acer ezDock II/II+
Model number: _________________________________
Serial number: ___________________________________
Purchase date: ___________________________________
Place of purchase: ________________________________
Acer and the Acer logo are registered trademarks of Acer Incorporated. Other companies
product names or trademarks are used herein for identification purposes only and belong to
their respective companies.
iii
Information for your safety and
comfort
Safety instructions
Read these instructions carefully. Keep this document for future reference.
Follow all warnings and instructions marked on the product.
Turning the product off before cleaning
Unplug this product from the wall outlet before cleaning. Do not use liquid
cleaners or aerosol cleaners. Use a damp cloth for cleaning.
CAUTION for plug as disconnecting device
Observe the following guidelines when connecting and disconnecting power to
the power supply unit:
Install the power supply unit before connecting the power cord to the AC
power outlet.
Unplug the power cord before removing the power supply unit from the
computerYYu/ e9 .
If the system has multiple sources of power, disconnect power from the system
by unplugging all power cords from the power supplies.
CAUTION for Accessibility
Be sure that the power outlet you plug the power cord into is easily accessible
and located as close to the equipment operator as possible. When you need to
disconnect power to the equipment, be sure to unplug the power cord from the
electrical outlet.
Warnings
•
•
•
•
Do not use this product near water.
Do not place this product on an unstable cart, stand or table. If the product
falls, it could be seriously damaged.
To avoid damage of internal components and to prevent battery leakage,
do not place the product on a vibrating surface.
Never use it under sporting, exercising, or any vibrating environment
which will probably cause unexpected short current or damage rotor
devices, HDD, Optical drive, and even exposure risk from lithium battery
pack.
Using electrical power
•
This product should be operated from the type of power indicated on the
marking label. If you are not sure of the type of power available, consult
your dealer or local power company.
iv
•
•
•
•
Do not allow anything to rest on the power cord. Do not locate this
product where people will walk on the cord.
If an extension cord is used with this product, make sure that the total
ampere rating of the equipment plugged into the extension cord does not
exceed the extension cord ampere rating. Also, make sure that the total
rating of all products plugged into the wall outlet does not exceed the fuse
rating.
Do not overload a power outlet, strip or receptacle by plugging in too
many devices. The overall system load must not exceed 80% of the branch
circuit rating. If power strips are used, the load should not exceed 80% of
the power strip's input rating.
This product's AC adapter is equipped with a three-wire grounded plug.
The plug only fits in a grounded power outlet. Make sure the power outlet
is properly grounded before inserting the AC adapter plug. Do not insert
the plug into a non-grounded power outlet. Contact your electrician for
details.
Warning! The grounding pin is a safety feature. Using a power
outlet that is not properly grounded may result in electric shock
and/or injury.
Note: The grounding pin also provides good protection from
unexpected noise produced by other nearby electrical devices that
may interfere with the performance of this product.
•
Use the product only with the supplied power supply cord set. If you need
to replace the power cord set, make sure that the new power cord meets
the following requirements: detachable type, UL listed/CSA certified, type
SPT-2, rated 7 A 125 V minimum, VDE approved or its equivalent, 4.6
meters (15 feet) maximum length.
Product servicing
Do not attempt to service this product yourself, as opening or removing covers
may expose you to dangerous voltage points or other risks. Refer all servicing to
qualified service personnel.
Unplug this product from the wall outlet and refer servicing to qualified service
personnel when:
•
the power cord or plug is damaged, cut or frayed
•
•
•
•
•
liquid was spilled into the product
the product was exposed to rain or water
the product has been dropped or the case has been damaged
the product exhibits a distinct change in performance, indicating a need
for service
the product does not operate normally after following the operating
v
instructions
Note: Adjust only those controls that are covered by the operating
instructions, since improper adjustment of other controls may
result in damage and will often require extensive work by a
qualified technician to restore the product to normal condition.
Telephone line safety
•
•
Disconnect all telephone lines from the equipment when not in use and/or
before servicing.
To avoid the remote risk of electric shock from lightning, do not connect
the telephone line to this equipment during lightning or thunderstorms.
Warning! For safety reasons, do not use non-compliant parts
when adding or changing components. Consult your reseller for
purchase options.
Additional safety information
Your device and its enhancements may contain small parts. Keep them out of
the reach of small children.
Disposal instructions
Do not throw this electronic device into the trash when discarding.
To minimize pollution and ensure utmost protection of the global environment,
please recycle. For more information on the Waste from Electrical and
Electronics Equipment (WEEE) regulations, visit
http://global.acer.com/about/sustainability.htm
English
1
First things first
We would like to thank you for making the Acer ezDock II/II+ your
choice. This User's Guide introduces you to the various features your
ezDock II/II+ can offer, and provides clear and concise information
about the product, so please read it thoroughly and retain it for future
reference.
Acer ezDock includes Acer ezDock II+ and Acer ezDock II, both of
which provide excellent total cost of ownership for you and your
corporation. For details of the features please check the table below.
Acer ezDock II/II+ comparison table
Functions
Acer ezDock II +
Acer ezDock II
Keyboard port (PS/2)
O
O
Mouse port (PS/2)
O
O
Parallel port
O
O
Serial port
O
O
Kensington lock
O
O
DC-In jack
O
O
Audio jacks
O
O
O
O
O
O
SPDIF-out port
Icon
SPDIF
VGA port
DVI-D port
O
O
S-Video port
O
O
LAN port
O
O
1394a 4-pin port
O
O
1394a 6-pin port
O
O
USB 2.0 ports
6
6
Modem port
O
O
ExpressCard™ /54 slot
DVI-D
O
x
Acer MediaBay
O
x
AC Adapter
O
O
ExpressCard/54
2
Note: Illustrations are for reference only. Actual product
specifications may vary.
After setting up your Acer ezDock II/II+ and the power supply as
illustrated, let us show you around your new Acer ezDock II/II+.
Top view
ezDockII+
ezDock II
English
An Acer ezDock II/II+ tour
English
3
Item
Description
ezDock II+
ezDock II
Power
indicator
Indicates the computer and ezDock’s power
status.
Orange is for ezDock powering-on only.
Green is for computer docked poweringon.
1
1
Dock
indicator
Indicates the ezDock’s status. Green is for
normal.
2
2
Charge
indicator
Indicates the status of the battery charging
in the ezDock media bay
3
n/a
Power
button
Turns the docked computer on and off.
4
3
Guide
adjuster
Make sure that the adjuster is secured in
the proper position when attaching your
TravelMate computer to the ezDock. The
position of the adjuster depends on the
computer model and the type of battery
installed. Refer to the label attached to the
ezDock for details.
5
4
Center
alignment
To provide a reference when attaching the
TravelMate computer to the ezDock.
6
5
Docking
connector
The connector is where you attach your
TravelMate computer.
7
6
Undock
button
By pressing the undock button, you can
request the operating system to undock
the computer from the ezDock. The Dock
indicator is green when the computer is
attached to the ezDock.
8
7
Adjuster
release
button
Press to unlock the adjuster and release to
secure in the proper position. The position
of the adjuster depends on the computer
model and the type of the battery installed.
9
8
Cover
To provide a solid look for connection.
10
n/a
Note: It’s not suggested to undock when the data is on
transmittion.
4
English
Rear view
ezDock II+
ezDock II
icon
DVI-D
Item
ezDock II+
ezDock II
Power connector
1
1
Universal PS/2 mouse connector
2
13
Universal PS/2 Keyboard connector
3
6
Digital Visual Input - Digital (DVI-D)
Port
4
3
English
5
icon
SPDIF
Item
ezDock II+
ezDock II
Serial port
5
7
External display port
6
8
Modem port
7
4
Ethernet port
8
5
S-video
9
9
Line in jack
10
10
Microphone in jack
11
11
USB 2.0 ports
12
2/12
Parallel port
13
14
S/PDIF output jack (for digital audio
equipment)
14
15
Headphone / Line out jack (based on
system support)
15
16
6
English
Side views (left)
item
description
ezDock II+
AcerMedia bay
Houses a removable media drive module
1
Eject button
Eject the AcerMedia drive module
2
Side views (right)
ezDock II+
English
7
ezDock II
icon
ExpressCard/54
Item
ezDock II+
ezDock II
Security lock, to lock the
eject button of the ezDock
1
1
USB ports
2
n/a
Six pin IEEE 1394 port
supporting power up to 15
Watt
3
3
ExpressCard slot
4
n/a
Four pin IEEE 1394 port
5
2
Security keylock
6
4
Note: To insert an ExpressCard, push the card gently until it clicks.
To eject, push the card gently until it clicks. Allow it to spring back
before pulling.
8
English
Bottom view
ezDock II+
ezDock II
#
Item
Description
1
Adjustable feet
Use the roller (2) to adjust the suitable height.
2
Feet adjustment
roller
Four settings A,B,C and D for rotating. Refer
to the label attached to your ezDock.
3
Feet lock
To secure the feet.
English
9
Features
Below is a brief summary of the Acer ezDock II Series's many features:
Performance
Basic
•
Simple one plug design - easy to connect
•
System power can be supplied from Acer ezDock II Series
•
Supports powering on system without lid open
•
Communicates with the system by a connector
•
7.1 audio solution via S/PDIF (Based on system design)
•
Supports modem (RJ-11)
•
Supports fast Ethernet (RJ-45)
•
Supports one parallel port and one serial port and two universal
PS2 ports for legacy devices
•
Supports analog VGA and DVI-D
•
Supports up to six USB 2.0 ports, 1.5A for each 2 ports
•
Supports 1394 port, four pin without power support
•
Supports 1394 port, six pin supports power up to 15 watt
Advanced (Acer ezDock II+ only)
•
Supports one Wide ExpressCard slot
•
Supports hot-swappable Acer MediaBay
11
The usage guide below shows the ports available for use once Acer
ezDock is connected to a Notebook PC.
Acer ezDock ports available table
Both Acer
ezDock and
system ports
Functions
USB
O
1394 (4-pin)
O
1394 (6-pin)
O
ExpressCard
O*
Acer MediaBay
O*
Either Acer
ezDock or
system port
Modem
O
Line-In
O
Mic-In
O
PS/2
O
Parallel
O
S/PDIF-Out
O
Acer ezDock
available only
Serial
O
LAN
O
DVI-D
O
VGA
O
S-video
O
* Not available on ezDock II.
English
Special notice
English
11
Connecting to a power supply
Connect an ac adapter to the ezDock, using the ac adapter included in
the package with the ezDock.
Connecting a notebook computer to ezDock
1
Disconnect the ac adapter from your computer, or you might
damage the ac adapter.
12
Check the ezDock code located on the underside of your Acer
notebook PC.
3
Underneath the ezDock, unlock the slider and rotate the roller to
the desired letter. Relock and place the ezDock upright on a flat
surface.
4
Press the release button and adjust the alignment guide to the
desired number.
English
2
English
13
5
Position your Acer notebook PC over the ezDock and gently lock in
place. When the green dock indicator light is on, gently graspe
and press the both sides of the system until you hear a click.
Disconnecting from a notebook PC.
1
Make sure that the battery pack is charged enough for normal
operation.
2
Make sure the security lock key of ezDock is in place and in the
unlocked position.
3
Press the undock button until the computer moves up.
4
Grasping both sides of the computer, remove the computer from
the ezDock.
Appendix A
Regulations
and Safety
Notices
This appendix lists the general notices
of your Acer ezDock.
16
This device has been tested and found to comply with the limits for a
Class B digital device pursuant to Part 15 of the FCC Rules. These limits
are designed to provide reasonable protection against harmful
interference in a residential installation. This device generates, uses,
and can radiate radio frequency energy and, if not installed and used
in accordance with the instructions, may cause harmful interference to
radio communications.
However, there is no guarantee that interference will not occur in a
particular installation. If this device does cause harmful interference to
radio or television reception, which can be determined by turning the
device off and on, the user is encouraged to try to correct the
interference by one or more of the following measures:
•
Reorient or relocate the receiving antenna.
•
Increase the separation between the device and receiver.
•
Connect the device into an outlet on a circuit different from that
to which the receiver is connected.
•
Consult the dealer or an experienced radio/television technician
for help.
Notice: Shielded cables
All connections to other computing devices must be made using
shielded cables to maintain compliance with FCC regulations.
Notice: Peripheral devices
Only peripherals (input/output devices, terminals, printers, etc.)
certified to comply with the Class B limits may be attached to this
equipment. Operation with non-certified peripherals is likely to result
in interference to radio and TV reception.s
Caution
Changes or modifications not expressly approved by the manufacturer
could void the user's authority, which is granted by the Federal
Communications Commission, to operate this device.
English
FCC notice
English
17
Appendix A Regulations and Safety Notices
Operating conditions
This device complies with Part 15 of the FCC Rules. Operation is subject
to the following two conditions: (1) this device may not cause harmful
interference, and (2) this device must accept any interference received,
including interference that may cause undesired operation.
Notice for users in Canada
This Class B digital apparatus complies with Canadian ICES-003.
Remarque a l'intention des utilisateurs canadiens
Cet appareil numerique de la classe B est conforme a la norme NMB003 du Canada.
Declaration of Conformity for EU countries
Hereby, Acer, declares that this notebook PC series is in compliance
with the essential requirements and other relevant provisions of
Directive 1999/5/EC. (Please visithttp://global.acer.com/about/
sustainability.htm for complete documents.)
Compliant with Russian regulatory certification
** Attached below:
1
Declaration of Conformity for CE marking letter.
2
Federal Communications Commission Declaration of Conformity
letter.
18
English
Acer Incorporated
8F, 88, Sec. 1, Hsin Tai Wu Rd., Hsichih
Taipei Hsien 221, Taiwan, R.O.C.
Tel : 886-2-2696-1234
Fax : 886-2-2696-3535
www.acer.com
Declaration of Conformity for CE marking
We,
Acer Inc.
8F, 88, Sec. 1, Hsin Tai Wu Rd., Hsichih,
Taipei Hsien 221, Taiwan, R. O. C.
Contact Person: Mr. Easy Lai
Tel: 886-2-8691-3089 Fax: 886-2-8691-3000
E-mail: [email protected]
Hereby declare that:
Produc
Trade Name:
Machine Type:
Docking Station
Acer ezDock II/II+
ezDock
Is in compliance with the essential requirements and other relevant provisions of the
following EC directives.
Reference No. Title
89/336/EEC
Electromagnetic Compatibility (EMC directive)
73/23/EEC
Low Voltage Directive (LVD)
1999/5/EC
Radio & Telecommunications Terminal Equipment Directive (R&TTE)
The product specified above was tested conforming to the applicable Rules under the most
accurate measurement standards possible, and that all the necessary steps have been taken
and are in force to assure that production units of the same product will continue to comply
with the requirements.
--------------------------Easy Lai/ Director
Qualification Center
Product Assurance, Acer Inc.
2006/8/01
-----------------Date
Appendix A Regulations and Safety Notices
English
19
Federal Communications Commission
Declaration of Conformity
This device complies with Part 15 of the FCC Rules. Operation is subject to the following
conditions: (1) this device may not cause harmful interference, and (2) this device must accep
interference received, including interference that may cause undesired operation.
The following local Manufacturer/Importer is responsible for this declaration:
Product:
Docking Station
Machine Name:
Acer ezDock II/II+
Name of Responsible Party:
Acer America Corporation
Address of Responsible Party:
2641 Orchard Parkway, San Jose
CA 95134, U. S. A.
Contact Person:
Phone No.:
Fax No.:
Mr. Young Kim
408-922-2909
408-922-2606