Download Brother MFC-J265W User`s guide

Transcript
BASIC USER’S GUIDE
MFC-J220
MFC-J265W
MFC-J410
MFC-J415W
Version 0
UK/IRE/GEN
If you need to call Customer Service
Please complete the following information for future
reference:
Model Number: MFC-J220, MFC-J265W, MFC-J410 and
MFC-J415W
(Circle your model number)
Serial Number: 1
Date of Purchase:
Place of Purchase:
1
The serial number is on the back of the unit. Retain
this User's Guide with your sales receipt as a
permanent record of your purchase, in the event of
theft, fire or warranty service.
Register your product on-line at
http://www.brother.com/registration/
© 2010 Brother Industries, Ltd.
User's Guides and where do I find it?
Which manual?
What's in it?
Where is it?
Safety and Legal
Please read the Safety Instructions before you
set up your machine.
Printed / In the box
Quick Setup Guide
Read this Guide first. Follow the instructions for
setting up your machine and installing the
drivers and software for the operating system
and connection type you are using.
Printed / In the box
Basic User's Guide
Learn the basic Fax, Copy, Scan and
PhotoCapture Center™ operations and how to
replace consumables. See troubleshooting tips.
Printed / In the box
Advanced User's Guide
Learn more advanced operations: Fax, Copy,
security features, printing reports and
performing routine maintenance.
PDF file /
Documentation
CD-ROM
Software User's Guide
Follow these instructions for Printing, Scanning,
Network Scanning (MFC-J265W and
MFC-J415W only), PhotoCapture Center™,
PC-Fax Send, and using the Brother
ControlCenter utility.
PDF file /
Documentation
CD-ROM
Network User's Guide
(MFC-J265W and
MFC-J415W only)
This Guide provides more advanced
information for configuring the Wireless network
connections. In addition, find information about
network utilities, network printing,
troubleshooting tips and supported network
specifications.
PDF file /
Documentation
CD-ROM
i
Table of Contents
(BASIC USER’S GUIDE)
1
General information
1
Using the documentation .......................................................................................1
Symbols and conventions used in the documentation ....................................1
Accessing the Advanced User’s Guide, Software User’s Guide and
Network User’s Guide.........................................................................................1
Viewing Documentation...................................................................................1
Accessing Brother Support (Windows®) ................................................................3
Accessing Brother Support (Macintosh) ................................................................3
Control panel overview ..........................................................................................4
LCD screen indications....................................................................................6
Basic Operations .............................................................................................6
Volume settings .....................................................................................................7
Ring Volume ....................................................................................................7
Beeper Volume................................................................................................7
Speaker Volume ..............................................................................................8
LCD display ...........................................................................................................8
Setting the backlight brightness.......................................................................8
2
Loading paper
9
Loading paper and other print media.....................................................................9
Loading envelopes and postcards .................................................................11
Removing small printouts from the machine .................................................13
Printable area ................................................................................................14
Paper settings......................................................................................................15
Paper Type ....................................................................................................15
Paper Size .....................................................................................................15
Acceptable paper and other print media..............................................................16
Recommended print media ...........................................................................16
Handling and using print media .....................................................................16
Choosing the right print media.......................................................................18
3
Loading documents
20
How to load documents .......................................................................................20
Using the ADF (MFC-J410 and MFC-J415W only) .......................................20
Using the scanner glass ................................................................................20
Scannable area .............................................................................................21
4
Sending a fax
22
How to send a fax ................................................................................................22
Setting scanner glass size for faxing .............................................................23
Colour fax transmission .................................................................................23
Cancelling a fax in progress ..........................................................................23
Transmission Verification Report...................................................................24
ii
5
Receiving a fax
25
Receive modes ....................................................................................................25
Choose the Receive Mode .................................................................................. 25
Using receive modes ........................................................................................... 26
Fax Only ........................................................................................................26
Fax/Tel...........................................................................................................26
Manual...........................................................................................................26
External TAD .................................................................................................26
Receive mode settings ........................................................................................27
Ring Delay ..................................................................................................... 27
F/T Ring Time (Fax/Tel mode only)............................................................... 27
Fax Detect ..................................................................................................... 28
6
Telephone and external devices
29
Voice operations .................................................................................................. 29
Tone or Pulse ................................................................................................ 29
Fax/Tel mode.................................................................................................29
Caller ID (U.K. and Ireland only).................................................................... 29
Telephone services.............................................................................................. 30
Setting the Telephone Line Type...................................................................30
Connecting an external TAD (telephone answering device)................................31
Settings.......................................................................................................... 32
Recording an outgoing message (OGM) on an external TAD .......................32
Multi-line connections (PBX) ......................................................................... 32
External and extension telephones...................................................................... 33
Connecting an external or extension telephone ............................................33
Operation from external and extension telephones .......................................33
Using extension telephones (U.K. only) ........................................................ 34
Using a cordless external telephone ............................................................. 35
Using remote codes....................................................................................... 35
7
Dialling and storing numbers
36
How to dial ...........................................................................................................36
Manual dialling...............................................................................................36
Speed Dialling ...............................................................................................36
Search ...........................................................................................................36
Fax Redial ..................................................................................................... 37
Additional dialling operations ...............................................................................37
Outgoing Call history ..................................................................................... 37
Caller ID history .............................................................................................38
Storing numbers .................................................................................................. 39
Storing a pause .............................................................................................39
Storing Speed Dial numbers..........................................................................39
Changing Speed Dial names or numbers...................................................... 40
iii
8
Making copies
41
How to copy .........................................................................................................41
Stop copying..................................................................................................41
Copy settings.................................................................................................42
Paper Options................................................................................................42
9
Printing photos from a memory card
43
PhotoCapture Center™ operations .....................................................................43
Using a memory card ....................................................................................43
Getting started .....................................................................................................44
Print Images.........................................................................................................46
View Photos...................................................................................................46
PhotoCapture Center™ print settings..................................................................46
How to scan to a memory card ............................................................................47
10
How to print from a computer
49
Printing a document.............................................................................................49
11
How to scan to a computer
50
Scanning a document ..........................................................................................50
Scanning using the scan key ...............................................................................50
Scanning using a scanner driver .........................................................................50
A
Routine maintenance
51
Replacing the ink cartridges ................................................................................51
Cleaning and checking the machine ....................................................................53
Cleaning the scanner glass ...........................................................................53
Cleaning the paper pick-up rollers .................................................................54
Cleaning the print head .................................................................................55
Checking the print quality ..............................................................................55
Checking the print alignment .........................................................................56
B
Troubleshooting
57
Error and Maintenance messages.......................................................................57
Error animations display ................................................................................61
Transferring your faxes or Fax Journal report ...............................................61
Document jam (MFC-J410 and MFC-J415W only) .......................................62
Printer jam or paper jam ................................................................................63
Troubleshooting ..................................................................................................66
If you are having difficulty with your machine ................................................66
Dial Tone detection........................................................................................73
Telephone line interference / VoIP ................................................................73
Machine Information ............................................................................................74
Checking the serial number ...........................................................................74
Reset functions..............................................................................................74
How to reset the machine..............................................................................74
iv
C
Menu and features
75
On-screen programming......................................................................................75
Menu table ...........................................................................................................76
Entering Text ....................................................................................................... 91
Inserting spaces ............................................................................................ 91
Making corrections ........................................................................................91
Repeating letters ........................................................................................... 91
Special characters and symbols.................................................................... 91
D
Specifications
92
General ................................................................................................................ 92
Print media...........................................................................................................94
Fax....................................................................................................................... 95
Copy ....................................................................................................................96
PhotoCapture Center™ ....................................................................................... 97
Scanner ...............................................................................................................98
Printer ..................................................................................................................99
Interfaces .............................................................................................................99
Computer requirements ..................................................................................... 100
Consumable items .............................................................................................101
Network (MFC-J265W and MFC-J415W only) .................................................. 102
E
Index
103
v
Table of Contents
(ADVANCED USER’S GUIDE)
The Advanced User's Guide explains the following features and operations.
You can view the Advanced User's Guide on the Documentation CD-ROM.
1
General setup
Memory storage
Automatic Daylight Saving Time
Sleep Mode
LCD display
Mode Timer
2
Security features
TX Lock
3
Sending a fax
Additional sending options
Additional sending operations
4
Receiving a fax
Additional receiving operations
5
Dialling and storing numbers
Voice operations
Additional dialling operations
Additional ways to store numbers
6
Printing reports
Fax reports
Reports
7
Making copies
Copy settings
8
Printing photos from a memory
card
PhotoCapture Center™ operations
Print Images
PhotoCapture Center™ print settings
Scan to a memory card
vi
A
Routine maintenance
Cleaning and checking the machine
Packing and shipping the machine
B
Glossary
C
Index
1
General information
Using the
documentation
The following symbols and conventions are
used throughout the documentation.
Bold
Bold typeface identifies specific
buttons on the machine’s
control panel, or on the
computer screen.
Italics
Italicized typeface emphasizes
an important point or refers you
to a related topic.
Courier
New
Text in the Courier New font
identifies messages on the
LCD of the machine.
WARNING
WARNING indicates a potentially
hazardous situation which, if not avoided,
could result in death or serious injuries.
1
Electrical Hazard icons alert you to
possible electrical shock.
1
Accessing the
Advanced User’s
Guide, Software User’s
Guide and Network
User’s Guide
IMPORTANT
IMPORTANT indicates a potentially
hazardous situation which may result in
property-damage-only accidents or loss of
product functionality.
1
This Basic User’s Guide does not contain all
the information about the machine such as
how to use the advanced features for Fax,
Copy, PhotoCapture Center™, Printer,
Scanner, PC-Fax and Network. When you
are ready to learn detailed information about
these operations, read the
Advanced User’s Guide,
Software User’s Guide and
Network User’s Guide that are on the
Documentation CD-ROM.
Viewing Documentation
a
CAUTION
CAUTION indicates a potentially hazardous
situation which, if not avoided, may result in
minor or moderate injuries.
1
Notes tell you how you should
respond to a situation that may arise
or give tips about how the operation
works with other features.
Thank you for buying a Brother machine!
Reading the documentation will help you
make the most of your machine.
Symbols and conventions
used in the documentation
1
1
Turn on your computer. Insert the
Documentation CD-ROM into your
CD-ROM drive.
Note
(Windows® users)
If the screen does not appear
automatically, go to
My Computer (Computer), double-click
the CD-ROM icon, and then double-click
index.html.
b
(Macintosh users)
Double-click the CD-ROM icon, and
then double-click index.html.
1
Chapter 1
c
Click your country.
How to find Scanning instructions
1
There are several ways you can scan
documents. You can find the instructions as
follows:
Software User’s Guide
 Scanning
 ControlCenter
d
Point to your language, point to View Guide,
and then click the guide you want to read.
 Network Scanning (MFC-J265W and
MFC-J415W only)
ScanSoft™ PaperPort™11SE with OCR
How-to-Guides (MFC-J410 and
MFC-J415W only)
(Windows®)
 The complete ScanSoft™
PaperPort™11SE with OCR How-toGuides can be viewed from the Help
selection in the ScanSoft™
PaperPort™11SE application.
Presto! PageManager User’s Guide
(MFC-J410 and MFC-J415W only)
(Macintosh)
Note
Presto! PageManager must be
downloaded and installed before use. See
Accessing Brother Support (Macintosh)
on page 3 for further instructions.
Note
• (Windows® users only)
Your web browser may display a yellow bar
at the top of the page that contains a security
warning about Active X controls. For the
page to display correctly you must click on
the bar, click Allow Blocked Content, then
click Yes in the Security Warning dialog box.
• (Windows® users only) 1
For faster access, you can copy all user
documentation in PDF format to a local
folder on your computer. Point to your
language, then click Copy to local disk.
1
2
Microsoft® Internet Explorer® 6.0 or greater.
 The complete Presto! PageManager
User’s Guide can be viewed from the Help
selection in the Presto! PageManager
application.
How to find Network setup instructions
(MFC-J265W and MFC-J415W only)
Your machine can be connected to a wireless
network. You can find basic setup
instructions in the Quick Setup Guide. If your
wireless access point or router supports Wi-Fi
Protected Setup or AOSS™, you can also
follow the steps in the Quick Setup Guide. For
more information about network setup please
see the Network User's Guide on the
Documentation CD-ROM.
1
General information
Accessing Brother
Support (Windows®)
You can find all the contacts you will need,
such as Web support (Brother Solutions
Center), on the Installation CD-ROM.
 Click Brother Support on the Top Menu.
The following screen will appear:
 To access our website
(http://www.brother.com), click
Brother Home Page.
 For the latest news and product support
information
(http://solutions.brother.com/), click
Brother Solutions Center.
 To visit our website for original Brother
Supplies
(http://www.brother.com/original/),
click Supplies Information.
 To access the Brother CreativeCenter
(http://www.brother.com/creativecenter/)
for FREE photo projects and printable
downloads,
click Brother CreativeCenter.
1
Accessing Brother
Support (Macintosh)
1
You can find all the contacts you will need,
such as Web support (Brother Solutions
Center) on the Installation CD-ROM.
 Double-click the Brother Support icon.
The following screen will appear:
 (MFC-J410 and MFC-J415W only)
To download and install Presto!
PageManager, click
Presto! PageManager.
 To register your machine from the Brother
Product Register Page
(http://www.brother.com/registration/),
click On-Line Registration.
 For the latest news and product support
information
(http://solutions.brother.com/), click
Brother Solutions Center.
 To visit our website for original Brother
Supplies
(http://www.brother.com/original/), click
Supplies Information.
 To return to the Top Menu, click Back or
if you have finished, click Exit.
3
1
Chapter 1
Control panel overview
1
The MFC-J220, MFC-J265W, MFC-J410 and MFC-J415W have the same control panel keys.
8
6
7
01:4
01:41
1:41
01. 01. 2010
Fax
Mem.
1
1
2
Fax and telephone keys:
 Redial/Pause
Redials the last 30 numbers called. It also
inserts a pause when programming quick
dial numbers.
 Tel/R
This key is used to have a telephone
conversation after picking up the external
handset during the F/T Ring (fast
double-ring).
Also, when connected to a PBX, you can
use this key to gain access to an outside line
or to transfer a call to another extension.
Mode keys:

SCAN
Lets you access Scan mode.

PHOTO CAPTURE
Lets you access PhotoCapture Center™
mode.
4
d c
While the machine is idle, you can press
these keys to adjust the ring volume.
 Speed Dial key




COPY
Lets you access Copy mode.

Menu keys:
 Volume keys
FAX
Lets you access Fax mode.

3

Lets you store, look up, and dial numbers
that are stored in the memory.
d or c
Press d or c to move the selected area left
or right on the LCD.
a or b
Press a or b to scroll through the menus
and options.
Menu
Access the main menu.
Clear
Press to delete characters or to go back to
the previous menu level.
OK
Lets you confirm a selection.
General information
1
5
01:4
01:41
1:41
01. 01. 2010
Fax
Mem.
2
4
Start keys:

7
Mono Start
Lets you start sending faxes or making
copies in monochrome. Also lets you start a
scanning operation (in colour or mono
depending on the scanning setting in the
ControlCenter software).

Colour Start
Lets you start sending faxes or making
copies in full colour. Also lets you start a
scanning operation (in colour or mono,
depending on the scanning setting in the
ControlCenter software).
5
Stop/Exit
Stops an operation or exits the menu.
6
3
LCD (Liquid Crystal Display)
Displays messages on the screen to help you
set up and use your machine.
8
4
Dial Pad
Use these keys to dial telephone and fax
numbers and as a keyboard for entering
information into the machine.
The # key lets you temporarily switch the
dialling mode during a telephone call from
Pulse to Tone.
On/Off
You can turn the machine on and off.
Press On/Off to turn the machine on.
Press and hold down On/Off to turn the machine
off. The LCD will show Shutting Down and will
stay on for a few seconds before going off.
If you have connected an external telephone or
TAD, it is always available.
If you turn the machine off, it will still
periodically clean the print head to maintain
print quality. To prolong print head life, provide
the best ink cartridge economy, and maintain
print quality, you should keep your machine
connected to the power at all times.
Note
Most of the illustrations in this User’s Guide
show the MFC-J415W.
5
Chapter 1
LCD screen indications
The LCD shows the current machine status
when the machine is idle.
1
1
Basic Operations
The following steps show how to change a
setting in the machine. In this example the
Mode Timer setting is changed from
2 minutes to 30 seconds.
a
b
01:4
01:41
1:41
01. 01. 2010
Fax
2
1
1
Press Menu.
Press a or b to choose
General Setup.
MENU
Mem.
Select
OK
Ink Management
3
4
Wireless Status (MFC-J265W and
MFC-J415W only)
A four level indicator shows the current
wireless signal strength if you are using a
wireless connection.
General Setup
Fax
Press OK.
c
Press a or b to choose Mode Timer.
General Setup
Mode Timer
0
2
2Mins
Max
Current Receive Mode
Lets you see the current receive mode.
 Fax (Fax only)
 F/T (Fax/Tel)
 TAD (External TAD)
 Mnl (Manual)
3
Memory Status
Lets you see the available memory in the
machine.
4
Ink indicator
Lets you see the available ink volume.
Paper Type
Paper Size
Press OK.
d
Press a or b to choose 30Secs.
Mode Timer
Off
0Sec
30Secs
1Min
Press OK.
You can see the current setting on the
LCD:
The warning icon
appears when there is
an error or a maintenance message. For
details, see Error and Maintenance
messages on page 57.
General Setup
Mode Timer
30Secs
Paper Type
Paper Size
e
6
Press Stop/Exit.
General information
Volume settings
Ring Volume
1
1
You can choose a range of ring volume
levels, from High to Off.
Press Menu.
Press a or b to choose
General Setup.
Press OK.
c
Press a or b to choose Volume.
Press OK.
d
Press a or b to choose Ring.
Press OK.
e
Press a or b to choose Low, Med, High
or Off.
Press OK.
f
Press Stop/Exit.
When the beeper is on, the machine will beep
when you press a key, make a mistake, or
after you send or receive a fax.
a
b
You can also change the volume through the
menu, by following the instructions below:
a
b
1
You can choose a range of beeper volume
levels, from High to Off.
While the machine is idle, press d or c
to adjust the volume level. The LCD shows
the current setting, and each key press will
change the volume to the next level. The
machine will keep the new setting until you
change it.
Setting the Ring Volume from the
menu
Beeper Volume
Press Menu.
Press a or b to choose
General Setup.
Press OK.
c
Press a or b to choose Volume.
Press OK.
d
Press a or b to choose Beeper.
Press OK.
e
Press a or b to choose Low, Med, High
or Off.
Press OK.
f
Press Stop/Exit.
1
7
1
Chapter 1
Speaker Volume
You can choose a range of speaker volume
levels, from High to Off.
a
b
Press Menu.
Press a or b to choose
General Setup.
Press OK.
c
Press a or b to choose Volume.
Press OK.
d
Press a or b to choose Speaker.
Press OK.
e
f
8
1
LCD display
Setting the backlight
brightness
1
1
If you are having difficulty reading the LCD,
try changing the brightness setting.
a
b
Press Menu.
Press a or b to choose
General Setup.
Press OK.
c
Press a or b to choose Low, Med, High
or Off.
Press OK.
Press a or b to choose LCD Settings.
Press OK.
d
Press a or b to choose Backlight.
Press OK.
Press Stop/Exit.
e
Press a or b to choose Light, Med or
Dark.
Press OK.
f
Press Stop/Exit.
2
Loading paper
Loading paper and
other print media
a
If the paper support flap is open, close it,
and then close the paper support. Pull
the paper tray completely out of the
machine.
2
c
2
With both hands, gently press and slide
the paper side guides (1) and then the
paper length guide (2) to fit the paper
size.
Make sure that the triangular marks (3)
on the paper side guides (1) and paper
length guide (2) line up with the marks
for the paper size you are using.
1
3
b
Lift the output paper tray cover (1).
2
1
3
9
2
Chapter 2
e
Note
When you are using Legal size paper,
press and hold the universal guide release
button (1) as you slide out the front of the
paper tray.
Gently put the paper into the paper tray
print side down and top edge in first.
Check that the paper is flat in the tray.
1
IMPORTANT
Be careful that you do not push the paper
in too far; it may lift at the back of the tray
and cause feed problems.
d
Fan the stack of paper well to avoid
paper jams and misfeeds.
f
Gently adjust the paper side guides (1)
to fit the paper using both hands.
Make sure the paper side guides touch
the sides of the paper.
1
IMPORTANT
Always make sure that the paper is not
curled or wrinkled.
10
Loading paper
g
Close the output paper tray cover.
Loading envelopes and
postcards
2
About envelopes
2
 Use envelopes that weigh between 80 to
95 g/m2.
 Some envelopes need margin settings to
be set in the application. Make sure you
do a test print first before printing many
envelopes.
h
IMPORTANT
Slowly push the paper tray completely
into the machine.
DO NOT use any of the following types of
envelopes, as they will cause paper feed
problems:
• That are of a baggy construction.
• That are embossed (have raised
writing on them).
• That have clasps or staples.
• That are pre-printed on the inside.
Glue
i
Double flap
While holding the paper tray in place,
pull out the paper support ( ) until it
clicks and unfold the paper support
flap ( ).
Occasionally you may experience paper
feed problems caused by the thickness,
size and flap shape of the envelopes you
are using.
2
1
IMPORTANT
DO NOT use the paper support flap for
Legal size paper.
11
2
Chapter 2
Loading envelopes and postcards
a
Before loading, press the corners and
sides of envelopes or postcards to make
them as flat as possible.
IMPORTANT
If envelopes or postcards are “doublefeeding”, put one envelope or postcard in
the paper tray at a time.
2
b
Put envelopes or postcards in the paper
tray with the side to be printed on face
down, and the shortest edge in first as
shown in the illustration. With both
hands, gently press and slide the paper
side guides (1) and paper length
guide (2) to fit the size of the envelopes
or postcards.
1
2
12
Loading paper
If you have problems printing on
envelopes with the flap on the short edge,
try the following:
a
b
Open the envelope flap.
c
Adjust the size and margin in your
application.
Put the envelope into the paper tray with
the address side down and the flap
positioned as shown in the illustration.
Removing small printouts
from the machine
2
2
When the machine ejects small paper onto
the output paper tray cover you may not be
able to reach it. Make sure printing has
finished, and then pull the tray completely out
of the machine.
13
2
Chapter 2
Printable area
2
The printable area depends on the settings in the application you are using. The figures below
show the unprintable areas on cut sheet paper and envelopes. The machine can print in the
shaded areas of cut sheet paper when the Borderless print feature is available and turned on.
(See Printing for Windows® or Printing and Faxing for Macintosh in the Software User’s Guide.)
Cut Sheet Paper
Envelopes
3
3
4
1
4
1
2
2
Top (1)
Bottom (2)
Left (3)
Right (4)
Cut Sheet
3 mm
3 mm
3 mm
3 mm
Envelopes
12 mm
24 mm
3 mm
3 mm
Note
The Borderless feature is not available for envelopes.
14
Loading paper
Paper settings
Paper Type
To get the best print quality, set the machine
for the type of paper you are using.
a
b
Press Menu.
Press a or b to choose
General Setup.
Press OK.
c
Press a or b to choose Paper Type.
Press OK.
d
Press a or b to choose Plain Paper,
Inkjet Paper, Brother BP71,
Brother BP61, Other Glossy or
Transparency.
Press OK.
e
Press Stop/Exit.
Note
2
2
Paper Size
2
You can use five sizes of paper for printing
copies: A4, A5, Letter, Legal and 10  15 cm
and three sizes for printing faxes: A4, Legal
and Letter. When you change the size of
paper you load in the machine, you will need
to change the paper size setting at the same
time so your machine can fit an incoming fax
on the page.
a
b
Press Menu.
Press a or b to choose
General Setup.
Press OK.
c
Press a or b to choose Paper Size.
Press OK.
d
Press a or b to choose A4, A5,
10x15cm, Letter or Legal.
Press OK.
e
Press Stop/Exit.
The machine ejects paper with printed
surfaces face up onto the paper tray in
front of the machine. When you use
transparencies or glossy paper, remove
each sheet at once to prevent smudging
or paper jams.
15
2
Chapter 2
Acceptable paper and
other print media
The print quality can be affected by the type
of paper you use in the machine.
To get the best print quality for the settings
you have chosen, always set the Paper Type
to match the type of paper you load.
You can use plain paper, inkjet paper (coated
paper), glossy paper, transparencies and
envelopes.
We recommend testing various paper types
before buying large quantities.
For best results, use Brother paper.
 When you print on inkjet paper (coated
paper), transparencies and glossy paper,
be sure to choose the correct print media
in the Basic tab of the printer driver or in
the Paper Type setting of the menu. (See
Paper Type on page 15.)
 When you print on Brother Photo paper,
load one extra sheet of the same photo
paper in the paper tray. An extra sheet has
been included in the paper package for
this purpose.
 When you use transparencies or photo
paper, remove each sheet at once to
prevent smudging or paper jams.
 Avoid touching the printed surface of the
paper immediately after printing; the
surface may not be completely dry and
may stain your fingers.
16
Recommended print media
2
2
To get the best print quality, we suggest using
Brother paper. (See the table below.)
If Brother paper is not available in your
country, we recommend testing various
papers before purchasing large quantities.
We recommend using “3M Transparency
Film” when you print on transparencies.
Brother paper
Paper Type
Item
A4 Plain
BP60PA
A4 Glossy Photo
BP71GA4
A4 Inkjet (Matte)
BP60MA
10  15 cm Glossy Photo BP71GP
Handling and using print
media
 Store paper in its original packaging, and
keep it sealed. Keep the paper flat and
away from moisture, direct sunlight and
heat.
 Avoid touching the shiny (coated) side of
photo paper. Load photo paper with the
shiny side facing down.
 Avoid touching either side of
transparencies because they absorb
water and perspiration easily, and this
may cause decreased output quality.
Transparencies designed for laser
printers/copiers may stain your next
document. Use only transparencies
recommended for inkjet printing.
2
Loading paper
IMPORTANT
DO NOT use the following kinds of paper:
• Damaged, curled, wrinkled, or
irregularly shaped paper
2
1
1
1
2 mm or greater curl may cause jams
to occur.
• Extremely shiny or highly textured
paper
• Paper that cannot be arranged
uniformly when stacked
• Short grain paper
Paper capacity of the output paper
tray cover
2
Up to 50 sheets of 80 g/m2 A4 paper.
 Transparencies and photo paper must be
picked up from the output paper tray cover
one page at a time to avoid smudging.
17
Chapter 2
Choosing the right print media
2
Paper type and size for each operation
Paper Type
Cut Sheet
Cards
Envelopes
Paper Size
Usage
18
Fax
Copy
Photo
Printer
Capture
A4
210  297 mm (8.3  11.7 in.)
Yes
Yes
Yes
Yes
Letter
215.9  279.4 mm (8 1/2  11 in.) Yes
Yes
Yes
Yes
Legal
215.9  355.6 mm (8 1/2  14 in.) Yes
Yes
–
Yes
Executive
184  267 mm (7 1/4  10 1/2 in.) –
–
–
Yes
JIS B5
182  257 mm (7.2  10.1 in.)
–
–
–
Yes
A5
148  210 mm (5.8  8.3 in.)
–
Yes
–
Yes
A6
105  148 mm (4.1  5.8 in.)
–
–
–
Yes
Photo
10  15 cm (4  6 in.)
–
Yes
Yes
Yes
Photo 2L
13  18 cm (5  7 in.)
–
–
Yes
Yes
Index Card
127  203 mm (5  8 in.)
–
–
–
Yes
Postcard 1
100  148 mm (3.9  5.8 in.)
–
–
–
Yes
Postcard 2
(Double)
148  200 mm (5.8  7.9 in.)
–
–
–
Yes
C5 Envelope
162  229 mm (6.4  9 in.)
–
–
–
Yes
DL Envelope
110  220 mm (4.3  8.7 in.)
–
–
–
Yes
COM-10
105  241 mm (4 1/8  9 1/2 in.)
–
–
–
Yes
Monarch
98  191 mm (3 7/8  7 1/2 in.)
–
–
–
Yes
–
–
–
Yes
JE4 Envelope 105  235 mm (4.1  9.3 in.)
Transparencies
2
A4
210  297 mm (8.3  11.7 in.)
–
Yes
–
Yes
Letter
215.9  279.4 mm (8 1/2  11 in.) –
Yes
–
Yes
Legal
215.9  355.6 mm (8 1/2  14 in.) –
Yes
–
Yes
A5
148  210 mm (5.8  8.3 in.)
Yes
–
Yes
–
Loading paper
Paper weight, thickness and capacity
Paper Type
2
Weight
Thickness
No. of
sheets
Plain Paper
64 to 120 g/m2
0.08 to 0.15 mm
100 1
Inkjet Paper
2
64 to 200 g/m
0.08 to 0.25 mm
20
Glossy Paper
Up to 220 g/m2
Up to 0.25 mm
20 2
Photo Card
Up to 220 g/m2
Up to 0.25 mm
20 2
Index Card
Up to 120 g/m2
Up to 0.15 mm
30
Postcard
Up to 200 g/m2
Up to 0.25 mm
30
Envelopes
75 to 95 g/m2
Up to 0.52 mm
10
Transparencies
–
–
10
Cut Sheet
Cards
1
Up to 100 sheets of 80 g/m2 paper.
2
BP71 (260 g/m 2) paper is especially designed for Brother inkjet machines.
2
19
3
Loading documents
How to load
documents
Make sure documents written with ink are
completely dry.
3
You can send a fax, make copies, and scan
from the ADF (automatic document feeder)
and from the scanner glass.
Using the ADF (MFC-J410 and
MFC-J415W only)
3
The ADF can hold up to 15 pages and feeds
each sheet individually. Use standard
80 g/m2 paper and always fan the pages
before putting them in the ADF.
Document Sizes Supported
Paper:
80 g/m2 A4
Length:
148 to 355.6 mm
Width:
148 to 215.9 mm
Weight:
64 to 90 g/m2
How to load documents
IMPORTANT
• DO NOT pull on the document while it is
feeding.
3
a
Unfold the ADF Document Output
Support Flap (1).
b
c
Fan the pages well.
d
Make sure you place your documents,
face down, top edge first in the ADF
underneath the guides until you feel
them touch the feed roller and the LCD
shows ADF Ready.
Adjust the paper guides (2) to fit the
width of your document.
3
2
1
IMPORTANT
3
DO NOT leave thick documents on the
scanner glass. If you do this, the ADF may
jam.
• DO NOT use paper that is curled,
wrinkled, folded, ripped, stapled, paper
clipped, pasted or taped.
Using the scanner glass
• DO NOT use cardboard, newspaper or
fabric.
You can use the scanner glass to fax, copy or
scan pages of a book or one page at a time.
Document Sizes Supported
20
Length:
Up to 297 mm
Width:
Up to 215.9 mm
Weight:
Up to 2 kg
3
3
Loading documents
How to load documents
Note
To use the scanner glass, the ADF must
be empty. (MFC-J410 and MFC-J415W
only)
a
b
3
Scannable area
3
The scannable area depends on the settings
in the application you are using. The figures
below show unscannable areas.
3
Lift the document cover.
4
3
1
Using the document guidelines on the
left and top, place the document face
down in the upper left corner of the
scanner glass.
2
Usage
Fax
Copy
Scan
1
c
Document
Size
Top (1)
Left (3)
Bottom (2)
Right (4)
A4
3 mm
3 mm 1
Letter
3 mm
4 mm
Legal
(MFC-J410
and
MFC-J415W
only)
3 mm
4 mm
A4
3 mm
3 mm
Letter
3 mm
3 mm
A4
3 mm
3 mm
Letter
3 mm
3 mm
The unscannable area is 1 mm when you use the
ADF.
Close the document cover.
IMPORTANT
If you are scanning a book or thick
document, DO NOT slam the cover down
or press on it.
21
4
Sending a fax
How to send a fax
Note
4
The following steps show how to send a fax.
a
4
When you want to send a fax, or change
fax send or receive settings, press the
(FAX) key to illuminate it in blue.
• If you send a mono fax from the ADF when
the memory is full it will be sent in real
time.
• You can use the scanner glass to fax
pages of a book one at a time. The
documents can be up to A4 or Letter size.
• To send colour faxes with multiple pages
use the ADF. (MFC-J410 and
MFC-J415W only)
 The LCD shows:
Press Start
Enter Number
• Since you can only scan one page at a
time, it is easier to use the ADF if you are
sending a multiple page document.
(MFC-J410 and MFC-J415W only)
c
Fax Resolution
Standard
Contrast
b
Set the scanner glass size, fax
resolution or contrast if you want to
change them.
For more advanced fax sending
operations and settings, see Sending a
fax in chapter 3 in the Advanced User’s
Guide:
Do one of the following to load your
document:
 Broadcasting
 Place the document face down in the
ADF. (See Using the ADF
(MFC-J410 and MFC-J415W only)
on page 20.)
 Real Time TX
 Overseas Mode
 Fax Resolution
 Load your document face down on
the scanner glass. (See Using the
scanner glass on page 20.)
 Contrast
 Glass ScanSize
d
Enter the fax number.
Using the dial pad
Using the Phone Book
 Speed Dial
Using call history
 Outgoing Call
 Caller ID hist.
22
Sending a fax
e
Press Mono Start or Colour Start.
Faxing from the ADF (MFC-J410 and
MFC-J415W only)
 The machine starts scanning the
document.
Faxing from the scanner glass
 If you press Mono Start, the
machine starts scanning the first
page.
Setting scanner glass size for
faxing
When documents are Letter size, you need to
set Scan Size to Letter. If you do not, the side
portion of the faxes will be missing.
a
Press
b
Press a or b to choose
Glass ScanSize.
Press OK.
c
Press a or b to choose Letter.
Press OK.
Do one of the following:
• To send a single page, press 2 to
choose No(Send) (or press
Mono Start again).
The machine starts sending the
document.
• To send more than one page,
press 1 to choose Yes and place
the next page on the scanner
glass. Press OK. The machine
starts scanning the page. (Repeat
this step for each additional
page.)
 If you press Colour Start, the
machine starts sending the
document.
Note
To cancel, press Stop/Exit.
4
(FAX).
4
Note
You can save the setting you use most
often by setting it as default. (See Setting
your changes as a new default in
chapter 3 in the Advanced User’s Guide.)
Colour fax transmission
4
Your machine can send a colour fax to
machines that support this feature.
Colour faxes cannot be stored in the memory.
When you send a colour fax, the machine will
send it in real time (even if Real Time TX is
set to Off).
Cancelling a fax in progress
4
If you want to cancel a fax while the machine
is scanning, dialling or sending, press
Stop/Exit.
23
Chapter 4
Transmission Verification
Report
You can use the Transmission Verification
Report as proof that you sent a fax. This
report lists the sender’s name or fax number,
the time and date of transmission, duration of
transmission, number of pages sent, and
whether or not the transmission was
successful.
There are several settings available for the
Transmission Verification Report:
 On: Prints a report after every fax you
send.
 On+Image: Prints a report after every fax
you send. A portion of the fax’s first page
appears on the report.
 Off: Prints a report if your fax is
unsuccessful due to a transmission error.
Off is the default setting.
 Off+Image: Prints a report if your fax is
unsuccessful due to a transmission error.
A portion of the fax’s first page appears on
the report.
a
b
Press Menu.
c
Press a or b to choose
Report Setting.
Press OK.
d
Press a or b to choose XMIT Report.
Press OK.
e
Press a or b to choose On, On+Image,
Off or Off+Image.
Press OK.
24
Press a or b to choose Fax.
Press OK.
f
4
Press Stop/Exit.
Note
• If you choose On+Image or Off+Image
the image will only appear on the
Transmission Verification Report if Real
Time Transmission is set to Off. (See Real
Time Transmission in chapter 3 in the
Advanced User’s Guide.)
• If your transmission is successful, "OK" will
appear next to "RESULT" on the
Transmission Verification Report. If
transmission is not successful, "ERROR"
will appear next to "RESULT".
5
Receiving a fax
5
Receive modes
5
You must choose a receive mode depending on the external devices and telephone services you
have on your line.
Choose the Receive Mode
5
By default, your machine will automatically receive any faxes that are sent to it. The diagram below
will help you choose the correct mode.
For more detailed information on the receive modes, see Using receive modes on page 26.
Do you want to use the telephone features of your machine (if available) or
an external telephone or external telephone answering device connected on the
same line as the machine?
Yes
No
Are you using the voice message function of
an external telephone answering device?
Fax Only
No
Do you want the machine to answer fax and
telephone calls automatically?
No
Manual
Fax/Tel
Yes
External TAD
Yes
To set a receive mode follow the instructions below:
a
b
Press Menu.
Press a or b to choose Initial Setup.
Press OK.
c
Press a or b to choose Receive Mode.
Press OK.
d
Press a or b to choose Fax Only, Fax/Tel, External TAD or Manual.
Press OK.
e
Press Stop/Exit.
The LCD will display the current receive mode.
25
5
Chapter 5
Using receive modes
5
External TAD
External TAD mode lets an external
answering device manage your incoming
calls. Incoming calls will be dealt with in one
of the following ways:
Some receive modes answer automatically
(Fax Only and Fax/Tel). You may want to
change the ring delay before using these
modes. (See Ring Delay on page 27.)
 Faxes will be automatically received.
Fax Only
5
Fax Only mode will automatically answer
every call as a fax call.
Fax/Tel
(For more information see Connecting an
external TAD (telephone answering device)
on page 31.)
5
Fax/Tel mode helps you automatically
manage incoming calls, by recognising
whether they are fax or voice calls and
dealing with them in one of the following
ways:
 Faxes will be automatically received.
 Voice calls will start the F/T Ring to tell you
to pick up the line. The F/T Ring is a fast
double-ring made by your machine.
(Also see F/T Ring Time (Fax/Tel mode only)
on page 27 and Ring Delay on page 27.)
Manual
Manual mode turns off all automatic
answering functions unless you are using the
BT Call Sign feature.
To receive a fax in manual mode lift the
handset of an external telephone. When you
hear fax tones (short repeating beeps), press
Mono Start or Colour Start and choose
Receive. You can also use the Fax Detect
feature to receive faxes by lifting a handset on
the same line as the machine.
(Also see Fax Detect on page 28.)
26
 Voice callers can record a message on the
external TAD.
5
5
Receiving a fax
Receive mode settings
Ring Delay
The Ring Delay sets the number of times the
machine rings before it answers in Fax Only
or Fax/Tel mode. If you have external or
extension telephones on the same line as the
machine choose the maximum number of
rings.
(See Operation from external and extension
telephones on page 33 and Fax Detect
on page 28.)
a
b
c
Press Menu.
Press a or b to choose Fax.
Press OK.
Press a or b to choose
Setup Receive.
Press OK.
d
Press a or b to choose Ring Delay.
Press OK.
e
Press a or b to choose how many times
the line rings before the machine
answers.
Press OK.
If you choose 0, the line will not ring at
all.
f
Press Stop/Exit.
5
5
F/T Ring Time
(Fax/Tel mode only)
5
When somebody calls your machine, you and
your caller will hear the normal telephone ring
sound. The number of rings is set by the ring
delay setting.
If the call is a fax, then your machine will
receive it; however, if it is a voice call the
machine will sound the F/T Ring (a fast
double-ring) for the time you have set in the
F/T Ring Time setting. If you hear the
F/T Ring it means that you have a voice caller
on the line.
Because the F/T Ring is made by the
machine, extension and external telephones
will not ring; however, you can still answer the
call on any telephone. (For more information
see Using remote codes on page 35.)
a
b
Press Menu.
c
Press a or b to choose
Setup Receive.
Press OK.
d
Press a or b to choose
F/T Ring Time.
Press OK.
e
Press a or b to choose how long the
machine will ring to alert you that you
have a voice call (20, 30, 40 or
70 seconds).
Press OK.
f
Press Stop/Exit.
Press a or b to choose Fax.
Press OK.
Note
Even if the caller hangs up during the fast
double-ring, the machine will continue to
ring for the set time.
27
5
Chapter 5
Fax Detect
If Fax Detect is On:
5
5
The machine receives a fax call
automatically, even if you answer the call.
When you see Receiving on the LCD or
when you hear “chirps” through the handset
you are using, just replace the handset. Your
machine will do the rest.
If Fax Detect is Off:
If you are at the machine and answer a fax
call by lifting the handset, press Mono Start
or Colour Start, then press 2 to receive the
fax.
If you answered at an extension telephone,
press l 5 1. (See Operation from external
and extension telephones on page 33.)
Note
• If this feature is set to On, but your
machine does not connect a fax call when
you lift an extension or external telephone
handset, press the remote activation code
l 5 1.
• If you send faxes from a computer on the
same telephone line and the machine
intercepts them, set Fax Detect to Off.
a
b
Press Menu.
c
Press a or b to choose
Setup Receive.
Press OK.
d
Press a or b to choose Fax Detect.
Press OK.
e
Press a or b to choose On (or Off).
Press OK.
f
Press Stop/Exit.
28
Press a or b to choose Fax.
Press OK.
5
6
Telephone and external devices
Voice operations
Tone or Pulse
6
6
If you have a Pulse dialling service, but need
to send tone signals (for example, for
telephone banking), follow the instructions
below:
a
Pick up the handset of the external
telephone.
b
Press # on the machine’s control panel.
Any digits dialled after this will send tone
signals.
When the machine is in Fax/Tel mode, it will
use the F/T Ring (fast double-ring) to alert
you to pick up a voice call.
If you are at an external telephone, lift the
handset of the external telephone, and then
press Tel/R to answer.
If you are at an extension telephone, you'll
need to lift the handset during the F/T Ring
Time and then press # 5 1 between the fast
double-rings. If no one is on the line, or if
someone wants to send you a fax, send the
call back to the machine by pressing l 5 1.
6
The Caller ID feature lets you use the Caller
ID subscriber service offered by many local
telephone companies. Call your telephone
company for details. This service shows the
telephone number, or name if it is available,
of your caller as the line rings.
After a few rings, the LCD shows the
telephone number of your caller (and name, if
available). Once you answer a call, the Caller
ID information disappears from the LCD, but
the call information stays stored in the Caller
ID memory.
When you hang up, the machine will return to
the Pulse dialling service.
Fax/Tel mode
Caller ID
(U.K. and Ireland only)
6
6
You can view the list or choose one of these
numbers to fax to, add to Speed Dial or delete
from the history. (See Caller ID history
on page 38.)
 You can see the first 18 characters of the
number (or name).
 The ID Unknown message means the
call originated outside your Caller ID
service area.
 The ID Withheld message means the
caller has intentionally blocked
transmission of information.
You can print a list of the Caller ID information
received by your machine. (See How to print
a report in chapter 6 in the Advanced User’s
Guide.)
Note
The Caller ID service varies with different
carriers. Call your local telephone
company to find out about the kind of
service available in your area.
29
6
Chapter 6
Setting the Caller ID to On
If you have Caller ID on your line, then this
function should be set to On to display the
caller's telephone number on the LCD as the
telephone rings.
a
b
Press Menu.
c
Press a or b to choose
Miscellaneous.
Press OK.
Press a or b to choose Fax.
Press OK.
d
Press a or b to choose Caller ID.
Press OK.
e
Press a or b to choose On (or Off).
Press OK.
f
Press Stop/Exit.
6
Telephone services
Your machine supports the Caller ID
subscriber telephone service that some
telephone companies offer.
Features like Voice Mail, Call Waiting, Call
Waiting/Caller ID, answering services, alarm
systems or other custom features on one
telephone line may create problems with the
operation of your machine.
Note
Caller ID is available for U.K. and Ireland
only.
Setting the Telephone Line
Type
If you are connecting the machine to a line
that features PBX or ISDN to send and
receive faxes, it is also necessary to change
the Telephone Line Type accordingly by
completing the following steps.
a
b
30
6
Press Menu.
Press a or b to choose
Initial Setup.
Press OK.
c
Press a or b to choose
Phone Line Set.
Press OK.
d
Press a or b to choose PBX, ISDN (or
Normal).
Press OK.
e
Press Stop/Exit.
6
Telephone and external devices
PBX and TRANSFER
The machine is initially set to Normal, which
lets the machine connect to a standard PSTN
(Public Switched Telephone Network) line.
However, many offices use a central
telephone system or Private Branch
Exchange (PBX). Your machine can be
connected to most types of PBX. The
machine's recall feature supports timed break
recall only (TBR). TBR will work with most
PBX systems allowing you to gain access to
an outside line, or transfer calls to another
extension. The feature works when Tel/R is
pressed.
Note
You can program a Tel/R key press as
part of a number stored in a Speed Dial
location. When programming the
Speed Dial number, press Tel/R first (the
LCD shows “!”), then enter the telephone
number. If you do this, you do not need to
press Tel/R each time before you dial
using a Speed Dial location. (See Storing
numbers on page 39.) However, if PBX is
not chosen in the Telephone Line Type
setting, you cannot use the Speed Dial
number that the Tel/R press is
programmed into.
6
Connecting an external
TAD (telephone
answering device)
6
You may choose to connect an external
answering device. However, when you have
an external TAD on the same telephone line
as the machine, the TAD answers all calls
and the machine “listens” for fax calling
(CNG) tones. If it hears them, the machine
takes over the call and receives the fax. If it
does not hear CNG tones, the machine lets
the TAD continue playing your outgoing
message so your caller can leave you a voice
message.
The TAD must answer within four rings (the
recommended setting is two rings). The
machine cannot hear CNG tones until the
TAD has answered the call, and with four
rings there are only 8 to 10 seconds of CNG
tones left for the fax “handshake”. Make sure
you carefully follow the instructions in this
guide for recording your outgoing message.
We do not recommend using the toll saver
feature on your external answering machine if
it exceeds five rings.
Note
If you do not receive all your faxes,
shorten the Ring Delay setting on your
external TAD.
1
1
1
TAD
When the TAD answers a call, the LCD
shows Telephone.
31
6
Chapter 6
Multi-line connections (PBX)
IMPORTANT
DO NOT connect a TAD elsewhere on the
same telephone line.
Settings
6
The external TAD must be connected as
shown in the previous illustration.
a
Set your external TAD to one or two
rings. (The machine's Ring Delay setting
does not apply.)
b
Record the outgoing message on your
external TAD.
c
d
Set the TAD to answer calls.
Timing is important in recording this
message.
a
Record 5 seconds of silence at the
beginning of your message. (This allows
your machine time to listen for the fax
CNG tones of automatic transmissions
before they stop.)
b
Limit your speaking to 20 seconds.
Note
We recommend beginning your OGM with
an initial 5-second silence because the
machine cannot hear fax tones over a
resonant or loud voice. You may try
omitting this pause, but if your machine
has trouble receiving, then you must
re-record the OGM to include it.
32
We cannot guarantee that your machine will
operate correctly under all circumstances
when connected to a PBX. Any difficulties
with sending or receiving faxes should be
reported first to the company who handles
your PBX.
Note
Set the Receive Mode to
External TAD. (See Choose the
Receive Mode on page 25.)
Recording an outgoing
message (OGM) on an
external TAD
We suggest you ask the company who
installed your PBX to connect your machine.
If you have a multi line system we suggest
you ask the installer to connect the unit to the
last line on the system. This prevents the
machine being activated each time the
system receives telephone calls. If all
incoming calls will be answered by a
switchboard operator we recommend that
you set the Receive Mode to Manual.
Make sure the Telephone Line Type is set
to PBX. (See Setting the Telephone Line
Type on page 30.)
6
6
Telephone and external devices
External and extension
telephones
Connecting an external or
extension telephone
Operation from external and
extension telephones
6
You can connect a separate telephone to
your machine as shown in the diagram below.
1
2
1
Extension telephone
2
External telephone
When you are using a telephone on the same
phone line, the LCD shows Telephone.
Note
Please make sure you use an external
telephone with a cable no more than
3 metres long.
6
6
If you answer a fax call on an extension or an
external telephone, you can make your
machine take the call by using the Remote
Activation Code. When you press the Remote
Activation Code l 5 1, the machine starts to
receive the fax.
If the machine answers a voice call and fast
double-rings for you to take over, use the
Remote Deactivation Code # 5 1 to take the
call at an extension telephone. (See F/T Ring
Time (Fax/Tel mode only) on page 27.)
If you answer a call and no one is on
the line:
6
6
You should assume that you're receiving a
manual fax.
Press l 5 1 and wait for the chirp or until the
LCD shows Receiving, and then hang up.
Note
You can also use the Fax Detect feature to
make your machine automatically take the
call. (See Fax Detect on page 28.)
33
Chapter 6
Using extension telephones
(U.K. only)
Inadvisable connection of extension
sockets (Fig. 1.)
1
Your premises may already be wired with
parallel extension telephones, or you may
plan to add extension telephones to your line,
as well as your machine. While the simplest
arrangement is a straightforward parallel
connection, there are some problems with
this arrangement, the most obvious of which
is inadvertent interruption of a facsimile
transmission caused by someone picking up
an extension telephone to make an outgoing
call. Also, remote activation code may not
operate reliably in such a simple
configuration.
The inadvisable configuration is shown in
figure 1, and the recommended master/slave
configuration is shown in figure 2.
This new connection configuration can be
arranged by contacting BT, Kingston upon
Hull Telecommunications, your PBX
maintainer or a qualified telephone
installation company as appropriate. Simply
explained, the extension telephone circuit
should be terminated on a normal modular
plug (BT 431A style), which in turn should be
put into the modular socket of the white “T”shaped connector provided as part of the line
cord assembly.
34
2
1
3
FAX
1
Extension socket
2
Master socket
3
Incoming line
Recommended connection of extension
sockets (Fig. 2.)
This machine may also be set to make a
delayed transmission (i.e. a transmission at a
pre-set time). This pre-set job may coincide
with someone picking up an extension
handset.
These problems can easily be eliminated, if
you arrange modification of your extension
wiring circuit, such that extension devices are
connected “downstream” of your machine in
a master/slave configuration (see fig. 2). In
this configuration the machine can always
detect whether a telephone is in use. Thus it
will not attempt to seize the line during that
time. This is known as “telephone off-hook
detection.”
6
6
1
1
2
6
3
FAX
1
Extension socket
2
Master socket
3
Incoming line
The fax machine must be plugged into the
master socket.
Note
These telephones are now connected as
external devices (see Connecting an
external or extension telephone
on page 33), because they are connected
to the fax machine via the T-connector.
Telephone and external devices
Using a cordless external
telephone
Changing the remote codes
6
Once the base unit of the cordless telephone
has been connected to the same telephone
line as the machine (see External and
extension telephones on page 33), it is easier
to answer calls during the Ring Delay if you
carry the cordless handset around with you.
If you let the machine answer first, you will
have to go to the machine so you can press
Tel/R to send the call to the cordless handset.
Using remote codes
Remote Activation code
If you receive a voice call and the machine is
in F/T mode, it will start to sound the F/T Ring
(fast double-ring), after the initial ring delay. If
you pick up the call on an extension
telephone you can turn the F/T Ring off by
pressing # 5 1 (make sure you press this
between the rings).
If the machine answers a voice call and fast
double-rings for you to take over, you can
take the call at the external telephone by
pressing Tel/R.
a
b
Press Menu.
c
Press a or b to choose
Setup Receive.
Press OK.
d
Press a or b to choose Remote Codes.
Press OK.
e
Press a or b to choose On (or Off).
Press OK.
f
Enter the new Remote Activation Code.
Press OK.
g
Enter the new Remote Deactivation
Code.
Press OK.
h
Press Stop/Exit.
6
If you answer a fax call at the external
telephone, you can make the machine
receive the fax by pressing Mono Start and
choose Receive.
Remote Deactivation Code
If you want to use Remote Activation, you
have to turn on the remote codes. The preset
Remote Activation Code is l 5 1. The preset
Remote Deactivation Code is # 5 1. If you
want to, you can replace them with your own
codes.
6
If you answer a fax call on an extension or
external telephone, you can tell your machine
to receive it by dialling the Remote Activation
Code l 5 1. Wait for the chirping sounds then
replace the handset. (See Fax Detect
on page 28.)
6
6
Press a or b to choose Fax.
Press OK.
Note
• If you are always disconnected when
accessing your external TAD remotely, try
changing the Remote Activation Code and
Remote Deactivation Code to another
three-digit code using the numbers 0-9, l,
#.
• Remote Codes might not work with some
telephone systems.
35
6
7
Dialling and storing numbers
How to dial
Manual dialling
7
7
Press all of the digits of the fax or telephone
number.
Speed Dialling
a
Press
(Speed Dial).
You can also choose Speed Dial by
pressing
(FAX).
b
Press a or b to choose Search.
Press OK.
c
Press the two-digit Speed Dial number.
(See Storing Speed Dial numbers
on page 39.)
Note
If the LCD shows Not Registered
when you enter or search a Speed Dial
number, a number has not been stored at
this location.
36
7
Search
You can search for names you have stored in
the Speed Dial memory.
a
Press
(Speed Dial).
You can also choose Speed Dial by
pressing
(FAX).
b
Press a or b to choose Search.
Press OK.
c
Press a or b to choose
Alphabetical Order or
Numerical Order.
Press OK.
d
If you chose Alphabetical Order in
step c, use the dial pad to enter the first
letter of the name, and then press a or b
to choose the name and number you
want to call.
Press OK.
7
7
Dialling and storing numbers
Fax Redial
If you are sending a fax manually and the line
is busy, press Redial/Pause, and then press
Mono Start or Colour Start to try again. If
you want to make a second call to a number
you recently dialled, you can press
Redial/Pause and choose one of the last 30
numbers from the Outgoing Call List.
Redial/Pause only works if you dialled from
the control panel. If you are sending a fax
automatically and the line is busy, the
machine will automatically redial up to three
times at five minute intervals.
a
b
7
Additional dialling
operations
7
Outgoing Call history
7
The last 30 numbers you sent a fax to will be
stored in the outgoing call history. You can
choose one of these numbers to fax to, add to
Speed Dial, or delete from the history.
a
Press Redial/Pause.
You can also choose Outgoing Call
by pressing
(FAX).
Press Redial/Pause.
b
Press a or b to choose the number you
want to redial.
Press OK.
Press a or b to choose the number you
want.
Press OK.
c
Do one of the following:
c
Press a or b to choose Send a fax.
Press OK.
d
Press Mono Start or Colour Start.
7
 To send a fax, press a or b to choose
Send a fax.
Press OK.
Press Mono Start or Colour Start.
Note
 If you want to store the number,
press a or b to choose
Add to Speed Dial.
In Real Time Transmission the automatic
redial feature does not work when using
the scanner glass.
Press OK.
(See Storing Speed Dial numbers
from Outgoing Calls in chapter 5 in
the Advanced User’s Guide.)
 Press a or b to choose Delete.
Press OK.
Press 1 to confirm.
d
Press Stop/Exit.
37
Chapter 7
Caller ID history
This feature requires the Caller ID subscriber
service offered by many local telephone
companies. (See Caller ID (U.K. and Ireland
only) on page 29.)
The numbers, or names if available, from the
last 30 faxes and telephone calls you
received will be stored in the Caller ID history.
You can view the list or choose one of these
numbers to fax to, add to Speed Dial or delete
from the history. When the thirty-first call
comes into the machine, it replaces
information about the first call.
Note
If you are not a Caller ID subscriber, you
can still view call dates from the Caller ID
history, and delete entries from the list.
a
Press Redial/Pause and press l.
You can also choose
Caller ID hist. by pressing
(FAX).
b
Press a or b to choose the number you
want.
Press OK.
c
Do one of the following:
 To send a fax, press a or b to choose
Send a fax.
Press OK.
Press Mono Start or Colour Start.
 If you want to store the number,
press a or b to choose
Add to Speed Dial.
Press OK.
(See Storing Speed Dial numbers
from Outgoing Calls in chapter 5 in
the Advanced User’s Guide.)
 If you want to delete the number,
press a or b to choose Delete.
Press OK.
Press 1 to confirm.
d
38
Press Stop/Exit.
7
Note
You can print the Caller ID list.
(See How to print a report in chapter 6 in
the Advanced User’s Guide.)
Dialling and storing numbers
Storing numbers
7
(for example:
(Speed Dial), Search, OK,
the two-digit number, and Mono Start or
Colour Start).
Note
If you lose electrical power, the Quick Dial
numbers that are in the memory will not be
lost.
Press Redial/Pause to put a 3.5-second
pause between numbers. If you are dialling
overseas, you can press Redial/Pause as
many times as needed to increase the length
of the pause.
7
Names and numbers can be stored as
two-digit Speed Dial locations. You can store
up to 40 different Speed Dial locations. When
you dial you will only have to press a few keys
You can set up your machine to do the
following types of easy dialling: Speed Dial
and Groups for broadcasting faxes. When
you dial a Quick Dial number, the LCD shows
the number.
Storing a pause
Storing Speed Dial numbers
a
b
Press
(Speed Dial).
Press a or b to choose
Set Speed Dial.
Press OK.
7
c
d
Press a or b to choose the Speed Dial
location where you want to store the
number in.
Press OK.
Do one of the following:
 Enter the name (up to 16 characters)
using the dial pad.
Press OK.
(To help you enter letters, see
Entering Text on page 91.)
 To store the number without a name,
press OK.
e
Enter the fax or telephone number (up to
20 digits).
Press OK.
f
Press a or b to choose Complete.
Press OK.
g
Do one of the following:
 To store another Speed Dial
number, go to step c.
 If you are finished storing numbers,
press Stop/Exit.
39
7
Chapter 7
Changing Speed Dial names
or numbers
h
7
You can change a Speed Dial name or
number that has already been stored.
a
Press
b
Press a or b to choose
Set Speed Dial.
Press OK.
c
Press a or b to choose the 2-digit
Speed Dial location you want to change.
Press OK.
d
Do one of the following:
(Speed Dial).
 Press a or b to choose Change.
Press OK.
 Press a or b to choose Delete.
Press OK.
Press 1 to confirm.
Go to step h.
Note
How to change the stored name or
number:
If you want to change a character,
press d or c to position the cursor under
the character you want to change, and
then press Clear. Re-enter the character.
e
If you want to change the name, press
a or b to choose Name, then press OK
and enter the new name using the dial
pad (up to 16 characters).
Press OK.
(See Entering Text on page 91.)
f
If you want to change the Fax/Tel
number, press a or b to choose
Fax/Tel:, then press OK and enter the
new fax or telephone number using the
dial pad (up to 20 digits).
Press OK.
g
Press a or b to choose Complete.
Press OK.
40
Press Stop/Exit.
8
Making copies
8
b
How to copy
8
 Place the document face down in the
ADF.
The following steps show the basic copy
operation. For details about each option, see
the Advanced User’s Guide.
a
Do one of the following to load your
document:
(See Using the ADF (MFC-J410 and
MFC-J415W only) on page 20.)
Make sure you are in copy mode, press
 Load your document face down on
the scanner glass.
(COPY) to illuminate it in blue.
(See Using the scanner glass
on page 20.)
If you want more than one copy, enter
the number (up to 99).
d
Press Mono Start or Colour Start.
Stop copying
 The LCD shows:
01
Press Start
c
1
8
8
To stop copying, press Stop/Exit.
Quality
Normal
Enlarge/Reduce
Paper Type
1
No. of Copies
You can enter the number of copies you
want by using the dial pad.
Note
The default setting is Fax mode. You can
change the amount of time that the
machine stays in Copy mode after the last
copy operation. (See Mode Timer in
chapter 1 in the Advanced User’s Guide.)
41
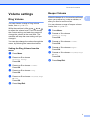
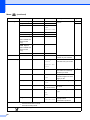
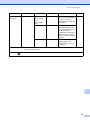
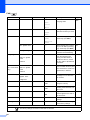
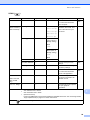
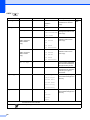
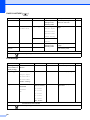
Chapter 8
Copy settings
You can change the following copy settings.
Press COPY and then press a or b to scroll
through the copy settings. When the setting
you want is highlighted, press OK.
8
Paper Options
Paper Type
8
(Basic User’s Guide)
If you are copying on special paper, set the
machine for the type of paper you are using to
get the best print quality.
For details about changing the following copy
settings, see page 42.
a
Press
b
c
d
Load your document.
e
Press a or b to choose Plain Paper,
Inkjet Paper, Brother BP71,
Brother BP61, Other Glossy or
Transparency.
Press OK.
f
If you do not want to change additional
settings, press Mono Start or
Colour Start.
 Paper Type
 Paper Size
(Advanced User’s Guide)
For details about changing the following copy
settings, see chapter 7:
 Quality
 Enlarge/Reduce
 Density
 Stack/Sort (MFC-J410 and
MFC-J415W only)
 Page Layout
 Set New Default
 Factory Reset
Note
If you want to sort copies, use the ADF.
(MFC-J410 and MFC-J415W only)
42
8
(COPY).
Enter the number of copies you want.
Press a or b to choose Paper Type.
Press OK.
Paper Size
8
If you are copying on paper other than A4
size, you will need to change the paper size
setting. You can copy only on A4, Legal,
Letter, A5 or Photo 10  15 cm paper.
a
Press
b
c
d
Load your document.
e
Press a or b to choose A4, A5,
10x15cm, Letter or Legal.
Press OK.
f
If you do not want to change additional
settings, press Mono Start or
Colour Start.
(COPY).
Enter the number of copies you want.
Press a or b to choose Paper Size.
Press OK.
9
Printing photos from a memory
card
PhotoCapture Center™
operations
9
9
Even if your machine is not connected to your
computer, you can print photos directly from
digital camera media. (See Print Images
on page 46.)
You can scan documents and save them
directly to a memory card. (See How to scan
to a memory card on page 47.)
If your machine is connected to a computer,
you can access a memory card that is
inserted in the front of the machine from your
computer.
(See PhotoCapture Center™ for Windows® or
Remote Setup & PhotoCapture Center™ for
Macintosh in the Software User’s Guide.)
Using a memory card
9
9
Your Brother machine has media drives
(slots) for use with the following popular
digital camera media: Memory Stick™,
Memory Stick PRO™, Memory Stick Duo™,
Memory Stick PRO Duo™, SD and SDHC.
The PhotoCapture Center™ feature lets you
print digital photos from your digital camera at
high resolution to get photo quality printing.
43
Chapter 9
Getting started
9
Firmly put a memory card into the correct slot.
1
1
Memory card slot
Slot
Compatible memory cards
Upper slot
Memory Stick™
Memory Stick PRO™
Memory Stick Duo™
Memory Stick PRO Duo™
Memory Stick Micro™
(Adapter required)
Lower slot
SD
SDHC
mini SD (Adapter required)
micro SD (Adapter required)
IMPORTANT
DO NOT insert a Memory Stick Duo™ into the lower SD slot, this may cause damage to the
machine.
44
Printing photos from a memory card
PHOTO CAPTURE key indications:
 PHOTO CAPTURE light is on, the memory card is correctly inserted.
 PHOTO CAPTURE light is off, the memory card is not correctly inserted.
 PHOTO CAPTURE light is blinking, the memory card is being read or written to.
IMPORTANT
DO NOT unplug the power cord or remove the memory card from the media drive (slot) while
the machine is reading or writing to the memory card (the PHOTO CAPTURE key is blinking).
You will lose your data or damage the card.
The machine can only read one device at a time.
9
45
Chapter 9
Print Images
View Photos
9
9
You can preview your photos on the LCD
before you print them. If your photos are large
files there may be a delay before each photo
is displayed on the LCD.
a
Make sure you have put the memory
card in the correct slot.
Press
(PHOTO CAPTURE).
b
Press a or b to choose
View Photo(s).
Press OK.
c
d
Press d or c to choose your photo.
e
Repeat step c and step d until you
have chosen all the photos.
PhotoCapture Center™
print settings
You can change the print settings
temporarily.
The machine returns to its default settings
after 3 minutes, or if the Mode Timer returns
the machine to Fax mode. (See Mode Timer
in chapter 1 in the Advanced User’s Guide.)
Note
You can save the print settings you use
most often by setting them as the default.
(See Setting your changes as a new
default in chapter 8 in the Advanced
User’s Guide.)
Enter the number of copies you want
using the dial pad.
Press Start
f
After you have chosen all the photos, do
one of the following:
 Press OK and change the print
settings. (See PhotoCapture
Center™ print settings on page 46.)
 If you do not want to change any
settings, press Colour Start to print.
46
1
Print Quality
Photo
Paper Type
Paper Size
Note
Press Clear to go back to the previous
level.
001
00
1
No. of prints
(For View Photo(s)
You can see the total number of photos that will
be printed.
(For Print All Photos, Print Photos)
You can see the number of copies of each
photo that will be printed.
(For DPOF printing) This does not appear.
9
Printing photos from a memory card
How to scan to a
memory card
d
Press a or b to choose
Scan to Media.
9
Select
You can scan monochrome and colour
documents onto a memory card.
Monochrome documents will be stored in
PDF (*.PDF) or TIFF (*.TIF) file formats.
Colour documents may be stored in PDF
(*.PDF) or JPEG (*.JPG) file formats. The
factory setting is Color 150 dpi and the
default file format is PDF. The machine
automatically creates file names based on
the current date. (For details, see the Quick
Setup Guide.) For example, the fifth image
scanned on July 1, 2010 would be named
01071005.PDF. You can change the colour
and quality.
Quality
Selectable File
Format
Color 150 dpi
JPEG / PDF
Color 300 dpi
JPEG / PDF
Color 600 dpi
JPEG / PDF
B/W 200x100 dpi
TIFF / PDF
B/W 200 dpi
TIFF / PDF
a
Make sure you have put the memory
card in the correct slot.
Scan to File
Scan to Media
Scan to E-mail
Press OK.
e
b
Load your document.
c
When you want to scan to a memory
card, press
(SCAN).
Do one of the following:
 To change the quality, press a or b to
choose Quality.
Press OK.
Go to step f.
 Press Mono Start or Colour Start to
start scanning without changing
additional settings.
f
g
Press a or b to choose
Color 150 dpi, Color 300 dpi,
Color 600 dpi, B/W 200x100 dpi
or B/W 200 dpi.
Press OK.
Do one of the following:
 To change the file type, go to step h.
 Press Mono Start or Colour Start to
start scanning without changing
additional settings.
IMPORTANT
DO NOT take out the memory card while
PHOTO CAPTURE is blinking to avoid
damaging the card or data stored on it.
OK
h
Press a or b to choose File Type.
Press OK.
Press a or b to choose JPEG, PDF or
TIFF.
Press OK.
Note
• If you chose a Color resolution in step f,
you cannot choose TIFF.
• If you chose a B/W resolution in step f,
you cannot choose JPEG.
47
9
Chapter 9
i
Do one of the following:
 To change the file name, go to
step j.
 Press Mono Start or Colour Start to
start scanning without changing
additional settings.
j
The file name is set automatically;
however, you can enter a name of your
choice using the dial pad.
Press a or b to choose File Name.
Press OK.
Enter the new name. (See Entering Text
on page 91.)
You can only change the first
6 characters.
Press OK.
Note
Press Clear to delete the current name.
k
48
Press Mono Start or Colour Start.
10
How to print from a computer
Printing a document
10
10
The machine can receive data from your
computer and print it. To print from a
computer, install the printer driver.
(See Printing for Windows® or Printing and
Faxing for Macintosh in the Software User’s
Guide for the details about the print settings.)
a
Install the Brother printer driver on the
Installation CD-ROM. (See the Quick
Setup Guide.)
b
From your application, choose the Print
command.
c
Choose the name of your machine in the
Print dialog box and click Properties.
d
Choose the settings you want in the
Properties dialog box.
 Media Type/Quality
 Paper Size
10
 Page Layout
 Colour Settings
 Scaling
 Use Watermark
 Print Date & Time
e
f
Click OK.
Click OK to begin printing.
49
11
How to scan to a computer
Scanning a document
11
There are several ways to scan documents.
You can use the SCAN key on the machine or
the scanner drivers on your computer.
a
b
c
To use the machine as a scanner, install
a scanner driver.
If the machine is on a Network,
configure it with a TCP/IP address.
(MFC-J265W and MFC-J415W only)
a
b
Press the SCAN key.
Choose the scan mode you want.
 Scan to File
 Scan to Media
 (MFC-J265W and MFC-J415W only)
Configure the machine with a TCP/IP
address if network scanning does not
work. (See Configuring Network
Scanning in the Software User’s
Guide.)
 Scan to Image
 Scan to E-mail
 Scan to OCR 1
1
MFC-J410 and MFC-J415W only
(Macintosh users)
Presto! PageManager must be downloaded
and installed before use. See Accessing
Brother Support (Macintosh) on page 3 for
further instructions.
Load your document. (See How to load
documents on page 20.)
c
 Use the ADF to scan multiple pages
of documents. It feeds each sheet
automatically. (MFC-J410 and
MFC-J415W only)
(MFC-J265W and MFC-J415W only)
Choose the computer you want to send
the data to.
d
Press Start to begin scanning.
 Use the scanner glass to scan a
page of a book or one sheet at a
time.
Scanning using a
scanner driver
Do one of the following:
 To scan using a scanner driver at
your computer, go to Scanning using
a scanner driver.
11
For more information, see Using the Scan
key in the Software User’s Guide.
 Install the scanner drivers on the
Installation CD-ROM. (See the Quick
Setup Guide and Scanning in the
Software User’s Guide.)
 To scan using the SCAN key, go to
Scanning using the scan key.
50
Scanning using the
scan key
11
11
For more information, see Scanning a
document using the TWAIN driver or
Scanning a document using the WIA driver in
the Software User’s Guide.
a
Start a scanning application and click
the Scan button.
b
Adjust the settings such as Resolution,
Brightness and Scan Type in the
Scanner Setup dialog box.
c
Click Start or Scan to begin scanning.
A
Routine maintenance
Replacing the ink
cartridges
Your machine is equipped with an ink dot
counter. The ink dot counter automatically
monitors the level of ink in each of the
4 cartridges. When the machine detects an
ink cartridge is running out of ink, the machine
will tell you with a message on the LCD.
A
a
Open the ink cartridge cover.
If one or more of the ink cartridges have
reached the end of their life, the LCD
shows B&W Print Only or
Cannot Print.
b
Press the lock release lever as shown to
release the cartridge indicated on the
LCD. Remove the cartridge from the
machine.
A
The LCD will tell you which ink cartridge is low
or needs replacing. Be sure to follow the LCD
prompts to replace the ink cartridges in the
correct order.
Even though the machine tells you to replace
an ink cartridge, there will be a small amount
of ink left in the ink cartridge. It is necessary
to keep some ink in the ink cartridge to
prevent air from drying out and damaging the
print head assembly.
IMPORTANT
Brother multifunction machines are
designed to work with ink of a particular
specification and will work to a level of
optimum performance and reliability when
used with genuine Brother Original ink
cartridges. Brother cannot guarantee this
optimum performance and reliability if ink
or ink cartridges of other specifications are
used. Brother does not therefore
recommend the use of cartridges other
than genuine Brother Original cartridges
or the refilling of used cartridges with ink
from other sources. If damage is caused
to the print head or other parts of this
machine as a result of using incompatible
products with this machine, any repairs
required as a result may not be covered by
the warranty.
A
c
Open the new ink cartridge bag for the
colour shown on the LCD, and then take
out the ink cartridge.
51
d
Turn the green knob on the protective
yellow cap clockwise until it clicks to
release the vacuum seal, then remove
the cap (1).
f
Gently push the ink cartridge until it
clicks, and then close the ink cartridge
cover.
g
The machine will automatically reset the
ink dot counter.
1
Note
e
Each colour has its own correct position.
Insert the ink cartridge in the direction of
the arrow on the label.
• If you replaced an ink cartridge, for
example Black, the LCD may ask you to
verify that it was a brand new one (for
example, Did You Change
Black).
For each new cartridge you installed,
press 1 (Yes) to automatically reset the
ink dot counter for that colour. If the ink
cartridge you installed is not a brand new
one, be sure to press 2 (No).
• If the LCD shows No Ink Cartridge or
Cannot Detect after you install the ink
cartridges, check that the ink cartridges
are installed correctly.
CAUTION
If ink gets in your eyes, wash it out with
water at once and call a doctor if you are
concerned.
52
Routine maintenance
IMPORTANT
• DO NOT take out ink cartridges if you do
not need to replace them. If you do so, it
may reduce the ink quantity and the
machine will not know the quantity of ink
left in the cartridge.
• DO NOT touch the cartridge insertion
slots. If you do so, the ink may stain your
skin.
Cleaning and checking
the machine
Cleaning the scanner glass
a
• If ink gets on your skin or clothing
immediately wash it off with soap or
detergent.
A
Lift the document cover (1). Clean the
scanner glass (2) and the white plastic
(3) with a soft lint-free cloth moistened
with a non-flammable glass cleaner.
1
• If you mix the colours by installing an ink
cartridge in the wrong position, clean the
print head several times after correcting
the cartridge installation.
3
• Once you open an ink cartridge, install it in
the machine and use it up within six
months of installation. Use unopened ink
cartridges by the expiration date written on
the cartridge package.
• DO NOT dismantle or tamper with the ink
cartridge, this can cause the ink to leak out
of the cartridge.
A
2
b
(MFC-J410 and MFC-J415W only)
In the ADF unit, clean the white bar (1)
and the glass strip (2) with a lint-free
cloth moistened with a non-flammable
glass cleaner.
A
1
2
53
Note
In addition to cleaning the glass strip with
a non-flammable glass cleaner, run your
finger tip over the glass strip to see if you
can feel anything on it. If you feel dirt or
debris, clean the glass strip again
concentrating on that area. You may need
to repeat the cleaning process three or
four times. To test, make a copy after each
cleaning attempt.
Cleaning the paper pick-up
rollers
a
Pull the paper tray completely out of the
machine.
b
Unplug the machine from the electrical
socket and open the Jam Clear
Cover (1).
A
i
When there is a
spot of dirt or
correction fluid
on the glass strip
the printed
sample shows a
vertical line.
After the glass
strip is cleaned
the vertical line is
gone.
1
c
Clean the Paper Pick-up Rollers (1) with
isopropyl alcohol on a cotton swab.
1
54
d
Close the Jam Clear Cover.
Make sure the cover is closed correctly.
e
Put the paper tray firmly back in the
machine.
f
Re-connect the power cord.
Routine maintenance
Cleaning the print head
To maintain good print quality, the machine
will automatically clean the print head when
needed. You can start the cleaning process
manually if there is a print quality problem.
Clean the print head and ink cartridges if you
get a horizontal line in the text or graphics, or
blank text on your printed pages. You can
clean Black only, three colours at a time
(Cyan/Yellow/Magenta), or all four colours at
once.
Cleaning the print head consumes ink.
Cleaning too often uses ink unnecessarily.
IMPORTANT
DO NOT touch the print head. Touching
the print head may cause permanent
damage and may void the print head's
warranty.
a
b
c
d
Press Menu.
Press a or b to choose
Ink Management.
Press OK.
A
Checking the print quality
If faded or streaked colours and text appear
on your output, some of the nozzles may be
clogged. You can check this by printing the
Print Quality Check Sheet and looking at the
nozzle check pattern.
a
b
Press Menu.
Press a or b to choose
Ink Management.
Press OK.
c
Press a or b to choose Test Print.
Press OK.
d
Press a or b to choose
Print Quality.
Press OK.
e
Press Colour Start.
The machine begins printing the Print
Quality Check Sheet.
f
Check the quality of the four colour
blocks on the sheet.
g
The LCD asks you if the print quality is
OK.
Do one of the following:
Press a or b to choose Cleaning.
Press OK.
Press a or b to choose Black, Color or
All.
Press OK.
The machine cleans the print head.
When cleaning is finished, the machine
will go back to the standby mode
automatically.
A
 If all lines are clear and visible, press
1 (Yes) to finish the Print Quality
check and go to step k.
 If you can see missing short lines as
shown below, press 2 to choose No.
OK
Poor
Note
If you clean the print head at least five
times and the print has not improved, try
installing a new Brother Original
Innobella™ ink cartridge for each problem
colour. Try cleaning the print head again
up to five more times. If the print has not
improved call your Brother dealer.
h
The LCD asks you if the print quality is
OK for black and three colours.
Press 1 (Yes) or 2 (No).
55
A
i
j
k
The LCD asks you if you want to start
cleaning.
Press 1 (Yes).
The machine starts cleaning the print
head.
After cleaning is finished, press
Colour Start.
The machine starts printing the Print
Quality Check Sheet again. Return to
step f.
Press Stop/Exit.
If you repeat this procedure at least five
times and the print quality is still poor,
replace the ink cartridge for the clogged
colour.
After replacing the ink cartridge, check
the print quality. If the problem still
exists, repeat the cleaning and test print
procedures at least five times for the
new ink cartridge. If ink is still missing,
call your Brother dealer.
Checking the print alignment
You may need to adjust the print alignment
after transporting the machine, if your printed
text becomes blurred or images become
faded.
a
b
Press a or b to choose
Ink Management.
Press OK.
c
Press a or b to choose Test Print.
Press OK.
d
Press a or b to choose Alignment.
Press OK.
e
Press Mono Start or Colour Start.
The machine starts printing the
Alignment Check Sheet.
f
Check the 600 dpi and 1200 dpi test
prints to see if number 5 most closely
matches number 0.
g
Do one of the following:
IMPORTANT
DO NOT touch the print head. Touching
the print head may cause permanent
damage and may void the print head's
warranty.
Press Menu.
 If the number 5 samples of both the
600 dpi and 1200 dpi test prints are
the best matches, press 1 (Yes) to
finish the Alignment Check and go to
step j.
Note
 If another test print number is a
better match for either 600 dpi or
1200 dpi, press 2 (No) to choose it.
i
When a print head
nozzle is clogged
the printed
sample looks like
this.
56
After the print
head nozzle is
cleaned, the
horizontal lines
are gone.
h
For 600 dpi, press the number of the test
print that most closely matches the
number 0 sample (1-8).
i
For 1200 dpi, press the number of the
test print that most closely matches the
number 0 sample (1-8).
j
Press Stop/Exit.
A
B
Troubleshooting
B
Error and Maintenance messages
B
As with any sophisticated office product, errors may occur and consumable items may need to be
replaced. If this happens, your machine identifies the error and shows an error message. The
most common error and maintenance messages are shown below.
You can correct most errors and routine maintenance by yourself. If you need more help, the
Brother Solutions Center offers the latest FAQs and troubleshooting tips.
Visit us at http://solutions.brother.com/
Error Message
Cause
Action
B&W Print Only
One or more of the colour ink
cartridges have reached the end
of their life.
You can use the machine in
monochrome mode for
approximately four weeks depending
on the number of pages you print.
While this message appears on
the LCD, each operation works in
the following way:
 Printing
If you click Greyscale in the
Advanced tab of the printer
driver you can use the machine
as a monochrome printer.
 Copying
If the paper type is set to
Plain Paper or
Inkjet Paper you can
make copies in monochrome.
 Faxing
If the paper type is set to
Plain Paper or
Inkjet Paper, the machine
will receive and print the faxes
in monochrome.
If a sending machine has a
colour fax, the machine’s
“handshake” will ask that the
fax be sent as monochrome.
If the paper type is set to
Other Glossy, Brother BP71
or Brother BP61 the machine
will stop all print operations. If you
unplug the machine, or take out
the ink cartridge, you cannot use
the machine until you change to a
new ink cartridge.
Replace the ink cartridges. (See Replacing
the ink cartridges on page 51.)
Replace Ink
B
57
Error Message
Cause
Action
BT Call Sign On
BT Call Sign is set to ON. You
cannot change the Receive Mode
from Manual to another mode.
Set BT Call Sign to OFF. (See BT Call Sign
(U.K. only) in chapter 5 in the Advanced
User’s Guide.)
You installed a new ink cartridge
too quickly and the machine did
not detect it.
Take out the new ink cartridge and
re-install it slowly until it clicks.
If you are using non Brother
Original ink the machine may not
detect the ink cartridge.
Replace the cartridge with a Brother
Original ink cartridge. If the error message
remains, contact your Brother dealer.
An ink cartridge is not installed
correctly.
Take out the new ink cartridge and reinstall it slowly until it clicks. (See
Replacing the ink cartridges on page 51.)
One or more of the ink cartridges
have reached the end of their life.
The machine will stop all print
operations. While memory is
available, monochrome faxes will
be stored in the memory. If a
sending machine has a colour fax,
the machine's “handshake” will
ask that the fax be sent as
monochrome.
Replace the ink cartridges. (See Replacing
the ink cartridges on page 51.)
Comm.Error
Poor telephone line quality
caused a communication error.
If the problem continues, call the telephone
company and ask them to check your
telephone line.
Cover is Open
The scanner cover is not
completely closed.
Lift the scanner cover and then close it
again.
The ink cartridge cover is not
completely closed.
Firmly close the ink cartridge cover until it
clicks.
Data Remaining
Print data is left in the machine's
memory.
Press Stop/Exit. The machine will cancel
the job and clear it from the memory. Try to
print again.
Disconnected
The other person or other
person's fax machine stopped the
call.
Try to send or receive again.
Document Jam
The document was not inserted or
fed correctly, or the document
scanned from the ADF was too
long.
(See Using the ADF (MFC-J410 and
MFC-J415W only) on page 20.)
The print head is too warm.
Allow the machine to cool down.
(U.K. only)
Cannot Detect
Cannot Print
Replace Ink
High Temperature
58
(See Document jam (MFC-J410 and
MFC-J415W only) on page 62.)
Troubleshooting
Error Message
Cause
Action
Ink Absorber Full
Internal servicing required.
This problem may be caused by
the use of cartridges other than
genuine Brother Original
cartridges or the refilling of empty
cartridges with ink from other
sources. If damage is caused to
the print head or other parts of this
machine as a result of using other
brands of ink or ink cartridges, any
repairs required as a result may
not be covered by the warranty.
Call Brother Customer Service / your
Brother dealer.
Ink Absorber NearFull
The ink absorber box or flushing
box is near full.
Call Brother Customer Service / your
Brother dealer.
Ink low
One or more of the ink cartridges
are near the end of their life. If a
sending machine has a colour fax
to send, your machine’s
“handshake” will ask that the fax
be sent as monochrome. If the
sending machine has the ability to
convert it, the colour fax will be
printed at your machine as a
monochrome fax.
Order a new ink cartridge. You can
continue printing until the LCD shows
Cannot Print. (See Replacing the ink
cartridges on page 51.)
Low Temperature
The print head is too cold.
Allow the machine to warm up.
Media Error
The memory card is either
corrupted, incorrectly formatted,
or there is a problem with the
memory card.
Put the card firmly into the slot again to
make sure it is in the correct position. If the
error remains, check the media drive (slot)
of the machine by putting in another
memory card that you know is working.
Media is Full.
The memory card you are using
already contains 999 files.
Your machine can only save to your
memory card if it contains less than 999
files. Try deleting unused files to free some
space and try again.
No Caller ID
There is no incoming call history.
You did not receive calls or you
have not subscribed to the Caller
ID service from your telephone
company.
If you want to use the Caller ID feature call
your telephone company. (See Caller ID
(U.K. and Ireland only) on page 29.)
No File
The memory card in the media
Put the correct memory card into the slot
drive does not contain a .JPG file. again.
No Ink Cartridge
An ink cartridge is not installed
correctly.
Take out the new ink cartridge and reinstall it slowly until it clicks. (See
Replacing the ink cartridges on page 51.)
59
B
Error Message
Cause
Action
No Paper Fed
The machine is out of paper or
paper is not correctly loaded in the
paper tray.
Do one of the following:
 Refill the paper in the paper tray, and
then press Mono Start or
Colour Start.
 Remove the paper and load it again
and then press Mono Start or
Colour Start. (See Loading paper and
other print media on page 9.)
The paper is jammed in the
machine.
Remove the jammed paper by following
the steps in Printer jam or paper jam
on page 63.
The Jam Clear Cover is not
closed correctly.
Check the Jam Clear Cover is closed
evenly at both ends. (See Printer jam or
paper jam on page 63.)
No Response/Busy
The number you dialled does not
answer or is busy.
Verify the number and try again.
Not Registered
You tried to access a Speed Dial
number that is not programmed.
Set up the Speed Dial number. (See
Storing Speed Dial numbers on page 39.)
Out of Memory
The machine's memory is full.
When copy operation is in progress, press
Stop/Exit and wait until the other
operations in progress finish and then try
again.
The memory card you are using
does not have enough free space
to scan the documents.
Delete unused files from your memory card
to make some free space and then try
again.
Paper is jammed in the machine.
Open the Jam Clear Cover (at the back of
the machine) and remove the jammed
paper. (See Printer jam or paper jam
on page 63.)
Paper Jam
Make sure the paper length guide is
adjusted to the correct paper size. Do not
extend the paper tray when you load A5 or
smaller size paper.
Unable to Clean XX
Unable to Init. XX
Unable to Print XX
Unable to Scan XX
Wrong Paper Size
60
The machine has a mechanical
problem.
—OR—
A foreign object such as a paper
clip or ripped paper is in the
machine.
Paper is not the correct size.
Open the scanner cover and remove any
foreign objects and paper scraps from
inside the machine. If the error message
continues, see Transferring your faxes or
Fax Journal report on page 61 before
disconnecting the machine so you will not
lose any important messages. Then,
disconnect the machine from the power for
several minutes and reconnect it.
Check that the Paper Size setting matches
the size of paper in the tray. Load the
correct size of paper, and then press
Mono Start or Colour Start. (See Paper
Size on page 15.)
Troubleshooting
Error animations display
B
Error animations display step-by-step
instructions when paper gets jammed. You
can read the steps at your own pace by
pressing c to see the next step and d to go
backward.
Transferring your faxes or Fax
Journal report
If the LCD shows:
Transferring faxes to another fax
machine
If you have not set up your Station ID, you
cannot enter fax transfer mode. (See Enter
personal information (Station ID) in the Quick
Setup Guide.)
B
a
Press Stop/Exit to interrupt the error
temporarily.
b
c
Press Menu.
 Unable to Clean XX
 Unable to Init. XX
We recommend transferring your faxes to
another fax machine or to your PC. (See
Transferring faxes to another fax machine
on page 61.)
Press a or b to choose Service.
Press OK.
d
Press a or b to choose
Data Transfer.
Press OK.
e
Press a or b to choose Fax Transfer.
Press OK.
f
Do one of the following:
 Unable to Print XX
 Unable to Scan XX
B
 If the LCD shows No Data, there
are no faxes left in the machine's
memory.
You can also transfer the Fax Journal report
to see if there are any faxes you need to
transfer. (See Transferring the Fax Journal
report to another fax machine on page 62.)
Press Stop/Exit.
 Enter the fax number to which faxes
will be forwarded.
g
Press Mono Start.
B
61
Transferring the Fax Journal report to
another fax machine
If you have not set up your Station ID, you
cannot enter fax transfer mode. (See Enter
personal information (Station ID) in the Quick
Setup Guide.)
a
Press Stop/Exit to interrupt the error
temporarily.
b
c
Press Menu.
d
Press a or b to choose
Data Transfer.
Press OK.
Press a or b to choose Service.
Press OK.
e
Press a or b to choose
Report Trans.
Press OK.
f
Enter the fax number to which the Fax
Journal report will be forwarded.
g
Press Mono Start.
B
Document jam (MFC-J410 and
MFC-J415W only)
Documents can jam in the ADF unit if they are
not inserted or fed correctly, or if they are too
long. Follow the steps below to clear a
document jam.
Document is jammed in the top of the
ADF unit
a
Take out any paper from the ADF that is
not jammed.
b
c
Open the ADF cover.
d
e
Close the ADF cover.
Pull the jammed document out to the
left.
Press Stop/Exit.
IMPORTANT
To avoid document jams close the ADF
cover correctly by pushing it gently in the
middle.
62
B
B
Troubleshooting
Document is jammed inside the ADF
unit
a
Take out any paper from the ADF that is
not jammed.
b
c
Lift the document cover.
Printer jam or paper jam
B
B
Take out the jammed paper depending on
where it is jammed in the machine.
a
Pull the jammed document out to the
left.
Unplug the machine from the electrical
socket.
IMPORTANT
Before you unplug the machine from the
power source, you can transfer your faxes
that are stored in the memory to your PC
or another fax machine so you will not lose
any important messages. (See
Transferring your faxes or Fax Journal
report on page 61.)
b
d
e
Open the Jam Clear Cover (1) at the
back of the machine. Pull the jammed
paper out of the machine.
Close the document cover.
Press Stop/Exit.
1
B
63
c
Close the Jam Clear Cover.
Make sure the cover is closed correctly.
f
Using both hands, grasp the plastic tabs
on both sides of the machine and lift the
scanner cover (1) until it locks securely
in the open position.
1
d
If the paper support flap is open, close it,
and then close the paper support. Pull
the paper tray completely out of the
machine.
Move the print head (if necessary) to
take out any paper remaining in this
area. Make sure that jammed paper is
not left in the corners of the machine.
Check both ends of the print cartridge.
Note
e
Pull out the jammed paper (1).
If the print head is at the right corner as
shown in the illustration, you cannot move
it. Re-connect the power cord, then hold
down Stop/Exit until the print head moves
to the middle. Unplug the machine from
the power source, and take out the paper.
1
IMPORTANT
If ink gets on your skin or clothing
immediately wash it off with soap or
detergent.
64
Troubleshooting
g
Lift the scanner cover to release the
lock ( ). Gently push the scanner cover
support down ( ) and close the
scanner cover ( ) using both hands.
1
3
2
h
Push the paper tray firmly back into the
machine.
i
While holding the paper tray in place,
pull out the paper support ( ) until it
clicks, and then unfold the paper
support flap ( ).
2
1
B
Make sure you pull out the paper
support until it clicks.
IMPORTANT
DO NOT use the paper support flap for
Legal size paper.
j
Re-connect the power cord.
65
Troubleshooting
B
If you think there is a problem with your machine, check the chart below and follow the
troubleshooting tips.
Most problems can be easily resolved by yourself. If you need additional help, the Brother
Solutions Center offers the latest FAQs and troubleshooting tips.
Visit us at http://solutions.brother.com/
If you are having difficulty with your machine
Printing
Difficulty
Suggestions
No printout.
Check the interface cable or wireless connection on both the machine and your
computer. (See the Quick Setup Guide.)
Check that the machine is plugged in and that the On/Off key is on.
One or more ink cartridges have reached the end of their life.
(See Replacing the ink cartridges on page 51.)
Check to see if the LCD is showing an error message.
(See Error and Maintenance messages on page 57.)
If the LCD shows Cannot Print and Replace Ink, see Replacing the ink
cartridges on page 51.
Check that the correct printer driver has been installed and chosen.
Make sure that the machine is online. Click Start and then Printers and Faxes.
Brother MFC-XXXXX (where XXXXX is your model name), and make sure that
Use Printer Offline is unchecked.
When you choose the Print Odd Pages and Print Even Pages settings, you may
see a print error message on your computer, as the machine pauses during the
printing process. The error message will disappear after the machine re-starts
printing.
Poor print quality.
Check the print quality. (See Checking the print quality on page 55.)
Make sure that the Media Type setting in the printer driver or the Paper Type
setting in the machine’s menu matches the type of paper you are using.
(See Printing for Windows® or Printing and Faxing for Macintosh in the Software
User’s Guide and Paper Type on page 15.)
Make sure that your ink cartridges are fresh. The following may cause ink to clog:
 The expiration date written on the cartridge package has passed. (Brother
Original cartridges stay usable for up to two years if kept in their original
packaging.)
 The ink cartridge has been in your machine for over six months.
 The ink cartridge may not have been stored correctly before use.
Make sure you are using Brother Original Innobella™ ink. Brother does not
recommend the use of cartridges other than genuine Brother Original cartridges
or the refilling of used cartridges with ink from other sources.
Try using the recommended types of paper.
(See Acceptable paper and other print media on page 16.)
The recommended environment for your machine is between 20 C to 33 C.
66
B
Troubleshooting
Printing (continued)
Difficulty
Suggestions
White horizontal lines appear in text
or graphics.
Clean the print head. (See Cleaning the print head on page 55.)
Make sure you are using Brother Original Innobella™ ink.
Try using the recommended types of paper.
(See Acceptable paper and other print media on page 16.)
The machine prints blank pages.
Clean the print head. (See Cleaning the print head on page 55.)
Make sure you are using Brother Original Innobella™ ink.
Characters and lines are stacked.
Check the printing alignment. (See Checking the print alignment on page 56.)
Printed text or images are skewed.
Make sure the paper is loaded correctly in the paper tray and the paper side
guides are adjusted correctly. (See Loading paper and other print media
on page 9.)
Make sure the Jam Clear Cover is closed correctly.
Smudged stain at the top centre of
the printed page.
Make sure the paper is not too thick or curled.
(See Acceptable paper and other print media on page 16.)
Smudged stain at the right or left
corner of the printed page.
Make sure the paper is not curled when you print on the back side of the paper
with the Print Odd Pages and Print Even Pages settings.
Printing appears dirty or ink seems
to run.
Make sure you are using the recommended types of paper. (See Acceptable
paper and other print media on page 16.) Don't handle the paper until the ink is
dry.
Make sure you are using Brother Original Innobella™ ink.
If you are using photo paper, make sure that you have set the correct paper type.
If you are printing a photo from your PC, set the Media Type in the Basic tab of
the printer driver.
Stains appear on the reverse side
or at the bottom of the page.
Make sure the printer platen is not dirty with ink. (See Cleaning the machine’s
printer platen in appendix A in the Advanced User’s Guide.)
Make sure you are using Brother Original Innobella™ ink.
Make sure you are using the paper support flap.
(See Loading paper and other print media on page 9.)
The machine prints dense lines on
the page.
Check Reverse Order in the Basic tab of the printer driver.
The printouts are wrinkled.
In the printer driver Advanced tab, click Colour Settings, and uncheck
Bi-Directional Printing for Windows® or Bi-Directional Printing for Macintosh.
Make sure you are using Brother Original Innobella™ ink.
Cannot perform “Page Layout”
printing.
Check that the paper size setting in the application and in the printer driver are the
same.
Print speed is too slow.
Try changing the printer driver setting. The highest resolution needs longer data
processing, sending and printing time. Try the other quality settings in the printer
driver Advanced tab. Also, click Colour Settings, and make sure you uncheck
Colour Enhancement.
Turn the borderless feature off. Borderless printing is slower than normal printing.
(See Printing for Windows® or Printing and Faxing for Macintosh in the Software
User’s Guide.)
Colour Enhancement is not
working correctly.
If the image data is not full colour in your application (such as 256 colour), Colour
Enhancement will not work. Use at least 24 bit colour data with the Colour
Enhancement feature.
67
B
Printing (continued)
Difficulty
Suggestions
Photo paper does not feed
correctly.
When you print on Brother Photo paper, load one extra sheet of the same photo
paper in the paper tray. An extra sheet has been included in the paper package
for this purpose.
Clean the paper pick-up rollers. (See Cleaning the paper pick-up rollers
on page 54.)
Machine feeds multiple pages.
Make sure the paper is loaded correctly in the paper tray. (See Loading paper and
other print media on page 9.)
Check that more than two types of paper are not loaded in the paper tray at any
one time.
There is a paper jam.
Make sure the paper length guide is set to the correct paper size. Do not extend
the paper tray when you load A5 or smaller size paper. (See Printer jam or paper
jam on page 63.)
Printed pages are not stacked
neatly.
Make sure you are using the paper support flap.
(See Loading paper and other print media on page 9.)
Machine does not print from
Try to reduce the print resolution. (See Printing for Windows® or Printing and
Faxing for Macintosh in the Software User’s Guide.)
Adobe
®
Illustrator®.
Printing Received Faxes
Difficulty
Suggestions
Condensed print and white streaks
across the page or the top and
bottom of sentences are cut off.
You probably had a bad connection, with static or interference on the telephone
line. Ask the other party to send the fax again.
Vertical black lines when receiving.
The sender's scanner may be dirty. Ask the sender to make a copy to see if the
problem is with the sending machine. Try receiving from another fax machine.
Received colour fax prints only in
black and white.
Replace the colour ink cartridges that have reached the end of their life, and then
ask the other person to send the colour fax again.
(See Replacing the ink cartridges on page 51.)
Left and Right margins are cut off or
a single page is printed on two
pages.
Turn on Auto Reduction. (See Printing a reduced incoming fax in chapter 4 in the
Advanced User’s Guide.)
Telephone Line or Connections
Difficulty
Suggestions
Dialling does not work.
(No dial tone)
Make sure the machine is plugged in and turned on.
Check the line cord connections.
Change the Tone/Pulse setting. (See Tone or Pulse on page 29.)
Lift the external telephone’s handset and listen for a dial tone. If there is no dial
tone, ask your telephone company to check the line and/or socket.
The machine does not answer
when called.
68
Make sure the machine is in the correct Receive Mode for your setup.
(See Choose the Receive Mode on page 25.) Check for a dial tone. If possible, call
your machine to hear it answer. If there is still no answer, check the telephone line
cord connection. If there is no ringing when you call your machine, ask your
telephone company to check the line.
Troubleshooting
Receiving Faxes
Difficulty
Suggestions
Cannot receive a fax.
If you connect your machine to PBX or ISDN, set the menu setting of Telephone
Line Type to your telephone type. (See Setting the Telephone Line Type
on page 30.)
Sending Faxes
Difficulty
Suggestions
Cannot send a fax.
Check all line cord connections.
Make sure that the FAX
key is illuminated.
Ask the other party to check that the receiving machine has paper.
Print the Transmission Verification Report and check for an error. (See Reports in
chapter 6 in the Advanced User’s Guide.)
Transmission Verification Report
says “RESULT:ERROR”.
There is probably temporary noise or static on the line. Try sending the fax again.
If you send a PC FAX message and get “RESULT:ERROR” on the Transmission
Verification Report, your machine may be out of memory. If the problem continues,
ask the telephone company to check your telephone line.
If you often get transmission errors due to possible interference on the telephone
line, try changing the menu setting of Compatibility to Basic(for VoIP).
(See Telephone line interference / VoIP on page 73.)
If you connect your machine to PBX or ISDN, set the menu setting of Telephone
Line Type to your telephone type. (See Setting the Telephone Line Type
on page 30.)
Poor fax send quality.
Try changing your resolution to Fine or S.Fine. Make a copy to check your
machine's scanner operation. If the copy quality is not good, clean the scanner.
(See Cleaning the scanner glass on page 53.)
Vertical black lines when sending.
(MFC-J410 and MFC-J415W only)
Black vertical lines on faxes you send are typically caused by dirt or correction fluid
on the glass strip. Clean the glass strip. (See Cleaning the scanner glass
on page 53.)
B
69
Handling Incoming Calls
Difficulty
Suggestions
The machine “Hears” a voice as a
CNG Tone.
If Fax Detect is set to On, your machine is more sensitive to sounds. It may
mistakenly interpret certain voices or music on the line as a fax machine calling
and respond with fax receiving tones. Deactivate the machine by pressing
Stop/Exit. Try avoiding this problem by turning Fax Detect to Off.
(See Fax Detect on page 28.)
Sending a fax call to the machine.
If you answered on an extension telephone, press your Remote Activation Code
(the factory setting is l 5 1). If you answered on an external telephone, press Start
to receive the fax. When your machine answers, hang up.
Custom features on a single line.
If you have Call Waiting, Call Waiting/Caller ID, an alarm system or other custom
feature on a single telephone line with your machine, it may create a problem
sending or receiving faxes.
For example: If you subscribe to Call Waiting or some other custom service and
its signal comes through the line while your machine is sending or receiving a fax,
the signal can temporarily interrupt or disrupt the faxes. Brother's ECM (Error
Correction Mode) feature should help overcome this problem. This condition is
related to the telephone system industry and is common to all devices that send
and receive information on a single, shared line with custom features. If avoiding
a slight interruption is crucial to your business, a separate telephone line with no
custom features is recommended.
Copying Difficulties
Difficulty
Suggestions
Cannot make a copy.
Make sure that the COPY
Poor copy results when using the
ADF. (MFC-J410 and MFC-J415W
only)
Try using the scanner glass. (See Using the scanner glass on page 20.)
Vertical black lines or streaks
appear in copies. (MFC-J410 and
MFC-J415W only)
Vertical black lines or streaks on copies are typically caused by dirt or correction
fluid on the glass strip. Clean the glass strip. (See Cleaning the scanner glass
on page 53.)
Fit to Page does not work correctly.
Make sure your source document is not skewed.
Reposition the document and try again.
key is illuminated.
Scanning Difficulties
Difficulty
Suggestions
TWAIN or WIA errors appear when
Make sure the Brother TWAIN or WIA driver is chosen as the primary source in
your scanning application. For example, in PaperPort™11SE with OCR
(MFC-J410 and MFC-J415W only), click File, Scan or Get Photo and click
Select to choose the Brother TWAIN or WIA driver.
starting to scan. (Windows®)
TWAIN or ICA errors appear when
starting to scan. (Macintosh)
Make sure the Brother TWAIN driver is chosen as the primary source.
In PageManager, click File, Select Source, TWAIN and choose the Brother
TWAIN driver.
Mac OS X 10.6.x users can also scan documents using the ICA Scanner Driver.
See Scanning a document using the ICA driver (Mac OS X 10.6.x) in the Software
User’s Guide.
Poor scanning results when using
the ADF. (MFC-J410 and
MFC-J415W only)
Try using the scanner glass. (See Using the scanner glass on page 20.)
70
Troubleshooting
Scanning Difficulties (continued)
Difficulty
Suggestions
OCR does not work. (MFC-J410
and MFC-J415W only)
Try increasing the scanner resolution.
(Macintosh users)
Presto! PageManager must be downloaded and installed before use.
See Accessing Brother Support (Macintosh) on page 3 for further instructions.
Software Difficulties
Difficulty
Suggestions
Cannot install software or print.
(Windows® users only)
Run the Repair MFL-Pro Suite program on the Installation CD-ROM. This
program will repair and reinstall the software.
“Device Busy”
Make sure the machine is not showing an error message on the LCD.
Cannot print images from
FaceFilter Studio.
To use FaceFilter Studio, you must install the FaceFilter Studio application from
the Installation CD-ROM supplied with your machine. To install FaceFilter Studio
see the Quick Setup Guide.
Also, before you start FaceFilter Studio for the first time, you must make sure your
Brother machine is turned On and connected to your computer. This will allow you
to access all the functions of FaceFilter Studio.
PhotoCapture Center™ Difficulties
Difficulty
Suggestions
Removable Disk does not work
correctly.
1
Have you installed the Windows® 2000 update? If not, do the following:
1) Unplug the USB cable.
2) Install the Windows ® 2000 update using one of the following methods.
 Install MFL-Pro Suite from the Installation CD-ROM. (See the Quick
Setup Guide.)
 Download the latest service pack from the Microsoft Web site.
3) Wait about 1 minute after you restart the PC, and then connect the USB
cable.
2
Take out the memory card and put it back in again.
3
If you have tried “Eject” from within Windows®, take out the memory card
before you continue.
4
If an error message appears when you try to eject the memory card, it means
the card is being accessed. Wait a while and then try again.
5
If all of the above do not work, turn off your PC and machine, and then turn
them on again. (You will have to unplug the power cord of the machine to turn
it off.)
B
Cannot access Removable Disk
from Desktop icon.
Make sure that you have correctly inserted the memory card.
Part of my photo is missing when
printed.
Make sure that Borderless printing and Cropping are turned off. (See Borderless
printing and Cropping in chapter 8 in the Advanced User’s Guide.)
71
Network Difficulties (MFC-J265W and MFC-J415W only)
Difficulty
Suggestions
Cannot print over the network.
Make sure that your machine is powered on and is online and in Ready mode.
Print a Network Configuration list (see Reports in chapter 6 in the Advanced
User’s Guide) and check the current Network settings printed in this list.
(If you are having Network problems, see Network User’s Guide for more
information.)
The network scanning feature does
not work.
(Windows® users)
It is necessary to configure the third-party Security/Firewall Software to allow
Network scanning. To add port 54925 for Network scanning, enter the information
below:
In Name: Enter any description, for example Brother NetScan.
In Port number: Enter 54925.
In Protocol: UDP is selected.
Please refer to the instruction manual that came with your third-party
Security/Firewall Software or contact the software manufacturer.
(Macintosh users)
Re-select your machine in the Device Selector application located in
Macintosh HD/Library/Printers/Brother/Utilities/DeviceSelector or from the
model list in ControlCenter2.
The Brother software cannot be
installed.
(Windows® users)
Allow network access to the following programs if your security software displays
an alert message during MFL-Pro Suite installation.
BrC3Rgin.exe
BrnIPMon
Brother Status Monitor (Network)
ControlCenter Program
Generic Host Process f...
Setup.exe
Spooler SubSystem App
wdsw MFC Application
(Macintosh users)
Re-select your machine in the Device Selector application located in
Macintosh HD/Library/Printers/Brother/Utilities/DeviceSelector or from the
model list in ControlCenter2.
Cannot connect to wireless
network.
Investigate the problem using WLAN Report.
Press Menu key, choose Print Reports and then press OK. Choose
WLAN Report.
For details, see the Network User’s Guide.
Reset the network settings.
Press Menu key, choose Network and then press OK. Choose
Network Reset.
For details, see the Network User’s Guide.
72
Troubleshooting
Dial Tone detection
When you send a fax automatically, by
default your machine will wait for a fixed
amount of time before it starts to dial the
number. By changing the Dial Tone setting to
Detection you can make your machine dial
as soon as it detects a dial tone. This setting
can save a small amount of time when
sending a fax to many different numbers. If
you change the setting and start having
problems with dialling you should change
back to the factory No Detection setting.
a
b
c
Press Menu.
Press a or b to choose
Initial Setup.
Press OK.
Press a or b to choose Dial Tone.
Press OK.
d
Press a or b to choose Detection or
No Detection.
Press OK.
e
Press Stop/Exit.
B
Telephone line
interference / VoIP
B
If you are having problems sending or
receiving a fax due to possible interference
on the telephone line, you can change the
compatibility setting, which reduces the
modem speed to minimise errors.
a
b
Press Menu.
Press a or b to choose
Initial Setup.
Press OK.
c
Press a or b to choose
Compatibility.
Press OK.
d
Press a or b to choose Normal or
Basic(for VoIP).
 Basic(for VoIP) cuts the
modem speed to 9,600 bps and
turns off ECM except for colour fax
sending. Unless interference is a
recurring problem on your telephone
line, you may prefer to use it only
when needed.
To improve compatibility with most
VoIP services, Brother recommends
changing the compatibility setting to
Basic(for VoIP).
 Normal sets the modem speed at
14,400 bps.
Press OK.
e
B
Press Stop/Exit.
Note
VoIP (Voice over IP) is a type of phone
system that uses an internet connection,
rather than a traditional phone line.
73
Machine Information
Checking the serial number
3 All Settings
B
B
Brother strongly recommends you use this
operation when you dispose of the
machine.
You can see the machine’s serial number on
the LCD.
a
b
You can reset all the machine settings
back to the settings that were set at the
factory.
Press Menu.
How to reset the machine
Press a or b to choose
Machine Info.
Press OK.
c
Press a or b to choose Serial No.
Press OK.
d
Press Stop/Exit.
Reset functions
The following reset functions are available:
a
b
2 Speed Dial&Fax
Speed Dial & Fax resets the following
settings:
 Speed Dial
(Speed-Dial and Setup Groups)
 Station ID
(Name and Number)
 Report settings
(Transmission Verification Report,
Quick Dial List and Fax Journal)
 History
(Caller ID history and Outgoing Call)
 Faxes in memory
74
Press a or b to choose
Initial Setup.
Press OK.
c
Press a or b to choose Reset.
Press OK.
d
Press a or b to choose the type of reset
you want to use.
Press OK.
Press 1 to confirm.
e
Press 1 to reboot the machine.
B
1 Network (MFC-J265W and MFC-J415W
only)
You can reset the print server back to its
default factory settings such as the
password and IP address information.
Press Menu.
B
C
Menu and features
On-screen
programming
C
C
Your machine is designed to be easy to
operate with LCD on-screen programming
using the menu keys. User-friendly
programming helps you take full advantage of
all the menu selections your machine has to
offer.
Since your programming is done on the LCD,
we have created step-by-step on-screen
instructions to help you program your
machine. All you need to do is follow the
instructions as they guide you through the
menu selections and programming options.
C
75
Menu table
C
The menu table will help you understand the menu selections and options that are found in the
machine's programs. The factory settings are shown in Bold with an asterisk.
Menu (
)
Level1
Level2
Level3
Options
Descriptions
Page
Ink Management
Test Print
—
Print Quality
Lets you check the print
quality or alignment.
55
Lets you clean the print
head.
55
See 1 .
Alignment
Cleaning
—
Black
Color
All
General Setup
Ink Volume
—
—
Lets you check the
available ink volume.
Mode Timer
—
Off
Sets the time to return to
Fax mode.
0Sec
30Secs
1Min
2Mins*
5Mins
Paper Type
—
Plain Paper*
Inkjet Paper
Sets the type of paper in
the paper tray.
15
Sets the size of the
paper in the paper tray.
15
Brother BP71
Brother BP61
Other Glossy
Transparency
Paper Size
—
A4*
A5
10x15cm
Letter
Legal
1
See Advanced User’s Guide.
The factory settings are shown in Bold with an asterisk.
76
Menu and features
Level1
Level2
Level3
Options
Descriptions
Page
General Setup
Volume
Ring
Off
Adjusts the ring volume.
7
Adjusts the volume level
of the beeper.
7
Adjusts the volume level
of the speaker.
8
Changes for Daylight
Savings Time
automatically.
See 1.
(Continued)
Low
Med*
High
Beeper
Off
Low*
Med
High
Speaker
Off
Low
Med*
High
Auto Daylight
—
On*
Off
LCD Settings
Adjusts the contrast of
the LCD.
LCD Contrast
Backlight
Light*
Med
You can adjust the
brightness of the LCD
backlight.
8
You can set how long
the LCD backlight stays
on for after the last key
press.
See 1.
Dark
Dim Timer
Off
10Secs
20Secs
30Secs*
Sleep Mode
—
1Min
2Mins
3Mins
You can choose how
long the machine will
remain idle before it
goes into sleep mode.
5Mins*
10Mins
C
30Mins
60Mins
1
See Advanced User’s Guide.
The factory settings are shown in Bold with an asterisk.
77
Level1
Level2
Level3
Options
Descriptions
Page
Fax
Setup Receive
Ring Delay
0
Sets the number of rings
before the machine
answers in Fax Only or
Fax/Tel mode.
27
Sets the fast double-ring
time in Fax/Tel mode.
27
Receives fax messages
automatically when you
answer a call and hear
fax tone.
28
Allows you to answer all
calls at an extension or
external telephone and
use codes to turn the
machine on or off. You
can personalize these
codes.
35
Cuts the size of
incoming faxes to fit the
paper size.
See 1 .
Initial setup for
Transmission
Verification Report and
Fax Journal Report.
24
1
2*
3
4
5
6
7
8
(Example for the
U.K.)
F/T Ring Time
20Secs
30Secs*
40Secs
70Secs
Fax Detect
On*
Off
Remote Codes
On*
(l51, #51)
Off
Auto Reduction
On*
Off
Report Setting
XMIT Report
On
On+Image
Off*
Off+Image
Journal
Period
Off
Every 50 Faxes*
Every 6 Hours
Every 12 Hours
Every 24 Hours
Every 2 Days
Every 7 Days
1
See Advanced User’s Guide.
The factory settings are shown in Bold with an asterisk.
78
See 1 .
Menu and features
Level1
Level2
Level3
Options
Descriptions
Page
Fax
Remaining Jobs
—
—
Check which jobs are in
the memory and lets you
cancel chosen jobs.
See 1.
Miscellaneous
TX Lock
—
Prohibits most functions
except receiving faxes.
BT Call Sign
Off*
Uses with BT Call Sign.
(U.K. Only)
On
Caller ID
On*
(U.K. and
Ireland only)
Off
(Continued)
1
View or print a list of the
last 30 Caller IDs stored
in the memory.
29
See Advanced User’s Guide.
The factory settings are shown in Bold with an asterisk.
C
79
Network menu
(MFC-J265W and MFC-J415W only)
Level1
Level2
Level3
Options
Descriptions
Network
TCP/IP
BOOT Method
Auto*
Chooses the BOOT
method that best suits your
needs.
Static
RARP
BOOTP
DHCP
IP Address
[000-255].
Enter the IP address.
[000-255].
[000-255].
[000-255]
Subnet Mask
[000-255].
Enter the Subnet mask.
[000-255].
[000-255].
[000-255]
Gateway
[000-255].
[000-255].
Enter the Gateway
address.
[000-255].
[000-255]
Node Name
BRWXXXXXXXXXXXX
Enter the Node name.
WINS Config
Auto*
Chooses the WINS
configuration mode.
Static
WINS Server
(Primary)
000.000.000.000
(Secondary)
000.000.000.000
DNS Server
(Primary)
000.000.000.000
(Secondary)
000.000.000.000
APIPA
On*
Off
Specifies the IP address of
the primary or secondary
server.
Automatically allocates the
IP address from the linklocal address range.
Setup Wizard
—
—
You can manually
configure your print server
for a wireless network.
WPS/AOSS
—
—
You can easily configure
your wireless network
settings using the onebutton push method.
See Network User’s Guide.
The factory settings are shown in Bold with an asterisk.
80
Specifies the IP address of
the primary or secondary
server.
Menu and features
Level1
Level2
Level3
Options
Descriptions
Network
WPS w/PIN Code
—
—
You can easily configure
your wireless network
settings using WPS with a
PIN code.
WLAN Status
Status
—
You can see the current
wireless network status.
Signal
—
You can see the current
wireless network signal
strength.
SSID
—
You can see the current
SSID.
Comm. Mode
—
You can see the current
Communication Mode.
MAC Address
—
—
You can see your
machine’s MAC address
from the control panel.
WLAN Enable
—
On
Lets you use the wireless
network connection.
(Continued)
Off*
Network Reset
—
—
—
See Network User’s Guide.
The factory settings are shown in Bold with an asterisk.
C
81
Menu (
) (continued)
Level1
Level2
Level3
Options
Descriptions
Page
Print Reports
XMIT Verify
—
—
24
Help List
—
—
Prints these lists and
reports.
Quick Dial
—
Alphabetical
Order
See 1 .
Numerical Order
Fax Journal
—
—
User Settings
—
—
Network Config
—
—
—
—
Caller ID hist.
—
—
Machine Info.
Serial No.
—
—
Lets you check the serial
number of your machine.
74
Initial Setup
Receive Mode
—
Fax Only*
Choose the receive mode
that best suits your needs.
25
See 2 .
(MFC-J265W and
MFC-J415W
only)
WLAN Report
(MFC-J265W and
MFC-J415W
only)
Fax/Tel
External TAD
Manual
Date&Time
—
—
Puts the date and time on
the LCD and in headings
of faxes you send.
Station ID
—
Fax:
Set your name and fax
number to appear on each
page you fax.
Name:
Tone/Pulse
—
Tone*
Choose the dialling mode.
29
Turns Dial Tone Detection
on or off.
73
Choose the telephone line
type.
30
Adjusts the modem speed
to help resolve
transmission problems.
73
Pulse
Dial Tone
—
Detection
No Detection*
Phone Line Set
—
Normal*
PBX
ISDN
Compatibility
—
Normal*
Basic(for VoIP)
1
See Advanced User’s Guide.
2
See Quick Setup Guide.
The factory settings are shown in Bold with an asterisk.
82
Menu and features
Level1
Level2
Level3
Options
Descriptions
Page
Initial Setup
Reset
Network
—
Resets the print server
back to its factory default
settings, such as the
password and IP address
information.
74
Speed Dial&Fax
—
Deletes all stored
Speed Dial numbers and
faxes, restores the Station
ID, Quick Dial List,
Transmission Verification
Report and Fax Journal
back to the factory default
settings.
All Settings
—
Resets all the machine’s
settings back to the
settings that were set at
the factory.
(Continued)
(MFC-J265W
and
MFC-J415W
only)
1
See Advanced User’s Guide.
2
See Quick Setup Guide.
The factory settings are shown in Bold with an asterisk.
C
83
FAX (
)
Level1
Level2
Level3
Options
Descriptions
Page
Fax Resolution
—
—
Standard*
Sets the resolution for
outgoing faxes.
See 1 .
Fine
S.Fine
Photo
Contrast
—
—
Auto*
Light
Changes the lightness or
darkness of faxes you send.
Dark
Speed Dial
Search
—
Alphabetical
Order
You can dial by pressing only
a few keys (and Start).
36
Numerical
Order
Outgoing Call
Set Speed Dial
—
—
Stores Speed Dial numbers,
so you can dial by pressing
only a few keys (and Start).
39
Setup Groups
—
—
You can set up Group
numbers for Broadcasting.
See 1 .
Send a fax
—
—
You can choose a number
from the Outgoing Call
history and then make a
telephone call to it, send a
fax to it, add it to Speed Dial,
or delete it.
37
—
—
You can choose a number
from the Caller ID history and
then send a fax to it, add it to
Speed Dial, or delete it.
38
—
—
You can send the same fax
message to more than one
fax number.
See 1 .
—
On
You can send a fax without
using the memory.
Add to Speed
Dial
Delete
Caller ID hist.
Send a fax
(U.K. and Ireland
only)
Add to Speed
Dial
Delete
Broadcasting
Add Number
Speed Dial
Complete
Real Time TX
—
Off*
Overseas Mode
—
—
On
Off*
Glass ScanSize
—
—
Letter
A4*
If you are having difficulty
sending faxes overseas, set
this to On.
Adjust the scan area of the
scanner glass to the size of
the document.
23
See 1 .
Set New Default
—
—
—
You can save your fax
settings.
Factory Reset
—
—
—
You can restore all settings
to the factory settings.
1
See Advanced User’s Guide.
The factory settings are shown in Bold with an asterisk.
84
Menu and features
SCAN (
)
Level1
Option1
Option2
Option3
Descriptions
Page
Scan to File
—
—
—
You can scan a monochrome
or a colour document into
your computer.
See 1 .
Scan to Media
(when a memory
card is inserted)
Quality
—
Color 150 dpi*
You can choose the scan
resolution, file format, and
enter a file name for your
document.
47
See 2 .
Color 300 dpi
Color 600 dpi
B/W 200x100 dpi
B/W 200 dpi
File Type
—
(If you chose
colour option in
Quality setting)
PDF*
JPEG
(If you chose
Mono option in
Quality setting)
TIFF
PDF*
File Name
—
—
Set New Default
—
—
You can save your scan
settings.
Factory Reset
—
—
You can restore all settings to
the factory settings.
Scan to E-mail
—
—
—
You can scan a monochrome
or a colour document into
your E-mail application.
Scan to OCR 3
—
—
—
You can have your text
document converted to an
editable text file.
—
—
—
You can scan a colour picture
into your graphics
application.
(MFC-J410 and
MFC-J415W
only)
Scan to Image
See 1 .
1
See Software User’s Guide.
2
See Advanced User’s Guide.
3
(Macintosh users)
Presto! PageManager must be downloaded and installed before use. See Accessing Brother
Support (Macintosh) on page 3 for further instructions.
C
The factory settings are shown in Bold with an asterisk.
85
COPY (
)
Level1
Level2
Level3
Options
Descriptions
Page
Quality
—
—
Fast
Choose the Copy
resolution for the next
copy.
See 1 .
Normal*
Best
Enlarge/Reduce
100%*
—
—
—
Enlarge
—
198% 10x15cmiA4
You can choose the
enlargement ratio for the
next copy.
186% 10x15cmiLTR
142% A5iA4
Reduce
—
(MFC-J220 and
MFC-J265W
only)
97% LTRiA4
93% A4iLTR
You can choose the
reduction ratio for the
next copy.
83%
69% A4iA5
47% A4i10x15cm
Reduce
—
(MFC-J410 and
MFC-J415W
only)
97% LTRiA4
93% A4iLTR
You can choose the
reduction ratio for the
next copy.
83% LGLiA4
69% A4iA5
47% A4i10x15cm
Paper Type
Fit to Page
—
—
Your machine will adjust
the size automatically to
the paper size you set.
Custom(25-400%)
—
—
You can choose the
enlargement or reduction
ratio for your type of
document.
—
—
Plain Paper*
Choose the paper type
that matches the paper in
the tray.
42
Choose the paper size
that matches the paper in
the tray.
42
Inkjet Paper
Brother BP71
Brother BP61
Other Glossy
Transparency
Paper Size
—
—
A4*
A5
10x15cm
Letter
Legal
1
See Advanced User’s Guide.
The factory settings are shown in Bold with an asterisk.
86
Menu and features
Level1
Level2
Level3
Options
Descriptions
Page
Density
—
—
Dark
Adjusts the density of
copies.
See 1.
Light
Stack/Sort
—
—
(MFC-J410 and
MFC-J415W
only)
Page Layout
Stack*
Sort
—
—
Off(1in1)*
2 in 1 (P)
You can choose to stack
or sort multiple copies.
You can make N in 1 or
Poster copies.
2 in 1 (L)
4 in 1 (P)
4 in 1 (L)
Poster (3x3)
Set New Default
—
—
—
You can save your copy
settings.
Factory Reset
—
—
—
You can restore all
settings to the factory
settings.
1
See Advanced User’s Guide.
The factory settings are shown in Bold with an asterisk.
C
87
PHOTO CAPTURE (
)
Level1
Level2
Level3
Options
Descriptions
Page
View Photo(s)
—
—
See the print
settings in the
following table.
You can preview your
photos on the LCD.
46
Print Index
6 IMGs/Line*
Paper Type
Plain Paper*
You can print a thumbnail
page.
See 1 .
5 IMGs/Line
Inkjet Paper
Brother BP71
Brother BP61
Other Glossy
Paper Size
A4*
Letter
Print Photos
—
—
Print All
Photos
—
—
1
See the print
settings in the
following table.
You can print an individual
image.
You can print all photos in
your memory card.
See Advanced User’s Guide.
The factory settings are shown in Bold with an asterisk.
Print Settings
Option1
Option2
Option3
Option4
Descriptions
Page
Print Quality
Normal
—
—
Choose the print quality.
See 1 .
(Not available for
DPOF printing.)
Photo*
Paper Type
Plain Paper
—
—
Choose the paper type.
(When A4 or
Letter is chosen)
—
Choose the paper and
print size.
Inkjet Paper
Brother BP71
Brother BP61
Other Glossy*
Paper Size
Letter
10x15cm*
13x18cm
A4
8 x 10cm
9 x 13cm
10 x 15cm
13 x 18cm
15 x 20cm
Max. Size*
1
See Advanced User’s Guide.
The factory settings are shown in Bold with an asterisk.
88
Menu and features
Option1
Brightness
Option2
Light
Option3
Option4
Descriptions
Page
—
—
Adjusts the brightness.
See 1.
—
—
Adjusts the contrast.
—
—
Crops the image around
the margin to fit the paper
size or print size. Turn
this feature off if you want
to print whole images or
prevent unwanted
cropping.
—
—
Expands the printable
area to fit the edges of
the paper.
—
—
Prints the date on your
photo.
Dark
Contrast
Cropping
On*
Off
Borderless
On*
Off
Date Print
On
(Not available for
DPOF printing.)
Off*
Set New Default
—
—
—
You can save your print
settings.
Factory Reset
—
—
—
You can restore all the
settings to factory
settings.
1
See Advanced User’s Guide.
The factory settings are shown in Bold with an asterisk.
C
89
Speed Dial (
)
Level1
Level2
Level3
Options
Descriptions
Page
Search
—
—
Alphabetical
Order
You can search for names
you have stored in the
Speed Dial memory.
36
Numerical Order
Set Speed Dial
—
—
—
Stores Speed Dial
numbers, so you can dial by
pressing only a few keys
(and Start).
39
Setup Groups
—
—
—
Sets up Group numbers for
Broadcasting.
See 1 .
1
See Advanced User’s Guide.
The factory settings are shown in Bold with an asterisk.
Redial/Pause (
)
Level1
Level2
Level3
Options
Descriptions
Page
Outgoing Call
history
Send a fax
—
—
You can choose a number
from the Outgoing Call
history and then make a
telephone call to it, send a
fax to it, add it to
Speed Dial, or delete it.
37
—
—
You can choose a number
from the Caller ID history
and then send a fax to it,
add it to Speed Dial, or
delete it.
38
Add to Speed
Dial
Delete
Caller ID hist.
Send a fax
(U.K. and Ireland
only)
Add to Speed
Dial
Delete
The factory settings are shown in Bold with an asterisk.
90
Menu and features
Entering Text
C
When you are setting certain menu selections, such as the Station ID, you may need to enter text
into the machine. Most dial pad keys have three or four letters printed on keys. The keys for 0, #
and l do not have printed letters because they are used for special characters.
Press the appropriate dial pad key the number of times shown in this reference table to access
the character you want.
Press
Key
one
time
two
times
three
times
four
times
five
times
2
A
B
C
2
A
3
D
E
F
3
D
4
G
H
I
4
G
5
J
K
L
5
J
6
M
N
O
6
M
7
P
Q
R
S
7
8
T
U
V
8
T
9
W
X
Y
Z
9
Inserting spaces
C
To enter a space in a fax number, press c once between numbers. To enter a space in a name,
press c twice between characters.
Making corrections
C
If you entered an incorrect letter and want to change it, press d to move the cursor under the
incorrect character. Then press Clear. Re-enter the correct character. You can also back up and
insert letters.
Repeating letters
C
If you need to enter a letter that is on the same key as the letter before, press c to move the cursor
to the right before you press the key again.
Special characters and symbols
C
C
Press l, # or 0, repeatedly until you see the special character or symbol you want.
Press l
for
(space) ! " # $ % & ' ( )
Press #
for
:;<=>?@[]^_
Press 0
for
ÄËÖÜÀÇÈÉ0
+,-./m
91
D
Specifications
D
General
D
Printer Type
Inkjet
Print Method
Mono:
Piezo with 94  1 nozzle
Colour:
Piezo with 94  3 nozzles
Memory Capacity
32 MB
LCD (Liquid Crystal Display) 1.9 in. (48.98 mm) STN Colour LCD
Power Source
AC 220 to 240V 50/60Hz
Power Consumption 1
Copying Mode:
Approx. 19.5 W 2
Standby Mode:
Approx. 4 W (MFC-J265W)
Approx. 4.5 W (MFC-J220, MFC-J410
and MFC-J415W)
Sleep Mode:
Approx. 2.5 W
Off:
Approx. 0.65 W
Dimensions
(MFC-J410 and MFC-J415W)
375 mm
180 mm
390 mm
405 mm
(MFC-J220 and MFC-J265W)
370 mm
460 mm
368 mm
150 mm
390 mm
Weight
Noise
92
360 mm
450 mm
(MFC-J220)
6.8 kg
(MFC-J265W)
6.9 kg
(MFC-J410 and
MFC-J415W)
7.8 kg
Operating:
LPAm = 50 dB or less 3
Specifications
Noise per ISO9296
Operating:
LWAd = 62.3 dB(A) (Mono)
LWAd = 56.7 dB(A) (Colour)
Office equipment with LWAd > 63.0 dB(A)
is not suitable for use in room where
people do primarily intellectual work. Such
equipment should be placed in separate
rooms because of the noise emission.
Temperature
Operating:
10 to 35 C
Best Print Quality: 20 to 33 C
Humidity
Operating:
20 to 80% (without condensation)
Best Print Quality: 20 to 80% (without condensation)
ADF (automatic document
feeder) (MFC-J410 and
MFC-J415W only)
Up to 15 pages
Document Size
ADF Width (MFC-J410 and MFC-J415W only):
148 mm to 215.9 mm
Paper: 80 g/m2 A4 or Letter size
ADF Length (MFC-J410 and MFC-J415W only):
148 mm to 355.6 mm
Scanner Glass Width: Max. 215.9 mm
Scanner Glass Length: Max. 297 mm
1
When all the modes are connected to USB.
2
When using ADF, resolution: standard, draft: ISO/IEC24712 printed pattern. (MFC-J410 and MFC-J415W)
When resolution: standard, draft: ISO/IEC24712 printed pattern. (MFC-J220 and MFC-J265W)
3
Noise depends on printing conditions.
D
93
Print media
Paper Input
D
Paper Tray
 Paper type:
Plain paper, inkjet paper (coated paper),
glossy paper 1, transparency 1 2 and envelopes
 Paper size:
A4, Legal, Executive, Letter, A5, A6, JIS B5, Envelopes
(commercial No.10, DL, C5, Monarch, JE4), Photo 10  15 cm,
Photo 2L (13  18 cm), Index Card and Postcard 3
Width: 98 mm - 215.9 mm
Length: 148 mm - 355.6 mm
For more details, see Paper weight, thickness and capacity
on page 19.
 Maximum paper tray capacity:
Approx. 100 sheets of 80 g/m2 plain paper
Paper Output
Up to 50 sheets of A4 plain paper (face up print delivery to the output
paper tray) 1
1
For glossy paper or transparencies, remove printed pages from the output paper tray immediately after they exit the
machine to avoid smudging.
2
Use only transparencies recommended for inkjet printing.
3
See Paper type and size for each operation on page 18.
94
Specifications
Fax
D
Compatibility
ITU-T Group 3
Modem Speed
Automatic Fallback
14,400 bps
Scanning Width
ADF: 208 mm (A4)
Scanner Glass: 204 mm (A4)
Printing Width
208 mm
Greyscale
Levels: 64 (B&W) / 256 (Colour)
Resolution
 Horizontal 8 dot/mm
 Vertical
Standard
3.85 line/mm (Mono)
7.7 line/mm (Colour)
Fine
7.7 line/mm (Mono/Colour)
Photo
7.7 line/mm (Mono)
Superfine
15.4 line/mm (Mono)
1
Speed Dial
40 stations
Groups
Up to 6
Broadcasting
90 stations
Automatic Redial
3 times at 5 minute intervals
Memory Transmission
Up to 170 1 pages
Out of Paper Reception
Up to 170 1 pages
“Pages” refers to the “ITU-T Test Chart #1” (a typical business letter, Standard resolution, MMR code). Specifications
and printed materials are subject to change without prior notice.
D
95
Copy
D
Colour/Monochrome
Yes/Yes
Copy Width
Max. 210 mm
Multiple Copies
Stacks up to 99 pages
Sorts up to 99 pages (MFC-J410 and MFC-J415W only)
Enlarge/Reduce
25% to 400% (in increments of 1%)
Resolution
(Mono)
 Prints up to 1200  1200 dpi
(Colour)
 Prints up to 600  1200 dpi
96
Specifications
PhotoCapture Center™
D
Compatible Media 1
Memory Stick™ (16 MB - 128 MB)
Memory Stick PRO™ (256 MB - 16 GB)
Memory Stick Duo™ (16 MB - 128 MB)
Memory Stick PRO Duo™ (256 MB - 16 GB)
Memory Stick Micro™ (M2™) with adapter
SD (16 MB to 2 GB)
SDHC (4 GB to 16 GB)
microSD with adapter
miniSD with adapter
Resolution
Up to 1200  2400 dpi
File Extension
(Media Format)
DPOF (ver. 1.0, ver. 1.1), Exif DCF (up to ver. 2.1)
(Image Format)
Photo Print: JPEG 2
Scan to Media: JPEG, PDF (Colour)
TIFF, PDF (Monochrome)
Number of Files
Up to 999 files
(The folder inside memory cards is also counted.)
Folder
File must be stored in the 4th folder level of the memory card.
Borderless
A4, Letter, Photo 10  15 cm, Photo 2L 13  18 cm 3
1
Memory cards and adapters are not included.
2
Progressive JPEG format is not supported.
3
See Paper type and size for each operation on page 18.
D
97
Scanner
D
Colour/Monochrome
Yes/Yes
TWAIN Compliant
Yes (Windows® 2000 Professional/Windows® XP/
Windows® XP Professional x64 Edition/Windows Vista®/
Windows® 7)
Mac OS X 10.4.11, 10.5.x, 10.6.x 1
WIA Compliant
Yes (Windows® XP 2/Windows Vista®/Windows® 7)
ICA Compliant
Yes (Mac OS X 10.6.x)
Colour Depth
36 bit colour Processing (Input)
24 bit colour Processing (Output)
(Actual Input: 30 bit colour/Actual Output: 24 bit colour)
Resolution
Up to 19200  19200 dpi (interpolated) 3
Up to 1200  2400 dpi (optical) (Scanner Glass)
Up to 1200  600 dpi (optical) (ADF) (MFC-J410 and
MFC-J415W only)
Scanning Speed
Monochrome: up to 3.44 sec.
Colour: up to 4.83 sec.
(A4 size at 100  100 dpi)
Scanning Width
Up to 210 mm
Scanning Length
Up to 291 mm
Greyscale
256 levels
1
For the latest driver updates for the Mac OS X you are using, visit us at http://solutions.brother.com/
2
Windows® XP in this User’s Guide includes Windows® XP Home Edition, Windows® XP Professional, and Windows®
XP Professional x64 Edition.
3
Maximum 1200  1200 dpi scanning when using the WIA Driver for Windows® XP, Windows Vista® and Windows® 7
(resolution up to 19200  19200 dpi can be selected by using the Brother scanner utility).
98
Specifications
Printer
D
Resolution
Up to 1200  6000 dpi
Printing Width
204 mm [210 mm (borderless) 1] 3
Borderless
A4, Letter, A6, Photo 10  15 cm, Index Card
127  203 mm, Photo 2L 13  18 cm,
Postcard 1 100  148 mm 2
1
When the Borderless feature is set to On.
2
See Paper type and size for each operation on page 18.
3
When printing on A4 size paper.
Interfaces
D
USB 1 2
A USB 2.0 interface cable that is no longer than 2 m.
Wireless LAN
(MFC-J265W and
MFC-J415W only)
IEEE 802.11b/g (Infrastructure/Ad-hoc Mode)
1
Your machine has a full-speed USB 2.0 interface. This interface is compatible with Hi-Speed USB 2.0; however, the
maximum data transfer rate will be 12 Mbits/s. The machine can also be connected to a computer that has a USB 1.1
interface.
2
Third party USB ports are not supported.
D
99
Computer requirements
D
SUPPORTED OPERATING SYSTEMS AND SOFTWARE FUNCTIONS
Computer Platform &
Operating System Version
Windows®
Operating
System 1
Supported
PC
PC Software
Interface
Functions
Processor
Minimum
Speed
Minimum Recommended
RAM
RAM
Hard Disk Space to install
For
Drivers
For
Applications
Windows® 2000
Professional 5
Printing,
PC Fax
Windows® XP Home 2 5
Windows® XP
Professional 2 5
Send 4,
128 MB
110 MB 340 MB
Scanning, (MFC-J265W and
Removable MFC-J415W only)
Disk 6
64-bit (Intel®64 or
256 MB 512 MB 110 MB 340 MB
AMD64) supported CPU
Windows® XP Professional
x64 Edition 2
USB,
Intel® Pentium® II
Wireless or equivalent
802.11b/g
64 MB
Intel® Pentium® 4
or equivalent
64-bit (Intel®64
or AMD64)
supported CPU
512 MB
Windows Vista® 2
Windows® 7 2
Windows Server® 2003
(print only via network)
Printing
Windows Server®
2003 x64 Edition
(print only via network)
Wireless Intel® Pentium®III
802.11b/g or equivalent
Intel® Pentium®III
or equivalent
Windows Server®
2003 R2 x64 Edition
(print only via network)
64-bit (Intel®64
or AMD64)
supported CPU
Windows Server®
2008 (print only via
network)
Intel® Pentium® 4
or equivalent 64-bit
(Intel®64 or AMD64)
supported CPU
Windows Server® 2008
R2 (print only via network)
64-bit (Intel®64 or
AMD64) supported CPU
Mac OS X 10.6.x
1 GB
600 MB 530 MB
1 GB
1 GB
(32 bit) (32 bit)
2 GB
2 GB
(64 bit) (64 bit)
650 MB 530 MB
256 MB 512 MB
50 MB
N/A
80 MB
400 MB
®
(MFC-J265W and 64-bit (Intel 64
MFC-J415W only) or AMD64)
supported CPU
Windows Server® 2003
R2 (print only via network)
Macintosh Mac OS X
Operating 10.4.11, 10.5.x
System
256 MB 110 MB 340 MB
Printing,
PC Fax
Send 4,
Scanning,
Removable
Disk 6
PowerPC G4/G5
USB 3,
Wireless Intel® Core™
802.11b/g Processor
(MFC-J265W and Intel® Core™
MFC-J415W only) Processor
512 MB
1 GB
2 GB
512 MB
1 GB
1 GB
2 GB
Conditions:
1
2
3
4
5
6
100
Microsoft® Internet Explorer® 5.5 or greater.
For WIA, 1200  1200 resolution. Brother Scanner
Utility enables to enhance up to 19200  19200 dpi.
Third party USB ports are not supported.
PC Fax supports black and white only.
PaperPort™11SE supports Microsoft® SP4 or higher
for Windows® 2000 and SP2 or higher for XP.
(MFC-J410 and MFC-J415W only)
Removable disk is a function of PhotoCapture Center™.
For the latest driver updates, visit us at
http://solutions.brother.com/
All trademarks, brand and product names are the
property of their respective companies.
Specifications
Consumable items
D
Ink
The machine uses individual Black, Yellow, Cyan and Magenta ink
cartridges that are separate from the print head assembly.
Service Life of Ink
Cartridge
The first time you install a set of ink cartridges the machine will use
an amount of ink to fill the ink delivery tubes for high quality
printouts. This process will only happen once. After this process is
complete the cartridges provided with your machine will have a
lower yield than standard cartridges (65%). With all following ink
cartridges you can print the specified number of pages.
Replacement
Consumables
<Black> LC985BK, <Cyan> LC985C,
<Magenta>LC985M, <Yellow> LC985Y
Black - Approximately 300 pages 1
Yellow, Cyan and Magenta - Approximately 260 pages 1
1
Approx. cartridge yield is declared in accordance with ISO/IEC 24711.
For more information about the replacement consumables, visit us
at http://www.brother.com/pageyield
What is Innobella™?
Innobella™ is a range of genuine consumables offered by Brother.
The name "Innobella™" derives from the words "Innovation" and
"Bella" (meaning "Beautiful" in Italian) and is a representation of the
"innovative" technology providing you with "beautiful" and "long
lasting" print results.
When you print photo images, Brother recommends Innobella™
glossy photo paper (BP71 series) for high quality. Brilliant prints are
made easier with Innobella™ Ink and paper.
D
101
Network (MFC-J265W and MFC-J415W only)
Note
For details about the full Network specifications, see the Network User’s Guide.
LAN
You can connect your machine to the network for Printing, Scanning,
PC Fax Send, and access to photos from PhotoCapture Center™ 1.
Also included is Brother BRAdmin Light 2 Network Management
software.
Wireless Network
Security
SSID (32 chr), WEP 64/128 bit, WPA-PSK (TKIP/AES),
WPA2-PSK (AES)
Setup Support Utility
AOSS™
Yes
WPS
Yes
1
See the Computer Requirements chart on page 100.
2
If you require more advanced printer management, use the latest Brother BRAdmin Professional utility version that is
available as a download from http://solutions.brother.com/
102
D
E
Index
E
A
D
ADF (automatic document feeder) ...........20
Answering machine (TAD) .......................31
connecting ............................................32
Apple Macintosh
See Software User's Guide.
Automatic
fax receive ............................................25
Fax Detect .........................................28
Dialling
a pause ................................................ 39
Caller ID history .................................... 38
manual ................................................. 36
Outgoing Call ....................................... 37
Speed Dial ............................................ 36
Document
loading ............................................ 20, 21
B
E
Brother
CreativeCenter ........................................3
Envelopes ............................. 11, 12, 18, 19
Error messages on LCD .......................... 57
B&W Print Only .................................... 57
Cannot Detect ...................................... 58
Cannot Print ......................................... 58
Comm. Error ......................................... 58
Cover is Open ...................................... 58
Data Remaining ................................... 58
Document Jam ..................................... 58
Ink Absorber Full .................................. 59
Ink Absorber NearFull .......................... 59
Ink Low ................................................. 59
No Ink Cartridge ................................... 59
No Paper Fed ....................................... 60
Not Registered ............................... 36, 60
Out of Memory ..................................... 60
Paper Jam ............................................ 60
Unable to Clean ................................... 60
Unable to Init. ....................................... 60
Unable to Print ..................................... 60
Unable to Scan ..................................... 60
Extension telephone, using ............... 34, 35
External telephone, connecting ............... 33
C
Caller ID ...................................................29
Caller ID history ....................................38
Cleaning
paper pick-up roller ...............................54
print head ..............................................55
scanner .................................................53
Connecting
external TAD
(answering machine) ..................... 31, 32
external telephone ................................33
Consumable items .................................101
Control panel overview ..............................4
ControlCenter
See Software User's Guide.
Copy
paper size .............................................42
paper type .............................................42
using scanner glass ..............................20
Cordless telephone ..................................35
Custom telephone features on a single
line ...........................................................70
103
F
J
Fax codes
changing ...............................................35
Remote Activation Code .......... 28, 33, 35
Remote Deactivation Code ............ 33, 35
using .....................................................35
Fax Detect ................................................28
Fax, from PC
See Software User's Guide.
Fax, stand-alone
receiving ................................................25
difficulties .................................... 68, 69
F/T Ring Time, setting ........................27
Fax Detect ..........................................28
from extension telephone ............ 33, 35
Ring Delay, setting .............................27
telephone line interference .................73
sending .................................................22
difficulties ...........................................69
telephone line interference .................73
Fax/Tel mode
answering at extension
telephones ..................................... 33, 35
Remote Activation Code ................ 33, 35
Remote Deactivation Code ............ 33, 35
Ring Delay ............................................27
Jacks
EXT
External telephone ............................ 33
Jams
document .............................................. 62
paper .................................................... 63
L
LCD (Liquid Crystal Display) ................... 75
Brightness .............................................. 8
M
G
Macintosh
See Software User's Guide.
Maintenance, routine
replacing ink cartridges ........................ 51
Manual
dialling .................................................. 36
receive .................................................. 25
Mode, entering
Copy ....................................................... 4
Fax ......................................................... 4
PhotoCapture ......................................... 4
Scan ....................................................... 4
Multi-line connections (PBX) ................... 32
Greyscale .......................................... 95, 98
N
H
Help
LCD messages .....................................75
Menu Table ...........................................76
Network
Printing
See Network User's Guide.
Scanning
See Software User's Guide.
I
O
Ink cartridges
ink dot counter ......................................51
replacing ...............................................51
Innobella™ .............................................101
Out of Area (Caller ID) ............................. 29
104
P
Q
Paper ................................................ 16, 94
capacity .................................................19
loading ............................................. 9, 11
loading envelopes and postcard ...........11
printable area ........................................14
size .......................................................15
size of document ...................................20
type ................................................ 15, 18
PaperPort™11SE with OCR
See Software User's Guide. See also Help
in the PaperPort™11SE application.
PhotoCapture Center™
from PC
See Software User's Guide.
Memory Stick PRO™ ............................43
Memory Stick™ ....................................43
Preview photos .....................................46
Print settings
Quality ................................................46
SD .........................................................43
SDHC ....................................................43
specifications ........................................97
Presto! PageManager
See Software User's Guide. See also Help
in the Presto! PageManager application.
Print
difficulties ....................................... 66, 68
paper jams ............................................63
printable area ........................................14
resolution ..............................................99
specifications ........................................99
Printing
on small paper ......................................13
See Software User's Guide.
Programming your machine .....................75
Quick Dial
Group dial
changing ............................................ 40
Search .................................................. 36
Speed Dial
changing ............................................ 40
setting up by 2-digit location .............. 39
using .................................................. 36
R
Receive Mode
External TAD ........................................ 25
Fax Only ............................................... 25
Fax/Tel ................................................. 25
Manual ................................................. 25
Redial/Pause ........................................... 37
Remote Setup
See Software User's Guide.
Resolution
copy ...................................................... 96
fax ........................................................ 95
print ...................................................... 99
scan ...................................................... 98
Ring Delay, setting .................................. 27
S
Scannable area ....................................... 21
Scanning
See Software User's Guide.
Serial Number
how to find ...............See inside front cover
Speed Dial
changing ............................................... 40
setting up .............................................. 39
using ..................................................... 36
105
E
T
TAD (telephone answering device),
external ............................................. 25, 31
connecting ...................................... 31, 32
receive mode ........................................25
recording OGM .....................................32
Telephone line
connections ...........................................32
difficulties ..............................................68
interference ...........................................73
multi-line (PBX) .....................................32
type .......................................................30
Text, entering ...........................................91
special characters .................................91
Transferring your faxes or
Fax Journal report ....................................61
Transparencies ...........................16, 19, 94
Troubleshooting .......................................66
document jam .......................................62
error messages on LCD ........................57
if you are having difficulty
copying ...............................................70
document jam ....................................62
incoming calls ....................................70
Network ..............................................72
PhotoCapture Center™ .....................71
printing ...............................................66
printing received faxes .......................68
receiving faxes ...................................69
scanning .............................................70
software .............................................71
telephone line or connections ............68
paper jam ..............................................63
V
Volume, setting
beeper .....................................................7
ring ..........................................................7
speaker ...................................................8
W
Windows®
See Software User's Guide.
Wireless Network
See Quick Setup Guide and Network
User's Guide.
106
Visit us on the World Wide Web
http://www.brother.com
This machine is approved for use in the country of purchase only. Local Brother companies or their
dealers will only support machines purchased in their own countries.