1
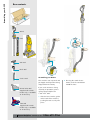
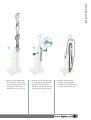
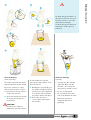
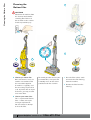
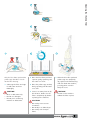
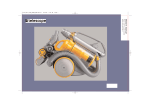
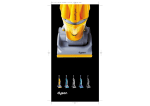
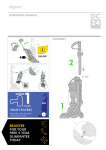
Owner’s Manual
Please read this guide carefully before use.
Important safety instructions
Please read this guide carefully
before use.
Assembling your DCO7
4
Using your DCO7
6
Using the tools
Page 2
8
TM
Emptying the clear bin
10
Cleaning the lifetime filter
12
Where to look for blockages
14
Warranty and customer care
16
Dyson Helpline contact us on
Contents
Owner’s Manual
1-866-693-9766
3
Assembling your DCO7
Box contents
Wand
Hose
2
1
Stair tool
Brush tool
Assembling your DCO7
Crevice tool
This machine was inspected and
packaged carefully before being
shipped from the factory.
Animal turbo tool
Supplied with certain
models only, or available
as an accessory.
Floor tool
Supplied with certain
models only, or available
as an accessory.
4
If you need assistance during
assembly or operation, please
call the Dyson Helpline on
1- 866 - 693 - 9766.
1 Slide the hose into the guides
at the back of the machine,
pushing the tab securely into
place.
Dyson Helpline contact us on
1-866-693-9766
2 Pressing the wand release
button, slide the wand down
inside the hose.
Assembling your DCO7
3
3 Slide the wand into the top
of the machine until it clicks
securely into place. You may
need to press firmly and
should hear a ‘click’ sound.
4
4 Push the brush and stair tools
securely into the storage holes
on either side of machine.
Fit the crevice tool into the tool
clip on the back of the wand.
5
5 Store the cord safely by
winding counter-clockwise
around the cord winders and
securing with the cord clip.
5
Using your DCO7
Using your DCO7
WARNING
• To reduce the risk of electric
shock and personal injury,
this appliance has a polarized
plug (one blade wider than
the other). This plug will fit in
a polarized outlet only one
way. If the plug does not fit
fully in the outlet, reverse the
plug. If it still does not fit,
contact a qualified electrician
to install the proper outlet.
Do not force the plug into
the outlet. Do not alter the
plug in any way.
1
CAUTION
• Keep hair, loose clothing,
fingers, and all parts of the
body away from openings
and moving parts.
• This machine is fitted with
a belt protection system.
If any item becomes caught
in the brushbar (e.g. rug
fringe), you will hear a loud
‘ratchet’ warning noise.
To rectify, turn the machine
off, disconnect from the
electrical outlet and clear
any obstruction (see page 15),
checking that the brush control
is set to the correct position
for the floor surface before
re-starting the machine.
Please note: This machine is
intended for domestic use only.
Fine dust such as plaster dust or
flour should only be vacuumed
in small amounts.
2
3
Switching on/off
1 Make sure you have read
and understood all safety
instructions before using the
machine for the first time.
The wand cap should be
closed when not using the
tools.
2 Plug into electrical outlet and
press the on/off switch.
6
Dyson Helpline contact us on
1-866-693-9766
3 To start vacuuming, push the
front of the cleaner head down
with your foot and tilt the
handle backwards.
Using your DCO7
1
2
Transporting your Dyson
Carrying your DCO7
Brush control system
To move the machine from room
to room, ensure it is upright,
with the cord stored on the cord
winders and the wand securely
in place. Tilt back on the rear
wheels and push forward.
Your DCO7 should be lifted by
using the carry handle.
Ensure the machine is in an
upright position before adjusting
the setting.
CAUTION
• Do not shake the machine
when carrying.
• For your safety do not press
the cyclone release catch
when carrying your machine.
1 Bare floors
Brushbar does not turn for
delicate rugs and hard/bare
floors.
2 Carpets
Brushbar turns for normal
carpet cleaning.
Please note: The brushbar will not
turn until you begin to vacuum.
7
Using the tools
Using the tools
A
Choosing the right tool
The tools allow you to clean
surfaces above the floor and
to reach hard to clean areas.
Ensure the machine is in an
upright position before using
tools.
B
A Brush tool – with soft bristles
to dislodge dust and cobwebs.
The brush head twists to make
cleaning easier.
2
B Stair tool – with velour strips
to pick up hairs and an
agitating edge to lift the
carpet. The tool channels
airflow downward for better
pick-up without sticking to
upholstery. The head twists
to make cleaning easier.
C
1
C Crevice tool – reaches deep
into nooks and crannies.
Ideal for cleaning along
baseboards and in tight
corners. The tool channels
airflow downward for better
pick-up without sticking.
D Animal turbo tool – the air
powered brushbar ensures
effective removal of pet hair
and fibers in confined spaces
such as stairs, upholstery
and in the car. Supplied with
certain models only, or
available as an accessory for
other models – contact the
Dyson Helpline or
www.dyson.com to order.
E Floor tool – to reach under
furniture. Adjustable for hard
floors or carpets. Maintains
perfect contact with the floor
to optimize pick-up. Supplied
with certain models only, or
available as an accessory
for other models – contact
the Dyson Helpline or
www.dyson.com to order.
8
D
E
How to clean your tools
Attaching tools
The brush tool, stair tool and
crevice tool may be washed in
warm water with a detergent.
Rinse and air dry thoroughly
before using. You may wipe the
outside of the floor tool or turbo
tool with a damp cloth, but do
not submerge in water. Do not
attempt to clean any tools when
they are attached to the machine.
1 Press the quick-draw hose
release to detach the hose/
wand from the machine.
Dyson Helpline contact us on
2 Slide the wand to the end of
the hose.
All Dyson tools can be used
in the following ways:
Wand mode
Slide back the wand cap and fit
one of the tools directly on to the
wand handle.
1-866-693-9766
Using the tools
Hose mode
Reversed wand mode
Stair cleaning
Press the wand release button and
remove the wand. Fit one of the
tools directly on to the end of
the hose. Use tools for confined
spaces such as car cleaning.
Reverse the wand and click into
the end of the hose, pressing
the wand release button to
ensure a correct fit. Fit one of
the tools on to the end of the
wand. Use tools for easier
handling in hard to reach areas.
Use the hose and stair tool or
turbo tool for stair cleaning. The
hose will stretch all the way to
the top of an average staircase
so you can leave your machine
at the bottom.
FOR YOUR SAFETY
• When the hose is fully
extended, grasp firmly by
the hose, not the tool.
CAUTION
• To avoid personal injury and
to prevent the machine from
falling when cleaning stairs,
always place it at the bottom
of the stairs.
9
TM
Emptying the clear bin
Emptying the
clear bin
A
TM
CAUTION
A
• Disconnect the machine from
the electrical outlet before
emptying the bin. Failure to
do so could result in electric
shock or personal injury.
B
B
To ensure your machine continues
to clean effectively, the clear bin
must be emptied when the dust
reaches the MAX mark.
Press the cyclone release catch
with your thumb to remove the
clear bin assembly from the
machine.
10
Clear bin emptying option 1
Clear bin emptying option 2
Recommended for asthma/allergy
sufferers.
A Pull the trigger to release dust
directly into a garbage can or
wastebasket. Shake or tap
firmly to remove all dust from
inside the fine dust collector.
Wipe the outside of the clear bin
with a damp cloth.
A Place the bin inside a bag,
close the bag around the bin
and pull the trigger to release
dust. Shake or tap firmly to
remove all dust from inside
the fine dust collector.
Fine dust collector
B Let the dust settle, then press
firmly on the center of the bin
base to close before removing
from the bag. Seal the bag
carefully and replace the bin.
B Press firmly on the center of
the clear bin base to close.
Dyson Helpline contact us on
1-866-693-9766
C
The British Allergy Foundation is a
UK national charity with the aim of
improving awareness, prevention
TM
and treatment of allergies.
The British Allergy Foundation Seal
of Approval is a UK registered
trademark.
B
D
Shroud cleaning
(when necessary)
To remove any build-up of lint or
large dust particles on the shroud:
Ensure the clear bin is empty
and the clear bin base is open.
A Press the bin release catch to
remove the clear bin.
B Clean the shroud with a cloth
or dry brush to remove the
lint and dust.
To reassemble the clear bin,
place on the floor with the clear
bin base closed.
C Holding the carry handle, put
the cyclone assembly inside the
clear bin, line up the front and
rear catches and push down
to click the catches into place.
D Ensure the clear bin is
secure before replacing on
the machine.
Emptying the clear bin
A
Clear bin cleaning
(optional)
• You may rinse the clear bin
with water. Rinse only the
clear bin – do not rinse the
inner cyclone, shroud or cones.
• Do not use detergents.
• Do not immerse any other
part of the machine in water.
• Ensure the clear bin is
completely dry before
replacing.
CAUTION
• Do not use the machine
without the clear bin in place.
11
Cleaning the lifetime filter
Cleaning the
lifetime filter
1
CAUTION
• Disconnect the machine from
the electrical outlet before
removing filter. Failure to
do so could result in electric
shock or personal injury.
2
B
A
A Lifetime pre-motor filter
Rinse at least once every six
months in accordance with
the instructions opposite.
If machine is regularly used
for vacuuming very fine dust
such as plaster dust or carpet
fresheners, you may need to
rinse more often.
To remind you when to rinse your
pre-motor filter, circle your two
6-monthly rinses on the sticker
provided under the clear bin.
B Lifetime post-motor filter
This is a permanent lifetime
filter – it does not require
rinsing or replacement.
Do not remove or attempt
to rinse this filter.
12
Dyson Helpline contact us on
1-866-693-9766
1 Press the filter release catch
to remove the filter housing
from the machine.
2 Remove the filter from the
housing.
Cleaning the lifetime filter
4
5
6
3
7
2
1
Only the blue foam pad and the
yellow cage should be rinsed –
not the filter housing.
4 Rinse the blue foam pad and
squeeze gently, repeating until
the water runs clear.
3 Submerge the filter and cage
in cold water and rinse
thoroughly.
5 Rinse the yellow cage and tap
firmly, repeating until the water
runs clear.
CAUTION
• Rinse in cold water only.
• Do not use detergent.
• Do not put in a washing
machine or dishwasher.
6 Leave in a warm place to dry
for 12 hours. Make sure the
filter is completely dry before
replacing in the machine.
7 When the blue filter pad and
yellow cage are completely
dry, replace in the filter housing
and click back into machine,
pressing points 1 and 2
firmly to secure.
CAUTION
• Do not use the machine
without the filter in place.
CAUTION
• Do not dry in an oven or
microwave.
• Do not dry in a clothes dryer.
• Do not dry near an open
flame.
13