1
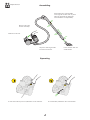
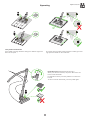
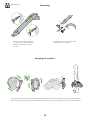
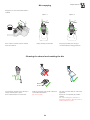
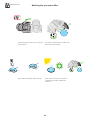
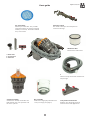
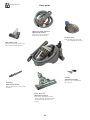
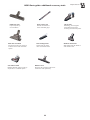
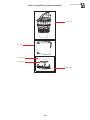
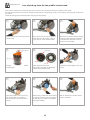
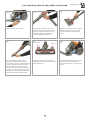
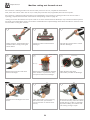
dyson stowaway
The full size cylinder with hygienic bin emptying
helpline manual
helpline manual
Contents
Page
Features and benefits
3
Assembling and Operating
4
Carrying the machine
6
Bin emptying and Cleaning the shroud and washing the bin
7
Washing the pre-motor filter
8
Parts guide
9
Parts recognition (exploded diagrams)
12
Airflow
16
Filtration
16
Helpline diagnostics
The Dyson 5 year guarantee
17
24
Features and benefits
The full-size cylinder with hygienic bin emptying
Root Cyclone technology™ + core separator
Doesn’t lose suction and captures more microscopic dust than any other.
Doesn’t lose suction and captures
more microscopic dust.
Cleaner exhaust air
Air expelled from a Dyson has up to 150 times less mould and bacteria than the
air you breathe.
root cyclone
Lifetime HEPA filter
Ideal for allergy sufferers.
core separator
*More airwatts
An extra 100 airwatts. Allows a bigger cleaner head for cleaning larger spaces.
*Longer cable
An extra 0.5 metres of cable. Clean a wider area without unplugging.
*Bigger bin
An extra 0.8 litres of bin capacity, so you don’t have to empty it so often.
*Compared to DC22
Shroud
Combines Root Cyclone™ technology
with a core separator - an extra
cyclonic stage between the outer and
inner cyclones - to separate particles
as small as 0.5 micron from the
airflow.
Hygienic bin emptying
No need to touch the dirt just
push the button.
Low profile contact head
Enables more thorough cleaning
under furniture and appliances.
Telescope Wrap system
Hose and wand compress and
wrap for easy storage.
Sits on the stairs
Follows you up the stairs as you
clean them.
helpline manual
Assembling
Extend telescopic wand handle
ensuring both sections lock in place.
(NB. The length of the telescopic
wand handle is not adjustable.)
Attach cyclone top
and bin assembly.
clik
Slide hose into inlet.
clik
clik
clik
Clip hose retaining bracket
into front of machine.
Insert the floor tool into
wand handle.
Operating
To start the machine press on/off button on the machine.
To rewind cable, hold down the rewind button.
4
Operating
Low profile contact head
Press pedal to change between settings for delicate rugs/hard
floors and carpets.
helpline manual
To prevent the low profile contact head from sticking to loose
rugs open the bleeds on the underside.
Power floor tool. (Motorhead variant only.)
When you start the machine, the power floor tool is set
to the brush ON mode.
For delicate surfaces press the pedal to turn the brush
bar off.
To return to brush ON mode, press the pedal again.
5
helpline manual
Operating
clik
clik
Press the suction reduction button
to prevent the wand handle from
sticking to loose fabrics such as
curtains.
Accessory tools can be fitted to wand
handle or hose as required.
Carrying the machine
Wrap the hose around the machine and fix the wand handle in place on the side of the cyclone assembly. Place the
floor tool in the parking yoke at the rear of DC23. Always carry the machine by the handle on the cyclone assembly.
6
MAX
MAX
helpline manual
Bin emptying
Empty bin as soon as the MAX mark is
reached.
Option 1
Option 2
MAX
Press catch to release cyclone and bin
from the machine.
Empty directly into dust bin.
Emptying carefully into a bag is
recommended for allergy sufferers.
Cleaning the shroud and washing the bin
To access the shroud, ensure the bin is
empty and bin base is open.
Press release button to remove bin.
Clean shroud with a dry cloth or brush to
remove fluff and debris.
Do not use water.
7
You may rinse the clear bin with water
(optional).
Ensure bin is completely dry before
refitting.
Do not use detergents, polishes or
freshening products. Do not immerse
whole machine in water.
helpline manual
Washing the pre-motor filter
Unplug and place machine on its side for
ease of access.
Turn release catch, lift the pre-filter cover
and remove the pre-filter.
24
24
Rinse and squeeze filter under cold tap.
Allow 24 hours to dry. Ensure filter is
completely dry before refitting into
machine.
8
helpline manual
Parts guide
Pre-motor filter
Lifetime pre-motor filter. The pre-filter
separates particles as small as cigarette
smoke (0.1 microns). Should be washed
every 3-6 months.
1
2
Telescopic wand
The wand is telescopic and compacts for
convenient storage.
HEPA Post filter
Kills bacteria and mould.
3
1. Brush tool
2. Crevice tool
3. Stair tool
Hose
The hose wraps around the machine for
easy storage.
Cyclone assembly
Contains the shroud, which filters out
fluff and hair, the core separator and
the inner cyclones.
Bin assembly
Made from tough polycarbonate and
is easy to empty (see page 7).
9
Low profile contact head
Enables more thorough cleaning
under furniture and appliances.
helpline manual
Parts guide
Telescopic wand and Hose
(Motorhead variant)
The hose wraps around the
machine for easy storage.
Pre-filter cover
Can be easily removed and
refitted. (Supplied with wheel.)
Mini turbine head
Ideal for removing pet hair and
fibres from confined spaces.
End cap
(Motorhead variant)
Can be sent out and fitted
by customer.
Brush bar
(Motorhead variant)
Can be taken out to remove hair
and fibre.
Power floor tool
(Motorhead variant)
Uses direct drive belt that never
needs replacing. Powerful bristles
remove dirt and pet hair from
carpet.
10
DC23 Parts guide: additional accessory tools
Hard floor tool
Improved pick-up
on hard floors.
Mini Flat-out Head
Compact and low for cleaning
under furniture and awkward
spaces.
Car turbine head
Rotating bristles improve pick-up
of pet hair in confined spaces.
Flexi crevice tool
Extends and flexes to
clean awkward gaps.
Soft dusting brush
Soft bristles to gently
dust around the home.
Mattress tool
Removes dirt and dust mites from
mattresses and upholstery.
11
helpline manual
Up top tool
Revolving, multi-angular
head designed to ease
cleaning in awkward spaces.
Stubborn dirt brush
With stiff bristles for dried-in
and stubborn dirt.
helpline manual
Parts recognition: Main body
Cable Rewind Actuator
Spring
On/Off Actuator
Switch
Spring
Screw
Switch Housing
Cable
Rewind
Assy
Cyclone Release Catch
Spring
Screw
Cyclone Release Catch Housing
Upper
Chassis
Rear Hose Guide
Screw
Tool Storage
Screw
Park Yoke (Motorhead)
Cyclone Inlet
(Passive)
Cyclone Inlet
(Motorhead)
Park Yoke
Duct Cover Seal
Cyclone
Exhaust Seal
Screw
Screw
Duct Cover
Screw
Motor Bucket Assy
Wheel
Assy
Main
Chassis
Post Filter Seal
Post Filter Assy
Post Filter
Exhaust Seal
PCB Assy
Castor
Body
Castor
Roller
Pre-Filter
Housing Assy
Pre-Filter
Assy
Axle
Screw
Motor Wiring Assy
Bleed Valve Housing
O-Ring
Bleed Valve Cap Assy
Bleed Valve Spring
Screw
Pre-Filter Door Assy
Wheel Assy
12
Parts recognition: Cyclone assembly
helpline manual
Cyclone Assy
Bin Assy
Bin Base Seal
FDC/IDC Seal
Bin Base Assy
13
helpline manual
Parts recognition: Wand and hose
Screw
Stubborn Dirt
Brush Assy
Wand Handle
Cover
Wand Handle
Universal Fit
Adaptor
Screw
Flexi Crevice
Tool Assy
Screw
Universal Fit
Adaptor
Power Wand
Hose Assy
Hard Floor
Tool Assy
Wand Cuff Cover
Screw
Mini Turbine
Head Assy
Wand Handle
Assy
MTH End
Cap Assy
Swivel Catch
Spring
MTH Brushbar Assy
Instruction Pack
Swivel Catch
Spring
Turbine
Head Assy
Screw
Brushbar
Assy
Hose Assy
Soleplate
Assy
Fastener
Crevice Tool
Low Profile
Contact Head
Brush Tool
Axle
Stair Tool
Soleplate
Wheel
14
Parts recognition: Motor head floor tool
helpline manual
Screw
Gimble Cover
Axle
Brushbar Actuator
Washer
Spring
Glamour Cap
Stow Microswitch Cam
E-Clip
Screw
Outer Wheel Hub
Stow Neck Cover
Stow Wheel
Internal Hose Assy
Axle
End Cap
Assy Right
Brushbar Motor
Brush Housing
Brushbar Motor
End Mount
Ropeseal
Screw
Ropeseal
Brushbar Microswitch
Floor Tool
Bumper Strip
Brushbar Motor Mount Front
Brushbar Motor Cover Lower
Brushbar Assy
Screw
End Cap Assy Left
Soleplate
Wheel
Soleplate Assy
Screw
Axle
Power Floor Tool Assy
15
helpline manual
DC23 Airflow
This section illustrates the direction of airflow through DC23.
The dirty air flows through the wand and hose and then continues up the inlet and into the clear bin.
The filtration process starts in the clear bin. Larger debris is separated from the airflow. The air is then directed through the shroud
and up through the core separator and on into the smaller cyclones in the cyclone top. The air then travels down the exhaust
duct before continuing through to the pre-motor filter and into the motor housing and up through the post-motor filter, where it is
exhausted into the atmosphere, thoroughly clean.
DC23 Filtration
DC23 has a 6-stage filtration process:
1. O
uter cyclone: as the air enters the clear bin, large dirt and debris is separated from
the airflow.
2. S
hroud: the air is then directed up through the shroud, which acts as a fluff and hair
separator.
3. C
ore separator: small/fine dust particles are then separated from the airflow in the
core separator.
4. Inner cyclones: smaller/microscopic dust particles are then separated from the airflow
in the inner cyclones. The air flows out of the cyclone assembly and into the duct, before
reaching the pre-motor filter.
5. P
re-motor filter: traps the last remaining particles of microscopic dust, allowing only
clean air to pass through.
6. P
ost-motor filter: lastly, as the clean air passes through the motor, it collects carbon
dust particles from the motor brushes. The post-motor filter traps these particles before
the air is then exhausted back into the atmosphere, thoroughly clean.
4
3
2
1
5
Lifetime pre-motor filter. The prefilter separates particles as small
as cigarette smoke (0.1 microns).
Should be washed every 3-6
months.
6
Lifetime HEPA post-motor filter.
Never needs washing or replacing.
16
Helpline diagnostics
helpline manual
This section is a Helpline Operators guide to DC23 fault diagnostics and a checklist of procedures that should be carried out before
booking a repair.
In some cases, DC23 can be easily repaired over the telephone. If a customer reports any of the following faults listed below, go to
the relevant page number.
Always make sure you ask the customer to unplug the machine before carrying out any maintenance or checks (unless otherwise
specified).
Contents
Page
Loss of pick-up from the low profile contact head
18
Power floor tool brush bar not operating
20
Turbine head brush bar not operating
21
Machine cutting out: thermal cut-out
27
Unusual noises and smells
27
Power failure
28
Important advice
CAUTION: If the fault is related to
any electrical or mechanical issues,
please ask the customer not to use
the machine until a repair has been
carried out.
17
helpline manual
Loss of pick-up from the low profile contact head
Carry out these checks if the customer reports low suction or loss of pick-up from the low profile contact head.
For turbine head variants carry out the ‘Turbine head brush bar not operating’ checks on p.21 before continuing with checks from
this section.
Switch off and unplug the machine before carrying out these checks:
1
2
Remove hose from the inlet and switch
machine ON.
4
Cyclone exhaust
3
Test suction from the inlet. If suction is
weak continue with checks, if strong
go to step 10. Switch machine OFF.
5
Intermediary
Remove the cyclone and bin assembly.
Check bin and cyclone for blockages
or obstructions and make sure the
shroud is clear of debris.
6
Bin entry
FDC
Seal
Check bin entry and cyclone exhaust
for blockages.
7
Open the pre-filter cover by turning
the release catch. (The machine
can be placed on its side for easier
access.)
Open bin base and check
intermediary and FDC for blockages.
Check seal is fitted correctly.
8
Check duct for blockages in the area
shown.
9
Remove the pre-filter. Ask the customer
to wash if necessary (when the call has
ended). Ensure pre-filter is completely
dry before refitting.
18
Ask the customer to refit the cyclone
and bin assembly.
Loss of pick-up from the low profile contact head
helpline manual
10
11
12
Refit hose back into the inlet.
Separate the hose from the wand
handle. Switch machine ON and test
suction from the end of the hose. If
weak this indicates a blockage or
possible damage to the hose.
Reconnect the hose. Switch machine
OFF and separate the low profile
contact head from the telescopic
wand.
13
14
15
Bleed tab
Ensure that both sections of the
telescopic wand are fully extended
and locked into place. Check length of
wand for damage. Check the suction
release button for damage. Switch
machine ON and test suction from the
end of the wand. If weak this indicates
a blockage or possible damage to the
wand handle. Switch machine OFF.
Bleed tab
Check low profile contact head for
blockages or damage. Check position
of the bleed tabs.
19
Reassemble the machine and switch
ON. If the machine operates as
normal end the call. If not arrange a
repair.
helpline manual
Power floor tool brush bar not operating
The brush bar on DC23 Motorhead is powered by its own motor.
The brush bar will stop rotating if it becomes obstructed. If the customer is advising that the brush bar is not operating or rotating,
this maybe due to the brush bar motor cut-out. The brush bar motor will operate immediately, once the obstruction is cleared and
the power floor tool reset.
1
2
Ask the customer to plug the machine
in and switch ON.
4
3
Ask the customer to check if the
brush bar is spinning. If spinning and
customer is happy, end the call. If not
ask customer to switch machine OFF
and continue with these checks.
5
Press the release catch and separate
the telescopic wand from the power
floor tool.
6
Pins
Connector
Check that the pins on the power floor
tool are not broken or bent and the
connector on the telescopic wand is
not damaged.
7
Check that the pins on the hose are
not broken or bent and the connector
on the inlet is not damaged.
8
Undo fasteners with a coin and
remove both end caps.
9
Stow micro-switch
Remove both brush bar sections and
clear any hair/fibre. Check power floor
tool for blockages.
Check the stow micro-switch is not
broken or obstructed.
20
Ask the customer to refit the brush bar
and end caps. Switch machine ON,
press brush bar ON/OFF button and
test. If customer is happy end the call.
If not arrange a repair.
Turbine head brush bar not operating
helpline manual
The brush bar will stop rotating if it becomes obstructed. The brush bar will operate immediately, once the obstruction is cleared.
1
2
3
Inlet seal
Plunger
Press the release catch and remove
the turbine head. Ask the customer
to check the suction on the end of the
wand handle. If weak go to section 1
on p.18, if strong continue with these
checks.
4
Pull the brush bars out from the
turbine head. Using scissors, carefully
cut away any hair or threads from the
brush bar.
7
Refit the soleplate and secure locking
tab.
Turn machine OFF and remove turbine
head. Check inlet plunger for dust/
debris. Check inlet seal for damage.
Undo both soleplate fasteners, release
the locking tab. Lift and remove the
soleplate.
6
5
Check the turbine duct for blockages.
Check the metal spindles are rotating
freely.
8
Position the brush bars back into the
turbine ensuring the arrows on the
brush bars are aligned with the arrow
on the shaft.
9
Check that the soleplate is fitted flush
against the housing with no visible
gap.
21
Ask the customer to plug machine in
and test that brush bar is spinning and
the plunger is working. If not working
send new turbine head.
helpline manual
Machine cutting out: thermal cut-out
If the customer is advising that the main vacuum motor power has cut-out*, complete the checks below.
Note, if the main vacuum motor has cut-out, it is likely the power floor tool (if applicable) will continue to operate.
If the customer is advising that the power floor tool (if applicable) is not operating or rotating (but the main vacuum motor is
operating), complete the ‘Power floor tool brush bar not operating’ checks on page 20.
*Cutting out is when the machine loses power whilst in use. If the machine becomes blocked, it may overheat and will stop due to
a thermal cut-out (fitted to the motor). The customer should follow the simple blockage checks below and allow a minimum of 30
minutes before re-using their machine.
1
Unplug machine. Separate telescopic
wand from floor tool by pressing the
release button.
4
3
2
Check low profile contact head for
blockages.
Cyclone exhaust
5
Separate the wand and hose. Check
wand for blockages.
6
Intermediary
Bin entry
FDC
Remove hose from inlet and check
hose for blockages.
7
Check duct for blockages in the areas
shown.
Remove the cyclone and bin assembly
from machine. Inspect the bin entry
and cyclone exhaust for blockages.
8
Open bin base and check
intermediary and FDC for blockages.
9
Open the pre-filter cover by turning
the release catch. (The machine
can be placed on its side for easier
access.)
22
Remove the pre-filter. Ask the customer
to wash if necessary (when the call has
ended). Ensure pre-filter is completely
dry before refitting. If machine is still
not working arrange a repair.
helpline manual
Power failure
Before completing these checks, it is important to determine whether or not the thermal cut-out has activated - was the machine in
use when the power stopped? If so, follow the checks on page 22. Otherwise, carry out these checks if the customer has reported
power failure.
Note: If the customer advises you the machine was working intermittently - cutting in and out in quick bursts, as the machine is moving
back and forth - arrange a repair, as this may indicate a cable problem. Also advise the customer not to use the machine until a
repair has been carried out.
1
2
Ask the customer to
unplug the machine.
5
Make sure the customer’s home has
power. Check trip switch and fuse
box.
6
3
4
Examine the plug thoroughly for
damage or burn marks. Check the
front and back of the plug.
Check the length of the cable for
wear and tear, such as splits or
damage.
Test the socket with a different
appliance.
*UK only. Make sure a 13 amp fuse is fitted. Also
try a 13 amp fuse from a known working appliance.
Note: 5 or 7 amp fuses will blow on initial start up
due to motor current surge.
7
Has water or any other liquid been
picked up which may have caused
electrical problems?
With the exception of the power fuse needing changing or a problem related to the power supply in the customers home, if the fault
is any of the above, arrange a repair.
Note: The Dyson guarantee does not cover wear and tear to the cable and plug, or the pick-up of liquids.
Important advice
CAUTION: If the fault is related to any electrical or mechanical issues, please ask the customer not to use the
machine until a repair has been carried out.
Unusual noises and smells
Carry out the relevant checks if the customer reports any unusual machine noises or smells.
•
•
•
•
If the noise is a loud, grinding sound, (possibly with strong odour), this may indicate a problem with the motor. A repair should
be booked. Advise the customer not to use the machine until after a repair has been carried out. Also check the cleaner head
for obstructions or damage.
If the noise is a high pitched or whistling sound, complete the suction/blockage checks on pages (19-21) before booking a
repair.
If the customer reports a rattling noise, check to make sure that there is nothing rattling around in the clear bin. If the noise
remains, carry out the blockage checks on pages (19-21), before booking a repair.
If the customer reports a strong, electrical type burning smell, book a repair and advise the customer not to use the machine. If
the smell is related to something that may have been picked up, carry out the blockage checks on pages (19-21). Also, ask the
customer to wash the clear bin and pre-filter.
23
helpline manual
Dyson 5 year guarantee
Summary of cover
Terms and conditions of the Dyson 5 year guarantee
•
•
•
•
•
•
The guarantee becomes effective at the date of purchase (or the date of delivery if this is later).
You must provide proof of delivery/purchase before any work can be carried out on your machine. Without this
proof, any work carried out will be chargeable. Please keep your receipt or delivery note.
All work will be carried out by Dyson or its authorised agents.
Any parts which are replaced will become the property of Dyson.
The repair or replacement of your machine under guarantee will not extend the period of guarantee.
The guarantee provides benefits which are additional to and do not affect your statutory rights as a consumer.
What is covered
•
The repair or replacement of your machine (at Dyson’s discretion), if your machine is found to be defective due to faulty
materials, workmanship or function within 5 years of purchase (if any part is no longer available or out of manufacture,
Dyson will replace it with a functional replacement part).
What is not covered
•
•
•
•
•
•
•
•
Normal wear and tear (e.g. Fuse, belt, brush bar, etc.).
Accidental damage, faults caused by negligent use or care, misuse, neglect, careless operation or handling of the machine
which is not in use with Dyson’s user guide.
Blockages - please refer to the user guide for details of how to unblock your machine.
Use of the machine for anything other than normal domestic household purposes.
Use of parts not assembled or installed in accordance with the instructions of Dyson.
Use of parts and accessories which are not Dyson Genuine Components.
Faulty installation (except installation by Dyson).
Repairs or alterations carried out by parties other than Dyson or its authorised agents.
We’ll help you choose the right Dyson and give you any advice and assistance you need when you’re using it. You can contact us
anytime at www.dyson.com or call our team of experts.
24
Technical helpline:
Jai Uthup:
Telephone:
E-mail:
+44 (0)1666 828393
[email protected]
Neil Soutar:
Telephone:
Mobile:
E-mail:
+44 (0)1666 827302
+44 (0)7715 760813
[email protected]
This controlled document contains CONFIDENTIAL information and must not be copied or distributed unless specifically
authorised by the Dyson Technical Service Department. Its content is solely for the use of Dyson personnel or Dyson appointed
representatives.
DC23 Helpline Manual
Produced by Dyson Technical Service.
Issued: February 2008
The Dyson Research Centre, Wiltshire, UK