1
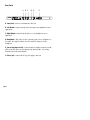
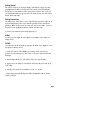
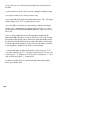
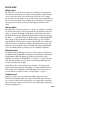
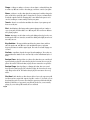
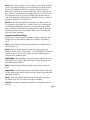
OWNER’S MANUAL
A Harman International Company
The Sound of Your Imagination
The symbols shown above are internationally
accepted symbols that warn of potential hazards with electrical products. The lightning
flash with arrowpoint in an equilateral triangle
means that there are dangerous voltages present within the unit. The exclamation point in
an equilateral triangle indicates that it is necessary for the user to refer to the owner’s
manual.
These symbols warn that there are no user
serviceable parts inside the unit. Do not
open the unit. Do not attempt to service the
unit yourself. Refer all servicing to qualified
personnel. Opening the chassis for any reason will void the manufacturer’s warranty. Do
not get the unit wet. If liquid is spilled on the
unit, shut it off immediately and take it to a
dealer for service. Disconnect the unit during
storms to prevent damage.
DECLARATION OF CONFORMITY
Manufacturer’s Name:
DOD Electronics
Manufacturer’s Address: 8760 S. Sandy Parkway
Sandy, Utah 84070
declares that the product:
Product Name:
VGS50
Product Options:
All
conforms to the following product specifications:
Safety:
EN 60065 (1993)
IEC65(1985) with Amendments 1, 2, 3
EMC:
EN 55013 (1990)
EN 55020 (1991)
Supplementary Information:
The product herewith complies with the requirements of the Low voltage directive 73/23/EEC and the
EMC Directive 89/336/EEC as amended by directive 93/68/EEC.
DOD Electronics
President
8760 S. Sandy Parkway
Sandy, Utah 84070, USA
Effective (9/28/98)
European Contact: Your local DOD Sales and Service or
International Sales Office
8760 S. Sandy Parkway
Sandy, Utah, USA
Tel: (801) 568-7642
Fax: (801) 568-7638
Page I
Table of Contents
Safety Information................I
Declaration of Conformity....I
Table of Contents................. II
Introduction
Congratulations................... 1
Included Items................... 1
Features.............................. 1
Section One
A Guided Tour..................... 2
Front Panel....................... 2
Rear Panel........................ 4
Getting Started.................... 5
Making Connections........... 5
Section Two
About the VGS50..................6
Performance Mode..............6
Selecting a Preset.................6
Data Wheel........................6
Footswitches......................6
Accessing the Tuner............. 7
Learn-A-Lick........................ 7
Section Three
Editing a Preset................... 9
Selecting Effects.................. 9
Editing Parameters............. 9
Creating a Preset................. 9
Storing/Copying.................. 12
Section Four
About the Effects................
Effect Definitions................
Parameters.........................
Resetting the VGS50...........
Pedal Calibration...............
Maintenance.......................
Preset List..........................
Warranty............................
Specifications....................
13
13
15
16
16
16
17
18
18
Page II
Congratulations!
You are now the proud owner of the best sound available in a package this size. The
VGS50 is an extremely powerful tool capable of producing virtually any sound that
you can imagine. It offers real tube distortions, the popular Grunge distortion, and a
host of great sounding digital effects...18 effects in all to choose from. Effects
include: Compression, Distortion, Equalization, Noise Gate, Chorus, Flange, Phaser,
Tremolo, Pitch Shifter, Detuner, Ring Modulator, Pixellator, Enveloped Effects, Pitch
Bending, Wah, Auto Wah, Tape Delay, Pong Delay, Delay and Reverb. The VGS50 also
includes a chromatic tuner, the Learn-a-Lick function and a built in expression
pedal capable of controlling effects in real time.
This Owner’s manual is your guide to getting the most out of your VGS50. Please
read it carefully, to get familiar with the controls of the VGS50. This will ensure
years of audio enjoyment.
Included Items
Your VGS50 was carefully assembled and packaged at the factory. Before proceeding
any further please make sure the following items are included.
• 1 VGS50 Valve Guitar System
• 1 PS750 External Power Supply
• 1 Owner’s Manual
• 1 Warranty Registration Card
Please save all packing materials, and take a moment to fill out the warranty
registration card. It is your safeguard in the unlikely event that your VGS50 needs
servicing. Please use the packing materials to return the unit if necessary.
Features
• 12AX7 Tube
• Built-in Expression Pedal
• 30 User/30 Factory Presets
• Up to Seven Effects at Once
• Stereo Outputs
• Chromatic Tuner
• 18 Different Effects to Choose From...Just add imagination
• Externally Isolated Transformer
• Learn-a-Lick
• Jam-A-Long
Page 1
Section One
A Guided Tour of the VGS50
Front Panel
5
4
3
6
7
8
9
10
11
F
2
1
12
1. Program and Bank Selector Footswitches - These switches provide access
to the VGS50 user presets and the 10 user banks. They are also used to bypass the
VGS50, access the tuner, and perform various functions for the Learn-a-Lick feature.
2. Effect Select Buttons - This row of buttons is used to select or bypass a
specific effect group for each preset. These groups include Master Level, Reverb,
Delay, 11 Modulation Effects, Noise Gate, Equalization, Distortion and Compression.
3. Store Button and LED - After editing a preset, your modifications must be
stored in order for the VGS50 to remember the changes that you made. When you
change any aspect of a preset, the store LED will light indicating that you need to
use the store button to save the change.
4. Clip LED - This LED will light to indicate that the VGS50 is receiving too much
signal. Clipping causes an unwanted distortion in the digital effects. To prevent
clipping from occurring, reduce the program level parameter.
Page 2
5. Display - The LED display serves three functions. In performance mode, the
display will indicate the bank and preset numbers that are currently active. In edit
mode, the display will show the value of the effect or effect group being edited. In
tuner mode, the display will show the input note you are closest to.
6. Tuner/Parameter LEDs - This row of LEDs serves a dual function. While
editing parameters, an LED will light to indicate the parameter being edited. In
tuner mode, these LEDs will indicate whether you are flat or sharp of the displayed
note.
7. Data Wheel - This knob is used to select the preset in performance mode, and
to increase or decrease a parameter value in the parameter edit mode.
8. Parameter Edit Button and LED - This button is used to activate the
Parameter Edit mode. Successive presses will access each parameter of the
currently selected effect group.
9. Valve Active - This icon will light when the tube is being used in a preset.
10. Output Knob - This knob adjusts the overall volume for all presets in the
VGS50.
11. Expression Pedal - This pedal can be assigned to control one of 9 different
parameters in real time for each preset.
12. Pedal Button - This button is used to select the function of the expression
pedal for each preset.
Page 3
Rear Panel
A B C
D E
F
A. Input Jack - Connect your instrument to this jack.
B. Left Output - Connect from this jack to the input of your amplifier for mono
applications.
C. Right Output - Connect from this jack to a second amplifier for stereo
applications.
D. Headphone - This jack is used for connecting a pair of stereo headphones to
the VGS50. The output level knob (10) will control the volume level in the
headphones.
E. Jam-a-long/Learn-a-Lick - Connect from the headphone output of your CD
player to this jack. This is used for playing along with your CD’s, or recording
material for the Learn-A-Lick function.
F. Power Jack - Connect the PS750 power supply to this jack.
Page 4
Getting Started
The VGS50 is ready for you to plug in and play. It already has a variety of sounds
programmed into both the 30 factory and 30 user presets. You will find that the
user presets are exact duplicates of the factory presets. This was done so that you
can experiment with the user presets and not be at risk of losing any of the sounds
that the VGS50 came with.
Making Connections
The VGS50 can be run in mono or stereo. The following connections outline the set
up for both applications. These steps should be performed in the order that are
listed here. Make sure that you do not connect the power to the VGS50, or turn on
the power to your amplification until the completion of these steps.
1. Connect your instrument to the VGS50 input jack (A).
MONO
2a. Connect the left output (B) to the input of your amplifier, or line input of a
mixing console.
STEREO
2b. Connect the left (B) and right (C) outputs to the inputs of two amplifiers, or two
line inputs of a mixing console.
3. Set the tone controls of the amplifier(s) or mixing console to the flat or 0
position. If you are running stereo into a mixer set the pan controls hard left and
hard right.
4. Turn the Output Knob (10) on the VGS50 all the way counterclockwise.
5. Apply power to the VGS50 by connecting the PS750 from the power jack (F) to
an AC outlet.
6. Turn the power switch of your amplifier(s) to the “on” position.
7. Begin playing and gradually adjust the VGS50’s Output Knob until the desired
volume is achieved.
Page 5
SECTION TWO
About the VGS50
Performance Mode
The Performance Mode of the VGS50 is the mode of operation where you are
performing. While in the performance mode, you can use the numbered
footswitches or Data Wheel to change from one preset to another. You can use the
Bank Footswitch to advance banks and the Expression Pedal to vary the amount of
the effect that it has been assigned to for the individual presets. From the
performance mode you may also bypass the effects by pressing the currently
selected Footswitch, or access the built-in chromatic tuner by pressing and holding
the currently selected Footswitch.
Selecting a Preset
The VGS50 has 30 factory and 30 user preset locations. The presets in the VGS50
are arranged in 10 banks with 3 presets in each bank. The user presets are
indicated by the letter “U” preceding the preset number in the display. The factory
presets are preceded with the letter “F”. Accessing the presets may be done by
using the Data Wheel or Footswitch.
Data Wheel
While in performance mode, the Data Wheel is used to select presets. Simply rotate
the Data Wheel until the desired preset number is shown in the display. The Data
Wheel will scroll through all of the presets in the user set, and then scroll through
all of the presets in the factory set. If you continue to rotate the Data Wheel, the
VGS50 will “wrap around” and access the user presets again.
Footswitches
The footswitches can also be used to select a preset. The bank footswitch is used to
select the bank, and the numbered footswitches are used to select the preset within
that bank. The Bank Footswitch (1) located on the far right side of the VGS50, next
to the expression pedal (11). Each successive press of the Bank switch will advance
you to the next bank of presets. Every time that a new bank has been selected, the
numbered footswitches will flash indicating that you need to select a preset with
these footswitches in order to activate that bank. Once you have selected the desired
bank, simply use the numbered footswitches to select one of the three possible
presets. The Preset Footswitches are also used to bypass the VGS50. To bypass all of
the effects within the VGS50, simply press the footswitch which has a lit LED above
it. In other words, if you want to access preset 63, press the bank switch repeatedly
until the display shows bank 6. Then press the #3 footswitch to access preset 3. The
display will then show “63”.
Page 6
Note: The footswitches will only activate the user presets and banks. To access the
factory presets and banks, you will need to use the Data Wheel and scroll above the
last user bank/preset.
When you have selected a particular bank and preset, the number of the preset and
bank will be shown in the display. Each effect that is active in that preset will be
indicated by the lit LEDs above the effect select buttons.
Accessing the Tuner
The VGS50 includes a chromatic tuner to quickly get your instrument in tune. To
access the tuner, press and hold the footswitch that is currently active(the footswitch
with a lit LED above it). The letters “tu” will appear in the display. You can then
play any string on your guitar. The display (5) will show the note that you are
closest to, and the Tuner/Parameter LEDs (6) will light to let you know whether you
are sharp or flat. Your note is in tune when the green LED in the middle is lit. The
red and yellow LEDs above the green LED indicate that you are sharp and need to
tune down. The red and yellow LEDs below the green LED indicate that you are flat
and need to tune up.
The tuning reference on the VGS50 has been set to A=440 (concert pitch) from the
factory. You may change the tuning reference for drop tunings by rotating the Data
Wheel at any time while in the tuner mode. Your tuning choices are A (standard
tuning), Ab (1/2 step flat), and G (whole step flat).
Pressing any footswitch will exit the tuner mode and return you to the performance
mode.
Learn-a-Lick/Jam-a-Long
The Jam-a-Long feature lets you connect a tape or CD player to the VGS50 and
output the music into your amp with your guitar signal. The VGS50 also includes a
powerful teaching tool called “Learn-a-Lick”. This feature lets you record solos that
are too fast to hear much less learn, and then slow them down to a speed where
you can figure out what notes are being played. To use this feature you will need the
tape or CD with the “too-fast-solo” on it, a tape or CD player, and a cable with an
1/8” stereo jack on one end and a connector appropriate for your tape or CD
player’s headphone output on the other end.
Just follow these steps and you’ll have a virtual personal guitar instructor teaching
you all of those speed burning licks.
Page 7
1. Connect the 1/8” stereo jack to the Learn-a-Lick jack (E) on the back panel of
the VGS50.
2. Connect the other end of the cable to your tape or CD player’s headphone output.
3. Cue up the recording to the solo that you want to learn.
4. Press and hold the Bank switch down until the display shows “LAL.” The display
will then change to show “STP” (an abbreviation for “stop”).
5. Press the number 1 footswitch as you start your tape or CD player. The display
will show “rec” indicating that it is recording. It will record up to 12 seconds of
incoming material. The Parameter Edit LEDs will light one at a time as your record
time is used.
6. Once recording is finished the VGS50 will start playback automatically. The
Parameter Edit LEDs will light one at a time to show where you are in the recording.
The lick will play through in its entirety, and then start again automatically. Pressing
the number 2 footswitch will back up the recording in 500 millisecond increments.
To start the lick from the beginning, you will need to press the number 3 footswitch
to stop the playback, and then press the number 2 footswitch again.
7. Press the Bank button to change the playback speed. Your choices are 7-8
(7/8 of the recorded speed), 3-4 (3/4 of the recorded speed), 5-8 (5/8 of the
recorded speed),1-2 (half speed), 3-8 (3/8 of the recorded speed), 1-4 (1/4
of the recorded speed, and ful (normal speed).
To exit the Learn-a-Lick mode, press and hold the bank switch until the display
shows a preset number again.
Page 8
SECTION THREE
Editing a Preset
The VGS50 allows you to edit the user presets to your liking. You can change the
effects that are stored in the preset, alter the amount of the effects, bypass an effect,
or vary several other aspects of the way the preset sounds. This is a very simple
process and gives you the ability to create custom sounds to suit your application or
taste. There are basically two levels of editing a preset. The first level is selecting the
effect type that you want. The second level is fine tuning the parameters of the
effects.
Selecting Effects
Choosing the type of effect that you want to use in a preset is extremely easy. Simply
use the effect select buttons (2) that represent the effect group that you want to use,
change, or disengage. The Display (5) will show the current status of that effect
type. When an effect group is bypassed, the display will indicate bypass by showing
two dashes “--”. Pressing the effect select button again, or rotating the Data Wheel
will re-engage the effect group and start with the last effect type selected in that
category. When an effect is activated, you may use the Data Wheel to scroll through
all the various effects or adjustments available to that particular effects group. Any
parameters associated with that effect type will light in the Parameter/Tuning LED
section (6) indicating that those parameters are also available for adjustment.
Editing Parameters
Pressing the Parameter Edit button (8) will access those parameters and allow you
to adjust them using the Data Wheel. The parameter being adjusted is indicated by a
flashing parameter LED. The Display (5) will show the current value of that
parameter. You can then use the Data Wheel (7) to increase, or decrease the value
of the indicated parameter. Successive presses of the Parameter Edit button will
select the next parameter for editing.
Anytime that an effect is changed from the stored settings, a decimal point will
appear in the bottom right corner of the Display (5) to indicate that that effect has
been changed. The store LED will also light indicating that your changes must be
stored in order to be retained. For more on storing changes, see page 12.
Creating a Preset
Suppose you want to create a preset that has medium compression, Grunge
distortion, boosted highs and lows on the EQ, a low threshold setting on the noise
gate, a chorus, no delay, and a room reverb. Let’s also suppose that you wanted the
expression pedal to control the reverb level. The steps outlined below will guide you
through creating this preset.
Page 9
1. Press the effect select button under the Compression group. The display will show
the current status of the compressor. If the compressor is bypassed (indicated by
two dashes “--”), press the Compression button again, or rotate the Data Wheel to
activate the compressor. Since we want a medium compression setting, roll the Data
Wheel until the number 2 shows in the display. You have now set the compressor to
a medium threshold setting.
2. The next step is to select the Grunge distortion. Press the effect select button in
the Distortion group. The display will show the current status of the distortion effect.
If the distortion is bypassed (indicated by two dashes “--” in the display), press
the Distortion button again, or rotate the Data Wheel to activate the distortion. Since
we want the Grunge distortion, and Grunge is listed in the group as number 5, roll
the Data Wheel until the display shows the number 5.
You will notice that the parameter LED next to the word “Gain” lights. This indicates
that gain is a parameter associated with the distortion, and you may adjust this
parameter. Press the Parameter Edit button once and the Gain LED will begin to
flash indicating that you are now about to edit the distortion gain. The display will
show the current value for the gain parameter. Using the Data Wheel will increase or
decrease the amount of distortion gain.
3. Next we wanted boosted highs and lows in the EQ. Press the effect select button
in the High EQ box. The display will show either a positive number, or a negative
number indicated by a minus sign (-). If the High EQ is bypassed it will be indicated
by a “0” in the display. Roll the Data Wheel clockwise to boost the High EQ to a
value of about “6”.
In order to get just the highs and lows boosted, we should bypass the Mid EQ. So,
press the effect select button in the Mid EQ box. The display will show the current
status of the Mid EQ. If the Mid EQ is already bypassed, a “0” will be displayed. If
the display does not show a “0,” press the Mid EQ button again to bypass the Mid
EQ section.
Finally, press the effect select button in the Low EQ box. Roll the Data Wheel to give
the lows a value of about “6” also.
4. We wanted to set the noise gate threshold at a low setting, so press the effect
select button in the Noise Gate box. If the noise gate is bypassed (indicated by two
dashes “--” in the display), you will need to press the Noise Gate button again, or
rotate the Data Wheel to activate the Noise Gate. Since we wanted a low threshold
for the Noise Gate, roll the Data Wheel until the display shows the number 1.
Page 10
5. We also wanted to have the Chorus as an effect in our example preset. Press the
Effect button. If the effects in this group are bypassed (indicated by two dashes “-” in the display), press the Effect button again, or rotate the Data Wheel to activate
this group. Chorus is listed as the first effect in this group so, roll the Data Wheel
until the number “1” is shown in the display.
You will notice that when you select Chorus as your effect type, the parameter LEDs
next to Speed, Depth, and Mix/Level will light. This indicates that these three
parameters are associated with the Chorus, and are available for adjustment. Press
the Parameter Edit button once and the LED next to Speed will begin to flash. The
display will show the current value of the Chorus speed. Use the Data Wheel to
increase or decrease the speed of the Chorus. For our example, let’s set the speed
to 5. Press the Parameter Edit button again and the LED next to Depth will begin to
flash. The display will show the current value of the Depth parameter. Use the Data
Wheel to increase or decrease the value of the Depth parameter. For our example,
let’s set this to 4. Press the Parameter Edit button again and the Mix/Level LED will
flash, and the display will show the value of the Mix. Use the Data Wheel to set this
to about 60.
6. In our example we were going to have the delay bypassed. So, press the Delay
button until “--” is shown in the display.
7. Finally, we wanted to use a Hall type reverb in our preset. By now you should be
getting the hang of it. Press the effect select button in the reverb box. If the reverb is
bypassed, press the Reverb button again, or rotate the Data Wheel to activate the
Reverb. Since the Hall Reverb is number two, roll the Data Wheel until the number
2 is shown in the display.
You will notice that the parameter LEDs next to Decay, and Mix/Level will light. Press
the Parameter Edit button once and the Decay LED will begin to flash. The display
will indicate the value of the Reverb Decay. Use the Data Wheel to set this to 30.
Press the Parameter Edit button again and the Mix/Level LED will begin to flash. Use
the Data Wheel to set the Reverb Level to about 40.
We have now added all of the effects to this preset that we had decided we wanted.
However, it may be too loud, or not loud enough. You can adjust the volume of the
preset by pressing the effect select button in the Master Level box, and using the
Data Wheel to set the volume level that you desire.
Page 11
Now the only edit that we have left to do in our example is to assign the expression
pedal to control the reverb level. Piece of cake! Just press the Pedal button (12),
and rotate the Data Wheel until the number 9 is shown in the display. Since number
9 is Reverb Level, the expression pedal will now bring the amount of the reverb up
and down as you rock it back and forth.
With all of this accomplished, we will now need to store our new preset, otherwise
the VGS50 will forget the changes that we have made to this new preset.
Storing/Copying a Preset
Once you have edited a preset to your liking, you must store the preset in order for
the VGS50 to remember you settings. There are three steps to storing a preset.
1. Press the Store button (3) once. The Store LED will start flashing. The flashing
LED is basically asking “where do you want to store this sound”
2. Use the data wheel to select the user bank and preset number that you want to
save this new sound to.
3. Once you have selected the preset number that the new sound is to be save to,
press the store button again. The new sound will then be stored at the preset
number that you had selected.
Note: This same procedure can be used to copy a preset to a different preset
location.
To abort the store function, simply press any footswitch (1) and do not press the
store button a second time.
Page 12
SECTION FOUR
About the Effects
The effects included with the VGS50 may require an explanation as to what they do
and what the different parameter adjustments mean. For this reason we have
included this section detailing the different effects and their parameters.
Effects Definitions
Compression - A compressor is a tool used to limit the dynamic range of an
instrument. In other words, it sets a boundary for how loud the instrument will be
able to get. The nature of limiting the dynamics of an instrument tends to provide a
smooth, even texture to the sound of the instrument.
The VGS50 has three different compressor settings: Low, Medium, and High. These
different settings are determining the threshold of the compressor. The threshold is
the strength that the incoming signal must be before the compression will begin.
Distortion - Distortion is one of the most common effects in music today. What it
is basically doing is adding so much gain to the signal that it deforms or distorts the
wave form. In other words, distortion will make the incoming signal so strong that it
“squares off” the top and bottom of an otherwise rounded wave.
The VGS50 has 8 different distortion types to choose from: American Stack, Classic
Combo, British Stack, Overdrive, Grunge, Clean Valve, Blues Valve, and Saturated
Valve. Some of these distortions use the tube and some use transistors to achieve the
distortion. The distortions using the tube will be indicated by a lit Tube icon (9).
EQ - An Equalizer is used to enhance a particular range of frequencies. It will either
boost, or cut specific frequencies in your signal. It can be compared to the tone
controls of a home stereo. The “High EQ” is the treble control, the “Mid EQ”
adjusts the mid-range frequencies, and the “Low EQ” is the bass control.
Noise Gate - A Noise Gate is like the name implies. It is a gate that will shut when
you are not playing, and open when you are playing. When the gate is closed, it will
not allow ambient noise to come through. A noise gate uses a threshold, which is
the level of volume that a signal must be in order to open the gate. If your guitar
signal is not strong enough to cross the threshold, the gate will not open, and no
sound will be heard. The gate on the VGS50 is also used for volume swells. When
you have selected the gate to act as a volume swell, you can strum your guitar, and
the sound will fade in.
Chorus - A Chorus is an effect that adds thickness to your guitar signal. It is
splitting your guitar signal, adding a short delay to half of the signal, and then
changing the delay time at an even pace. This results in the pitch of the delayed
signal fluctuating slightly, giving the illusion of two guitars playing together.
Page 13
Flanger - A Flanger is similar to a chorus as far as what it is technically doing, but
it sounds very different. It adds a “whooshing up, and down” sound to your guitar.
Phaser - A Phaser is an effect that splits the incoming signal, and then changes the
phase of half of the signal. This phase is changed at an even pace, and mixed back
in with the original sound. The changing phase causes different frequencies to be
canceled, resulting in a warm, twisting sound in your guitar.
Tremolo - Tremolo is an effect that modulates the volume of your guitar up and
down at a steady rate.
Pitch - Pitch shifting is like having another guitarist playing with you. It makes a
copy of your pitch, and then shifts it to a different pitch. The result is two different
notes playing together.
Detune - Detuning is an effect that uses the pitch shifting technology, but does not
shift the pitch a full note. Instead, it just takes the shifted pitch slightly in and out of
tune with your note.
Ring Modulator - The ring modulator modulates the guitars volume and then
takes the signals sum, and difference of the modulated frequency, and guitar
frequency and mixes it with the original signal. The result is a metallic ringing sort
of sound.
Pixellator - A pixellator degrades the signal by undersampling it. The result is an
unnatural distortion similar to those used in today’s techno and industrial styles of
music.
Envelope Phase - Envelope Phase is a phaser effect that alters your sound based
upon how hard you play. The softer that you play, the less intense the sweep of the
phaser effect will be. The harder that you play, the more intense the sweep will be.
Envelope Flange - Envelope Flange is a flanging effect that alters your sound
based upon how hard you play. The softer that you play, the less intense the sweep
of the flanger effect will be. The harder that you play, the more intense the sweep
will be.
Pitch Bend - Pitch Bend is an effect that you will need to use the expression pedal
for. When you have assigned the expression pedal to a value of 7, for bend, you can
then change the pitch of your note by rocking the expression pedal back and forth.
With the pedal in the toe up position, your pitch will be the note you are actually
playing. As you rock the pedal forward, the note will bend.
Page 14
Delay - Delay is often referred to as an echo. This is because it will record a short
passage of your playing, and then repeat it a moment later. You can have it repeat
the passage several times just like an echo would do. The VGS50 offers three
different types of delay, they are Tape delay, Mono delay, and Pong delay. The Tape
delay is typical of older delays that were actually using a tape to record, and repeat.
Tape delay settings are not as crystal clear as digital delays. The Mono delay is a
clear, concise digital delay. The Pong delay is a delay that will “bounce” from left to
right when your VGS50 is connected in stereo.
Reverb - Reverb will simulate different environments. It can make it sound as if
you are playing in a big empty room, or a small closed in room. It adds ambiance
to your guitar by mimicking the characteristics of sound bouncing off of distant
walls. The VGS50 has three different environments that it is capable of producing.
They are Room, Hall, and Arena environments. Room reverb is the smallest and
Arena is the largest environment.
Parameters Available for Editing
The following is a list of the parameters available for editing or fine tuning, and a
description of how each parameter will affect the sound of the corresponding
effects.
Gain - The Gain parameter is the amount of distortion that you will get when the
distortion effect is on.
Speed - The Speed control adjusts how fast the chorus, flange, phaser, ring
modulator, tremolo, detuner, enveloped phase, or enveloped flange will sweep back
and forth. It can be used to vary these effects between a fast shimmering type of
sound, and a slow gradual sweeping.
Depth/Amount - The Depth/Amount parameter adjusts the intensity of the chorus,
flange, phaser, tremolo, ring modulator, and detuner. It adjusts the interval of the
pitch shift and pitch bend effects.
Delay - The Delay parameter adjusts the length of time between repeats of the
delay.
Regeneration - The Regeneration parameter will adjust the number of times that
the delay will repeat the sound. It will also increase the amount of whooshing heard
in the flanger and phaser.
Decay - The Decay parameter adjusts how long the reverb will be heard. This is
also related to how “big” of a room the reverb effect is simulating.
Mix/Level - The Mix/Level parameter will adjust the overall strength of effects in
the preset.
Page 15
Resetting the VGS50
This function erases all of the user presets and restores the VGS50 to the original
factory presets.
Caution! This procedure will destroy and reset ALL user presets in the VGS50
memory. Be sure you want to erase the memory and start fresh before continuing
with this procedure.
1. Disconnect the power from the rear panel of the VGS50.
2. Press and hold the Low EQ Select button, and the Parameter Select button while
reconnecting the power.
The display will briefly show “rS” to indicate that it has reset. After the reset has
occurred, the expression pedal needs calibrating and is indicated by the letters
“tdn” in the display. Rock the expression pedal forward to the toe down position
and press the flashing footswitch 1. The display now reads “tup”. Rock the pedal
back to the toe up position and now press the flashing footswitch 3. The expression
pedal is now calibrated for use with all programs.
Calibrating the Expression Pedal
If the expression pedal ever has problems with controlling parameters between
their full range, it may be necessary to re-calibrate it. Follow these steps for
calibrating the expression pedal:
1. Disconnect the power from the VGS50.
2. Press and hold the Pedal button (12) on the front panel and connect the power.
3. When the display reads “tdn”, release the Pedal button and rock the expression
pedal forward to the toe down position.
4. Press the flashing number 1 footswitch. The display now reads “tup”.
5. Rock the pedal back to the toe up position and press the flashing number 3
footswitch.
The expression pedal is now calibrated for use with all programs.
Maintenance and Service
The VGS50 is basically a maintenance free device. There are no user serviceable
parts inside of the unit. Opening the chassis will void your warranty. All service and
repair must be performed by an authorized DOD service center. Tube replacement
should be referred to an authorized service center. Should a problem arise with
your VGS50, contact your local DOD dealer for return/repair procedures.
age 16
Preset List
Showcase
01 - Solo Time
02 - Clean Chorus
03 - Crunch Rhythm
Heavy
11 - Crusher
12 - Phase Monster
13 - Octo Bass
Modern
21 - Whammy
22 - Ottowah
23 - Dyna Phase
Retro
31 - Surficide
32 - Wahs Up?
33 - Rockabilly
Country
41 - Pedal Steel
42 - Tremolo
43 - Chicken Picken
Blues
51 - Blues Rhythm
52 - Blues Solo
53 - Clean Blues
Studio
61 - Studio Crunch
62 - Chorus Swell
63 - Greasy Solo
Jazz/Fusion
71 - Jazz Combo
72 - Fusion 5ths
73 - Modern Detune
Rock
81 - Flange Rock
82 - Chorused Clean
83 - Metal Delay
Special
91 - Psyco Phase
92 - Pixellate Me
93 - D-Tune
Page 17
Warranty
1. The warranty registration card must be mailed within ten days after purchase date
to validate the warranty of this DOD product.
2. DOD warrants this product when used solely within the U.S. to be free from
defects and workmanship under normal use and service.
3. DOD Electronics liability under this warranty is limited to repairing or replacing
defective materials that show evidence of defect, provided the product is returned
through the original dealer, where all parts and labor will be covered up to a period
of one (1) year. The company shall not be responsible for any consequential
damage as a result of the products use in any circuit or assembly.
4. Proof of date of purchase is considered to be the burden of the consumer
5. DOD reserves the right to make changes in design or make improvements upon
this product without incurring any obligation to install the same on PRODUCTS
PREVIOUSLY MANUFACTURED.
6. The foregoing is in lieu of all other warranties, either expressed or implied, and
DOD neither assumes nor authorizes any person to assume any obligation or
liability in connection with the sale of this product. In no event shall DOD or its
dealers be liable special or consequential damages or from any delay in the
performance of this warranty due to causes beyond their control.
Specifications:
Input: 1/4” unbalanced
Input Impedance: 500 k ohms
Max Input Level: 7.6 dBV
Output: 2 - 1/4” unbalanced
Output Impedance: 10 ohms
Max Output Level: 11 dBV
Headphone: 1/4” Stereo TRS
Headphone Impedance: 10 ohms
A/D: 64 x oversampling, monolithic 18
bit delta sigma
DSP: 24 bit
Tube: 12AX7
Page 18
Power Supply: 9 volts AC (PS750)
Power Consumption: 5.5 watts
Memory: 30 user/30 factory
Effects: 18 total including: compression, 8
distortions, 3 band EQ, noise gate, chorus,
flange, tremolo, phaser, ring modulator,
pixellator, pitch shift, pitch bend, detune,
enveloped flange, enveloped phase, wah, delay,
and reverb.
Simultaneous Effects: 8
Dimensions: 17.7” L x 9” W x 2.8” H
Weight: 3.7 lbs.
DOD Electronics Corporation
8760 S. Sandy Parkway
Sandy, Utah 84070
PH (801) 566-8800
FAX (801) 566-7005
International Distribution
8760 S. Sandy Parkway
Sandy, Utah 84070 USA
PH (801) 568-7642
FAX (801) 568-7638
DOD and VGS50 are registered trade marks of the
Harman Music Group Inc.
Copyright the Harman Music Group
Printed in the USA 01/99
Manufactured in the USA
VGS50 Owners Manual 18-2286-A
Please visit DOD on the World Wide Web at:
http://www.dod.com