1
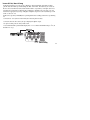
Warning
For your protection, please read the following:
Water and Moisture: Appliances should not be used near water
(e.g. near a bathtub, washbowl, kitchen sink, laundry tub, in a wet
basement, or near a swimming pool, etc.) Care should be taken so
that objects do not fall and liquids are not spilled into the enclosure
through openings.
These symbols are internationally accepted symbols that warn of potential
hazards with electrical products.The lightning flash means that there are
dangerous voltages present within the unit.The exclamation point indicates
that it is necessary for the user to refer to the owners manual.
These symbols warn that there are no user serviceable parts inside the unit.
Do not open the unit. Do not attempt to service the unit yourself. Refer all
servicing to qualified personnel. Opening the chassis for any reason will void
the manufacturer’s warranty. Do not get the unit wet. If liquid is spilled on
the unit, shut it off immediately and take it to a dealer for service.
Disconnect the unit during storms to prevent damage.
Electromagnetic Compatibility
Operation is subject to the following conditions:
•This device may not cause harmful interference.
•This device must accept any interference received, including interference that may cause undesired operation.
•Use only shielded interconnecting cables.
•Operation of this unit within significant electromagnetic fields should
be avoided.
Power Sources: The appliance should be connected to a power
supply only of the type described in the operating instructions or as
marked on the appliance.
Grounding or Polarization: Precautions should be taken so that
the grounding or polarization means of an appliance is not defeated.
Power Cord Protection: Power supply cords should be routed so
that they are not likely to be walked on or pinched by items placed
upon or against them, paying particular attention to cords at plugs,
convenience receptacles, and the point where they exit from the
appliance.
Servicing: To reduce the risk of fire or electrical shock, the user
should not attempt to service the appliance beyond that described in
the operating instructions. All other servicing should be referred to
qualified service personnel.
For units equipped with externally accessible fuse receptacle: Replace fuse with same type and rating only.
DECLARATION OF CONFORMITY
anufacturer’s Name:
DOD Electronics
anufacturer’s Address: 8760 S. Sandy Parkway
Sandy, Utah 84070
eclares that the product:
roduct Name:
GS30
roduct Options:
All (requires a Class II power adapter that conforms to the requirements of EN60065,
EN60742, or equivalent).
onforms to the following product specifications:
afety:
EN 60065 (1993)
IEC65(1985) with Amendments 1, 2, 3
MC:
EN 55013 (1990)
EN 55020 (1991)
upplementary Information:
he product herewith complies with the requirements of the Low voltage directive 73/23/EEC and the EMC Directive
9/336/EEC as amended by directive 93/68/EEC.
DOD Electronics
President
8760 S. Sandy Parkway
Sandy, Utah 84070, USA
Effective (5/11/99)
uropean Contact: Your local DOD Sales and Service or
Harman Music Group
8760 S. Sandy Parkway
Sandy, Utah, USA
Tel: (801) 568-7642
Fax: (801) 568-7638
II
Table of Contents
fety Information................
eclaration of Conformity....
ble of Contents.................
ntroduction
ongratulations...................
cluded Items...................
atures..............................
Section One
Guided Tour.....................
Front Panel.......................
Rear Panel........................
etting Started....................
aking Connections...........
Section Two
erformance Mode..............
lecting a Preset.................
Data Wheel........................
Footswitches......................
ccessing the Tuner.............
arn-A-Lick/Jam-A-Long....
Section Three
diting a Preset...................
ser Interface.....................
Comp/Wah........................
Expression........................
I
II
III
1
1
1
2
2
5
6
6
8
8
8
9
10
11
13
13
14
14
Model...............................
Tone/Gate.........................
Effect................................
Delay/Reverb....................
Parameters.......................
SpkrSim............................
Store.................................
Display..............................
Expression Pedal................
Storing/Copying..................
14
14
15
15
15
16
16
16
16
18
Section Four
Effect Definitions................
Parameter Definitions........
19
22
Section Five
Creating a Preset.................
24
Section Six
Resetting the GS30..............
Pedal Calibration...............
Maintenance.......................
28
28
29
Section Seven
Warranty............................
Specifications....................
30
31
ntroduction
Congratulations!
ou are now the proud owner of the GS30 complete guitar system. The GS30 is an extremely powerful tool capable of producing
rtually any sound that you can imagine. It offers Amp/Guitar Modeling, and a host of great sounding digital effects including:
ompression, Distortion, Equalization, Noise Gate, Chorus, Flange, Phaser, Tremolo, Pitch Shifter, Detuner, Ring Modulator,
xellator, Enveloped Effects, Pitch Bending, Wah, Auto Wah, Tape Delay, Pong Delay, Delay and Reverb. The GS30 also includes a
hromatic tuner, the Jam-A-Long and Learn-A-Lick function and a built in expression pedal capable of controlling effects in real
me. This Owner’s manual is your guide to getting the most out of your GS30. Please read it carefully, to get familiar with the
ontrols of the GS30. This will ensure years of musical satisfaction.
ncluded Items
our GS30 was carefully assembled and packaged at the factory. Before proceeding any further please make sure the following
ems are included.
1 GS30 Guitar System
1 PS750 External Power Supply
1 Owner’s Manual
1 Warranty Registration Card
1 Preset Card
ease save all packing materials, and take a moment to fill out the warranty registration card. It is your safeguard in the unlikely
ent that your GS30 needs servicing. Please use the packing materials to return the unit if necessary.
Features
Authentic Amp/Guitar Modeling
Built-in Expression Pedal
30 User/30 Factory Presets
Up to 10 Effects at Once
Stereo Outputs
• Chromatic Tuner
• Externally Isolated Transformer
• Learn-A-Lick
• Jam-A-Long
• Headphone Output
1
SECTION ONE - Introduction
A Guided Tour of the GS30
Front Panel
Program Footswitches - These switches provide access to the GS30 user presets. They are also
used to bypass the GS30, access the Tuner, and perform various functions
for the Learn-A-Lick feature.
2. Bank Footswitches - These two switches are used to advance or reverse the currently selected Bank.
The Bank Up switch is also used to access the Learn-A-Lick mode.
3. Edit Section - These columns and buttons are used to select, bypass, and edit each specific effect group.
The effects which are currently active within a preset are indicated by a lit LED. The button
at the bottom of each column will select the effect group within the indicated column.
Successive presses of the same button will advance to the next type of effect within that
group. The currently selected effect will be represented by a flashing LED. The effect
groups include Compression, Wah, Expression Pedal, Amp/Guitar Modeling, Tone and
Gate, 10 Modulation/Pitch Shift Effects, Delay, and Reverb.
4. Parameter Section - This column represents the various aspects of the Mod/Pitch, Delay, and Reverb
Effects which can be fine tuned to suit your application. When any of these three
effect groups are selected, the associated parameter LEDs will light indicating
that you can fine tune these aspects of the selected effect. The parameters are
selected with the button at the bottom of the parameter column, and the
selected parameter will be indicated by a flashing LED. Successive presses of the
parameter button will advance to the next available parameter. Once the desired
Parameter has been selected, the current value will be shown in the display (7),
and you may adjust the value of the parameter with the Data Wheel (9). The
Parameter LEDs also serve as sharp and flat indicators in the tuning mode.
5. Tuning LEDs - The In Tune LED works in conjunction with the parameter LEDs while you are in Tuning
mode. Once the Tuner has been accessed, the Display (7) will show the note being played
and the parameter LEDs will indicate whether you are sharp or flat of the displayed note.
Parameter LEDs above the In Tune LED indicate that you are sharp and need to tune
down. Parameter LEDs below the In Tune LED indicate that you are flat and need to tune
up. Your note is in tune when the In Tune LED is the only one lit.
3
6. Speaker Simulator - This button is used to engage or disengage the Speaker Simulator. The LED will
light when the Speaker Simulator is engaged.
7. Display - The Display serves four functions. In performance mode, the Display will indicate the Bank and
Preset that is currently active. In edit mode, the Display will show the status or value of the effect
or effect group being edited. In Tuner mode, the display will show the note played. In Learn-ALick Mode, the Display will show the status of the function, and the selected play back speed.
8. Store Button and LED - After editing a Preset, your modifications must be stored in order for the
GS30 to remember the changes that you made. When you change any
aspect of a Preset, the Store LED will light indicating that you need to use
the Store button to save the change.
9. Data Wheel - This knob is used to select the Preset in performance mode, and to increase or decrease
the value of a Parameter in the edit mode. It is also used to change the tuning reference
in Tuner mode.
0. Expression Pedal - This pedal can be assigned to control one of 9 different Parameters in real time
for each Preset. As you rock the pedal back and forth, the value of the assigned
Parameter will change giving you expressive control over the effects.
Rear Panel
A. Input Jack - Connect your instrument to this jack.
B. Jam-A-long/Learn-A-Lick - Connect from the headphone output of your tape or CD player to this
jack. This is used for playing along with your tapes and CD’s, or
recording material for the Learn-A-Lick function.
C. Headphone - This jack is used for connecting a pair of stereo headphones to the GS30.
D. Left Output - Connect from this jack to the input of your amplifier for mono applications, or to the left
channel of a stereo power amp for stereo applications.
E. Right Output - Connect from this jack to a second amplifier, or right channel of a stereo power amp for
stereo applications.
F. Power Jack - Connect only the PS750 power supply to this jack.
5
Getting Started
he GS30 is ready for you to plug in and play. It already has a variety of sounds programmed into both the 30
ctory and 30 user Presets. You will find that the User Presets are exact duplicates of the Factory Presets. The
actory Presets are permanently written into the GS30 and cannot be changed. The User Presets can be
verwritten with your sound creations as many times as you choose.
Making Connections
he GS30 can be run in mono or stereo. The following connections outline the set up for both applications. These
eps should be performed in the order that are listed here. Make sure that you do not connect the power to the
S30, or turn on the power to your amplification until the completion of these steps.
. Connect your instrument to the GS30 input jack.
a.(mono) Connect the left output to the input of your amplifier, or line input of a mixing console.
b. (stereo) Connect the left and right outputs to the inputs of two amplifiers, or two line inputs of a mixing
onsole.
. Set the tone controls of the amplifier(s) or mixing console to the flat or 0 position. If you are running stereo
into a mixer set the pan controls hard left and hard right. Turn your amplifier or mixer’s volume level down.
. Apply power to the GS30 by connecting the PS750 from the power jack to an AC outlet.
. Turn the power switch of your amplifier or mixer to the “on” position.
. Begin playing and gradually increase the amplifier or mixer’s volume until the desired level is achieved.
7
SECTION TWO - About the GS30
Performance Mode
he Performance Mode of the GS30 enables you to use the numbered footswitches or Data Wheel to change from
ne Preset to another, the Bank Footswitches to change Banks and the Expression Pedal to vary the amount of the
ssigned Parameter. From the Performance mode you may also bypass the effects by pressing the currently
elected Footswitch, or access the built-in chromatic tuner by pressing and holding the currently selected
ootswitch.
Selecting a Preset
he GS30 has 30 Factory and 30 User Preset locations. The Presets in the GS30 are arranged in 10 Banks with 3
resets in each bank. The User Presets are indicated by a decimal point in the bottom right corner of the Display.
he Factory Presets do not have the decimal point. Accessing the Presets may be done by using the Data Wheel or
ootswitches.
Data Wheel
While in Performance mode, the Data Wheel is used to select Presets. Simply rotate the Data Wheel until the
esired preset number is shown in the Display. The Data Wheel will scroll through all of the Presets in the User
et, and then scroll through all of the Presets in the Factory set. If you continue to rotate the Data Wheel, the GS30
ill “wrap around” and access the User Presets again. In edit mode, rotating the Data Wheel will change the status
r value of the selected effect or parameter. In Tuner mode, rotating the Data Wheel will change the tuning
eferrence. In Learn-A-Lick mode, rotating the Data Wheel will change the playback speed of the recorded
material.
Footswitches
he footswitches are also used to select a Preset. The Bank Up and Bank Down footswitches advance or reverse
anks, and the 1-3 numbered footswitches select the Preset within the active Bank. Successive presses of the Bank
p or Down switches will advance or decrease to the next Bank of Presets. Every time that a new Bank has been
elected, the numbered footswitches will flash indicating that you need to select a Preset using these footswitches
n order to activate that Bank. If no preset is selected within 5 seconds, the GS30 will revert to the last Bank and
reset that had been active. Once you have selected the desired Bank, simply use the numbered footswitches to
elect one of the three possible Presets. In other words, if you want to access User Preset 63, press the Bank Up
r Down switch repeatedly until the display shows Bank 6. Then press the #3 footswitch to access Preset 3. The
isplay will then show 63 . The Preset footswitches are also used to bypass the GS30. Press the footswitch which
as a lit LED above it to bypass the unit. The display will show bP indicating that it is bypassed. Press any
umbered footswitch to re-engage the GS30.
Note: The footswitches will only activate the User Presets and Banks. To access the Factory Presets and Banks,
ou will need to use the Data Wheel and scroll above or below the last User Bank/Preset.
9
Accessing the Tuner
he GS30 includes a chromatic Tuner to quickly get your instrument in tune. To access the Tuner, press and hold
he numbered footswitch that is currently active (the footswitch with a lit LED above it) until the letters tn
ppear in the display (and abreviation for tuner). You can then play any string on your guitar. The display will
how the note played, and the Parameter LEDs will light to let you know whether you are sharp or flat. Your note
in tune when the In Tune LED is lit. The LEDs above the In Tune LED indicate that you are sharp and need to
une down. The LEDs below the In Tune LED indicate that you are flat and need to tune up.
he tuning reference on the GS30 has been set to A=440 (concert pitch) from the factory. You may change the
uning reference for drop tunings by rotating the Data Wheel at any time while in the tuner mode. Your tuning
hoices are A (standard tuning), Ab (1/2 step flat), G (whole step flat), and gb (one and 1/2 steps flat).
ressing any footswitch will exit the tuner mode and return you to the performance mode.
Learn-A-Lick/Jam-A-Long
he Jam-A-Long feature lets you connect a tape or CD player to the GS30 and mix the music with your guitar
gnal. The GS30 also includes a powerful teaching tool called “Learn-A-Lick”. This feature lets you record solos
hat are too fast to hear much less learn, and then slow them down to a speed where you can figure out the notes
eing played. To use this feature you will need a tape or CD player, a cable with an 1/8” stereo jack on one end
nd a connector appropriate for your tape or CD player’s headphone output on the other end, and the tape or CD
ith the “too-fast-solo” on it.
ust follow these steps and you’ll virtually have a personal guitar instructor teaching you all of those speed burning
cks.
. Connect the 1/8” stereo jack to the Learn-A-Lick jack on the back panel of the GS30.
. Connect the other end of the cable to your tape or CD player’s headphone output.
. Cue up the recording to the solo that you want to learn.
. Press and hold the Bank Up switch until the display shows LL for a moment and will then change to St (an
bbreviation for “stop”).
OPEN /
CLOSE
COMPACT
SKIP
PLAY / PAUSE
SKIP
DIGITAL AUDIO
SEARCH
STOP
SEARCH
11
. Press the number 1 footswitch as you start your tape or CD player. The display will show rC indicating that it
recording. It will record 16 seconds of incoming material. The Parameter Edit LEDs will light one at a time as
our record time is used.
OPEN /
CLOSE
COMPACT
SKIP
PLAY / PAUSE
SKIP
DIGITAL AUDIO
SEARCH
STOP
SEARCH
. Once the recording is finished the GS30 will start playback automatically. The Parameter Edit LEDs will light one
a time to show where you are in the recording. The recorded lick will play through in its entirety, and then start
gain automatically. Pressing the number 3 footswitch will back up the recording in 500 millisecond increments.
o start the lick from the beginning, press the number 2 footswitch to stop the playback, and then press the
umber 3 footswitch to begin again.
. Successive presses of the Bank Down button will change the playback speed. Your choices are 78 (7/8 of the
ecorded speed), 34 (3/4 of the recorded speed), 58 (5/8 of the recorded speed),12 (half speed), 38
3/8 of the recorded speed), 14 (1/4 of the recorded speed), and fL (full or normal speed).
o exit the Learn-A-Lick mode, press and hold the Bank Up switch until the display shows a Preset number again.
SECTION THREE - Edit Mode
Editing a Preset
he GS30 allows you to edit the User Presets to your liking. You can change the effects that are used in the Preset,
ter the values of the effect Parameters, or bypass an effect. This is a very simple process and gives you the ability
o create custom sounds to suit your application or taste. You must start with an existing Preset. It is not possible
o start with a blank Preset. Once you have selected a Preset as your starting point, you can select the effect type
hat you want and then fine tune the Parameters of the effects.
User Interface
hoosing the type of effect that you want to use in a Preset is extremely easy. The GS30 has been divided into
roups of effects. Each effect group is accessed by a dedicated effect group button. Simply press the effect button
hat represents the effect group that you want to use, change, or disengage. The following describes the functions
f each button in the user interface while selecting and editing effects:
13
Comp/Wah - This button will access the Compressor and Wah effects. Successive presses of this button
ill toggle between the Compressor and the Wah. The selected effect is indicated by the flashing LED. The status
f the selected effect can then be changed by rotating the Data Wheel. Compression and Wah can be used
multaneously. See page 19 for a complete description of Compression and Wah effects.
2. Expression - This button is used to assign functions to the Expression Pedal. Pressing this button once
ill cause the Expression LED, and the LED of the Parameter currently assigned to the Expression pedal to begin
ashing. Rotating the Data Wheel will change the assignment. The new Parameter selection will be indicated by a
ashing LED in the effect group, or parameter section. Only one Parameter at a time can be controlled by the
xpression Pedal. Successive presses of this button will allow you to edit the range of the Expression Pedal. See
age 16 for more information on assigning the Expression Pedal.
3. Model - This button will access the Amp and Guitar Modeling section. The LED next to the currently
elected Amp/Guitar Model will flash. Successive presses of the Model button will advance through all available
mp and Guitar Models. Only one Model can be used in each Preset. The Display will show the status of the
Modeling section as either on, or two dashes -- indicating bypass. Rotate the Data Wheel to change between
n and bypass. See page 19 for a complete description of Amp/Guitar Models.
4. Tone/Gate - This button will access the Gain, EQ, and Level Parameters of the selected Model, as well as
he Noise Gate Threshold. The selected Modeling Parameter will be indicated by a flashing LED. The Display will
how the value of the selected Parameter, and rotating the Data Wheel will adjust the value. Successive presses of
he Tone/Gate button will advance through all of these Parameters. A separate value for each Modeling Parameter
an be stored to Presets. See page 19 for a complete description of Tone adjustments and Noise Gate effect.
5. Effect - This button will access the Modulation and Pitch shifting effects. The currently selected type of
fect in this group is indicated by a flashing LED. Successive press of the Effect button will select a different type
f effect within this group. The choices include: Chorus, Flanger, Phaser, Tremolo, Ring Modulator, Pixellator,
nveloped Flanger, Enveloped Phaser, Pitch Shift, Detune, and Pitch Bend. Only one type of Effect from this group
may be used at a time. The Display will show the status of the Effect section as either on, or two dashes -ndicating bypass. If the Enveloped Effect is chosen, the Display will show an abbreviation for the type of Envelope
ffect. Rotating the Data Wheel will change the status of the Effect type. You will notice that one or more of the
arameter LEDs will light with each selection in the Effect group. This means that those Parameters are associated
ith the selected Effect, and are available for further adjustment. You will need to use the Parameter button to
ccess the associated Parameters. See page 20 for a complete description of these effect types.
6. Delay/Reverb - This button will access the Delay and Reverb effects. The selected effect type will be
ndicated by a flashing LED. Successive presses of the Delay/Reverb button will toggle between the two effects. The
atus of the selected effect and the current type of Delay and Reverb are shown in the Display. Rotating the Data
Wheel will change the status and/or the type of Delay and Reverb. Both the Delay and Reverb can be used
multaneously in any Preset. You will notice that one or more of the Parameter LEDs will light with each selection
n this group. This means that those Parameters are associated with the selected effect, and are available for
urther adjustment. You will need to use the Parameter button to access the associated Parameters. See page 22
or a complete description of Delay and Reverb effects.
7. Parameters - This button provides access to any Parameters associated with the Effect group, Delay, and
everb. The Parameter button will only work when one of these effects groups has been selected. The lit LEDs
ndicate which Parameters are associated with the selected effect, and the currently selected parameter will be
ndicated by a flashing LED. Successive presses of the Parameter button will advance through all Parameters
vailable for the selected effect. The Display will show the value of the selected Parameter, and rotating the Data
Wheel will change the value of the selected Parameter.
15
8. Spkr Sim - This button turns the Speaker Simulator on and off. The status of the Speaker Simulator is
ndicated by the LED above this button.
9. Store - This button is used to save changes to Presets. The LED above this button will light whenever a
hange has been made to effects or parameters in a preset, indicating that you need to perform the Store function
n order to retain your changes. See page 18 for more information on storing procedures.
0. Display - While in editing mode, the Display will show the status of the selected Effect, or the value of the
elected Parameter. When an effect is bypassed, the display will indicate bypass by showing two dashes -- .
otating the Data Wheel will re-engage the effect, or change the value of the selected Parameter.
Expression Pedal Assignments
he GS30 allows you to assign the Expression Pedal to control various Parameters in real time. Only one
arameter at a time can be assigned to the Expression Pedal. In order for the Expression Pedal to work, it must be
ssigned to the Parameter of an effect currently active in the Preset. The following steps outline the procedure for
ssigning a Parameter to the Expression Pedal:
.- Press the Expression button once. The Expression LED, and the LED of the Parameter currently assigned to the
Expression Pedal begin to flash.
. - Rotate the Data Wheel to select the Effect or Parameter you wish to assign. The selection will be indicated by a
flashing LED in the effect group, or parameter section. The Display will show a number between 1 and 9
representing the 9 possibilities. Your choices include: -- Not Assigned
1 - Volume
2 - Wah
3 - Amp Gain
4 - Modulation Speed
5 - Modulation Depth
6 - Modulation Level
7 - Bend Amount
8 - Delay Level
9 - Reverb Level
nce the desired effect or Parameter has been selected, you can set minimum and maximum values for the
xpression Pedal. These are stop points which limit the range of variance for the Pedal.
. - Press the Expression button a second time to set the toe up value. The Display will alternate between showing
tu and the value currently assigned. Rotate the Data Wheel to select the value that the Expression Pedal will
reach in the toe up position.
. - Press the Expression button a third time to set the toe down value. The Display will alternate between showing
td and the value currently assigned. Rotate the Data Wheel to select the value that the Expression Pedal will
reach in the toe down position.
17
Storing/Copying a Preset
nce you have edited a Preset to your liking, you must store the changes in order for the GS30 to remember your
ettings. There are three steps to storing a Preset.
. Press the Store button once. The Store LED will flash and the User LED lights. The flashing LED is asking “where
do you want to store this sound”?
. Use the Data Wheel to select the User Bank and Preset location for this new sound to be saved.
. Once you have selected the desired Preset location, press the Store button again. The new sound will be saved
in the location you selected.
Note: This same procedure can be used to copy a Preset to a different Preset location.
o abort the store function, press any footswitch and do not press the Store button a second time.
SECTION FOUR - Effects Definitions
Compression - A compressor is a tool used to limit the dynamic range of an instrument. In other words, it
ets a boundary for the volume the instrument will be able to reach. The nature of limiting the dynamics of an
nstrument tends to provide a smooth, even texture to the sound of the instrument. The GS30 has three different
ompressor settings: 1 (low), 2 (medium), and 3 (high). These different settings determe the ratio of the
ompressor. The ratio is the relationship between the input volume to the output volume.
Wah and AutoWah - Wah is a classic effect which provides a sweepable filter giving the instrument a
ocal type sound. The regular Wah is controlled by the Expression Pedal. AutoWah is a Wah effect which is
utomatically controlled based on how hard you play. The GS30 includes 3 types of Wah (1 - Classic Wah, 2 reble Wah, 3 - Bass Wah), and 10 types of AutoWah (u1 - u5 - upward sweeping AutoWah with a progressing
egree of signal strength required to trigger the AutoWah, d1 - d5 - downward sweeping AutoWah with a
rogressing degree of signal strength required to trigger the AutoWah).
Modeling - Modeling is a new technology which allows you to emulate the sounds and frequency response of
ifferent types of amplifiers and guitars. Modeling applies the mathematical equation of an amplifier to your guitar
gnal. The modeling in the GS30 can emulate the sound of an acoustic guitar, or some of the greatest amps in
musical history.
he GS30 has an acoustic guitar simulator, and 6 different Amp Models to choose from: Clean Combo, Dirty
ombo, Stack, Fuzz, Grunge, and Metal. Each Amp Model as well as the acoustic simulator contains 6 adjustable
arameters: Gain (the amount of distortion), High EQ (treble), Mid EQ (mid range tone), Low EQ (bass), Gate
hreshold (see noise gate definition), and Volume (signal strength).
19
Noise Gate - A Noise Gate is a barrier that will close when you are not playing, and open when you are
laying. When the gate is closed, it will not allow ambient noise to come through. A noise gate uses a threshold,
hich is the volume level required to open the gate. If your guitar signal is not strong enough to cross the
hreshold, the gate will not open, and no sound will be heard. The gate on the GS30 is also used for volume
wells. When you have selected the gate to act as a volume swell, you can strum your guitar, and the sound will
de in. There are 10 Gate Threshold settings (1 - 10 with 1 being the most sensitive and progressing to10
equiring the strongest level to open), and 5 Auto Swell settings (A1 opens with a weak signal and fades in
uickly, progressing to A5 requiring a stronger signal and fades in slower).
Chorus - A Chorus is an effect that adds thickness to your guitar signal. It is splitting your guitar signal, adding
short delay to one of the signals, and then changing the delay time at an even rate. This results in a slight
uctuation in pitch of the delayed signal giving the thickness of two guitars playing together.
Flange - A Flanger is similar to a Chorus as far as what it is technically doing, but it sounds very different. It
dds a “whooshing up, and down” sound to your guitar by incorporating regeneration into the delayed signal.
Phaser - A Phaser is an effect that splits the incoming signal, and then changes the phase of one of the signals.
his phase is changed at an even rate, and mixed back in with the original sound. The changing phase mixed with
he original signal causes different frequencies to be canceled, resulting in adding a warm, twisting effect to your
nstrument.
Tremolo - Tremolo is an effect that modulates the volume of your guitar up and down at a steady rate. The
remolo offers two selections of wave forms: triangle and square wave. A triangle wave form is shown as tr in
he display and is smooth. A square wave is shown as re in the display and is more abrupt.
Ring Mod - The ring modulator modulates the guitar’s volume and then takes the sum, and difference of the
modulation frequency and instrument frequency, and mixes it with the original signal. The result is a metallic
nging sound.
Pixellator - A pixellator degrades the signal by undersampling it. The result is an unnatural distortion similar
o those used in today’s techno and industrial styles of music.
Envelope - Envelope can be linked to FL (Flanger) or PH (Phaser). The Envelope alters your sound based
pon how hard you play. The softer that you play, the less intense the sweep of the flanger or phaser effect will be.
he harder that you play, the more intense the sweep will be.
Pitch - Pitch shifting is like having another guitarist playing with you. It makes a copy of your signal, and then
hifts it to a different pitch. The result is two different notes playing together. The Amount Parameter determines
he interval of the shifted note. The possible intervals are: ba = One octave down with no dry signal mixed in, 2d
two octaves down, 1d = one octave down, -5 = a fifth below, -4 = a fourth below, b3 = a minor third
bove, 3 = a Major third above, 4 = a fourth above, 5 = a fifth above, b6 = a flatted sixth above, 6 = a sixth
bove, and 1u = an octave up.
Detune - Detuning is an effect that uses the pitch shifting technology, but does not shift the pitch a full note.
nstead, it just takes the shifted pitch slightly out of tune with your note, as if two guitarists were playing the same
ote. The Amount Parameter is available with this effect and determines the detuning applied which is measured
n cents (100 cents = 1 semitone). The Amount is variable from -18 (18 cents below) to 18 (18 cents above).
Pitch Bend - Pitch Bend is an effect that will require the expression pedal. When the expression pedal is
ssigned to this effect, you can bend the pitch of your note by rocking the expression pedal up and down. As you
ock the pedal forward, the note will bend either up or down depending on the pitch interval you have selected
21
ith the Amount Parameter. The Amount Parameter determines the possible bend ranges and includes: 1u (1
ctave up), 7 (7 semitones above), 2 (2 semitones above), -2 (2 semitones below), 1d (1 octave down), and
d (2 octaves down), 24 (2 semitones above to 4 semitones above), and 34 (3 semitones above to 4 semitones
bove).
Delay - Delay is often referred to as an echo. This is because it will record a short passage of your playing,
nd then repeat it a moment later. You can have it repeat the passage once, or several times. The GS30 offers three
ifferent types of delay, they are tA (tape delay), dL (delay), and PP (ping pong delay). The tape delay is typical
f older delays that were actually using a tape to record and repeat. Tape delay settings deteriorate with each
epeat. All other delay setting provides clear, concise repeats. The ping pong setting will “bounce” repeats from
ft to right when your GS30 is connected in stereo.
Reverb - Reverb simulates different acoustic environments. Reverb can make you sound as though you are
laying in a big empty room, or a small tiled bathroom. It adds ambiance to your guitar by mimicking the
haracteristics of sound bouncing off of walls. The GS30 is capable of producing three different environments.
hey are PL (plate), HA (hall), and Ar (arena). Plate reverb is the way recording studios used to produce
everb. They would attach a driver to a metal plate and then send the signal into the driver which would make the
late vibrate. Hall Reverb is intended to simulate a small acoustic echo chamber, and Arena is the largest
nvironment.
Parameter Definitions
he following is a list of the Parameters available for editing and a description of how each Parameter will affect
he sound of the corresponding effects.
Speed - The Speed control adjusts how fast the Chorus, Flanger, Phaser, Ring Modulator, Tremolo, Detuner,
nveloped Phase, or Enveloped Flange will sweep back and forth. It can be used to vary these effects between a
st shimmering type of sound, and a slow gradual sweeping. Speed ranges from 0 (slow) to 99 (fast).
Depth - The Depth adjusts the intensity of the Chorus, Flanger, Phaser, Tremolo, Ring Modulator, Pixellator, or
nveloped effects. Depth ranges from 0 (minimum intensity) to 99 (maximum intensity).
Amount - The Amount selects the interval of the Detune, Pitch Shift, or Pitch Bend effects. See the description
f these effects for their Parameter ranges.
Delay Time - The Delay Time adjusts the length of time between repeats of the Delay. The Delay Time is
ariable in three ranges from 1 millisecond to 3 seconds. The ranges are as follows: 1 through 99 (1 millisecond
o 99 milliseconds in one millisecond increments), 10. through 99. (100 milliseconds to 990 milliseconds in
n millisecond increments), and 1.0 to 3.0 (1 second to 3 seconds in 100 millisecond increments). Note that
he decimal point is what differentiates between the three ranges.
Regen/Fback - The Regeneration will adjust the number of times that the Delay will repeat the sound. It will
so increase the amount of whooshing heard in the Flanger and Phaser. The Feedback/Regeneration ranges from
to 99.
Decay - The Decay adjusts the length of time the Reverb will be heard. This is perceived as how “big” of a
oom the Reverb effect is simulating. Decay ranges from 0 (smallest) to 99 (largest).
Level - The Level will adjust the overall strength of effects in the Preset. The Level ranges from 0 to 99.
23
SECTION FIVE - Tutorial
Creating a Preset
uppose you want to create a Preset that has medium Compression, the Amp Modeling of a Stack with high Gain
nd boosted highs and lows on the EQ, a low Threshold setting on the Noise Gate, a slow medium Chorus, no
elay, and a Room Reverb. Let’s also suppose that you wanted the Expression Pedal to control a classic Wah. The
eps outlined below will guide you through creating this Preset.
tep 1. Adjust the Compression - Press the effect select button under the Compression group. The LED next
o Compressor will begin to flash. The Display will show the current status of the Compressor. Since we want a
medium compression setting, rotate the Data Wheel until the number 2 shows in the Display.
tep 2. Select the Wah Type - Since the Wah effect is in the Compression section, press the select button
nder the Compression group again. The LED next to Wah will begin to flash. Rotate the Data Wheel until the
isplay shows the number 1 (representing a classic wah).
tep 3. Assign the Expression Pedal to Wah - Press the Expression button. The LED next to Expression
ssign begins to flash. If the Expression Pedal is currently assigned to a Parameter, the assigned Parameter’s LED
ill flash also. Rotate the Data Wheel until the LED next to Wah is flashing with the Expression Assign LED (this
hould correspond to a number 2 in the Display).
tep 4. Select the Amp/Guitar Model - Press the Model button. An LED next to the currently selected Amp
Model will begin to flash. Continue to press the Model button until the LED next to “Stack” is lit. If the Amp/Guitar
Modeling is bypassed (indicated by two dashes -- in the Display), rotate the Data Wheel until the Display shows
n.
tep 5. Adjust the Tone/Gate Parameters - In this sample Preset, we wanted high gain, and boosted bass
nd treble. Press the button in the Tone/Gate column. The LED next to Gain will begin to flash. Rotate the Data
Wheel until the Display shows 99. Press the Tone/Gate button again and the LED next to High EQ begins to flash.
otate the Data Wheel until the Display shows 4. Press the Tone/Gate button again and the LED next to Mid EQ
ashes. Rotate the Data Wheel until the Display shows 0. Press the Tone/Gate button again and the Low EQ LED
ill flash. Rotate the Data Wheel until the Display shows 6. Press the Tone/Gate button again and the Gate LED
ashes. Rotate the Data Wheel until the Display shows 1. Press the Tone/Gate button one more time and the
olume LED blinks. This parameter is a matter of personal taste, but since we have such a high Gain level, let’s set
his to about 75 by rotating the Data Wheel.
25
tep 6 Select the Chorus Effect - Press the Effect button until the LED next to Chorus is flashing. If the Chorus
bypassed (indicated by two dashes -- in the Display), rotate the Data Wheel until the Display shows on.
ou will notice that the Parameter LEDs next to the words “Speed,” “Depth,” and “Level” are now lit. This
ndicates that these three Parameters are associated with the Chorus, and you can adjust these parameters. Press
he Parameter Edit button once and the Speed LED will begin to flash indicating that you are about to edit the
horus Speed. The Display will show the current value for the Chorus Speed. Since our sample Preset calls for a
ow medium Chorus, use the Data Wheel to set the Speed value to 5. Press the Parameter button again and the
epth LED flashes. Rotate the Data Wheel until the Display shows 10. Press the Parameter button again and the
evel LED flashes. Rotate the Data Wheel until the Display shows 50.
tep 7 Turn the Delay off - Our Sample Preset called for no Delay to be used. So, press the Delay/Reverb
utton and the LED next to Delay begins to flash. Rotate the Data Wheel counterclockwise until the Display shows
wo dashes -- indicating that it is bypassed.
tep 8 Select the Reverb - Our sample preset called for a Hall type Reverb. Press the Delay/Reverb button
gain and the Reverb LED will light. Rotate the Data Wheel until the display shows HA for Hall. The Parameter
EDs next to the words Decay and Level light indicating that these parameters are available for Reverb adjustment.
ress the Parameter button and the Decay LED will flash. Rotate the Data Wheel until the Display shows 60.
ress the Parameter button again and the Level LED begins to flash. Rotate the Data Wheel until the Display shows
5 as the Reverb Level.
tep 9 Store the Preset - All that is left to do now is to store our new preset, otherwise the GS30 will forget the
hanges that we have made. Press the Store button once. The Store LED will begin to flash and the Display shows
he Preset used before we edited our effects. Rotate the Data Wheel to select the User Preset location to store this
ew sound. Once the desired location is in the Display, press the Store button again and the changes will be saved.
ongratulations! You have successfully created a new Preset.
27
SECTION SIX - Other Stuff
Resetting the GS30
his function erases all of the user presets and copies the factory Presets into the User Presets.
Caution! This procedure will overwrite and reset ALL User Presets in the GS30 memory. Be sure you want to
rase the memory and start fresh before continuing with this procedure.
. Disconnect the power from the rear panel of the GS30.
. Press and hold the Compressor, and Model select buttons simultaneously.
. Reconnect the power while continuing to hold the Compressor and Model buttons until the display shows rS
indicating it has reset.
fter the reset has occurred, The GS30 will ask you to calibrate the Expression Pedal. The Display will read tu.
ock the expression pedal back to the toe up position and press the flashing number 1 footswitch. The display
ow reads td. Rock the pedal forward to the toe down position and press the flashing number 3 footswitch.
he expression pedal is now calibrated for use with all programs.
Calibrating the Expression Pedal
the Expression Pedal ever has problems with controlling parameters through their full range, it may be
ecessary to re-calibrate it. Follow these steps for Expression Pedal calibration:
. Disconnect the power from the GS30.
. Press and hold the Expression button and reconnect the power. Continue holding the Expression button until
the display shows tr, then release it.
. When the display reads tu, rock the pedal back to the toe up position and press the flashing number 1
Footswitch.
. The display now reads td. Rock the Expression Pedal forward to the toe down position and press the flashing
number 3 Footswitch.
he expression pedal is now calibrated for use with all programs.
an er shows in the Display, an error has occurred in the Pedal Calibration and the GS30 will repeat the
alibration prompts asking you to repeat steps 3 and 4.
he Expression Pedal can be disabled by pressing and holding the Expression button down for a few seconds.
Maintenance and Service
he GS30 is a maintenance free device. There are no user serviceable parts inside of the unit. Opening the chassis
ill void your warranty. All service and repair must be performed by an authorized DOD service center. Should a
roblem arise with your GS30, contact your local DOD dealer for return/repair procedures.
29
SECTION SEVEN - Appendix
Warranty
. The warranty registration card must be mailed within ten days after purchase date to validate the warranty of
his DOD product.
. DOD warrants this product when used solely within the U.S. to be free from defects and workmanship under
ormal use and service.
. DOD Electronics liability under this warranty is limited to repairing or replacing defective materials that show
vidence of defect, provided the product is returned through the original dealer, where all parts and labor will be
overed up to a period of one (1) year. The company shall not be responsible for any consequential damage as a
esult of the products use in any circuit or assembly.
. Proof of date of purchase is considered to be the burden of the consumer
. DOD reserves the right to make changes in design or make improvements upon this product without incurring
ny obligation to install the same on PRODUCTS PREVIOUSLY MANUFACTURED.
. The foregoing is in lieu of all other warranties, either expressed or implied, and DOD neither assumes nor
uthorizes any person to assume any obligation or liability in connection with the sale of this product. In no event
hall DOD or its dealers be liable special or consequential damages or from any delay in the performance of this
arranty due to causes beyond their control.
Specifications
nput: 1/4” unbalanced
nput Impedance: 500 k ohms
Max Input Level: 7.6 dBV
utput: 2 - 1/4” unbalanced
utput Impedance: 10 ohms
Max Output Level: 11 dBV
eadphone: 1/8” Stereo TRS
eadphone Output Impedance: 10 ohms
/D: 64 x oversampling, 24 bit delta sigma
SP: 24 bit
ower Supply: 10 volts AC, 780 mA (PS750)
ower Consumption: 5.5 watts
Memory: 30 user/30 factory
ffects: Compression, 7 Amp/Guitar Models, 3 band EQ, Noise Gate, Chorus, Flange, Tremolo, Phaser, Ring
Modulator, Pixellator, Pitch Shift, Pitch Bend, Detune, Enveloped Flange, Enveloped Phase, Wah, AutoWah, Delay,
everb, Speaker Simulator.
imultaneous Effects: up to 10
imensions: 17” L x 8” W x 2.75” H
Weight: 3.7 lbs.
31
DOD Electronics Corporation
8760 S. Sandy Parkway
Sandy, Utah 84070
PH (801) 566-8800
FAX (801) 566-7005
International Distribution
8760 S. Sandy Parkway
Sandy, Utah 84070 USA
PH (801) 568-7642
FAX (801) 568-7638
DOD and GS30 are trade marks of the
Harman Music Group Inc.
Copyright the Harman Music Group
Printed in the USA 05/99
Manufactured in the USA
GS30 Owners Manual 18-6310-B
Please visit DOD on the World Wide Web
at:
http://www.dod.com