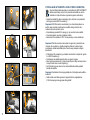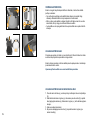
1
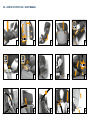
CYBEX GmbH
Riedinger Str. 18 | 95448 Bayreuth | Germany
[email protected]
www.cybex-online.com
www.facebook.com/cybex.online
C223_741-9_01A
SOLUTION X2-FIX
USER GUIDE
RS / EN
ECE R44/04, Gr. 2/3 | 15-36kg (ca. 3–12Y)
RS – KRATKO UPUTSTVO / EN – SHORT MANUAL
1
1
2
3
4
5
6
7
8
9
10
11
12
13
14
15
RS
UPOZORENJE! OVO KRATKO UPUTSTVO SLUŽI SAMO ZA OPŠTI PREGELD. ZA MAKSIMALNU BEZBEDNOST I KOMFOR VAŠEG
DETETA, NEOPHODNO JE DA PAŽLJIVO PROČITATE I PRATITE CELO UPUTSTVO ZA UPOTREBU.
EN
WARNING! THIS SHORT MANUAL SERVES AS AN OVERVIEW ONLY. FOR MAXIMUM PROTECTION AND BEST COMFORT OF YOUR
CHILD, IT IS ESSENTIAL TO READ AND FOLLOW THE ENTIRE INSTRUCTION MANUAL CAREFULLY.
2
3
DRAGI KUPCI!
PUNO HVALA NA KUPOVINI CYBEX SOLUTION X2-FIX. U RAZVOJU CYBEX SOLUTION X2-FIX NAŠ GLAVNI
INTERES BIO JE SIGURNOST, UDOBNOST I LAKO KORIŠĆENJE. PROIZVOD JE RAZVIJEN UZ STROGU
KONTROLU KVALITETE I ZADOVOLJAVA SVE RELEVANTNE SIGURNOSNE STANDARDE.
DEAR CUSTOMER!
Thank you for purchasing the CYBEX Solution X2-fix. We assure you that in the process of
developing the CYBEX Solution X2-fix we focused on safety, comfort and user friendliness.
The product is manufactured under special quality surveillance and complies with the
strictest safety requirements.
4
UPUTSTVO ZA UPOTREBU
CYBEX Solution X2-fix booster
sa naslonom za leđa
PREPORUČLJIVO ZA:
Starost: od cca 3 do 12 godina
Težina: 15 do 36 kg
Visina: do 150 cm
za sedišta sa automatskim sigurnosnim
pojasom sa
uporištem u 3 tačke.
HOMOLOGACIJA:
ECE R-44/04, grupa 2/3, 15-36 kg
04301298
CYBEX GmbH
Riedinger Str. 18, 95448 Bayreuth
Germany
5
10/2013
INSTRUCTION MANUAL
CYBEX Solution X2-fix
booster with backrest
RECOMMENDED FOR:
Age: from approximately 3 to 12 years
Weight: 15 to 36 kg
Body height: up to 150 cm
For vehicle seats with three-point
automatic retractor belt
HOMOLOGATION:
ECE R-44/04, group 2/3, 15 to 36 kg
RSsadržaj
Upozorenje! Za maksimalnu bezbednost Vašeg deteta, neophodno je
koristite i montirate CYBEX Solution X2-fix u skladu sa ovim uputstvom za
upotrebu.
Napomena! Molimo Vas da uvek imate uputstvo za upotrevu pri ruci te ih
čuvajte ispod elastičnog dela na zadnjoj strani naslona za leđa.
Napomena! Karatkeristike sedišta se mogu razlikovati u zavisnosti od države.
Kratko uputstvo...........................................................................................1
Upozorenje/Napomena...............................................................................2
Homologacija.................................................................................................5
Postavljanje...................................................................................................7
Podešavanje u skladu sa visinom deteta...........................................7
Podešavanje naslona za glavu..............................................................7
Najbolja pozicija u automobilu..............................................................9
Postavljanje auto sedišta u vozilo pomoću konektora.........11
Uklanjanje Solution X2-fix.....................................................................13
Osiguravanje deteta.................................................................................13
Pričvršćivanje sigurnosnog pojasa Vašeg deteta...................15
Da li je Vaše dete pravilno osigurano?...........................................17
Naslon za glavu...........................................................................................17
Održavanje proizvoda..............................................................................19
Uklanjanje presvlaka..............................................................................19
Uklanjanje presvlaka sa naslona......................................................19
Čišćenje...........................................................................................................21
Šta uraditi nakon nesreće.....................................................................21
Trajnost proizvoda...................................................................................21
Odlaganje.......................................................................................................23
Garancija........................................................................................................23
ENCONTENT
Warning! For your child`s maximum protection, it is essential to use and
install the CYBEX Solution X2-fix according to the instructions in this
manual.
Note! Please keep the instruction manual close by for future reference (e.g.
under the elastic cover on the rear side of the backrest)
Note! According to local codes the product characteristic can be different.
Short manual..................................................................................................1
Warning / Note................................................................................................2
Homologation.................................................................................................5
First installation..........................................................................................8
Adjustment regarding the child`s height.......................................8
Adjustment of the headrest..................................................................8
The best position in the car..................................................................10
Installation of the car seat with connectors...........................12
Uninstalling the Solution X2-fix.........................................................14
Securing the child.....................................................................................14
Fastening the seat belt of your child.............................................16
Is your child properly secured?.......................................................18
Reclining headrest....................................................................................18
Product care...............................................................................................20
Removing the seat cover........................................................................20
Removing the seat cover of the backrest....................................20
Cleaning..........................................................................................................22
What to do after an accident...............................................................22
Durability of the product ....................................................................22
Disposal...........................................................................................................24
Warranty........................................................................................................24
6
postavljanje
b
Auto sedište se sastoji od postavljenog sedišta (d) i naslona za leđa (a) sa
podesivim naslonom za glavu i ramena. Samo će pravilna kombinacija oba dela
pružiti Vašem detetu optimalnu udobnost i sigurnost.
Upozorenje! Niti jedan deo ne sme se koristiti odvojeno ili u kombinaciji
sa proizvodima druge linije ili drugog proizvođača. U tim slučajevima
sertifikat ovog sedišta prestaje da vredi.
a
c
a
d
d
Spojite naslon za leđa (a) na booster (d) zakopčavajući držač (b) na osovinu (c)
boostera (d).
Napomena! Molimo Vas da uvek imate uputstvo za upotrevu pri ruci te ih
čuvajte ispod elastičnog dela na zadnjoj strani naslona za leđa.
Upozorenje!Molimo proverite da se plastični delovi auto sedišta nikad ne
zaglave (npr. vratima automobila ili kod podešavanja zadnjeg sedišta).
Pričvrstite bočnu zaštitu pomoću odgovarajućih otvora (z), a onda povucite
zaštitu na ole dok ne čujete klik.
z
PODEŠAVANJE U SKLADU SA VISINOM DETETA
e
e
f
h
Podešavanje visine naslona za glavu (e) na najbolji mogući položaj, će
optimizovati sigurnost i udobnost Vašeg deteta. Ona takođe garantuje najbolji
položaj za dijagonalni pojas (f). Naslon za glavu (e) može se podesiti u 11
različitih pozicija. Naslon za ramena je pričvršćen na naslon za glavu i ne mora
se posebno prilagođavati. Možete proveriti optimalnu prilagođenost naslona za
glavu pokušavajući da stane tačno dva prsta između naslona za glavu i ramena
deteta.
PODEŠAVANJE NASLONA ZA GLAVU
7
• Postavite Vaše dete u auto sedište.
• Povucite dršku za podešavanje (h) kako biste otključali naslon za glavu.
• Sada možete podesiti naslon za glavu (e) na željenu visinu.
• Čim pustite dršku za podešavanje (h),naslon za glavu (e) će biti zaključan u
željenom položaju.
FIRST INSTALLATION
The child seat consists of a booster seat (d) and a backrest (a) with height
adjustable shoulder and headrest. Only the combination of both parts provides
best protection and comfort to your child.
Warning! The parts of the CYBEX Solution X2-fix must not be used
alone or in combination with boosters, backrests or headrests from
other manufacturers or of a different product series. In such cases, the
certification expires immediately.
Connect the backrest (a) to the booster (d) by hooking the guide lug (b) on the
axis (c) of the booster (d).
Note! Please keep the instruction manual close by for future reference (e.g. by
storing it under the elastic cover at the rear side of the backrest.)
Warning! Please make sure that the plastic parts of the child seat never
get jammed (e.g. in the car door or by adjusting the back seat).
Insert the Linear Side-impact Protection (L.S.P. System) pads on both sides into
the mounting holes (z), then push down until they click into place.
adjustment regarding the child`s height
A headrest can only provide the best protection and comfort for your child
if optimally adjusted. Only then it can guarantee the optimal position of the
diagonal belt (f). You can adjust the height of the Solution X2-fix headrest (e) in
11 positions. The shoulder rest is attached to the headrest and does not have to
be adjusted separately. You can check the optimal adjustment of the headrest
by trying to fit exactly two fingers between the headrest and the shoulders of the
child.
Adjustment of the headrest
• Place your child in the child seat.
• Pull the adjustment handle (h) in order to unlock the shoulder and headrest.
• Bring the shoulder and headrest (e) in the desired position.
• As soon as you let go of the adjustment handle (h), the shoulder and headrest
(e) locks automatically.
8
NAJBOLJA POZICIJA U AUTOMOBILU
CYBEX Solution X2-fix se može koristiti na svim sedištima opremljenim
automatskim sigurnosnim pojasom sa uporištem u tri tačke. Preporučujemo
korišćenje auto sedišta u zadnjem delu vozila. U prednjem je Vaše dete
najčešće izloženo većem riziku u slučaju nesreće.
Auto sedišto se ne sme koristiti uz pojas sa dve uporišne tačke ili pojasom
preko krila. Osiguravanje Vašeg deteta pomoću pojasa sa dve uporišne
tačke može dovesti do ozlede ili smrti deteta.
Instaliranje CYBEX Solution X2-fix sa ISOFIX-CONNECT sastavom
moguće je izvesti samo u određenim vrstama vozila. molimo pogledajte
popis odobrenih automobila da biste proverili kompatibilnost vašeg
vozila. Ovaj popis se redovno ažurira, a najnovija verzija može se
dobiti od CYBEX, vašeg prodavca ili pristupa online na www.cybex-online.com.
Izuzetno, auto sedište se može koristiti i na suvozačevom sedištu. U tom slučaju
uradite sledeće:
f
9
• Ako je vozilo opremljeno vazdučnim jastukom za suvozačevo sedište gurnite
suvozačevo sedište unatrag što je više moguće, ali upamtite da početna tačka
sigurnosnog pojasa automobila uvek mora biti iza vodiča za pojas.
• Sledite uputstva proizvođača automobila.
Upozorenje! Dijagonalni pojas (f) mora prolaziti dijagonalno sa zadnje na
prednju stranu. Dijagonalni pojas (f) ne sme ni pod kojim okolnostima
prolaziti kroz vodič na ramenu sa prednje strane. Ako niste u mogućnosti
da pravilno postavite CYBEX Solution (npr.pomeranjem sedišta u
automobilu), ovo auto sedište nije pogodno za taj tip vozila.
Prtljag i drugi predmeti u vozilu moraju biti bezbedno prišvršćeni, jer mogu
izazvati povrede prilikom nesreće. Predmeti koji misu pričvršćeni postaju
smrtonosni projektili prilikom sudara.
Upozorenje! Za vozila s putničkim mestima koji su pozicionirani
postrance, korišćenje ovog dečjeg sedišta nije dozvoljeno. Za sedišta
koja su pozicionirana u smeru suprotnom od putovanja, npr. u kombi ili
minibus vozilima, korištenje dečjeg sedišta je dozvoljeno, uz pretpostavku
da je sedište odobreno za korišćenje odraslih osoba. Molimo Vas da
osigurate da se naslon za glavu ne ukloni prilikom ugradnje dečjeg
sedišta na sedište koje je postavljeno u smeru suprotnom od putovanja!
Dečje sedište mora imati pričvršćen pojas čak i kada nije u upotrebi. To je
neophodno kako bi se izbegle ozlede vozača ili putnika od nepričvršćenog
sedišta u slučaju naglog zaustavljanja ili sudara.
Napomena! Nikad ne ostavljajte dete u automobilu bez nadzora odraslih.
THE BEST POSITION IN THE CAR
Without using the connectors the CYBEX Solution X2-fix can be installed on all
vehicle seats equipped with a three-point automatic retractor belt. We generally
recommend, however, using the child seat in the back of the vehicle. In the
front, your child is usually exposed to higher risks in case of an accident.
Warning! You must not use the Solution X2-fix with a two-point belt or a
lap belt. When securing your child with a two-point belt, the child may
sustain lethal injuries in an accident.
When installing the CYBEX Solution X2-fix with its ISOFIX-CONNECT
system the child seat falls into the „semi-universal“ admission category,
i.e. it may only be used in certain types of vehicles. Please refer to the
list of approved cars to check your vehicle`s compatibility. This list is
updated regularly, and the latest version can be obtained from CYBEX, your
retailer or accessed online at www.cybex-online.com. In exceptions, the child
seat may be used on the passenger seat. Please note the following for such
cases:
• In cars equipped with airbags you should push the passenger seat as far back
as possible. Please make sure that the upper point of the vehicle seat belt
stays behind the belt guide of the child seat.
• You must follow the recommendations of the vehicle manufacturer.
Warning! The seat belt (f) must run diagonally from the back and must
never lead to the front to the upper belt point of the front seat of in your
vehicle. Should you be unable to adjust this for example by pushing the
seat to the front or by using the seat on a different seat in the car, then the
child seat is not suitable for this vehicle.
Luggage or other objects in the vehicle which may cause injuries in an accident
must always be secured properly. Loose parts may turn into deadly projectiles
during an impact.
Warning! For vehicles with passenger seats that are positioned sideways,
the use of this child seat is not allowed. For seats that are positioned
against the direction of travel, e.g. in a van or a minibus, the use of the
child seat is allowed, assuming the seat is approved to carry an adult.
Please ensure that the headrest is not taken off when mounting the child
seat on a passenger seat which is positioned against the direction of
travel! The child seat must have the seat belt fastened even when not in
use. This is necessary to avoid the driver or passenger getting injured by
a loose child seat when making an emergency stop or in case of a crash.
Note! Please never leave your child unattended in the car.
10
POSTAVLJANJE AUTO SEDIŠTA U VOZILO POMOĆU KONEKTORA
Sigurnost Vašeg deteta povećaće će se korišćenjem ISOFIX-CONNECT
sistema povezivanja, koji će čvrsto povezati auto sedišto sa vozilom.
Vaše dete će i dalje biti vezano sigurnosnim pojasom automobila.
• Spojite dva dodata X-fix dela za instalaciju (njihov duži deo mora pokazivati
prema gore) sa dva ISOFIX konektora (i).
Napomena! ISOFIX konektori na automobilu (i) su dva metalna prstena na
sedištu, koja se nalaze između naslona i sedišta vašeg vozila. Ako ste u
nedoumici proverite priručnik vozila.
• Za podešavanje premestiti X-fix polugu (v), koji se nalazi na dnu sedišta.
• Povucite konektore (w) koliko god daleko možete.
• Zaokrenite X-fix konektore za 180 ° dok ne pokazuju u smeru instaliranja
Napomena! pobrinite se da dve zelene tipke za sigurnost (x) konektora nisu
izvučene. Ako je potrebno, otpustite konektore pritiskom na zelenu tipku i
povlačenjem unazad narandžaste tipke. Ponovite ovaj postupak sa drugim
konektorom.
• Pritisnite oba X-fix konektora (w) u dodatke za isofix dok ne čujete klik i gurnite
ih u ISOFIX konektore (i).
• Povlačenjem auto sedišta proverite da je ono sigurno spojeno.
• Zeleni sigurnosni pokazivači (x) tada moraju biti jasno vidljivi sa donje strane i
moraju izvirivati izvan crvenih dugmadi (y).
• Sa X-fix tipkom koja se nalazi na dnu auto sedišta sada možete podesiti
položaj auto sedišta.
Napomena! Za dodatne informacije pogledajte deo „postavljanje auto sedišta u
automobil“
• Sada možete vezati dete sigurnosnim pojasom.molimo pogledajte deo
„Pričvršćivanje sigurnosnog pojasa Vašeg deteta“
y
11
x
INSTALLATION OF THE CAR SEAT WITH CONNECTORS
The saftey of your child will be increased using the ISOFIX-CONNECT
system linking the child seat tightly with the vehicle. Your child will still
be buckled up using the car`s 3-point-belt.
• Connect the two enclosed X-fix installation aids (their longer parts pointing
upwards) with the two ISOFIX anchorage points (i).
Note! The car`s ISOFIX anchorage points (i) are two metal rings per seat,
located between the backrest and the seat cushion of your vehicle seat. If in
doubt please refer to your vehicle owner’s manual.
• For adjustment move the X-fix lever (v), located on the bottom of the seat.
• Pull the connectors (w) as far out as they will go.
• Rotate the X-fix connectors by 180° until they point into the direction of the
installation aids.
Note! Make sure that the green safety indication (x) of the connectors is not
visible. If necessary, release them by pushing and simultaneously pulling back
the red release button (y). Repeat this procedure with the other connector.
• Push both of the X-fix connectors (w) into the installation aids until you hear
them clicking into the ISOFIX anchorage points (i).
• Make sure that the child seat is connected safely by trying to pull it out.
• The green safety indication (x) must be clearly visible on both sides of the red
release buttons (y).
• With the X-fix button located on the bottom of the child seat you can now
adjust the position of the seat.
Note! For additional information please refer to the section “Placing the Seat in
the Car”.
• You can now buckle up the child. Please refer to “Buckling Up the Child”.
12
UKLANJANJE SOLUTION X2-FIX
Izvedite sve gore navedene postupke obrnutim redom.
• Otpustite ISOFIX konektore (w) tako što ćete istovremeno povlačiti
unazad crvenu dugmad (y).
• Izvucite sedište izvan dodataka za instalaciju (u).
• Okrenite X-fix konektore za 180 °.
• Povucite X-fix polugu smeštenu na dnu auto sedišta i gurnite X-fix konektore
u dečije sedište sve dok nisu potpuno skriveni.
Napomena! Sledeći ove korake sedište vozila će biti zaštićeno, a ISOFIX
konektori neće biti uprljani ili oštećeni. Oštećenja i mrlje mogle bi ometati
nesmetan rad.
a
1
2
OSIGURAVANJE DETETA
13
Postavite auto sedište na sedište automobila.
• Molimo osigurajte da je naslon za leđa (a) dečjeg auto sedišta čvrsto
prislonjen za naslon za leđa sedišta automobila tako da dečje auto sedište ni
pod kojim okolnostima nije u položaju za spavanje.
• Kad koristite-ISOFIX sidrišta u automobilu, proverite da li je naslon
Solution X2-fix je savršeno usklađen i u punom kontaktu sa zadnjim
sedištem. Pozicija se može podesiti sa polugom za nameštanje (v) koja
se nalazi na dnu auto sedišta.
• Ako Vam smeta naslon za glavu na sedištu automobila, molimo Vas izvucite
ga do krajnjeg položaja ili potpuno izvucite. Naslon za leđa auto sedišta (a) se
optimalno prilagođava skoro svakom nagibu sedišta automobila.
Upozorenje! Naslon za leđa (a) dečijeg auto sedišta trebalo bi da bude
čvrsto prislonjen za naslon za leđa sedišta automobila. Za najbolju
moguću zaštitu Vašeg deteta, sedište mora biti u normalnom uspravnom
položaju!
Napomena! Na nekim auto presvlakama auto sedišta koje su napravljene od
osetljivih materijala (npr. velur, koža i sl.) korišćenje dečjih auto sedišta može
dovesti do tragova trošenja i habanja. Kako bi to izbegli, trebali biste pod auto
sedišto staviti ćebe ili peškir.
UNINSTALLING THE Solution X2-fix
Perform all installation steps in reverse order.
• Release the ISOFIX connectors (w) by simultaneously pulling and
slinging back the red release buttons (y).
• Pull the seat out of the installation aids (u).
• Rotate the X-fix connectors by 180°.
• Pull the X-fix lever located at the bottom of the child car seat and push the
X-fix connectors into the child seat until completely hidden.
Note! Following these steps the vehicle`s seat pad will be protected and the
Isofix connectors will be prevented from being stained or damaged. Damages
and stains could obstruct a smooth operation.
SECURING THE CHILD
Place the child seat on the respective seat in the car.
• Please make sure that the backrest (a) of the child safety seat rests flat
against the backrest of the car seat so that the child seat is under no
circumstances in a sleeping position.
• When using the ISOFIX-anchorages in the car, make sure that the
backrest of the Solution X2-fix is perfectly aligned and in full contact
with the rear vehicle seat. The position can be adjusted with the
adjustment lever (v) located on the bottom of the child car seat.
• Should the headrest of the vehicle seat interfere, please pull it out
completely and turn it around or take it off entirely. The backrest (a)
optimally adjusts to almost any inclination of the vehicle seat.
Warning! The backrest of the Solution X2-fix should rest flat against the
upright part of the car seat. Pushing the booster rearwards the seat should
be tightly pressed against the seat. For the best possible protection of
your child, the seat must be in a normal upright position!
Note! On some car seat covers made of sensitive material (e.g. velours, leather
etc.) the use of child seats may lead to traces of wear and tear. To avoid this,
you should put a blanket or a towel underneath the child seat.
14
PRIČVRŠĆIVANJE SIGURNOSNOG POJASA VAŠEG DETETA
l
l
m
f
k
n
g
f
15
d
n
k
e
f
Stavite dete u auto sedište. Izvucite pojas i postavite ga ispred vašeg deteta do
kopče (l).
Upozorenje! Nemojte uvrtati sigurnosni pojas.
Postavite kraj pojasa (m) u kopču (I). Zatvorite kopču (m+l), tako da čujete
klik,kako biste bili sigurni da je pravilno zaključana.
Postavite pojas preko kukova (n) u donje vodiče za pojas (k) na auto sedištu.
Sada stegnite pojas preko kukova (n) na način da povučete dijagonalni pojas
(f), sve dok više nema slobodnog mesta. Što je pojas čvršće stegnut bolje štiti
od ozleda. Dijagonalni pojas i pojas preko kukova bi trebalo da budu umetnuti u
donji vodič za pojas na istoj strani na kojoj je i kopča.
Upozorenje! Kopča (l) ni pod kojim uslovima ne bi smela dohvatiti otvore
za pojas na dnu sedišta (k).Ako je pojas predug auto sedište nije pogodno
za taj automobil.
Pojas preko kukova (n) bi trebalo da bude u donjim otvorima (k) sa obe strane
sedišta (d).
Napomena! Od početka naučite dete da obraća pažnju na čvrstoću
sigurnosnog pojasa i da samo stegne pojas ukoliko je to potrebno.
Upozorenje! Pojas preko kukova mora, sa obe strane, prelaziti što je niže
moguće preko prepona Vašeg deteta kako bi se postigao optimalni učinak
u slučaju nesreće.
Sada provedite dijagonalni pojas (f) kroz gornji crveni vodič za pojas (g) na
naslonu za ramena (e),sve dok nije potpuno unutar vodiča za pojas.
Proverite da li dijagonalni pojas (f) prolazi između detetovog vrata i spoljnog
ruba ramena.Ako je potrebno podesite naslon za glavu.Visina naslona za glavu
može se podesiti i kada je auto sedište namešteno u automobilu.
FASTENING THE SEATBELT OF YOUR CHILD
Put your child in the child seat. Pull out the three-point belt and lead it in front of
your child to the belt buckle (l).
Warning! Never twist the belt!
Put the belt guide (m) into the belt buckle (l). If you hear a clicking sound it is
securely locked.
Put the lap belt (n) in the bottom belt guides (k) of the child seat. Now pull the
lap belt (n) tight by pulling the diagonal belt (f) until there is no slack. The tighter
the belt the better it can protect from injuries. The diagonal belt and lap belt
should both be inserted in the bottom belt guide at the side of the belt buckle.
Warning! The belt buckle of the car seat (l) must under no circumstances
reach into the bottom belt guide (k). If the belt strap is too long, the child
seat is not suitable for this vehicle.
The lap belt (n) should be placed in the bottom belt guides (k) on both sides of
the seat (d).
Note! Teach your child from the beginning to always pay attention to a tight belt
and that it should pull the belt tight by itself if necessary.
Warning! The lap belt must, on both sides, run as low across the groin
of your child as possible in order to take optimal effect in case of an
accident.
Now lead the diagonal belt (f) through the upper red belt guide (g) in the
shoulder rest (e) until it is inside the belt guide.
Please make sure that the diagonal belt (f) runs between the outer edge of
the shoulder and your child`s neck. If necessary, adjust the running of the belt
by adjusting the height of the headrest. The height of the headrest can still be
adjusted in the car.
16
DA LI JE VAŠE DETE PRAVILNO OSIGURANO?
t
Kako bi omogućili najviši stepen zaštite za Vaše dete, molimo Vas obratite
pažnju na sledeće pre pokretanja automobila:
• Pojas preko kukova (n) mora prolaziti kroz donje vodiče za pojas (k) s obe
strane sedišta.
• Dijagonalni pojas (f) mora biti u donjem otvoru za pojas (k) na strani gde je i
kopča.
• Dijagonalni pojas (f) mora prolaziti kroz otvor za pojas na vrhu (g) kod naslona
za glavu,označen crveno.
• Dijagonalni pojas (f) mora prolaziti kroz otvor za pojas na vrhu prema natrag
prema vodiču za pojas vozila
• Celi sigurnosni pojas mora biti zategnut i ne sme biti uvijen.
• Sedište je zaključano na obe strane s X-fix konektorima i ISOFIX
konektorima.
• Naslon za leđa (a) auto sedišta je čvrsto naslonjen na naslon sedišta
automobila, osiguravajući da auto sedište uvek ostaje u uspravnom
položaju.
Napomena! Zeleni indikatori za sigurnost (x) su jasno izvan crvenih dugmadi sa
obe strane(y).
NASLON ZA GLAVU
17
CYBEX Solution X2-fix sadrži podešavajući naslon za glavu (r). U slučaju da
Vaše dete zaspi, naslon pomaže da glava deteta ne klizne prema napred.
Takođe, povećava udobnost Vašeg deteta prilikom vožnje automobilom.
Napomena! Molimo Vas da osigurate da je detetova glava uvek u kontaktu s
naslonom za glavu jer inače naslon za glavu ne može optimalno ispuniti svoju
funkciju zaštite od udaraca sa strane.
Lagano podižući naslon za glavu nagib naslona za glavu (r) može se podesiti u
tri različita položaja.
Upozorenje! Mehanizam za podešavanje (t) ne sme biti blokiran nikakvim
preprekama. Kako biste sprečili ozlede Vašeg deteta u slučaju nesreće
funkcionalnost sedišta mora biti garantovana.
IS YOUR CHILD PROPERLY SECURED?
In order to ensure the maximum safety for your child, please check prior to the
ride whether …
• the lap belt (n) runs in the bottom belt guides (k) on both sides of the seat.
• the diagonal belt (f) also runs in the bottom belt guide (k) of the seat on the
side of the belt buckle.
• the diagonal belt (f) runs through the belt guide (g) of the shoulder rest,
marked red.
• the seat belt (f) runs diagonally to the back.
• the entire belt is snugly fastened and not twisted.
• the seat pad is locked in place on both sides with the X-fix connectors
and the ISOFIX anchorage points.
• the backrest (a) of the of the child seat rests flat against the vehicle
seat, making sure the child seat always stays in an upright position.
Note! The green safety indication (x) must be clearly visible on both sides of the
red release buttons (y).
RECLINING HEADREST
The CYBEX Solution X2-fix has a reclining headrest (r) preventing your child`s
head from falling forward when asleep. Furthermore, this adjustable headrest
contributes to the comfort of your child during the car ride.
Note! Please ensure that the child`s head always remains in contact with the
reclining headrest since otherwise the headrest cannot fulfill its optimal sidecrash protective function.
By slightly lifting the headrest, the inclination of the headrest (r) can be adjusted
in three different positions.
Warning! The locking device (t) must never be blocked by any objects!
In case of an accident, the free movement of the inclination must be
guaranteed since otherwise your child might be injured.
18
ODRŽAVANJE proizvoda
Kako bi omogućili najviši stepen zaštite za Vaše dete, molimo Vas obratite
pažnju na sledeće:
• Sve važne delove dečijeg auto sedišta treba redovno proveravati zbog
oštećenja. Mehanički delovi moraju besprekorno funkcionisati.
• Bitno je da se auto sedište ne zaglavi između tvrdih delova kao što su vrata
automobila, itd. koji mogu prouzrokovati štetu na sedištu.
• Auto sedište se mora pregledati od strane proizvođača nakon pada ili sličnih
situacija.
UKLANJANJE PRESVLAKA
Presvlake se sastoje od 4 dela, koji su pričvršćeni ili čičkom ili drikerima. Kada
se drikeri otkopčaju delovi presvlaka se mogu skinuti.
Kako bi delove presvlake vratili na sedište ponovite postupak kao i za skidanje
presvlaka obrnutim redom.
Upozorenje! Auto sedište se ne sme koristiti bez presvlaka.
UKLANJANJE PRESVLAKA sa naslona za leđa
1.Povucite naslon za hlavu (e) u navišu poziciju, korišćenjem ručuce za otpuštanje
(h).
2.Kako biste skinuli nalson za glavu (e), istovremeno povucite ručicu (h) i spustite
19
obod gornjeg dela naslona (a). Sada naslon za glavu ( e ) može da bude potpuno
odvojen .
3.Sada se navlaka može skinuti.
4.Za ponovno sklapanje povucite ručicu (h) ai postavite naslon za glavu (e) u
naslon za leđa (a).
PRODUCT CARE
In order to guarantee the best possible protection of your child seat, it is
necessary that you take note of the following:
• All important parts of the child seat should be examined for any damages on a
regular basis. The mechanical parts must function flawlessly.
• It is essential that the child safety car seat does not get jammed between hard
objects e.g. like the door of the car, seat rail etc. causing possible damage to
the seat.
• The child seat must be examined by the manufacturer after a fall or similar
situations.
REMOVING THE SEAT COVER
The seat cover consists of three parts which are fixed to the seat either by
velcros, press buttons or button holes. Once you have released all fixations, the
cover parts can be removed.
In order to put the covers back on the seat, proceed in the reversed order as
removing them.
Warning! The child seat must never be used without the cover.
REMOVING THE SEAT COVER FROM THE BACKREST
1.Pull the headrest (e) into top position, by using the release handle (h).
2.To release the headrest (e), simultaneously pull the handle (h) and the lower
rim of the upper rib of the backrest (a). Now the headrest (e) can be completely
detached.
3.Now the cover can be removed.
4.For reassembly pull the adjustment handle (h) and insert the headrest (e) into the
backrest (a).
20
ČIŠĆENJE
Važno je koristiti samo originalne CYBEX Solution X2-fix presvlake jer su
presvlake bitan deo funkcije sedišta. Možete nabaviti rezervne presvlake od
Vašeg dobavljača.
Napomena! Molimo operite presvlake pre prve upotrebe. Presvlake sedišta
su mogu prati u mašini za veš na programu za osetljivu tkaninu i temperaturi
do max. 30°C. Ako ih perete na višoj temperaturi,tkanina može izgubiti boju.
Molimo da presvlake perete odvojeno i nikad ih ne sušite mehanički i na direktoj
sunčevoj svetlosti! Plastične delove možete prati blagim deterdžentom i toplom
vodom.
Upozorenje! Molimo da nikad ne koristite agresivne deterdžente ili
izbeljivače.
ŠTA URADITI NAKON NESREĆE
Sedište može postati nesigurno nakon nesreće zbog oštećenja koja nisu
odmah uočljiva. Stoga se ne sme opet koristiti, pre nego ga pregleda
proizvođač, te odobri ili zameni novim proizvodom.
TRAJNOST PROIZVODA
Solution X2-fix je dizajniran za normalno korišćenje za vreme uobičajenog
trajanja proizvoda, što je 9 godina. Međutim, budući da može doći do velike
razlike u temperaturi kao i nekih nepredviđenih okolnosti, važno je imati na umu
sledeće:
• Ako je automobil duže vremena izložen direktnoj sunčevoj svetlosti dečje auto
sedište mora se izvaditi iz auta ili prekriti tkaninom.
• Ispitajte sve plastične delove sedišta na oštećenja ili promene u obliku. Ako
primetite bilo kakve promene ne smete više koristiti sedište ili ono mora
pregledati proizvođač i zameniti ukoliko je portebno.
• Promene na tkanini - pogotovo gubitak boje - su normalne i ne smatraju se
oštećenjem.
21
CLEANING
It is important to use only an original CYBEX Solution X2-fix seat cover since
the cover is also an essential part of the function. You may obtain spare covers
at your retailer.
Note! Please wash the cover before you use it the first time. Seat covers are
machine washable at max. 30°C on delicate cycle. If you wash it at higher
temperature, the cover fabric may lose colour. Please wash the cover separately
and never dry it mechanically! Do not dry the cover in direct sunlight! You can
clean the plastic parts with a mild detergent and warm water.
Warning! Please do not use chemical detergents or bleaching agents
under any circumstances!
WHAT TO DO AFTER AN ACCIDENT
If you had an accident, the seat might have sustained damages which are
not visible. In this case, the child seat must absolutely be examined by the
manufacturer and replaced if necessary.
DURABILITY OF THE PRODUCT
The CYBEX Solution X2-fix was designed to easily fulfill its purpose for the
expected durability (adding up to 9 years). However, since high fluctuations of
temperature might occur and since there might be unforeseeable exposures to
the child seat, it is important to note the following:
• If the car is exposed to direct sunlight for a longer period of time, the child seat
must be taken out of the car or covered with a cloth.
• Examine all plastic and metal parts of the seat for any damages or changes
about their form or colour on a yearly basis. If you notice any changes, you
need to dispose of the child seat or it must be examined by the manufacturer
and replaced if necessary.
• Changes to the fabric, in particular the fading of colour, are normal after
yearlong use in a car and do not constitute a fault.
22
ODLAGANJE
Kada završite s korišćenjem Vašeg CYBEX Solution X2-fix, odgovarajuće
odlaganje je vrlo važno. Odvoz otpada može biti različit u svakoj zemlji. Molimo
kontaktirajte Vaše lokalno preduzeća za upravljanje otpadom kako bi bili
sigurni da ćete pravilno odložiti CYBEX Solution. Uvek postupajte u skladu sa
propisima Vaše države.
Garancija
Garancija u nastavku važi samo u zemlji u kojoj ga je kupac kupio. Garancija
pokriva sve greške u proizvodnji i materijalu, koji postoje ili se pojavljuju u
trenutku kupovine ili u periodu do 3 godine od datuma kupovine od prodavca
(proizvođačeva garancija). Ukoliko se pojavi greške u proizvodnji ili materijalu,
mi ćemo - po vlastitom nahođenju - ili besplatno popraviti proizvod ili zameniti
proizvod novim. Da biste dobili takvu garanciju neophodno je odnesete ili
pošaljete proizvod prodavcu, kod koga ste kupili proizvod, i da dostavite
originalan dokaz o kupovini proizvoda (račun ili fakturu) koji sadrži datum
kupovine, ime prodavca i oznaku proizvoda. Garancija ne vredi ukoliko se
proizvod pošalje proizvođaču ili bilo kojoj drugoj osobi osim prodavcu kod koga
je proizvod kupljen. Molimo Vas da prilikom kupovine (u radnji ili ukoliko Vam
proizvod stigne poštom) proverite da li je proizvod kompletan i da li postoje
neke greške u materijalu ili defekti za koje je odgovoran proizvođač. U slučaju
bilo kakvog oštećenja prestanite da koristite proizvod i odmah ga odnesite ili
pošaljite prodavcu od koga ste kupili proizvod. U slučaju garancije, proizvod
se mora vratiti čist i kompletan. Pre kontaktiranja prodavca, molimo Vas da
pročitate ovo uputstvo. Ova garancija ne pokrivaštete prouzrokovane lošim
rukovanje, uticajima iz okoline (poplava, požar, saobraćajne nezgode itd.) ili
normalnim habanjem i oštećenjem. Primenjuje se isključivo u slučaju da se
proizvod koristio u skladu sa uputstvom za upotrebu, ako su sve izmene i servisi
bili obavljeni od strane ovlašćene osobe i ako su korišćeni originalni delovi i
pribor. Ova garancija ne isključuje, ne ograničava i na bilo koji način ne utiče
na zakonska prava potrošača, uključujući žalbe u deliktima i reklamacije u
pogledu kršenja ugovora, koje kupac može imati protiv prodavca ili proizvođača
proizvoda.
23
DISPOSAL
At the end of the durability of the child seat, you must dispose it properly.
Waste disposal regulations may vary regionally. In order to guarantee a
proper disposal of the child safety seat, please contact your communal waste
management or administration of your city. In all cases, please note the waste
disposal regulations of your country.
WARRANTY
The following warranty applies solely in the country where this product was
initially sold by a retailer to a customer. The warranty covers all manufacturing
and material defects, existing and appearing, at the date of purchase or
appearing within a term of three (3) years from the date of purchase from the
retailer who initially sold the product to a consumer (manufacturer’s warranty).
In the event that a manufacturing or material defect should appear, we will – at
our own discretion – either repair the product free of charge or replace it with a
new product. To obtain such warranty it is required to take or ship the product
to the retailer, who initially sold this product to a customer and to submit an
original proof of purchase (sales receipt or invoice) that contains the date of
purchase, the name of the retailer and the type designation of this product.
This warranty shall not apply in the event that this product is taken or shipped
to the manufacturer or any other person other than the retailer who initially
sold this product to a consumer. Please check the product with respect to
completeness and manufacturing or material defects immediately at the date
of purchase or, in the event that the product was purchased in distance selling,
immediately after receipt. In case of a defect stop using the product and take
or ship it immediately to the retailer who initially sold it. In a warranty case the
product has to be returned in a clean and complete condition. Prior to contacting
the retailer, please read this instruction manual carefully. This warranty does
not cover any damages caused by misuse, environmental influence (water,
fire, road accidents etc.) or normal wear and tear. It does solely apply in the
event that the use of the product was always in compliance with the operating
instructions, if any and all modifications and services were performed by
authorized persons and if original components and accessories were used.
This warranty does not exclude, limit or otherwise affect any statutory consumer
rights, including claims in tort and claims with respect to a breach of contract,
which the buyer may have against the seller or the manufacturer of the product.
24