1
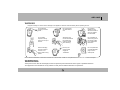
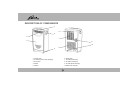
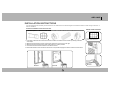
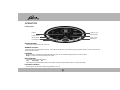
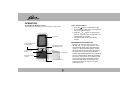
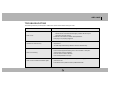
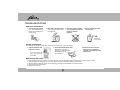
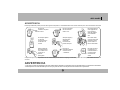
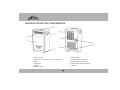
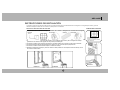
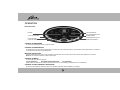
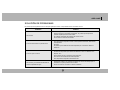
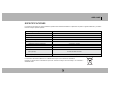
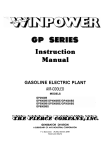
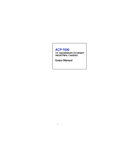
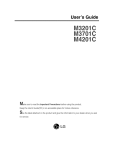
OWNER’S MANUAL
ARP- 1003E
PORTABLE AIR CONDITIONER
ACONDICIONADOR DE AIRE PORTÁTIL
Read and retain these instructions for future reference
For any Customer Support needs please
choose the Customer Support tab on
www.royalsovereign.com
Royal Centurian Inc.
PORTABLE AIR CONDITIONER
Model ARP-1003E
INTRODUCTION
Thank you for choosing this air conditioner to provide you and your family with all of the "Home Comfort" requirements for your home,
apartment, or office. This appliance can be moved from room to room and set-up in just minutes.
It is a multi-functional room air conditioner that offers you Cool, Dehumidify, and Independent Fan modes.
This manual will provide you with valuable information necessary for the proper care and maintenance for you new appliance.
Please take a few moments and read the instructions thoroughly. If properly maintained, your appliance will give you many years of
trouble free operation.
Electrical Specifications
1. All wiring must comply with local and national electrical codes and be installed by a qualified electrician. If you have any questions
regarding the following instructions,contact a qualified electrician.
2. Check available power supply and resolve any wiring problems before installation and operation of this unit.
3. For your safety and protection, this unit is grounded through the power cord plug when plugged into a matching wall outlet. If you are
not sure whether the wall outlets in your home are properly grounded, please consult a electrician. Do not use plug adapters or
extension cords with this unit.
ARP-1003E
WARNING
Improper handling can cause serious damage to the appliance. Read this manual carefully before operating the unit.
Do not wet the
housing or control
panel.
Do not cover the
air outlet while in
use.
Do not allow
children to play
with the controls or
drop any objects
into the outlet.
Do not place
objects or let any
person sit on top of
the unit.
Always turn the
unit off and remove
the power plug
from the socket
when cleaning.
Do not attempt to
remove any part of
the casing unless
by an authorized
technician.
Remove the plug
from the socket if
the unit is not
being used for long
period.
Use only the
correct power
supply AC
115V/60Hz.
Do not operate the
unit with damaged
plug or loose
socket point.
Make sure that the back of the unit is at least 4" or more from a wall. Do not place the unit in front of curtains or drapes.
WARNING
-If the power cord on this unit is damaged, it must be replaced by the manufacturer service agent or qualified electrician.
-This appliance is not intended for use by children or other persons without assistance or supervision.
3
DESCRIPTION OF COMPONENTS
1
6
4
2
7
3
9
10
5
8
1. Control panel
6. Screen filter
2. Air outlet (Up-Down and Left-Right)
7. Air intake (Evaporator)
3. Front panel
8. Air intake (Condenser)
4. Handle
9. Air outlet (Heat exchange)
5. Casters
10.Water drain with plug
4
ARP-1003E
INSTALLATION INSTRUCTIONS
Connect exhaust hose assembly to the back of the unit. Extend hose to desired length and locate the exhaust nozzle through a window or
wall for ventilation.
EXHAUST ASSEMBLY AND INSTALLATION
Exhaust nozzle connection
Window spacer
Exhaust nozzle Exhaust nozzle connector Exhaust hose Exhaust hose connector
1. Insert ends of exhaust hose into exhaust nozzle connector and exhaust hose connector by twisting clockwise
until it stops.
2. Attach the exhaust hose connector onto the rear outlet of the unit and turn to the right.
3. Attach the exhaust nozzle to the window spacer with the 4 screws provided.
4. Connect the exhaust nozzle connector to the exhaust nozzle.
5. Extend the exhaust hose and close the window as far as possible trapping the exhaust nozzle as shown below .
Insert exhaust nozzle from rear.
Attach screws from front.
INDOOR
INDOOR
INDOOR
5
OPERATION
Control panel
Display
Timer On / Off
Warning Light
Power Control
Timer / Temp
Set Control
Mode Control
Fan Speed Control
POWER CONTROL
The power control turns the unit on and off.
WARNING CONTROL
Condensed water may accumulate in the unit . If the internal tank becomes full, the Warning Light will shine and the unit will not operate until
the unit has been drained.
FAN MODE
When fan mode is selected the indicator light will shine green. Air is circulated throughout the room with no cooling.
NOTE: Unit does not need to be vented in fan mode.
MODE CONTROL
The Mode Control has three settings:
Cool
Dehumidify
Fan
The settings are adjusted with the Mode Control button. A light will indicate which setting is currently being used.
FAN SPEED CONTROL
The Fan Speed Control has 3 settings: High, Medium, and Low.
6
ARP- 1003E
DEHUMIDIFY MODE
When dehumidify mode is selected, the indicator light will shine green. Air is dehumidified as it passes through the unit, without being in full
Cooling mode.The fan will operate in Medium speed. Fan speed is not adjustable in Dehumidify mode.
NOTE: The air exchange hoses must vent inside the room when using Dehumidify mode.
COOL MODE
When Cool mode is selected, the indicator light will shine green. During the Cool mode the air is cooled and hot air is exhausted to the
outside through the exhaust tube.
NOTE: The air exchange hoses must vent outside the room when using Cool mode.
TIMER / TEMP SET CONTROLS
Used for adjusting the timer and thermostat.
The default display is the room temperature.
In Cool mode, when "+" or "-"button is pressed, the set temperature is displayed and may be adjusted. After 15 seconds the display will
revert back to room temperature . Temperature is only adustable in Cool mode . The time is adjustable between 1~12 hours.
NOTE: By pressing both Timer /Temp set buttons at the same time, the display will toggle between Celsius and Fahrenheit.
TIMER
Auto turn off:
With machine in Fan mode, press timer button to select number of hours you would like the unit to run in Cool mode until it
automatically shuts off.
Auto turn on:
With machine powered off, press timer button to select number of hours until you would like the unit to automatically start running in Cool
mode.
After switching the air conditioner off, you must wait 3 minutes before switching it back on again.
7
OPERATION
Air Conditioner Remote Control
TIMER PROGRAMMING
The functions work the same as your air conditioner's touch controls.
1. Press the
button on the remote or the
"Timer Setting" button on the control panel to
turn on the Timer Function.
2. Press the
or
buttons on the remote or
the + or - buttons on the control panel to set
the desired shut-off period.
3. The unit will shut off when the set time
elapses.
LCD Screen
Timer and thermostat
Setting Buttons
Power ON / OFF
Button
A/C Fan Speed Button
(High,Medium or Low)
Mode Button
(Select Cool,Fan or Dehumidify)
Fahrenheit / Celsius
Selector
Timer ON/OFF Button
8
DEHUMIDIFICATION OPERATION
Press the
button on the remote or the
"MODE" button on the control panel to select
the Dehumidify mode. When the Dehumidify
mode is on, the temperature buttons and the
fan speed buttons do not function and the fan
will operate on low speed. The Dehumidify
indicator light will illuminate and stay solid while
the unit is dehumidifying. When the humidity in
the room is 50% or lower, the compressor will
not run, the unit will not dehumidify, and the
Dehumidify light will blink. Remember, the
exhaust hose does not need to be used in
Dehumidify mode.
ARP-1003E
TROUBLESHOOTING
The following cases may not always be a malfunction. Please check it before asking for srvice.
Analysis
Trouble
Does not run
If the protector strip or fuse is blown:
Please wait for 3 minutes and start again, protector device may be
preventing unit from working.
If batteries in the remote controller need replacement.
If the plug is not properly plugged in.
Operates for short time only
If the set temperature is close to room temperature, you should lower the set
temperature.
Air outlet may be blocked by obstacle. Take the obstacle away.
Runs but not cooling
If the door or window is open.
If there is other appliance heating room, such as heater or lamp,etc...
Check air filter, clean if necessary.
If the air outlet or intake is blocked.
If the set temperature is too high.
Does not run and water full indicator lights
Drain the water into a prepared container by the drainage pipe on the rear
panel of the unit.
If still doesn't work, please consult a qualified technician.
9
TROUBLESHOOTING
Appliance maintenance
1. Cut off the power supply
Turn off the appliance first
before disconnecting from
power supply
2. Wipe with a soft and dry cloth
Use lukewarm water to clean
the appliance.
3. Never use volatile substance
such as gasoline or polishing
powder to clean the
appliance.
4. Never sprinkle water onto
the main unit.
Dangerous!
Electric shock!
Air filter maintenance
It is necessary to clean the air filter after using it for about 100 hours. Clean it as follows:
1. Stop the appliance and
remove the air filter
Stop the appliance
first, then pull back
the air filter.
2. Clean and reinstall the air filter
Wash it with a solution of
detergent in lukewarm water.
After cleaning, dry it,
then reinstall it...
3. Clean the air filter every two
weeks if the air conditioner
operates in an extremely dusty
environment.
Maintenance after using
1. If the appliance will not be used for a long time, be sure to pull out the rubber plug of the drain port in order to drain the water.
2. Keep the appliance running with fan only for a half day to dry the appliance inside and prevent mold.
3. Stop the appliance and pull out the power supply plug, then take out the batteries of remote controller.
4. Clean the air filter and reinstall it.
5. Remove the air hoses.
10
ARP-1003E
ARP-1000ES
SPECIFICATIONS
Figures noted are for reference only; variation may result due to application in different countries or regions, and shall be based on the best of
practical operation.
Description of product
Air Conditioner
Model
ARP-1003E
Voltage / Frequency
115A / 60Hz
Input power
1300W
Operating cycle
12 A
Cooling capacity
10000 B.T.U.
Dehumidifying capacity
3.3pints/1.6L/Hour
Coolant
R-22
Timer
12 hour
Dimensions
20.3 x 34.5 x 14.6 "
(W) x (H) x (D)
51.7cm x 87.6cm x 37.2cm
Weight (N.W.)
77Ibs/35kg
Electrical waste products should not be disposed of with household waste.
Please recycle where facilities exist. Check with your local authority or retailer for recycling advice.
14
11
FULL ONE YEAR WARRANTY
Royal Sovereign warrants each Portable Air Conditioner to be free from defects in material and workmanship. Our obligation under this warranty is limited to
the repair or replacement, free of charge, when delivered to an authorized Royal Sovereign service center, of any defective part(s) thereof, other than parts
damaged in transit. This warranty is in effect to the original purchaser, for a period of one year from the date of purchase and is not transferable. This warranty
shall apply only if the air conditioner is used on Alternating Current (AC) circuit, in accordance with the factory provided instructions which accompany it.
LIMITED FIVE YEAR WARRANTY (COMPRESSOR)
For a period of five years from the date of purchase, when this Royal Sovereign Portable Air Conditioner is operated and maintained according to the
instruction manual provided with the product, Royal Sovereign will supply a replacement compressor (part only), free of charge, if the original compressor is
determined to be defective in workmanship or material. If repair becomes necessary, please contact our customer service center. You will be responsible for all
freight, insurance, and any other transportation charges to get the unit to our factory or service center. If shipping is required, be sure to pack the unit properly
to avoid shipping damages, as we will not be responsible for such damages.
THIS WARRANTY IS VALID THROUGHOUT THE UNITED STATES AND PUERTO RICO ONLY
EXCLUSIONS
This warranty excludes and does not cover defects, malfunctions or failures of your Royal Sovereign Portable Air Conditioner, caused by repairs by
unauthorized persons or service centers, mishandling, improper installation, modification or unreasonable use including incorrect voltage, acts of god, or failure
to provide reasonable and necessary maintenance.
This warranty is in lieu of any and all expressed warranties. In no event shall Royal Sovereign be liable for consequential or incidental damages. Some states do
not allow the exclusion or limitation of incidental or consequential damages, so the above limitation or exclusion may not apply to you. This warranty gives you
specific legal rights and you may also have other rights which vary from state to state.
ROYAL SOVEREIGN INTERNATIONAL, INC.
Royal Centurian Inc.
2 Volvo Drive Rockleigh, NJ 07647 USA
TEL : +1) 201-750-1020, +1) 800-397-1025
FAX : +1) 201-750-1022
RS International Australia PTY. LTD.
Royal Sovereign Canada
30 Prime Drive, Seven Hills, NSW 2147, AUSTRALIA
TEL : +61) 2-9674-2127 FAX : +61) 2-9674-2027
164 Oakdale Road, Toronto, Ontario M3N 2S5 CANADA
TEL: +1) 416-741-8400 FAX: +1) 416-741-8185
www.royalsovereign.com / [email protected]
ARP-1000ES
MANUAL DEL PROPIETARIO
ARP- 1003E
PORTABLE AIR CONDITIONER
ACONDICIONADOR DE AIRE PORTÁTIL
Lea y conserve estas instrucciones para referencia futura
Si necesita ayuda, escoja la pestaña Customer Support en
www.royalsovereign.com
Royal Centurian Inc.
ACONDICIONADOR DE AIRE PORTÁTIL
Modelo ARP-1 003E
INTRODUCCIÓN
Gracias por elegir este acondicionador de aire portátil para proporcionarle a usted y a su familia todos los requisitos de “comodidad
hogareña” para su casa, departamento u oficina. Este dispositivo se puede mover de una habitación a otra y configurar en pocos
minutos.
Es el acondicionador de aire para habitaciones multifuncional que le ofrece los modos independientes de enfriamiento, deshumidificación
y ventilación.
Este manual le proporcionará valiosa información, necesaria para el cuidado y el mantenimiento adecuados de su nuevo dispositivo.
Tómese algunos momentos y lea completamente las instrucciones. Si se le da un mantenimiento adecuado, su dispositivo funcionará
muchos años sin problemas.
Especificaciones eléctricas
1. Todo el cableado debe cumplir con los códigos eléctricos locales y nacionales, y lo debe instalar un electricista autorizado. Si tiene
alguna pregunta con respecto a las siguientes instrucciones, comuníquese con un electricista calificado.
2. Inspeccione el suministro eléctrico disponible y resuelva cualquier problema con el cableado antes de instalar y operar esta unidad.
3. Para su seguridad y protección, esta unidad se conecta a tierra mediante el enchufe del cable de alimentación cuando se conecta al
tomacorriente de pared correspondiente. Si no está seguro respecto de si el tomacorriente de pared de su casa está debidamente
puesto a tierra, consulte a un electricista. No use adaptadores de enchufe ni cables de extensión con esta unidad.
ARP-1000ES
ADVERTENCIA
El manejo inadecuado puede provocar daños graves al dispositivo. Lea detenidamente este manual antes de poner en funcionamiento la unidad.
No moje la
cubierta ni el panel
de control.
No cubra la salida
de aire mientras
esté en uso.
No permita que los
niños jueguen con
los controles ni
deje caer objetos
en la salida de
aire.
No coloque objetos
ni deje que
ninguna persona
se siente en la
unidad.
Siempre apague y
desenchufe la
unidad del
tomacorriente
cuando la limpie.
No intente retirar
ninguna parte de la
carcasa a menos
que lo realice un
técnico autorizado.
Retire el enchufe
del tomacorriente
si la unidad no se
usará por un
período
prolongado.
Use sólo el
suministro eléctrico
correcto de CA
1 15V/60Hz.
No haga funcionar
la unidad con un
enchufe dañado o
un terminal del
tomacorriente
suelto
Compruebe que la parte posterior de la unidad esté por lo menos a 4 pulg. o más de la pared. No coloque la unidad en frente de
cortinas.
ADVERTENCIA
- Si se daña el cable de alimentación de esta unidad, debe cambiarlo un agente de servicio del fabricante o un electricista autorizado.
- Este dispositivo no está diseñado para su uso por parte de niños u otras personas sin asistencia o supervisión.
15
DESCRIPCIÓN DE LOS COMPONENTES
1
6
4
2
7
3
9
10
5
8
1.Panel de control
6. Filtro de malla
2.Salida de aire (de arriba abajo y de izquierda a
7. Entrada de aire (evaporador)
derecha)
8. Entrada de aire (condensador)
3. Panel frontal
9. Salida de aire (intercambio térmico)
4. Manilla
10.Desagüe
5.Ruedas giratorias
16
ARP-1003E
INSTRUCCIONES DE INSTALACIÓN
Conecte el conjunto de manguera de escape a la parte posterior de la unidad. Extienda la manguera a la longitud que desee y pase la
tobera de escape a través de una ventana o pared para su ventilación.
MONTAJE E INSTALACIÓN DEL ESCAPE
Exhaust nozzle connection
Separador de la Tobera de escape
ventana
Conector de la tobera
de escape
Manguera de Conector de la manguera
escape
de escape
1. Inserte los extremos de la manguera de escape en los conectores de la tobera y de la manguera de escape
girándolos en el sentido de las agujas del reloj hasta que se detengan.
2. Conecte el conector de la manguera de escape en la salida posterior de la unidad y gírelo hacia la derecha.
3. Conecte la tobera de escape al separador de la ventana con los 4 tornillos que se proporcionan.
4. Conecte el conector de la tobera de escape a la tobera de escape.
5. Extienda la manguera de escape y cierre la ventana lo más posible a fin de atrapar la tobera de escape, como
se muestra a continuación.
Inserte la tobera de escape
desde la parte posterior.
Coloque los tornillos desde la
parte delantera.
INTERIOR
INTERIOR
INTERIOR
17
OPERATION
Panel de control
Pantalla
Luz de advertencia
Control de encendido
Activación/desactivación
del temporizador
Control de modo
Control de velocidad del ventilador
Temporizador/Control de
ajuste de temperatura
CONTROL DE ENCENDIDO
El control de encendido enciende y apaga la unidad.
CONTROL DE ADVERTENCIA
Es posible que se acumule agua condensada en la unidad. Si se llena el tanque interno, se encenderá la luz de advertencia y la unidad no
funcionará hasta que ésta se haya desaguado.
MODO DE VENTILACIÓN
Cuando se selecciona este modo, la luz indicadora se enciende de color verde. El aire circula a través de la habitación sin enfriarla.
NOTA: No es necesario ventilar la unidad en este modo.
CONTROL DE MODO
El control de modo tiene tres ajustes:
Cool (Enfriamiento)
Dehumidify (Deshumidificación)
Fan (Ventilador)
Estos ajustes se controlan con el botón de control de modo. Una luz indicará qué ajuste está en uso actualmente.
CONTROL DE VELOCIDAD DEL VENTILADOR
El control de velocidad del ventilador cuenta con 3 ajustes: High (Alta), Medium (Media) y Low (Baja).
18
ARP- 1003E
MODO DE DESHUMIDIFICACIÓN
Cuando se selecciona este modo, la luz indicadora se enciende de color verde. El aire se deshumidifica a medida que pasa a través de la
unidad, sin estar por completo en el modo de enfriamiento. El ventilador funcionará a velocidad media. La velocidad del ventilador no se
puede ajustar en el modo de deshumidificación.
NOTA: Las mangueras de intercambio de aire deben ventilar el interior de la habitación cuando se usa el modo de deshumidificación.
MODO DE ENFRIAMIENTO
Cuando se selecciona este modo, la luz indicadora se enciende de color verde. Durante el modo de enfriamiento, el aire se enfría y el aire
caliente se elimina hacia el exterior a través del tubo de escape.
NOTA: Las mangueras de intercambio de aire deben ventilar el exterior de la habitación cuando se usa el modo de enfriamiento.
CONTROLES DE AJUSTE DE TEMPORIZADOR / TEMPERATURA
Se usan para ajustar el temporizador y el termostato. La pantalla predeterminada muestra la temperatura ambiente.
En el modo de enfriamiento, cuando se presiona el botón “+” o “-“, aparece la temperatura de ajuste, la cual se puede ajustar. Luego de 15
segundos, la pantalla volverá a mostrar la temperatura ambiente. La temperatura sólo se puede ajustar en el modo de enfriamiento. El
tiempo se puede ajustar entre 1 a 12 horas.
NOTA: Al presionar los botones de ajuste Timer/Temp (Temporizador/Temperatura) al mismo tiempo, la pantalla alternará entre grados
Celsius y Fahrenheit.
TEMPORIZADOR
Apagado automático:
Con la máquina en el modo de ventilación, presione el botón del temporizador para seleccionar la cantidad de horas que desea que funcione
la unidad en el modo de enfriamiento hasta que se apague automáticamente.
Encendido automático:
Con la máquina apagada, presione el botón del temporizador para seleccionar la cantidad de horas que desea hasta que la unidad se
encienda automáticamente funcionando en el modo de enfriamiento.
Después de apagar el acondicionador de aire, debe esperar 3 minutos antes de encenderlo nuevamente.
19
OPERATION
Control remoto del acondicionador de aire
Las funciones operan igual que los controles táctiles de su
acondicionador de aire.
PROGRAMACIÓN DEL TEMPORIZADOR
1. Presione el
botón del control remoto o el
botón de ajuste del temporizador del panel de
control para activar la función de temporizador.
2. Presione el botón
o
buttons on the
remote or the + or - buttons on the control
panel to set the desired shut-off period.
3. The unit will shut off when the set time elapses.
Pantalla LCD
OPERACIÓN DE DESHUMIDIFICACIÓN
Botones de ajuste del
temporizador y el
termostato
Botón de
encendido/apagado
Botón de velocidad del ventilador
del acondicionador de aire
(alta, media o baja)
Botón de modo
(Seleccione enfriamiento,
ventilación o deshumidificación
Selector de grados
Fahrenheit/Celsius
ButTemporizador
encendido/apagado
20
Presione el botón
del control remoto o el
botón "MODE" del panel de control para
seleccionar el modo de deshumidificación.
Cuando se activa el modo de deshumidificación,
los botones de temperatura y los botones de
velocidad del ventilador no funcionan y el
ventilador opera a baja velocidad. Se encenderá
la luz indicadora de deshumidificación y
permanecerá encendida mientras la unidad esté
en el proceso de deshumidificación. Cuando la
humedad de la habitación sea de 50% o menos,
no funcionará el compresor, la unidad no
deshumidificará y parpadeará la luz de
deshumidificación. Recuerde que no es necesario
usar la manguera de escape en el modo de
deshumidificación.
ARP-1003E
SOLUCIÓN DE PROBLEMAS
Es posible que los siguientes casos no siempre signifiquen averías. Compruébelos antes de solicitar servicio.
Análisis
Problema
No funciona
Si el desenganche o fusible protector está quemado:
Espere 3 minutos y enciéndalo nuevamente, es posible que el dispositivo
protector impida que funcione la unidad.
Si se deben reemplazar las baterías del control remoto.
Si el enchufe no está bien enchufado.
Funciona sólo durante un período breve
Si la temperatura de ajuste es similar a la temperatura ambiente, debe reducir
la temperatura
de ajuste.
Es posible que la salida de aire esté bloqueada por un obstáculo. Retire el
obstáculo.
Funciona, pero no enfría
Si la puerta o la ventana está abierta.
Si existe otro dispositivo que calienta la habitación, como un calefactor, una
lámpara, etc…
Revise el filtro de aire y límpielo si fuese necesario.
Si la salida o la entrada de aire está bloqueada.
Si la temperatura de ajuste es demasiado alta.
No funciona y se enciende el indicador de
máxima capacidad de agua
Desagüe la unidad en un recipiente preparado por el tubo de drenaje que se
encuentra en el panel posterior de la unidad.
Si aún no funciona, consulte a un técnico calificado.
21
Mantenimiento del dispositivo
Mantenimiento del filtro de aire
Se debe limpiar el filtro de aire después de usarlo durante 100 horas aproximadamente. Límpielo como se indica a continuación:
1. Corte el suministro eléctrico 2. Límpielo con un paño seco
3. Nunca use polvos volátiles
4. Nunca rocíe agua sobre la
Primero apague el dispositivo
sobre la unidad principal
y suave.
como gasolina o polvos para
antes de desconectarlo del
pulir para limpiar el
Use agua tibia para limpiar el
suministro eléctrico
dispositivo.
dispositivo.
¡Peligro de
descarga
eléctrica!
Mantenimiento del filtro de aire
Se debe limpiar el filtro de aire después de usarlo durante 100 horas aproximadamente. Límpielo como se indica a continuación:
1. Detenga el dispositivo y
retire el filtro de aire
Primero detenga el
dispositivo y luego
retire el filtro de aire
hacia atrás.
2. Limpie el filtro de aire y
vuelva a instalarlo.
Lávelo con una solución
de detergente en agua
tibia. Luego de limpiarlo,
séquelo,
3. Limpie el filtro de aire cada
dos semanas si el
acondicionador de aire
funciona en un ambiente con
demasiado polvo.
Mantenimiento después del uso
1. Si no se usará el dispositivo durante un período prolongado, asegúrese de retirar el tapón de goma del orificio de desagüe para desaguar
la unidad.
2. Mantenga funcionando el dispositivo con el ventilador solamente durante medio día para secarlo por dentro e impedir la formación de
moho.
3. Detenga el dispositivo y desconecte el enchufe de suministro eléctrico; luego retire las baterías del control remoto.
4. Limpie el filtro de aire y vuelva a instalarlo.
5. Retire las mangueras de aire.
22
ARP-1003E
ARP-1000ES
ESPECIFICACIONES
Las cifras que se indican son sólo de referencia; pueden existir variaciones debido a su aplicación en países o regiones diferentes, y se deben
basar en la mejor operación práctica.
Descripción del producto
Acondicionador de aire
Modelo
ARP-1003E
Voltaje/Frecuencia
115A / 60Hz
Potencia de entrada
1300W
Ciclo de trabajo
12 A
Capacidad de enfriamiento
10000 unidades térmicas
Capacidad de deshumidificación
3.3 pintas/1 .6L/hora
Enfriador
R-22
Temporizador
12 horas
Dimensiones
20.3 x 34.5 x 14.6 "
(A) x (A) x (P)
51.7cm x 87.6cm x 37.2cm
Peso (neto)
77Ibs/35kg
Los productos de desecho eléctricos no se deben eliminar junto con los desechos domésticos.
Recicle en donde existan instalaciones para ello. Solicite consejos sobre reciclaje a su autoridad o
distribuidor local.
14
23
GARANTÍA DE UN AÑO COMPLETO
Royal Sovereign garantiza que los acondicionadores de aire portátiles no presentan defectos en material ni mano de obra. Nuestra obligación, según lo establecido
en esta garantía, se limita a la reparación o al reemplazo, sin cargo, de cualquier pieza defectuosa que no sea una pieza dañada durante su traslado, cuando sea
entregada a un centro de servicios autorizado de Royal Sovereign. Esta garantía tiene vigencia para el comprador original durante un período de un año a partir de
la fecha de compra y no es transferible. Esta garantía se aplicará sólo si el acondicionador de aire se usa en un circuito de corriente alterna (CA) de acuerdo con
las instrucciones que acompañan la unidad, proporcionadas por el fabricante.
GARANTÍA LIMITADA DE CINCO AÑOS (COMPRESOR)
Durante un período de cinco años a partir de la fecha de compra, siempre y cuando se opere y mantenga este acondicionador de aire portátil Royal Sovereign de
acuerdo con el manual de instrucciones proporcionado junto con el producto, Royal Sovereign proveerá un compresor (pieza sola) de reemplazo, sin cargo, si se
determina que el compresor original tiene un defecto de material o mano de obra.
Si es necesario repararlo, comuníquese con nuestro centro de
servicio al cliente. Usted será responsable de todos los gastos de flete, seguro y cualquier otro gasto de transporte para llevar la unidad a nuestra fábrica o centro
de servicio. Si es necesario enviar la unidad, asegúrese de embalarla adecuadamente para evitar daños de envío ya que no nos haremos responsables de tales
daños.
ESTA GARANTÍA SÓLO ES VÁLIDA EN LOS ESTADOS UNIDOS Y PUERTO RICO
EXCLUSIONES
Esta garantía excluye y no cubre defectos, mal funcionamiento o fallas de su acondicionador de aire portátil Royal Sovereign causados por reparaciones
realizadas por personas o centros de servicio no autorizados, uso indebido, instalación inadecuada, modificación o uso irrazonable, incluso voltaje incorrecto,
daños fortuitos o falta de mantenimiento necesario y razonable.
Esta garantía reemplaza cualquier garantía expresa. En ningún caso, Royal Sovereign será responsable de cualquier daño incidental o consiguiente. Algunos
estados no permiten la exclusión o limitación de daños incidentales o indirectos. Por lo tanto, la exclusión o limitación anterior no se aplicará en su caso. Esta
garantía le otorga derechos legales específicos y usted también puede gozar de otros derechos que varían según el estado.
ROYAL SOVEREIGN INTERNATIONAL, INC.
Royal Centurian Inc.
2 Volvo Drive Rockleigh, NJ 07647 USA
TEL: +1) 201-750-1020, +1) 800-397-1025 FAX : +1) 201-750-1022
RS International Australia PTY. LTD.
Royal Sovereign Canada
30 Prime Drive, Seven Hills, NSW 2147, AUSTRALIA
TEL: +61) 2-9674-2127 FAX: +61) 2-9674-2027
164 Oakdale Road, Toronto, Ontario M3N 2S5 CANADA
TEL: +1) 416-741-8400 FAX: +1) 416-741-8185
www.royalsovereign.com / [email protected]