1
Make suretoresdtheImpo_nt Pr_autbns beforeusingtheprodu_.
KeeptheUsersGuide(OD)
in sn accessible
placeforfurturereference,
S@ thelabeiattachedontheproductand9iretheinformation
toyourdealerwhenyouask
forsewics,
PI_
read these safeW precautions
_refully
before using the product.
_Wiii
_
Precautions in installing the Product
II Keep aw_ from heat s_mes
- E_¢lrical shock, fire, maffur_
_ke e|ectriaa| heaters.
or derogation may _ur.
II Keep the packing antj._isture
n_tenal or vi_! _king
out of the reach of children.
oAnfi-m_s_u_ ma|enal is _fu_
ff swalloW, if swa_ky¢¢edby mi_e,
force the p_tient to v_it a_ vis_ the
r_are_ _.
A_itiopafly, vi_l ip_ing _ _e
_fffocat_.
K_p __ of t_ reach of chi_ren.
1 Do not put _avy _jects on t_ _od_t: or sit upon it,
=ff _ p_
co[_s
or is dr_d,
y_ may _ injured.C_ldren must pay 1>3rt_u_r
a_ent_.
m _ not leave _e poweror sign_ ca_e un_ten_d on tl_ pathway,
- The _:_rby _n fa_er,which _n cauGee_m_ shock,fire, p,rod_ _eak_
m Install _e pmdu_ in a neat and dry pl_e,.
- DL_t or mo_e
can ca_,e e]ec_
shock, tire or p_d_
or inj_,
damage.
= If you ca_ smel|smo_ or _er _
or heara s_
_und unp|ug_e p_er cordand _n'_
s_vi_ cen_r,i
- ify_ contin_ to _ wiP_Jt takingpro_r _a_res, eJ_J_ @.3ckor tire can _ur.
the
= If you dropped _e productort_ c_e is broken,turn off _e productand un_ug _e power co=_.
If y_ _ntin_ _ _ w_t
_kJr_j p_per _a_res, e_l
shock or fire can _r,
_ntact the _r'#_e
c_er_
! Do not _rop an o_
_ or a_ly imp_t to t_ p_uct.
- It can cause inju_ to _m_,
p_blem to pr_
a_ _ma_
DOn_ _row any toys or objectson the p_uct
the d_y.
Caution
= Make su_mthe pr_uct vent}|_
than lOcm from _e wa|l)
=ff _J in_l the prc_
too d_
m _ not _ock _e v_|_ion
=The pr_
can _ _.f_ed
_|e
is r_t bl_k_,
Insta|l _e pr_uct
to the wa_, it may be _d
_n a suably
or fire can break out d_
wide pla_ (more
to infema__at.
h_e of t_ _od_t
by a tabl_loth
or curtain.
orflre _n break o_ d_ to _¢erh_J_
i_e
the product
= In_ll _e producton atilt and _ble _e
that has;_ risk of droppingthe product.
- If _ p_
_ _rop_, y_ may be inj_d or _ productmay be b_e_
m in_ll
_e productw_re no EM| _urs,
m Keep t_ prod_ away from di_t
- The pr_
can _ _maged,
sunlight.
Electrical Power Related Precautions
Warning
= Make sure _ _nnect th_ _wer cane to tl_ g_n_d
- You may be e_ctrocuted or ini_ed,
cu_nL
[] Use the rated voltage only,
- The predu_ can be damaged, or you may be e_c_Jted,
[] in t_ _nce
_ thun_r
very' dangerous.
- ff ¢_ _se
e_ctriic _ck,
and lightning,
never to_h
the pow_ cord and signal ca_e becau_
it c_
be
= _ _t conn_ _veral exten_on c_s, el_nca! appliancesot el_dc_ heaters _ a single o_et.
Use a powerbar wt_ a grounding _ir,_l
design_ for excl_tve usewith t_ comp,uter.
A fire can break outd_ to crve_flr_
m Do r_t touch the powerplug with _t hands. AdditionaJly,if the cord _n is wet or c_ered w_ dust,d_
• e p_er plug c_p_e_ely or wipe dust off.
- You may be e_ctrocuted due _ ex_s _isture.
I If you don't intendto usethe productfor a long Ume, unplug t_ _er
cable from the p_uct
- Coven_ d_t c_ _
a fire, or ir_Jlat_ _tedor_ion can cau_ e_ect#_leaka_, el_
sh_k orris.
• _x the power ¢_ble compl_ely,
Hfl_ pc_welrcable is not fixed comp_1ely, a fire _n
bre_ out,
Hold t_ plug wh_ pu_lingo_ _e power cable. _ r_t be.r_ the _er
_
_j_ts on t_ _r
co_l.
The _wer li_ _n be damaged,whichmay _
e_ctr_ _ck or fire
cord with excessiveforce or p_
• Do r_t inse_ a c_duc_
(like a metalchop_ck) intoone end of the powercable while t_ other end is
connectedto tbe input _rminal on the wall Additiona!l_y,
do not touchthe _,er cable right after
plugginginto the wall input terminal.
- You may be e_ctrocuted.
ImThe power supply cord is u_
accessibleafter installati_.
m M_n _r
_ate.
as,_e main diac_c_on
_vi_,.
Ensurethat the socket_Set ise_ily
b_aker is the powercord a_'this brea_ng _e_¢_emust be _ocatedat a I_ion
Caution
m Do not unplug _e _rc_
while _e _duct
- E_icaI _hock_n _mage the prod_
Precautions
is in u_.
in Moving the Product
Warning
[] Make sureto turn off t_ producL
- You rr_aybe e_ctrocuted or_ _uct
can be d_aged,
[] Make sure to relive all cables befo_ i_v_ng the _d_,.
- "Yourr_y be e_ctrc_uted or_ p_oduct
can be d_a_d.
whe_ it is easy
Caution
II _ not shock_e p_uct _en f_ving it.
- You may be e_ctr_ed
or_ productcan be dama_d.
-I DOnot dispose the _duct_pack_ng box. U_ it Hen you move.
B Makethe panelface forward and hold it with both handsto move,,
- ff y_ drop P_ pr_uct, _ d_od
product_n _u_ el_
shockor fire, _tact
for repair.
w_ t_ serJicece_er
Precautions, in Using the Product
Warning
_i
= Do not disassemble, _pair or _d_
_e p_duct at your own discre_on.
Fi_ or el_c _
_ci_nt _n €>_cur_
oContact the _rvice center for check,calibratJonor repair,
mWhen c_ning _e brown_
surface,unplug t_ power _
_ratching. Do not cleanwith a wet c_ot_.
_d scrubwith softc_othto prev_t
I Keep the p_uct _ay from water.
- Fireor el_c shock_ci_nt _n occur.
Caution
! Do not p_ _ store i_!ammable _bs_c_
r_ar _e pr_uct.
T_re is a _r
of expl_on _ fire due to care_ss I"_n_ingoft_ i_mrnable _stan_
I When ,c_ean_ng
_e b_n _
surfa_, unp_ugit_ power _
_ratc_ing.. Do not clean wi_ a wet cir.
-T_
water can _nk into the prm_t,
ii Take a rest from time to ti_
to _
v_
_
ca_
e_ctr_
_d scrubwith softofoth _ prev_t
s_k
or s_nous mafft_nct_.
y_ur vision,
I Keep _e productclean at al__s.
B Takea comforlableand natum_position when wo_ng wAh a pr_uct to relax _e musc|_.
i Ta_ a regularbreakw_n w_ng
Do not pre_ s_ng_y u_
a scratch on it.
with a produc_for a long _..
the pardi w_h a hand or sharpobject_ch as ha& _nci| or ipen,or make
i Ksep _e properd|stan_ from the product,
Yourvi_ rn_y_ impai_ ifyou 1_ at the p,rod_ too cindy,
m _ the _propri_
tesolt_on
-Your vi_
can be im_red.
a_
• Use _tP_zod
_tergent only Hen
- _odL_t can be deformed.
clock by referring _ the Ueet_s Gu|de.
cl_nin_
the product_ (Do not use _l_ene,
_inn_r
or alco,_,)
On Disposal
Ili The fluorescent lamp used |n _is productcontainsa small amountof _rcury.
• DOnot dispo_ of this _t
_th _e_ra| householdwaste.
Dispose! _ _s p_uct must _ ca_ed o_t in a_ar._e
_ _e regu|_ions of your Io_1 a_o_
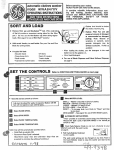
Name of the Remote Control Bu_,ons (A type)
* Mute button
• Volume 4 I_ Button
° Cheek Button
• AV Button
• inp,_ Select Burton
_ch time you pre_ the Input
buttc4q it will change to
AV---I_ Com_nentl
Com_nent2
_
HDMWDVl
ff you pre,'_ the b_ton once_
me foH_ing Inp_ SignaJ
Wind_
will appear. _lect
me signal _pe you want
wing the V & b_t_,
RGBi_
In rting
I
bakeries into remote ntrol.
1. Take out the battery cap,
2, insert the batteries w|th correct po_arity {+/-13. Close the b_e_
cap,
• Dis_.._e of used _tterie_
environmental pollution,
_n the recycle bin _o prevent
Name of the Remote Control Bu_ons( B type)
AM
_R
/
|
INPJT
F
* AV Button_
4 5116"°°
• ARC button
To seJ_ the image size d the
screen.
• Auto _n
• SI_ Bu_ton
w_hing AV/S_Vid_D@
tC_n_tll
,Com_nen_
The pr_u_ _gl__ aL_a_ca_ly _r_d
off_a
ce_.ainperi_ of time,
P_
th_ b_n re.rely
_
an _riate
_n_ d_a_on
• _$M B_ton
tt_
- A_atic.3l_
Pre_ _is _
, Power Onl_ Button
• Input _lect Button
(_ next page)
AutotoXic _ustment fu_n
(Operational for the analog signal
|
®,
ad_s t_ image.
re_#_eby to _t
inter_
screen.
®
I
©
There_ nota f_
....
wh_:hissupported
There _ _t a funcfl_
wh_h _:su#rted
-- There_ _ a Nn_on
_Ai_ _ sup_
J- ......
i
MENU
* Menu
_on
_\
i
/_
v
- uPand;_n b_on,s
Bring up ar_ _n
I....
......* Voleme < I_ Betton
° Che_ Button
di_o_
adjustment
_,_,',,_ --
L
Th_ is n_ a fu_bn
wh_h _ _d
A¥
P_ER
FS-7
• AV Bu_on
Each time you press the Inp_
butt_ _ will c_nge to
_NP_
SLEEP
PSM
ARC
if you press the b_on once,
the following _np_ Signal
Window will appear_ _ect
the _gnal _ype y_ want
_O
AV_
Com_nentl
_mponent2
_
R,GB_
HDMI/DVI
wing the A V b_on_
MENU
EXiT
A
MUTE
InseAing batteries into remote control.
_*'_,/
/
/
/
'-_-,/
/
/ _
/
2 Insert the batteries
wi_ co_ct
polarity (+/-),
_
/
I.Take
OUtof
theused
battery
cap.in the recycle bin to prevent
- Dispose
batteries
environmentaJ potluti_.
* Applicable onllyfor m_els that support the _and
],
Disassemble the stand cover. The cover may be easily disassembled by pressing
up on the base as shown in the figure.
Stand cover
_° After connecting the canes, ,correctly position the stand cover into the holes on the
stand, If securely connected, you wNI hear the, iatch click into place,
* Applicable onJyfor models Mat sup,_
Use the screws to s_ure
in the below figure.
the s_akers
the speakers on the rear side of the pr_uct
as, shown
When the speaker is: ins_lled.
* The
pri_uct
im_e
in the user's guide could be different from the actual image.
Rear View
0
Pow_
Conn,_t_
I_
Wir_
: Connect the power cord
Power conn_or
and image may differ according
Remote Controt Port
RS-232,C _rial
Ports
RGB, HDMI/DV_ Ports
0
PC Sound Jack
: Conn_ the audio cabi,e to the *UNE OUT ja_ _ the PC sound _rd.
AV iPorts
to model
First of a!!, see if the ,computer, woduct
Then, conne_ the signal input cable.
_When
_)
conne_ng
and the _ripherals
are turned oiff_
with the D-Sub sign@ input _te,
When connecting with the HDMI to DVI signal inp_ ca_lle (not ind_),
Rear side of the product.
Pr_C
LJ_ the _n_
ad_l_
Rear side of the product,
Connect the Audio cable.
Rear side of the product.
Conne_
the power cord,
Ma_nto_
a_p_r
sinc_ an i_ompalib_
_savailable in _le maAet (D_erent signa/i_
system)
q_j_ Turn on _,wer
by pressing
the _er
Ibu_o,n on the proud,
PoeJer b_on
_Turn
_ _e PC,
Sel_t an input signal
Press the iNPUT b_on
on the remote c_trol
to select the in_t
iNPUT--,,
VA--_
SET.")
Or, press the iNPUT bu_on at the front side of the woduct,
w_
_Sub
_e_
* Select RGB' 15-pin _Sub anabg signal
__.)Vv'_n _r_ciing
, Se_ H_VI
wi_ha HDMI to DVl s_na[ input cable.
: HDMI to DVI Digi_ s_naL
signal,
Use this fun_ion
when displaying ANALOG
RGB inputs of a PC to the other pr_uct,.
• To use different pr_u_s
connected to each other
Connect one end of the signal input _ble(15-pin D-Sub Signal Cabte) to the RGB OUT
oonne_or of prode_ 1 and connect the other end to the RGB IN connector of other
products.
15-pin D-Sub Signal Cable
Product: 1
Pr_uct
2
Product 3
Product 4
Connect the video _ble
cord (See page 11 ),
as sh_n
in the _low
When connecting with a BNC cable.
• Connect the input terminal with a
proper color match.
figure and then _nnect
%hen ._nnecting
with a S°Video cable.
Connect to the S-Video input te_inal to
watch high image quality movies.
Product:
Product
VC_VD
an input signal,,
@ Select
Press the INPUT butt_
on the r_ote
Or, press the INPUT huron
• _lecl
AV.
Wh_ connecti_
• _lect AV.
with an _Vi_
control to sell_
cable_
R_i:ver
the input signal,
at the front side. of the product.
w_h _ BNC cabS.
V'_n
the _w_
Connect the video/audio cable as shown in the _ow
_wer cord (See page 11).
• Conn_
the input te_inM w_h a proper _br
Product
figure and then, connect the
mat_.
_}
Product
HD#v' R_er
an in,_t signal.
@ Seect
Press the INPUT buffon
INPUT----*
V =--_
HD_
on the remote _ntr_
to sel_t
R_i_¢er
the input signal.
SET
Or, press the INPUT button at: the front side of the pr_ui_.
Conn_t the vide/audio
cane as shown in the _low
power cord (S_ page 1t).
V_-'D VDi_-top
B_
vc_vo/_,top
Box
Select an inpm signal,
Pros the INPUT bu_on on the remote control to sel_t
(,.puT
VCR_iDVD/Sel4op
the input signal.
sET)
Or, press the iNPUT button _ the front side of the pr_uct.
@W_n
_nn_J_ witha HDMI to DV_s_gr_Jinputcable,
W_n conn_r_ witha HDMI s_
Jnp__e.
• _lect HDMI_VI
_W_n
_cting
• _le_ RGB
with a D-_
_gnal input cabS.
the
Product
Product
Product
®
figure and then c_ne_
Box
• When you set the input _gna_ of the main _r_n
as 'AV (CVBS)', you can transmit the signaJ that
you're watching to the AV output terminal
Vid_V
BNC Cable
(not lnc|uded)
Audio C,ab_e
Product
BNC Cable
(_t inclu_d)
Audio Cable
Video/TV
* This fe_ure
is not available for all models,
•. Set it up cl_
to the wall so t_
The insertions
product d_sn_t fail over when it is pushed backwards.
shown below is a safer way to set up the product, which is to fix it _
fat! over when _ is pulled in the, forward direction
will also prevent t_
t_ product,
t}'_ wall _ the product do_n't
_twitl prevent Me product from falling foP;_,ardand hudir_ _ople,
product: from damage caused b,y_alL Plea_
make sure. that:children _nt
it
climb on _ _'_ng from
1. Use the braker and _e bolt to fix the produ_ to the wall as shown in the picture,
2. Secure the bracket with the bolt(not provided
as pa_
of the produ_,
must pt_rchase separately)
3. Use a sturdy rope (not provii_d as parts of the produ_, must purchase se_rately)
safer to tie the, rope _ it becomes horizont_ between the wall and the pr_uct
......
*To g_ t_ _o_A sa_e_m_e _Jrethat_e hei)_ _ _e b_et _
prod,ucL
on the wall
to _e Me product,
_t is
_ m_r¢_# on_ wa_!iS_me _ _
the
Name of the Buttons in the Screen Adjustment Unit
ower
Indicator) _
.This
lights up
w_n
the display
normally(on
mo_),Indicator
if the display
is green
in s_eep
(Energy
Saving)operates
mode, his
indicator
• U_ this button to show/hide the OSD (On _en
screen,.
• Use this bu_on to se_t
• Adjust t_
_Ii _
,,,_j_st
an icon or adj.:
up and down.
the volume,
Display) menu
the se,_ing in the OSD ssr_n
Name of the Buttons, in the Screen Adjustment Unit
_._
,0_o,_
_o°)...................................
[When XGA M_e is active and
1360 X768 Is selected]
|NP_
BuH_
INPUT _
* _÷_
T A, _
AUTO/SET
the inp_ signai
AV
RGIB
HOM_VI
C_F:_e
V_eo, S_rate
HDTV, DVD
HOTV, DVD
15_in D-S_ ar_
_g_l
Digffa_s_
• The unit that receives t_
V_eo
signal from the rem_e co_roL
OSD Menu
Function
Adj_ts
scan
bdght_ss,
Adjusts
the timer function,
P_TURE
SO_J_D
Adjusts the scr_n
video.
De_riptiion
contrast and _|or
that you prefer.
How to adjust _e OSD (On _reen
Display) screen
(A Ty_)
_U
EX_
tt
:
_
EXIT
• Use the remote control to ad|ust the OSD scan,
Press. the MENU IBu_,
W_n
the i_
y_
U_ t_ Y _ _
Accept the chants
then the main menu of ti-_ OSD appears,
want becomes highiighted , press the SET 8L_iOn,
_
B_ons to adiust the itemt,o,the desired _eve,
I.
by pressing the SET B_on.
Exit the OSD by pressing tlk_ EXIT Button.
How to adjust the s_een
a_omati_lly
You need to adjust the screen display when _r_cting
a new c_p_er
set an _'timal
or _ar_ji_
the m_e.
t_
product to
Refer to tk_ foi[owi_
secti_
to
product screen,
Press the AUTO/SET button (AUTO button in a tempe
PC analog signal Then, an ep_mal _reen
fi_ into t_ current mode
ff adiusiment is not sa_sfactory, you r_ed to a_ust _r_n
clock and p_3se inthe OSD men_
Centre,I) in the
stat_s will be _lec_ed _at
position,
[When XGA Mode is active and
1360 X768 is selected]
Adjusting Scr n
PSM
Color
The PSM function automatically adjusts the screen image quality
depending _ the AV usa_ environment_
- Dynamic : Select this option to display with a s.haq_ imam,
• Standard : T_ most general and natural _reen display status,
• Mi|d : Seled this option to display with a mi_d image.
, User1,2 : Sele_ this option to use the user-d_ined selling..
Contta_ : Adiu_ t_ difference between the i_ht and dark levels in the picture
8tlghtness : To adiust the bfight_
of the screen,
Colouri : To adiust the color to desired level
Sharpn_s
: To adiust:t_
clearness of the _reen
Tint :To adiust the flr_ to desired level
CSM
Selecting a facto_ setting color _t
, Warm ' SBghtly reddish white,.
• Nodal
: Sllightly bluish white.
: ,Cool : Slightly purpli_ white,
User : Se_e_ this option to u_ the user-defined _ttings.
R_ / ,Grin / Blue
Set your c_wncol_ levells.
_U1U1U1U1U1U1U1U1U1U1U1U1U1U1U1U1U1U1U1U1U1U1U1U1U1U1U1U1U1U1U1U1U1U1U1U1U1U1U1U1U1U1U1U1U1U1U1U1U1U1U1U1U1U1U1U1U1U1U1U1U1U1U1U1U1U1U1U1U1U1U1U1U1U1U1U1U1U1U1U1U1U1U1U1U1U1U1U1U1U1U1U1U1U1U1U1U1U1U1U1U1U1U
Adjusting Scr n
XD
Color
XD is LG E_ect_onics unique picture impro_Jing techndogy to display a real HO source through
an advanced digi_J signal prc_es_ng a_godthm_
its not avaiiable to use this run.ion in RGB-PC or HOM_IDVI PC m_e_,,
This menu is activated a_er selecting the U_rl
or U_r2
of PSM.
• AL,to : XD is automatically change to Auto.
• Manual : When seceding the Manual, y_ can adjust the XD Contr_t0
MPIEG NR.
XD Colour,
Advanc_
- Cinema : (Functi_ works in the following mode- AV, Com_ne,nt 4,8_/576i)
When you w_ch the m_ie, this function adiu_s the set to the _st _cture
appearar_e.
.8,lack
Res_
Level • (Fur_tbn works in the foll_i_
mode - AV(NTSC), HDMIiDVll
adjusts the,c_trast and the br_htne_s of the _reen usi_ t_
bJack ileve! of the scre_
R_urn to the de,fau_ _ttings
PSM, CSM, XD, Advan_d
at the factory.
XD NR,
Adjusting the audio function
SSM
The_
_d
v_eo _j_ _
_
q_
will
you're,_
washing
• Surround MAX : Set tl-_ Suffound IMAX on. This fur_t_n plays back the mono or stereo sound input
with the dynamic surround ef_s.
It wiB provide rich a_ profound sound t_e. if you set t_
Su_ound MAX on, u_r audio se_ing can n_ be adjure.
• Rat : T_ most commanding _d natu_ a_io.
• Music : Se_ th_ option to enjoy _e or_Jr._l sound when iistening to the music.
,.Movie : $e_ct th_ option to enjoy su_ime sound,,
• Sports: Select this option to watch sports broadca_ir_,,
• User : Select this option to use tl"_ user-_fined audio settings,
AVL
To adiust u_ven s_nd votum_ across aHct'_n_s
ap_opdate _eveLTo use this feature, select On.
Balance
U_ _is func_on to bal_ce
sound from the _eff_d
o,rsigna_ a_o,mati_By to, the most
dght s_akers_
You _n a,dj_ internalspeak_ _tus.
if you w_t to u_ youre_erna] hi-fister_ system, turn off the internal speakemof the,set,
When _n_._,_,
,,_y_r _c_omp_er_
_,_,
_the 'SSM' gsettin =_
in the _d_o menu is one of Fi_,, _Music,
Adjusting the, timer function
Cl_k
if the time is on the dock is incorred,
1) P_ss the MENU button a_ hen
2) Press the !_ butt_ and then use
3) Press the _ button and then _
4) Press the i_ b_on and _hen u_
m_et the clock manually°
use T & b_en to select the _ME menu.
T A b_on to select the C_k: m_u
T & bu_on to s_ the h_r(00~23),
T A b_on to set the minutes(00~59).
Off / On time The off time a_om_icaHy
1)
2)
3)
4)
5)
Auto si_p
Press the
Press the
Pre.ss the
Press the
Press the
if Auto sleep
automatically
1) Press the
2) Press the
swffches the set to sta_by at the pre-_t time.
MENU button and then use T A button to _el_ tl_ TIME menu.
!_ butffon a_ hen u_ T Abutto.n to sele_ Off time or On ti_.
i_ button and hen u_ Y A b_to,n to set the hour(01 _23).
I_ b_on and hen u_ T& button to set the minutes(00._59)_
!_ button and hen u_ Y A b_on to select On or Off
is active and t_'_re is no input signal, t_ set switches to Stanby mode
after 10 minutes.
MENU button a_ then use T A b_on toi select the Auto sleep menu,
_ butt_ and then use • & b_on to _l_t
On or Off,
time f_ion
overnd_. On time _n_ion
ff _hey are _
, When ,On time is Operated, input screen iS tumd on _ff
to the same time;
was t,med off.
Selecting
the options
To cho_e
Child lock
the language in which the controt n_es
are displayed.
Use the T A buttons to seie_ On or _. _e Set can be set up so that it can only be used
with the remote control. This feature can prevent una_hodzed viewing.
In order to I_k the OSD _t_n
adj_tment,
set t_ Child lock t_ to the 'On' po._dtion.
In order to unrock it, do the following :
• Push t_ MENU button on the remote centre! a_ set Child I_k to the 'Off' _ilJo,n.
ISM Meth_
A frozen _ stil! picture from a PCNi_o
game dispi[ayed on _e screen for pro!_ged _riods
result in a g_t
image remaining even when y_ cha_e the image, Avoid allowing a fixed
image to rem_n on the _'ts screen for a long peri_ _ time.
Normal : ff image sticki_
is never a problem, ISM is not neces_ry
=_t to Normal.
White wash : white wash removes permanent images from the _reen,
(An excessive _rmanent image may be impossible to ct_r entirely with white, wash,
Orbiter : may help preve_ ghost imag_, However, it is _st not to all_ any fix_ image to
rem_n on the _reen, _o avoid a _rmanent ima_ on _e _reen, the screen will move every 2
minutes.
Inversion : This is fun_on to inve_ the pa_l cebr of the _reen. T_ _nel color is
a_omaticaIly inve_
eve_ 30 minutes,
S_!D
You can assign a unique Set ID NO (name assignment) to each product w_n several
produc_ are _nr_cted for display. Specify 'the number (1 --99) using the _!' A bL_on
and ex_,, U_ the assign_ Set |D to individuality o_t_I
each prod_st using t_ Product
Co_troI Program.
wilt
Tile m_
_tis u_d to eniar_ the screen and
a_ used w_h s_,eral p_oductsto
view screen°
• '_e Mode
Tile m_e and choose Titealignment and _t t_ _Dof the current p_uct to set
I_ation.
* Only after F_sing the SET button the
adjustments made to the se_s
will be saved
- Ti_ mode : row x _]umn
- 4 x 4 available,
( r = 1,2, 3, 4 c= 1, 2,3,4)
Configuration d an int_r_ion screen is also awitab]e as well as
configuration of One by one D_p_ay,
- Ti|e mode (product 1 ~ 4) : t(2) x e(2)
row
Selecting the options
i
_le mode (product i ~ 9) : r(3) x c(3)
row
Ti|e mode (product 1 ~ 2) : r(2) x c(1)
row
column
J
Tile mode (producti _16) : r(4) x c(4)
rOW
_lumn
Selecting the options
• Tile [D
_!_
• H Stze
Adj_t the horizoma_size oft_
bezel
* V Size
_j_t
. H-P_,itton
Moving the screen _sffion
_rizontally.
* V_o_n
Moving t_
ve_icaily,
* R_et
Function to initialize a_ re,lease Tile,
tt-_ iocation of the _le by setting an ]D,
the,vertical size of the screen _kmg into ac_unt the size of the bezel
screen _,_ion
N[ Ti_ setting a_e relea_
to Fuji _reen_
Power
Indicator
Use this fun_ion
screen taking into account the size,_ the
when selecting Tile recall _d tile sc_en returns
to set the power indic_or
on the front side of the produ_
ff you _et Off, it will go off. If you set On at any time, the power indic_or
automatic_]y
be turned on.
_o
Ught
will
Use this function to _t the Lo_ Display Lamp on the front side of the pr_uct to On
or Off_ if you set On__e lamp wi[_automatica!]y be turned on
Demo
to
On or Off
Use it to see the difference
(XD Demo function
_tween
is not available
XD demo on and XD Demo off.
in RGIB PC/IHDMI/DVl
PC mode.)
Adjusting Screen CLOC PHASE
AL,_O_onf[g,i
(RGB PC
input only)
and Position
This button is for the automatic adi_.tmer_ of the screen position, dock and phase,
This function is suitable for ana]_ue signal inp_: only.
If the picture is#'t c_ear a4ter a_o adjustme_ and es_c[a![y that c_mcters are still
trembling, adiu_ the pidure phase manually.
* It's !E_tavailable to, use Phase, Clock function in RGB DTV, C_por_ent,
HDM]/DVI D'FJ_)
XGA M_e
(RGB-PC
only),
Clock
To minimize any vertical ban or stipes visible, on the _reen
background. The. hodzo_l
screen size will also chan_. This funcfi_
is suitable tot analogue signal input onty
Pb_e
To, adjust the f_us of t_e display, This _em allows you to remove any
hofiz_l
noise and clear or _arpen the [ma_ of ,characters., This
function is sui_b]e for analogue signa! input only
HoPosition
Moving the _reen
V°Position
Moving the screen positi_
po_iti.onhorizontally.
vertioa]ly.
For more improved or better picture quality, _lect
computer re_uti_.
the same m_e
corresponding
to
Adjusting Screen CLOCKJPHAS, E and Position
ARC
To select the image size of the screen
When your AV receives tl-_ wide screen signal, it will lead you
adj_t t}_ picture honzontal_y, in a nonlir_ar pro_rtion, to fiH the entire
Fu_l
When y_r AV receives the wide screen signal it will lead you to adju_
Me picture horiz_tally or vertically, in a linear propodion, to f iil the entire
_r_n
fully (Europe vemdon on[y)
When y_r AV re_ives t_ wide screen signa[, it will be a_ornatically
changed to picture format to be sent,
This p_ure
16:9
Y_ can enj_ t}'_ cinema (the pidure torrent of 16:9) or general TV
programme through the 16:9 mode
The _reen 16:9 is viewed just like that b_ t}_ _reen 4:3 is magnified to
• e left and rigM _ that the screen 16:9 is full
1:1
This picture, format is 1 to 1 o,fge_ral
14:9
You can enj_ t_ pictu_ to.at
of 1,4:9 or ge_ral AV programme
through the 14;9 mode
The _reen 14:9 is viewed just like that the screen 4:3 is magnified to the
uppedlower and _e_right.
PC, HDMI/DVI
PC)
e
X
X
X
x
X
x
•
..........................................
X
0
X
i
...................................
!
......................................
r_
_
_;_;_;_
X
X
.........................................................................................
i
o:
X
e
I
X
..........................................
•
_
AV, (only _B
You can enjoy the cinema in a vast _een through t_ Z_m mode,
The screen 4:3 is magnified to the upperAower and te,_nght sides _ t_t
_:reen 16:9 is full, The bottom a_ top of the picture may be i_t,
2
i
Z_ml,
Reset
format is 4 to 3 of general AV
•
X
X
X
X
X
•
X
•
X
•
X
X
•
•
X
X
•
U_ this function to reset the product to the, facto_ default(Manual
co,nfig, rnanu only)
@ is Me pr_u_
_er
_[d
c_n_ed?
but the ser_n
@ the _we_
power indicator
ap_ars
indi_
to the
• See if the power switch is turned on.
O _sthe p_e_ indicator I_ht on?
@ Power is _,
• See ff the power _rd is properly _nn_ed
outlet.
is green
e×tt_e_y
° Adjust bff_ess
and _ntrast ag_n,
_rk.
_r?
• If the proud is in power saving m_e, move the
mouse or press any key.
@ Does the 'Out of range' message
• The signal from the PC (video card) is:o_ of the
ve_cal or horizontal frequency ran_ of the
product. Adjust: the fr_uency range by refernng
to the Specifications in this _quaL
• M_imum _soi_ion
- 32 /37 / _ inch model
RGB _ 16_ x 1200 @60Hz
HDMI/DVl _ 1280 x 1024 @60Hz
@ Does the 'Ch_k
• The signal cable, between PC and product is not
connected. Check the signal cable.
o Press the 'INP_'
menu in the remote Control to
signal cable' mess@
check the input signal.
@ _d you in_[[
• Install the product driver, which is provid_ with
the produ_, or downl_d it from the web site,
(http://www, lge,com)
Me dtive_
• See if the plug&play function is.supposed by
referring to the video card user manual.
@ The
'Controls
Locked'
message
eThe _qtroJ I_ng
f_ctbn
prevents uni_ntJ®al
@Isthe
screen _si_on wrong?
• D-Sub, an_og si_
-Press the "A_O _button in
the remote _ntrol to, automa_ly
_t_ the
optirral _reen status t_t fits into the current
mode. if a_ustment is _t _isfa_o,ry, use the
Posffion OSD menu.
° See if the video casd re_lutJon and frequency are
suppled by the produ_, If the frequency is out of
ran_, setto the re_mmend_
re_lu_on in the,
Control Panel _ Display _ Setting menu,
@ _ _in _ines _ppear on the
ba_ground
screen?
• D-Sub anaJog si_al -Press the "A_'
button
in the remote _ntrot to automatically sele_ an
optJrral _reen status t_t fits into the current
mode, If a_ustment is_t satisfacto,_ use the
Clod< OSD menu.,
@ Horizontal noise appears or the
ch_acte_
_ook blurted,
• ID-Sub anaJog si_
- Press the "AUTO" button
in the remote controt to a_omatica[ly sele_ an
opti_aJ _reen status that fits into the cur#ent
mode, If a_us_nent is not satMacto_y use the
Phase OSD menu.
@ _e
_n
is displayed abnormally.
• The p_per input s_gn_ is not _nnected to the
signal port. Connect the signa_cable that matches
with the s_rce inp_ signal.
• No sound?
• See ff the audio _le
is _nnected
• A_u_ the volume
• See if the sound is set prope_y
• Sele_ the _propnate
_ualize
ipr_e_y
sound
• Adjust the volume
@ _reen
• Set the, number of _lom to morn _an 24 bits (tree
has poor co[_ re_uti_
(18colors)
_tor)
Select _ntrol Pane_- Display - Se_ngs - _lor
Table menu in Wind.s
• Screen
cotor_
O _
co,or
is unstable
black spots a_ear
ot mono_
on the _reen?
• Checkthe _nnection sta_s of the signal _bte
Or re inse_t the PC vid_ _rd
• Several pixels (red green wh_e or b_ack_1o0
may _pear on the screen which can be
attnbutabie to the unique char_eris#cs of the
LCD panel It is r_t a maffun_on of the LCD
The product s_cifications
LCD Panel
can change without prior notice, for product improvement,
[32 _nch]
32 inches (8&04 cm) TFT _hin Film Transistor)
LCD (Liquid C_stal
Display) Pane_
Viable diagonaU size: 80,04 cm
&5_5
[37 _nch]
mm (PixeJPffch)
37 inches (9403 cm) TFT _hin
LCD (Liquid C_stal
Fiim Transisto0
Display) Pane_
Viable diagonal size: 94,03 cm
0,6_
[42 inch]
mm (piixe! Pitch)
42 inches (106.73 cm) TFT (Thin Fi_mTransisto0
LCD (Liquid Cpystal DispLay) Panel
Anti-Glare coating
Viable diagonam size: 106.73 cm
0,,681 mm (_xel Pi'uch)
[32 inch]
Rated Vol_ge
AC 100-240V~ 50/60Hz 1.5A
Power Consumption
On Mode
: 145W
SJeep Mode
Off Mode
: _<lW (RGB) /4W (HDMI/DVI)
; _ lW
[37 _nch]
Rated Vol_ge
AC 100-240V-
_/60Hz
2.0A
Power ConsumpUon
On Mode
: 180W
Sleep Mode
Off Mode
: < lW (RGB) / 4W(HDMI!DVl)
: _ IW
[42 _nch]
Rated Vol_ge
AC 100=240V *- _/60Hz
Power Consumption
On Mode
: 240W
2.5A
Sleep Mode
Off Mode
: < lW (RGB) / 4W(HDMI!DV[)
: _ IW
De
pr_uct
Illl
m
specifications
can change without prior notice for pr_uct
[1]
[2]
[3]
1[4]
W
W --
Width x Height x Depth
[32 inch]
[1] 80._ _
(31.61 hdles) x 54._
(21._ i_es)
x l&00 _
(7.09 inches)
[2] _._
mq #1,61 hd_es) x 49,_ _
(19.4 i_,es) x 9.,_ cm (3.&3in_es)
[3] _,_
_
(37,95 hches} x _,_
[4] _,_
_
(37,95 hdles) x 49,_ _
(19A i_es)
[1] 92._ _
(36.54 hdles) x 61.90 _
(24._ i_es)
x 22.77 _
(8,._ i_)
[2] 92_ _
(_54 hdqes) x 57_12 _
(2249 i_)
x 1 li,_ _
(&53 i_s)
[3] 112.9 _
(4&45 h_es) x 61 _ _
(24_ i_es)
x 22,77 cm (8,_ i_)
[4] 112.9 all (4&_ hches) x _. 12 _
(22.49 i_es)
x 1 t,_ _
(&53 i_)
(_,_
x 29.45 _
(11.59 ir_es)
x 1!,91 _
(4.,69i@_s)
(2764 i_es) x 29,45 _
(25.71 ir_es) x 11.91 _
(11_59i_es)
(4.69 i_s)
(21,26 i_)
x l&_
_
x 9_
_,_
incus)
(3,9.3in_es)
[37 inch]
[42 inch]
[1] 105,7 _
@1,61hches) x 70_
_
[2] 1057 _
(41_61hches) x _.33 al! (25.71 i_es)
[3] 12&9_ (4957 hdles) x 70._ _
[4] 125.9 cm (49.57 h_es) x 65,_ _
i_)
The product sp_ications
can change without prior notice for product
[32 inch]
[1] 19.4 kg (42,77Ibs)
[3] 21.1 kg (4&52 Ibs)
_] 16.0 kg (3.27 ]bs)
[4] 17.7 kg (39.02 ]_)
[37 inch]
[1] 2&i kg (57,_ I_)
[3] 2_.5 kg (67,24Ibs)
_] _,_g (48_ _)
IE41
_.7 kg (_._ ]bs)
[42 inch]
[1] 35.2 kg (77,_ Ibs)
_] 30.8kg(67._Ibs)
_] 38.0 kg (_,77 I_)
[4] _.6 kg (74.07 ibm)
De
product s_ifications
can change w_hout prior notice for product
M_. R_luti_
RGB : 1_
X 12_ @_Hz
HDMbOV_: 12_ X 1_,4 @60Hz - It tray _t be sLJpp_
_pendi_ on lfneOSor,_
cardbj_
P_eom_nded Resolution
RGB: WSXGA
HDML,'DVI
" WSXGA
t_
1_0
X 768X @6_z
7_ @_Hz _ It may not b_
sup_
_n_ng
on the OS or vM_ cardt_'_
Horizen_l Frequency
RGB : _ - 83 kHz
HDMI/DVI : _ - 72 kHz
VeAi¢_ F_u_cy
56 - 85 Hz
Synch_n_on
Type
Separate!Comp_i_oOG
(Sync On GreenyDigita_
15-pin D_,_b type, IHDMI (dig_31),_VMeo,
_pos_te
Operatj_al
_nditjon
VM_, _po_nt,
Temperature: 10_C ~ 35°C_ Humid_:
Tem_ratu_:
* Appiicable only for models _at sup_
RMS Audio Output
Input Sensit:Mty
RS-23_
,-20°C - 60'C, H_id_:
the speakers
10W+10W(R+L)
0.7Vrms
10% ~ _%
5% ~ 95%
P'CMode- PresetM_e
VGA
640 x 3_
VGA
720x400
VGA
640 x 480
VESA 640 x 480
VESA 640 x 480
VESA 800 x 6_
VESA 800 x 6_
VESA 800 x 6_
MAC
832x624
VESA 1024 x 768
70
70
6O
75
85
60
75
85
75
60
31.469
31 468
31.469
37,500
43°269
37.879
46.875
5&674
49,725
48 _3
VESA
VESA
VESA
VESA
VESA
VESA
1024
1024
1280
1280
1360
1366
x
x
x
x
x
x
768
768
720
768
768
768
VESA128i0
x 1024
VESA1280
VESAI_,0
x 1024
x 1200
60.123
68.68
44.772
47
47.72
47
63.981
79.98
75.00
RG8 : Mode 1 ~ Mo_ 1'9
HDMI/DVI : M_e 1 ~ Mode 17
@ DW Mode
@ PowerIndi_
On Mode
Green
Steep Mo_
Off Mode
Amber
VESA wall mounting
Connected to another object (stand type and wall-mounted type.) This product accepts a VESAcompliant mounting interface pad. = ffhis has to be purchased se_rately
if requital.)
For fuRher information, refer to the VESA Wall Mounting Instruction Guide.
t
I(ensi_on
separ_ely
Connoted
separately
S_udty Slot- (This has to _ purchased
if required.)
to a locking cable that can be purchased
at most computer stores
LI_ this method to connect _veral products to a single PC.
You can control _veral products at a time by _nne_ing
them to a single PC.
iii_i_i_
Connecting
the cable
Connect the RS-232C cable as shown in the picture.
* The RSo232C pr,otocol is used for commun[_tion
between the PC and product. Yo,u can
turn the product on!off_ select an input _urce or adjust the OSD menu from your PC.
iii
i
monitor 1
i_
monitor 2
,
monitor 3
monitor 4
RS-232C Configurations
PC
Monitor
RXD
TXD
2
€
GND
DTR
5 _
_
2
5
DSR
RTS
CTS
PC
TXD
RXD
RXD
TXD
GND
DSR
GND
DTR
DTR
CTS
RTS
DSR
RTS
CTS
Monitor
TXD
RXD
3
GND
DSR
6
7
7
D-S_b9
_Sab 9
D_Sab9
DoS_ '9
(Femur}
(aa_}
(Female)
(Male)
Oommuni_tion
Parameter
i_ Ba_ Rate: 9_uadRate
1_Data Len_h : 8b_
I!, Parity Bit: None
l_ Stop Bit : 1bit
it, Row Control : None
I_ Communication _de
I_ Use a _raight cable
(UART)
: ASCII _e,
DTR
CTS
RTS
Command Reference List
01. Power
02,
03.
04,
05.
Input Select
Aspect Ratio
Screen Mute
Volume Mute
COMMAND1
k
k
k
k
k
06. Volume Contro_
07. Contrast
08. Brightness
09. Color
10_ Tint
11. Sharpness
12_ OSD Select
13. Remote LocW key' Lock
14. Balance
15. Color Temperature
16. _J
state
17, ISM rr_e
I8.
I9.
20,
21_
22.
23.
Auto _nfoura_on
Key
Tile Mode
Tile H Size
Tile V Size
Tile ID Set
24. Elapsed time return
25. Temperature value
26. Lamp fault check
COMMAND2
a
bi
c
d
e
DATA(Hexa)
OOH- 01H
02H - 09H
01H - 09H
OOH - 01H
OOH - 01H
k
f
00H ° 64H
k
k
k
9
h
i
OOH- 64H
OOH - 64H
OOH - 64H
k
k
k
k
k
k
k
j
k
I
m
t
u
z
00H
00H
OOH
OOH
OOH
OOH
FFH
j
p
u
c
d
00H08H
01H
Key Code
OOH - 44H
9
h
i
I
n
OOH - 64H
OOH - 64H
OOH - 10H
FFH
FFH
p
FFH
j
m
d
d
d
d
d
d
d
o
-
64H
64H
01H
01H
64H
03H
Transmission /Receiving
I [Commandl][Command2][
Protocol
][Set ID][ ][Data][Cr]
I
* [Command I]: First command. (j, k, m, d)
* [Command 2]: Second command_
* [Set ID]: Set up the, Set: ID number of product.
range : 1~99, by sexing '0', server can control a]ll products
* In case of operating with more, than 2 sets: using set ]D as: '0' at the same
time, it should not be checked the ack message,
Because all seLs will send the ack message, so it's impossible the check the
whole ack messages
* [DATA]: To transmit command data.
Transmit 'FF' data to read status of command,
* [Cr]: Carriage Return
ASCII code '0x0D'
*[
]: ASCII code Space (0x20)
OK A cknowledgemen
I [Command2][
t
][Set IDI[ ][OK][Datal[x ]
1
* The Product transmits ACK (acknowIedgemen0
based on
this format when receiving normal data. At this: time, if the
data is da_ read mode, it indicates present status data,
If the data is data write mode, it returns the data of the PC
computer,
Errot: Acknewledgement
I [Command2][
][Set ]D][ ][NG][Data][x]
* if tlhere is error, it: returns NG
1
Transmission / Receiving Protocoll
01, Power(Command
° a)
I_ To control Power On/Off of the Set.
Transmission
Data 0 " Power Off
! " Power On
I [a][ ][Set ID][ ][OK][Data][x]
I
!_To show the status of Power On/Off.
Transmission
I [kl[al[ ][Set IDI[ ][FFI[Cr I
I
[ [a][ ][Set ID][ ][OK][Data][x]
]
Data 0 " Power Off:
1 • Power On
I
02. Input
Sele_ (Command
: b) (Main Picture input)
To select input source for the Set.
You can also seJect an input source using the iNPUT
butt:on on tlhe remote control.,
Transmission
]
! [k][b][ ][Set ID][ ][Da_][Cr]
Data 2 : AV
4: Component
5 : Component
1
2
6
7
8
9
I [b][ ][Set ID][ ][OK][Data][x]
Data 2 _ AV
4 ' Component
5 Component
(DTV)
(PC)
(DTV)
(PC)
I
6
1
2
RGB
RGB
HDMI
HDMI
7
8
9
RGB
RGB
HDMI
HDMI
(DTV)
(PC)
(DTV)
(PC)
Transmission / Receiving Protocol
03, Aspect Ratio(Command
: c) (Main picture format)
!_To adjust the screen format.
You can also, adjust the screen format using the ARC
(Aspect Ratio Control) button on remote control or in the
Screen menu,
[ [k][c][ ][Set ]D][ ][Datq[Cr]
]
Data I : Normal Screen (4:3)
2: Wide Screen (16:9)
3: Horizon (Spectacle)
4:Zoom1
5 : ,Zoom2
] [c][ ][Set ID][ ][OK][Data][x]
6 : Original
7:14:9
8 : Full (Europe ,version only)
9, :1:1
(PC)
!
04, Scmien Mute(Command
: d)
I_ To select screen mute on/off.
Transmission
[k][d][ l[Set ]D][ ][Data][Cr]
Data 0 ' Screen mute, off (Picture on)
1 • Screen mute on (Picture off)
AcknowledAem,ent
] [d][ ][Set IDI[ ][OKl[Datali[xl
I
@ Transmission
/ Receiving Protocol
0,5. Volume Mute(Command
: e)
_-To control On/Off of the Volume Mute.
Transm,ission
I [k][el[ l[Set ID][ l[Datal[Cr]
Data 0 ' Volume
]
Mute On (Volume Off)
1 " Volume, Mute Off (Volume On)
I [e][ ][Set ID][ ][OK][Data][x]
Data 0 : Volume
1 : Volume
_,
]
Mute On (Volume Of 0
Mute Off (Volume On)
Volume Control(Command
To adjust Volume.
:
Transmission
[ [k][f][ ][Set [D][ ][Data][Cr]
Data
]
Min : OOH ~ Max : 64H
(Hexadecimal
code)
Acknowledgernent
I [_[ ][,Set ID][ ][OK][Data][x]
Data
]
Min : 0OH ~ Max : 64H
* Refer to 'Real data mapping _page A7,
Transmission / Receiving Protocol
07, Contrast(Command
: g)
i_ To adjust screen contrast,
You can also adjust the contrast
in the Picture menu.
Transmission
I [k][g][ ][Set iD][ ][Data][Cr]
Data
Min " OOH ~ Max 64H
• Refer to 'Real data mapping'
[ [g][ ][Set ID][ ][OK][Data]Ix]
I
_ shown below,
I
* Real data mapping
0
Step 0
A
Step 10
F: Step 15
lO: Step 16
64
Step 100
08. Brightness(Command
: h)
i_ To adjust screen br[ghtness,
You can also adjust the brightness
Transmission
I [k][h][ ][Set ]D][ ][Data][Cr]
Data
IMin : OOH ~ Max : 64H
• Refer to 'Real data mapping'
[ [h][ ][Set ID][ ][OK][Data]Ix]
* Real data mapping
0 Step
A
Step 10
F Step 15
10 Step 16
64
Step 100
in the Picture menu.
!
_ shown below,
!
Transmission / Receiving Protocol
_,
Color(Command
: i) (Video only)
To adjust the screen color.
You can also adjust the color in the Picture menu
1
[ [k][i][ ][Set _D][ ][Data][Cr]
Data
Min "00H *- Max ' 64H
(Hexadecimal
code)
• Refer to 'Real data mapping'
page A7.
! [i][ ][Set ID][ ][OK][Data][×]
Data
]
Min ' 00H ~ Max ' 64H
10, Tint(Command
: j) (Video ,only)
To adjust the screen tint:.
You can also adjust the tint in the Picture menu,
Transmission
[ [k]U][ ][Set ID'][ ][Data][Cr]
Data
1
Red: 00H ~ Green: _H
(Hexadecimal
code)
- Refer to 'Real dam mapping _page A7
I _][ ][Set ID][ ][OK][Data][x]
Data
Red: 00H ~ Green: _H
* Tint Real data mapping
0 "Step °50
64 • Step 50
I
Transmission / Receiving Protocol
11, Sharpness(Command
: k) (Video only)
i_ To adjust the screen Sharpness,
You can also adjust the sharpness in the Picture menu.
Transmission
]
I [k][k][ ][Set ID][ ][Data][Cr]
Data
Min " 00H ~ M_
(He,xad_imai
" 64H
code)
* Refer to °Rea_ data mapping'
page A7,
[ [k][ ][Set ID][ ][OK][Data]Ix]
Data
Min : O,OH~ M_
]
: 64H
12, OSD Sel_(Co,
mmiand : I)
I_ To control OSD on/off to the set.
Transmission
i [k][I][ ][Set ID][ ][Data][Cr]
Data 0 : OSD Off
[
[I][
][Set
i
1 : OSD On
ID][ ][OK][Data][x]
Data 0 ' OSD Off
1 _ OSD On
13. Remote Lock/Key Lock (Command
- m)
I_ To control Remote, Lock on/off to the set.
This function,
when controlling
I [k][m][ ][Set ID][ ][Data][Cr]
Data 0 • Off
1 "On
Acknowledgement
I IEm][][Set ID][ ][OK][Data][x]
Data 0 • Off
1 "On
RS-232C,
I
locks the remote control and the local keys,
Transmission / Receiving Protocol
14 Balance(Command
: t)
To adjust the sound balance.
I [k][t][ ][Set ID][ ][Data][Cr]
Data
I
Min " 00H ~ Max • 64H
(Hexadecimal code)
- Refer to 'Real data mapping' page A7,
!
[ [t][ ][Set ID][ ][OK][Data]i[x]
Data
Min _00H ~ Max'
* Balance
_L50-
64H
R50
15, Color Temper_ure
(Command
: u)
i_ To adjust the screen color temperature_
Transmission
[ [k][u][
Data 0
1
2
3
][Set ID][ ][Data][Cr]
: Normal
:Cool
:Warm
: User
[ [u][ ][Set tD][ ][OK][Data][x]
Data 0 : Normal
1 :Cool
2:: Warm
3 : User
I
I
Transmission/Receiving
Protocol
16. Abnomal _te
(Command : z)
I_ Abnormal State : Used to Read the power off status when Stand-by mode.
ion.
! [kl[z][ ][,Set fU][ ][Data][Crl
!
Data FF : Read
0 : Normal
1: No signal
2 : Turn the
3 : Turn the
(Power
(Power
monitor
monitor
on and signal exist)
on)
off by remote control
off by sleep time function
4 : Turn the monitor off by RS-232C function
6: AC down
8 : Turn the monitor off by off time function
9 : Turn the monitor off by auto off function
I [z][ ][Set ID][ ][OK][Data][x]
]
17. ISM mode(Command:
j p)
I_ Used to select the afterimage preventing
Transmission
! DI[P][ ][Set IDI[ ][Data][Cr]
Data 1 :Inversion
2 : Orbiter
4 : White Wash
8: Normal
I [p][ ][Set ID][ ][OK][Data][x]
]
function.
Transmission / Receiving Protocol
18. Au_ Configur_Command:
j u)
I_ To adjust picture position and minimize
automatically,
it works only in RGB(PC)
! D][u][ ][Set ID][ ][Data][Cr]
]
Data 1 _ To set
[ [u][ ][Set IID][ ][OK][Data][x]
I
19. Key(Command
: m c)
I_ To send IR remote key code.
Transmission
I [m][c][ ][Set ID][ ][Data][Cr]
!
Data Key code • Refer to page A1,8
Acknowte_ement
I [eli l[Set ID][ ][OKl[Datal[x
]
I
image shaking
mode,
Transmission / Receiving Protocol
20. Tile Mode(Command
1_ Change a Tile Mode,
Transmission
I [d][d][][Set
: d d)
ID][][Data][x]
i
D,ata
O0
Tile mode is off.
12
1 x 2 mode(column
13
1 x 3 mode
14
1 x 4 mode
44
4 x 4 mode
x row)
* The data can not be set to OX or XO except 00_
I [d][]['00][][OWNG][Data][x]
I
Transmission / Receiving Protocol
21. Tile H Size(Command
: d g)
I_To set the Horizontal size
Transmission,
! [d][g][l[Set
Data
iD][l[Datal[x]
IMin : 00H ~ Max : 64H
I [g][][Set ID]H[OWNG][Data][x
22, Tile V Size(Command
i_To set the Vertical size.
I [d][h][][Set
Data
I [h][][Set
]
I
- d h)
ID][][Data][x]
1
IMin " 00H ~ Max • 64H
ID][][O_NG][Data][x]
I
Transmission /Receiving
Protocol
23. Tile ID Set(Command
: d i)
!_ To assign the Tile ]D for Tiling function.
Transmission
I
1
Da_
Min : 00H ~ Max : 10H
(Hexadecimal
code)
I [!!!![Set!D![![O.ING![Da,!_!!x
! ]
24. Elapsed time return(Command
I_ To read the elapsed time,
Transmission
I [d][l][][Set
]Dill[Data][x]
[
* The data is always FF(in Hex),
Acknowledgement
I [Ill][Set
Ial[][OWNel[Data![x
]
* The data means used hours,
(Hexadecimal
code,)
I
: d I)
Transmission / Receiving Protocol
25, Temper_ure
value (Command
: d n),
To read the inside temperature value,
Transmissio_
I
[d][n][][Set
UD][][Data][x]
* The data is always
I
[hill[Set
FF(in Hex).
ID][][O_NG][Data][x]
* The data
]
I
is 1 byte long in HexadecimaL.
26. Lamp fault Ch_k(C:ommand
I_ To ch_k Ilamp fault.
I [d][p][][Set
ID][][Data][x]
• d p)
!
* The data is a_ways FF(in Hex),
I [Pill[Set
_D][][OKJNG][Data][x]
Data 0 ' Lamp Fault
!: Lamp OK
I
!
I_" Connect your wired remote co,ntrol to Remote Control port on the Product,
i_ Ou_ut
waveform
singJe pulse, m_ulated
with 37_9,17KHz signam at 455KHz
!
t
FCAR = lfTc
=fosd12
Duty ratio = T1 _c = 1/3
_TI
1_ Configuration
Carrier frequency
of frame
• i st f_me
High
custom code
• Repeat frame
i_ Le_
code
I-,
gm$
vF"
"-!
9ms
b B_ d_cription
• B,_ '0 °
* Bit "1"
_J
,j
_"
r
1ot2ms
Frame int_a/I
: Tf
• The waveform
is transmitted
_
as long as a key is depressed,
Tf
Tf
_J ...............................................
I
P[
D I
Tf=108ms@455KHz
Function
Nole
00
A
PJC Bu'tlon
01
v
R!C Button
02
VOL(_)
R/C Button
03
VOL(41 )
R/C Button
08
POWER
ONtOFF
PR!C Bu_on
C4
POWER
ON
Di_ret:e
IR Code(Only
Power
On)
C5
POWER
OFF
Discrete
LR Code(Only
Power
On)
09
MUTE
PJC Button
98
AV
R/C Button
INPUT
PJC Button
0E
SLEEP
RIC Button
43
MENU
RtC Bulton
5B
EXIT
PJC Button
6E
PSM
RiO Button
44
SET
RiO Button
!0
Number
Key 0
R/C Button
11
Number
Key !
RIO Button
12
Number
Key 2
RiC Button
13
Number
Key 3
RiC Bu_on
14
Number
Key 4
PJC Button
15
Number
Key 5
R/C Button
16
Number
Key 6
PdC Butlon
17
Number
Key 7
_C
18
Number
Key 8
R/C Button
0B
i
(Power
On/Off)
Button
RJC Button
Di_rete
IR Coide_!r]put
iAV
Discrete
rR Code(!nput
COMPONENT1
Selection)
Di_rete
IR Code(!nput
COMPONENT2
Selection)
Discrete
IR Code(input
RGB PC Selection}
Di_rete
IR Co,de(hput
RGB DTV Selection)
Di_rete
LR Code(!nput
HDM_/DW
Selection_
Selection)
RiG Button
ARC
(4:13)
4:3 mode)
ARC (1619)
Discrete
IR Code(On!y
16:9 mode)
ARC (ZOOM)
Discrete
_R Code(Only
ZOOM1
AUTO CONFIC
Discrete
LR Code
ZOOM2
mode)