1
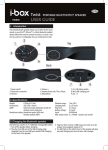
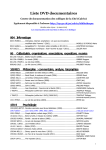
MAC GUILD NEWSLETTER
V OLUME 4 ISSUE 3 DECEMBER 2003
IN THIS ISSUE:
• WWDC 2003 Excerpt
• Bob’s Panther Party Experience
• Updated Mac VPN FAQ
• Apple iMovie 3 Review
• MacAlly iVoice II Review
• Dymo Labelwriter 330 Review
WWDC 2003 Excerpt
By Larry Peng
This year the conference was pushed back by one month, and the location changed to the Moscone West
Convention Center in San Francisco. The reason for the delay was to ensure that developers would
receive a stable and workable developer preview of the next major revision of Mac OS X (code name of
Panther).
This year, WWDC represented a combination of "WWDC" and the "QuickTime Live Conference". In
addition, this year there was an Enterprise Track which tried to address issues that are of concern to
system and network administrators.
Keynote Address (June 23, 2003)
It soon became obvious that the keynote speech was not aimed only at the development community, but
to the world. According to Steve Jobs, the attendance of 3800 developers represents just over one
percent of the total number of registered Apple developers. Developers of all kinds are there from the
Mac, Unix, and Java communities. Steve began with a few status updates.
First was Airport Extreme (802.11g). The 802.11g standard was ratified the previous week, and Apple
via the latest software update should now be in compliance with the standard. To date, Apple has shipped
more than 300,000 Airport Extreme products.
Second was the Apple Stores. 58 stores over the last 25 months, with 17 million visitors. Three new
stores were mentioned: Chicago (opened the June 28th weekend), San Francisco next spring, and Tokyo
early next year.
Third was the iPod. Apple is now on the 3rd generation model, and waiting for competitors to match the
first generation. The one millionth iPod shipped on June 23.
Fourth was the iTunes Music Store and iTunes 4. iTunes 4 and the store was launched 8 weeks ago, and
the 5 millionth song was sold on June 21st.
Fifth was Safari. Steve declared Safari version one available today after 5 million beta downloads. A
Safari SDK is also available today so developers can embed Safari capabilities into their apps.
Steve then moved on to preview Mac OS X 10.3, codenamed Panther. WWDC attendees got a developer
preview copy of Panther after the keynote. Steve announced that Panther will ship before the end of the
year for 129 dollars retail.
Steve outlined several new features of Panther:
A)
B)
C)
D)
A new Finder
Improved iDisk
Expose
File Vault
PAGE 1 OF 13
The Mac Guild – December 2000
E) Improvements to Mail
F) IPSec based VPN in Panther and Panther Server
G) Built in Fax
H) Pixlet
I) Preview
J) Fast User Switching
K) FontBook
L) IChatAV (Videoconferencing for the rest of us)
Following the highlights of Panther, there were several major announcements:
iSight
As a companion product to iChat AV, Apple shipped iSight on the same day of the WWDC keynote. It is a
high quality firewire video camera (640 by 480, 30 fps, f2.8 aperture, dual element microphone). iSight is
auto focus and exposure, and features 3 different mounts of the top of monitors on laptops, flat screens,
eMacs. To a roaring crowd, Steve announced that each WWDC 2003 attendee would receive a free
iSight.
As an aside, Larry Peng (author of this report) and his LLNL colleague Steve Kiar tried doing an iChatAV
session between their homes, and it worked well. We were both on Airport wireless 802.11b running
through Linksys switches to our broadband ISP's (cable modem for Larry, DSL modem for Steve). Larry
was using a 1 GHz Titanium PowerBook, and Steve was on a 733 MHz G4 tower. Our wives finally got the
chance to meet each other!
XCode
Steve introduced the new Apple supplied development environment for Mac developers named XCode for
Jaguar and Panther. The focus of XCode is to minimize development and debugging time. It features a
cleaner user interface, gcc 3.3 compiler, much improved compile time, a zero link feature (only link what
needs to be linked), fast code searching, predictive compilation (compile based on what you type), fix and
continue (developers can make code changes to an application while the application is running), auto use
of idle resources, and distribute compilation to distributed hosts, etc.
As a result, compile times between CodeWarrior is now around 2x faster than XCode (The Finder UI as
the example) versus around a factor of 10 previously under the same setup. If multiple hosts are
involved, then XCode can compile faster than CodeWarrior. Steve only half-jokingly suggested using a
rack of Xserves for distributed compiles.
Power Mac G5
In a major departure from recent WWDC keynotes, Steve Jobs spent a major portion of his talk
introducing the new Power Mac G5 (billed as the world's fastest personal computer). These are totally
redesigned from the ground up, and based on the IBM PPC 970 (marketed as the G5).
The IBM PPC 970 is derived from IBM's high performance POWER 4 processor. The new 970 is a 64 bit
PowerPC CPU with a front side bus of half of the CPU clock speed. Symmetric multiprocessing is
natively supported by the 970. The 970 is manufactured at IBM's new $3 billion fab in East Fishkill, New
York. The POWER processor family is also the basis for LLNL's ASCI Purple supercomputer (via the
upcoming POWER 5).
NOTE: The above is only an excerpt from the trip report. For the full-length detailed report of the WWDC 2003
by Guild member Larry Peng, go to http://mac.excaliburworld.com/wwdc/wwdc03.html.
PAGE 2 OF 13
The Mac Guild – December 2003
Bob’s Panther Party Experience
Contributed by Bob Kenyon
Event: Apple's Nationwide Panther Release
Date: 10/24/2003
Time: 8:00 PM
Where: Apple Store, Valley Fair, Santa Clara, California
The Day After...
Man it's so much fun drinking the Kool-Aid. I did just that last night, going to the Panther Party at my
local Apple Store at Valley Fair.
I was pretty casual about going there. I didn't really want to wait in line forever, but when I got there
around 8pm, I was chagrined to see a line sweeping around the "courtyard" outside Nordstrom. Sure
enough, it was the line for the Apple Store and like a coke-addled disco queen dying to get into Studio
54, I got into line.
I was immediately impressed by the buzz around the place. People were walking up and asking what was
going on, and why was everyone in line. The Apple employees were wandering around the line making
sure everyone filled out the cards for the drawing for the free iMac. Most people who didn't already know
what was going on would do the quizzical dog tilt of the head, realize it was a Mac thing and either walk
away or fill out a card. The Mac heads, however, just got into line and waited patiently.
After about a half an hour, I noticed a young kid come out of the store and sit down at one of the
Nordstrom cafe tables with his iBook and a newly fresh copy of Panther. He opened the box and emptied
out the contents, after waking up his machine from sleep. He rifled through some of the documents,
discarded them on top of the Panther box and found the CD's. Regarding them closely, he looked at each
one and set them down. He then put the documentation and other flotsam back in the box, set it aside
and went back to the disks. He inserted the first disk and started the install program.
I lost track of him for a while, but later I noticed him playing a game on his phone. I assume that he was
waiting for the installation to complete but I couldn't see his screen. There were other Apple employees
walking around the line with PowerBooks demonstrating the new Panther features. The time went by
somewhat quickly, but I was getting tired of waiting.
But finally, the time arrived and I swept into the store. Panther boxes were on top of all the software
aisles, and I grabbed one. I really only wanted to buy a couple of other things--an iTrip to play my iPod
through the radio, and an iMic so I could make mp3's of my old records and tapes. I got both items and
wandered around the store, checking out all the folks trying out the new machines. There were a lot of
PowerBooks and G5's exiting the store, that's for sure.
Finally, I was able to check out. The lady made sure that I had an old iPod to go with the iTrip, and I got
all my 10% discounts. I was so happy to get out of there, I walked right past the people at the front
giving out the "gift" from Apple, which was some dog tags with the Panther X logo on them. Maybe I can
put them on my dogs.
PAGE 3 OF 13
The Mac Guild – December 2003
Updated Mac VPN FAQ
Contributed by Bill Catambay
The following FAQ is in support of the Netlock Mac VPN client, the only VPN client that Lockheed Martin
employees can use on their Macs for connecting to the Lockheed Martin Enterprise Virtual Private
Network (EVPN). This FAQ, and other related VPN information, can be found at the Mac Guild VPN web
site: http://mac.excaliburworld.com/vpn/vpn.html.
Does the Mac VPN client support OS X?
Yes, version 2.1 (or later) of the VPN client supports OS X.
Does the Mac VPN client support Panther (10.3)?
VPN client v2.1.7 adds support for Panther, but Mac Guild testing has shown that versions as old as v2.1.4
work fine with Panther (OS 10.3) as well. There are problems reported using v2.1.2 with Panther.
Can I use the VPN component built-in to OS X to access EVPN?
No, the VPN client built-in to OS X does not support the Nortel switch. You must purchase the Netlock VPN
client to access EVPN.
What are the Mac requirements?
Mac OS X - 10.1.5 or later
•
Netlock client v2.1 or later
•
CD ROM drive
•
10 MB free disk space
•
64 MB RAM
•
Web Browser
Mac OS 8.6 - 9.2.2
•
Netlock client v1.2 or later
•
Open Transport 2.0.3 or later
•
CD ROM drive
•
10 MB free disk space
•
64 MB RAM
•
Web Browser
Does the Mac VPN client work through a router or an Apple airport?
The ability to use the Client with a router is dependent upon the router model and firmware. The router must
allow data through port 500, protocols 50 and 51, and allows any UDP port to be used for NAT traversal. For
example, the Asante FR1000/3000 series routers are not End Point solutions, and does not work with the
Netlock VPN client; whereas, the Asante VR2000 series should support it.
In general, the EVPN solution is using NAT Traversal over port UDP/4500. This information is in the LM EVPN
FAQs. Be sure to keep the firmware current.
The ability to use the Client with the AirPort is dependant on the model and firmware version of the AirPort
being used, whether or not the AirPort is acting as a NAT device, and whether or not NAT traversal is configured
on the Contivity switch. Early models of the AirPort do not support IPSec passthrough or NAT traversal. They
will not work with the Client when it is used as a NAT device. These models of AirPort will only work when the
AirPort is configured to act as a bridge.
AirPorts with firmware 2.0.4 or later support IPSec passthrough. These versions require Mac OS X in order to
configure the AirPort. They will support the use of the Client when the AirPort is used as a NAT, but NAT
traversal must not be enabled on the Contivity switch.
PAGE 4 OF 13
The Mac Guild – December 2003
AirPort Extreme with firmware 5.1 or later supports both IPSec passthrough and NAT traversal. This will
support the use of the Client when the AirPort is used as a NAT, independent of the NAT traversal settings on
the Contivity switch.
How do I get updates to the Mac VPN client?
If you were to purchase today, your purchase includes annual maintenance. Annual maintenance includes
technical support and free upgrades for one year. If you already own the client, but are not on the maintenance
program, you can sign up for the maintenance program for $25, and you get free upgrades for a year from the
point at which you purchased the client (or from the date your last maintenance ended).
Can Mac users access Lockheed Martin through VPN?
Yes, that's what these pages are all about. As of December of 2001, Nortel has released a Mac client which can
be used to access Lockheed Martin's VPN switches.
Is the Mac client covered under Lockheed Martin licensing?
No, as a Mac user, you must purchase the Mac client yourself. For information on ordering the Mac client, check
out the Mac VPN ordering page.
Is there anything special I need to do to use VPN on the Mac?
Yes, as a Mac user, you need to purchase the VPN client yourself, and you must also ensure that your EVPN
account is assigned to the non-compression profile. This special profile has compression turned off, which is a
requirement to use the Mac VPN client. Submit a service request to the ESD, let them know you are a Mac EVPN
user and request getting switched to the non-compression EVPN profile. Have the request assigned to ISO-RAS assignment group.
If my account is placed in the non-compression profile, will I still be able to use EVPN on my PC?
Yes, the non-compression profile will still allow access via VPN on your PC. The only difference is that your
connection on the PC will also be uncompressed.
Every time I try to connect, the connections fails with a message about compression. What's wrong?
The Mac VPN client does not work on EVPN accounts using compression. You need to submit a service request
to the ESD to have your EVPN account switched to the non-compression profile.
Why don't the VPN DNS names work on the Mac client?
The Mac client is not setup to access the VPN switches through the domain names. You must specify the
actual IP addresses. See the internal data page for IP addresses.
Can I purchase the Mac VPN Client directly from Netlock?
Yes. Netlock has announced that the client is available directly from the Netlock web store (buy it directly from
this link). See the order page for more information.
I installed the Mac client, but there is no VPN menu in my menu bar. What's wrong?
There is a known bug with version 1.1 of the Mac client running on newer Macs in OS 9.2 and higher. Obtain
version 1.2 to resolve the problem.
WORK AROUND: You can access the client using the following URL: http://127.0.0.1:9161/
NOTE: You can bookmark the URL and/or drag the URL to your desktop to make it easier to access on
subsequent connections.
Where do I go for help with the Mac VPN client?
For Mac specific issues, send a message to the Mac Guild mailing list for help. You must be subscribed to post
a message, and you can subscribe on the Mac Guild sign-up page. For VPN switch issues or SecurID issues,
PAGE 5 OF 13
The Mac Guild – December 2003
you need to call the ESD (408-742-SERV). If you are unsure what category your issue falls into, ask the Mac
Guild for guidance.
When contacting the ESD, how can I make sure the request goes to the right group?
Have your request assigned to the ISO--RAS assignment group.
Are there any other FAQs related to VPN for Lockheed Martin employees?
Yes, there is a generic EVPN FAQ which is geared towards both Windows and Mac users on the Enterprise VPN
site .
How do I get reimbursed for purchasing the Mac client?
If you wish to be reimbursed for the Mac client, you should go through your local management or financial
approval process prior to ordering the product or you may not be reimbursed.
I'm having problems with Outlook and Exchange Servers. What can I do?
Here are some suggestions that have helped customers resolve problems experienced with Outlook.
1. Add the Exchange Server to the Macs hosts file in the TCP/IP control
panel. The format is:
mail.company.com A 10.1.0.1
It's basically, host name, followed by an 'A', followed by the IP Address.
2. There is a long discussion regarding general problems with Outlook and any VPN tunnel. Two suggestions
from the discussion:
A) In the Outlook preferences, make sure the default transport type is set to TCP/IP instead of
Appletalk.
B) Within the setup of the Outlook profile, open the "Exchange Server" service properties. Click on the
Advance tab. Enable "Check server every" box and set it to 22 seconds (22 gave the testers the best
results after much testing).
3. Some customers report that they can read email, but cannot view or send large attachments. This is most
likely an MTU related problem. We have provided a utility to reduce MTU that resolves that issue. Download the
free Netlock MTU Reducer from here.
Note: The application will display a simple windoid confirming the MTU change. It also creates a log file for
review. If you reboot the computer it will change the MTU back to its original setting and you will need to run
the application again to reduce MTU.
Is there an alternate VPN solution to the Netlock client for accessing the Lockheed Martin network?
Any alternate solution must work with the Nortel switches and they must support authentication with SecurID.
A lot of products can support working with Nortel switches, but the issue is supporting the necessary SecurID
authentication. Right now the only known supported solution is the Netlock client product.
PAGE 6 OF 13
The Mac Guild – December 2003
Mac Guild Reviews
APPLE IMOVIE 3
Reviewed By Diane Love
Review systems
iMac 1Ghz G4, 1GB memory, 80 GB hard disk, 1440 x 900 display
Review Project
Turn 3 DV tapes and 100+ digital images of an annual open-air musical event into DVDs!
Introduction
iMovie is the modern "killer app" for the Mac versus Windows. Amazingly, what we take for granted on
Macs - that we can capture video, edit it and turn it into finished video or DVD - is still hard going for PC
users.
Even on Macs though, it's hasn't always been easy. Video capture is very demanding of processor
speed, memory, disk space and disk transfer speeds. An older machine may cease to work for video
when a new version of the operating system makes increased demands.
This was the position I was left in when I discovered that the video I had captured from the 2002 event
would no longer play glitch-free on our 500MHz iBook.
Around the time of the 2003 event I got a new iMac, equipped with a DVD burner and pre-loaded with the
iLife suite.
Upgrading to iMovie 3
With iMovie 3 on my new machine I was able to capture the DV from the 2003 event without issue and
edit the movies pretty quickly. Having done that, I then connected up the firewire disk containing the
nearly finished project of the 2002 event and finished that too. After all the DVDs were burned, labeled
and distributed, my review copy of "iMovie 3 and iDVD the Missing Manual" arrived. Here I discovered
that it's actually not a good idea to work on an iMovie 2 project in iMovie 3 - you are recommended to
finish it in iMovie 2. Seems I got lucky.
Improvements over previous versions
For me the worst feature of the previous iMovie was the infamous ghostly triangles. Given that the
program was designed to edit video, you'd think the controls for selecting points to cut, copy and paste
would have been visible and easy to manipulate. Incredibly, in the previous iMovie neither was true.
Working on my own, I never discovered how to use the ghostly triangles that occasionally flitted around
the scrubber bar but disappeared when I tried to grab them with the mouse. I did discover you could split
the clip at the playhead, move the playhead, split again and then throw away the unwanted part inside or
outside the cuts. "iMovie 2 the Missing Manual" explained precisely how to conquer the ghostly
triangles, and iMovie 3 makes them visible and easy to use. For better or worse though, I like to use my
split clip at playhead method, since I like to focus on defining one cut point at a time.
New in iMovie 3, the Ken Burns effect allows you to add motion to stills that you incorporate into your
video. You can define a start point and zoom level and an end point and zoom level, and iMovie then
constructs a clip from the photo. This is a lifesaver for people who like to park their camcorder on a tripod
and video themselves playing with their band - the static view from the tripod gets old when nobody is
zooming in on solos. If you have photos from the event, you can cut to closeups moving and crossfading
through each other while the sound is still running, and end up with more interesting video. Another
application is to create movies from stills only.
So how do you find the right still photos to incorporate? The iLife link to iPhoto vastly improves workflow
even if you know which of the stills in your iPhoto library you want. I found myself working with both
iMovie and iPhoto simultaneously. In iPhoto, I was examining the stills in detail, choosing the ones with
PAGE 7 OF 13
The Mac Guild – December 2003
the best facial expressions. The thumbnails that iMovie shows you are too small for this. Still in iPhoto, I
would also define specific albums for the movie and put the selected photos into them. This made it far
easier to locate the chosen photos from within iMovie. Thankfully, iMovie and iPhoto display the albums
in the same order.
The iLife link to iTunes was not necessary for my project. It looks like it would work nearly as well as the
iPhoto link, with the exception that the playlist selector in iMovie madly shows the iTunes playlists in a
random order - neither the alphabetical order of iTunes nor chronological.
I noticed there were some very interesting new sound effects including the self-explanatory "suspense"
and "foreboding". The wagon crash sound I use for ski mishaps was unfortunately gone, though no doubt
it's still on one of our machines somewhere. Also worth mentioning is the improved sound editing
capability in iMovie 3, where you can change the volume in a clip by dragging points on a volume curve
up and down.
Similarly there are some interesting new visual effects. While I don't normally indulge in these, I did
make an exception and use the lightning effect to draw attention to a great guitar solo from one of my
band members!
Due to lack of a DVD burner on my previous machine, I can't say how much of an improvement to
workflow is made by the iLife link to iDVD. Suffice to say that defining chapter numbers and hitting the
iDVD button are about all you have to do to get started with the DVD phase of your project. Just make
sure you've finished your iMovie activities first.
Another unexpected bonus was a new export option to export the sound of the whole video as an AIFF
file. From there I could import it into Sound Studio (bundled with my iMac), cut it up into tracks, import
the AIFF tracks into iTunes, burn them to CD and even rip my own CD to get mp3s. Making the CD of the
movie was a breeze, especially with the 16x CD burner.
The preference for "New projects are :" PAL or NTSC is helpful for those of us who regularly deal with
both formats. As iMovie can't reliably tell what type of analog camera is connected via the Dazzle bridge,
I would often experience the situation where previous versions of iMovie refused to allow me to continue
work with the camera and an existing project.
Don't try this at home!
If you have an iSight camera plugged into one of your firewire ports and a camcorder plugged into the
other, don't be surprised if you can't capture any video. How does iMovie know which of those cameras
it's supposed to be working with ? Before I realized this, I captured some video that had alternate sound
and silence - a couple of seconds of each.
Expect the worst if you choose the "New projects are NTSC" preference and then connect a PAL analog
camcorder via your Dazzle bridge or similar. I did this purely as an experiment and was pleasantly
surprised to get video that looked normal. Then I discovered that either sound was missing or sound
from one clip was associated with a different clip. I was trying to see if iMovie would detect the situation
and refuse to capture - maybe it would if the offending camcorder was digital.
iMovie limitations
iMovie allows you to make beautiful end credits just like those you see in a real movie; your friends and
family will love to see their own names rolling up the screen. In some types of titles, the right hand edge
of the text is slightly misaligned. Nobody who saw the movies seemed to notice, but I'd still prefer this
not to happen. Another thing I noticed about making titles was that there was some sort of usability flaw
that left me always getting the text of the previous title in the one I was currently trying to do. I always
managed to fix this by retyping and re-rendering the offending titles.
Many of my finished projects involve music, either because they are live music events or because I set
them to music. In either case, it's a serious limitation not to be able to see the sound waveform. I find
myself memorizing frame numbers, playing, rewinding and playing again to evaluate where cuts should be
to line up with music, when this would be plainly visible in the waveform. iMovie would be better if it did
this, but then again it's free and Apple makes Final Cut Express and Final Cut Pro for people who want to
take their video making to the next level.
PAGE 8 OF 13
The Mac Guild – December 2003
I found that converting NTSC to PAL using iMovie and Quicktime was of limited value. A little girl
running happily through the frame in NTSC turned into a cloud of shredded bits running through the frame
in PAL. I discovered that all but one of the DVD players I tried in the US and UK could play both PAL and
NTSC DVDs made from iMovie. This is a separate issue from region coding, but it's worth noting that
iMovie's output is not region coded.
Summary
Unlike iTunes and iPhoto, Apple doesn't (as far as I know) have any way of making money from your
home movie collection. Instead iMovie seems to be provided for free as an incentive to choose Mac
rather than Windows. For me it's simply one of the compelling factors in being a Mac owner. The latest
version is stable, reliable and easy to use. The new iLife links improve workflow and help creativity. Your
finished products will wow your friends, especially those who try to emulate you using their Windows
systems.
Pros:
•
•
•
•
Easiest program to edit movies
Ken Burns effect
No more ghostly triangles
Links to other iLife applications
Cons:
•
•
•
Sound waveform not visible
iTunes playlists in random order
Titles usability and occasional slight misalignment
Overall Rating:
5 out of 5 Mice
MACALLY IVOICE II
Reviewed by Bill Catambay
Overview
The Macally iVoice II is a Mac audio add-on that adds Audio In and Audio Out ports through your Mac's
USB port. It makes Audio In and Out ports very accessible, and is especially useful for Macs that don't
have a built-in Audio In port.
Retail price is $49.
Features
•
Built-in microphone
•
Stereo line-in jack to digitize your analog audio from cassette tape player, CD player etc.
•
Mic-in and line-out jacks accept the regular PC headset (not included) for comfort and
convenience of internet chatting
•
Mute button to turn off built-in mic, mic-in and line-in
•
Perfect for application such as voice command and control, voice recognition, voice recording,
internet phone and video conference
•
Power mute indicator
•
Fully compliant with USB1.1 specification
Requirements
•
G3/G4, iMac or PowerBook with a built-in USB port or any PowerPC with 3rd party USB adapter
installed
•
MacOS 9.2, Mac OS 10.1.5
Initial Setup
Hooking up the iVoice II is incredibly simple. Just plug the USB cable into your Mac's USB port (or a
USB hub), and then use your OS software to set your input to USB (on OS 9, "External Mic, and on OS X,
"Macally USB Microphone"). There is no external power needed. I just plugged it in, and it worked.
PAGE 9 OF 13
The Mac Guild – December 2003
In Use
The iVoice II comes in an egg-like shape with curved foot that props it upright. The design is quite
functional, as all the ports and knobs are easily accessible, and if you are using the built-in microphone,
the positioning is just right for capturing audio in. Not only that, but it looks cool sitting on your desktop.
Although an egg-shape device may seem prone to tipping over, I found that the foot on the iVoice II did
an excellent job of preventing such a fall (even when I purposely was poking at it trying to tip it over).
The casing is made of a durable white plastic with a very sturdy feel.
There's one button on the top of the device for switching from Mic In (non-powered input) to Line In
(powered input). On the left side are the Mic In and Line Out ports, appropriately together in case you
use a computer headset that has duel jacks. On the right side is the Line In port as well as a volume
control knob for the Line Out signal.
You can use this device in a variety of ways, from recording sounds on the built-in Mic, recording sounds
on an external non-powered Mic, and recording sound from a powered device (such as a CD player, MP3
player, etc.). Utilizing the Mic In and Line Out ports together, you can also use it for video conferencing
using a computer headset, or headphones with an external Mic.
I was amazed at how simple it was to use this unit. Under OS 9, I hooked it up, switched the input to
External Mic, and immediately went to the Alerts tab of the Sound control panel and clicked on New
Sound. I spoke into the iVoice II, and the sound instantly was recorded as a new alert sound. The quality
of the recording was pretty good for a built-in Mic. Of course, the quality varies with the type of
microphone you use, the level of input, and the background noise. Using a desktop microphone
connected to the Mic In port, I was able to capture a much higher quality sound.
Besides using the record function on the OS 9 Sound control panal, you can also capture audio using any
recording software, such as SoundEdit or Sound Studio. You can also use it with video conferencing
software to speak and listen through the iVoice II audio in and out ports. What was a very pleasant
surprise is that the iVoice II also supports the Apple microphones (you know, those Mics that used to
come with every Mac). Just when I thought it was time to toss out the old microphones, the iVoice II has
given them a reprieve.
The iVoice II is well integrated with the Mac OS, both OS 9 and OS X, and I am hard-pressed to find any
fault with the hardware. If I could suggest anything, I would ask for a longer cable, one that would make
the distance between a desktop microphone connected to a tower Mac that may be sitting underneath
the desk. Of course, since the iVoice II can also be hooked into a USB hub, using a desktop hub
circumvents that particular drawback.
Summary
The magic of the iVoice II is in its simplicity. This is a USB add-on device that puts Audio In and Out
ports on your desktop, complete with volume control and a toggle for powered or non-powered input. The
design is both pleasing and functional. For any Mac user with Audio needs, this is a welcome addition to
your Mac system; and for those G4 users that do not have an Audio In port at all, the iVoice II is a must
have.
Pros
•
•
•
•
•
Brings back the Audio In port for G4 Macs that don't have them
Supports Mic input, externally amped device input, and Audio out
Built-in Mic, or supports 3rd party Mics (including the Apple Mic)
Cool and functional design, including volume control on output
Inexpensive
Cons
•
A longer cable would be helpful for hooking up to a tower Mac
Overall Rating
5 out of 5 Mice
PAGE 10 OF 13 The Mac Guild – December 2003
DYMO LABELWRITER 330
Reviewed by Bill Catambay
Overview
The DYMO LabelWriter 330 is a compact printer designed to print labels directly from your Mac or PC,
so there's no more fussing with trying to load label sheets into your normal document printer. With the
LabelWriter's resolution of 300 dpi, your labels will come out crisp and clearly legible, whether you're
printing nametags, address labels, or barcodes.
The 330 can print directly from many standard business applications such as Word and Outlook, so you
can use a variety of fonts and print sizes, and even add pictures. Less than 5 inches across, and
weighing less than 5 pounds, it fits snugly on even small desks. It comes with all cables, as well as the
software and labels to get you started. DYMO provides a one-year warranty on parts and service.
The LabelWriter 330 handles more than 40 standard label sizes up to 2.3 inches (56mm) wide, including
address, postage, shipping, file folder, disk, video, name badge, cassette, and many more. It comes with
DYMO Label software and integrates directly with Microsoft Word, Outlook, the Palm Desktop, GoldMine,
ACT, and CardScan. And it works with all other software through standard printer drivers.
Retail price is $179.99 (Amazon price is $159.99).
Features
•
Eliminates the hassle of printing labels with a desktop or network printer.
•
Direct thermal print technology eliminates ribbons, toner and ink cartridges.
•
300dpi resolution for laser sharp labels.
•
Prints labels up to 2.3" (56 mm) wide.
•
Prints labels in less than 4 seconds, 16 per minute.
•
Prints Internet postage.
•
Automatically captures addresses from popular applications for instant address labels with no
retyping.
•
Prints Code 39, Code 128, Codabar, UPC-A/E, EAN-8/13/128, ITF-14 and Interleaved 2 of 5
bar codes.
•
Connects to USB or Serial port.
•
Easy to share over a network.
•
Works with Windows 98, 2000, Me, XP and MAC OS X. Can be used with MAC OS 8.6, 9, and 9.1
with version 5.03 of our DLS software.
•
Package contents: Printer, power cable, serial cable, USB cable, roll of labels, Windows/Mac
software on CD, printed Quick Start Guide.
Initial Setup
I hooked the Dymo 330 up to my G4/867 via my USB hub and installed the Dymo software on Mac OS
9.2.2 (this is DLS 5). At first the software didn't recognize the labelwriter. To remedy the situation, I
went into the Chooser to select the Dymo Laberlwriter and tried to print a small file within SimpleText as
a test. That seemed to work fine. I then went back into the Chooser to reselect my HP printer since I
didn't want all my printing to go to the Labelwriter. After that initial test print, the Dymo software had no
problems seeing the printer. I typed in an address, clicked the Dymo print button, and the address label
printed out perfectly.
I switch between OS 9 and OS X, so later I booted up OS X and installed the OS X version of the Dymo
software (DLS 6). I went into the software to create a label, and ran into a small snag. Basically, the text
in the software was condensed on each line into just the first character cell (the label printed out the
same way). After contacting the vendor, I was informed that the Dymo software for OS X only worked in
10.1.5 -or- 10.2.5 and higher. I happened to have been on 10.2.2, which put me in the doesn't-workright zone. After downloading Apple's 10.2.6 update and installing it, I then went back into the software,
and all the text was showing up correctly, and it printed like a charm.
PAGE 11 OF 13 The Mac Guild – December 2003
In Use
The Dymo LabelWriter 330 is a very sleek and stylish design. It's a low profile label printer that takes up
very little of your valuable desktop space.
The Dymo 330 can be used from 3rd party programs (such as word processors and database apps), but
for ease-of-use, I prefered using the Dymo Labelwriter Software (DLS) that comes with the labelwriter.
Using DLS, you can create labels on the fly, or you can store labels in an address book so you can
retrieve them again later for subsequent printing. I keep my family and friends in the address book, and
when I have one-shot needs to create a label (such as for sending out an eBay item), the software is
perfect for quickly entering in an address and printing out a label.
For OS 9 users, the LabelWriter uses DLS version 5, and for OS X users, it uses DLS version 6. They are
basically the same software, except that DLS 6 has a more polished user interface and a few extras.
When using DLS, you do not use the Chooser to select the Dymo labelwriter. DLS automatically switches
to using the labelwriter when you print from within the software (and it doesn't affect other applications,
i.e., they will still use the printer setup in Chooser).
DLS includes a variety of label templates to choose from (from address labels to zip disk labels to folder
labels). After choosing a label from the Label Templates popup menu, the label is presented in the DLS
window. Each label type depends upon the size of the label paper you are using (and there are several
label types you can order). Making a label is done by either clicking on the label window to change the
text on-the-fly, or you can click on the Address Book and then select an address stored there. The label
editor, whether used to change text on-the-fly or creating an entry in the address book, offers a fair
amount of text handling, such as font, size, style, vertical printing, and a mirror effect. You can also
specify the text attributes for the entire label, just the first line, or the remaining lines. Further, when
entering an address, if you use a full 9 digit zip code, the software automatically inserts a postage
barcode (POSTNET) on the label. There are preference settings that allow you to specify to always use
the barcode, and also whether to put the barcode above or below the address.
DLS also includes a designer function that lets you alter the label template by adding graphics and text
directly on the template. For the graphics, there are tools for lines and objects, barcodes, and an option
to insert your own graphics from a file. In DLS 6, there is also a text tool for bending your text in an arc.
You can then save the label template under a different name. The next time you select that template, all
of your template text and graphics, as well as the text styles selected for the label, will automatically be
loaded back in . I found this feature to be extremely useful. I found the Dymo software to be adequate for
all my needs, but there is definite room for improvement (e.g., graphics scaling, showing size, drag &
drop, etc.).
The quality of the prints from the Dymo are outstanding. The most amazing part of labelwriter is that you
never have to change out an ink cartridge or ribbon. The Dymo 330 is a thermal printer, meaning that is
uses heat applied to the special labels to create the print. I tried entering some grayscale graphic
images, and the grayscale was duplicated amazingly well, just as good as my laserwriter would have
done. The only downside on OS 9 is that you have to wait while the label prints (i.e., no background
printing option). Under OS X, this setback is removed, as DLS 6 supports background printing.
The printer itself is very easy to operate. The top lid opens up with ease, under which you can change the
spool out with a new label spool. There is only one button on the front which is used for paper feed. When
not printing, the 330 does not make a peep, so you can leave it on 24/7 (there's just a small green LED
light in front that stays illuminated to let you know it has power). Overall, I was very impressed by the
design of the printer. In fact, in terms of just the hardware, I could not find any fault with this product.
There were a few quirks I discovered with the Dymo software. The OS 9 version (DLS 5) does not have
descriptors (neither static or pop-up) for the buttons, so you have to learn what the buttons are by trial or
by reading the documentation. Additionally, DLS 5 did not have all the features of DLS 6, such as the arc
text feature and background printing. One major quirk I ran into, however, is for users who switch
between OS 9 and OS X. DLS 5 and DLS 6 can be set to work from the same folder for storing address
books, but they use different formats of the address book. I found this out the hard way. I had created an
extensive address book in DLS 5, but when I used DLS 6 to access my address book, the software must
have changed something. It loaded the address book into DLS 6 just fine at first, but when I returned to
DLS 5, the address book was no longer readable by the program. I went back to DLS 6 to open up the
address book again, and the address book was suddenly empty. Peeking in the address book file with
PAGE 12 OF 13 The Mac Guild – December 2003
BBEdit, I confirmed that the addresses were all wiped out. This is a disheartening effect of the
incompatibility between DLS 5 and DLS 6.
Summary
The Dymo LabelWriter 330 is one of those desktop tools that you may not think you need, but once you
use it for awhile, you cannot imagine being without it. Whether you are creating address labels for holiday
cards, sending out eBay items, or even a quick label for your household boxes, the Dymo 330 is both
convenient and versatile. The print quality is amazing, including a variety of supported barcodes as well
as graphics. The 330 model also holds the larger labels, which allows you to print just about any kind of
label you might possibly need, such as full address labels, return address labels, disk labels, file labels,
zip labels, and more. The Dymo software even lets you create your own label templates based upon the
label type. Users of OS 9 and OS X will have to use two separate address books due to incompatibilities
between DLS 5 and DLS 6, but that is the only fault I could find in this product. Given the variety of
labels that the Dymo 330 supports, there's a use for this labelwriter for every Mac user. After using it for
awhile, you'll wonder how you ever got along without one. This product comes highly recommended!
Pros
•
•
•
•
•
Simple to use
Stylish low-profile design
Accepts several label types
No printer ink required
High quality labels (including graphics)
Cons
•
•
Using both OS 9 and OS X on the same address book corrupts the address book
Dymo software is adequate, but could be improved upon
Overall Rating
4 1/2 out of 5 Mice
The Mac Guild Newsletter
Editor: Bill Catambay
e-mail: [email protected].
Mac Guild Home Page: http://mac.excaliburworld.com/
PAGE 13 OF 13 The Mac Guild – December 2003