1
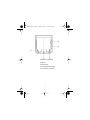
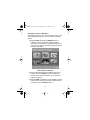
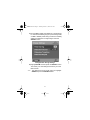
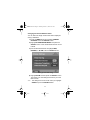
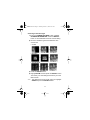
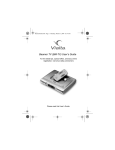
VistaFrame.book Page 1 Thursday, March 11, 2004 10:41 AM
User’s Guide VF-100 Series
For the latest tips, special offers, and easy online
registration, visit www.vialta.com/owners
Please read this User’s Guide.
www.vialta.com
VistaFrame.book Page 2 Thursday, March 11, 2004 10:41 AM
VistaFrame.book Page 1 Thursday, March 11, 2004 10:41 AM
Table of Contents
Important Safety Precautions ................................................3
Introduction............................................................................4
What’s Included with your VistaFrame ..................................4
Setting up your VistaFrame...................................................5
Locating VistaFrame’s Features............................................6
Using VistaFrame’s Features ................................................8
Brightness Adjustment .....................................................8
My Album ......................................................................... 8
Power Saving Mode .........................................................8
Motion Sensor ..................................................................8
Power Button ....................................................................9
Menu Button ..................................................................... 9
Save Button ......................................................................9
Slideshow Button ............................................................ 10
Rotate Button .................................................................10
Directional Buttons .........................................................10
Select Button ..................................................................10
Exit Button ......................................................................10
4-in-1 Memory Card Slot ................................................ 11
Insert a Memory Stick®, SD™, or MultiMediaCard™ 11
Insert a SmartMedia™ Card ......................................12
CompactFlash® Card Slot .............................................12
Insert a CompactFlash® Card ....................................12
Displaying Pictures with VistaFrame ...................................13
Displaying Pictures Using the Menu Button ...................13
Saving Pictures with VistaFrame......................................... 16
Saving Pictures from a Memory Card ........................16
Replacing a Picture in My Album ...............................18
Displaying a Slideshow on VistaFrame ...............................19
Saving a Picture During a Slideshow ............................. 20
Pausing and Resuming a Slideshow ..............................20
Changing Settings ...............................................................20
Power Saving .................................................................20
Changing the Interval Between Slides ...........................22
Choosing a Transition Type ...........................................23
VistaFrame.book Page 2 Thursday, March 11, 2004 10:41 AM
Setting Slideshow to Play Once or Repeat ....................24
Erasing Pictures from My Album ......................................... 25
Creating a Custom Slideshow .............................................26
Create/Edit Custom Slideshow .......................................26
Playing a Custom Slideshow...............................................28
Tips...................................................................................... 29
Custom Slideshow Tip .................................................... 29
My Album Tip .................................................................29
Compatibility........................................................................30
Care and Maintenance ........................................................ 31
Troubleshooting Guide ........................................................ 32
Specifications ......................................................................32
Service ................................................................................33
Limited Warranty ............................................................ 34
Electronic Emission Notices ................................................ 35
FCC Part 15 Information ................................................ 35
CE Statement .................................................................35
VistaFrame.book Page 3 Thursday, March 11, 2004 10:41 AM
Important Safety Precautions
Always follow these basic safety precautions when using
your VistaFrame. This will reduce the risk of fire, electric
shock, and injury.
• Unplug VistaFrame from the power outlet
before performing care and maintenance.
• Should any object or liquid fall into the
housing, unplug VistaFrame and have it
checked by qualified personnel before
operating it again.
• Do not use VistaFrame near water or when
you are wet.
• Slots and openings on the VistaFrame are for
ventilation to prevent overheating. Do not
cover them up.
• Do not place VistaFrame near a heat source
or in direct sunlight.
• Do not disassemble VistaFrame. There are
no user-serviceable parts inside.
Disassembly of VistaFrame will void your
warranty.
• Only use the AC power adapter included with
VistaFrame. Using any other power
adapter will void your warranty.
3
VistaFrame.book Page 4 Thursday, March 11, 2004 10:41 AM
Introduction
Welcome to VistaFrame. Now you can display your digital
pictures directly from a memory card without the need for a
computer. Simply insert a memory card into a card reader
slot and select a single picture for a continuous viewing or
create your own Custom Slideshow. VistaFrame supports
CompactFlash®, Memory Stick®, SmartMedia™, SD™,
and MultiMediaCard™
Do you want to save some pictures directly to your
VistaFrame? No problem! VistaFrame allows you to store
up to eight digital pictures in its internal memory
(My Album).
To learn more about VistaFrames features and to get the
maximum benefit from your new VistaFrame. Please take a
few minutes to read this User's Guide. Also, please fill out
the enclosed Warranty Card and mail it to Vialta, to activate
your product warranty. As a convenient option you can also
register online at www.vialta.com/owners.
What’s Included with your VistaFrame
Everything you need to begin using your VistaFrame is
included in the package:
•
•
•
•
One VistaFrame
AC Power Adapter
This User’s Guide
Warranty Card
4
VistaFrame.book Page 5 Thursday, March 11, 2004 10:41 AM
Setting up your VistaFrame
You can use your VistaFrame in any location, as long as a
power outlet is available.
1) Plug the AC power adapter’s pin into the POWER IN
jack on the back of your VistaFrame.
2) Plug the power cord into a wall socket.
3) Press the POWER button on the back of VistaFrame
to turn VistaFrame on.
Your screen will briefly display the message
“VistaFrame is now ready” to let you know that it is
ready for you to insert a memory card.
5
VistaFrame.book Page 6 Thursday, March 11, 2004 10:41 AM
Locating VistaFrame’s Features
Your VistaFrame places everything you need right at your
fingertips.
1 Screen
6
Rotate Button
2 Motion Sensor
7
Prev (Previous) Button
3 Menu Button
8
Select Button
4 Save Button
9
Next Button
5 Slideshow Button
10 Exit Button
6
VistaFrame.book Page 7 Thursday, March 11, 2004 10:41 AM
1 Brightness Adjustment
2 Power In
3 Power Button
4 CompactFlash ® Card Slot
5 4-in-1 Memory Card Slot
7
VistaFrame.book Page 8 Thursday, March 11, 2004 10:41 AM
Using VistaFrame’s Features
The following section describes your VistaFrame features.
Brightness Adjustment
You can adjust the brightness of the screen with the scroll
wheel on the back of your VistaFrame.
My Album
VistaFrame can save up to 8 pictures in its internal
memory. Pictures saved in My Album can be viewed even
if you remove the memory card.
Power Saving Mode
VistaFrame has a power saving mode that will
automatically turn off the LCD screen after 120 minutes of
inactivity (no movement detected or button pressed for 120
minutes). You can wake VistaFrame from power saving by
pressing any button or if the motion sensor detects any
movement. (See Power Saving on page 20 to disable
power saving).
Motion Sensor
VistaFrame uses a motion sensor located on the front of
VistaFrame to wake from power saving mode. Slowly wave
your hand 4-6 inches away from the sensor to wake
VistaFrame up and continue displaying the previous
picture(s).
8
VistaFrame.book Page 9 Thursday, March 11, 2004 10:41 AM
Power Button
Turn on your VistaFrame by pressing the POWER button.
The LED located on the POWER button will light up when
the power is on.
Menu Button
Press the MENU button to display the Menu. By selecting
View Pictures, you can access My Album or memory card
pictures. From the Menu you can also create or play a
Custom Slideshow, Change Settings, and Erase Pictures
from My Album.
Menu Screen
Save Button
Press the SAVE button to save JPEG pictures from a
memory card into My Album.
9
VistaFrame.book Page 10 Thursday, March 11, 2004 10:41 AM
Slideshow Button
Press the SLIDESHOW button to start, pause or resume
playing a slideshow. VistaFrame’s slideshow feature
displays pictures one after the other. (See Displaying a
Slideshow on VistaFrame on page 19.)
Rotate Button
Press the ROTATE button to turn the current picture
clockwise 90 degrees. Continue to press the button until
the picture is displayed properly. You will not be able to use
the rotate feature while playing a slideshow or while
displaying thumbnails.
Directional Buttons
The PREV (PREVIOUS) and NEXT buttons, above and
below the SELECT button, move the yellow highlight box
to a different position. Using the directional buttons during
a slideshow will immediately display the next or previous
picture.
Select Button
Use the SELECT button to choose a highlighted thumbnail
or option on your VistaFrame.
Exit Button
Press the EXIT button to stop the current action and return
to the previous display. Pressing the EXIT button while the
Menu is displayed will put VistaFrame in power-saving
mode.
10
VistaFrame.book Page 11 Thursday, March 11, 2004 10:41 AM
4-in-1 Memory Card Slot
VistaFrame can display pictures from several types of
memory cards. The 4-in-1 memory card slot can read the
following types of memory cards: Memory Stick®,
SmartMedia™, SD™, and MultiMediaCard™.
If the card doesn’t slide in easily, or VistaFrame doesn’t
read the card, remove the card. Make sure the label is
facing you and the notched corner is pointing toward the
side of VistaFrame and try inserting the card again.
Note: The 4-in-1 reader only reads one memory card at a
time. Do not insert more than one card into the
memory card slot or damage may occur.
Note: If you insert your memory card directly from your
digital camera, most cameras will put the pictures in
a folder under the DCIM folder. Please check with
your camera’s user guide for more information.
Insert a Memory Stick®, SD™, or MultiMediaCard™
1) With VistaFrame’s display facing you, hold the
memory card with the label facing you and the
notched corner pointing toward VistaFrame.
2) Gently slide the card into the 4-in-1 memory card slot
on the side of VistaFrame. The card should slide in
easily and VistaFrame should display “Loading”.
11
VistaFrame.book Page 12 Thursday, March 11, 2004 10:41 AM
Insert a SmartMedia™ Card
Note: SmartMedia™ cards are very thin. It is a good idea
to steady VistaFrame with one hand and carefully
slide the card into the slot with the other hand.
1) With VistaFrame’s display facing you, hold the
SmartMedia™ card with the metal contacts facing you
and the notched corner pointing toward VistaFrame.
2) Gently slide the card into the 4-in-1 memory card slot
on the side of VistaFrame. The card should slide in
easily and VistaFrame should display “Loading”.
CompactFlash® Card Slot
VistaFrame’s CompactFlash® Card Slot can display
pictures from Type I CompactFlash® cards.
Insert a CompactFlash® Card
1) With VistaFrame’s display facing you, hold the
CompactFlash® card with the label facing you and
with the pinholes pointing toward VistaFrame.
2) Gently slide the card into the CompactFlash® card
slot on the side of VistaFrame. The card should slide
in easily and VistaFrame should display “Loading”.
If the card doesn’t slide in easily, or VistaFrame
doesn’t read the card, remove the card. Make sure
the label is facing you and the pinholes are facing the
side of VistaFrame and try inserting the card again.
12
VistaFrame.book Page 13 Thursday, March 11, 2004 10:41 AM
Displaying Pictures with VistaFrame
VistaFrame can display pictures from My Album or a
memory card, as thumbnails or as full-sized pictures. You
can automatically display thumbnails of the pictures on a
memory card by simply inserting the card into VistaFrame.
If your memory card contains a combination of folders and
pictures, VistaFrame will display thumbnails of all the
folders first.
Displaying Pictures Using the Menu Button
1) To display thumbnails from My Album or a memory
card, press the MENU button, then highlight VIEW
PICTURES and press the SELECT button.
• If one or more memory cards are present, you will
be prompted to choose a memory card type. Use
the directional buttons to highlight a memory card
type and press the SELECT button.
Select Memory Type
13
VistaFrame.book Page 14 Thursday, March 11, 2004 10:41 AM
• If no memory cards are present, My Album opens
and the first six pictures are displayed as
thumbnails.
• The first six folders or pictures are displayed as
thumbnails. The screen also shows information
about the folders, pictures and memory card.
Thumbnails Display
• Memory type is displayed in the upper left corner.
• The selected item number and the total number of
items are shown in the bottom right corner.
Note: If you insert your memory card directly from your
digital camera, most cameras will put the pictures in
a folder under the DCIM folder. Please check with
your camera’s user guide for more information.
14
VistaFrame.book Page 15 Thursday, March 11, 2004 10:41 AM
2) If a folder is highlighted, the name of the folder is
shown in the bottom left corner. From the thumbnail
view, you can open folders and choose a picture to
display full-size.
• To open a folder, use the directional buttons to move
the yellow highlight box to the desired folder. Press
the SELECT button to open the folder and display
any folders and pictures inside.
• To choose a picture, use the directional buttons to
move the yellow highlight box to the desired picture.
• To display the next six thumbnails, press the NEXT
button until the next screen of thumbnails appears.
• To display the previous six thumbnails, press the
PREV button until the previous screen of thumbnails
appears.
• To go back to the previous folder, highlight the folder
with a bent arrow and press the SELECT button.
3) To display a full-sized picture, highlight a picture and
press the SELECT button. The thumbnails are
replaced with a full-sized picture.
4) To return to the thumbnail display, press the EXIT or
SELECT button.
15
VistaFrame.book Page 16 Thursday, March 11, 2004 10:41 AM
Saving Pictures with VistaFrame
You can save up to 8 pictures from memory cards to
My Album so you can view them later without the need for
a memory card.
Saving Pictures from a Memory Card
1) Insert a memory card into VistaFrame. The screen will
show the first 6 folders or pictures on the card as
thumbnails, with the yellow highlight box on the first
picture or folder. The screen also shows information
about the folders, pictures and memory card.
Saving Pictures from Memory Card
• Memory type is displayed in the upper left corner.
• The selected item number and the total number of
items are shown in the bottom right corner.
• The name of the highlighted folder is shown in the
bottom left corner.
16
VistaFrame.book Page 17 Thursday, March 11, 2004 10:41 AM
2) Choose a picture to save using the directional buttons
to move the yellow highlight box to the desired
picture.
• To display the next six thumbnails, repeatedly press
the NEXT button until the next screen of thumbnails
appears.
• If your pictures are saved in folders, use the
directional buttons to move the yellow highlight box
to the desired folder. Press the SELECT button to
open the folder and display any folders and pictures
inside. To go back to the previous folder, highlight
the folder with a bent arrow and press the SELECT
button.
3) Press the SAVE button. VistaFrame displays status
messages while saving the picture. The picture is
displayed full-size while being saved.
4) Once the picture is saved, you’ll see a pop-up screen
asking if you want to save another picture. Highlight
NO and press the SELECT button to go back to the
Menu screen. Highlight YES and press the SELECT
button to save another picture.
You can save up to 8 pictures in My Album. If you
already have 8 pictures saved, and you wish to save
a new picture, you’ll need to replace one of the
pictures already in My Album.
17
VistaFrame.book Page 18 Thursday, March 11, 2004 10:41 AM
Replacing a Picture in My Album
If My Album is full and you try to save another picture, you’ll
see a message asking if you want to replace an existing
picture.
1) Highlight YES and press the SELECT button to
replace a picture. VistaFrame displays a page of
thumbnails. The first picture, with a blue border, is the
picture you are saving. The remaining are the first five
pictures in My Album.
Select Picture to Replace
2) Use the directional buttons to highlight a picture to
replace. Press the SELECT button to replace the
picture. A pop-up screen will ask you if you want to
replace the picture.
3) Highlight YES to replace the picture or NO to go back
to the previous screen and choose a different picture
to replace. Press the SELECT button.
18
VistaFrame.book Page 19 Thursday, March 11, 2004 10:41 AM
Displaying a Slideshow on VistaFrame
VistaFrame can display the pictures in My Album or on a
memory card as a slideshow. The slideshow plays all of the
pictures in My Album, or all pictures located in a single
folder on a memory card. To create a slideshow with
pictures inside multiple folders on a memory card, see
Create/Edit Custom Slideshow on page 26.
Note: Your VistaFrame loads lower resolution pictures
more quickly.
1) Press the SLIDESHOW button.
• If a memory card is present and there are pictures in
My Album, VistaFrame will ask you to choose a
memory type. Use the directional buttons to
highlight a memory type and press the SELECT
button.
• If there are pictures in My Album and no memory
card is present, the slideshow starts immediately.
• If there are no pictures in My Album and a memory
card is present, VistaFrame will start playing the
slideshow of pictures on your memory card.
Note: You can also display a slideshow of all pictures
inside a folder on a memory card. Simply insert the
memory card and open the desired folder. Then
press the SLIDESHOW button.
2) Press the EXIT button to stop the slideshow and
return to the thumbnails.
19
VistaFrame.book Page 20 Thursday, March 11, 2004 10:41 AM
Saving a Picture During a Slideshow
Press the SAVE button to save the current picture.
VistaFrame displays status messages while saving the
picture. When the picture is saved, the slideshow resumes.
Pausing and Resuming a Slideshow
1) While a slideshow is playing, press the SLIDESHOW
button to pause the slideshow.
2) Press the SLIDESHOW button again to resume
playing the slideshow.
Changing Settings
These settings let you choose whether the power saving
mode is on or off, how long each picture is shown in a
slideshow, the type of transition effect between pictures,
and whether the slideshow repeats after displaying the last
picture.
Power Saving
You can select the length of time each slide is displayed
during a slideshow.
1) Press the MENU button and highlight CHANGE
SETTINGS. Press the SELECT button.
2) Highlight POWER SAVING and press the SELECT
button. A red checkmark shows the current setting.
20
VistaFrame.book Page 21 Thursday, March 11, 2004 10:41 AM
3) Choose ON to display the slideshow or single image
for 120 minutes before going into power saving mode,
or OFF to disable power saving mode and constantly
display the slideshow or single image. Press the
SELECT button.
Change Power Saving Settings
4) Highlight DONE and then press the SELECT button.
This saves your new settings and returns you to the
Menu screen.
Note: The settings will not be saved unless you highlight
DONE and press the SELECT button.
21
VistaFrame.book Page 22 Thursday, March 11, 2004 10:41 AM
Changing the Interval Between Slides
You can select the length of time each slide is displayed
during a slideshow.
1) Press the MENU button and highlight CHANGE
SETTINGS. Press the SELECT button.
2) Highlight SLIDESHOW INTERVAL and press the
SELECT button. A red checkmark shows the current
interval.
3) Use the directional buttons to highlight FAST,
NORMAL, or SLOW. Press the SELECT button.
Change Interval Settings
4) Highlight DONE and then press the SELECT button.
This saves your new settings and returns you to the
Menu screen.
Note: The settings will not be saved unless you highlight
DONE and press the SELECT button.
22
VistaFrame.book Page 23 Thursday, March 11, 2004 10:41 AM
Choosing a Transition Type
1) From the CHANGE SETTINGS screen, highlight
SLIDESHOW TRANSITION. Press the SELECT
button. A red checkmark shows the current setting.
2) Choose a transition type for the slideshow. The
choices are:
• Curtain
• Blooming
• Vertical Blinds
3) Press the SELECT button.
4) Highlight DONE and then press the SELECT button.
This saves your new settings and returns you to the
Menu screen.
Note: The settings will not be saved unless you highlight
DONE and press the SELECT button.
23
VistaFrame.book Page 24 Thursday, March 11, 2004 10:41 AM
Setting Slideshow to Play Once or Repeat
You can choose to play the slideshow once, or repeatedly
for up to 120 minutes.
1) From the CHANGE SETTINGS screen, highlight
SLIDESHOW REPEAT and then press the SELECT
button. A red checkmark shows the current setting.
2) Choose ON to play the slideshow in a continuous
loop, or OFF to stop the slideshow after the last
picture. Press the SELECT button.
3) Highlight DONE and then press the SELECT button.
This saves your new settings and returns you to the
Menu screen.
Note: The settings will not be saved unless you highlight
DONE and press the SELECT button.
24
VistaFrame.book Page 25 Thursday, March 11, 2004 10:41 AM
Erasing Pictures from My Album
You can erase pictures from My Album at any time.
1) Press the MENU button and highlight ERASE
PICTURES FROM MY ALBUM. Press the SELECT
button. VistaFrame displays thumbnails of the first six
pictures in My Album.
Erasing Pictures
2) Use the directional buttons to highlight a picture to
erase, and press the SELECT button. VistaFrame will
ask you if you want to erase the picture.
To erase all pictures in My Album, highlight ERASE
ALL and press the SELECT button. VistaFrame will
ask you if you want to erase all of the pictures.
• Highlight NO to keep the selection and then press
the SELECT button.
25
VistaFrame.book Page 26 Thursday, March 11, 2004 10:41 AM
• Highlight YES to erase the picture and then press
the SELECT button. The picture is erased. You
can erase as many pictures as you wish, one at a
time, in the same manner.
3) Press the EXIT button when you’re finished to return
to the Menu.
Creating a Custom Slideshow
With a Custom Slideshow, you can choose the order in
which to play specific pictures in a slideshow. You can even
choose pictures from more than one folder on a memory
card. You can create one Custom Slideshow for My Album
and one for a memory card currently in VistaFrame.
Once you have created a Custom Slideshow use the PLAY
feature of the Custom Slideshow. (See Playing a Custom
Slideshow on page 28.)
Note: A Custom Slideshow for My Album is saved until
you change it. A Custom Slideshow from a memory
card is only saved until the memory card is removed
or power is interrupted.
Create/Edit Custom Slideshow
Use CREATE/EDIT CUSTOM SLIDESHOW to choose the
pictures and play order of the slideshow.
1) Press the MENU button.
2) Highlight CUSTOM SLIDESHOW and press the
SELECT button.
• Highlight CREATE/EDIT and press the SELECT
button.
26
VistaFrame.book Page 27 Thursday, March 11, 2004 10:41 AM
3) Highlight a memory type, either My Album or a
memory card, and press the SELECT button.
• The first six thumbnails are displayed. If your
memory card contains a combination of folders and
pictures, VistaFrame will display all folders first. To
display the next six thumbnails, repeatedly press the
NEXT button until the next screen of thumbnails
appears.
Note: To open a folder, use the directional buttons to
highlight the desired folder. Press the SELECT
button to open the folder and display any folders or
pictures inside.
4) Use the directional buttons to highlight a picture you
want to include in the Custom Slideshow, and then
press the SELECT button. A red checkmark appears
under the picture.
Create Custom Slideshow
Note: Pictures will play in the order you select them.
27
VistaFrame.book Page 28 Thursday, March 11, 2004 10:41 AM
• To remove a picture from the Custom Slideshow,
highlight the picture and then press the SELECT
button. The red checkmark will disappear.
5) Repeat Step 4 to add or remove as many pictures as
you wish to the Custom Slideshow.
• To include all of the pictures in a folder, highlight
SELECT ALL, and then press the SELECT button.
To clear all selected pictures in a folder, highlight
CLEAR ALL and then press the SELECT button.
6) When you’re finished adding all your pictures to the
Custom Slideshow, highlight DONE and press the
SELECT button.
Note: The Custom Slideshow will not be saved unless you
highlight DONE and press the SELECT button.
Playing a Custom Slideshow
1) Press the MENU button.
2) Highlight CUSTOM SLIDESHOW and press the
SELECT button.
3) Highlight PLAY and then press the SELECT button.
• Highlight a memory type and then press the
SELECT button. VistaFrame displays the Custom
Slideshow for the selected memory type.
28
VistaFrame.book Page 29 Thursday, March 11, 2004 10:41 AM
Tips
Lower resolution pictures will load from memory cards
faster. To have your pictures load quicker, make sure the
images on your memory card are lower resolution images.
Custom Slideshow Tip
When selecting pictures to be included in your Custom
Slideshow, some images may need to be rotated so that
they are displayed in the way you want them to appear.
Here is an easy way to quickly rotate them.
1) Play the Custom Slideshow and when a picture
appears that you want to rotate, press the SELECT
button to pause the slideshow.
2) Press the ROTATE button until the picture is
displayed in the desired orientation.
3) Press the SLIDESHOW button to resume viewing the
slideshow.
Note: A Custom Slideshow, along with any rotation
instructions, is saved until the memory card is
removed or the power is turned off.
My Album Tip
If you want to save a picture from your memory card to My
Album, in a different orientation than how it currently saved
on your memory card, VistaFrame can do it in three easy
steps.
29
VistaFrame.book Page 30 Thursday, March 11, 2004 10:41 AM
1) Display in full size the picture that you want to save in
My Album (See Displaying Pictures with VistaFrame
on page 13).
2) Press the ROTATE button until the picture is
displayed in the desired orientation.
3) Press the SAVE button to save the picture into My
Album.
Every time you view the picture saved in My Album, it will
be displayed in the orientation that you have chosen.
Compatibility
VistaFrame only supports the JPEG picture format.
VistaFrame supports the following memory storage
devices: SmartMedia™, CompactFlash® (Type I), SD™,
MultiMediaCard™, and Memory Stick®.
30
VistaFrame.book Page 31 Thursday, March 11, 2004 10:41 AM
Care and Maintenance
To keep your Vialta VistaFrame working and looking good,
follow these simple guidelines:
• Avoid putting your VistaFrame near heating
appliances and devices that generate electrical
noise. (For example, motors and fluorescent lamps.)
• Do not expose VistaFrame to direct sunlight or
moisture.
• Clean your VistaFrame with a soft cloth. (Remember
to unplug VistaFrame from the power outlet first.)
• Never use a strong cleaning agent or abrasive
powder when caring for your VistaFrame, as this will
damage the finish.
• Retain the original packaging for future use.
• Please visit us at www.vialta.com/owners for more
information.
31
VistaFrame.book Page 32 Thursday, March 11, 2004 10:41 AM
Troubleshooting Guide
Problem
What to Do
Display has tiny
black or bright
points.
This is a normal result of the manufacturing
process, not a malfunction.
Only can see 6
Use the NEXT button to see the next 6
pictures on a card. thumbnails.
Picture display
seems slow.
Use lower resolution pictures.
VistaFrame
Make sure your memory card is inserted
doesn't display any properly and that the pictures on it are in
pictures.
JPEG format.
Pictures may be saved in a DCIM folder
VistaFrame
doesn’t display all
my pictures.
VistaFrame is limited to 500 images per
directory. Make sure that the pictures on the
card are in JPEG format.
Black Screen
Be sure that the POWER LED is illuminated.
Press any button to wake up VistaFrame.
Specifications
Display
6.8” Active Matrix TFT LCD
Adjustable Brightness
Power
Power Consumption 18 Watts
Operating Voltage (AC adapter) 100-240VAC,
50/60HZ
Supported memory devices
CompactFlash® (Type I), SmartMedia™,
SD™ , MultiMediaCard™ , Memory Stick®
File Format
JPEG
Dimensions
7.3 in (H) x 7.5 in (W) x 1.5 in (D)
32
VistaFrame.book Page 33 Thursday, March 11, 2004 10:41 AM
Service
For instructions on how to obtain service, refer to the
warranty included in this guide or call Vialta Customer Care
at 510-870-3198. Or send an email to: [email protected]
Attach your sales receipt to this booklet for future
reference, or jot down the date this product was
purchased, along with the name of the store. This
information will be valuable if service should be required
during the warranty period.
Purchase
date____________________________________
Name of
store_____________________________________
Information contained in this User’s Guide is subject to
change at any time, and without notice.
Vialta®, VistaFrame™, Beamer™, Beamer TV™, and
Beamer FX™ are registered trademarks or trademarks of
Vialta, Inc. CompactFlash® is a registered trademark of
SanDisk Corp. Memory Stick® is a registered trademark of
Sony Corporation. SmartMedia™ and SD™ are a
trademarks of Toshiba Corporation. MultiMediaCard™ is a
trademark of MultiMediaCard Association. All trademarks
are either registered trademarks or trademarks of their
respective holders.
33
VistaFrame.book Page 34 Thursday, March 11, 2004 10:41 AM
Limited Warranty
Vialta VistaFrame (VF-100 Series)
Be sure to keep your original sales slip. Attach it to this User's Guide and
keep both accessible. Also, keep the original box and packing material in
case you need to return your VistaFrame for service.
Limited Warranty
Vialta, Inc. (Vialta) warrants this product against substantial defects in
materials or workmanship to the original purchaser as follows:
Labor: Vialta will repair or replace this product, at its option and without
charge, if it is determined to be defective, for a period of 90 days from date
of purchase. After 90 days, labor charges will apply to all repair services.
Parts: In addition, Vialta will replace defective parts, without charge, for a
period of one year from date of purchase. After 90 days, labor charges will
apply to all repair services.
Exclusions: This warranty does not cover installation or setup charges.
Cosmetic damage, unauthorized repair, acts of God, accidental damage,
misuse, abuse, negligence, improper voltage, or customer modification of
the unit are not covered. Any commercial use of this product will
automatically void this warranty. This warranty is invalid if the factory applied
serial number has been altered or obliterated.
IN NO EVENT SHALL VIALTA BE LIABLE OR IN ANY WAY
RESPONSIBLE FOR DAMAGES OR DEFECTS IN THE PRODUCT
CAUSED BY REPAIRS OR ATTEMPTED REPAIRS PERFORMED BY
ANYONE OTHER THAN AN AUTHORIZED SERVICE REPRESENTATIVE.
NOR SHALL VIALTA BE LIABLE OR IN ANY WAY BE RESPONSIBLE FOR
ANY INCIDENTAL OR CONSEQUENTIAL ECONOMIC OR PROPERTY
DAMAGE.
Because some states do not allow the exclusion or limitation of
consequential or incidental damages, the above limitations may not apply to
you. THIS WARRANTY GIVES YOU SPECIFIC LEGAL RIGHTS, AND
YOU MAY ALSO HAVE OTHER RIGHTS WHICH MAY VARY FROM
STATE TO STATE.
Proof of purchase, such as a bill of sale or receipted invoice that indicates
that the unit is within the warranty period is required to obtain warranty
service.
Warranty service will be provided when the product is returned to Vialta, in
its original packaging and postage prepaid. For product return or customer
questions, please call Vialta at 510-870-3198. Or send an email to
[email protected].
34
VistaFrame.book Page 35 Thursday, March 11, 2004 10:41 AM
Electronic Emission Notices
FCC Part 15 Information
This equipment has been tested and found to comply with the limits for a
Class B digital device, pursuant to Part 15 of the Federal Communication
Commission (FCC) Rules. These limits are designed to provide reasonable
protection against harmful interference in a residential installation.
This equipment generates, uses, and can radiate radio frequency energy
and if not installed and used in accordance with the instructions, may cause
harmful interference to radio communications. However, there is no
guarantee that interference will not occur in a particular installation. If this
equipment does cause harmful interference to radio or television reception,
which can be determined by turning the equipment off and on, the user is
encouraged to try to correct the interference by one or more of the following
measures:
• Reorient or relocate the receiving antenna.
• Increase the separation between the equipment and receiver.
• Connect the equipment to an outlet on a circuit different from that to
which the receiver is connected.
• Consult the dealer or an experienced radio/TV technician for help.
CE Statement
Products with the CE Marking comply with the EMC Directive (89/336/EEC)
issued by the Commission of the European Community.
Compliance with the directive implies conformity to the following European
Norms:
• EN 55022: 1998+A1: 2000
• EN 61000-3-2: 2000
• EN 61000-3-3: 1995+A1: 2001
• EN 55024: 1998+A1: 2001
35
VistaFrame.book Page 36 Thursday, March 11, 2004 10:41 AM
VistaFrame.book Page 37 Thursday, March 11, 2004 10:41 AM
VistaFrame.book Page 38 Thursday, March 11, 2004 10:41 AM
Specials and Easy Registration
For tips, the latest VistaFrame specials, and easy online
registration, visit us at www.vialta.com/owners
www.vialta.com
Vialta, Inc.
Fremont, California, USA
11PG05-00003-B
©2004, by Vialta, Inc. All rights reserved.
VistaFrame.book Page 1 Thursday, March 11, 2004 10:41 AM
Table of Contents
Important Safety Precautions ................................................3
Introduction............................................................................4
What’s Included with your VistaFrame ..................................4
Setting up your VistaFrame...................................................5
Locating VistaFrame’s Features............................................6
Using VistaFrame’s Features ................................................8
Brightness Adjustment .....................................................8
My Album ......................................................................... 8
Power Saving Mode .........................................................8
Motion Sensor ..................................................................8
Power Button ....................................................................9
Menu Button ..................................................................... 9
Save Button ......................................................................9
Slideshow Button ............................................................ 10
Rotate Button .................................................................10
Directional Buttons .........................................................10
Select Button ..................................................................10
Exit Button ......................................................................10
4-in-1 Memory Card Slot ................................................ 11
Insert a Memory Stick®, SD™, or MultiMediaCard™ 11
Insert a SmartMedia™ Card ......................................12
CompactFlash® Card Slot .............................................12
Insert a CompactFlash® Card ....................................12
Displaying Pictures with VistaFrame ...................................13
Displaying Pictures Using the Menu Button ...................13
Saving Pictures with VistaFrame......................................... 16
Saving Pictures from a Memory Card ........................16
Replacing a Picture in My Album ...............................18
Displaying a Slideshow on VistaFrame ...............................19
Saving a Picture During a Slideshow ............................. 20
Pausing and Resuming a Slideshow ..............................20
Changing Settings ...............................................................20
Power Saving .................................................................20
1
VistaFrame.book Page 2 Thursday, March 11, 2004 10:41 AM
Changing the Interval Between Slides ...........................22
Choosing a Transition Type ...........................................23
Setting Slideshow to Play Once or Repeat ....................24
Erasing Pictures from My Album ......................................... 25
Creating a Custom Slideshow .............................................26
Create/Edit Custom Slideshow .......................................26
Playing a Custom Slideshow...............................................28
Tips...................................................................................... 29
Custom Slideshow Tip .................................................... 29
My Album Tip .................................................................29
Compatibility........................................................................30
Care and Maintenance ........................................................ 31
Troubleshooting Guide ........................................................ 32
Specifications ......................................................................32
Service ................................................................................33
Limited Warranty ............................................................ 34
Electronic Emission Notices ................................................ 35
FCC Part 15 Information ................................................ 35
CE Statement .................................................................35
2