1
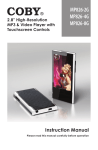
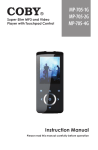
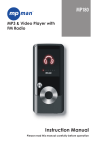
MP3 & Video Player with FM Radio MP610-1G MP610-2G MP610-4G Instruction Manual Please read this manual carefully before operation Table of Contents Table of Contents................................................ 2 Package Contents.............................................. 4 Features.................................................................. 5 Controls at a Glance....................................... 6 Disabling the Controls (Hold)................................8 Getting Started.................................................... 9 Charging the Battery..............................................9 Charging with a Computer...........................9 Turning the Player On/Off.................................... 10 Resetting the Player.............................................. 10 Main Menu........................................................... 11 Main Menu Controls............................................. 11 Music Mode......................................................... 12 Music Browser Controls......................................... 12 Now Playing Controls (Music Playback)............ 14 Quick Option Menu...................................... 15 Pictures Mode..................................................... 17 Picture Browser Controls....................................... 17 Picture Viewer Controls........................................ 18 Movies Mode....................................................... 19 Movie Browser Controls........................................ 19 Movie Playback Controls.....................................20 Radio Mode......................................................... 21 Radio Tuning Controls........................................... 21 E-Books Mode.....................................................23 E-Book Browser Controls.......................................23 E-Book Reader Controls.......................................24 Page Coby Electronics Corporation Table of Contents Explorer Mode...................................................25 Explorer Controls...................................................25 Settings Mode.....................................................26 Transferring Files to the Player...................28 Transferring with Microsoft Windows..................29 Transferring with Macintosh OS X........................29 Disconnecting from a Computer.......................30 Microsoft Windows........................................30 Macintosh OS X............................................. 31 Video Conversion............................................32 Installation..............................................................33 Converting Video..................................................34 Firmware Upgrades...........................................36 Troubleshooting............................................... 37 Specifications....................................................40 www.cobyusa.com Page Package Contents Please make sure that the items shown below are included in the package. Should an item be missing, please contact the local retailer from which you purchased this product. 1. COBY MP3 Player 2. USB Cable 3. Instruction Manual & Documentation 4. Professional Stereo Earphones Page Coby Electronics Corporation Features Integrated flash memory 1.8” TFT LCD full-color display Plays music, video, photos and text ID3 and LRC support for song and synchronized lyric information display Integrated FM radio USB 2.0 Hi-speed for fast file transfers www.cobyusa.com Page Controls at a Glance 1 2 5 3 4 8 6 Page 7 Coby Electronics Corporation Controls at a Glance Front View 1. LCD Display 2. Menu Button <MENU> <UP> <DOWN> 3. Control Buttons <LEFT> <RIGHT> 4. Enter Button <ENTER> Side View 5. Power / Hold Switch Slide and hold the switch down for Power. Slide the switch up for Hold. <POWER> Bottom View 6. 3.5mm Headphone Jack 7. USB/Charge Port Rear View 8. Reset Button www.cobyusa.com <RESET> Page Controls at a Glance Disabling the Controls (Hold) When the <POWER> switch is set to the “Hold” position, your player’s controls are disabled. 1. To disable the controls, slide the <POWER> switch up until it clicks into the “Hold” position. 2. To enable the controls, slide the <POWER> switch down to release it from the “Hold” position. You may want to disable the controls to avoid turning on the player or activating the controls accidentally when it is in your pocket or bag. A lock icon will appear on the screen when the controls are disabled. Re-enable the controls to continue. Page Coby Electronics Corporation Getting Started Charging the Battery Your player has an integrated rechargeable battery. Upon initial use, the battery should be charged fully to ensure optimal performance and battery life. If the player has not been used in a while, the battery may need to be recharged overnight (about 8 hours). The battery used in this device may present a fire or chemical burn if mistreated. Do not disassemble, incinerate, or heat the battery. Do not leave the battery in a place subject to direct sunlight, or in a car with its windows closed. Do not connect the player to a power source other than that which is indicated here or on the label as this may result in the risk of fire or electric shock. Charging with a Computer Your player can be charged through a USB computer connection. Use the supplied USB cable to connect the player to a high-power USB port of a computer. The computer must be powered on and not in sleep mode. When the player is connected and charging, a USB symbol will be displayed on the player’s screen. www.cobyusa.com Page Getting Started Turning the Player On/Off To turn the player on, slide the <POWER> switch down and hold it until the screen turns on. To turn the player off, slide the <POWER> switch down and hold it until the screen turns off. Slide & hold the switch in the direction of the arrow Resetting the Player Reset the player if it should freeze and not respond or otherwise malfunction. 1. Disconnect your player if it is connected to a computer. 2. Use a paper clip to gently press the <RESET> button located on the rear of the player. Page 10 Coby Electronics Corporation Main Menu When you turn on the player, you will see the Main menu. The Main menu gives you access to the different function modes of your player. These modes are: Music: Browse and play music. Pictures: Browse and view pictures. Movies: Browse and play movies. Radio: Listen to FM radio broadcasts. E-Books: Browse and read text files. Explorer: Browse and play all files. Settings: Adjust the player’s options. Main Menu Controls To browse through the different modes, press <LEFT> or <RIGHT>. To select a mode, press the <ENTER> button. www.cobyusa.com Page 11 Music Mode Browse for and play your music files. If you have loaded new music files onto the player, the music library will need to be refreshed when you enter Music mode. This process may take several minutes. You will not be able to access the Music Browser screen until you refresh the music library. For more information about how to get music onto your player, please refer to the section “Transferring Files to the Player”. Music Browser Controls When you choose MUSIC mode from the Main menu, you will see the Music Browser screen. You can choose to browse your music by song name, album, artist, or genre, or you may choose “Browser” to view the music files and folders on the player. Function Key Action To browse through the list Press <UP> or <DOWN> To select an item Press <ENTER> To return to the previous screen Press <LEFT> To return to the Now Playing screen Press <MENU> To return to the Main menu Page 12 Hold <MENU> Coby Electronics Corporation Music Mode If your music files contain ID3 song information tags, you will be able to view your tracks by Artist, Album, or Genre. To view all files (including those that do not contain ID3 information), select “All Songs” or use the “Browser” option. If music is already playing, you will have the additional option to return to the Now Playing screen. Lyric display requires a “.LRC” lyric file which may be found on the internet or may be created with a Lyric file editor. Lyric files can contain synchronized timing information as well as lyric information. Lyric files must have the same name as its corresponding music file (e.g., “SongTitle1.lrc” and “SongTitle1. mp3”) and must be placed in the same directory. Using the Quick Play List To create a quick Play List that contains your favorite songs: 1. Select “Browser” from the Music Browser screen 2. Use the browser controls to select a song to add 3. Press and hold <ENTER>. The screen will display “Add to List” 4. Press <ENTER> to finish adding the song to the Play List This quick Play List can be played from the Quick Option menu of the Now Playing screen (see page 16 for more details). www.cobyusa.com Page 13 Music Mode Now Playing Controls (Music Playback) To start playing music, browse for a song and then press <ENTER> to start playback. When a song is playing, the Now Playing screen appears (see below). Lock Icon Play Mode Play Status Battery Level Equalizer Current Track / File Name Total Tracks Artist Album Elapsed Time Progress Bar Remain Time Page 14 Coby Electronics Corporation Music Mode The following functions may be performed from the Now Playing screen. Function Key Action To play the next track Press <RIGHT> To play the previous track Press <LEFT> To forward-scan quickly through the current track Hold <RIGHT> To reverse-scan quickly through the current track Hold <LEFT> To pause/resume playback Press <ENTER> To access the Quick Option menu (see below for details) Hold <ENTER> To adjust the volume level Press <UP> or <DOWN> To return to the Music Browser screen Press <MENU> To return to the Main menu Hold <MENU> Quick Option Menu To access the quick option menu, press and hold <ENTER> on the Now Playing screen. To browse through the settings, press <UP> or <DOWN> To select a setting, press <ENTER> To return to the previous screen, press <LEFT> www.cobyusa.com Page 15 Music Mode Equalizer Select a digital equalizer preset to optimize the way the player processes audio signals. The options are: Normal, Pop, Rock, Classic, Jazz, and Bass. Repeat Change the repeat options to adjust the order in which tracks are played. Item Description Normal Play tracks in normal order. Repeat One Play the current track repeatedly. Repeat All Play all tracks repeatedly. Random Play tracks in random order. Library Return to the Music Browser screen. Play List Select “Play List” and then “My List” to play a list of your favorite songs. To add songs to the list, see “Using the Quick Play List” on page 13. Page 16 Coby Electronics Corporation Pictures Mode Browse for and view your photo files (JPG). For more information about how to get pictures onto your player, please refer to the section “Transferring Files to the Player”. Picture Browser Controls When you choose PICTURES mode from the Main menu, you will see the Picture Browser screen. Your pictures will be displayed as thumbnail images. Pictures 1. Folder (selected) 1 2. Picture 3. Name of the selected folder or picture 2 3 Vacation Folder Use the Picture Browser to find all picture files loaded on your player. Function Key Action To browse through the pictures & folders Press <UP>, <DOWN>, <LEFT>, <RIGHT> To select/view an item Press <ENTER> To return to the previous screen Press <MENU> www.cobyusa.com Page 17 Pictures Mode Function Key Action To return to the Main menu Hold <MENU> Picture Viewer Controls To view a picture, browse through the thumbnail pictures and then press <ENTER>. The following functions may be performed from the Picture Viewer screen. Function Key Action To view the next picture Press <RIGHT> To view the previous picture Press <LEFT> To start or stop slideshow mode Press <ENTER> To return to the Picture Browser screen Press <MENU> To return to the Main menu Hold <MENU> You can override and stop the automatic slideshow by pressing <LEFT> or <RIGHT> at any time. The time period between pictures in slideshow mode can be adjusted in the Settings menu. Page 18 Coby Electronics Corporation Movies Mode Browse for and play your movie files. Your player supports MTV files encoded at 160 x 128 and 25 fps. Videos may need to be encoded with the included software for device playback. For more information about converting video, please refer to the section “Movie Conversion”. For more information about how to get movies onto your player, please refer to the section “Transferring Files to the Player”. Movie Browser Controls When you choose MOVIES mode from the Main menu, you will see the Movie Browser screen. Use the Movie Browser to find all movie files loaded on your player. Function Key Action To browse through the list of movie files & folders Press <UP> or <DOWN> To select/play an item Press <ENTER> To return to the previous screen Press <LEFT> To return to the Main menu Hold <MENU> www.cobyusa.com Page 19 Movies Mode Movie Playback Controls When a movie is playing, hold the player horizontally (landscape). The orientation of the controls will change accordingly. Use the following controls during movie playback. (The name of the controls are still given as if you were holding the player vertically.) Function Key Action To play the next movie Press <DOWN> To play the previous movie Press <UP> To forward-scan quickly through the current movie Hold <DOWN> To reverse-scan quickly through the current movie Hold <UP> To pause/resume playback Press <ENTER> To adjust the volume level Press <RIGHT> or <LEFT> To return to the Movie Browser screen Press <MENU> To return to the Main menu Hold <MENU> Page 20 Coby Electronics Corporation Radio Mode Listen to FM radio broadcasts. You must have a pair of headphones connected to the headphone jack to receive FM broadcasts; your player will utilize the headphone cord as an antenna. Radio Tuning Controls When you choose RADIO from the Main menu, you will see the Radio Tuning screen. You can search for stations, tune to stations manually, or tune to preset stations. You must have saved preset stations prior to using preset tuning mode. Hold <ENTER> to automatically save all stations within reception range as preset stations. This will overwrite all previously saved preset stations. The following functions may be performed from the Radio Tuning screen. Function Key Action To toggle between normal (manual) and preset tuning Press <ENTER> To auto-save all available stations as preset stations Hold <ENTER> To tune to a higher station Press <RIGHT> To tune to a lower station Press <LEFT> To scan to the next highest station (normal mode only) Hold <RIGHT> www.cobyusa.com Page 21 Radio Mode Function Key Action To scan to the next lowest station (normal mode only) Hold <LEFT> To save the current station as a preset station (normal mode) Press <MENU>, then <ENTER> To delete the current preset station (preset mode) Press <MENU>, then <ENTER> To adjust the volume level Press <UP> or <DOWN> To return to the Main menu Hold <MENU> Page 22 Coby Electronics Corporation E-Books Mode Read text files loaded on your player (TXT). For more information about how to get text files onto your player, please refer to the section “Transferring Files to the Player”. E-Book Browser Controls When you choose E-BOOKS from the Main menu, you will see the E-Book Browser Screen. Use the E-Book Browser to find all text files loaded on your player. Function Key Action To browse through the list of text files & folders Press <UP> or <DOWN> To select/view an item Press <ENTER> To return to the previous screen Press <LEFT> To return to the Main menu Hold <MENU> www.cobyusa.com Page 23 E-Books Mode E-Book Reader Controls When reading a text file, hold the player horizontally (landscape). The orientation of the controls will change accordingly. Use the following controls while reading text. (The name of the controls are still given as if you were holding the player vertically.) Function Key Action To read the next page Press <DOWN> To read the previous page Press <UP> To toggle the auto-scroll function Press <ENTER> To return to the E-Book Browser screen Press <MENU> To return to the Main menu Hold <MENU> You can override the auto-scroll function by pressing <DOWN> or <UP> at any time. The time period between pictures in slideshow mode can be adjusted in the Settings menu. Page 24 Coby Electronics Corporation Explorer Mode Enter Explorer mode to view and delete folders and files loaded on your player. To enter Explorer mode, select and confirm EXPLORER from the Main Menu. Explorer Controls When you choose EXPLORER mode from the Main menu, you will see the File Explorer screen. You can find and delete files or folders from the player. Function Key Action To browse through the list of files & folders Press <UP> or <DOWN> To select a folder Press <ENTER> To return to the previous screen Press <LEFT> To delete a selected item Press <MENU> To return to the Main menu Hold <MENU> www.cobyusa.com Page 25 Settings Mode Enter the Settings mode to set your player’s system options. To enter Settings mode, select SETTINGS in the Main menu. Function Key Action To browse through the options Press <UP> or <DOWN> To select an item Press <ENTER> To cancel and return to the previous screen Press <LEFT> To return to the Main menu Hold <MENU> The following options are available. Some of these options may be set from the Quick Option menus. Item Description Power Sleep Set the duration of time (in minutes) until the player turns off automatically. A setting of “Off” will disable this power-saving feature. Language Language Page 26 Set the language that the on-screen menus appear in. Coby Electronics Corporation Settings Mode Item Description Backlight Display Adjust the duration of time (in seconds) that the backlight will remain on after a key press. A setting of “On” will keep the backlight on continuously. Sys Tools Format It may become necessary to format your player if data or files become corrupt. You may choose either Quick or Complete formatting. A Complete format will take more time. Reset Restore all of the player's settings to their factory-default state. Sys Info View Firmware & Memory Usage information. Sort Sort all music that loaded on your player. Select “Force Sort” to update the music library immediately. This process may take several minutes if you have transferred music files to the player recently. www.cobyusa.com Page 27 Transferring Files to the Player Connect the Coby player to a computer with the USB 2.0 cable provided to: Transfer files to and from your player Perform basic file management functions. USB Port USB Port Computer Upon connection: Your computer will automatically recognize the player as a Removable Disk. To open the player to view files, double-click the icon that appears. Once you have opened the player’s folder, simply drag and drop files to the player as you would a floppy disk. Copy music files to the “MUSIC” folder Copy movie files to the “MOVIE.DIR” folder Copy photo files to the “PHOTO.DIR” folder Copy text files to the “TEXT.DIR” folder. Page 28 Coby Electronics Corporation Transferring Files to the Player If you need further assistance with transferring files, please refer to your operating system’s instruction manual or on-screen help. If you are using media management software such as iTunes, Winamp, or Windows Media Player, please refer to their documentation for support. Transferring with Microsoft Windows 1. Open a file explorer window. Locate the files you would like to transfer from your computer. Select the files/folders with the mouse and press CTRL-C (copy) on the keyboard. 2. Double-click the “My Computer” icon on your desktop and then double-click the icon that represents your Coby player (e.g., MP610 / Removable Disk). The computer will display all files and folders currently stored in the player. 3. Press CTRL-V (paste) on the keyboard to transfer the files you selected in Step 1 to the player. Transferring with Macintosh OS X 1. Open a finder window. Locate the files you would like to transfer from your computer. Select the files/folders with the mouse and press APPLE-C (copy) on the keyboard. 2. Click on the Removable Disk icon located on the left side of the finder window. The computer will display all files and folders currently stored in the player. www.cobyusa.com Page 29 Transferring Files to the Player 3. Press APPLE-V (paste) on the keyboard to transfer the files you selected in Step 1 to the player. Disconnecting from a Computer To avoid data loss or file/firmware corruption, disconnect the player as instructed below or as by your specific operating system. Microsoft Windows 1. Double-click the green arrow in the taskbar located on the lower-right side of the computer screen (Safely Remove Hardware). 2. Safely Remove Hardware: Select “USB Mass Storage Device” from the list that appears and then click on “Stop”. Stop a Hardware Device: Select “USB Mass Storage Device” from the list that appears and then click on “OK”. 3. Page 30 When the “Safe to Remove Hardware” window appears, click the OK button and disconnect the USB cable from the player and your computer. Coby Electronics Corporation Transferring Files to the Player Macintosh OS X 1. On the left side of the Finder Window, identify the appropriate Removable Disk icon. 2. Click on the “Eject” arrow on the right of the Removable Disk icon. 3. Disconnect the USB cable from the player and your computer. www.cobyusa.com Page 31 Video Conversion Use the video conversion software utility included on the Installation CD to create video files that are suitable for playback on the player. Your player supports MTV files with the following specifications: 160 x 128 resolution at 25 frames per second (fps). The video conversion software is included for your convenience and is compatible with Microsoft Windows operating systems only. There are many other video conversion utilities available for download or purchase on the internet. Because the program is licensed free of charge, there is no warranty for the program, to the extent permitted by applicable law. Except when otherwise stated in writing the copyright holders and/or other parties provide the program “as is” without warranty of any kind, either expressed or implied, including, but not limited to, the implied warranties of merchantability and fitness for a particular purpose. The entire risk as to the quality and performance of the program is with you. Should the program prove defective, you assume the cost of all necessary servicing, repair or correction. In no event unless required by applicable law or agreed to in writing will any copyright holder, or any other party who may modify and/or redistribute the program as permitted above, be liable to you for damages, including any general, special, incidental or consequential damages arising out of the use or inability to use the program (including but not limited to loss of data or data being rendered inaccurate or Page 32 Coby Electronics Corporation Video Conversion losses sustained by you or third parties or a failure of the program to operate with any other programs), even if such holder or other party has been advised of the possibility of such damages. Installation Minimum System Requirements OS Support Microsoft 2000/XP/Vista (32-bit only) CPU Pentium class equivalent or better Memory (RAM) >64MB Free HD Space 10MB Video 24-bit color adapter WMP Windows Media Player 9 or better 1. Copy the folder “VideoConverter_V2.12.00(160x128)” to your computer 2. To start the software, double-click the file “VideoConvert.exe” www.cobyusa.com Page 33 Video Conversion Converting Video To start the software, double-click the file “VideoConvert.exe”. The application window shown below will appear. 1 5 2 3 4 6 1. Seek Bar for preview and time selection 2. Start and End time-point selection 3. Select the video file to convert 4. Select the destination folder of the converted video file 5. Video preview window 6. Conversion progress bar Page 34 Coby Electronics Corporation Video Conversion To convert a video: 1. Click the “Input Video” button [3] to select the source video file to convert. The source file must be one of the following video types: AVI (*.avi), WMV (*.wmv, *.asf), MPEG-1 (*.mpg), QuickTime (*.mov, *.qt), MPEG-2 (*.vob), RealMedia (*.rm, *.rmvb), MPEG-4, or 3GP (*.3gp) DirectX 9.0, Media Player 9.0, and other codecs must be installed to support all media types. 3. Click the “Output Video” button [4] to select the folder that the converted file will be saved to. 4. Click the “Start Conversion” button to start the conversion process. 5. When the conversion is complete, copy the converted files to the player’s “MOVIE.DIR” folder for playback. www.cobyusa.com Page 35 Firmware Upgrades From time to time, COBY may release firmware upgrades to improve the performance of the Player or to add additional features. Please check the COBY website periodically at www.cobyusa.com to see if new firmware has been released for your player. If you are experiencing abnormal behavior with your player, you may choose to restore (format) your player before updating its firmware. Do not interrupt the firmware upgrade process—doing so could damage your player and render it inoperable. See the documentation that is included with the firmware upgrade file for detailed instructions. Page 36 Coby Electronics Corporation Troubleshooting If you have a problem with this device, please read the troubleshooting guide below and check our website at www.cobyusa.com for Frequently Asked Questions (FAQs) and firmware updates. If these resources do not resolve the problem, please contact Technical Support. Address COBY Electronics Technical Support 56-65 Rust Street Maspeth, NY 11378 Email [email protected] Web www.cobyusa.com Phone 800-727-3592: Weekdays 8:00AM–9:00PM EST Saturdays 9:00AM–5:30PM EST 718-416-3197: Weekdays 8:00AM–5:30PM EST The player does not turn on. Ensure that the player is fully charged. Try charging the player overnight (8 hours). Reset the player (use a paper clip to gently press the Reset button on the rear of the player) and try again. www.cobyusa.com Page 37 Troubleshooting The buttons do not work. Ensure that the Hold switch is disengaged. Reset the player (use a paper clip to gently press the Reset button on the rear of the player) and try again. I cannot transfer files to the player. Ensure that your computer is running a supported operating system. If using a USB extension cable, ensure that it is securely attached to the player and the PC, or try using another USB cable. If you have connected the player through a USB hub, try connecting the player directly to your computer. Ensure that the player’s memory capacity is not full. Ensure that the Hold switch is disengaged. There is no sound during playback. Check the volume level. Ensure that the headphones are attached securely to the player. The sound quality of the music is poor. Page 38 Try playing the file on your computer. If the sound quality is still poor, try downloading the file again or re-encoding the file yourself. Coby Electronics Corporation Troubleshooting Ensure that the bit rate of the file is not too low. The higher the bit rate of the file, the better it will sound. The minimum recommended bitrate is 128kbps for MP3s and 96kbps for WMAs. Try lowering the volume of the player. Ensure that the headphones are attached securely to the player. The player will not play my music file. Ensure that the file is in a compatible format. The file may be copy-protected and you no longer have authorization to play this file. If you feel this is in error, please contact the service from which you downloaded the file. The LCD characters are corrupted or something is wrong with the display. Ensure that the correct menu language has been set. Reset the player (use a paper clip to gently press the Reset button on the rear of the player) and try again. The player has malfunctioned. Reset the player (use a paper clip to gently press the Reset button on the rear of the player) and try again. Try updating the player’s firmware. Please refer to the Firmware Upgrades section of this manual for instructions. www.cobyusa.com Page 39 Specifications Display Type 1.8” Full-Color LCD @ 160x128 Memory MP610-1G: 1GB Flash MP610-2G: 2GB Flash MP610-4G: 4GB Flash Audio Format Support MP3, WMA, WAV Video Format Support MTV: 160x128, 25fps Photo Format Support JPEG DRM Support -- Song Info Support ID3, Windows Media FM Frequency Range 87.5 - 108.0MHz PC Interface USB 2.0 (MSC) Plug and Play Support Windows 2000/XP/Vista Macintosh OS X Audio Output 3.5mm Stereo (Headphone) Power Supply Rechargeable Lithium-Polymer Battery USB Charge Play Time Music: 8 hours* Unit Dimensions 1.65” x 3.66” x 0.38” (WHD) Specifications and manual are subject to change without notice. * Music play time is an estimated value based on playing an MP3 encoded at 128 kbps. Actual play time may vary depending on encoding method used and other factors. Page 40 Coby Electronics Corporation Notes www.cobyusa.com Page 41 Notes Page 42 Coby Electronics Corporation Notes www.cobyusa.com Page 43 Coby Electronics Corporation 1991 Marcus Avenue, Suite 301 Lake Success, NY 11042 www.cobyusa.com www.ecoby.com Coby is a registered trademark of Coby Electronics Corporation. Printed in China. 610AL