Transcript
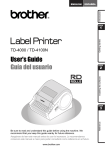
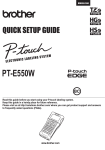
CAUTION
Safety Precautions
WARNING
Indicates a potentially hazardous
situation which, if not avoided,
could result in serious injuries.
Follow these guidelines to avoid the risk of fire, burns, injury,
electric shock, rupture, overheating, abnormal odor or
smoke.
ELECTRONIC LABELING SYSTEM
User’s Guide
English
Español
With your PT-E100, you can create labels for multiple
applications. Select from the many character sizes and styles to
design professional looking custom labels. In addition, the
variety of tape cassettes available allows you to print labels with
different widths and industrial colors.
Read this manual carefully before you begin and keep the
manual in a handy place for future reference.
• Always use the specified voltage and the recommended AC adapter
(AD-24ES) for the P-touch labeler to prevent any damage or failure.
• Do not touch the P-touch labeler during a lightning storm.
• Do not use the P-touch labeler/AC adapter in places of high humidity
such as bathrooms.
• Do not overload the power cord.
• Do not place heavy objects on, or damage the power cord or plug. Do
not forcibly bend or pull the power cord. Always hold the AC adapter
carefully when disconnecting from the power outlet.
• Make sure that the plug is fully inserted in the power outlet. Do not use
an outlet that is loose.
• Do not allow the P-touch labeler/AC adapter/power plug/batteries to get
wet, for example, by handling them with wet hands or spilling beverages
on to them.
• Since loss of eyesight may result when leaked fluid from batteries gets
into your eyes, immediately rinse your eyes with a large amount of clean
water, and then seek medical attention.
• Do not disassemble or modify the P-touch labeler/AC adapter/batteries.
• Do not allow a metal object to contact both the plus and minus ends of a
battery.
• Do not use sharp objects, such as tweezers or a metallic pen, to change
the batteries.
• Do not throw the batteries into fire or expose to heat.
• Disconnect the AC adapter, remove batteries immediately and stop
using the P-touch labeler if you notice abnormal odor, heat,
discoloration, deformation or anything unusual while using or storing it.
• Do not use a damaged or leaking battery as the fluid may get on your
hands.
• Do not use a deformed or leaking battery or one with a damaged label.
There is a possibility of generating heat.
Printed in China
LAB662001
Indicates a potentially hazardous
situation which, if not avoided,
may result in minor or moderate
injuries.
Follow these guidelines to avoid personal injury, liquid
leakage, burns or heat.
• When the P-touch labeler is not being used, store it out of the reach of children. In
addition, do not allow children to put the P-touch labeler parts or labels in their
mouths. If any object has been swallowed, seek medical attention.
• Do not touch metal parts around the print head immediately after printing.
• Do not touch the cutter blade.
• If leaked fluid from batteries gets on your skin or clothes, immediately rinse them with
clean water.
• Remove the batteries and disconnect the AC adapter if you do not intend to use the
P-touch labeler.
• Do not use a battery other than that specified. Do not use combinations of old and
new batteries or combinations of different types, different charging levels, different
manufacturers or different models. Do not insert a battery with its plus and minus
ends reversed.
• Do not drop or hit the P-touch labeler/AC adapter.
• Do not press on the LCD display.
• Be careful not to trap your fingers when closing the cassette cover.
• Before using Ni-MH rechargeable batteries, carefully read the instructions for the
batteries and battery charger, and be sure to use them correctly.
• When using Ni-MH rechargeable batteries, charge the batteries with a specialized
battery charger before using the batteries.
General Precautions
• Depending on the location, material, and environmental conditions, the label may
unpeel or become irremovable, the color of the label may change or be transferred
to other objects. Before applying the label, check the environmental conditions and
the material.
• Do not use the P-touch labeler in any way or for any purpose not described in this
guide. Doing so may result in accidents or damage the P-touch labeler.
• Use only Brother TZe or HGe tapes with the P-touch labeler. Do not use tapes that
do not have the
or
mark.
• Only use a soft, dry cloth to clean the labeler; never use alcohol or other organic
solvents.
• Use a soft wipe to clean the print head; never touch the print head.
• Do not put any foreign objects into the tape exit slot or battery compartment, etc.
• Do not place the P-touch labeler, batteries or AC adapter in direct sunlight or rain,
near heaters or other hot appliances, in any location exposed to extremely high or
low temperatures (e.g., on the dashboard or in the back of your car) or high humidity,
or in dusty locations.
• Do not apply excessive pressure to the cutter lever.
• Do not try to print if the cassette is empty; it will damage the print head.
• Do not pull the tape while printing or feeding; it will damage the tape and the P-touch
labeler.
• Any data stored in memory will be lost due to failure or repair of the P-touch labeler,
or if the battery expires.
• The P-touch labeler is not equipped with a charging feature for rechargeable
batteries.
• The length of the printed label may differ from the displayed label length.
• A protective clear plastic sticker is placed over the display during manufacturing and
shipping. This sticker should be removed prior to use.
• When power is disconnected for more than three minutes, all text, format settings and
any text files stored in the memory will be cleared.
FCC NOTICE
BASIC USAGE
USING TEMPLATES
Entering Text
You can preview the text before printing.
/
ON)
Lower case (
OFF)
X Feeding (Tape Feed)
/
X Making Two Lines of Text
• Enter the text for the first line and then press
for the
second line.
• Move the cursor to where the second line starts and press
.
Use either 0.35" (9mm) or 0.47" (12mm) wide tape for two line text.
LCD display
Label image
NOTE
Do not press
after the second line; otherwise the “Line Limit!”
error message will appear.
Power Supply and Tape Cassette
/
[Text&Format]
1
2
Print head
3
4
End of tape
Cutter’s
edge
Toothed
wheel
/
Tape cutter
lever
Open the cassette cover by pressing the
above indicated area at the top end of the
machine.
Insert six new AAA alkaline batteries
(LR03:not included) or fully charged NiMH batteries (HR03:not included),
making sure that their poles point in the
correct directions.
Users of alkaline batteries:
Always replace all six batteries at the
same time with brand new ones.
Users of Ni-MH batteries:
Always replace all six batteries at the
same time with fully charged ones.
If a tape cassette is already installed, remove it by
pulling it straight up. Also, if batteries are already
installed, remove them.
• Make sure that the power is turned off when
replacing batteries or tape cassettes.
/
Tape
exit slot
Tape guide
Insert a tape cassette, making sure that
it snaps into place.
Securely close the cassette cover, making
sure that it snaps into place.
• Make sure that the end of the tape feeds under
the tape guides.
• Use only Brother TZe or HGe tapes with this
machine.
When using the optional AC adapter (AD-24ES)
4
5
6
7
8
18
19
20
1
2
3
9
10
11
21
22
23
12
13
14
15
1.
2.
3.
4.
5.
6.
7.
Size
Cursor
Caps
Cable Wrap
Faceplate
Cable Flag
Label Length
If a specific label length
has been selected,
also appears.
8. Guidance (left, right)
9. Power key
10. Cursor key: Right
11. Cursor key: Left
12.
13.
14.
15.
16.
17.
18.
19.
20.
21.
22.
23.
24.
25.
Backspace key
Cable Wrap key
Cable Flag key
Character keys
Caps key
Symbol key
Menu key
Clear key
Print key
Enter key
Serialize key
Faceplate key
Accent key
Space key
NOTE
1"
Approx. 0.9 lb. (Approx. 390 g)
(without batteries and tape cassette)
Power supply:
Six AAA alkaline batteries (LR03)
Six AAA Ni-MH batteries (HR03)*1
Optional AC adapter (AD-24ES)
*1
• The LCD shows one row of 15 characters; however, the text that
you enter can be up to 80 characters in length.
• While selecting the settings, press the Space key to go back to
the default item.
24
25
Weight:
Tape cassette:
NOTE
16
17
Approx. 4.4" × 8.2" × 2.4"
(Approx.110(W) × 208(D) × 59(H)mm)
[Tab]
• The print preview shows just the text data on the label and will
differ from the actual printed label.
• Label length shown on LCD may slightly differ from the actual
label length when printed.
Brother TZe tape (width)
0.13" (3.5mm), 0.23" (6mm),
0.35" (9mm), 0.47" (12mm)
Brother HGe tape (width)
0.23" (6mm), 0.35" (9mm),
0.47" (12mm)
Visit us at http://solutions.brother.com/ for the latest
information about the recommended batteries.
2
Set the language.
Should you encounter any problems with your product,
please do not return your product to the store!
After referring to the User's guide, if you still need
assistance, call Brother Customer Service at:
Voice: 1-800-255-0415
Web: www.brothermobilesolutions.com
Email: [email protected]
I
L
R
T
Z
/
/
5. Press
to enter more text.
6. Clear the text, enter the text for the next label, and then
.
chain of labels.
Half
t
Narrow
z
[Label Length]
• The machine automatically turns off if no keys are pressed within
five minutes.
• To cancel any operation, press
.
1
Turn off the P-touch labeler, hold down
and then press
Release
and
Message
Cause/Remedy
• The batteries are weak.
• If using AAA alkaline batteries: Replace them with
new ones.
• If using Ni-MH batteries: Charge them fully.
• Use recommended (optional) AD-24ES adapter until
the battery issue is resolved.
Battery Dead
The installed batteries are running low.
Invalid!
• An invalid number was entered as the label length,
tab length, cable diameter, flag length or faceplate
length.
• An invalid letter or number to be incremented was
selected in the Serialize function.
•
or
was pressed when no text is entered.
• You tried to select Text Preview when no text is
entered.
• You tried to enter a 3rd line by pressing
The tape cutter lever was used during the printing
process.
Text Full!
The maximum number of characters (80 characters for
regular text) has already been entered.
Text Limit!
Since the number of entered characters exceeds the
label length, reduce the text, or select [Auto] as the
label length.
Printing on 0.13" (3.5mm) tape with invalid Frame
• You tried to print a text file when there is no data
stored in the memory.
No Data!
Cutter Error
X What to do when...
Cause/Remedy
.
Line Limit!
• You tried to print or preview two lines of text while
0.13" (3.5mm) or 0.23" (6 mm) tape is installed. Install
tape of a larger size.
No Cassette!
You tried to print or preview a label when there is no
cassette installed.
No Frame OK? setting ON. (Select
to print with no Frame,
to cancel.)
OK to Feed?
Feeding tape after printing when [Chain Print] is
selected. Refer to “Setting Margin”.
Wrong Tape!
Use a tape cassette with the
or
Problem
The display stays blank
after you have turned on
the machine.
Problem
Solution
• Check that the batteries are correctly
inserted.
• If the batteries are weak, replace them.
• Plug in (optional) AD-24ES adapter.
When the label is printed
out, the margin (space) is • See “Setting Margin” in this users guide
and select [Half] or [Narrow] to have
too large on both sides of smaller margins for your label.
the text.
• Check that the tape cassette has been
The machine does not
inserted correctly.
print, or the printed
• If the tape cassette is empty, replace it.
characters are not formed
• Check the cassette cover is properly
properly.
closed.
mark.
The setting has cleared
on its own.
A blank horizontal line
appears through the
printed label.
• The batteries may be weak. Replace
them.
• When power is disconnected for more
than three minutes, all text & formats in
the display will be lost. Language and Unit
settings will also be cleared.
• There maybe some dust on the print
head. Remove the tape cassette and use
a dry cotton swab to gently wipe the print
head with an up-and-down motion.
Solution
The machine has “locked
up” (i.e., nothing happens
• Refer to "Resetting the PT-E100."
when a key is pressed,
even though the machine
is on.)
You can save up to 9 labels and recall them for printing at a later date. A
maximum of 80 characters can be saved per file, a maximum total of 720
characters for the total memory. You can also edit and overwrite the stored label.
press
. Press
to cancel.
• Depending on the format you select, the entire contents of your text
may not be printed. For example, if the text is too long to fit into the
format, the "Text Limit!" error message will appear.
• Text cannot be rotated in the Cable Flag function.
Using the Serialize function, you can print multiple labels with a
number or letter automatically incremented on each label.
A block of text is evenly spaced on a single label.
This serializing function can also be used with the Cable Wrap,
Cable Flag or Faceplate templates to save time entering and
printing a series of labels.
/
Select a faceplate length
[Copies: ]
text
/
/
Input
-
/
Input text
• Faceplate length: 1.2" to 12.0" (30mm to 300mm)
Default: 2.0" (50mm)
[Serialize: ]
/
[File]
/
/
-
NOTE
To position the text appropriately for multiple ports in a single
print, either use the chain print function with the Faceplate length
equal to the port width, or enter the Faceplate length equal to the
total length over all the ports and then use the tab function to
space out each port data.
Underline and Frame
Symbol Key
1
You can select the desired frame design.
/
[Undl/Frame]
/
Press
Select a
frame type
2
2
Use
/
3
/
Select a category
/
to select the desired symbol.
Select a symbol
Punctuation
NOTE
Frames cannot be printed on 0.13" (3.5mm) tape.
Brackets
Short Cut Keys
to select one of 12 symbol categories.
1
2
3
4
5
6
7
8
9
10
11
12
13
14
15
16
17
18
19
20
21
1
2
3
4
5
6
7
8
Size
Tab
Style
Tab Length
Width
Preview
Undl/Frame
Margin
Label Length
Unit
CableRot/Rpt
Feed
Bullets
1
2
3
4
5
6
Sup(Superscript)/
Subscript
1
2
3
4
5
6
8
9
10
Mathematics
1
2
3
4
5
6
Arrows
1
2
3
4
5
6
8
9
10
11
12
13
Currency
1
2
3
4
5
Greek
1
2
3
4
5
6
7
1
2
3
4
5
6
7
8
9
10
11
12
13
14
15
16
17
18
19
20
21
22
23
24
25
26
27
28
29
30
31
32
33
34
35
36
37
1
2
3
4
5
6
7
8
9
10
11
12
13
1
2
3
4
5
6
7
8
9
10
11
12
13
14
15
16
17
18
19
20
21
1
2
3
4
5
6
7
I+Outline
8
9
10
11
12
13
14
I+Shadow
15
16
17
18
19
7
[Print]
/
-
X Save
/
[File]
/
[Save]
File
Language
/
to turn the P-touch back on.
7
8
Text Keys
X Open
/
[File]
/
[Open]
/
1
Accessories
X Replacing the Cutter Unit
Press
+ / /
+
/
/
Electrical
to select the settings to
enter the text.
NOTE
If you try to store a label when there is already a label stored to that
number, a message “Overwrite?” will appear. Press
to save
your new label. Press
to cancel.
The tape does not feed • Check that the end of the tape feeds
under the tape guides.
properly or the tape gets
• The cutter lever was pressed while printing.
stuck inside the machine. Do not touch the cutter level during printing.
+
2
/
Press
Size
/
/
/
Select an item
to select the settings.
Large
+
Medium
Datacom
Small
Style
Normal
+
AV / Security
Bold
Outline
1. Pull out the two sections of the cutter unit (green) in the
direction of the arrows shown in the illustration.
Shadow
22
Italic
and select [Text&Format].
I+Bold
• Refer to “Initial Settings”.
Contact Information
Brother Mobile Solutions, Inc.
100 Technology Drive, Suite 250A
Broomfield, CO 80021
www.brothermobilesolutions.com
Select a character to be ascended
/
X Print
and
.
, select [Text&Format] or [Text only], then
Labels printed with this function can be used to identify various
components or panels.
1"
(25 mm)
Tape Cassettes: See the included “Supplies and Accessories Guide”.
Cutter Unit:
TC-4 (replacement)
If the cutter blade becomes dull after repetitive use and the tape cannot
be cut cleanly, replace with a new cutter (stock no. TC-4). You may
obtain this item from an authorized Brother reseller.
The LCD is set to an
incorrect language.
accordingly and the
• To clear all text, press
Serialize
ABC
• The batteries may be weak. Replace
them.
The power turns off when
• Check that the batteries are correctly
you try to print.
inserted.
• Plug in (optional) AD-24ES adapter.
All text and format settings
need to be cleared to
• Press
create a new label.
and then select
Faceplate
All text, settings and stored files are cleared.
X Error message
0.2" to 3.6" (3mm to 90mm) available
Default: 0.3" (6mm)
ABC
• To print more than 1 copy of a label with minimum margin, set
the margin to [Narrow].
• When [Chain Print] is set, feed the tape before using the cutter
otherwise a part of the text may be cut off. Also, cut along the
printed dots ( ) with scissors so the text is centered in the label.
*Feed the tape before using the cutter.
• Do not pull the tape since this may damage the tape cassette.
NOTE
Troubleshooting
-
1.6"
(41 mm)
[Copies: ]
You can reset your PT-E100 labeling system when you need to
initialize the settings, or if the PT-E100 is not working properly.
-
NOTE
ABC
2.7"
(67 mm)
The P-touch labeler turns on with the internal memory reset.
Low Battery!
Label image
Saving Label Files
[Auto/1.2"-12.0" (30-300 mm)]
/
• Flag length: 0.4" to 8.0" (10mm to 200mm), Auto
Default: Auto
USEFUL FUNCTIONS
Full
i
l
r
Reset the PT-E100
NOTE
2
Message
.
/
Input text
8. After the tape is fed, press the cutter lever to cut off the
/
.
/
• To activate the Txt Rpt function, press
[CableRot/Rpt].
. Printing will start, and then the message "OK
to Feed?" appears.
LCD display
d
• After the label is printed, cut along the printed dots (:) with
scissors so that the label length matches the machine setting.
• If a specific label length has been selected,
also appears in
the LCD.
[Unit]
[inch/mm]
a
c
e
g
k
n
o
s
u
y
D
NOTE
The default setting is [inch].
/
0.16"
(4 mm)
• When [Half] or [Narrow] is set, the displayed label length is the
length from the printed dots ( ) to the end of the label.
/
X Changing Label Length
.
Set the unit of measurement.
/
0.16"
0.47"
(12 mm)
NOTE
• To cancel the current operation, press
.
• The order of accented characters differs depending on the
selected LCD language.
.
/
[Language]
/
[English/Español/Français/Hrvatski/Italiano/Magyar/
Nederlands/Norsk/Polski/Português/Portug. (BR)/
Română/Slovenski/Slovenský/Suomi/Svenska/Türkçe/
3
/
• Cable diameter:
/
Select a flag length
[Copies: ]
Input text
, then [Copies: ] appears.
label is printed, press
-
Select a cable diameter
[Copies: ]
4. Press
X Entering Accented Characters
Start your machine.
Čeština/Dansk/Deutsch]
0.47"
ABC
/
or enter a number using the number keys
to select the number of copies.
[Auto/0.0”-4.0” (0-100 mm)]
A
C
E
G
K
N
O
S
U
Y
Supply power by using six AAA batteries, and then press
1"
(25 mm)
2. Press
3. Press
[Tab Length]
NOTE
the bottom of the machine.
2. Insert the plug into the nearest standard electrical
outlet. For memory back up, we recommend using
AAA alkaline batteries (LR03) or Ni-MH batteries
(HR03) together with the AC adapter.
1
Narrow
ABC
[Chain Print]
For batch printing without ejecting each label.
1. Enter text.
Entering a Tab will position the cursor to the next Tab Length starting
from the left side of the label and not from the last character position.
1. Connect the AC adapter into the AC adapter socket on
/
operation, press
/
/
settings change back to standard.
Half
press
Initial Settings
Dimensions:
(W x D x H)
[Margin]
7. When the message "OK to Feed?" appears after the last
Visit us at http://solutions.brother.com/ for the latest
information about the recommended batteries.
Specifications
/
-
• For labels attached to cables and wires, we recommend using Flexible
ID Tape. Use the cable flag function when the diameter of the object
is less than 0.2" (3mm).
• To deactivate the Cable Wrap/Cable Flag/Faceplate function during
ABC
Using a 0.35" (9mm) wide tape with settings of [Small] text size, [×
1/2] text width and [0.59" (15mm)] tab length, you can create a
label suitable for patch panel.
NOTE
LCD Display & Keyboard
/
[Full/Half/Narrow/Chain Print]
Full
[Text Only]
To change tab length:
/
You can select the desired flag length. When [Auto] is selected, the
flag length is automatically adjusted according to the text length.
Txt Rpt: On
[Full]/[Half]/[Narrow]
For leaving equal margins on both sides of the text.
X Entering Tab
AC adapter socket
/
X Setting Margin
/
To delete text only :
/
Txt Rpt: Off
• If you need only 1 copy of the label, press
without
selecting the number of copies.
• The number of copies can also be specified by pressing a
number key.
• To prevent damage to the tape, do not touch the cutter lever
while the message "Printing..." or "Feeding..." is displayed.
• To cut off the label, push in the tape cutter lever on the upperright corner of the machine.
• Peel the printed label from the backing and apply the label.
• You can print up to 9 copies of each label.
to delete the letters one by one.
/
[Feed]
[Copies: 1]
X To Clear
Press
With the CableRot/Rpt function, the text is printed repeatedly along
the length of the label so that it can easily be read from any angle.
X Printing
To delete all text and settings :
Cassette
cover
[Preview]
With this function, a label can be wrapped
around a cable or wire with its ends stuck
together to form a flag. The input text lines
are printed at the both ends of a label.
This is not a preview image of the label, just the text on the label.
To make two lines of text, do one of following:
This device complies with Part 15 of the FCC Rules. Operation is subject to
the following two conditions: (1) this device may not cause harmful
interference, and (2) this device must accept any interference received,
including interference that may cause undesired operation.
This equipment has been tested and found to comply with the limits for a Class
B digital device, pursuant to Part 15 of the FCC Rules. These limits are
designed to provide reasonable protection against harmful interference in a
residential installation. This equipment generates, uses, and can radiate radio
frequency energy and, if not installed and used in accordance with the
instructions, may cause harmful interference to radio communications.
However, there is no guarantee that interference will not occur in a particular
installation. If this equipment does cause harmful interference to radio or
television reception, which can be determined by turning the equipment off
and on, the user is encouraged to try to correct the interference by one or more
of the following measures:
• Reorient or relocate the receiving antenna.
• Increase the separation between the equipment and receiver.
• Consult the dealer or an experienced radio/TV technician for help.
Important
• Changes or modifications not expressly approved by Brother Industries,
Ltd. could void the user’s authority to operate the equipment.
Cable Flag
You can create a label that can be wrapped
around a cable or wire. The input text line is
rotated 90° counterclockwise and printed on a
label whose length is automatically determined
by setting the cable diameter.
X Preview
X Switching Upper Case/Lower Case
Upper case (
Cable Wrap
Printing Labels
Safety
Vertical
Width
2. Install a new cutter unit. Push it in until it snaps into place.
Do not touch the cutter blade directly with your fingers.
+
Normal
×2
× 1/2
NOTE
• Press
to return to the previous step.
• The symbols shown in the above table may look slightly
different on the machine LCD and when printed.