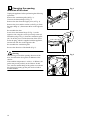
1
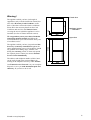
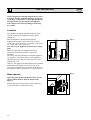
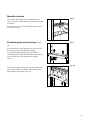
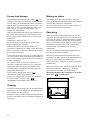
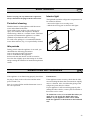
REFRIGERADOR
REFRIGERATOR
FRIGORIFICO
ZO 29 Y
ZO 29 S
ZO 29 N
LIBRO DE INSTRUCCIONES
2222 151-92
INSTRUCTION BOOKLET
MANUAL DE INSTRUÇÕES
Warning!
595
We congratulate you on your choice. Read this
instruction manual carefully and follow the
recommendations it provides to benefit from years
of excellent service.
The appliance which you have just purchased has
been very accurately controlled throughout the
entire manufacturing process. Nevertheless, should
any problem arise during usage, whether it be
during the warranty period, or when such period
has expired, please contact your nearest Zanussi
Service Centre immediately.
43
600
D223
Open door
The address and telephone number of this Centre
can be easily found in the enclosed List or by
looking in the telephone directory, under Zanussi.
Our Zanussi Service Network is at your complete
disposal, to serve you with maximum speed and
efficiency, all you have to do is call.
Printed on recycled paper
Appliance height:
1380 mm
1180
Please fill in the necessary details on the Card
Certificate and send it to the Zanussi Centre
covering the area in which the appliance is to be
installed. (See list of Zanussi network centres).
600
The appliance which you have just bought is
supplied not only with the instruction manual, but
also with a Warranty Card Certificate, on the
back of which are written the relative conditions.
Closed door
643
D224
13
WARNINGS
GB
It is most important that this instruction book should be retained with the appliance for future reference.
Should the appliance be sold or transferred to another owner, or should you move house and leave the
appliance, always ensure that the book is supplied with the appliance in order that the new owner can be
acquainted with the functioning of the appliance and the relevant warnings.
These warnings are provided in the interest of safety. You must read them carefully before installing or
using the appliance.
General Safety
ª This appliance is designed to be operated by
adults. Children should not be allowed to tamper
with the controls or play with the product.
ª It is dangerous to alter the specifications or modify
this product in any way.
ª Care must be taken to ensure that the appliance
does not stand on the electrical supply cable.
ª Before any cleaning or maintenance work is
carried out, be sure to switch off and unplug the
appliance.
ª This appliance is heavy. Care should be taken
when moving it.
ª Ice lollies can cause frost burns if consumed
straight from the appliance.
Service / Repair
ª Any electrical work required to install this
appliance should be carried out by a qualified
electrician or competent person.
ª This product should be serviced by an authorized
Service Centre, and only genuine spare parts
should be used.
ª Under no circumstances should you attempt to
repair the appliance yourself.
Repairs carried out by inexperienced persons may
cause injury or more serious malfunctioning. Refer
to your local Service Centre, and always insist on
genuine spare parts.
Use
ª The domestic refrigerators and freezers are
designed to be used specifically for the storage of
edible foodstuffs only.
ª Frozen food must not be re-frozen once it has been
thawed out.
ª Manufacturers’ storage recommendations should
be strictly adhered to. Refer to relevant
instructions.
ª The inner lining of the appliance consists of
channels through which the refrigerant passes. If
14
these should be punc tured this would damage the
appliance beyond repair and cause food loss.
DO NOT USE SHARP INSTRUMENTS to
scrape off frost or ice. Frost may be removed by
using the scraper provided. Under no
circumstances should solid ice be forced off the
liner. Solid ice should be allowed to thaw when
defrosting the appliance. See defrost instructions.
ª Do not place carbonated or fizzy drinks in the
freezer as it creates pressure on the container,
which may cause it to explode, resulting in
damage to the appliance.
Installation
ª There are working parts in this product which heat
up. Always ensure that there is adequate
ventilation as a failure to do this will result in
component failure and possible food loss. See
installation instructions.
ª Parts which heat up should not be exposed.
Wherever possible the back of the product should
be against a wall.
ª If the appliance has been transported horizontally,
it is possible that the oil contained in the
compressor flows in the refrigerant circuit. It is
advisable to wait at least two hours before
connecting the appliance to allow the oil to flow
back in the compressor.
Environment Protection
ª This appliance does not contain gasses which
could damage the ozone layer, in either its
refrigerant circuit or insulation materials. The
appliance shall not be discarded together with
the urban refuse and rubbish. Avoid damaging
the cooling unit, especially at the rear near the
heat exchanger. Information on your local
disposal sites may be obtained from your
municipal authorities.
The materials used on this appliance marked
with the symbol
are recyclable.
CONTENTS
Installation
16
ª Location
16
ª Rear spacers
16
ª Cleaning the interior
17
GB
ª Changing the opening
direction of the door
18
ª Changing the opening direction of the
compartment door
19
Technical specification
19
ª Electrical connection
19
Use
20
ª Operation - Temperature adjustment
20
ª Fresh food refrigeration
20
ª Movable shelves
21
ª Positioning the door shelves
21
ª Frozen food storage
22
ª Thawing
22
ª Making ice cubes
22
ª Defrosting
22
Maintenance
23
ª Periodical cleaning
23
ª Idle periods
23
ª Interior light
23
Something not working
23
15
INSTALLATION
GB
If this refrigerator featuring magnetic door seals is
to replace an older appliance having a spring lock
on the door or lid, be sure to make that spring lock
unusable before you discard the old appliance.
This will prevent it from becoming a death-trap
for a child.
Location
A
B
10 mm
100 mm
Fig. 1
10 mm
The appliance should be installed well away from
sources of heat such as radiators, boilers, direct
sunlight etc.
Best performance is obtained with ambient
temperature between +18°C and +43°C (class T);
+18°C and +38°C (class ST); +16°C and +32°C (class
N); +10°C and +32°C (class SN).
The class of your appliance is shown on its rating
plate.
Make sure that there is nothing hindering air
circulation at the back, bottom, or top of the
appliance.
To achieve the best performance when the appliance
is set under a wall cabinet the top of the appliance
should be at least 5 mm away from the base of the
cabinet (Fig. 1/A).
However, the appliance should ideally not be installed
underneath wall cabinets (as shown in Fig. 1/B).
One or more adjustable feet mounted on the base of
the appliance make it possible to set it perfectly level.
NP007
Fig. 2
Rear spacers
In the bag with the documentation, there are two
spacers which must be fitted as shown in the
figure 2.
Slacken the screws and insert the spacer under the
screw head, then re-tighten the screws.
PR153
16
Important
It is essential that the appliance be connected to an
efficient earth tap. For this purpose the supply cable
plug incorporates a special earth contact. If the
sockets of your domestic wiring system are not
earthed, have the appliance connected to a separate
earth wire by a qualified electrician in accordance
with existing safety regulations.
The Manufacturer declines all responsibility if the
above safety precautions are not observed.
This appliance complies with EEC directive
number 87/308 of 2/6/87 relative to radio
interference suppression.
This appliance complies with the following
E.E.C. Directives:
- 73/23 EEC of 19.2.73 (Low Voltage Directive) and
subsequent modifications;
- 89/336 EEC of 3.5.89 (Electromagnetic
Compatibility Directive) and subsequent
modifications.
Cleaning the interior
Before using the appliance for the first time, wash the
interior and all internal accessories with lukewarm
water and some neutral soap so as to remove the
typical smell of a brand-new product, then dry
thoroughly.
Do not use detergents or abrasive powders, as these
will damage the finish.
17
Changing the opening
direction of the door
Unplug the appliance before performing the following
operations:
Remove the ventilation grille (D-Fig. 3).
Unscrew the bottom hinge (E-Fig. 3).
Remove the door from the upper pivot (A-Fig. 4).
Remove the pivot and the washer (A+B-Fig. 4) from
the upper hinge (C), then mount these on the opposite
side.
Re-assemble the door.
Screw down the bottom hinge (E-Fig. 3) on the
opposite side, using the screws previously removed.
Detach the plug (F-Fig. 3) from the ventilation grille
(D). To do this, press it in the direction of the arrow.
Insert the plug, which is supplied with the appliance,
into the hole left free on the opposite side.
Re-assemble the ventilation grille.
Reverse the direction of the handle (Fig. 5).
Fig. 3
F
E
F
F
D
F
D640
Fig. 4
C
B
A
D736
Warning
After having reversed the opening direction of the
door, check that the door gasket is adherent to the
cabinet.
If the ambient temperature is cold (i.e. in Winter), the
gasket may not fit perfectly to the cabinet. In that
case, wait for natural fitting of the gasket or accelerate
this process by heating up the part involved with a
normal hairdrier.
Fig. 5
D737
18
Changing the opening direction of
the
compartment door (Fig. 6)
Remove pin (1).
Remove the door. Pin (4) could drop out when this
operation is carried out; if so, it must be retrieved for
fitting on the opposite side.
Remove bush (5) and fit it on the opposite side.
Remove the catch (3) and fit it on the opposite side.
Fit pin (4) on the opposite side.
Reposition the door and insert pin (1), pressing it into
place.
Fig. 6
4
3
2
D164
5
TECHNICAL SPECIFICATION
1
GB
The technical data is indicated in the rating plate on
the left side inside the appliance.
Electrical connection
Before plugging in, ensure that the voltage and
frequency shown on the serial number plate
correspond to your domestic power supply.
Voltage can vary by ±6% of the rated voltage.
For operation with different voltages, a suitably sized
auto-transformer must be used.
19
USE
GB
Operation - Temperature adjustment
Fresh food refrigeration
Turn the thermostat knob clockwise beyond position
«O» to the required setting.
A medium setting is generally the most suitable.
Temperature is adjusted automatically and may be
increased (less cold) by turning the knob towards the
lower numbers, or may be decreased (colder) by
turning it towards the higher numbers.
The correct position, however, must be located by
taking into account that the internal temperature
depends on the following factors:
ambient temperature;
the number of times the door is opened;
the amount of food stored;
the location of the appliance.
Operation is stopped by turning the control knob until
its pointer coincides with symbol «O».
In this refrigerator incorporating a 2-star (
)
evaporator, the temperature in the refrigerator can be
adjusted by means of the thermostat and also by
means of the conveyor (Fig. 7). To get less cold
slightly raise the conveyor and push it in all the way,
to reduce the temperature return it to its initial
position.
The refrigerator compartment is suitable for cooling
drinks and for normal food storage.
To obtain the best performance, do not store warm
food or evaporating liquids in the refrigerator, do
cover or wrap the food, particularly if it has a strong
flavour.
Do not cover the shelves with any protective material,
such as paper, cardboard or plastic, which may
obstruct the air circulation through them.
To help you use refrigerator correctly, here are some
useful hints:
Fig. 7
**
A
D182
20
Cooked food, cold cuts, jelly, etc.: these should be
well covered and can be stored on any of the shelves.
Fruit & vegetables: these should be thoroughly
cleaned and placed in the bottom drawer.
Butter & cheese: these should be placed in special
airtight containers or wrapped in aluminium foil or
polythene bags to exclude as much air as possible.
Milk bottles: these should have a cap and should be
stored in the bottle rack on the door.
Raw meat (beef, pork, lamb & game): wrap in
polythene bags and place on the top shelf,
immediately underneath the evaporator.
Movable shelves
Fig. 8
The walls of the refrigerator are equipped with a
series of runners so that the shelves can be positioned
as desired.
For better use of space, the front half-shelves can lie
over the rear ones.
D338
Fig. 9
Positioning the door shelves (Fig. 910)
To permit storage of food packages of various sizes,
the door shelves can be adjusted in height.
To make these adjustments proceed as follows:
Gradually pull the shelf in the direction of the arrows
until it comes free, then reposition as required
(Fig. 9).
D064
Fig. 10
For more thorough cleaning, the top door shelf can be
removed by pulling it in the direction of the arrows,
then refitting it in position (Fig. 10).
D066
21
Frozen food storage
Making ice cubes
The compartment marked by the symbol
is
suitable for storing frozen food and, to obtain the best
results, make sure the thermostat knob is set near the
coldest setting (if ambient temperature is low-i.e., less
than 20°C - it is necessary to adjust the conveyor in
such a way as to reduce the temperature in the
refrigerator compartment).
With this thermostat knob setting, the temperature in
the refrigerator compartment could fall below 0°C.
If this occurs readjust the knob so as to increase the
temperature.
Furthermore, make sure that:
the frozen food to be stored has been kept at the
proper temperature in the shop;
transport of frozen food from the shop to the
evaporator compartment is carried out in a brief time;
do not exceed the storage time indicated on packages
by the food manufacturer.
After an idle period it is necessary to let the appliance
run for at least two hours with the thermostat knob set
on the coldest setting before placing any frozen food
in this compartment.
If no frozen food is stored in the evaporator, it is
advisable to adjust the conveyor so as to reduce the
temperature in the refrigerator compartment thus
reducing energy consumption and improving food
refrigeration performance.
Never put fizzy drinks in the 2-star (
)
compartment as they might well burst.
A word of warning about ice lollies: they should not
be eaten straight out of the 2-star (
)
compartment as this might cause cold burns.
The refrigerator is provided with an ice cube tray.
This tray should be filled with drinking water and then
placed in the evaporator compartment.
Do not use metal tools to remove the tray when it is
stuck-frozen inside the compartment.
Defrosting
While in operation, the refrigerated surfaces of the
evaporator become progressively covered with frost.
This frost, which acts as a thermal insulator and thus
prevents the cold from reaching the food, should be
removed at regular intervals, otherwise, there will be
a marked rise of temperature in the compartment
concerned and a wastefull increase in power
consumption.
To carry out complete defrosting push the button at
the centre of the thermostat knob.
Remove the plug from the drain hole in the water
collecting tray. Place a basin under the drain hole in
the tray to collect the defrost water (Fig. 11).
When defrosting is completed, operation is resumed
automatically.
Remove the defrost water which has collected in the
basin placed under the collecting tray. Refit the
previously removed plug into the drain hole.
Defrosting should be done when there is no food in
the 2-star (
) compartment.
Fig. 11
Thawing
Frozen food, prior to being used, can be thawed in the
refrigerator or at room temperature depending on the
time available for this operation.
Small pieces may even be cooked still frozen, directly
from the evaporator; in this case, though, cooking will
take longer.
22
D137
MAINTENANCE
Before carrying out any maintenance operation,
always disconnect the plug from the wall socket.
Periodical cleaning
Wash the interior of the appliance with lukewarm
water and sodium bicarbonate.
Clean cabinet outer surfaces with a silicone-wax
spray. The condenser and compressor should be
cleaned using a brush or a vacuum cleaner. This latter
operation will maintain the appliance’s excellent
standards of performance and save energy.
To avoid water spillage it is recommended that the
water drain collector (Fig. 11) is periodically cleaned.
GB
Interior light
The light bulb inside the refrigerator compartment can
be reached as follows:
- unscrew the light cover securing screw,
- unhook the moving part as shown in the figure.
Fig. 12
Idle periods
During periods when the appliance is not used, you
should take the following precautions:
remove the plug from the wall socket;
remove all food from the appliance;
defrost and clean the interior and all accessories;
leave the door slightly open, thus letting air circulate
and preventing the formation of mould and unpleasant
smells.
D731
SOMETHING NOT WORKING
GB
If the appliance is not functioning properly check that:
Furthermore:
the plug is firmly in the wall socket and the mains
power switch is on;
If the appliance seems too noisy check that the sides
are not touching furniture that can transmit or amplify
noise or vibration. Also, check that the piping of the
refrigerant system does not vibrate.
there is no power failure and the thermostat is set to
the correct position.
If your appliance is still not working properly after
making the above checks, contact your local dealer or
the neares service centre.
To obtain fast service, it is essential that when you
apply for it you specify the model and serial
number of your appliance which can be found
inside the appliance at the bottom on the left hand
side.
23