1
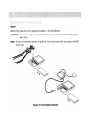
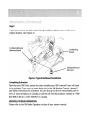
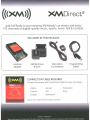
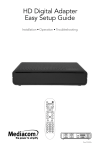
700XMJEN1 XM Mini Tuner Jensen Car Kit This is a package consisting of: 220CNPJEN1 ‐ XM Satellite CNPJEN1 Jensen Adapter Car Kit Cable 220CNP20UC ‐ Audiovox CNP2000UC XM Mini Tuner with Car Kit ~~ AUDIO''"O~
~ ELECTRONICS CORP.
Step 1:
Remove the head unit from your dashboard.
Important: Depending on how your head unit was installed you may have to remove
part or all of your dash board before the head unit can be pulled out. You may also
have to remove screws to complete this step.
Note: Before proceeding, make sure that the PIA Adapter has been programmed. Refer to the PIA Installation Manual. Professional installation is
recommended.
Step 2:
Connect the 34-pin cable connector to the Programmable Interface Adapter (PIA) mating
connector as shown in Figure 1. Slide the rubber strain relief onto the PIA case. Attach
the Car Dock USB connector into the USB receptacle on the PIA. Make sure the connec-
tors ::i_::::::~dand -g-Slide
the top cover onto t::e:~:tom housing. (Ref~~
Car Dock
~~
--
Pass-Through
Connector
.6J-~-_ Left/Right
Audio Cable
Connector
To Head Unit
Note: Make sure all cables
Figure 1. PIA Cable Interface
are securely connected.
Step 3:
Connect the end of the cable with the right angle DIN connector and audio cables to
the back of the head unit as shown in Figure 2. The shorter end of the cable coming
from the PIA is a pass-through cable that can be used to connect other products to your
head unit, i.e., CD changer.
Connector
LeftlRightAudio
Cables (Model Specific)
/
Figure 2. Typical Head Unit, Rear View
Note: The location of the connections on the head unit may vary depending on the
model.
Step 4:
Start your car and turn on your head unit to confirm that the XM Direct system is
properly connected. Please refer to your stereo owners manual on how to a,ccess XM
mode. When you tune to XM channell, you should see "XM Preview" on your head unit
LCD, and hear that channel through your car speakers. If not, check to make sure all
connections are correct or refer to the troubleshooting section of this installation guide.
StepS:
Mount and secure the interface cable in a suitable location that will not interfere with
the radio and will not vibrate or rattle after installation.
Step 6:
Return the head unit to its original location in the dashboard.
CAUTION: Ensure the cables are not kinked or get disconnected when installing the
head unit.
Note: If you had removed screws to pull the car stereo head unit out, please reinstall
the screws.
Figure 3. Smart DigitalAdapter
Step 7:
If you had removed the dash board during installation please return it back to its
original location. (See Figure 4.)
Car Mounting Bracket
(Alternate Position)
Car Mounting
Bracket
Figure 4. Typical Dashboard Installation
Completing Activation:
Now that your XM Direct system has been installed your XM Universal Tuner will need
to be activated. Tune your car stereo head unit to the XM Preview Channel, channel 1
and follow instructions for activation. You can also go on-line at www.xmradio.comin
the U.S. (www.xmradio.cain Canada) or call the toll free XM activation number at 1-800852-9696 in the U.S. (1-877-438-9677 in Canada).
XM SATELLITE RADIO OPERATION
Please refer to the XM Radio Operation section of your owners manual.
ANTENNA:
The XM antenna is not connected to the XM tuner.
• Check whether the XM antenna cable is attached securely.
UPDATING:
Radio is being updated with latest encryption code.
• Wait until encryption code has updated. Channels 0 and 1 should function
normally.
NO SIGNAL:
XM signal is too weak or blocked at the current location.
• Wait until the car reaches a location with a stronger signal
or
• Wait until the car is in an area that has a clear view of the open sky.
LOADING:
Radio is acquiring audio or program information.
• Wait until the radio has received the information.
OFFAIR:
The channel currently selected has stopped broadcasting.
• Select another channel.
or
11
"
11------"
The user has selected a Channel Number that does not exist or is not subscribed to.
• The unit will revert back to the previously selected channel.
or
There is no artist name/feature, song/program title, or additional information
associated with the channel at that time.
• No action needed.
f(~
AUDIO''"O~
~ ELECTRONICS CORP.
12 MONTH LIMITED WARRANTY
Interface Adapter Cable
AUDIOVOX ELECTRONICS CORPORATION (the Company) warrants to the original retail purchaser of this product
that should under normal use and conditions, be proven defective in material or workmanship within 12 months
from the date of original purchase, such defect(s) will be repaired or replaced with new or reconditioned product
(at the Company's option) without charge for parts and repair labor.
To obtain repair or replacement within the terms of this Warranty, the product is to be delivered with proof of
warranty coverage (e.g. dated bill of sale), specification of defect(s), transportation prepaid, to an approved warranty station or the Company at the address shown below.
This Warranty does not extend to the elimination of externally generated static or noise, to costs incurred for
installation, removal or reinstallation of the product, or to damage to speakers, accessories or electrical systems.
Warranty does not apply to malfunction of satellite transmissions, repeater signals or audio systems or to damage
caused by poor installation of the interface adapter cable.
This Warranty does not apply to any product in the opinion of the Company that has been damaged through
alteration, improper installation, mishandling, misuse, neglect, accident, or by removal or defacement of the factory serial number/bar code label(s). THE EXTENT OF THE COMPANY'S LIABILITY UNDERTHIS WARRANTY IS L1MITEDTOTHE REPAIR OR REPLACEMENT PROVIDED ABOVE AND, IN NO EVENT, SHALL THE COMPANY'S LIABILITY
EXCEED THE PURCHASE PRICE PAID BY PURCHASER FOR THE PRODUCT.
This Warranty is in lieu of all other express warranties or liabilities. ANY IMPLIED WARRANTIES, INCLUDING ANY IMPLIED WARRANTY OF MERCHANTABILITY, SHALL BE LIMITED TO THE DURATION OF THIS
WRITIEN WARRANTY. ANY ACTION FOR BREACH OF ANY WARRANTY HEREUNDER MUST BE BROUGHT
WITHIN 24 MONTHS FROM DATE OF ORIGINAL PURCHASE. IN NO CASE SHALL THE COMPANY BE LIABLE
FOR ANY CONSEQUENTIAL OR INCIDENTAL DAMAGES FOR BREACH OF THIS OR ANY
OTHER WARRANTY. No person or representative is authorized to assume for the Company any liability
other than expressed herein in connection with the sale of this product.
Some states do not allow limitations on how long an implied warranty lasts or the exclusion or limitation of incidental or consequential damage so the above limitations or exclusions may not apply to you.
This Warranty gives you specific legal rights and you may also have other rights which vary from state
to state.
AUDIOVOX ELECTRONICS CORPORATION, 150 MARCUS BLVD., HAUPPAUGE, NEW YORK 11788· 1-800-645-4994
128-8040
~AUDIO"O~
~ ELECTRONICS CORP.
GARANTrA llMITADA DE 12 MESES
Cable del adaptador de interfaz
AUDIOVOX ELECTRONICS CORPORATION (Ia Empresa) garantiza al comprador original de este producto que, en caso de
que en condiciones normales de uso este produeto 0 alguna de sus partes presente defeetos materiales 0 de fabricaci6n
dentro de los 12 meses de la fecha original de compra, se reparara 0 reemplazara con un produeto nuevo 0 reacondicionado
(a cargo de la Empresa) sin costa de partes 0 de reparaci6n.
Para solicitar la reparaci6n 0 el reemplazo que dispone esta Garantfa, se debera devolver el produeto con la constancia de
cobertura de la garantfa (como el recibode compra con la debida fecha), indicarel tiPO dedefeeto odefeetos,enviarcon franqueo
prepago al departamento de garantfas autorizado 0 a la Empresa, a la direcci6n que se indica acontinuaci6n.
Esta garantfa no cubre la eliminaci6n de la estatica 0 ruido generado externamente, los costos de instalaci6n, extracci6n 0
reinstalaci6n del produeto,darios alos altavoces,accesorios 0 sistemas elect:ricos. La garantfa no se aplica al mal funcionamiento
de las transmisiones satelitales, selial de la repetidora 0 sistemas de audio 0 a los dalios ocasionados por una instalaci6n
deficiente del cable del adaptador de interfaz.
Esta garantfa no cubre aaquellos produetos que, adiscreci6n de la Empresa, hayan sufrido dalios como consecuencia de
alteraciones, instalaci6n inadecuada, manipulaci6n incorreeta, uso indebido, descuido, accidente 0 extracci6n del numero
de serie 0 etiqueta de c6digo de barras de fabrica. DE CONFORMIDAD CON ESTA GARANTfA, LA RESPONSABILIDAD DE LA
EMPRESA SE L1MITAA LA REPARACI6N 0 REEMPLAZO ANTES MENClONAOOS. EN NINGUN CASO ESTAGARANTIA EXCEDEAA
EL MONTO DE LA COMPRA ABONADO POR EL COMPRADOR DEL PRODUCTO.
Esta garantfa reemplaza a cualquier otra garantfa expresa 0 responsabilidad que pudiera existir.
LAS GARANTfAS IMPLlClTAS, COMO LA GARANTfA IMPLICITA DE COMERCIABILIDAD, SE L1MITARA A LA
DURACION DE ESTA GARANTfA EXPRESA. LAS ACCIONES POR INCUMPLIMIENTO DE LAS GARANTfAS AQuf
DISPUESTAS DEBERAN PRESENTARSE DENTRO DEL PERfoDO DE 24 MESES DESDE LA FECHA DE COMPRA
ORIGINAL. EN NINGNUN CASO LA EMPRESA SERA RESPONSABLE POR LOS DANOS CONSECUENTES 0
INCIDENTALES DERIVADOS DEL INCUMPLIMIENTO DE ESTA U OTRA GARANTfA, EXPRESA 0 IMPLICITA.
La Empresa no autoriza a ninguna persona ni representante a asumir otras responsabilidades que las
expresamente dispuestas en esta garantfa, con relaci6n a la venta de este produeto.
Algunos estados no permiten la exclusi6n de darios incidentales 0 consecuentes, 0 la limitaci6n sobre la duraci6n
de la garantfa implfcita, por 10 que puede que alguna de las anteriores Iimitaciones no Ie sea de aplicaci6n. Esta
garantfa Ie otorga derechos espedficos ademas de cualquier otro derecho que Ie pudiera corresponder que
variaran segun el estado en el que resida.
AUDIOVOX ELECTRONICS CORPORATION, 150 MARCUS BLVD., HAUPPAUGE, NEWYORK 11788· 1-800-645-4994
128-8040
GARANTIE llMITEE DE 12 MOIS
Cable d'adaptateur d'interface
AUDIOVOX ELECTRONICS CORPORATION (Ia Societe) garantit aI'acheteur au detail d'origine de ce produit que,
si ce produit ou toute partie dudit produit, lors d'un usage et des conditions d'utilisation normaux, s'avere
defectueux (materiel ou fabrication) dans les 12 mois acompter de la date d'origine, Ie produit sera repare ou
remplace par un produit neuf ou remis a neuf (au choix de la Societe) sans frais de pieces ni de main-d'reuvre.
Pour obtenir une reparation ou un rem placement dans Ie cadre de cette garantie, Ie produit doit etre envoye
avec preuve de la couverture de garantie (p.ex., Ie bordereau d'achat), la description du ou des defauts, en
transport paye a I'avance, a un centre de garantie approuve ou a la Societe a I'adresse indiquee ci-dessous.
Cette garantie ne couvre pas I'elimination des charges statiques ou du bruit externes, ni la correction des problemes
associes aI'antenne, ni les frais encourus pour I'installation, ni Ie retrait ou la reinstallation du produit, ni les dommages
aux bandes, aux disques compacts, aux haut-parleurs, aux accessoires ou aux systemes electriques du vehicule.
La garantie ne s'applique pas au mauvais fonctionnement des transmissions par satellite, aux signaux de repetiteurs,
aux systemes audio ou au dommage entraine par une mauvaise installation du cable de I'adaptateur d'interface.
Cette garantie ne s'applique pas a un produit qui, selon I'opinion de la Societe, a ete endommage par une
modification, une installation incorrecte, une mauvaise manipulation, un usage a mauvais escient, une
negligence, un accident ou par Ie retrait ou la deterioration du numero de serie/des etiquettes de code a barres
apposes a I'usine. DANS LE CADRE DE CEnE GARANTIE, LA RESPONSABILITE DE LA SOCIETE EST L1MITEE A LA
REPARATION OU AU REMPLACEMENT MENTIONNE CI-DESSUS ET, EN AUCUN CAS, LA RESPONSABILITE DE LA
SOCIETE NE DEPASSERA LE PRIX PAVE PAR L'ACHETEUR POUR LE PRODUIT.
Cette Garantie remplace toutes les autres garanties ou responsabilites expresses. TOUTES LES GARANTIES
IMPLICITES, V COMPRIS TOUTES LES GARANTIES IMPLICITE DE POSSIBILITE DE MISE EN MARCHE, SONT
L1MITEES A LA DUREE DE CEnE GARANTIE ECRITE. TOUT RECOURS POUR MANQUEMENT A LA GARANTIE
MENTION NEE DANS LA PRESENTE DOlT ETRE ENTAME DANS UNE PERIODE DE 24 MOIS A COMPTER DE LA
DATE DE L'ACHAT D'ORIGINE. EN AUCUN CAS, LA SOCIETE NE PEUT ETRE TENUE RESPONSABLE POUR DES
DOMMAGES CONSECUTIFS OU ACCESSOIRES DUS A UN MANQUEMENT ACEnE GARANTIE OU TOUTE
AUTRE GARANTIE. Aucune personne ou aucun representant n'est autorise aassumer pour la Societe une
responsabilite autre que celie exprimee dans Ie present document en relation a la vente de ce produit.
Etant donne que certaines provinces ou autres juridictions n'autorisent pas l'exclusion ou la
limitation de la responsabilite Iiee aux dommages consequents ou fortuits, les limitations ou
exclusions presentes ne s'appliquent pas necessairement dans votre cas. Cette garantie vous
confere certains droits :
la legislation de votre juridiction locale peut vous en accorder d'autres.
AUDIOVOX ELECTRONICS CORPORATION, 150 MARCUS BLVD., HAUPPAUGE, NEW YORK 11788 ·1-800-645-4994
i 28-8040
For additional information: call 1-800-645-4994 or visit www.audiovox.com.
For more information about XM Satellite Radio service, visit www.xmradio.com or call
1-800-852-9636.
The XM name and related logos are trademarks of XM Satellite Radio Inc.
128-7984
AUDIO'T"O~
ELECTRONICS CORP.
PROTOCOL INTERFACE ADAPTER
CNP2000UC
For All Car Stereos
Installation Guide
Table of Contents
Table of Contents
Introduction & Installation Overview
Installation Basics
Installation Planning
Antenna Installation
Cable Routing
Tools Required
Installation Procedure
Com pleti ng Activation
XM Satellite Radio Operation
XM Radio ID
Troubleshooting
No Sound
Advisory Message
Antenna
Updating
No Signal
Off Ai r
Loading
No Info
CH 1,......
Other Symptoms
Warranty
JJ
2
3
4
4
4
5
6
6
8
9
~
9
10
10
10
10
10
10
11
11
11
11
11
12
3
Introduction & Installation Overview
Thank you for purchasing the AUDIOVOX Protocol Interface Adapter for
satellite radio ready car stereo head units. The Protocol Interface Adapter
allows you to adapt a satellite radio ready car stereo to receive XM Satellite
Radio service.
The PIA is easy to install plugging directly into the car stereo head unit*. The
illustration below shows the installation of the XM Direct system, including
the mini-tuner and the antenna.
Mini-Tuner
Docking Station
& Car Bracket
Antenna
Model Specific Head Unit Cable
Interface (Sold Separately)
*Professional installation is recommended for the XM Direct System
4
Note:
Before installation, your PIA must have the proper radio model
protocol downloaded. Please see an authorized dealer for
programming of your PIA.
When choosing a location to mount the components, care must be taken
not to interfere with any of the vehicles existing systems. Good installation
practkes should be observed when mounting components to avoid any
vibration, movement or rattling after installation, When routing the cables
avoid blocked passages and any obstructions that could kink, crimp, twist,
or chafe the cables. Components should be secured in place with methods
such as Velcro, double stick foam tape, screws and nuts, cable ties etc. All
mounting hardware and methods are at the discretion of the installer.
Cables should also be secured ,in place to avoid movement. Care should be
taken not to crimp any of the cables when installing them. And special care
should be taken not to route cables on or near sharp edges that could
eventually cut into the jacket 'of the cable.
The PIA should be located within 2-3 feet of the radio due to the cable
lengths. The ~ntenna .should be located in an area to insure the cable will
reach the tuner location. Check this prior to installation.
Prior to installation, locate the area where the XM Universal Mini-Tuner shall
be installed. Typical locations are the glove box or the center console.
1. Best reception is achieved with the antenna mounted on the metal
surface of the vehicle roof in the center of an area with at least 12" x 121/
of surface area and a minimum of 6" from a window or sun roof.
2. If the vehicle has roof racks or skid ribs, it may be necessary to mount
the antenna off-center.
3. If the vehicle roof does not provide sufficient metal surface area then
the antenna can be mounted on the metal trunk lid at least 4/1 from the
rear window.
Caution:
DO NOT INSTALL ANTENNA INSIDEVEHICLE PASSENGER COMPARTMENT. Mounting the antenna in the passenger compartment either on the front dash board or on the rear window deck area of the vehicle may interfere with reception and
must be avoided.
Caution:
4.
Mounting the antenna on a non-metallic surface will also result in severe degradation in reception.
If an appropriate antenna mounting location cannot be identified,
contact your local distributor installation department for additional
guidance.
1. Once you have mounted the antenna in the correct location, plan how
to route the cable from this location to the receiver, avoiding blocked
passages and any obstructions that could kink, crimp, twist or chafe
the cable. If the cable will come in contact with a rough metal opening,
use a rubber grommet to prevent damage.
6
2.
For antenna mounting locations at the front or middle of the roof,
the cable can be routed down along the door jam and into the car. In
some cars, the cable may be brought into the vehicle through the
grommet in the door jam which carries the power window and power
lock wires. If the cable does not fit easily through this grommet, do
not try to force it through. Instead, route the cable under the weather
seal near the lowest part of the trunk to reduce possible water leaks.
3.
Use pre-existing wiring channels created by the vehicle manufacturer
whenever possible.
The antenna contains a powerful magnet that will secure it to a metal
roof under normal driving conditions. No additional tools should be
needed to mount the antenna.
Step 1
Remove the car stereo head unit from your dash board.
Important:
Depending on how your head unit was installed you may
have to remove part or all of your dashboard to remove the
head unit before the head unit can be pulled out. You may
also have to remove screws to complete this step.
Step 2
Connect the cable into the PIA. Plug the other end of the cable into the
head unit adapter. Read your cable installation manual for proper
installation to your specific head unit.
Step 3
Start your car and turn on your unit to confirm that the XM Direct system
is properly connected. When you tune to XM channell, you should see
"XM Preview" on your head unit LCD, and hear that channel through your
car speakers. If not, check to make sure all connections are correct or refer
to the troubleshooting section of this installation guide.
Step 4
Mount and secure the PIA in a suitable location that will not interfere with
the radio and will not vibrate or rattle after installation.
StepS
Return the car stereo head unit back to its original location in the dash
board, be careful with cables that you just installed so that they do not
unplug or get kinked by the head unit.
Note: If you had removed screws to pull the car stereo head unit out
please screw those back in.
Step 6
If you had removed the dash board during installation please return it
back to its original location.
Car Mounting Bracket
(Alternate Position)
Car Mounting
Bracket
Docking Station and
Mini-Tuner
Now that your XM Direct system has been installed your XM Universal
Tuner will need to be activated. Details on how to operate your head unit
in XM mode are listed on the following page. Tune your car stereo head
unit to the XM Preview Channel, channel 1 and follow instructions for
activation. You can also go on-line at XMradio.com or call the toll free XM
activation number at 1-800-852-9696. Once you have activated your tuner
box make sure the XM antenna on the outside of your car has an
unobstructed view of the sky.
Please refer to the "XM tuner control features" section of your cassette, CD
or mobile video receiver manual for instructions on operating your XM
satellite radio service.
1. During XM Satellite Radio reception, press the Seek button to select
"CHANNEL 0:'
2. Press the "Seek - (down)" button. "RADIO 10" is indicated for 2 seconds
and the XM Radio 10 number is indicated for 10 seconds.
To cancel the XM Radio 10 display, press the Seek button to select a
channel.
• Adjust the volume control of the head unit.
• Make sure that all of the cables between the PIA and the head unit
and the tuner are securely plugged in.
When a problem occurs with the XM Direct system, an error message will
be indicated on the display of the head unit.
ANTENNA
The antenna is not connected properly.
• Check the connection of the antenna to the XM tuner.
UPDATING
Radio is being updated with latest encryption code.
• Wait until the encryption code updates. Channels 0 and 1 should
function normally. You have not subscribed to XM service.
• Contact XM to subscribe.
NO SIGNAL
XM signal is being blocked from reaching the XM antenna.
• The message should disappear as soon as you move out of an
obstructed area such as an indoor garage. If the problem persists,
make sure your antenna is mounted outside and on top of the car
with a clear view of the sky.
11
OFF AIR
The channel currently selected has stopped broadcasting.
• Automatically switches to valid channel. No action is required.
LOADING
The receiver is reading the channel information.
• Wait until the XM tuner completes receiving the information.
NOINFO
No information is available to display.
• No action is required.
"CH
"
The channel to be tuned is void due to a channel lineup change. The
tuner will automatically switch to a valid channel.
• No action is required.
OTHER SYMPTOMS
Should any problem persist after you have made the following checks,
call Audiovox for help at 1-800-645-4994 on any business day, between 9
A.M. and 5:30P.M., EST and ask for Technical Support.
12
"'~AUDIO"OXELECTRO:\,ICS CORP.
~
12 MONTH LIMITED WARRANTY
PROGRAMMABLE INTERFACE ADAPTER
I
CNP2000UC
I
AUDIOVOX ELECTRONICS CORPORATION (the Company) warrants to the original retail purchaser of this product that should under normal use and conditions, be proven defective in material or workmanship within 12 months
from the date of original purchase, such defect(s) will be repaired or replaced with new or reconditioned product (at the Company's option) without charge for parts and repair labor.
To obtain repair or replacement within the terms of this Warranty, the product is to be delivered with proof of warranty coverage (e.g. dated bill of sale),
specification of defect(s), transportation prepaid, to an approved warranty
station or the Company at the address shown below.
This Warranty does not extend to the elimination of externally generated
static or noise, to costs incurred for installation, remov.al or reinstallation of
the product, or to damage to speakers, accessories or electrical systems.
Warranty does not apply to malfunction of satellite transmissions, repeater
signals or audio systems or to damage caused by poor installation of included components such as magnetic roof mount antenna, programmable
interface adapter or receiver docking station.
This Warranty does not apply to any product in the opinion of the Company
that has been damaged through alteration, improper installation, mishandling, misuse, neglect, accident, or by removal or defacement of the factory
serial number/bar code label(s).
WARRANTY (Cant)
THE EXTENTOFTHE COMPANY'S LIABILITY UNDERTHIS WARRANTY IS LIMITED
TOTHE REPAIR OR REPLACEMENT PROVIDED ABOVE AND, IN NO EVENT, SHALL
THE COMPANY'S LIABILITY EXCEED THE PURCHASE PRICE PAID BY PURCHASER
FOR THE PRODUCT.
This Warranty is in lieu of all other express warranties or liabilities. ANY
IMPLIED WARRANTIES, INCLUDING ANY IMPLIED WARRANTY OF MERCHANTABILITY, SHALL BE LIMITED TO THE DURATION OF THIS WRITTEN WARRANTY.
ANY ACTION FOR BREACH OF ANYWARRANTY HEREUNDER MUST BE BROUGHT
WITHIN 24 MONTHS FROM DATE OF ORIGINAL PURCHASE. IN NO CASE SHALL
THE COMPANY BE LIABLE FOR ANY CONSEQUENTIAL OR INCIDENTAL DAMAGES FOR BREACH OF THIS OR ANY OTHER WARRANTY, EXPRESS OR IMPLIED,
WHATSOEVER. No person or representative is authorized to assume for the
Company any liability other than expressed herein in connection with the
sale of this product.
Some states do not allow limitations on how long an implied warranty lasts
or the exclusion or limitation of incidental or consequential damage so the
above limitations or exclusions may not apply to you. This Warranty gives
you specific legal rights and you may also have other rights which vary from
state to state.
U.s.A.:
AUDIOVOX ELECTRONICS CORPORATION, 150 MARCUS BLVD.,
HAUPPAUGE, NEW YORK 11788 • 1-800-645-4994
CANADA:
CALL 1-800-645-4994 FOR LOCATION OF WARRANTY STATION
SERVING YOUR AREA
128-8054
14
,
PRODUCT REGISTRATION
Thank you for purchasing an Audiovox product. We pride ourselves on the
quality and reliability of all our electronic products but if you ever need
service or have a question, our customer service staff stands ready to help.
Contact us at www.audiovox.com
PRODUCT PROTECTION:
In case of an insurance loss such as fire, flood or theft, your
registration will serve as proof of purchase.
PURCHASE REGISTRATION:
Registering On-Line will allow us to contact you in the unlikely
event a safety notification is required under the Federal
Consumer Safety Act.
ClickOn Product Registration and Fill Outthe BriefQuestionnaire:
For additional information: call 1-800-645-4994
or visit .audiovox.com.
~
For more information about XM Satellite Radio service,
AUDIO'Y"OX~
visit www.xmradio.com or call 1-800-852-9636.
CORPORATION
r',;.,
;./
,j-"
""".
128-7978
1.
2.
3.
4.
5.
Locate XM Direct 2 Mini-USB port on module.
Attach XM Direct 2 USB programming cable.
Locate USB 2.0 port on your computer
Attach other end of XM Direct 2 programming cable.
Program XM Direct 2 module per latest website instructions.
www.audiovox.com/xmdirect
XMDirect
2
Add XM Radio to your existing XM Ready® car stereo and enjoy
170 channels of digital-quality music, sports, news, talk & comedy.
INCLUDED IN THIS PACKAGE:
Interface
Adapter
Mini-Micro
Car Antenna
XM MiniTuner
& Dock
Programming
Cable*
CONNECTION CABLE REQUIRED
Choose the proper XM Connection Cable for your car stereo.
Alpine
Jensen
Panasonic
Clarion
JVC
Sony
Eclipse
Kenwood
Speak with a Sales Representative for details.