1
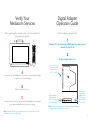
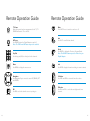
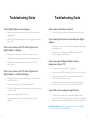
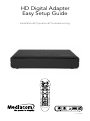
HDDigital
DigitalAdapter
Adapter
Easy
EasySetup
Setup Guide
Installation
Installation••Operation
Operation••Troubleshooting
Troubleshooting
Pace DC60Xu
What You Need To Know
Table Of Contents
To bring you better service now and in the future
Mediacom is upgrading to an All Digital network –
All Digital for every channel, on every TV set.
What’s Included In This Install Kit . . . . . . . . . . . . . . . . . . . . . . . . . . . . . . . . . . . . . . . . . 4
Items You May Also Need . . . . . . . . . . . . . . . . . . . . . . . . . . . . . . . . . . . . . . . . . . . . . . . 5
Start Here. . . . . . . . . . . . . . . . . . . . . . . . . . . . . . . . . . . . . . . . . . . . . . . . . . . . . . . . . . . . . 6
What You Need To Do
Connecting To A TV With HDMI. . . . . . . . . . . . . . . . . . . . . . . . . . . . . . . . . . . . . . . . . . 8
To continue receiving all the channels you get now,
you will need to make sure that every TV in your home
is equipped with one of our Digital Adapters
or Digital Cable Boxes.
Power Up. . . . . . . . . . . . . . . . . . . . . . . . . . . . . . . . . . . . . . . . . . . . . . . . . . . . . . . . . . . . 10
Connecting To A TV With Coax Cable. . . . . . . . . . . . . . . . . . . . . . . . . . . . . . . . . . . . . 9
Connecting To The Cable Network And Activating Your Digital Adapter. . . . . . . . 12
Remote Control Setup Instructions. . . . . . . . . . . . . . . . . . . . . . . . . . . . . . . . . . . . . . . 13
Digital Adapter Operation Guide (Two Remotes). . . . . . . . . . . . . . . . . . . . . . . . . . . 17
Verify Your Mediacom Services . . . . . . . . . . . . . . . . . . . . . . . . . . . . . . . . . . . . . . . . . . 18
Digital Adapter Operation Guide. . . . . . . . . . . . . . . . . . . . . . . . . . . . . . . . . . . . . . . . 19
Remote Operation Guide. . . . . . . . . . . . . . . . . . . . . . . . . . . . . . . . . . . . . . . . . . . . . . . 20
Troubleshooting Guide. . . . . . . . . . . . . . . . . . . . . . . . . . . . . . . . . . . . . . . . . . . . . . . . . 22
2
3
What’s Included
What’s
included
in this Install Kit? Kit
In
This
Installation
What’s included in this Install Kit?
Digital Adapter
Digital Adapter
Each TV will need to be connected to a Digital Adapter or a
Digital
Adapter
Each
TV will
need
to be connected to a Digital
Digital
Cable
Box, but
not both.
Each TV will need to be connected to a Digital Adapter or a
or
a
Digital
Cable
Box,
but not both.
Digital Cable Box, but not both.
Items You May
Also Need
Flashlight
Adapter
Power Strip
You’ll need a power strip if you already have two items
plugged into the electrical outlet that you plan to use.
HDMI Cable
HDMI
HDMI
CableCable
5 Foot Coax Cable
Five-foot
Coax Cable
5 Foot
Coax Cable
Extension Cord
You’ll need an extension cord if you already have two items
plugged into the electrical outlet closest to your TV.
Power Cord
Power
Power
Cord Cord
Remote
Control
Remote
Remote
ControlControl
In
order
to
operate
the
Digitalthe
Adapter
you must
use
In order
tothe
operate
Digital
Adapter,
you must use
In order
to operate
Digital Adapter
you must use
remote
control
included
with
thisProgramming
kit. Programming
thethe
remote
control
included
with
this
kit.
the
remote
control
included
with
this
kit.
Programming
instructions
remote
control
are included
this guide.
instructions
for for
thethe
remote
control
are included
in thisinguide.
instructions for the remote control are included in this guide.
2 AAA
Batteries
2 AAA
Batteries
2 AA Batteries
Adhesive
Fasteners
Adhesive
Fasteners
Adhesive
Fasteners
Use
these
if you
want
to stick
the Digital
Adapter
to your
TV. TV.
Use
these
if you
want
to stick
the Digital
Adapter
to your
44
3698674A final4 4
3698674A final4 4
4
Use these if you want to stick the Digital Adapter to your TV.
responsible for
any damage done to any surface you stick these to.
Note:
Please
be careful.
YourYour
operator
is notisresponsible
for for
Note:
Please
be careful.
operator
not responsible
Note:
Please
be
careful.
Mediacom
not
anyany
damage
done
to any
surface
you
stick
thesethese
to. isto.
damage
done
to any
surface
you stick
10/5/11 4:38 PM
10/5/11 4:38 PM
5
Start Here
Please refer to the Welcome Letter that
was delivered with this kit to identify:
1
List the last four digits of the serial number of
each Digital Adapter you will be activating.
Serial Number
Location In Your Home
Output Channel
The account number associated
with your Mediacom account.
2
Any specific instructions not
included in this Setup Guide.
Note: The serial number can be found on the bottom of the Digital Adapter
itself and is also printed on the outside of the Digital Adapter package.
6
7
Connecting To A TV
With An HDMI Cable
1
Connect the Digital Adapter
to the Cable Outlet
A
Turn off your TV.
B
Locate the cable that currently runs
from the cable wall outlet to the
back of your TV. Leave one end of
the cable connected to the wall, but
disconnect the other end from the
back of your TV.
C
Reconnect this end of the cable to the
“Cable In” input on the back of the
Digital Adapter.
8
2
Connect the Digital Adapter
to the TV
A
Find the HDMI cable included in this
kit. Connect one end of the cable to
the “HDMI” output on the back of the
Digital Adapter.
B
Connect the other end to the “HDMI”
input on the back of your TV.
Connecting To A TV
With A Coax Cable
1
Connect the Digital Adapter
to the Cable Outlet
A
Turn off your TV.
B
Locate the cable that currently runs
from the cable wall outlet to the back
of your TV. Leave one end of the cable
connected to the wall, but disconnect
the other end from the back of your
TV.
2
Connect the Digital Adapter
to the TV
A
Find the 5-foot coax cable included in
this kit. Connect one end of the cable
to the “To TV” output on the back of
the Digital Adapter.
B
Connect the other end to the “Cable
IN/RF” input on the back of your TV.
C
Reconnect this end of the cable to the
“Cable In” input on the back of the
Digital Adapter.
9
Power Up
A
If you are connecting the Digital Adapter to a television with HDMI, set your TV
to choose “HDMI” as the input source.
OR
Pick which output channel your TV will use (Ch 3 or Ch 4) and set the switch on
the back of the Digital Adapter to the proper output channel you selected.
CC
Plug
into aaworking
workingelectrical
electrical
outlet
power
Plugthe
theother
other end
end into
outlet
or or
power
strip.strip.
Make
thatthe
theoutlet
outletis isnot
not
controlled
Make sure
sure that
controlled
by by
a a
switch
it on
off.
switch
thatthat
getsturns
turned
on and
and off.
B
D
C
D
B
Find the power cord included in the kit. Plug the end of the power cord into the
power input “+5V DC In” on the back of the Digital Adapter.
Check the front of the Digital Adapter to see if the green light is on and
blinking.
Check the front of the Digital
Adapter to see if the green light
isIfon
is notsure
on, the
check
to make
sureplugged
the power
it isand
notblinking.
on, checkIftoit make
power
plug was
cordinto
is plugged
into
the
power
input
“+5V
DC
In”
and
that the
the power input “+5V DC In” and that the other end
other isend
is
plugged
into
a
working
electrical
outlet.
plugged into a working electrical outlet.
Note: After activation, this light will remain on and constantly lit.
D
D
Note: After activation, the power light will remain on and constantly lit.
Please wait 20 minutes before calling to activate.
This will allow the Digital Adapter to connect to the network
retrieve
latest
updates.
Pleaseand
wait 20
minutesthe
before
calling
to activate.
This will allow the Digital Adapter to connect to
the network and get the latest updates.
10
11
11
Connecting To The Cable
Network And Activating
Your Digital Adapter
Remember, you must wait 20 minutes before calling to activate.
This will allow the Digital Adapter to connect to the cable
network and retrieve the latest updates.
Remote Control
Setup Instructions
The RF remote control you received in your HD Digital Adapter
kit must be set up before it will work with your television and
Digital Adapter.
This is a two-step process.
A
If you received more than one Digital Adapter, this would be a good time to get
the others installed so you can activate them all with one call.
First, you must set up the remote to control the Digital
Adapter. Next, you set up the remote to control the television.
Note: To complete your activation, you will need your account information and
the serial number of each Digital Adapter you are activating. The serial number
can be found on the bottom of the Digital Adapter itself and is also printed on
the outside of the Digital Adapter package.
B
Call Mediacom’s automated activation line
877-537-5360
and follow the instructions.
C
Turn on your TV and tune it to the proper
output channel (Ch 3 or Ch 4) or HDMI input.
12
13
RF Remote Pairing Process
When multiple remotes work in a shared space, interference
can result. To avoid this problem, the remote must be paired
with the HD Digital Adapter.
Step 1
Turn on your TV using the buttons on the TV or the TV remote. Make sure
power is connected to your HD Digital Adapter and it is plugged into the TV.
Note: Your TV must always be set to the proper channel (Ch 3 or Ch 4) or HDMI
input to match the output channel on the back of your HD Digital Adapter.
Step 2
Install the batteries (included in your kit) in your new remote control.
Step 4
Point the Digital Adapter remote
control at the Digital Adapter. Press
and hold the SETUP button until the
indicator LED changes from red to
green, then press the MENU button
until the on-screen instructions appear.
Step 5
Follow the on-screen instructions to
enter the 3-digit code that appears
on the TV screen using the Digital
Adapter remote control. Once the
code is correctly entered, the remote
will be paired with the Digital Adapter.
Press until the on-screen instructions appear
Changes from
red to green
Step 3
Make sure no other HD Digital Adapter remote is in the area. Make sure power
is connected to your HD Digital Adapter. Turn on your TV using the buttons on
the TV or the TV remote (not the Digital Adapter remote in this instance.).
Press and hold the SETUP button until the
indicator LED changes from red to green
Note: Please insure your remote can “see” the front of the Digital Adapter
during the pairing process.
Note: If you still don’t succeed, find the small instruction booklet that came with
the remote. Use those instructions to pair your remote to the HD Digital Adapter.
If you are still not successful, turn to page 23 in this booklet.
14
15
Step 6
Turn on your TV. On the remote
control, press and hold the SETUP
button until the indicator LED
changes from red to green,
then press the “A” button.
Step 7
Press the CH^ (channel up) button
several times until the TV turns off.
After the TV turns off, press the
SETUP button. The indicator LED will
blink twice in green when the TV code
is successfully stored.
Step 8
Point the new remote control at the
TV. Press the POWER button on the
remote to turn on your TV. If the TV
responds (turns on), then you have
successfully programmed your remote.
The setup of the remote is now
complete. If you are not successful the
first time, try again.
When the remote control is
programmed to operate the TV, there
are 5 keys that control the TV:
Changes from
red to green
Blinks twice
in green
when the
TV code is
successfully
stored
Press several
times until the
TV turns off
TV POWER, INPUT, VOLUME +,
VOLUME -, MUTE
Two Remotes
If you were unable to program your
remote, you will need to use two
remotes to operate your TV: the
Digital Adapter remote and the one
that came with your TV.
••
Press after
green light
••
Press and hold until the indicator
LED changes from red to green
16
Press after TV
has turned off
Keys to Success
Setting The Remote Volume
Use the remote control that
came with your TV to adjust
the volume to a comfortable
level. This should be the last
time you’ll use this remote for
volume control.
••
Pay attention to the red and green
LED Indicator after each step.
••
Going forward use only your
Digital Adapter remote to
adjust volume up or down.
Take your time when pressing
the “CH^” button. If you hit
“CH^” one too many times
after your TV turns off, you’ll
need to start the process over.
••
You must press the SETUP
button within five seconds of
the TV turning off to lock in
the code.
••
Be patient. You may have to
press “Ch^” many times.
Note: Don’t use your TV remote to
change channels. Your TV must always
be set to the proper Input, HDMI, and
Ch 3 or Ch 4 or you will see a snowy
or blank screen.
17
Verify Your
Mediacom Services
Digital Adapter
Operation Guide
After completing the activation step, wait a few minutes for
programming to appear.
Quick Troubleshooting Checklist
A
1
C
Confirm TV is on the proper HDMI input or proper output
channel (Ch 3 or Ch 4).
2
Digital Adapter light is on.
B
A
Be sure the TV is on
the proper HDMI
input or channel
(Ch 3 or Ch 4).
Confirm that the Digital Adapter is connected to power and that the light
on the front is solid (not blinking).
B
Make sure that the TV is on.
C
Using the remote control to operate your Digital Adapter, scroll through
your channels and make sure they are all working.
Be sure that the
Digital Adapter is
on. You should see
a solid green light.
Be sure that
the Digital
Adapter is set
to the proper
output channel
(Ch 3 or Ch 4).
Note: Always use the remote that came with the Digital Adapter
to change channels and for volume control.
Note: If the light is blinking, or your channels are not showing up, turn to the
troubleshooting section of this guide.
18
19
Remote Operation Guide
TV Power
When the remote has been programmed to the TV, TV
POWER will turn the TV on and off.
All Power
Use POWER to turn the Digital Adapter on and off.
Note: The DTA Power Off feature may not be enabled.
Mute
Press MUTE once to turn the sound on or off.
Last
Use LAST to recall the last channel.
Key Pad
Use the key pad (0-9) to directly select the channels.
Guide
Use GUIDE to display the Electronic Program Guide.
Note: This GUIDE feature may not be offered on your
Digital Adapter.
Menu
Use MENU to display the menu screen.
Info
Use INFO to display information relating to current contents.
Navigation
Use Navigation Keys to move the cursor UP, DOWN, LEFT
and DOWN.
Vol Button
Use VOL+ and VOL- to raise and lower the volume.
OK
Use OK to select the item the cursor is pointing to.
20
Remote Operation Guide
Ch Button
Use CH+ and CH- to select the next higher and lower
channels.
21
Troubleshooting Guide
If your Digital Adapter is not coming on:
••
Make sure that the power cord is securely connected to the back of the
Digital Adapter.
••
Make sure that the Digital Adapter power cord is plugged into a working
power outlet.
If there is no picture on the TV and the light on the
Digital Adapter is blinking:
••
Check your cables and make sure that they are attached correctly.
••
Unplug the Digital Adapter, plug it back in, then wait five minutes for it to reset.
••
Call Mediacom’s automated activation line again, 1-877-537-5360.
Refer to page 12.
If there is no picture on the TV and the light on the
Digital Adapter is solid (not blinking):
••
Check that the TV is set to the proper HDMI input or tuned to the proper
channel (Ch 3 or Ch 4).
••
If you are also connected to a VCR, try turning the VCR off.
••
Check that the Digital Adapter is connected directly to the cable provider
outlet in your wall.
••
Make sure that all cables are firmly connected.
••
Check the input setting on your TV, making sure that it is set on ANT
or CABLE.
Troubleshooting Guide
If the remote control does not work:
••
Check that the batteries still have a charge and are inserted correctly.
If you cannot get the remote to pair with your Digital
Adapter:
••
Make sure your remote can “see” the front of the Digital Adapter during
the pairing process.
••
Make sure you are holding down the SETUP button until the LED
Indicator changes from red to green.
If you cannot get the Digital Adapter remote
programmed to your TV:
••
You may not be pressing the “CH^” enough times.
••
Be sure to push the SETUP button within 5 seconds once your TV turns off.
••
You may be pressing the “CH^” once the TV has already turned off.
Start over and press the button slowly.
••
Find the small instruction booklet that came with the remote and use
those instructions to enter the code for your TV make and model.
If your VCR is not recording the right channel:
••
The VCR will only record the channel that the Digital Adapter is tuned to.
Set your TV and VCR to the proper channel (Ch 3 or Ch 4), then use the Digital
Adapter remote to tune the Digital Adapter to the channel to be recorded.
For Additional Assistance: Please visit www.mediacomcable.com/getdigital
or contact customer service at 1-800-578-8697
22
23
M731-22873 HD DTA Guide - Pace