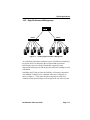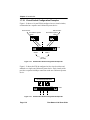
1
FAST NETWORK 100 USER GUIDE FN100-8 Port Status Mode TX Act 100 Select Ready Reset RX Col Usr Pwr TX RX NMS Port Link Status Link Status 1 1X 2X 3X 4X 5X 6X 8X 7X 1 2 3 4 5 6 7 8 FN100-8FX Port Status Mode TX Act 100 Select Ready Reset RX Col Usr TX RX TX RX TX RX TX RX TX RX TX RX TX RX Pwr TX RX NMS Port Link Status 1 2 3 5 4 6 1 2 3 4 5 6 7 8 8 7 TX RX 9 10 11 12 13 14 15 16 Link Status Link Status 9 9X 10X 11X 12X 13X 14X FN100-16 16X 15X Port Status Mode TX Act 100 Select Ready Reset RX Col Usr Pwr TX RX NMS Port Link Status Link Status 1 3X 4X 5X 6X 1X 2X TX RX TX RX TX RX TX RX TX RX TX RX TX RX TX RX 9 10 11 12 13 14 15 16 8X 7X 1 2 3 4 5 6 7 8 9 10 11 12 13 14 15 16 Link Status FN100-16FX Port Status Mode TX Act 100 Select Ready Reset RX Col Usr TX RX TX RX TX RX TX RX TX RX TX RX TX RX Pwr TX RX Link Status 1 2 3 4 5 6 7 8 1 2 3 4 5 6 7 8 NMS Port NOTICE Cabletron Systems reserves the right to make changes in specifications and other information contained in this document without prior notice. The reader should in all cases consult Cabletron Systems to determine whether any such changes have been made. The hardware, firmware, or software described in this manual is subject to change without notice. IN NO EVENT SHALL CABLETRON SYSTEMS BE LIABLE FOR ANY INCIDENTAL, INDIRECT, SPECIAL, OR CONSEQUENTIAL DAMAGES WHATSOEVER (INCLUDING BUT NOT LIMITED TO LOST PROFITS) ARISING OUT OF OR RELATED TO THIS MANUAL OR THE INFORMATION CONTAINED IN IT, EVEN IF CABLETRON SYSTEMS HAS BEEN ADVISED OF, KNOWN, OR SHOULD HAVE KNOWN, THE POSSIBILITY OF SUCH DAMAGES. Copyright 1996 by Cabletron Systems, Inc., P.O. Box 5005, Rochester, NH 03866-5005 All Rights Reserved Printed in the United States of America Order Number: 9031866-01 May 1996 All product names mentioned in this manual may be trademarks or registered trademarks of their respective companies. Printed on Fast Network 100 User Guide Recycled Paper i Notice FCC NOTICE This device complies with Part 15 of the FCC rules. Operation is subject to the following two conditions: (1) this device may not cause harmful interference, and (2) this device must accept any interference received, including interference that may cause undesired operation. NOTE: This equipment has been tested and found to comply with the limits for a Class A digital device, pursuant to Part 15 of the FCC rules. These limits are designed to provide reasonable protection against harmful interference when the equipment is operated in a commercial environment. This equipment uses, generates, and can radiate radio frequency energy and if not installed in accordance with the operator’s manual, may cause harmful interference to radio communications. Operation of this equipment in a residential area is likely to cause interference in which case the user will be required to correct the interference at his own expense. WARNING: Changes or modifications made to this device which are not expressly approved by the party responsible for compliance could void the user’s authority to operate the equipment. DOC NOTICE This digital apparatus does not exceed the Class A limits for radio noise emissions from digital apparatus set out in the Radio Interference Regulations of the Canadian Department of Communications. Le présent appareil numérique n’émet pas de bruits radioélectriques dépassant les limites applicables aux appareils numériques de la class A prescrites dans le Règlement sur le brouillage radioélectrique édicté par le ministère des Communications du Canada. VCCI NOTICE This equipment is in the 1st Class Category (information equipment to be used in commercial and/or industrial areas) and conforms to the standards set by the Voluntary Control Council for Interference by Information Technology Equipment (VCCI) aimed at preventing radio interference in commercial and/or industrial areas. Consequently, when used in a residential area or in an adjacent area thereto, radio interference may be caused to radios and TV receivers, etc. Read the instructions for correct handling. ii Fast Network 100 User Guide Notice CABLETRON SYSTEMS, INC. PROGRAM LICENSE AGREEMENT IMPORTANT: Before utilizing this product, carefully read this License Agreement. This document is an agreement between you, the end user, and Cabletron Systems, Inc. (“Cabletron”) that sets forth your rights and obligations with respect to the Cabletron software program (the “Program”) contained in this package. The Program may be contained in firmware, chips or other media. BY UTILIZING THE ENCLOSED PRODUCT, YOU ARE AGREEING TO BECOME BOUND BY THE TERMS OF THIS AGREEMENT, WHICH INCLUDES THE LICENSE AND THE LIMITATION OF WARRANTY AND DISCLAIMER OF LIABILITY. IF YOU DO NOT AGREE TO THE TERMS OF THIS AGREEMENT, PROMPTLY RETURN THE UNUSED PRODUCT TO THE PLACE OF PURCHASE FOR A FULL REFUND. CABLETRON SOFTWARE PROGRAM LICENSE 1. LICENSE. You have the right to use only the one (1) copy of the Program provided in this package subject to the terms and conditions of this License Agreement. You may not copy, reproduce or transmit any part of the Program except as permitted by the Copyright Act of the United States or as authorized in writing by Cabletron. 2. OTHER RESTRICTIONS. You may not reverse engineer, decompile, or disassemble the Program. 3. APPLICABLE LAW. This License Agreement shall be interpreted and governed under the laws and in the state and federal courts of New Hampshire. You accept the personal jurisdiction and venue of the New Hampshire courts. EXCLUSION OF WARRANTY AND DISCLAIMER OF LIABILITY 1. EXCLUSION OF WARRANTY. Except as may be specifically provided by Cabletron in writing, Cabletron makes no warranty, expressed or implied, concerning the Program (including its documentation and media). CABLETRON DISCLAIMS ALL WARRANTIES, OTHER THAN THOSE SUPPLIED TO YOU BY CABLETRON IN WRITING, EITHER EXPRESSED OR IMPLIED, INCLUDING BUT NOT LIMITED TO IMPLIED WARRANTIES OF MERCHANTABILITY AND FITNESS FOR A PARTICULAR PURPOSE, WITH RESPECT TO THE PROGRAM, THE ACCOMPANYING WRITTEN MATERIALS, AND ANY ACCOMPANYING HARDWARE. 2. NO LIABILITY FOR CONSEQUENTIAL DAMAGES. IN NO EVENT SHALL CABLETRON OR ITS SUPPLIERS BE LIABLE FOR ANY DAMAGES WHATSOEVER (INCLUDING, WITHOUT LIMITATION, DAMAGES FOR LOSS OF BUSINESS, PROFITS, BUSINESS INTERRUPTION, LOSS OF BUSINESS INFORMATION, SPECIAL, INCIDENTAL, CONSEQUENTIAL, OR RELIANCE DAMAGES, OR OTHER LOSS) ARISING OUT OF THE USE OR INABILITY TO USE THIS CABLETRON PRODUCT, EVEN IF CABLETRON HAS BEEN ADVISED OF THE POSSIBILITY OF SUCH DAMAGES. BECAUSE SOME STATES DO NOT ALLOW THE EXCLUSION OR LIMITATION OF LIABILITY FOR CONSEQUENTIAL OR INCIDENTAL DAMAGES, OR ON THE DURATION OR LIMITATION OF IMPLIED WARRANTIES, IN SOME INSTANCES THE ABOVE LIMITATIONS AND EXCLUSIONS MAY NOT APPLY TO YOU. Fast Network 100 User Guide iii Notice UNITED STATES GOVERNMENT RESTRICTED RIGHTS The enclosed product (a) was developed solely at private expense; (b) contains “restricted computer software” submitted with restricted rights in accordance with Section 52227-19 (a) through (d) of the Commercial Computer Software - Restricted Rights Clause and its successors, and (c) in all respects is proprietary data belonging to Cabletron and/or its suppliers. For Department of Defense units, the product is licensed with “Restricted Rights” as defined in the DoD Supplement to the Federal Acquisition Regulations, Section 52.227-7013 (c) (1) (ii) and its successors, and use, duplication, disclosure by the Government is subject to restrictions as set forth in subparagraph (c) (1) (ii) of the Rights in Technical Data and Computer Software clause at 252.2277013. Cabletron Systems, Inc., 35 Industrial Way, Rochester, New Hampshire 03867-0505. iv Fast Network 100 User Guide CONTENTS CHAPTER 1 INTRODUCTION 1.1 Getting Help................................................................................. 1-2 1.2 Document Conventions ............................................................... 1-2 1.3 Related Documentation ............................................................... 1-3 1.4 Overview...................................................................................... 1-4 1.4.1 OSI Compliance.............................................................. 1-7 1.5 FN100 Architecture...................................................................... 1-8 1.5.1 Store and Forward Switching.......................................... 1-8 1.5.2 Spanning Tree Algorithm ................................................ 1-9 1.5.3 FN100 Bridge Address Table ......................................... 1-9 1.6 FN100 Applications ................................................................... 1-11 1.6.1 Server Farms ................................................................ 1-11 1.6.2 High-Performance Workgroups .................................... 1-12 1.6.3 Backbones .................................................................... 1-13 1.7 FN100 Configurations................................................................ 1-13 1.7.1 Trunking Configurations................................................ 1-14 1.7.1.1 Trunking Configuration Examples ................ 1-15 1.7.2 Virtual Switch Configurations ........................................ 1-16 1.7.2.1 Virtual Switch Configuration Examples ........ 1-17 1.7.3 Workgroups .................................................................. 1-18 1.7.3.1 Workgroup Configuration Example .............. 1-18 CHAPTER 2 UNPACKING AND INSTALLING THE FN100 2.1 FN100 Panels.............................................................................. 2-1 2.2 Power Switch............................................................................... 2-2 2.3 Installing the FN100..................................................................... 2-2 2.3.1 Table-Mounting the FN100 ............................................. 2-2 2.3.2 Rack-Mounting the FN100 .............................................. 2-3 2.3.3 Checking the Power-up Diagnostics Sequence.............. 2-4 2.4 Connecting the Local Console Manager ..................................... 2-5 Fast Network 100 User Guide v Contents 2.5 2.6 2.7 Local Console Manager Overview ...............................................2-6 Command Syntax Conventions ...................................................2-6 2.6.1 Basic LCM Commands....................................................2-7 2.6.1.1 help .................................................................2-8 2.6.1.2 erase ...............................................................2-8 2.6.1.3 exit ..................................................................2-8 2.6.1.4 logout ..............................................................2-8 Connecting the FN100 to the Network .........................................2-9 2.7.1 Punch-Down Block and Patch Panel Connections..........2-9 2.7.2 Direct Device Connections ..............................................2-9 2.7.3 Wiring Considerations ...................................................2-10 CHAPTER 3 CONFIGURING THE FN100 3.1 Assigning IP Addresses ...............................................................3-2 3.1.1 Displaying IP Addresses .................................................3-3 3.1.2 Deleting an IP Address....................................................3-3 3.1.3 Changing a Subnet Mask ................................................3-4 3.2 Setting Port Speed.......................................................................3-4 3.3 Enabling Bridging .........................................................................3-5 3.4 Disabling Bridging ........................................................................3-6 3.5 Displaying Bridging Functions......................................................3-6 3.6 Trunking .......................................................................................3-6 3.7 Disabling Trunking .......................................................................3-8 3.8 Displaying Trunking Status ..........................................................3-8 3.9 Defining and Deleting Virtual Switches ......................................3-10 3.9.1 Displaying Virtual Switch Information ............................3-11 3.9.2 Creating and Modifying Virtual Switches.......................3-11 3.10 Defining and Deleting Workgroups ............................................3-12 3.11 Local Address Filtering ..............................................................3-14 3.12 Assigning a Community Name...................................................3-15 3.13 Configuring Multicast Storm Protection......................................3-16 3.14 Modifying MIB Variables ............................................................3-17 3.14.1 System Contact .............................................................3-17 3.14.2 System Name................................................................3-18 3.14.3 System Location............................................................3-18 3.14.4 Authentication Password...............................................3-18 3.14.4.1 Set Password................................................3-18 3.14.4.2 Get Password ...............................................3-19 3.14.5 Aging Parameter ...........................................................3-19 vi Fast Network 100 User Guide Contents CHAPTER 4 MONITORING AND MANAGING THE FN100 4.1 FN100 Management Tools .......................................................... 4-1 4.2 FN100 Statistics .......................................................................... 4-2 4.2.1 Gathering Statistics......................................................... 4-2 4.2.2 System Statistics ............................................................ 4-3 4.2.3 Ethernet Port Statistics ................................................... 4-3 4.2.4 SNMP Statistics .............................................................. 4-5 4.3 Using LCM to Check FN100 Status............................................. 4-6 4.3.1 Displaying Status ............................................................ 4-6 4.3.2 Displaying MAC Addresses ............................................ 4-8 4.3.3 Displaying Manufacturing Information .......................... 4-11 4.4 Using LCM to Manage the FN100 ............................................. 4-12 4.4.1 Disabling a Port ............................................................ 4-12 4.4.2 Enabling a Port ............................................................. 4-13 4.4.2.1 NoRIP Option ............................................... 4-13 4.4.3 Changing a Subnet Mask ............................................. 4-14 4.4.4 Changing a Community Name...................................... 4-14 4.4.5 Setting the Baud Rate................................................... 4-15 4.4.6 Setting a Reboot Time .................................................. 4-16 CHAPTER 5 FN100 DIAGNOSTICS AND TROUBLESHOOTING 5.1 Power-up Diagnostics.................................................................. 5-1 5.1.1 Power-Up LED Sequence............................................... 5-1 5.1.2 Specific Power-Up Tests ................................................ 5-2 5.1.3 Software Checksum Comparison ................................... 5-2 5.1.4 Power-Up Diagnostics Results ....................................... 5-3 5.2 Responses to Failures at Power Up ............................................ 5-3 5.3 Status and Activity Indicators ...................................................... 5-3 5.4 Troubleshooting........................................................................... 5-5 5.4.1 FN100 Does Not Power Up ............................................ 5-5 5.4.2 Power Supply Fuse......................................................... 5-6 5.4.3 Connectivity Problems .................................................... 5-6 5.4.4 FN100 Has Rebooted ..................................................... 5-7 5.4.5 FN100 Does Not Respond to NMS................................. 5-7 Fast Network 100 User Guide vii Contents APPENDIX A TECHNICAL SPECIFICATIONS A.1 FN100 Specifications .................................................................. A-1 A.2 Types/Connectors ....................................................................... A-3 A.3 Cable Specifications ................................................................... A-3 A.3.1 10BASE-T Cable Specifications ..................................... A-3 A.3.2 100BASE-TX Cable Specifications................................. A-4 A.3.3 100BASE-FX Cable Specifications................................. A-4 A.4 Management Cable Pin Assignments ......................................... A-5 A.5 10BASE-T and 100BASE-TX Pin Assignments.......................... A-5 A.5.1 Connectors ..................................................................... A-6 A.6 Straight-Through Wiring .............................................................. A-7 A.7 Crossover Wiring ........................................................................ A-7 A.8 Limitations and Restrictions ........................................................ A-7 APPENDIX B GLOSSARY INDEX viii Fast Network 100 User Guide CHAPTER 1 INTRODUCTION This manual is for system administrators responsible for installing, configuring, monitoring, and maintaining the Cabletron Systems Fast Network 100 (FN100) switch. You should have a familiarity with networking concepts and principles. In addition, a basic understanding of Simple Network Management Protocol (SNMP) is helpful. This manual provides instructions for using the FN100’s internal Local Console Manager (LCM) to set basic configuration parameters. When it is not possible to use LCM, general instructions and guidelines applicable to most Network Management Software (NMS) systems are provided. The contents of each chapter are described below. • Chapter 1, Introduction, describes the available configurations of the FN100, the features and functions of the FN100, and introduces Cabletron Systems’ Local Console Manager (LCM) for managing the FN100. • Chapter 2, Unpacking and Installing the FN100, describes the FN100 front panels, how to install the FN100, how to initiate an LCM session, and how to connect the FN100 to the network. • Chapter 3, Configuring the FN100, provides instructions for configuring the FN100 using LCM. It also provides some common Management Information Base (MIB) variables that you may decide to change through your NMS. • Chapter 4, Monitoring and Managing the FN100, describes how to monitor FN100 status and statistics. It also describes how to manage the FN100 ports using LCM. • Chapter 5, FN100 Diagnostics and Troubleshooting, describes the FN100 diagnostics and provides information on troubleshooting common problems. Fast Network 100 User Guide Page 1-1 Chapter 1: Introduction • Appendix A, Technical Specifications, provides the FN100 specifications and basic 10BASE-T and 100BASE-TX cabling pin assignments. • Appendix B, Glossary, provides a glossary of terms both specific to the FN100 and common to the networking field. 1.1 GETTING HELP If you need additional support related to this device, or if you have any questions, comments, or suggestions concerning this manual, contact Cabletron Systems Technical Support: By phone By CompuServe By Internet mail By FTP Login Password (603) 332-9400 Monday – Friday; 8 A.M. – 8 P.M. Eastern Time GO CTRON from any ! prompt [email protected] ctron.com (134.141.197.25) anonymous your email address 1.2 DOCUMENT CONVENTIONS The following conventions are used throughout this document: LCM commands, prompts, and information displayed by the computer appear in Courier typeface, for example: Current Number of Learned Addresses: 133 Information that you enter appears in Courier bold typeface, for example: FN100 >status Information that you need to enter with a command is represented in capital letters and enclosed in angle brackets < >. For example, you must enter a port number and an IP address to execute the ipaddr <PORT#> <IPADDR> command: FN100 >ipaddr 6 192.138.217.40 Field value options appear in bold typeface. For example, FN100 bridging options include off, on, and noBPDU. Page 1-2 Fast Network 100 User Guide Related Documentation NOTE TIP ! Note symbol. Calls the reader’s attention to any item of information that may be of special importance. Tip symbol. Conveys helpful hints concerning procedures or actions. Caution symbol. Contains information essential to avoid damage to the equipment. CAUTION Warning symbol. Warns against an action that could result in equipment damage, personal injury or death. 1.3 RELATED DOCUMENTATION You may need to refer to the following documentation: • Fast Network 100 MIB Reference Guide – contains the enterprise MIB. If you need internetworking reference material, you may find the following books helpful: • Interconnections, Bridges and Routers, Radia Perlman, Addison Wesley © 1992. • Internetworking with TCP/IP: Principles, Protocols, and Architecture (2nd edition), Volumes I and II, Douglas Comer, Prentice Hall © 1991. • The Simple Book, An Introduction to Management of TCP/IP-based internets, Marshall T. Rose, Prentice Hall © Second Edition, 1994. 1.4 OVERVIEW The FN100 is an intelligent Fast Ethernet switch that supports 10 Mbps or 100 Mbps connectivity on up to 16 ports over Category 5 Unshielded Twisted Pair (UTP), and 100 Mbps over 62.5/125 micron Multimode Fast Network 100 User Guide Page 1-3 Chapter 1: Introduction (MM) fiber. The FN100 is available in the four configurations shown below. FN100-8 Port Status Mode TX Act 100 Select Ready Reset RX Col Usr Pwr TX RX NMS Port Link Status Link Status 1 1X Figure 1-1 2X 3X 4X 5X 6X 8X 7X 1 2 3 4 5 6 7 8 8 TX Ports and 1 Redundant FX (Fiber Optic) Port (FN100-8) TX RX 9 10 11 12 13 14 15 16 Link Status Link Status 9 9X 10X 11X 12X 13X 14X FN100-16 16X 15X Port Status Mode TX Act 100 Select Ready Reset RX Col Usr Pwr TX RX NMS Port Link Status Link Status 1 1X Figure 1-2 2X 3X 4X 5X 6X 8X 7X 1 2 3 4 5 6 7 8 16 TX Ports and 2 Redundant FX Ports (FN100-16) FN100-8FX Port Status Mode TX Act 100 Select Ready Reset RX Col Usr TX RX TX RX TX RX TX RX TX RX TX RX TX RX Pwr TX RX NMS Port Link Status 1 2 3 4 Figure 1-3 5 6 7 8 1 2 3 4 5 6 7 8 8 FX Ports (FN100-8FX) TX RX TX RX TX RX TX RX TX RX TX RX TX RX TX RX 9 10 11 12 13 14 15 16 9 10 11 12 13 14 15 16 Link Status FN100-16FX Port Status Mode TX Act 100 Select Ready Reset RX Col Usr TX RX TX RX TX RX TX RX TX RX TX RX TX RX Pwr TX RX NMS Port Link Status 1 2 3 4 Figure 1-4 Page 1-4 5 6 7 8 1 2 3 4 5 6 7 8 16 FX Ports (FN100-16FX) Fast Network 100 User Guide Overview The FN100 features the following: • Supports 10BASE-T, 100BASE-TX, and 100BASE-FX standards. • Supports IEEE 802.3u Auto-Negotiation for 10BASE-T and 100BASE-TX connections. • Provides full store and forward switching functionality. • Supports trunking for combining up to 8 links for a total bandwidth of 800 Mbps. • Lets you define virtual workgroups to optimize network traffic. • Allows you to configure the FN100 into four virtual switches. • Supports 48-bit IEEE 802 MAC addressing. • Maintains a learning database of up to 8192 MAC-address entries. • Implements the Spanning Tree protocol (802.1d). • Comes with factory-set defaults for plug-and-play capability. In addition, the FN100 offers features that can help you manage and maintain your network, such as: • Configuration and management using the Simple Network Management Protocol (SNMP) with either an in-band or out-of-band connection. • Cabletron Systems Local Console Manager (LCM). • Protection against multicast storms. The FN100 contains full store-and-forward functionality and is protocol transparent. This allows the FN100 to bridge different types of network traffic, regardless of the network protocol. The FN100 supports over 8000 MAC addresses, with constant learning and aging of the entries associated with each port. The FN100 supports IEEE 802.1(d) Spanning Tree that allows the design of fully redundant Fast Ethernet topologies. In addition, the FN100 supports Cabletron Systems port trunking feature allowing a number of parallel links to provide a higher aggregate bandwidth. Fast Network 100 User Guide Page 1-5 Chapter 1: Introduction To dynamically arbitrate between 10 Mbps and 100 Mbps on each port, the FN100 employs IEEE 802.3u Auto-Negotiation. Auto-Negotiation allows each 10BASE-T/100BASE-TX port on the FN100 to self-configure to 100 Mbps when the device on the other end of the wire is also capable of self-configuration to 100 Mbps. This is performed automatically via information exchanged between devices sharing the same link without management intervention. The FN100 also provides the ability to disable Auto-Negotiation if desired, locally or through remote management.The FN100 is fully SNMP compliant for comprehensive monitoring and control by all popular network management systems. Finally, the FN100 has LEDs for each port indicating link, transmit activity, receive activity, collisions, and port speeds (10/100 Mbps). 1.4.1 OSI Compliance The Open System Interconnection (OSI) Reference Model, developed by the International Standards Organization (ISO), identifies the levels of functionality inherent in each of its seven layers. The FN100 operates at the Media Access Control (MAC) sub-layer of the Data Link layer. Figure 1-5 shows the OSI Reference Model. 7 Application 6 Presentation 5 Session 4 Transport 3 Network 2 Data Link 1 Physical FN100 operates at Layer 2 Figure 1-5 OSI Reference Model Because the FN100 does not process any Network Layer information, it provides a high level of performance in terms of packet throughput. In addition, the FN100 does not need to learn network topology, requiring less programming and configuration time. Page 1-6 Fast Network 100 User Guide FN100 Architecture 1.5 FN100 ARCHITECTURE The FN100 is based on an architecture that utilizes a high speed switch engine coupled with an AMD 29200 RISC processor for management functions. This architecture provides an efficient mix of optimal performance and intelligence. The non-blocking design of the FN100 provides wire-speed filtering and forwarding rates for all Fast Ethernet ports, allowing the device to keep up with incoming packets even when the packet rates on all LANs are at the maximum possible rate. The high speed scalable switch fabric at the core of the FN100 allows packets to be forwarded through the FN100 at very high rates with minimal latency. The switch fabric in the FN100 supports data rates up to 2.56 Gbps - more than enough for sixteen 100 Mbps ports. The Address Database Engine is used by the FN100 to make filtering and forwarding decisions. Each time a packet is received, it is placed into packet memory, analyzed for errors, compared against the MAC address and filtering entries in the database, and sent to the appropriate destination port. 1.5.1 Store and Forward Switching The FN100 is an intelligent Fast Ethernet switch that uses full store and forward switching. Store and forward switching allows the FN100 to temporarily store packets until network resources, typically an unused link, are available for forwarding. This allows for complete error checking, and limits the amount of time between when a device requests access to the network and when it is granted permission to transmit. In addition, full store and forward switching ensures data integrity and prevents error conditions from being generated throughout the network. Fast Network 100 User Guide Page 1-7 Chapter 1: Introduction 1.5.2 Spanning Tree Algorithm The FN100 supports the IEEE 802.1d Spanning Tree algorithm. The Spanning Tree algorithm converts multiple LANs into a “spanning tree” of networks that prevents bridging loops. This standard defines a logical (not physical) network configuration consisting of one extended LAN without active duplicate paths between spanning tree bridges. The FN100, along with other IEEE 802.1d Spanning Tree compliant bridges or switches in the network, dynamically configure the network topology into a single Spanning Tree by exchanging Bridge Protocol Data Units (BPDUs). Typically, each LAN segment is sent one BPDU every two seconds. When there are multiple FN100 switches connecting LANs in a loop, the Spanning Tree algorithm determines which FN100 should forward packets to the LAN. If there is a cable break or a port failure, the network topology is automatically reconfigured by the Spanning Tree protocol to create an alternate path to the LAN. 1.5.3 FN100 Bridge Address Table The FN100 creates and maintains a dynamic database of addresses called the Bridge Address Table. The FN100 examines every packet to determine its source address and LAN segment origin. It then compares the source address and segment information to the entries in the Bridge Address Table. If a packet’s address is not already stored in the Bridge Address Table, the FN100 adds general information including learned address, associated segment number, trunk group information, and virtual switch information. Consequently, the FN100 knows the address and associated segment number the next time it sees that address. By using the information stored in the Bridge Address Table, the FN100 is able to quickly forward each packet to the correct LAN segment. Page 1-8 Fast Network 100 User Guide FN100 Architecture The FN100 learns addresses from all packets, including data transmissions and “keep alive” packets (packets sent by an idle station to let other stations know it is present and functional). When devices are added to the network, removed from it, or relocated, you do not have to reconfigure the FN100. The FN100 automatically learns new device addresses, and recognizes when a previously used address is missing, or when a device has been moved to a new LAN segment. An address stored in the Bridge Address Table is discarded if there is no subsequent activity from that address after a configured length of time (five minutes by default). This aging process ensures that the Bridge Address Table is continually updated. Each dynamic entry includes: • An Ethernet MAC address • A single port number of the LAN on which the address resides • Trunk group information • Virtual switch information The FN100 stores over 8,000 dynamic (learned) entries in its Bridge Address Table. Fast Network 100 User Guide Page 1-9 Chapter 1: Introduction 1.6 FN100 APPLICATIONS The FN100 provides the network designer with complete flexibility and has many applications including: • Server farms • High-performance workgroups • Backbones 1.6.1 Server Farms FN100 Fast Ethernet Server Farm Figure 1-6 Using the FN100 to Create Server Farms As shown in Figure 1-6, the FN100 replaces conventional Ethernet 10BASE-T hubs and switches to provide each fileserver a dedicated 100 Mbps pipe. The increased bandwidth of switched Fast Ethernet allows the FN100 to instantly multiply the available bandwidth, virtually eliminating all collisions and providing a means of dramatically increasing the bandwidth where needed most - at the fileservers. Page 1-10 Fast Network 100 User Guide FN100 Applications 1.6.2 High-Performance Workgroups FN100 FN100 Figure 1-7 Creating High-Performance Workgroups As workstation performance continues to grow, Fast Ethernet switching is the perfect choice for addressing the new bandwidth requirement. Providing the most cost-effective bandwidth compared to other high-speed technologies, the FN100 provides dedicated 100 Mbps to each workstation. In addition, the FN100 provides the flexibility of allowing workstations with 10BASE-T adapters to be combined in the same workgroup, as shown in Figure 1-7. This allows flexible workgroup networks to be constructed with minimal impact to the design of the rest of the network. Fast Network 100 User Guide Page 1-11 Chapter 1: Introduction 1.6.3 Backbones Studies indicate that backbone congestion is the number one issue facing most networks. The FN100 reduces congestion by increasing the overall aggregate bandwidth between existing routers, switches or hubs. A Fast Ethernet backbone consisting of one or more FN100 switches that consolidate the traffic needed to traverse to the backbone is shown in Figure 1-8. The FN100 provides the increased bandwidth required to “inter-switch” the existing Ethernet and Token Ring switches. TX RX 9 10 11 12 13 14 15 16 Link Status Link Status 9 9X 10X 11X 12X 13X 14X 15X 16X Port Status Mode TX Act 100 Select Ready FN100-16 Reset RX Col Usr Pwr TX RX 1 1X 3X 2X 4X 13X 14X 15X 16X 17X 18X 19X 20X 21X 22X 23X 24X X 2X 3X 4X 5X 6X 7X 8X 9X 10X 11X 12X 5X 13 14 15 16 17 18 19 20 21 22 23 24 1 2 3 4 5 6 7 8 9 10 11 12 6X Link Figure 1-8 7X 8X 1 2 3 4 5 6 7 8 Segment Status TX RX Act Col Link AUI 1 NMS Port Link Status Link Status A B Usr Select Reset Ready Pwr NMS Port Using the FN100 in the Backbone 1.7 FN100 CONFIGURATIONS This section describes the ways in which the FN100 can be configured in your network, including • Trunking configurations • Virtual switch configurations • Workgroup configurations Page 1-12 Fast Network 100 User Guide FN100 Configurations 1.7.1 Trunking Configurations If your network configuration requires you to connect two or more FN100 switches together, but the applications you are running over the network require more than 100 Mbps of bandwidth per connection, you can use the built-in trunking feature to increase bandwidth up to 800 Mbps, without installing additional hardware on your network. The FN100 supports up to 8 trunk groups with 2 to 8 ports per trunk group. Trunking is a Cabletron Systems proprietary extension to the 802.1D Spanning Tree algorithm. It enables you to use multiple 100BASE-TX or 100BASE-FX Ethernet segments to connect FN100 switches together, while maintaining first-in, first-out ordering of Ethernet packets. In addition, if any of the Ethernet segments configured for trunking become inoperable, those Ethernet segments are automatically bypassed. Figure 1-9 shows two FN100 switches connected by four 100BASE-TX crossover cables. You can connect up to eight ports for sharing the traffic load. Any additional connected ports become standby ports. The connections must be point-to-point. That is, there cannot be any other devices on the Ethernet segments. FN100 100 Mbps 100 Mbps 100BASE-TX Crossover Cables (providing 400 Mbps of bandwidth) FN100 100 Mbps 100 Mbps Figure 1-9 Fast Network 100 User Guide Trunk Connections Page 1-13 Chapter 1: Introduction NOTE In some wiring closets, it may be easier to connect two FN100 switches via an Ethernet concentrator. However, you must make sure that there are no other devices connected to the Ethernet concentrator. 1.7.1.1 Trunking Configuration Examples The FN100 allows multiple trunk groups with up to eight ports each to be connected between the FN100 and other network devices. This capability provides a scalable dedicated bandwidth of up to 800 Mbps. For example, local traffic, such as the Manufacturing Department’s internal traffic, can be easily handled by a single, 100 Mbps connection. However, when the Manufacturing Department needs access to the corporate database, the traffic travels over a trunk line, thereby increasing the speed of transmission. Figure 1-10 illustrates the trunking of multiple FN100 ports to increase the bandwidth. LAN segments FN100 100 Mbps 100 Mbps Up to 400 Mbps Bandwidth Trunk Lines FN100 100 Mbps 100 Mbps 100 Mbps 100 Mbps LAN segments Figure 1-10 FN100 Trunking Configuration Example #1 Figure 1-11 illustrates how the FN100 can be used in a backbone network configuration. Page 1-14 Fast Network 100 User Guide FN100 Configurations Servers 100BASE-TX Cables FN100 100 Mbps 100 Mbps ATX Trunk Lines Network Management Station 100 Mbps 100 Mbps 100BASE-TX Cables FN100 WAN Router Workgroup Hub Figure 1-11 FN100 Trunking Configuration Example #2 1.7.2 Virtual Switch Configurations The FN100 can be configured as a collection of virtual switches. Virtual switches provide increased bandwidth, enhanced security, and other advantages gained by having multiple switches operating in your network. Specifically, virtual switches can be used to increase bandwidth between the FN100 and non-Cabletron Systems devices that do not support trunking. You can define up to four virtual switch groups, and assign any of the FN100 ports to one of these virtual switch groups. The virtual switch capability breaks the address table into a separate table for each virtual switch that is defined. Each switch group is assigned a switch ID as follows: sw1, sw2, sw3, sw4. The default configuration is for all ports to be set to sw1. Fast Network 100 User Guide Page 1-15 Chapter 1: Introduction 1.7.2.1 Virtual Switch Configuration Examples Figure 1-12 shows a 16-port FN100 configured as two virtual switches, each attached to a separate non-Cabletron Systems device. Host Connection Host Connection Non-Cabletron Systems Router 100 Mbps Non-Cabletron Systems Router 100 Mbps Virtual Virtual Switch 1 Switch 2 FN100 (No Traffic) Figure 1-12 FN100 Virtual Switch Configuration Example #1 Figure 1-13 shows the FN100 configured as four virtual switches and attached to a single non-Cabletron Systems device. Each virtual switch provides a separate 100 Mbps connection to the non-Cabletron Systems device. Non-Cabletron Systems Device 100 Mbps SW1 SW2 Figure 1-13 Page 1-16 100 Mbps SW3 FN100 SW4 FN100 Virtual Switch Configuration Example #2 Fast Network 100 User Guide FN100 Configurations 1.7.3 Workgroups The FN100 allows you to define ports for logical groups of associated hosts to create workgroups. Workgroups provide an efficient flow of traffic across an Ethernet network by enabling you to limit broadcasts to logical domains within the network. The FN100 recognizes Workgroup destinations and routes broadcast packets directly to hosts within the workgroup, eliminating the need to perform a general broadcast across each segment of the network to find host addresses. 1.7.3.1 Workgroup Configuration Example Workgroups are created by assigning workgroup IDs to specific FN100 ports. A port is assigned to one workgroup at a time. Figure 1-14 shows two Ethernet segments using the workgroup feature of the FN100 to increase the bandwidth dedicated to each A and B host. Router A 100 Mbps A A A Workgroup A Figure 1-14 B 100 Mbps B FN100 B B Workgroup B Using the FN100 to Create Workgroups A host from workgroup A can limit a broadcast to all hosts within workgroup A or B and prevent the broadcast from going across the network and adding to the amount of contention for the limited 100 Mbps bandwidth. Fast Network 100 User Guide Page 1-17 Chapter 1: Introduction Page 1-18 Fast Network 100 User Guide CHAPTER 2 UNPACKING AND INSTALLING THE FN100 Carefully unpack the FN100 from the shipping carton and inspect it for possible damage. If any damage is evident, contact Cabletron Systems. The shipping carton contains: • The FN100 device • Console cable kit • One AC power cord • Two rack-mounting brackets with fasteners (for rack-mount installation) • Four stick-on feet (for desktop installation) • Documentation – In addition to this manual, the Fast Network 100 Quick Setup Instructions, the Fast Network 100 Local Console Manager (LCM) Commands Reference Card, the Fast Network 100 MIB Reference Guide, and Release Notes are also included. 2.1 FN100 PANELS The FN100 front panel is available in the following configurations: • 8-100BASE-TX/10BASE-T (twisted pair) Ethernet ports with one redundant 100BASE-FX fiber port (FN100-8) • 16-100BASE-TX/10BASE-T (twisted pair) Ethernet ports with two redundant 100BASE-FX fiber ports (FN100-16) • 8-100BASE-FX (fiber) Ethernet ports (FN100-8FX) • 16-100BASE-FX (fiber) Ethernet ports (FN100-16FX) Each FN100 also includes an RS232C port for out-of-band management. Figure 2-1 shows the FN100 16-port twisted pair and fiber front panels. Fast Network 100 User Guide Page 2-1 Chapter 2: Unpacking and Installing the FN100 . TX RX 9 10 11 12 13 14 15 16 Link Status Link Status 9 9X 10X 11X 12X 13X 14X FN100-16 16X 15X Port Status Mode TX Act 100 Select Ready Reset RX Col Usr Pwr TX RX NMS Port Link Status Link Status 1 3X 4X 5X 6X 1X 2X TX RX TX RX TX RX TX RX TX RX TX RX TX RX TX RX 9 10 11 12 13 14 15 16 8X 7X 1 2 3 4 5 6 7 8 9 10 11 12 13 14 15 16 Link Status FN100-16FX Port Status Mode TX Act 100 Select Ready Reset RX Col Usr TX RX TX RX TX RX TX RX TX RX TX RX TX RX Pwr TX RX NMS Port Link Status 1 2 Figure 2-1 3 5 4 6 7 8 1 2 3 4 5 6 7 8 FN100 16-Port Twisted Pair and Fiber Front Panels 2.2 POWER SWITCH The power switch is located on the back panel of the FN100. The power is ON when the rocker switch is set to 1. 2.3 INSTALLING THE FN100 The FN100 can be either table-mounted or rack-mounted. Follow the applicable instructions in this section to mount your FN100. 2.3.1 Table-Mounting the FN100 If the FN100 is to be table-mounted, install the four stick-on feet on the bottom of the unit, as shown in Figure 2-2. In addition, make sure the unit is within reach of the network cables to which it will be connected. 100 Mbps Figure 2-2 Page 2-2 100 Mbps Installing the Stick-on Feet Fast Network 100 User Guide Installing the FN100 2.3.2 Rack-Mounting the FN100 The table below describes some general considerations you should be aware of before mounting the FN100 in a rack assembly. Table 2-1 General Considerations for Mounting the FN100 Consideration Discussion Temperature Since the temperature within a rack assembly may be higher than the ambient room temperature, make sure the rack-environment temperature is within the Operating Temperature range specified in Appendix A. Air Flow Make sure there is at least 2 inches (or more) on both sides of the FN100 to allow for adequate air flow. Mechanical Loading Do not place equipment on top of a rack-mounted FN100. Circuit Overloading Make sure the power supply circuit to the rack assembly is not overloaded. Grounding (Earthing) Rack-mounted equipment should be grounded. In addition to the direct connections to the main power supplies, make sure all the other supply connections are also grounded. The FN100 can be rack-mounted in a standard 19-inch equipment cabinet (EIA RS310C). To mount the FN100 in a rack assembly, apply the following steps: 1. Attach the rack-mount brackets to either side of the FN100 chassis. NOTE The FN100 may have been shipped with the rack-mount brackets already installed. 2. Place the FN100 chassis in the cabinet. Fast Network 100 User Guide Page 2-3 Chapter 2: Unpacking and Installing the FN100 3. Secure the FN100 with the rack-mount fasteners by inserting and securing a fastener through each of the four slots in the rack-mount brackets, as shown in Figure 2-3. TX RX 9 10 11 12 13 14 15 16 Link Status Link Status 9 Fasteners 9X 10X 11X 12X 13X 14X 15X FN100-16 16X Port Status Mode TX Act 100 Select Ready Reset RX Col Usr Pwr TX RX NMS Port Fasteners Link Status Link Status 1 1X 2X 3X 4X 5X 6X 7X 8X 1 2 3 4 5 6 7 8 Rack Figure 2-3 Rack-mounting the FN100 4. Once the FN100 is installed, plug the AC power cord into the AC power connector on the rear of the FN100 chassis. Plug the other end of the power cord into a three-prong grounded outlet. 2.3.3 Checking the Power-up Diagnostics Sequence Before connecting any devices to the FN100, power on the unit and observe the power-up diagnostics sequence to check for proper operation. To observe the power-up diagnostics sequence completely, you may want to repeat it. To restart the power-up sequence, turn the power switch OFF, then ON again, or press the reset button on the front panel. When you power up the FN100, the following occurs: 1. All LEDs, except for the Port Link LEDs, turn on for one second. 2. The Power (Pwr) LED remains on. 3. The Ready LED starts flashing. 4. After several seconds, the Port Link and ACT LEDs flash briefly. Page 2-4 Fast Network 100 User Guide Connecting the Local Console Manager 5. After several more seconds, the Ready LED will stay on, indicating that the power-up diagnostics sequence is complete. In addition, the Port Link LEDs will turn on for those ports with good links and the Segment Status LEDs will turn on (or flash) when the selected status condition is present. NOTE If the Ready LED does not stay on, contact Cabletron Systems Technical Support. Refer to Chapter 1, Section 1.1, Getting Help. 2.4 CONNECTING THE LOCAL CONSOLE MANAGER The Local Console Manager (LCM) is a command-line interface for configuring, monitoring, and managing the FN100 through the out-of-band RS232C connection on the front panel. To connect LCM: 1. Connect your ASCII terminal or terminal emulator to the out-of-band management RS232C port on the front panel of the FN100 using the console cable kit or a standard 9-pin serial cable. (Only three of the nine wires are necessary: Receive Data, Transmit Data, and Ground.) NOTE For your convenience, a male DB-9 to DB-25 converter is included in the FN100 shipping carton. You may need the converter when connecting to your ASCII terminal or to your terminal emulator. 2. Set the terminal to 9600 baud, 8 data bits, 1 stop bit, and no parity. 3. Press the Enter key several times. If the FN100 is operational, LCM responds with the following prompt: FN100 > LCM is now ready to use. Fast Network 100 User Guide Page 2-5 Chapter 2: Unpacking and Installing the FN100 2.5 LOCAL CONSOLE MANAGER OVERVIEW The Local Console Manager (LCM) is a command-line interface built into the FN100 that enables you to monitor, manage, and configure the FN100 through the out-of-band RS232C connection on the front panel attached to any non-intelligent terminal. You can also use a Cabletron Systems Network Management System, or a standard SNMP-based Network Management System, to manage the FN100. For a list of available FN100 network management tools, see Chapter 4, Section 4.1, FN100 Management Tools. The following sections describe LCM command syntax and the basic LCM commands for logging in, logging out, and getting help. • LCM commands used for configuring the FN100 are described in Chapter 3, Configuring the FN100. • LCM commands used for monitoring and managing the FN100 are described in Chapter 4, Monitoring and Managing the FN100. NOTE You can also use the Fast Network 100 Local Console Manager (LCM) Commands Reference Card as a quick reference for all LCM commands, including each command’s options. 2.6 COMMAND SYNTAX CONVENTIONS The following conventions apply as you use LCM commands: • Press the Enter key to execute a command after you type it in. • A port range is either a single port number, or a list of port numbers separated by commas or hyphens. For example, 3 is port 3; 3,7 are ports 3 and 7; 3-5 are ports 3,4, and 5; and 3-5,7 are ports 3,4,5, and 7. • To quit any command, press the Control-C keys (^C or Ctrl-C). • You can abbreviate any command where there is no ambiguity; if there is ambiguity, LCM responds with an error message. • Commands are not case sensitive. • Any invalid commands or misspellings will receive an error message. Page 2-6 Fast Network 100 User Guide Command Syntax Conventions • A previous command can be repeated by typing !!. • MAC addresses are displayed in little-endian Ethernet bit order, with each octet separated by a colon. For example: FN100 > address 00:40:27:04:1a:0f • Information that you need to enter with an LCM command is enclosed in brackets < >. For example, you must enter a port number and an IP address to execute the ipaddr <PORT#> <IPADDR> command: FN100 > ipaddr 6 192.138.217.40 • Parameters that appear in all capital letters, for example bridge <PORTS>, indicate that you must enter a value for that parameter. If a string of parameters is displayed between braces, for example <{off|on|noBPDU}>, you must select one of the displayed options. For example, if you wanted to enable bridging on a port, or a range of ports, you would enter: FN100 >bridge 2-4 on • The default values for filtering command field options appear in square brackets [ ], for example: Type:[Entry] (Entry/Exit)> 2.6.1 Basic LCM Commands To manage the FN100 using LCM, you first must connect the FN100 to an ASCII terminal or terminal emulator. See Section 2.4, Connecting the Local Console Manager for instructions. When you want to use LCM, begin by pressing the Enter key several times to get the LCM prompt: FN100 > Fast Network 100 User Guide Page 2-7 Chapter 2: Unpacking and Installing the FN100 2.6.1.1 help Use the help command to display the menu of available commands. Help can also be displayed by typing a question mark (?). The output from the help command is displayed below. FN100 > help Fast Network 100 Command Console address [SW#] [display] [any] [ADDR [MASK]] arp [display] baud [BAUD-RATE] bridge [PORTS [OPTIONS]] community disable [PORTS] enable [PORTS [noRIP]] erase exit or logout help [command] or ? [command] ident ipaddr [PORT# IPADDR [MASK]] localfilter [PORTS] [hardware | software] reboot {SECONDS | off} routes display [IPADDR] speed [PORTS] [auto|[man 10|100]] status [PORTS] sttimer [SW# [TIMER-VALUE]] trunk [PORTS [{on | off}]] vswitch [SW#] [EDIT_MODE [PORTS]] workgroup [NAME [delete | PORTS [TYPE]]] Display learned addresses Display the ARP table Display or set console baud rate Display or set bridging methods Change the password/community name Display or disable a set of ports Display or enable a set of ports Erase configuration information Logout Display this menu or command usage Display unit identification Display or set IP addresses Display or set local filtering Re-boot the unit after SECONDS Display routing table information Display or set port speed Display unit and port status Display or set st age time Display or set trunking status Display or set virtual switch Display or set workgroups 2.6.1.2 erase Use the erase command to erase the current FN100 configuration and return to factory defaults. This sets the IP address on Port 1 to 192.0.2.1 (default) when the FN100 is rebooted. 2.6.1.3 exit Use the exit command to log out of LCM. (The exit command is functionally equivalent to the logout command.) 2.6.1.4 logout Use the logout command to log out of LCM. (The logout command is functionally equivalent to the exit command.) Page 2-8 Fast Network 100 User Guide Connecting the FN100 to the Network 2.7 CONNECTING THE FN100 TO THE NETWORK Installations vary depending on existing wiring, application objectives, and other considerations. Be sure to have your current network topology map available or contact your network administrator. You can connect network devices to the FN100 via a 10BASE-T, 100BASE-TX, or 100BASE-FX cable directly, or via a punch-down block or patch panel located in a wiring closet. Individual devices are then connected to the FN100. 2.7.1 Punch-Down Block and Patch Panel Connections For each network device you connect to the FN100 through a punch-down block or patch panel, do the following: 1. Connect one end of the 10BASE-T, 100BASE-TX, or 100BASE-FX cable to the network interface card on the device. 2. Connect the other end of the cable to a connector on the punch-down block or patch panel. 3. Connect one end of a second cable to the connector on the punch-down block or patch panel. 4. Connect the other end of the second cable to a numbered port on the FN100. 2.7.2 Direct Device Connections For each network device you connect directly to the FN100, do the following: 1. Connect one end of the 10BASE-T, 100BASE-TX, or 100BASE-FX cable to the network interface card on the device. 2. Connect the other end of the cable to a numbered port on the FN100. Fast Network 100 User Guide Page 2-9 Chapter 2: Unpacking and Installing the FN100 2.7.3 Wiring Considerations Each port on the FN100 has built-in internal crossovers. If the network device you are connecting to the FN100 has an internal crossover design, use an internal crossover cable. If the device you are connecting has a straight-through design, use a straight-through cable. For more information about straight-through and crossover wiring considerations, refer to Appendix A. Page 2-10 Fast Network 100 User Guide CHAPTER 3 CONFIGURING THE FN100 The FN100 does not require any additional configuration to operate as a standard, transparent switch. However, if you want to use any of the FN100 advanced functions, such as workgroups, you must first assign an IP (Internet Protocol) address to any of the ports on the FN100 that you use to communicate with a Simple Network Management Protocol (SNMP) manager. To initially assign an IP address, you can use the Local Console Manager (LCM). For more information, see Section 3.1, Assigning IP Addresses. Once you have assigned an IP address, you can use any of the following network management tools to configure and manage the FN100: • Any SNMP-based NMS. Configuration parameters are stored in an SNMP standard Management Information Base (MIB). All FN100 MIB variables are listed and described in the Fast Network 100 MIB Reference Guide. NOTE There are some configuration options that cannot be configured using LCM commands. You may need to modify your configuration using an NMS. See Section 3.14, Modifying MIB Variables. The following sections describe how to configure the FN100 using LCM commands, including: • Assigning IP addresses • Enabling and disabling bridging • Displaying bridging functions • Enabling and disabling trunking • Displaying trunking status • Defining and deleting workgroups and virtual switches Fast Network 100 User Guide Page 3-1 Chapter 3: Configuring the FN100 • Assigning a community name NOTE You can use the LCM erase command to erase all configuration information on the next system reset. If you are using a network management tool other than LCM, refer to its accompanying documentation. 3.1 ASSIGNING IP ADDRESSES IP addresses for each port must be unique. IP addresses are divided into classes based on what portion of the address is network or port information. The address classes are A, B, and C. • Class A addresses are used in very large networks that support many ports. The first byte identifies the network and the other three bytes identify the node. The first byte of a class A address must be in the range 1-126. The address 100.125.110.10 would identify node 125.110.10 on network 100. • Class B addresses are used for medium sized networks. The first two bytes identify the network and the last two identify the node. The first byte of a class B address must be in the range 128-191. The address 128.150.50.10 identifies node 50.10 on network 128.150. • Class C addresses are used for small networks. The first three bytes identify the network and the last byte identifies the port. The first byte of a class C address must be in the range 192-223. The address 192.138.217.10 identifies node 10 on network 192.138.217. The ipaddr <PORT#> <IPADDR> command allows you to assign an IP address to a port. For example, ipaddr 6 192.138.217.40 would set the IP address of Port 6 to 192.138.217.40. LCM responds by displaying the IP address table, as shown under the ipaddr command on page 3-3. NOTE Page 3-2 Entering erase to erase the current FN100 configuration sets the IP address on Port 1 to 192.0.2.1 (default) when the FN100 is rebooted. Fast Network 100 User Guide Assigning IP Addresses 3.1.1 Displaying IP Addresses Use the ipaddr command to display IP addresses, subnet masks, and MAC addresses of all ports on the FN100 you are configuring. LCM displays the current IP address table, for example: FN100 > ipaddr Port IP 1 2 3 4 5 6 7 8 Address 198.113.121.149 0.0.0.0 0.0.0.0 0.0.0.0 0.0.0.0 0.0.0.0 0.0.0.0 0.0.0.0 Address Mask 255.255.255.0 255.0.0.0 255.0.0.0 255.0.0.0 255.0.0.0 255.0.0.0 255.0.0.0 255.0.0.0 MAC Address 00:40:27:07:b6:f6 00:40:27:07:b6:f7 00:40:27:07:b6:f8 00:40:27:07:b6:f9 00:40:27:07:b6:fa 00:40:27:07:b6:fb 00:40:27:07:b6:fc 00:40:27:07:b6:fd 3.1.2 Deleting an IP Address Use the ipaddr <PORT#> 0.0.0.0 command to delete an IP address. FN100 > ipaddr 6 0.0.0.0 LCM responds by redisplaying the current IP address table. 3.1.3 Changing a Subnet Mask You can optionally set the subnet mask for a port using the ipaddr <PORT#> <IPADDR> <MASK> command. A subnet mask is a 32-bit address mask used in IP to specify a subnet. If the subnet mask is 0.0.0.0, the FN100 automatically converts the displayed mask to the standard default, based on the IP address class of the port. (Class A address masks are 255.0.0.0, Class B address masks are 255.255.0.0, Class C address masks are 255.255.255.0.) FN100 > ipaddr 6 192.138.217.40 255.255.240.0 For example, typing the above command sets the subnet mask for port 6 to 255.255.240.0. LCM responds by displaying the current address table. Fast Network 100 User Guide Page 3-3 Chapter 3: Configuring the FN100 NOTE When you change the subnet mask for a port, you must also enter the IP address for that port. Be sure to enter the port’s IP address correctly; whatever you enter becomes the IP address. 3.2 SETTING PORT SPEED Use the LCM speed command to select a bandwidth of 10 Mbps or 100 Mbps for each port. The options include: • auto - (default) Allows the FN100 to auto-detect the maximum bandwidth available for the port(s) based on the existing connection. • 10 - Lets you manually set the bandwidth for specified port(s) to 10 Mbps (excluding ports with 100BASE-FX connections). • 100 - Lets you manually set the bandwidth for specified port(s) to 100 Mbps (limited to the maximum available port speed). The full syntax for the command is as follows: speed <PORTS> <auto|10|100> For example, to manually set the port speed on port 7 to 100 Mbps: FN100 > speed 7 100 LCM responds: Port 7 Speed: 100 Use the speed <PORTS> command to display existing port speed settings. For example, to display ports speed settings for ports 1-5: FN100 > speed 1-5 LCM responds: Port Port Port Port Port Page 3-4 1 2 3 4 5 Speed: Speed: Speed: Speed: Speed: auto auto auto auto auto (100) (100) (100) (10) (10) Fast Network 100 User Guide Enabling Bridging 3.3 ENABLING BRIDGING Use the LCM bridge command to set bridging options for a single port or a range of ports. The options include: • off • on (the default with BPDU enabled) • noBPDU BPDU (Bridge Protocol Data Unit) is a data unit transmitted as part of the IEEE 802.1d Spanning Tree protocol. The exchange of BPDUs allows bridges within a network to logically configure the network as a single spanning tree. NOTE Selecting the noBPDU option could make your network inoperable because the FN100 would be unable to detect loops. Use the bridge <PORTS <{off|on|noBPDU}>> command to enable bridging for a port or port range. For example, to turn on bridging for port 2: FN100 > bridge 2 on LCM responds: Port 2 Sw1 bridging: Transparent Bridging 3.4 DISABLING BRIDGING Use the bridge <PORTS> off command to turn off the bridging function for a port or port range. For example, to turn off bridging for port 2: FN100 > bridge 2 off LCM responds: Port 2 Sw1 bridging: Off 3.5 DISPLAYING BRIDGING FUNCTIONS Use the bridge command to display the bridging functions that are enabled for all ports. Fast Network 100 User Guide Page 3-5 Chapter 3: Configuring the FN100 FN100 > bridge LCM responds with a list of all ports and the bridging function that is enabled. Port Port Port Port Port Port Port Port 1 2 3 4 5 6 7 8 Sw1 Sw1 Sw1 Sw1 Sw1 Sw1 Sw1 Sw1 bridging: bridging: bridging: bridging: bridging: bridging: bridging: bridging: Transparent Transparent Transparent Transparent Transparent Transparent Transparent Transparent Bridging Bridging Bridging Bridging Bridging Bridging Bridging Bridging You could also use the bridge <PORTS> command to look at a specific range of ports. For example bridge 2-4 would display bridging functions for ports 2, 3, and 4. 3.6 TRUNKING Trunking enables you to use multiple Ethernet segments to connect Fast Network switches together, providing greater aggregate bandwidth. Each set of connections between two FN100 switches is called a Trunk Group. You can create several Trunk Groups to interconnect your FN100 switches. Each FN100 can have up to eight Trunk Groups. For example, if you have three FN100 switches (A, B, and C), as shown in Figure 3-1, you could connect them using a single Ethernet segment. However, that would limit the interconnection to 100 Mbps. To solve this problem, you could connect A to B with one Trunk Group, and connect B to C with a second Trunk Group. Page 3-6 Fast Network 100 User Guide Trunking 100 Mbps 100 Mbps FN100 A 100 Mbps 100 Mbps FN100 B 100 Mbps 100 Mbps FN100 C Trunk Group #1 Trunk Group #2 Figure 3-1 Trunk Groups To enable trunking for the example shown above, you would: 1. Connect the desired ports of the FN100 switches together using crossover cables. If Switch A is handling only a small number of users, the A to B Trunk Group could have just two ports per FN100. If Switches B and C are expected to interconnect many users, you could use up to eight ports in the B to C Trunk Group. 2. Using the trunk <PORTS> command, turn on trunking for the connected ports on each FN100. For FN100 A, at the LCM prompt: a. Type trunk 1,2 on For FN100 B, at the LCM prompt: b. Type trunk 1-8,9-10 on For FN100 C, at the LCM prompt: c. Type trunk 1-8 on Each FN100 determines which ports are part of which Trunk Group. After Trunk Group configuration, the FN100 switches complete the Fast Network 100 User Guide Page 3-7 Chapter 3: Configuring the FN100 standard 802.1D Spanning Tree state changes, treating each Trunk Group as a single 802.1D Spanning Tree port. 802.1D Spanning Tree takes about thirty seconds to resolve which FN100 ports are to become forwarding ports. As ports within a Trunk Group become forwarding ports, traffic within the Trunk Group is momentarily halted to guarantee the first-in, first-out ordering of the Ethernet packets. NOTE The Fast Network-to-Fast Network connections must be point-to-point. There cannot be any other devices on those Ethernets. The ports used for trunking can be in any order. However, both ends of the Fast Network-to-Fast Network connections must have trunking turned on for the ports that are being used for the connections. 3.7 DISABLING TRUNKING Use the trunk <PORTS> off command to turn off trunking. For example: > trunk 2-4 off 3.8 DISPLAYING TRUNKING STATUS Use the trunk <PORTS> command to check the status of your current trunking configuration. FN100 > trunk 2-4 LCM responds: FN100 > trunk 2-4 Port 2 trunking joined to Bridge MAC Addr 00:40:27:00:06:1f IP Addr 192.138.217.1 Port 3 trunking joined to Bridge MAC Addr 00:40:27:00:06:c3 IP Addr 192.138.200.2 Port 4 trunking joined to Bridge MAC Addr 00:50:36:00:07:4a IP Addr 192.140.250.7 Page 3-8 Fast Network 100 User Guide Displaying Trunking Status The following conditions can be displayed: • Closed (or Oneway) — Trunking is enabled, and the Trunking Protocol is attempting to establish a trunk connection. • Heldown — Trunking is enabled, but the trunk connection was rejected. After a short time-out period, another attempt is automatically initiated to establish a good trunk connection. • Joined — Trunking is enabled, and the Trunking Protocol has established a good trunk connection. • Off — Trunking is not enabled. • Perturbed — Trunking is enabled, and a good trunk connection has been established. However, the forwarding of data packets is temporarily suspended to allow for a change in the membership of the Trunk Group. Use the status <PORTS> command to check the status for ports configured for trunking. FN100 > status 1 LCM responds: Port 1 Status Bridging: Enabled/Disabled: Spanning Tree: Trunking State: Speed: Virtual Switch: Work Group: Hardware State: Pkts Transmitted: Pkts Received: Link Status: Total Collisions: Excess Collisions: RX Missed Pkts: RX Dropped Mgmt Pkts: RX CRC/Align Errs: Internal RX Errs: Internal TX Errs: Transparent Bridging Enabled, Rip listening Forwarding Off auto (10) Sw1 (None) Up 215119 179539521 Up (1 outage) 1492 0 0 0 0 0 0 Fast Network 100 User Guide Page 3-9 Chapter 3: Configuring the FN100 The following conditions can be displayed in the Trunking State field: • Broken — Trunking is enabled, but the port in non-operational. • Closed (or Oneway) — Trunking is enabled, and the Trunking Protocol is attempting to establish a trunk connection. • Heldown — Trunking is enabled, but the trunk connection was rejected. After a short time-out period, another attempt is automatically initiated to establish a good trunk connection. • Joined — Trunking is enabled, and the Trunking Protocol has established a good trunk connection. • Off — Trunking is not enabled. • Perturbed — Trunking is enabled, and a good trunk connection is established. However, the forwarding of data packets is temporarily suspended to allow for a change in Trunk Group membership. 3.9 DEFINING AND DELETING VIRTUAL SWITCHES The FN100 can be configured as a collection of virtual switches. You can define up to four virtual switch groups, and assign any of the FN100 ports to one of these virtual switch groups. Use the LCM command, vswitch, to create, modify, and delete virtual switches. The full syntax of the command is as follows: vswitch <SW#> <EDIT_MODE> <PORTS>> The options for SW# include: • sw1 - Virtual switch 1 • sw2 - Virtual switch 2 • sw3 - Virtual switch 3 • sw4 - Virtual switch 4 The options for EDIT_MODE include: • append - Appends ports to an existing virtual switch • create - Creates a virtual switch consisting of specified ports (default) • remove - Removes ports from an existing virtual switch Page 3-10 Fast Network 100 User Guide Defining and Deleting Virtual Switches 3.9.1 Displaying Virtual Switch Information Use the vswitch command to display all of the virtual switch configurations defined by the FN100. FN100 > vswitch LCM responds: Virtual Switch: Sw1: 1,2,3,4,5,6,7,8 Sw2: 9,10,11,12,13,14,15,16 Sw3: Sw4: Use the vswitch <SW#> command to display information about a specific workgroup. For example: FN100 > vswitch sw1 LCM responds: Virtual Switch: Sw1: 1,2,3,4,5,6,7,8 3.9.2 Creating and Modifying Virtual Switches Use the vswitch <SW#> create <PORTS> command to create a virtual switch consisting of the specified port(s). For example: FN100 > vswitch sw1 create 2-5 LCM responds: Virtual Switch: Sw1: 2,3,4,5 NOTE Since all ports are assigned to SW1 by default, assigning specific ports to SW1 will disable bridging capabilities for the remaining ports. Only NMS functions are available for the unassigned ports. Use the vswitch <SW#> append <PORTS> command to append ports to an existing virtual switch configuration. For example: FN100 > vswitch sw1 append 6,8 Fast Network 100 User Guide Page 3-11 Chapter 3: Configuring the FN100 LCM responds: Virtual Switch: Sw1: 2,3,4,5,6,8 Use the vswitch <SW#> remove <PORTS> command to remove ports from an existing virtual switch configuration. For example: FN100 > vswitch sw1 remove 2-4 LCM responds: Virtual Switch: Sw1: 5,6,8 3.10 DEFINING AND DELETING WORKGROUPS The FN100 allows you to define logical groups of associated hosts to create workgroups that provide a more efficient flow of traffic across your Ethernet network. Workgroups offer you the ability to limit broadcasts to logical domains within the network. Workgroup destinations are recognized by the FN100 and packets are routed directly to hosts within the workgroup, eliminating the need to perform a general broadcast across each segment of the network to find specific host addresses. Use the LCM command, workgroup, to create, modify, and delete workgroups. The full syntax of the command is as follows: workgroup <NAME <{delete | PORTS}>> Use the workgroup command to display all of the workgroups defined by the FN100. FN100 > workgroup Use the workgroup <NAME> command to display information about a specific workgroup. For example: FN100 > workgroup a Use the workgroup <NAME> delete command to delete a workgroup. For example: FN100 > workgroup a delete Page 3-12 Fast Network 100 User Guide Defining and Deleting Workgroups Use the workgroup <NAME> <PORTS> command to create or modify the port list for a specific workgroup. For example: FN100 > workgroup a 2-6 Figure 3-2 shows the FN100 with two defined workgroups (A and B). Workgroup A uses ports 1 through 3, and workgroup B uses ports 5 and 7. Port 11 connects a segment that contains both workgroup A and workgroup B hosts: Router A B FN100 100 Mbps 100 Mbps A A A B Workgroup A B B Workgroup B A B A Figure 3-2 B Defining Workgroups The LCM commands used to create the above configuration are as follows: 1. To create workgroup A on ports 1, 2, 3, 11, and 12: FN100 > workgroup A 1-3,11,12 Fast Network 100 User Guide Page 3-13 Chapter 3: Configuring the FN100 LCM responds: Name: a Ports: 1, 2, 3, 11, 12 Type: All 2. To create workgroup B on ports 5, 7, 15: FN100 > workgroup B 5,7,15 LCM responds: Name: b Ports: 5, 7, 15 Type: All Port 11 has been assigned to a segment that includes hosts that belong to workgroup A and workgroup B. Port 12 connects workgroup A to the router and port 15 connects workgroup B to the router. 3.11 LOCAL ADDRESS FILTERING The localfilter command determines whether the per-port filtering of local addresses is performed by hardware or software. The option you choose depends on the type of performance you want and the application of your FN100. Options include: hardware - local address filtering performed by hardware. This option is a good choice in environments where the FN100 is primarily handling local traffic. This option provides optimal buffer utilization, but with limited observability into packet error statistics. You would most likely use this option if you were connecting the FN100 to devices such as concentrators. software - local address filtering performed by software. This option is a good choice when you want greater observability of packet error statistics, and in environments with less local traffic. However, this option does not maximize buffer utilization efficiency. You would most likely use this option if you were connecting the FN100 to devices such as switches and user nodes. The full syntax for the command is as follows: localfilter <PORTS> <hardware|software> Page 3-14 Fast Network 100 User Guide Assigning a Community Name The localfilter command displays the current filtering option for all ports: FN100 > localfilter Usage: localfilter [PORT-RANGE [hardware | software]] Port 1 - Filtertype : Software Port 2 - Filtertype : Software Port 3 - Filtertype : Software Port 4 - Filtertype : Software Port 5 - Filtertype : Software Port 6 - Filtertype : Hardware Port 7 - Filtertype : Hardware Port 8 - Filtertype : Hardware The localfilter <PORTS> command displays settings for local traffic filtering for the specified ports. FN100-fesw> localfilter 3,5,7 Usage: localfilter [PORT-RANGE [hardware | software]] Port 3 - Filtertype : Software Port 5 - Filtertype : Software Port 7 - Filtertype : Hardware The localfilter <PORTS> [hardware | software] command lets you select whether filtering of local traffic is being performed by hardware or software. For example, to set the software to perform local traffic filtering for ports 6-8: FN100-fesw> localfilter 6,7,8 software Usage: localfilter [PORT-RANGE [hardware | software]] Port 6 - Filtertype : Software Port 7 - Filtertype : Software Port 8 - Filtertype : Software 3.12 ASSIGNING A COMMUNITY NAME A community name is similar to a password. You use the same steps to assign a new community name or to change an existing community name. This sets the MIB variable sfadminAnyPass. You can then enter a community name to perform any SNMP sets. The default password is an empty string that allows you to enter your community name. Fast Network 100 User Guide Page 3-15 Chapter 3: Configuring the FN100 Use the community command to assign a community name. At the LCM prompt: 1. Type community 2. Enter the old community name. If one has not been assigned, you do not need to enter anything. LCM prompts you for the new community name. 3. Enter the new community name. LCM prompts you to verify the new community name by retyping it. 4. Retype the new community name. 3.13 CONFIGURING MULTICAST STORM PROTECTION The FN100 provides automatic protection against multicast storms. Multicast storms are excessive broadcasts to all ports, typically caused by a malfunctioning device. They can result in severe network performance problems, including causing the network to crash. To protect against multicast storms, you must define an acceptable rate for multicast traffic across a port. Each FN100 port can be individually configured for automatic multicast storm protection. You define what level of multicasts the FN100 will recognize as a multicast storm by specifying the number of multicast packets that can be transmitted within a given time period. NOTE LCM does not allow you to configure for multicast storm protection. You must use a SNMP-based NMS. See the documentation that came with your NMS for configuration instructions. For example, if you configure the FN100 to transmit onto Port 3 no more than five multicasts per 60 seconds, any multicasts destined for Port 3 are discarded after the first five multicasts. After 60 seconds have elapsed, another five multicasts to Port 3 will be allowed. This maintains an effective maximum rate of five multicast packets per minute. Page 3-16 Fast Network 100 User Guide Modifying MIB Variables The two Management Information Base (MIB) variables for configuring multicast storm protection are: • sfifTxStormCnt – specifies the maximum number of multicasts that can be broadcast within the given time. • sfiTxStormTime – specifies the period of time that the maximum number of multicasts can be broadcasted. Refer to the Fast Network 100 MIB Reference Guide for a complete listing and description of MIB variables. 3.14 MODIFYING MIB VARIABLES Specific instructions for controlling FN100 operations, modifying parameters, and so on, depend on the NMS you are using. This manual provides instructions for using LCM commands. However, LCM commands do not exist for all configuration options. You may need to modify your configuration using an NMS. This section provides several common MIB variables you may want to change. Refer to the Fast Network 100 MIB Reference Guide for a complete listing and description of MIB variables. Each variable is first described in words, and is then identified in MIB form, for example, sfadminGetPass - {sfadmin 3}. The Display String line shows the range of values that can be used for the given parameter. In each case, the DisplayString is a string of ASCII characters. 3.14.1 System Contact The system contact parameter identifies the contact person who is responsible for operating the FN100. Typically, this parameter includes the person’s name, company or division name, and telephone number. sysContact - {system 4} DisplayString (SIZE (0..255)) Fast Network 100 User Guide Page 3-17 Chapter 3: Configuring the FN100 3.14.2 System Name The system name is a name assigned to the FN100 by the network administrator. By convention, the system name is the fully qualified domain name. (This name then becomes the LCM prompt.) sysName - {system 5} DisplayString (SIZE (0..255)) 3.14.3 System Location The system location identifies the physical location of the FN100. sysLocation - {system 6} DisplayString (SIZE (0..255)) 3.14.4 Authentication Password The set password and get password variables (from the proprietary MIB), must be initialized with the correct authentication passwords. All requests from any SNMP manager contain a community name field. For set requests, the community name must match the set password; otherwise, the request will be rejected by the FN100. For get requests, the community name must match either the set password or the get password. 3.14.4.1 Set Password The set password variable (sfadminAnyPass) must be set to the value of the community name used by the SNMP manager for performing either set or get operations. A zero length password means that any community name is acceptable. sfadminAnyPass - {sfadmin 2} DisplayString (SIZE (0..24)) Page 3-18 Fast Network 100 User Guide Modifying MIB Variables 3.14.4.2 Get Password The get password variable (sfadminGetPass) must be set to the value of the community name used by the SNMP manager for performing get operations. A zero length password means that any community name is acceptable. sfadminGetPass - {sfadmin 3} DisplayString (SIZE (0..24)) 3.14.5 Aging Parameter Dynamic (learned) addresses are automatically deleted from the FN100 Bridge Address Table after a certain length of time. The aging time default is five minutes, as set by the IEEE 802.1d standard. You can change the aging time using the MIB variable dot1dTpAgingTime. The FN100 continually compares the actual age of each dynamic address against the age specified by the dot1dTpAgingTime parameter, and deletes any addresses that are older than the age specified (or older than five minutes if you are using the default). Typically, there is no need to set the aging time to a very small number because the FN100 Bridge Address Table supports over 8000 addresses. Fast Network 100 User Guide Page 3-19 Chapter 3: Configuring the FN100 Page 3-20 Fast Network 100 User Guide CHAPTER 4 MONITORING AND MANAGING THE FN100 Monitoring the FN100 consists of collecting and analyzing statistics and system status information. You can use the Select button on the front panel of the FN100 to monitor segment status on any of the Ethernet ports. See Status and Activity Indicators in Chapter 5 for a description of the status options. Basic management of the FN100 consists of disabling or enabling Ethernet ports, changing subnet masks, setting the community name for the FN100, and changing the baud rate for your Local Console Manager (LCM) connection. 4.1 FN100 MANAGEMENT TOOLS LCM is a command-line interface built into the FN100 that enables you to monitor and manage the FN100 through the out-of-band RS232C connection attached to any non-intelligent terminal. You can also use one of the following Cabletron Systems Network Management Stations (NMSs), or a standard SNMP-based NMS to manage the FN100: • Any SNMP-based NMS. 4.2 FN100 STATISTICS The FN100 gathers statistics that help you build a comprehensive profile of the network traffic flow between each Local Area Network (LAN), as well as the network traffic flow to and from each Ethernet port on the FN100. FN100 statistics are divided into the following groups: • System statistics • Ethernet port statistics • SNMP statistics You can use this information to analyze your overall network performance and to make configuration changes as necessary. For Fast Network 100 User Guide Page 4-1 Chapter 4: Monitoring and Managing the FN100 example, Ethernet port statistics help you identify network devices that require high bandwidth, and therefore should be connected through a dedicated, rather than a shared, network connection. In addition, Ethernet port statistics help you identify a network device that is the source of numerous multicast packets due to a possible malfunction. 4.2.1 Gathering Statistics For purposes of network management, managed objects, such as the FN100, must be identified. Creation of a managed object is achieved by placing its identifier, and a set of management information appropriate to its class, in the Management Information Database (MIB). Using the MIB variables, you can obtain a detailed analysis of your network by combining statistics for each source network, destination network, and source and destination port. The Fast Network 100 MIB Reference Guide contains the SNMP MIB variables you need to monitor and manage the FN100. 4.2.2 System Statistics For each FN100, the following system statistics are available: • The number of seconds since the FN100 was last reset. • The number of spanning tree topology changes that have occurred since the FN100 was last reset. • The time since a topology change was last initiated. • The physical location of the FN100. • The name and address of the contact person for the FN100. • The name of the FN100. • The current number of dynamic (learned) addresses. NOTE Page 4-2 To check FN100 system status using LCM, see Section 4.3, Using LCM to Check FN100 Status. Fast Network 100 User Guide FN100 Statistics 4.2.3 Ethernet Port Statistics Ethernet statistics help you analyze network activity and utilization, and in some cases, indicate faulty equipment or cabling. For each Ethernet port connection on the FN100, the following statistics are available: • The number of packets received from the port. The packets are broken down into the following categories by type of destination address: - Known individual destination address - Unknown individual destination address - Multicast address (other than broadcast) - Broadcast address - Individual node management packets - Multicast node management packets (other than broadcast) - Broadcast node management packets • The number of bytes in the received packets. • The number of bytes in the packets that were forwarded. • The total number of packets transmitted to the LAN. The packets are broken down into the following categories by type of destination address: • - Known individual destination address - Unknown individual destination address - Multicast address (other than broadcast) - Broadcast address - Individual node management packets - Multicast node management packets (other than broadcast) - Broadcast node management packets The number of bytes in the transmitted packets. Fast Network 100 User Guide Page 4-3 Chapter 4: Monitoring and Managing the FN100 • The number of packets not transmitted to the LAN. The packets are broken down into the following categories: - Not sent due to congestion - Not sent due to multicast storm protection • The number of received Frame Check Sequence (FCS) errors detected. • The number of missed packets due to receive queue overflows. • The number of received packets with frame alignment errors. • The number of packet transmissions that were initially deferred due to the media being busy. • The number of packets not transmitted due to excessive collisions. • The number of packets transmitted with one collision. • The number of packets transmitted with multiple collisions. • The number of RX and TX collisions. NOTE All statistics counters are cleared when the FN100 is reset or when Ethernet ports are re-enabled. 4.2.4 SNMP Statistics The following statistics relate specifically to SNMP. The Management Information Base (MIB) variable that collects the statistics is provided in square brackets. • The number of SNMP PDUs received. [snmpInPkts] • The number of SNMP PDUs created. [snmpOutPkts] • The number of SNMP PDUs received with an unsupported SNMP version. [snmpInBadVersions] • The number of SNMP PDUs received with an unrecognized SNMP community name. [snmpInBadCommunityNames] Page 4-4 Fast Network 100 User Guide Using LCM to Check FN100 Status • The number of SNMP PDUs received with an authentication failure. [snmpInBadCommunityUses] • The number of SNMP PDUs received with an ASN.1 parsing error while being decoded. [snmpInASNParseErrs] • The total number of MIB objects which have been successfully retrieved as a result of SNMP GetRequest or GetNext PDUs. [snmpInTotalReqVars] • The total number of MIB objects which have been successfully altered as a result of SNMP SetRequest PDUs. [snmpInTotalSetVars] • The total number of SNMP GetRequest PDUs received and processed with no errors. [snmpInGetRequests] • The total number of SNMP GetNext PDUs received and processed with no errors. [snmpInGetNexts] • The total number of SNMP SetRequest PDUs received and processed with no errors. [snmpInSetRequests] • The total number of SNMP PDUs created with a value of tooBig in the PDU’s ErrorStatus. [snmpOutTooBigs] • The total number of SNMP PDUs created with a value of noSuchName in the PDU’s ErrorStatus. [snmpOutNoSuchNames] • The total number of SNMP PDUs created with a value of badValue in the PDU’s ErrorStatus. [snmpOutBadValues] • The total number of SNMP PDUs created with a value of genErr in the PDU’s ErrorStatus. [snmpOutGenErrs] • The total number of SNMP GetResponse PDUs created. [snmpOutGetResponses] • The total number of SNMP Trap PDUs created. [snmpOutTraps] 4.3 USING LCM TO CHECK FN100 STATUS The LCM commands that enable you to quickly check on the status of the FN100 include: • Status Fast Network 100 User Guide Page 4-5 Chapter 4: Monitoring and Managing the FN100 • Address display • Ipaddr • Ident These LCM commands are described in the sections that follow. 4.3.1 Displaying Status Use the status command to display the status of the FN100 and automatically page through the status of all of the Ethernet ports, pausing at each information screen. NOTE You can also use the status command to display status for individual Ethernet ports by typing status and specifying a port number. For example, to display status information for all FN100 ports: FN100 > status LCM displays: Software Currently Running: FN100 Mon 11/13/95 09:01:21 Next Bootstrap (2nd bank) : FN100 Mon 11/13/95 09:01:21 Power-up test failures: none Current unit temperature is normal. System Up Time: 2 days, 18:48:18 Current Number of Learned Addresses: Virtual Switch 1: 0 Virtual Switch 2: 0 Type <Return> to continue the display ... > Press the Return key to display additional status information. Page 4-6 Fast Network 100 User Guide Using LCM to Check FN100 Status Port 1 2 3 4 5 6 7 8 . . . 16 RX Packets 179539521 179529809 179525816 179524026 179585909 179515393 0 0 TX Packets 215252 83296 83296 83289 172032 82167 0 0 Fast Network 100 User Guide Collisions 1492 981 904 928 1258 1029 0 0 Erred Packets 0 0 0 0 0 2 0 0 Page 4-7 Chapter 4: Monitoring and Managing the FN100 You can continue to press the Return key to display status information for each individual port. Port 1 Status Bridging: Transparent Bridging Enabled/Disabled: Enabled, Rip listening Spanning Tree: Forwarding Trunking State: Off Speed: auto (10) Virtual Switch: Sw1 Work Group: (None) Hardware State: Up Pkts Transmitted: 215265 Pkts Received: 179539521 Link Status: Up (1 outage) Total Collisions: 1492 Excess Collisions: 0 RX Missed Pkts: 6998082 RX Dropped Mgmt Pkts: 0 RX CRC/Align Errs: 0 Internal RX Errs: 0 Internal TX Errs: 0 Type <Return> to display port 2 status ... > If you do not want to view the status of each Ethernet port, use the Ctrl-C keys to return to the LCM prompt. NOTE You can view the status for multiple of ports by typing status and indicating the range of port numbers, for example status 2-6. 4.3.2 Displaying MAC Addresses Use the address display command to display all MAC addresses in the FN100 Bridge Address Table. The display includes: • The MAC address • Type of address, including: - Dynamic (learned) - Ethernet port (for the MAC address of an Ethernet port) Page 4-8 Fast Network 100 User Guide Using LCM to Check FN100 Status - BPDU (the MAC address to which all BPDUs are directed) - Reserved (the address reserved by 802.1d, but not yet assigned) - All LANs (the addresses reserved by 802.1d for network management) • Port number • Virtual switch number The display automatically pauses with each screen of information. Addresses are displayed in random order; for example, address 02:00:00:00:00:00 may appear after address 04:00:00:00:00:00. Use the address display any command to display all MAC addresses. FN100 > address display any LCM responds with a list of all MAC addresses, their associated ports, the type, age, and number of frames from and to that address. Address 00:40:27:07:b7:05 00:40:27:07:b7:04 00:40:27:07:b7:03 00:40:27:07:b7:02 00:40:27:07:b7:01 00:40:27:07:b7:00 00:40:27:07:b6:f7 00:40:27:07:b6:f6 00:40:27:07:b6:ff 00:40:27:07:b6:fe 00:40:27:07:b6:fd Type Port Port Port Port Port Port Port Port Port Port Port Port 16 15 14 13 12 11 2 1 10 9 8 Sw# * * * * * * * * * * * Use the address display <ADDR> command to display a specific address. For example: FN100 > address display 02:04:06:03:2a:43 LCM displays: Address 02:04:06:03:2a:43 Type Learned Fast Network 100 User Guide Port 5 Sw# 2 Page 4-9 Chapter 4: Monitoring and Managing the FN100 Use the address display <ADDR> <MASK>command to display a range of addresses using a net mask. This is helpful when determining the status associated with stations containing the same make of Ethernet network interface cards. For example, to see all addresses that begin with 02:04:06, you would enter: FN100 > address display 02:04:06:00:00:00 ff:ff:ff:00:00:00 LCM displays: Address 02:04:06:03:2a:43 02:04:06:00:2a:67 02:04:06:a3:70:2b Type Learned Learned Learned Port 5 4 6 Sw# 2 2 2 You can also use the address display <SW#> parameter to display address information for a particular virtual switch. LCM allows you to display MAC addresses in two formats: • Little-endian (default) Little-endian is a method of storing or transmitting data in which the least significant bit of each byte is presented first. This is used in Ethernet networks. • Big-endian Big-endian is a method of storing or transmitting data in which the most significant bit of each byte is presented first. Use the big option to display MAC addresses in big-endian format. Big-endian format separates the bytes with spaces rather than colons. You can also enter MAC addresses in big-endian format by using spaces rather than colons. This option is helpful if your network includes Token Ring or FDDI along with Ethernet. Use the ipaddr command to display the IP addresses, subnet masks, and MAC addresses of all FN100 ports. FN100 > ipaddr Page 4-10 Fast Network 100 User Guide Using LCM to Check FN100 Status LCM displays the current IP address table, for example: Port 1 2 3 4 5 6 7 8 IP Address 198.113.121.149 0.0.0.0 0.0.0.0 0.0.0.0 0.0.0.0 0.0.0.0 0.0.0.0 0.0.0.0 Address Mask 255.255.255.0 255.0.0.0 255.0.0.0 255.0.0.0 255.0.0.0 255.0.0.0 255.0.0.0 255.0.0.0 MAC Address 00:40:27:07:b6:f6 00:40:27:07:b6:f7 00:40:27:07:b6:f8 00:40:27:07:b6:f9 00:40:27:07:b6:fa 00:40:27:07:b6:fb 00:40:27:07:b6:fc 00:40:27:07:b6:fd For more detailed information, see Chapter 3, Section 3.1, Assigning IP Addresses. 4.3.3 Displaying Manufacturing Information The ident command identifies FN100 manufacturing information, including the part number and any power-up test codes and diagnostic data. Use the ident command to display the manufacturing information. FN100 > ident LCM displays: Part Number: 501-3100-002 Power-up test codes: MP: 00000000 Port 1: 00000000 Port 2: 00000000 Port 3: 00000000 Port 4: 00000000 Port 5: 00000000 Port 6: 00000000 Port 7: 00000000 Port 8: 00000000 Fast Network 100 User Guide X00002e4-0505590 00000000 00000000 00000000 00000000 00000000 00000000 00000000 00000000 00000000 00000000 00000000 00000000 00000000 00000000 00000000 00000000 00000000 00000000 Page 4-11 Chapter 4: Monitoring and Managing the FN100 4.4 USING LCM TO MANAGE THE FN100 You can use the Local Console Manager (LCM), any Cabletron Systems NMS, or a standard SNMP-based NMS to manage the FN100. For more information, see Section 4.1, FN100 Management Tools. LCM commands that enable you to manage the FN100 include: • Disable • Enable • Ipaddr • Community • Baud • Reboot 4.4.1 Disabling a Port There can be times when you may want to disable a specific Ethernet port, for example, after you have determined that there is faulty equipment. Disabling a port effectively stops all bridging functions for that port. Disabled ports do not accept SNMP packets, and therefore cannot communicate with an NMS. Use the disable <PORTS> command to disable a port, or port range. For example, to disable ports 7, 8, and 9: FN100 > disable 7-9 LCM responds: Port Port Port 7: Disabled 8: Disabled 9: Disabled Once an Ethernet port is disabled, it will remain disabled until you enable it again. Resetting the FN100 will not enable a port that has been disabled. Page 4-12 Fast Network 100 User Guide Using LCM to Manage the FN100 ! CAUTION If you disable the port through which someone is remotely managing the FN100, that person will not be able to communicate with the FN100. Use the LCM address display command to find the port number you are using to manage the FN100. 4.4.2 Enabling a Port When you enable an Ethernet port that has been disabled, whatever bridging functions you had previously configured for that port are re-enabled. Use the enable <PORTS> command to enable a port, or a range of ports. For example, to enable ports 7, 8, and 9: FN100 > enable 7-9 LCM responds: Resetting statistics and enabling port 7, Rip listening. Resetting statistics and enabling port 8, Rip listening. Resetting statistics and enabling port 9, Rip listening. ! Entering the enable <PORTS> command for an already enabled FN100 port resets that port’s statistics counters. CAUTION NOTE Rip listening means that the FN100 is in listening mode only. No RIP packets are created. 4.4.2.1 NoRIP Option The Routing Information Protocol (RIP) is one of the protocols that lets the FN100 build an accurate, current routing table. This table includes the networks it knows about, the next hop, and the number of hops to get there. RIP enables you to use an NMS to remotely manage the FN100 through a router. The noRIP option lets you turn off the routing information that builds the routing table. Use this option when you are connecting network devices that do not support RIP. Fast Network 100 User Guide Page 4-13 Chapter 4: Monitoring and Managing the FN100 4.4.3 Changing a Subnet Mask You can optionally set the subnet mask for a port. A subnet mask is a 32-bit address mask used in IP to specify a particular subnet. If the subnet mask is omitted, the FN100 automatically uses the standard default, based on the port’s IP address class. (Class A address masks are 255.0.0.0, Class B address masks are 255.255.0.0, Class C address masks are 255.255.255.0.) Use the ipaddr <PORTS> <ADDR> <MASK> command to change the subnet mask. FN100 > ipaddr 6 192.138.217.40 255.255.240.0 For example, ipaddr 6 192.138.217.40 255.255.240.0 would set the subnet mask for port 6 to 255.255.240.0. LCM responds by redisplaying the address table. NOTE When you change the subnet mask for a port, you must also enter the IP address for that port. Make sure you enter the IP address for the port correctly; whatever you enter becomes the IP address. To assign a new IP address, see Chapter 3, Section 3.1, Assigning IP Addresses. 4.4.4 Changing a Community Name A community name is similar to a password. You use the same steps to assign a new community name or to change an existing community name. This sets the MIB variable sfadminAnyPass. You can then enter a community name to perform any SNMP sets. Use the community command to change an existing community name. At the LCM prompt: 1. Type community 2. Enter the old community name. If one has not been assigned, you do not need to enter anything. LCM prompts you for the new community name. Page 4-14 Fast Network 100 User Guide Using LCM to Manage the FN100 3. Enter the new community name. LCM prompts you to verify the new community name by retyping it. 4. Retype the new community name. 4.4.5 Setting the Baud Rate You can set the baud rate for your LCM console connection. The options for baud rate include: • 1200 • 2400 • 4800 • 9600 • 19200 The default rate is 9600. NOTE Make sure that the baud rate you set matches the baud rate setting for the terminal you are using. Use the baud command to display the current baud rate setting. FN100 > baud LCM responds: Baud rate is 9600 Use the baud <BAUD-RATE> command to change the baud rate setting. For example, to change the baud rate to 4800: FN100 > baud 4800 LCM responds: Baud rate is 4800 Fast Network 100 User Guide Page 4-15 Chapter 4: Monitoring and Managing the FN100 4.4.6 Setting a Reboot Time Use the reboot <SECONDS|off> command to enter the number of seconds the FN100 waits before rebooting. For example, to set the reboot time interval to 60 seconds: FN100 > reboot 60 LCM responds: System will be reset in 60 seconds. Page 4-16 Fast Network 100 User Guide CHAPTER 5 FN100 DIAGNOSTICS AND TROUBLESHOOTING The FN100 incorporates several built-in diagnostic and testing capabilities which are convenient to use and cause minimal or no disruption to the operational network. These capabilities are effective for isolating problems within the FN100 unit. Built-in diagnostic capabilities include system-wide power-up diagnostics, which are run every time the system is powered up or reset. All tests can be performed locally or remotely using an in-band or out-of-band Network Management System (NMS). 5.1 POWER-UP DIAGNOSTICS The FN100 performs an extensive set of diagnostic self-tests whenever any of the following events occur: • Power-up • Reset using the front panel Reset button • Reset via the NMS (a soft reset) • Automatic reset in response to a non-recoverable failure The power-up diagnostics tests processors, memory, and other critical hardware components of the FN100. All diagnostic software is stored in non-volatile memory (EPROM and FLASH). 5.1.1 Power-Up LED Sequence When you power-up the FN100, the following occurs: 1. All LEDs, except for the Port Link LEDs, turn on for one second. 2. The Power (Pwr) LED remains on. 3. The Ready LED starts flashing. 4. After several seconds, the Port Link and ACT LEDs flashed briefly. Fast Network 100 User Guide Page 5-1 Chapter 5: FN100 Diagnostics and Troubleshooting 5. After several more seconds, the Ready LED will stay on, indicating that the power-up diagnostics sequence is complete. In addition, the Port Link LEDs will turn on for those ports with good links and the Segment Status LEDs will turn on (or flash) when the selected status condition is present. NOTE If the Ready LED does not stay on, contact Cabletron Systems Technical Support. 5.1.2 Specific Power-Up Tests The power-up diagnostic tests performed on the FN100 include: • ROM checksum test • Instruction/Data memory test • Address database memory test • Ethernet controller test • Packet memory test • Shared RAM test • Ethernet data loopback test 5.1.3 Software Checksum Comparison When the FN100 reboots, its operational software is verified by a checksum comparison before it is loaded. If the software fails the checksum test due to an interrupted new software distribution procedure, the FN100 automatically uses its backup version of software. A backup version of software is always stored in non-volatile memory. The operational parameters of the FN100 software are also protected by a checksum comparison. When the FN100 reboots, if the operational parameters of the FN100 fail a checksum test due to a power failure in the midst of a previous update, the FN100 automatically uses its backup version of the parameters. Page 5-2 Fast Network 100 User Guide Responses to Failures at Power Up NOTE A backup version of the operational parameters is always stored in non-volatile memory before any update is attempted. 5.1.4 Power-Up Diagnostics Results After completion of the power-up diagnostic sequence, both the Power (Pwr) and Ready LEDs located on the front panel of the FN100 should be on. 5.2 RESPONSES TO FAILURES AT POWER UP How the FN100 responds to failures detected during power-up depends on the seriousness of the failure. For example, the FN100 will operate if a non-critical component, such as the out-of-band management port, fails diagnostics. However, in the event of a critical failure, such as a failure of the management processor, the FN100 halts execution and does not boot to operational mode. 5.3 STATUS AND ACTIVITY INDICATORS The front panel of the FN100 includes LEDs that indicate the status or activity of various system components. Figure 5-1 shows the FN100 front panel LEDs and buttons. FN100-8 Port Status Mode TX Act 100 Select Ready Reset RX Col Usr Pwr TX RX NMS Port Link Status Link Status 1 1 2 3 4 5 6 7 8 1X Figure 5-1 FN100 Status and Activity Indicators Table 5-1 describes how to interpret FN100 system LEDs. Fast Network 100 User Guide Page 5-3 Chapter 5: FN100 Diagnostics and Troubleshooting Table 5-1 Interpreting system LEDs LED Meaning Port Status Mode You can select a single status condition to monitor for all ports by pressing the Select button on the front panel. When selected, the option monitors and displays the desired port status activity on this LED. The selectable options include: TX – Transmit Activity - monitors all transmit activity. RX – Receive Activity - monitors receive activity. Act – Any Activity - monitors any transmit and receive activity. Col – Collisions - monitors all collisions. 100 – Port Speed - monitors port speed (10 or 100 Mbps activity). Usr – monitors error conditions. Ready On – Indicates the FN100 is operational. Blinking – Indicates the FN100 is running power-up diagnostics. Off – Indicates the FN100 is non-operational. Pwr On – Indicates the FN100 is receiving power and the voltage is within the acceptable range. Off – Indicates the FN100 is not receiving power. ! CAUTION If the Ready LED continues to blink after power-up diagnostics are complete, it could mean the FN100 is overheating. Use the LCM status command to verify. Table 5-2 describes how to interpret FN100 port LEDs Table 5-2 Interpreting Port LEDs LED Meaning Link (upper level of port LEDs) On – Indicates the link is good. Off – Indicates there is no link. Status (lower level of port LEDs) On/Blinking – Indicates activity being monitored for the selected port status mode. Page 5-4 Fast Network 100 User Guide Troubleshooting Table 5-3 describes the FN100 button functions. Table 5-3 FN100 Button Functions Button Function Select Cycles through the Port Status mode options (TX, RX, Act, Col, 100, and Usr) for all ports. The lower port status LEDs of the ports you are monitoring are activated based on what function you chose with the Select button. Reset Restarts the FN100. 5.4 TROUBLESHOOTING This section lists several situations that could happen while using the FN100, and suggests appropriate action. Because every situation is potentially unique, the corrective actions suggested here should be considered as guidelines only. 5.4.1 FN100 Does Not Power Up If your FN100 does not power up, check each one of the following: • Make sure the power switch is set to 1 (on). • Make sure the power source is operational. • Make sure the power cord is securely connected. • Check the power supply fuse. If problems persist, contact Cabletron Systems Technical Support. Fast Network 100 User Guide Page 5-5 Chapter 5: FN100 Diagnostics and Troubleshooting 5.4.2 Power Supply Fuse The power supply contains a 3.15 ampere 250 V slow-blow fuse located immediately above the three-prong power input connector on the back of the FN100. If you think this fuse may have blown, inspect it for visible damage and replace it if necessary. In most cases, any damage to the fuse will be readily apparent (e.g., shattered fuse, blackened glass, broken fuse element). If you do not see any damage, but still suspect a fuse problem, try replacing the fuse. To replace the fuse: 1. Power off the FN100 and disconnect the power cord. 2. Pull the small plastic fuse drawer next to the ON/OFF switch outward. 3. Remove and replace the fuse. ! For protection against fire hazard, replace only with 250V slow-blow 3.15 ampere fuses. CAUTION 4. Push the fuse drawer back into the housing until it snaps into place. 5. Reconnect the power cord and power up the FN100. 5.4.3 Connectivity Problems • Check for LED abnormalities. • Check port status using LCM. • Check for loose port connections. • Check to see if the number of carrier losses is increasing using LCM. This indicates that the connection is suspect. • Check to see if the number of total collisions has dramatically increased using LCM. • If problems persist, contact Cabletron Systems Technical Support. Page 5-6 Fast Network 100 User Guide Troubleshooting 5.4.4 FN100 Has Rebooted • Use the LCM ident command to check the FN100 diagnostic codes, and call Cabletron Systems Technical Support. 5.4.5 FN100 Does Not Respond to NMS • Check the port status using LCM. • Check to see if the Spanning Tree topology is stable using LCM. • Check that a pathway to the FN100 exists. • Verify the FN100 IP address using LCM. • Verify the FN100 routing table using LCM. • If problems persist, contact Cabletron Systems Technical Support. Fast Network 100 User Guide Page 5-7 Chapter 5: FN100 Diagnostics and Troubleshooting Page 5-8 Fast Network 100 User Guide APPENDIX A TECHNICAL SPECIFICATIONS A.1 FN100 SPECIFICATIONS Physical Height Width Depth Weight Installation options 3.5 in. (8.89 cm) 17 in. (43.18 cm) 17.5 in. (44.45 cm) 10 lb. (4.54 kg) Tabletop or rack-mount Electrical Input voltage Frequency AC power consumption Auto-ranging 100-120 VAC, 200-240 VAC 50/60 Hz Less than 200 watts Connector Ports • • • • 10BASE-T: RJ45 (MDI-X) using UTP cable, EIA/TIA Cat. 3, 4, 5 100BASE-TX: RJ45 (MDI-X) using UTP cable, EIA/TIA Cat. 5 100BASE-FX: ST connectors using 62.3/125 µ multimode fiber optics 1 RS232C D-type, 9-pin female out-of-band port supporting direct VT-100-type terminal connection and remote connection via PPP Environmental Operating temperature Relative humidity 5° to +40°C (41° to +104°F) 0% to 95%, non-condensing Diagnostic LEDs Individual port link status (8, 16) Individual port segment status (8, 16) Port Status Mode (6), specifying: • Transmit activity • Receive activity • Collision • 100 Mbps operation • Transmit or receive activity • User-defined Ready (1) Power (Pwr) (1) Fast Network 100 User Guide Page A-1 Appendix A: Technical Specifications Standards • • • • • • • • IEEE 802.1 Part D (Spanning Tree) IEEE802.2 (Logical Link Control) IEEE 802.3 (CSMA/CD, 10BASE-T), 802.3u 10BASE-T, 100BASE-TX, 100BASE-FX Transparent Bridging with Spanning Tree Ethernet Version 2 EIA RS232C (DTE-to-DCE Interface Specification) EIA RS310C (Rack-mount Specification) Address table size • Over 8,000 entries Management support • • • MIB II, 802.1d, 802.3, PPP, and Enterprise MIB Cabletron Systems Local Console Manager (LCM) Any SNMP-based network management system Certification Safety Emission Immunity Page A-2 UL 1950, CSA C22.2 No. 950, EN 60950, and IEC 950 FCC Part 15 Class A, VCCI Class 1, and EN 55022 Class A EN 50082-1 Fast Network 100 User Guide Types/Connectors A.2 TYPES/CONNECTORS Depending on the type of FN100 you’re using, you’ll need to use specific cables, as described in the IEEE 802.3u specification, shown in the table below: Table A-1 Cable Types and Connectors Cable Type Male Connector 10-BASE-T Twisted-Pair (UTP) Category 3, 4, 5 8-pin RJ45 Category 5 100 Ohm UTP, 22-26 AWG 0.4 - 0.6 mm 2 pairs 8-pin RJ45 Duplex Fiber 62.5/125 micron core ST Twisted-Pair (Management port) 150 Ohm STP 9-pin DB9 100BASE-TX Twisted-Pair (UTP) A.3 CABLE SPECIFICATIONS A.3.1 10BASE-T Cable Specifications Table A-2 10BASE-T Twisted-Pair Cable Specifications 10BASE-T Twisted-Pair Cable Specifications Type Category 3, 4, 5 Number of Pairs 2 Max. Link Segment Length 100 meters Min. Link Segment Length 0 Max. Number of Attachments 2 Fast Network 100 User Guide Page A-3 Appendix A: Technical Specifications A.3.2 100BASE-TX Cable Specifications Table A-3 100BASE-TX Twisted-Pair Cable Specifications 100BASE-TX Twisted-Pair Cable Specifications Type Category 5 balanced UTP Number of Pairs 2 Max. Link Segment Length 328 ft. (100 m) Min. Link Segment Length 2.0 ft. (0.6 m) Max Number of Attachments 2 A.3.3 100BASE-FX Cable Specifications Table A-4 100BASE-FX Duplex Fiber Cable Specifications 100BASE-FX Duplex Fiber Cable Specifications Type 62.5/125 micron core multimedia fiber Max. Link Segment Length 1312 ft (400 m) Min. Link Segment Length 0 Max. Number of Attachments 2 Page A-4 Fast Network 100 User Guide Management Cable Pin Assignments A.4 MANAGEMENT CABLE PIN ASSIGNMENTS For a PC running a Windows terminal connected to the RS232C Network Management Port on the front panel of the FN100, the following serial cable pin assignments are required to manage the FN100 using the Local Console Manager (LCM). Table A-5 Serial Cable Pin Assignments DB-9 (male) to FN100 (female) PC DB9 (female) 25-pin (female) Pin 2 (Rx) Pin 2 Pin 3 Pin 3 (Tx) Pin 3 Pin 2 Pin 5 (Ground) Pin 5 Pin 7 A.5 10BASE-T AND 100BASE-TX PIN ASSIGNMENTS When connecting the FN100 to another device, use only RJ45 connectors on the cabling. An Ethernet twisted-pair link segment requires two pairs of wires. Each wire pair is identified by solid and striped colored wires. For example, one wire in the pair might be red and the other wire, red with white stripes. Each port on the FN100 has built-in internal crossovers. If the network device you are connecting to the FN100 has a straight-through design, use a straight-through cable. See Section A.6, Straight-Through Wiring. If the network device you are connecting to the FN100 has an internal crossover design, use an internal crossover cable. See Section A.7, Crossover Wiring. Fast Network 100 User Guide Page A-5 Appendix A: Technical Specifications A.5.1 Connectors Refer to the diagram below and note how the pins are numbered. Be sure to hold the connectors in the same orientation when connecting the wires to the pins. 8 8 1 Figure A-1 1 Connector Pin Numbers Each twisted-pair cable must have a male connector attached to both ends. According to the 10BASE-T and 100BASE-TX specifications, pins 1 and 2 on the connector are used for transmitting data; pins 3 and 6 are used for receiving data, as shown in Table A-6. Table A-6 RJ45 Crossover Pin Assignments RJ45 Pin Assignment* 1 Tx+ 2 Tx- 3 Rx+ 6 Rx- *. The “+” and “-” signs are used to represent the polarity of the two wires that make up each wire pair. Page A-6 Fast Network 100 User Guide Straight-Through Wiring A.6 STRAIGHT-THROUGH WIRING If you are connecting the FN100 to a device that has a straight-through design, the two pairs of wires must be straight-through, as shown in Table A-7. Table A-7 Straight-Through RJ45 Wiring Configuration Hub (pin number) Device (pin number) 1 (Tx+) 1 (Tx+) 2 (Tx-) 2 (Tx-) 3 (Rx+) 3 (Rx+) 6 (Rx-) 6 (Rx-) A.7 CROSSOVER WIRING If you are connecting the FN100 to a device that also has an internal crossover design, a crossover must be implemented in the wiring, as shown in Table A-8. Table A-8 Crossover RJ45 Wiring Configuration FN100 FN100 1 (Tx+) 3 (Rx+) 2 (Tx-) 6 (Rx-) 3 (Rx+) 1 (Tx+) 6 (Rx-) 2 (Tx-) A.8 LIMITATIONS AND RESTRICTIONS Between any two nodes (such as PCs or other stations) on the network, there may be limitations or restrictions that you should be aware of. For more information on limitations and restrictions, see the IEEE 802.3 specification. Fast Network 100 User Guide Page A-7 Appendix A: Technical Specifications Page A-8 Fast Network 100 User Guide APPENDIX B GLOSSARY address A set of characters that uniquely identifies a station, peripheral device, node, or other unit in a network. address table A database of device addresses and their associated ports maintained by a switch or bridge for use in making data packet forwarding and filtering decisions. agent Network management software that runs within a managed network device. alarm See trap. ANSI American National Standards Institute – One of several organizations that establishes standards that apply to internetworking. ARP Address Resolution Protocol – An auxiliary protocol of the IP layer used to perform dynamic address translation between MAC addresses and internet addresses. Binds IP addresses to specific MAC addresses. attenuation The amount of power (or light) lost as power travels through a medium from the transmitter to the receiver. Difference between transmitted and received power, in decibels (dB). AUI (attachment unit interface) A standard connector type used for Ethernet connections. Fast Network 100 User Guide Page B-1 Appendix B: Glossary backbone The major, central transmission path for a network. A backbone usually handles high-volume, high-density traffic. Typically a backbone connects various LANs into an integrated network. bandwidth A measure of the amount of traffic a given medium can handle at one time: The communications capacity (measured in bits per second), of a transmission line or of a specific path through a network. Greater bandwidth generally means more information can be sent through a circuit during any given period of time. BPDU (bridge protocol data unit) A data unit transmitted as part of the IEEE 802.1d Spanning Tree Protocol. The exchange of BPDUs allows bridges within a network to logically configure the network as a single spanning tree. bps (bits per second) The basic unit of data communications rate measurement. bridge An intelligent, protocol independent device used to connect similar or dissimilar LANs. bursty Adjective used to describe sporadic heavy volumes of network traffic (e.g., bursty traffic). bypass Optical or electronic isolation of a station from the network. A bypass situation typically occurs as a result of a station failure or shutdown; the bypass allows the network to function normally, except for the absence of the missing station. combination port filter A filter that can include several configurable fields and can be used to filter network traffic in a specific way. Page B-2 Fast Network 100 User Guide Appendix B: Glossary concentrator A device that provides attachment points for stations that are not connected to the FN100. The concentrator is connected directly to the network; the stations connect to the concentrator. congestion A condition where a portion of the network is overloaded with more data than can be transmitted in the desired time period. CSMA/CD (carrier-sense multiple access with collision detection) A channel access (contention) method that requires each station to wait for an idle channel before transmitting. In addition, stations are able to detect overlapping transmissions (collisions) and retransmit in the event of a data collision. data link layer Layer 2 in the OSI model. Defines frame construction, addressing, error detection, and other services to higher layers. datagram Abbreviated and connectionless single-packet message sent from one station to another. data rate (or speed) The maximum number of bits of information that can be transmitted per second. destination address filtering A process that discards (filters) traffic based on MAC destination addresses. downstream Refers to the relative position of a station in a network to another station in the same network. A station is downstream from another station if it receives data after the other station receives data. dynamic address An address “learned” by the FN100, as opposed to addresses that are manually entered into the Bridge Address Table. The FN100 “learns” addresses by reading them from the data packets it processes. Fast Network 100 User Guide Page B-3 Appendix B: Glossary EIA (Electronic Industries Association) Organization that sets standards for electrical interfaces (connectors). encapsulation A method for moving messages across networks that use different types of protocols. The message is encapsulated (rather than translated), so it can move across a network that otherwise could not understand its protocol. Encapsulating bridges and switches generally use proprietary encapsulation schemes. encode To translate data into a series of electrical or optical pulses that can travel efficiently over a cable or other medium. entity An active element within an Open Systems Interconnection (OSI) network layer or sublayer. extended LAN A collection of LANs interconnected by protocol-independent bridges or switches. filter An instruction to the FN100 to discard certain types of data packets. filtering rate A measure (in packets per second) of the efficiency of the FN100 in examining each frame, comparing it with an address table, and then deciding whether to discard the frame or forward it. forwarding rate The rate (in packets per second) at which the FN100 receives a stream of packets from one network segment, completes all processing, and transmits the packets to another network segment. frame A data message that includes a source address, destination address, data, frame check sequence (FCS), and control information. Page B-4 Fast Network 100 User Guide Appendix B: Glossary full wire speed Refers to packet forwarding at the maximum rate at which data can be transmitted on a given LAN. ICMP (Internet control message protocol) An auxiliary protocol of IP used to convey advice and error messages about events in the IP layer. IEEE (Institute of Electrical and Electronic Engineers) International professional society which issues networking and other standards. The IEEE created the 802 family of LAN standards: IEEE 802.2 The data link layer standard; used with IEEE 802.3, 802.4, 802.5, and other LAN/WAN protocols. IEEE 802.3 The physical layer standard that uses the CSMA/CD access method on a bus topology LAN. IEEE 802.6 Standard for metropolitan area networks (MANs) currently under development. initialization Transition of a device or network from startup state to operational state. intelligent bridge/switch A bridge/switch that is able to identify source and destination addresses. internet A large communications infrastructure composed of wide and local area networks. A generic reference to a network built using internetworking technology. Internet A large collection of connected networks which use TCP/IP. (Also referred to as the DARPA Internet, NSF/DARPA Internet or the Federal Research Internet.) Fast Network 100 User Guide Page B-5 Appendix B: Glossary internetworking The linking of one or more networks to facilitate communication across networks. interoperability The ability of equipment from multiple vendors to exchange information using standardized protocols. IP (Internet protocol) IP is the basic datagram protocol used at the network layer of the TCP/IP stack. ISO (International Standards Organization) An organization that creates, controls and publishes standards. jitter Clocking deviation on a network. Kbps (kilobits per second) 1,000 bits per second. LAN (local area network) A network that interconnects a variety of devices (computers, printers, servers, and so on), within a limited geographical area. A LAN typically connects devices within a building or campus. link-loss budget Each connection (link) in an optical system results in a certain amount of signal strength loss. Link-loss budget refers to the process of calculating link loss for the entire system. If the total link loss exceeds a certain limit, the system will not function. LLC (logical link control) A part of the data link layer of the OSI model that defines the transmission of a frame of data between two stations (with no intermediate switching nodes). LMA (local management agent) Software running on a network device to control the device in terms of network management functions. Page B-6 Fast Network 100 User Guide Appendix B: Glossary local traffic Traffic within a given network segment. MAC (media access control) The data link layer sublayer responsible for scheduling, transmitting, and receiving data on a shared medium local area network. mask Specified a subset of a larger set of data to be included for comparison and analysis. For example, in switch filtering, a mask might be configured to include only the first four address bits as the basis for filtering decisions. Mbps (megabits per second) 1 million bits per second. MIB (management information base) A collection of objects unique to a specific device that can be accessed via a network management protocol. The FN100 has its own MIB. multicast Packets destined for more than one address. multicast (broadcast) storm Excessive multicast packet traffic, typically generated by a faulty device. Multicast storms can cause severe network performance problems. network Interconnected computer systems, terminals, and data communication facilities. A network must have at least three endpoints and may have any number of links and nodes. node Any device connected to a communication network, for example a computer, workstation, printer, server, concentrator, bridge, and switch. OSI (Open Systems Interconnection) Refers to the OSI reference model, a logical structure for network operations. OSI is the internationally accepted framework of standards for internetwork communication. Fast Network 100 User Guide Page B-7 Appendix B: Glossary packet A group of bits including data and control elements arranged in a specific format that are transmitted and switched as a composite whole. Control elements include a source address, destination address, frame control and status indicators, and a Frame Check Sequence (FCS). PDU (protocol data unit) The portion of a datagram that contains the data associated with a particular protocol. peer-to-peer Term used to describe data transmission between entities in the same sublayer of the OSI model. physical layer Layer 1 of the OSI model. Defines and handles the electrical and physical connections between systems. power budget The difference between transmit power and receiver sensitivity, including any safety margins. PPP (point-to-point protocol) A protocol for transmitting datagrams (IP or MAC packets) over a serial point-to-point link (e.g., the out-of-band management port). pps (packets per second) Unit of measure used to express packet data throughput. 18 pps is approximately equal to 9600 bps. propagation delay The time it takes for a signal to travel across a network. protocol A set of rules used by computers and related devices to communicate with each other. protocol suite A group of protocols related to a common framework. Page B-8 Fast Network 100 User Guide Appendix B: Glossary RARP (reverse address resolution protocol) A protocol that binds MAC addresses to specific IP addresses. RISC (Reduced Instruction Set Computing) A data processing technology in which functions are performed using the least possible number of instructions to yield very fast processing. segment When two or more networks are interconnected to form an internetwork, the original networks are referred to as segments. service A set of functions offered to a user by a provider. SNMP (simple network management protocol) A TCP/IP protocol for communication between a network management system and a network device. source address filtering A switch or bridge function that forwards or rejects data, depending on the data’s source address. static address Addresses manually entered into the Bridge Address Table (as opposed to those automatically learned by the FN100). STP (spanning tree protocol) A protocol that ensures that only one path will be used between two devices; prevents active loops (multiple paths to devices), by closing redundant paths. With STP operating, a redundant link serves as a backup link only if a normal path fails. switch An intelligent, protocol independent device used to connect similar or dissimilar LANs. symbol The smallest signaling element used by the MAC sublayer. Each symbol corresponds to a specific sequence of code bits to be transmitted by the physical layer. Fast Network 100 User Guide Page B-9 Appendix B: Glossary synchronous transmission A transmission technique in which an uninterrupted block of data is transmitted, using no redundant information such as stop and start bits to identify the beginning and end of a unit of data. TCP/IP (transmission control protocol/Internet protocol) Internetworking protocols sometimes referred to as the Internet suite of protocols. topology The arrangement of devices and cable paths that make up a network. translating bridge A bridge that can pass data between LANs that use different protocols. translation Modification of data packets from one type of network so they can be used on a different type of network (e.g., Ethernet to FDDI translation). trap Alarm; notification of an event that has occurred on a network. Some alarms require intervention or action by the network administrator; some are merely informational. UDP (user datagram protocol) A TCP/IP protocol for the connectionless transport layer. upstream Refers to the relative position of a station in a network to another station in the same network. A station is upstream from its neighbor if it receives data before its neighbor receives the data. WAN (wide area network) A communication network that spans a large geographic area. Page B-10 Fast Network 100 User Guide INDEX Numerics C 100BASE-FX cabling specifications A-4 100BASE-TX cabling pin assignments A-5 specifications A-4 10BASE-T cabling pin assignments A-5 specifications A-3 802.1D Spanning Tree 3-8 certification A-2 checksum comparison test 5-2 community name assigning 3-15 changing 4-14 configuration erasing 3-2 connecting ASCII terminal 2-5 LCM 2-5 connections direct device 2-9 patch panel 2-9 punch-down block 2-9 connectivity problems, troubleshooting 5-6 connector port specifications A-1 connectors DB-9 A-5 RJ-45 A-6 crossover wiring 2-10, A-7 pin assignments A-7 A address table dynamic entry 1-10 size A-2 addresses adding IP addresses 3-3 displaying IP addresses 4-10 aging time 3-19 B basic LCM commands 2-7 baud command 4-15 baud rate displaying 4-15 for ASCII terminal 2-5 setting 4-15 Bridge Address Table, defined bridge command 3-5 Bridge Protocol Data Unit (BPDU) 3-5 bridging functions disabling 3-6 displaying 3-6 enabling 3-5 buttons Reset 5-5 Select 5-5 D 1-9 Fast Network 100 User Guide diagnostics checksum comparison 5-2 overview 5-1 power-up 2-4, 5-1 direct device connections 2-9 disable command 4-12 displaying baud rate 4-15 bridge functions 3-6 MAC addresses 4-9 manufacturing information 4-11 status 4-6 Index-1 Index E enable command 4-13 environmental specifications A-1 erasing configuration 2-8, 3-2 Ethernet port statistics 4-3 exit command 2-8 IP addresses assigning 3-3 displaying 4-10 IP subnet mask changing 4-14 L F filtering hardware 3-14 software 3-14 FN100 Bridge Address Table 1-9 buttons 5-5 connecting to network 2-9 diagnostics 5-1 management tools 4-1 power switch 2-2 power-up diagnostics 5-1 sample applications 1-11, 1-16 specifications A-1 statistics 4-2 fuses replacing 5-6 G get password 3-19 H hardware filtering 3-14 help command 2-8 I ident command 4-11 installation rack-mounting 2-4 table-mounting 2-4 Index-2 LCM connecting 2-5 description of 2-6, 4-1 LCM commands addresses display 4-8, 4-13 basic 2-7 baud 4-15 bridge 3-5 community 3-15, 4-14 disable 4-12 enable 4-13 erase 2-8, 3-2 exit 2-8 help 2-8 ident 4-11 ipaddr 3-3, 4-11, 4-14 localfilter 3-14 logout 2-8 reboot 4-16 speed 3-4 status 4-6 syntax 2-6 trunk 3-6 vswitch 3-10 workgroup 3-12 LEDs Link 5-4 Port Status Mode 5-4 Power (Pwr) 5-4 power-up sequence 5-1 Ready 5-4 specifications A-1 Status 5-4 Link LEDs 5-4 local address filtering 3-14 Fast Network 100 User Guide Index Local Console Manager. See LCM 2-6, 4-1 localfilter command 3-14 logout command 2-8 M MAC addresses, displaying 4-9 management cable pin assignments A-5 management support A-2 management tools 4-1 manufacturing information displaying 4-11 MIB variables aging parameter 3-19 get password 3-19 modifying 3-17 multicast storm protection 3-16 set password 3-18 system contact 3-17 system location 3-18 system name 3-18 multicast storm protection 3-16 N network connecting FN100 2-9 non-volatile memory 5-3 noRIP option 4-13 O OSI Reference Model 1-7 P patch panel connections 2-9 performance specifications A-2 pin assignments 100BASE-TX A-5 10BASE-T A-5 crossover A-7 management cable A-5 straight-through A-7 Port Status Mode LED 5-4 Fast Network 100 User Guide ports disabling 4-12 enabling 4-13 Power (Pwr) LED 5-4 power supply fuse changing 5-6 power switch 2-2 power-up LED sequence 2-4, 5-1 power-up diagnostics 2-4, 5-1 results 5-3 specific tests 5-2 punch-down block connections 2-9 R rack-mounting 2-4 Ready LED 5-4 reboot command 4-16 Reset button 5-5 Routing Information Protocol (RIP) 4-13 S Select button 5-5 serial cable pin assignments A-5 set password 3-18 SNMP statistics 4-2, 4-5 software filtering 3-14 Spanning Tree algorithm 1-9 specifications 100BASE-FX cabling A-4 100BASE-TX cabling A-4 10BASE-T cabling A-3 address table size A-2 certification A-2 connector ports A-1 electrical A-1 environmental A-1 LEDs A-1 management cabling A-5 management support A-2 performance A-2 Index-3 Index physical A-1 standards A-2 speed command 3-4 standards A-2 statistics Ethernet port 4-3 gathering 4-2 overview 4-2 SNMP 4-5 system 4-3 status command 4-6 Status LEDs 5-4 straight-through wiring 2-10, A-7 pin assignments A-7 subnet mask, IP changing 4-14 system contact 3-17 system location 3-18 system name 3-18 system statistics 4-3 displaying information examples 1-17 overview 1-16 vswitch command 3-10 3-11 W wiring crossover 2-10, A-7 straight-through 2-10, A-7 workgroup command 3-12 workgroups creating and modifying 3-12 displaying information 3-12 examples 1-18 overview 1-18 T table-mounting 2-4 troubleshooting connectivity problems 5-6 NMS problems 5-7 power supply fuse 5-6 power up 5-5 trunk command 3-6 trunking closed 3-9 configuring groups 3-6 disabling 3-8 examples 1-15 heldown 3-9 joined 3-9 overview of 1-14 turning on 3-7 trunking states 3-10 V virtual switches creating and modifying Index-4 3-11 Fast Network 100 User Guide