1
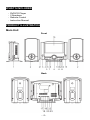
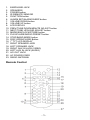
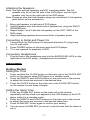
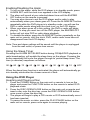
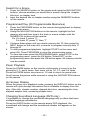
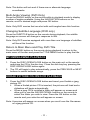
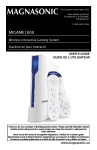
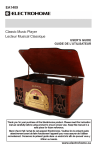
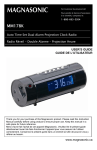
For Customer Assistance Call: 1-800-663-5954 MMD1040 DVD/CD Player with Stereo Radio/Clock INSTRUCTION MANUAL Thank you for your purchase of this Magnasonic product. Please read this Instruction Manual carefully before using product to ensure proper use. Keep this manual in a safe place for future reference. www.magnasonic.ca TABLE OF CONTENTS Product Warning What’s Included Product Illustration Main Unit Remote Basic Connections Connecting to a TV Attaching the Speakers Connect to outlet and Power On Connecting Headphones Operation Getting Started Time and Alarm Settings Sleep Timer Using the DVD Player Inserting a Disc Volume Skipping Ahead/Back Rewind/Fast Forward Stopping Playback Slow Motion Play (DVD) Repeat Function Search Programmed Play Zoom Playback On Screen Display Changing Soundtrack Language (DVD) Multi-angle Viewing (DVD) Changing Subtitle Language (DVD) MP3 Playback Kodak Picture/JPEG CD Picture CD Operation Setup and Personal Settings General Setup Audio Setup Video Setup Preferences Setup Digital Tuner Operation Basic Operation Setting Preset Radio Stations Auxiliary Input Disc Handling Precautions Troubleshooting Magnasonic Warranty -2- 3 4 4 4 5 6 6 7 7 7 7 7 7 8 8 8 9 9 9 9 9 9 10 10 10 10 10 11 11 11 11 12 12 12 13 13 13 13 14 14 14 15 15 16 ATTENTION - CAUTION: USE OF ANY CONTROLS, ADJUSTMENTS, OR PROCEDURES OTHER THAN THOSE SPECIFIED HEREIN MAY RESULT IN HAZARDOUS RADIATION EXPOSURE CAUTION: DANGER OF EXPLOSION IF BATTERY IS INCORRECTLY REPLACED. REPLACE ONLY WITH THE SAME OR EQUIVALENT TYPE TO PREVENT FIRE OR SHOCK HAZARD, DO NOT USE THIS PLUG WITH AN EXTENSION CORD, RECEPTACLE OR OTHER OUTLET UNLESS THE BLADES CAN BE FULLY INSERTED TO PREVENT BLADE EXPOSURE WARNING: TO REDUCE THE RICK OF FIRE OR ELECTRICAL SHOCK, DO NOT EXPOSE THIS PRODUCT TO RAIN OR MOISTURE WARNING: THE BATTERIES SHALL NOT BE EXPOSED TO EXCESSIVE HEAT SUCH AS SUNLIGHT OR FIRE IMPORTANT SAFETY INSTRUCTIONS This unit has been designed and manufactured to assure personal safety. Improper use can result in electric shock or fire hazard. The safeguards incorporated in this unit will protect you if you observe the following procedures for installation, use, and servicing. This unit does not contain any parts that can be repaired by the user. 1. Read these instructions. 2. Keep these instructions. 3. Heed all warnings. 4. Follow all instructions. 5. Do not use this unit near water. 6. Clean only with a dry cloth. 7. Clean the screen only with a specified cleaning solution for use products such as laptops and computer monitors. 8. Check that the power voltage stated on the power adapter rating label corresponds to your local electricity supply. 9. Do not block any ventilation openings. Install in accordance with the manufacturers instructions. 10. Do not place near any heat sources such as radiators, heat registers, stoves or other apparatus (including amplifiers) that produce heat. 11. Do not immerse the main unit, the power adapter or any accessories in water or other liquid. 12. Unplug the power adapter from the wall when the product is unused for a long period of time and during thunderstorms. 13. Only use attachments/accessories specified by the manufacturer. 14. Unwind and straighten the power adapter before use. 15. Damage Requiring Service Unplug the power adapter and refer servicing to qualified service personnel under the following conditions: A. If the product has been exposed to rain, water, or other liquids. B. If the product does not operate normally by following the operating instructions. Adjust only those controls that are covered by the operating instructions. Improper adjustment of other controls may result in damage and will often require extensive work by a qualified technician to restore the product to its normal operation. C. If the product has been dropped or damaged in any way. D. When the product exhibits a distinct change in performance. It indicated a need for service. 16. Servicing Do not attempt to service this product yourself as opening or removing covers may expose you to dangerous voltage or other hazards. Refer all servicing to qualified service personnel. 17. Replacement Parts When replacement parts are required, be sure the service technician has used replacement parts specified by the manufacturer or have the same characteristics as the original parts. Unauthorized substitutions may result in fire, electric shock or other hazards. 18. Safety Check Upon completion of any service or repairs to this product, ask the service technician to perform safety checks to determine that the product is in proper operating condition. -3- WHAT’S INCLUDED - DVD/CD Player 2 Speakers Remote Control Instruction Manual PRODUCT ILLUSTRATION Main Unit Front Back -4- 1. 2. 3. 4. 5. 6. 7. 8. 9. 10. 11. 12. 13. 14. 15. 16. 17. 18. 19. 20. 21. 22. 23. EARPHONE JACK SPEAKERS POWER button IR REMOTE SENSOR FUNCTION button ALARM SET/ALARM SLEEP button VOLUME DOWN button VOLUME UP button LCD DISPLAY PREV/TUNE DOWN/MINUTE ADJUST button NEXT/TUNE UP/HOUR ADJUST button MODE/EQ/CLOCK/STORE button PLAY/PAUSE/RADIO PRESET button STOP/BAND MODE button DISC OPEN/CLOSE Button 7” TFT-LCD DISPLAY RIGHT SPEAKER JACK LEFT SPEAKER JACK RIGHT AUX IN JACK (VIDEO) LEFT AUX IN JACK (AUDIO) A/V OUT JACK AC POWER CORD RADIO ANTENNA Remote Control -5- 1. 2. 3. 4. 5. 6. 7. 8. 9. 10. 11. 12. 13. 14. 15. 16. 17. 18. 19. 20. 21. 22. 23. 24. 25. 26. 27. DISPLAY button FUNCTION button PREV/REWIND/TUNE DOWN/MINUTE button NEXT/FAST FORWARD/TUNE UP/HOUR button SUBTITLES button NAVIGATIONAL buttons (UP/DOWN/ (LEFT/M-) / (RIGHT/M+) ) PROGRAM/ANGLE button NUMERIC buttons VOLUME DOWN button CLOCK ADJUST button ALARM SET/ALARM SLEEP button POWER button DISC OPEN/CLOSE button MENU button SETUP button STOP/BAND MODE button TITLE MENU button OK/PLAY/PAUSE button ZOOM/SLOW button AUDIO button SEARCH button REPEAT/STORE button EQ button VOLUME UP button MUTE button BUZZER OFF button BATTERY COMPARTMENT BASIC CONNECTIONS - Before attempting to connect your DVD player, ensure that player and all other electrical equipment are OFF and unplugged Read instructions carefully before attempting to connect DVD player to other appliances Observe color coding to ensure proper connection and performance of product Connecting your DVD player to a Television 1. Connect the single end of an A/V cable to the A/V jack on the back of the DVD player. 2. Attach the three connectors on the opposite end of the A/V cable to the television. 3. Attach the YELLOW connector to the VIDEO IN jack on the television. 4. Attach the RED connector to the AUDIO R jack on the television. 5. Attach the WHITE connector to the AUDIO L jack on the television -6- Attaching the Speakers Note: The right and left speakers are NOT interchangeable. The left speaker only fits on the left side of the DVD player, and the right speaker only fits on the right side of the DVD player. Note: Please be sure that both speaker plugs are connected to the speaker jacks before unit is powered on. 1. Bring right speaker to right side of DVD player 2. Unwind speaker wire from back side of speaker box, plug into RIGHT SPEAKER jack. 3. Repeat steps 1 and 2 with the left speaker on the LEFT SIDE of the DVD player. 4. Wrap remaining speaker wires around back of speaker boxes. Connecting to Outlet and Power On 1. Connect both the DVD player AC plug and television AC plug to any live AC wall outlet. 2. Press POWER button on television and then DVD player. 3. TV is not required for playback of DVD. Connecting Headphones 1. Plug the end of the headphone cord into the EARPHONE JACK on the right side of the DVD player. (Headphones not included) OPERATION Getting Started Setting the Time 1. Press and hold the CLOCK button on the main unit or the CLOCK SET button on the remote when DVD player is in standby mode. 2. Press the MINUTE and HOUR buttons on the main unit or the remote to adjust the hours and minutes to the desired time. 3. Press the CLOCK button on the main unit or the CLOCK SET button on the remote to save these changes. Setting the Alarm Time 1. Press the ALARM SET button on the main unit or the remote, repeatedly until the clock icon appears in the LCD display on the DVD player while it is in standby mode. 2. Press the MINUTE and HOUR buttons on the main unit or the remote to adjust the hours and minutes to the desired alarm time. 3. Press ALARM SET button again to confirm your setting. 4. You can press ALARM SET just once to view the time that the alarm is set to. -7- Enabling/Disabling the Alarm 1. To turn on the alarm, while the DVD player is in standby mode, press ALARM SET until the clock icon appears in the LCD display. 2. The alarm will sound at your selected alarm time until the BUZZER OFF button on the remote is pressed. 3. You may also choose to set the DVD player and/or radio to play automatically when your alarm goes off. Press the ALARM SET button repeatedly while the DVD player is in standby mode, you will see the DVD or radio words along with the clock icon, on the LCD display. 4. When your alarm goes off in this setting, the DVD or radio will begin playing. To stop you must turn off the DVD player, the BUZZER OFF button will not stop DVD or radio alarm playback. 5. To disable the alarm, press the ALARM SET button repeatedly on the main unit or remote, until the clock, DVD, and/or radio icons have all disappeared from the LCD display. Note: Time and alarm settings will be saved until the player is unplugged from the wall outlet, or power loss occurs. Using the Sleep Timer Pressing the ALARM SET/SLEEP button during CD/Mp3/DVD playback or radio broadcasting, will enable the sleep timer on the player. Pressing this button repeatedly will cycle the player through its’ preset sleep times. The time (in minutes) sequences as follows: 90 80 70 60 50 40 30 20 10 OFF When the sleep timer function is activated, the player will automatically go into standby mode after the chosen amount of time. Using the DVD Player Inserting and Playing a Disc 1. Press the POWER button on the main unit or remote to turn on the player and press the FUNCTION button on the remote to select DVD playback mode. 2. Press the DISC OPEN/CLOSE button on the main unit or remote and insert a disc onto the disc tray, press the DISC OPEN/CLOSE button once more to close the disc tray. 3. The player will begin to play a CD’s music or DVD automatically once it has been inserted. 4. To pause the music or video, press the PLAY/PAUSE button on the main unit or remote, press once again to resume playing. -8- Adjusting the Volume 1. To change the volume during playback, press the VOLUME UP or VOLUME DOWN buttons on the main unit or the remote. 2. The volume level will be displayed on the LCD screen. 3. To mute the volume, press the MUTE button on the remote. 4. Press the EQ button on the main unit or remote to toggle the EQ effect of the sound system, the effect will change from Rock, POP, Jazz, Classic and Normal. Note: If the volume is very quiet while connected to a television, you may also have to adjust the volume on your television. Skipping Ahead or Back Press the NEXT or PREVIOUS buttons on the main unit or remote once during playback to skip ahead or back one chapter (DVD) or track (CD). Rewind and Fast Forward Press and hold the NEXT or PREVIOUS button on the remote to scan the disc forward or reverse, press NEXT or PREVIOUS multiple times to play at x2, x4, x8, x16, x32 speed. Press the PLAY button to resume normal play. Stopping Playback Press the STOP button on the main unit or remote during playback. Pressing PLAY on the main unit or the remote will resume playback. Note: When a DVD disc is stopped and the player is turned off, the DVD player enters resume mode. The player will remember the moment you pressed stop and begin the disc at the same point the next time the player is turned on, and playback is resumed. To clear this disc memory, press the DISC OPEN/CLOSE button and remove the disc, press the STOP button while the disc tray is out. Re-insert the disc and it will play normally from the title menu. Slow Motion Play (DVD only) Press and hold the SLOW button on the remote during playback will play the footage at 1/2 speed at first, press and hold SLOW repeatedly and the speed will cycle to 1/4, 1/8, and 1/16 speed. Pressing PLAY again will resume normal playback speed. Repeat Function Press the REPEAT button on the remote. It will repeat one chapter on a DVD or one song on a CD. Press REPEAT multiple times and it will repeat all, turn off repeat, or replay 2 seconds of the last video/audio played. -9- Search for a Scene 1. Press the SEARCH button on the remote and using the NAVIGATION buttons, choose whether you would like to search using title, chapter, title time, or chapter time. 2. Input the desired title or chapter number using the NUMERIC buttons on the remote Programmed Play (20 Programmable Memories) 1. Press the PROGRAM button on the remote during playback to display the program menu. 2. Using the NAVIGATION buttons on the remote, highlight the first memory slot and then type in the track or scene number with the NUMERICAL buttons on the remote. Ex. For track 3, press “3” For track 21, press “2” then “1” 3. Continue these steps until you reach memory slot 10; then press the NEXT button on the main unit or remote to program memory slots 11 through 20. 4. To start programmed playback, highlight START on the menu and press OK. Press PROGRAM to close the programming menu. 5. To clear the menu press the PROGRAM button, select STOP in the programming menu, press the OK button. Select EXIT on the programming menu and press the OK button again. All memory should now be erased. Zoom Playback Press the ZOOM button on the remote continuously to zoom in on the picture by 2, 3, and 4 times, then zoom out by 1/2, 1/3, and 1/4 times. Press the ZOOM button once more in 1/4 size to return to normal size. Scroll across the picture while zoomed in using the NAVIGATION buttons on the remote. On Screen Display When the player is in playback mode, pressing the DISPLAY button on the remote will cycle through information that is available to display from the disc. (Disc title, chapter number, elapsed disc time, remaining disc time, elapsed chapter time, remaining chapter time) Changing Soundtrack Language (DVD only) It is possible to change the soundtrack language only on discs that have multiple language soundtracks. Press the AUDIO button on the remote during DVD playback, the soundtrack will change and the soundtrack number will appear on the screen. - 10 - Note: This button will not work if there are no alternate language soundtracks. Multi-Angle Viewing (DVD Only) Press the ANGLE button on the remote while in playback mode to display number of angles available. Using the NAVIGATION buttons on the remote; scroll to desired angle and press OK button. Note: Only DVD movies that are shot with multi-angles have this function. Changing Subtitle Language (DVD only) Press the SUBTITLE button on the remote during playback, the subtitle language on screen will change in response to this. Note: Only DVD movies equipped with more than one language of subtitles will have this function. Return to Main Menu and Play DVD Title Press the MENU button on the remote during playback to return to the main menu of the disc and press the TITLE MENU button to play the title. MP3/MPEG4/WMA PLAYBACK 1. Press the DISC OPEN/CLOSE button on the main unit or the remote and place the CD in the disc tray. Close the disk tray buy pressing the DISC OPEN/CLOSE button again. 2. The CD will begin to play automatically, press the PREVIOUS or NEXT buttons to switch between songs. KODAK PICTURE CD/JPEG CD PLAYBACK 1. Press the DISC OPEN/CLOSE button and insert your Kodak or jpeg picture CD. When a Kodak picture CD is inserted, the pictures will load and a slideshow will begin automatically. When a jpeg CD is installed a folder will appear on screen and allow you to use the NAVIGATIONAL buttons on the remote to select the folder you wish to view. Press the OK button on the remote and your selection will appear on screen. Note: A preview will appear on screen when you scroll over the file names on a jpeg picture CD. - 11 - Kodak Picture CD/JPEG CD Operation 1. Playback Mode – Press the REPEAT button on the remote to switch to repeat or repeat all. 2. Skip to Next/Previous Picture – Press the NEXT and PREVIOUS buttons on the main unit or remote to switch to the next or previous pictures. Slideshow will begin after a few seconds if no further keys are pressed. 3. Rotating a Picture – Press the RIGHT and LEFT NAVIGATIONAL buttons on the remote to rotate the pictures clockwise and counterclockwise, respectively. 4. Flipping a Picture – Press the UP NAVIGATIONAL button on the remote to flip the picture vertically. Press the DOWN NAVIGATIONAL button on the remote to flip the picture horizontally. 5. Zoom In/Out – Press the ZOOM button on the remote to zoom in and then out of the picture. When the picture is enlarged you can use the NAVIGATIONAL buttons to view blocked parts of the picture. SETUP AND PERSONAL SETTINGS The setup menu lets you make personal settings that are saved in the DVD players’ CPU until otherwise changed. All changes made to the setup menu can be done by pressing the SETUP button on the remote, use the NAVIGATION and OK buttons on the remote to make your choices. To exit the setup menu press the SETUP menu button again. General Setup TV Display TV Display is the mode that the DVD player will display movies or pictures. Options: 1. 4:3/PS - Pan and Scan Mode 2. 4:3/LB - Letter Box Mode 3. 16:9 - Wide Screen Mode Angle Mark The angle mark option gives you the choice of whether or not the multiangle icon is visible when a DVD enabled with alternate angle viewing is played. Choose on to show the icon or off to hide it. OSD Language OSD language is used to select a different on screen language than the default setting of English. All menus and on screen prompts will appear in the chosen language, English or French. Screen Saver - 12 - When the DVD player is not in use for several minutes, a DVD logo screen saver will appear on the screen to protect the TV screen, when set to off the screen saver will never appear even when not in use. Audio Setup Down Mix Changes the way the DVD player plays sounds through the speakers. Options: 1. LT/RT – Left/Right mix mode (Used for 5.1 surround sound stereo systems) 2. STEREO – Select this option for best sound quality if you do not have a 5.1 surround sound system connected. Video Setup The video setup page gives you the options to adjust the picture on screen. Options: 1. Brightness – Adjust the lightness or darkness of the display. 2. Contrast – Adjusts the contrast ratio of the display. 3. Hue – Adjusts the colour impression of the display. 4. Saturation – Adjusts the darkness or colourfulness of the display. Preferences Setup TV Type Choose your TV type according to where you reside. Options: 1. NTSC – Choose this option if you live in North America. 2. PAL – Choose this option if you live in Europe. Audio Select your preferred default audio setting, (DVD only – disc software support required) Subtitle Language Select your preferred default subtitle language. (DVD only – disc software support required) Disc Menu Select your preferred default disc menu language. (DVD only – disc software support required) Default Select this option to return the DVD player to all factory default settings. - 13 - DIGITAL TUNER (RADIO) OPERATION Basic Operation 1. Press the FUNCTION button on the main unit or remote to choose the Tuner function. 2. Press the STOP button on the main unit or remote to choose either AM or FM radio. 3. Press the TUNE UP or TUNE DOWN buttons on the main unit or remote to manually change the radio station you are listening to. 4. To scan for the next available radio station, hold the TUNE UP or TUNE DOWN button for two seconds. When the tuner finds the next available radio station, the broadcast will begin to play automatically. Setting Preset Radio Stations 1. Press the PRESET button on the main unit or the M+/- (Left/Right navigation) buttons on the remote to choose a preset station number, you may preset up to 20 stations. 2. Press the TUNE UP or TUNE DOWN buttons on the main unit or remote to select a frequency to store. 3. Press the STORE button on the main unit or remote TWICE to store the selected frequency. 4. Repeat the process to store the rest of your chosen preset radio stations. 5. To recall your selected radio stations, press the PRESET button on the main unit or the M+/- (Left/Right navigation) buttons on the remote to cycle though all presets. AUXILIARY INPUT Any audio signal can be input and played through the DVD player as an amplifier, via the right and left auxiliary inputs. 1. Press the FUNCTION button on the main unit or remote several times to select AUX mode. 2. Insert the auxiliary plugs into the DVD players right and left AUX IN jacks on the back of the DVD player, and the opposite, smaller end into the jack of your audio device. (Example: headphone jack of a MP3 player) 3. Press PLAY on your selected audio source. 4. Adjust the volume using the DVD players’ volume control; the volume control of the audio source will not affect the sound while plugged into the DVD player. - 14 - DISC HANDLING PRECAUTIONS • • • • • • • Hold the disc by the edge to the surface will not be spoiled with finger prints. Dirt and scratched cause skipping and distortion, or may render the disc completely unreadable Do not write on the label side with a ball-point pen or other writing utensils Do not clean with benzene, thinner, or any liquid that prevents against static electricity Install only one disc, label side up, into the disc tray at a time Do not attempt to close the disc tray while the disc is not inserted properly and lying flat Be sure to store the disc in its case while not in use to prevent damage Do not store the disc in direct sunlight TROUBLESHOOTING If your DVD player appears to not be working properly, check these troubleshooting symptoms below first before contacting an authorized service center. Symptom Check Power does not turn on Ensure that the AC cord is securely plugged into an AC or suddenly turns off wall outlet Turn the power off and then on again Remote control does Check that the battery is inserted in the “+” and “-“ not work direction properly The battery may be dead, replace it with a new one Ensure you are directing the remote towards the IR sensor on the front of the DVD player Try using the remote closer to the DVD player Ensure there are no obstacles between you and the DVD player No picture or sound Check that the LCD display is on Ensure that the video in plug is fully and securely plugged into the video in jack on the television. Check plug colour coding Ensure that the right and left Audio in plugs are fully and securely plugged into the audio in jacks on the television. Check plug colour coding Distorted Video or Ensure that you are using a disc with no visible dents or sound scratches Attempt to play another disc to ensure it plays properly - 15 - MAGNASONIC® WARRANTY Consumer Electronics Products and Home Appliances Thank you for choosing MAGNASONIC®! BlueTronics Group gives the following express warranty to the original consumer purchaser or gift recipient for this MAGNASONIC product, when shipped in its original container and sold or distributed in Canada by BlueTronics Group or by an Authorized MAGNASONIC Dealer: BlueTronics Group warrants that this product is free, under normal use and maintenance, from any defects in material and workmanship. If any such defects should be found in this product within the applicable warranty period, BlueTronics Group shall, at its option, repair or replace the product as specified herein. Replacement parts furnished in connection with this warranty shall be warranted for a period equal to the unexpired portion of the original equipment warranty. This warranty shall not apply to: a. Any defects caused or repairs required as a result of abusive operation, negligence, accident, improper installation or inappropriate use as outlined in the owner’s manual. b. Any MAGNASONIC product tampered with, modified, adjusted or repaired by any party other than BlueTronics Group or MAGNASONIC’s Authorized Service Centres. c. Damage caused or repairs required as a result of the use with items not specified or approved by BlueTronics Group, including but not limited to head cleaning tapes and chemical cleaning agents. d. Any replacement of accessories, glassware, consumable or peripheral items required through normal use of the product including but not limited to earphones, remote controls, AC adapters, batteries, temperature probe, stylus, trays, filters, cables, paper, cabinet, cabinet parts, knobs, buttons, baskets, stands, shelves, cookware and cooking utensils. e. Any cosmetic damage to the surface or exterior that has been defaced or caused by normal wear and tear. f. Any damage caused by external or environmental conditions, including but not limited to transmission line/power line voltage or liquid spillage. g. Any product received without appropriate model, serial number and CSA /cUL /cULus /cETL /cETLus markings. h. Any products used for rental or commercial purposes. i. Any installation, setup and/or programming charges. Should this MAGNASONIC product fail to operate during the warranty period, warranty service may be obtained upon delivery of the MAGNASONIC product together with proof of purchase and a copy of this LIMITED WARRANTY statement to an Authorized MAGNASONIC Service Centre. In-home warranty service may be provided at BlueTronics Group’s discretion on any MAGNASONIC television with the screen size of 27” or larger. This warranty constitutes the entire express warranty granted by BlueTronics Group and no other dealer, service centre or their agent or employee is authorized to extend, enlarge or transfer this warranty on behalf of BlueTronics Group. To the extent the law permits, BlueTronics Group disclaims any and all liability for direct or indirect damages or losses or for any incidental, special or consequential damages or loss of profits resulting from a defect in material or workmanship relating to the product, including damages for the loss of time or use of this MAGNASONIC product or the loss of information. The purchaser will be responsible for any removal, reinstallation, transportation and insurance costs incurred. Correction of defects, in the manner and period of time described herein, constitute complete fulfillment of all obligations and responsibilities of MAGNASONIC Electronics to the purchaser with respect to the product and shall constitute full satisfaction of all claims, whether based on contract, negligence, strict liability or otherwise. CARRY-IN PARTS & LABOUR WARRANTY PERIODS: • Audio / Communications Products: 1 Year (Remote Control, if applicable – 90 Days) • DVD Products: 1 Year (Remote Control – 90 Days) • LCD & Plasma Display TV: 1 Year (Remote Control – 90 Days) • Television Products: 1 Year (Remote Control – 90 Days) • VCR Products: 1 Year (Remote Control – 90 Days, Video Heads – 6 Months) • Home Appliances: 1 Year o Microwave Magnetron parts only additional 3 Years o Refrigerator / Freezer Compressor parts only, additional 4 years To obtain the name and address of the nearest Authorized MAGNASONIC Service Centre or for more information on this warranty • visit www.magnasonic.ca • mail your inquiry to: BlueTronics Group MAGNASONIC Customer Service 1040 Martin Grove Road, Toronto, ON M9W 4W4; or • call toll free 1-800-663-5954, Monday to Friday 9:00am – 5:00pm Eastern Time. 02.2009 - 16 -