1
MSI
P620/ P640
User’s Manual
Table of Contents
How to Use This Manual..................................................................................... 1
Safety Instructions....................................................................................................2
Chapter 1. Introduction ...........................................................................................3
Unpack ................................................................................................................ 4
Chapter 2. Getting Started.......................................................................................5
Overview ............................................................................................................. 5
LCD Display ....................................................................................................... 6
Main Menu ...................................................................................................6
Normal Playback Mode ................................................................................7
Li-ion Battery Recharge ...................................................................................... 8
Battery Status................................................................................................8
Lock Switch......................................................................................................... 9
Utility CD............................................................................................................ 9
Chapter 3. Connect and Disconnect......................................................................10
Connect to Computer......................................................................................... 10
Safely Remove from Computer..........................................................................11
Chapter 4. Basic Usage...........................................................................................12
Power On........................................................................................................... 12
Refresh Music Database .................................................................................... 12
Power Off .......................................................................................................... 13
Select and Enter a Function............................................................................... 13
Music................................................................................................................. 14
Music Playback ..........................................................................................14
Add Songs to Playlist .................................................................................15
Add Artist/ Album/ Line In/ Radio/ Voice to Playlist .................................15
Remove a Song from Playlist .....................................................................16
Delete a Song from Device.........................................................................16
Lyric Function On/ Off ...............................................................................17
SRS WOW Enhancement Effect ................................................................17
Set EQ.........................................................................................................18
Set Repeat Mode.........................................................................................18
Photo ................................................................................................................. 19
View Photo .................................................................................................19
Slideshow ...................................................................................................20
Rotate Photo ...............................................................................................20
Puzzle .........................................................................................................21
Video ................................................................................................................. 22
Play Video...................................................................................................22
Notes ................................................................................................................. 23
Read *.txt File ............................................................................................23
FM Radio (Optional) ......................................................................................... 24
Listen to FM Ratio......................................................................................24
Customize Channels/ Auto-Scan ................................................................25
Browser ............................................................................................................. 26
Browse Contents.........................................................................................26
Setting................................................................................................................ 27
Lyric On/ Off ..............................................................................................27
SRS.............................................................................................................28
Set EQ.........................................................................................................29
Set Repeat Mode.........................................................................................29
Record Quality/ File Type/ Source .............................................................30
Slide Interval/ Slide Repeat/ Transitions ....................................................31
Radio Region ..............................................................................................32
Power Off ...................................................................................................32
Backlight Off ..............................................................................................33
Brightness ...................................................................................................33
Language ....................................................................................................34
Date and Time.............................................................................................35
Transfer Mode ............................................................................................36
Master Reset ...............................................................................................36
Info .............................................................................................................37
Record ............................................................................................................... 38
Line-In Recording.......................................................................................38
Microphone Recording ...............................................................................39
Radio Broadcast Recording (Optional).......................................................39
Language Learning Function............................................................................. 40
Synchronize Songs ............................................................................................ 41
Appendix A. Specifications ....................................................................................43
COPYRIGHT NOTICES
The material in this document is the intellectual property of MICRO-STAR INTERNATIONAL. We
take every care in the preparation of this document, but no guarantee is given as to the
correctness of its contents. Our products are under continual improvement and we reserve the
right to make changes without notice.
TRADEMARKS
All trademarks are the properties of their respective owners.
MICRO-STAR INTERNATIONAL Statement
All contents are subject to change without notice.
One year guarantee is for the device only. Warranty for accessories shall be expired within seven
days of purchase date.
WEEE Statement
English: To protect the global environment and as an environmentalist, MSI must remind
you that...Under the European Union ("EU") Directive on Waste Electrical and Electronic
Equipment, Directive 2002/96/EC, which takes effect on August 13, 2005, products of
"electrical and electronic equipment" cannot be discarded as municipal waste anymore and
manufacturers of covered electronic equipment will be obligated to take back such products at the end of
their useful life. MSI will comply with the product take back requirements at the end of life of MSI-branded
products that are sold into the EU. You can return these products to local collection points.
Deutsch: Hinweis von MSI zur Erhaltung und Schutz unserer UmweltGemäß der Richtlinie 2002/96/EG
über Elektro- und Elektronik-Altgeräte dürfen Elektro- und Elektronik-Altgeräte nicht mehr als kommunale
Abfälle entsorgt werden. MSI hat europaweit verschiedene Sammel- und Recyclingunternehmen
beauftragt, die in die Europäische Union in Verkehr gebrachten Produkte, am Ende seines Lebenszyklus
zurückzunehmen. Bitte entsorgen Sie dieses Produkt zum gegebenen Zeitpunkt ausschliesslich an einer
lokalen Altgerätesammelstelle in Ihrer Nähe.
Français: En tant qu’écologiste et afin de protéger l’environnement, MSI tient à rappeler ceci...Au sujet
de la directive européenne (EU) relative aux déchets des équipement électriques et électroniques,
directive 2002/96/EC, prenant effet le 13 août 2005, que les produits électriques et électroniques ne
peuvent être déposés dans les décharges ou tout simplement mis à la poubelle. Les fabricants de ces
équipements seront obligés de récupérer certains produits en fin de vie. MSI prendra en compte cette
exigence relative au retour des produits en fin de vie au sein de la communauté européenne. Par
conséquent vous pouvez retourner localement ces matériels dans les points de collecte.
Srpski: Da bi zaštitili prirodnu sredinu, i kao preduzeće koje vodi računa o okolini i prirodnoj sredini, MSI
mora da vas podesti da…Po Direktivi Evropske unije ("EU") o odbačenoj ekektronskoj i električnoj
opremi, Direktiva 2002/96/EC, koja stupa na snagu od 13. Avgusta 2005, proizvodi koji spadaju pod
"elektronsku i električnu opremu" ne mogu više biti odbačeni kao običan otpad i proizvođači ove opreme
biće prinuđeni da uzmu natrag ove proizvode na kraju njihovog uobičajenog veka trajanja. MSI će
poštovati zahtev o preuzimanju ovakvih proizvoda kojima je istekao vek trajanja, koji imaju MSI oznaku i
koji su prodati u EU. Ove proizvode možete vratiti na lokalnim mestima za prikupljanje.
Polski: Aby chronić nasze środowisko naturalne oraz jako firma dbająca o ekologię, MSI przypomina,
że...Zgodnie z Dyrektywą Unii Europejskiej ("UE") dotyczącą odpadów produktów elektrycznych i
elektronicznych (Dyrektywa 2002/96/EC), która wchodzi w życie 13 sierpnia 2005, tzw. “produkty oraz
wyposażenie elektryczne i elektroniczne " nie mogą być traktowane jako śmieci komunalne, tak więc
producenci tych produktów będą zobowiązani do odbierania ich w momencie gdy produkt jest
wycofywany z użycia. MSI wypełni wymagania UE, przyjmując produkty (sprzedawane na terenie Unii
Europejskiej) wycofywane z użycia. Produkty MSI będzie można zwracać w wyznaczonych punktach
zbiorczych.
Türkçe: Çevreci özelliğiyle bilinen MSI dünyada çevreyi korumak için hatırlatır:Avrupa Birliği (AB)
Kararnamesi Elektrik ve Elektronik Malzeme Atığı, 2002/96/EC Kararnamesi altında 13 Ağustos 2005
tarihinden itibaren geçerli olmak üzere, elektrikli ve elektronik malzemeler diğer atıklar gibi çöpe
atılamayacak ve bu elektonik cihazların üreticileri, cihazların kullanım süreleri bittikten sonra ürünleri geri
toplamakla yükümlü olacaktır. Avrupa Birliği’ne satılan MSI markalı ürünlerin kullanım süreleri bittiğinde
MSI ürünlerin geri alınması isteği ile işbirliği içerisinde olacaktır. Ürünlerinizi yerel toplama noktalarına
bırakabilirsiniz.
Česky: Záleží nám na ochraně životního prostředí - společnost MSI upozorňuje...Podle směrnice
Evropské unie ("EU") o likvidaci elektrických a elektronických výrobků 2002/96/EC platné od 13. srpna
2005 je zakázáno likvidovat "elektrické a elektronické výrobky" v běžném komunálním odpadu a výrobci
elektronických výrobků, na které se tato směrnice vztahuje, budou povinni odebírat takové výrobky zpět
po skončení jejich životnosti. Společnost MSI splní požadavky na odebírání výrobků značky MSI,
prodávaných v zemích EU, po skončení jejich životnosti. Tyto výrobky můžete odevzdat v místních
sběrnách.
Magyar: Annak érdekében, hogy környezetünket megvédjük, illetve környezetvédőként fellépve az MSI
emlékezteti Önt, hogy ...Az Európai Unió („EU") 2005. augusztus 13-án hatályba lépő, az elektromos és
elektronikus berendezések hulladékairól szóló 2002/96/EK irányelve szerint az elektromos és
elektronikus berendezések többé nem kezelhetőek lakossági hulladékként, és az ilyen elektronikus
berendezések gyártói kötelessé válnak az ilyen termékek visszavételére azok hasznos élettartama
végén. Az MSI betartja a termékvisszavétellel kapcsolatos követelményeket az MSI márkanév alatt az
EU-n belül értékesített termékek esetében, azok élettartamának végén. Az ilyen termékeket a
legközelebbi gyűjtőhelyre viheti.
Italiano: Per proteggere l’ambiente, MSI, da sempre amica della natura, ti ricorda che….In base alla
Direttiva dell’Unione Europea (EU) sullo Smaltimento dei Materiali Elettrici ed Elettronici, Direttiva
2002/96/EC in vigore dal 13 Agosto 2005, prodotti appartenenti alla categoria dei Materiali Elettrici ed
Elettronici non possono più essere eliminati come rifiuti municipali: i produttori di detti materiali saranno
obbligati a ritirare ogni prodotto alla fine del suo ciclo di vita. MSI si adeguerà a tale Direttiva ritirando tutti
i prodotti marchiati MSI che sono stati venduti all’interno dell’Unione Europea alla fine del loro ciclo di vita.
È possibile portare i prodotti nel più vicino punto di raccolta.
Русский: Компания MSI предпринимает активные действия по защите окружающей среды,
поэтому напоминаем вам, что.... В соответствии с директивой Европейского Союза (ЕС) по
предотвращению загрязнения окружающей среды использованным электрическим и электронным
оборудованием (директива WEEE 2002/96/EC), вступающей в силу 13 августа 2005 года, изделия,
относящиеся к электрическому и электронному оборудованию, не могут рассматриваться как
бытовой мусор, поэтому производители вышеперечисленного электронного оборудования
обязаны принимать его для переработки по окончании срока службы. MSI обязуется соблюдать
требования по приему продукции, проданной под маркой MSI на территории EC, в переработку по
окончании срока службы. Вы можете вернуть эти изделия в специализированные пункты приема.
Español: MSI como empresa comprometida con la protección del medio ambiente, recomienda: Bajo la
directiva 2002/96/EC de la Unión Europea en materia de desechos y/o equipos electrónicos, con fecha
de rigor desde el 13 de agosto de 2005, los productos clasificados como "eléctricos y equipos
electrónicos" no pueden ser depositados en los contenedores habituales de su municipio, los fabricantes
de equipos electrónicos, están obligados a hacerse cargo de dichos productos al termino de su período
de vida. MSI estará comprometido con los términos de recogida de sus productos vendidos en la Unión
Europea al final de su periodo de vida. Usted debe depositar estos productos en el punto limpio
establecido por el ayuntamiento de su localidad o entregar a una empresa autorizada para la recogida
de estos residuos.
Nederlands: Om het milieu te beschermen, wil MSI u eraan herinneren dat….De richtlijn van de
Europese Unie (EU) met betrekking tot Vervuiling van Electrische en Electronische producten
(2002/96/EC), die op 13 Augustus 2005 in zal gaan kunnen niet meer beschouwd worden als vervuiling.
Fabrikanten van dit soort producten worden verplicht om producten retour te nemen aan het eind van
hun levenscyclus. MSI zal overeenkomstig de richtlijn handelen voor de producten die de merknaam MSI
dragen en verkocht zijn in de EU. Deze goederen kunnen geretourneerd worden op lokale
inzamelingspunten.
How to Use This Manual
This User’s Manual provides instructions and illustrations on how to install and
operate your P620/ P640. We assume that your operating system is at least Windows
ME / 2000 / XP, and you are capable to follow the step-by-step instructions to install
the utility of P620/ P640. For users who are not able to manage the OS properly, it is
suggested to learn more about Microsoft Windows by referring to your Microsoft
Windows manual before installing the provided utility.
Chapter 1, Introduction, tells you the main features of P620/ P640 and lists the
accessories should be found in the package.
Chapter 2, Getting Started, introduces the function keys on P620/ P640, and shows
the LCD Display status in different mode.
Chapter 3, Utility Installation, describes how to install P620/ P640 and the specially
designed utility for your new P620/ P640.
Chapter 4, Basic Usage, describes how to use each function of P620/ P640. It is
recommended to read this chapter carefully before using P620/ P640.
Appendix A, Specification, provides the specification and accessories of P620/ P640.
1
Safety Instructions
1.
Always read the safety instructions carefully.
2.
Keep this User’s Manual for future reference.
3.
Keep this equipment away from humidity.
4.
Never pour any liquid into the opening that could damage or cause electrical
shock.
5.
If any of the following situations arise, get the equipment checked by a service
personnel:
• Liquid has penetrated into the equipment.
• The equipment has been exposed to moisture.
• The equipment has not worked well or you can not get it work according to
User’s Manual.
• The equipment has been dropped and damaged.
6.
Do not change the default folders in the P620/ P640, or the device might function
abnormally.
7.
Adjust to proper volume while listening with earphone to avoid permanent harm
to hearing capability.
8.
If P620/ 640 does not response for several minutes, press
for about 10
seconds to force shut down.
9.
Make sure to disconnect P620/ 640 from computer with Safely Remove
procedures, or the system might be failure.
2
Chapter 1. Introduction
Congratulations on becoming a new user of P620/ P640. The new P620/ P640 will
improve the convenience of listening music, viewing photos/ videos, and sharing data.
We are proud to tell our users that P620/ P640 is thoroughly tested and certified by
our reputation for unsurpassed dependability and customer satisfaction.
P620/ P640 is a high performance portable multimedia player that enables users to
play MP3/ WMA/ WMA with DRM audio, M-JPEG video, JPEG graphic, listen to
FM radio broadcast (optional), record voice/ Line-in/ FM program (optional), and to
store personal data. Here are the major features:
Digital Audio Player – supports MP3, WMA and WMA with DRM audio.
Video Player – supports M-JPEG format and smaller 320x240 pixels video.
Photo Browser – supports JPEG graphics and provides slideshow function.
FM Radio (optional) – with the optional FM module, P620/ P640 supports FM
Radio function.
TXT File Reader – supports TXT and LRC Unicode files.
Voice Recorder – provides synchronous voice recording function.
Record Voice/ FM Radio (optional) – provides synchronous recording function
from FM or directly from a CD player. Recorded files will be stored in MP3 or
WAV format.
A-B Section Repeat – enables users to repeat particular section during normal
playback. With this function, users can pay attention on the repeated playback to
learn language.
EQ and SRS effect – you are able to select SRS effect or one of EQ modes to
enjoy your music listening.
USB Storage Device – allows users to store data needed in P620/ P640. (The
capacity depends on the model you bought.)
3
Hold Switch – P620/ P640 has a Hold Switch, which locates on the side for
preventing any accidental operation while recording or playing. Once the Hold
Switch is slided to lock position, all function keys on are disabled instantly.
Unpack
Please check if you have all the accessories included when you open the packing box.
If any of the items are damaged or missing, please contact directly the vendor where
you purchased P620/ P640.
z
Earphone
z
USB Cable (A male to mini B male)
z
Line-In Cable
z
Utility CD (User’s Manual included)
z
Quick Starting Guide
z
Power Adaptor (optional accessory)
4
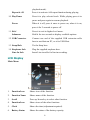
Chapter 2. Getting Started
Overview
1. Display Screen
Read status and information at this window.
2. MIC
Internal Microphone.
3. OK/ Enter
Press it to confirm item selection.
4. Up
Press it to select among items.
Volume Up
5. Left
Previous/Rewind
During playback, press it to increase volume level.
Press it to select among options.
During playback, press it to go the previous track, or
press and hold to rewind within a track.
6. Right
Next/Forward
Press it to select among options.
During playback, press it to go to the next track. Press
and hold to fast-forward within a track.
7. Down
Volume Down
8. Lock
Press it to select among items.
During playback, press it to decrease volume level.
Switch to Lock position to prevent any mis-touch. Switch
back to unlock.
9. Record
Press this button to start/ stop recording (not available in
5
playback mode).
Repeat A->B
10. Play/Pause
Press it to activate A-B repeat function during playing.
Press it to play selected track. While playing press it to
pause and press again to resume playback.
Power
When it is off, press it once to power on; when it is on,
press it for 2 seconds to power off.
11. Exit/
Submenu
12. USB Connecter
Press it to exit to higher level menu.
Hold it for two seconds to display available options.
Connect one end of the supplied USB extension cable
here to read data on PC, or to be USB Host.
13. Strap Hole
Tie the Strap here.
14. Earphone Jack
Plug the supplied earphone here.
Line-In Jack
Insert Line-in cable for line-in recording.
LCD Display
Main Menu
1.
Function Icon
Shows icon of the function.
2.
Function Name
Shows name of the function.
3.
Scroll
Press up/ down key to select other function.
4.
Function Icon
Shows icons of the other functions.
5.
Clock
Shows the time (adjustment required).
6.
Battery Status
Shows the status of the battery capacity.
6
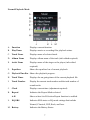
Normal Playback Mode
A. Function
Displays current function.
B. Play/Pause
Displays music or recording files playback status.
C. Track Name
Displays name of selected track.
D. Album Name
Displays album name of the track (info edited required).
E. Artist Name
Displays name of the singer or the player (info edited
required).
F.
Equalizer
Shows the equalizer bar of current playback.
G. Playback Time Bar Shows the playback progress.
H. Track Timer
Displays the on-going timer of the current playback file.
I.
Display the current track number and the total number of
Track Number
sound tracks.
J.
Clock
K. Repeat/
A-B
L. EQ/SRS
Displays current time (adjustment required).
Indicates the Repeat Mode selected.
Shows when A to B Section Repeat function is enabled.
Indicates SRS status or EQ mode settings that include
Normal, Classical, POP, Rock, and Jazz.
M. Battery
Indicates the Battery Status.
7
Li-ion Battery Recharge
P620/ P640 comes with a Li-ion rechargeable battery. To charge the Li-ion battery,
follow the instructions below:
1. On the upper side of P620/ P640, you could see a USB (B type, female) port.
2. Do not turn on P620/ P640. Plug mini USB (B type, male) end of supplied USB
cable to P620/ P640, and USB (A type, male) end to your computer.
3. While recharging is on going, you would see
battery is full of power, you would see
icon on the display. When the
icon. The built-in battery can be
80-percent charged in about three hours, and fully charged in about five hours.
4. If you have an optional AC Adapter, connect the USB (A type, male) end to it,
and connect the adapter to an AC outlet to charge. By this way, the charging
duration would be shorter.
5. To stop recharging, refer to next chapter to safely disconnect the USB cable.
Note: The built-in battery can only be charged by the optional adapter or the USB
cable. Charge the player for 8 hours before first time operation.
Note: You are able to operate P620/ P640 during charging with the optional adapter.
Only the charging time will be longer.
Battery Status
Low
Full
P620/ P640 comes with a Li-ion rechargeable battery. Refer to the figure above to
know the battery status. Charge the battery when necessary.
Note: Before using for the first time, it is recommended to charge exact eight hours
for a full battery charge.
Note: Do not separately recharge, disassemble, incinerate, or expose the battery to
high temperature. Examples of high temperatures that may damage your
product include leaving it in a locked car in summer, or putting it on top of
heat generating electronical devices (Such as power amplifiers and computer
monitors.)
8
Lock Switch
P620/ P640 has a Lock Switch to avoid accidental operation. Slide it to lock position
while power is on, and all function keys are disabled. Slide it to unlock to continue. If
the switch is at lock position, P620/ P640 can not be turned on. Unlock it to continue.
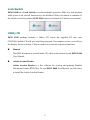
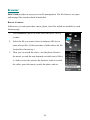
Utility CD
P620/ P640 package includes a Utility CD. Insert the supplied CD into your
CD-ROM, and the CD will auto run Setup program. On computer screen, you will see
the display shown as below. Click on each icon to execute respective function.
Manual
This PDF document is packed in the CD, click on the button to read P620/ P640
User Manual.
Adobe Acrobat Reader
Adobe Acrobat Reader is a free software for viewing and printing Portable
Document Format (PDF) files. To read P620/ P640 User Manual, you also have
to install the Adobe Acrobat Reader.
9
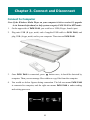
Chapter 3. Connect and Disconnect
Connect to Computer
Note: If the Windows Media Player on your computer is below version 10, upgrade
it via Internet beforehand, to help system recognize P620/ P640 in MTP mode.
1.
On the upper side of P620/ P640, you could see a USB (B type, female) port.
2.
Plug mini USB (B type, male) end of supplied USB cable to P620/ P640, and
plug USB (A type, male) end to your computer. Then turn on P620/ P640.
3.
Once P620/ P640 is connected, press
button once, it should be detected by
computer. Then you can manage files within or copy files from the computer.
4.
You would see below figures during connection. The left one means P620/ P640
is connected to computer, and the right one means P620/ P640 is under reading
and writing processes.
10
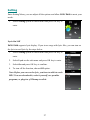
Safely Remove from Computer
After updating firmware or managing the files by PC, follow the steps to safely
remove P620/ P640 to prevent system or device corrupt:
1.
While an USB device is connecting to a computer, there will be an
icon on
the task bar. Double click the icon to bring Safely Remove Hardware dialog box.
You can find all devices connected on the display. To remove P620/ P640, close
all the programs related, and click USB Mass Storage Device and Stop button.
2.
As you see a window as below, select USB Mass Storage Device and click OK.
3.
Following message shall appear, and you can remove the device now.
Note: make sure to disconnect P620/ 640 from computer with Safely Remove
procedures, or the system might be failure.
11
Chapter 4. Basic Usage
This chapter introduces you the basic usages of P620/ P640. Please read carefully to
know how to operate your device. Note that the figures below are for reference only.
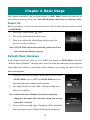
Power On
Before operation, you have to turn on the device first. Follow the steps below to turn
on P620/ P640.
1.
Press Play/ Pause button
2.
The screen will display the Start Logo.
3.
Then you will see the Main Menu on the screen, the
once.
device is ready to function.
Note: if P620/ P640 can not be turned on, please check the
Lock switch and battery capacity.
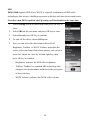
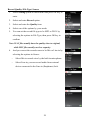
Refresh Music Database
If the transfer mode has been set to be MSD, the display of P620/ P640 will show
“Refresh Music Database” message once power on after disconnecting from computer.
Select Yes and confirm to refresh the music database for sorting the music files by
latest management.
1.
Seeing the message on display, means the Transfer Mode
of P620/ P640 is set to MSD, and P620/ P640 has been
disconnected from computer and restarted.
2.
Use right/ left Key to select Yes or No option and press
OK key to confirm.
Note: refresh the music database if you have made any
changes to the music files, then the system can sort the
music files correctly.
3.
You would see second figure. Database will be refreshed
after the progress bar is filled and the figure disappears.
12
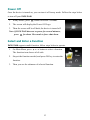
Power Off
Once the device is turned on, you can turn it off in any mode. Follow the steps below
to turn off your P620/ P640.
1.
In any modes, press
2.
The screen will display the Power Off Logo.
3.
Then the screen will be all dark, the device is turned off.
button for about 2 seconds.
Note: if P620/ P640 does not response for several minutes,
press
for about 10 seconds to force shut down.
Select and Enter a Function
P620/ P640 supports multi-function, follow steps below to operate.
1.
On Main Menu, press
or
button to select a function.
The function icon shows at left side.
2.
Stop at the function needed, and press OK key to enter the
function.
3.
Then you see the submenu of selected function.
13
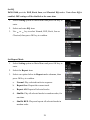
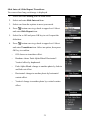
Music
Music Playback
P620/ P640 supports MP3, WAV, WMA and WMA format with DRM audio. Follow
the steps below to enjoy music.
1.
To play music/ voice, select and enter the Music option on
Main Menu.
2.
Then press
or
button to select how you want to sort
the music files.
- Select All List to play all music files stored.
- Select Artist to select all songs of an artist.
- Select Album to select an album to play.
- Select Record to play files recorded by the device.
- Select Playlist to play songs by playlist edited.
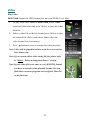
3.
Select a music file or select a Playlist, and press OK key
to play.
4.
While playing, press
/
button continuously to
rewind / fast-forward the track; press
beginning of the track; press
once to go to
once to go to the next
track.
5.
Press
key to increase volume level, or press
key to
decrease. Volume bar will show at the bottom of display.
Note: refer to Synchronize Songs section to synchronize
music to make sure all MP3 info is imported correctly.
14
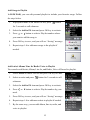
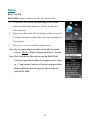
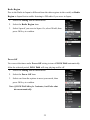
Add Songs to Playlist
In P620/ P640, you can edit personal playlist to include your favorite songs. Follow
the steps below.
1.
In playback mode or on Music file list, press
button
for 2 seconds to call submenu.
2.
Select the Add to PL item and press OK key to activate.
3.
Press
or
button to select a Playlist number where
you want to add the song to.
4.
Press OK key to save, and you will see “Saving” message.
5.
Repeat steps 1-4 to add more songs to the playlist if
needed.
Add Artist/ Album/ Line In/ Radio/ Voice to Playlist
You can also add Artist, Album, Line In, and Radio, Voice of Record to playlist.
1.
Select Artist on Music file list and press OK key to Enter
2.
Select an artist and press
button for 2 seconds to call
submenu.
3.
Select the Add to PL item and press OK key to activate.
4.
Press
or
button to select a Playlist number by your
need.
5.
Press OK key to save, and you will see “Saving” message.
6.
Repeat steps 1-4 to add more artists to playlist if needed.
7.
By the same way, you can add album, line-in, radio, and
voice to playlist.
15
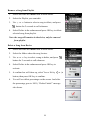
Remove a Song from Playlist
1.
Select and enter the Music item in Main Menu.
2.
Select the Playlist you want edit.
3.
Use
or
button to select a song to delete, and press
button for 2 seconds to call submenu.
4.
Select Delete in the submenu and press OK key to delete
selected song from playlist.
Note: the song still remains in the device, only be removed
from playlist.
Delete a Song from Device
1.
Select and enter the Music item in Main Menu.
2.
Select the folder where the song locates.
3.
Use
or
key to select a song to delete, and press
button for 2 seconds to call submenu.
4.
Select Delete in the submenu and press OK key to
activate.
5.
A confirm box will show up, select Yes or No by
or
button, then press OK key to confirm.
6.
You will see delete percentage on the screen. And after
the percentage goes to 100%, “Delete Finish!” message
also shows.
16
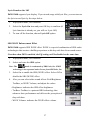
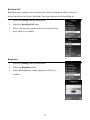
Lyric Function On/ Off
P620/ P640 supports lyric display. If you stored songs with lyric files, you can turn on
the lyric to read lyric by the steps below.
1.
In playback mode, call submenu.
2.
Select the Lyric On item and press OK key to confirm. (if
lyric function is already on, you will see Lyric Off)
3.
To turn off the function, choose Lyric Off option.
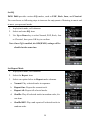
SRS WOW Enhancement Effect
P620/ P640 supports SRS WOW effect. WOW is a special combination of SRS audio
technologies that creates a thrilling experience with deep rich bass from sound source.
Note that when SRS is enabled, the EQ settings will be disabled at the same time.
1.
In playback mode, call submenu.
2.
Select and enter the SRS option.
Note: The
mark is a trademark of SRS Labs, Inc. WOW
technology is incorporated under license from SRS Labs, Inc.
3.
Select On to enable the SRS (WOW) effect. Select Off to
disable the SRS (WOW) effect.
4.
Also you can select other sound effects Field Brightness,
TruBass, or WOW Volume, and adjust the values.
- Brightness: indicates the SRS effect brightness.
- TruBass: TruBass is a patented SRS technology that
enhances bass performance and delivers the perception of
deep rich bass.
- WOW Volume: indicates the WOW effect volume.
17
Set EQ
P620/ P640 provides various EQ modes, such as POP, Rock, Jazz, and Classical.
You can choose as following steps to increase the enjoyment of listening to music and
to meet your personal needs.
1.
In playback mode, call submenu.
2.
Select and enter EQ item.
3.
Use Up or Down key to select Normal, POP, Rock, Jazz
or Classical, then press OK key to confirm.
Note: Once EQ is enabled, the SRS(WOW) settings will be
disabled at the same time.
Set Repeat Mode
1.
In playback mode, call submenu.
2.
Select the Repeat item.
3.
Select one option below in Repeat mode submenu.
a.
Normal: Play selected tracks in sequence.
b.
Repeat One: Repeat the current track.
c.
Repeat All: Repeat all selected tracks.
d.
Shuffle: Play all selected tracks in random order, for
one time.
e.
Shuffle REP: Plays and repeats all selected tracks in
random order.
18
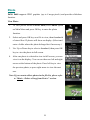
Photo
P620/ P640 supports JPEG graphics (up to 8 mega pixels) and provides slideshow
function.
View Photo
1.
To view photos stored on P620/ P640, select Photo option
on Main Menu and press OK key to enter the photo
function.
2.
Select and press OK key on a file to view, then thumbnails
of stored first 12 photos will show on display. (Select and
enter a folder where the photo belongs first if necessary.)
3.
Use Up or Down key to select a thumbnail, then press OK
key to view the photo in full screen.
4.
After one photo is selected to view in full screen, you can
view it on the display. You can see there are left and right
arrows at the bottom of the photo. Press left key to view
the previous photo, or press right arrow to view the next
one.
Note: If you want to delete photos in the file list, please refer
to “Music - Delete a Song from Device” section.
19
Slideshow
You can have the JPEG files slideshow on P620/ P640.
1.
While viewing one photo, press
slideshow. There will be a
button to start
icon at the bottom right
corner of the display.
2.
To stop slideshow, press
be a
button again. And there will
icon at the bottom right corner of the display.
Note: You can set how long each image to be displayed, refer
to Setting - Slide Interval.
Note: You can also set to have photos slideshow after
performing rotation when necessary. Simply press OK
key will do.
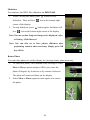
Rotate Photo
You can rotate photos to suit the display for viewing clearly when necessary.
1.
To rotate one photo, call submenu while viewing it. Select
90cw or 90ccw option and press OK key to rotate the
photo 90 degrees by clockwise or by counter-clockwise.
The photo will rotate and show on the display.
2.
Select 90cw or 90ccw again to rotate again or to restore
the photo.
20
Puzzle
You can play puzzle with the stored photo.
1.
While viewing one photo, call submenu. Select Puzzle
option and press OK key. The photo will be cut in pieces,
one piece will be cut down as a black box, and the others
will be moved and placed in wrong order.
2.
Use up/ down/ left/ right keys to move the pieces near the
black box and have the photo restored. Ex: press up key to
bring the piece below the box upwards; press right key to
move the piece at the left of the box to right. (Quit by
press
button once. Hold
button can rewind the
steps.)
3.
You have at most 500 steps to move. After all pieces are
replaced in order, the black box will also appear. And you
will see “Finish!” message on the display. Or, if you can
not restore the photo in 500 steps, you will see “Game
Over!” on the display.
21
Video
Play Video
P620/ P640 supports M-JPEG format (the .mov and M-JPEG .avi files).
1.
To play video files stored on P620/ P640, select Video
option on Main Menu and press OK key to enter the video
function.
2.
Select a video file on the file list and press OK key to play
the selected file. (Select and enter a folder where the
video locates first if necessary.)
3.
Press
button to pause or resume the video playback.
Note: Video will be played broadwise to fit the screen and to
have better view.
Note: If you want to delete video in the file list, please refer
to “Music - Delete a Song from Device” section.
Note: If your video file is not .mov or .avi (M-JPEG) format,
you have to transfer it into playable format. You can
find video converter program such as Quick Time Pro
on the Internet.
22
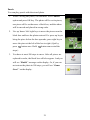
Notes
Read *.txt File
P620/ P640 supports reading .txt and .lrc Unicode files.
1.
To read text files stored on P620/ P640, select Notes
option on Main Menu and press OK key to enter the
Notes function.
2.
Select a text file on the file list and press OK key to read
it. (Select and enter a folder where the video belongs first
if necessary.)
3.
Press
or
key to read the complete text.
Note: If you want to delete text files on the file list, please
refer to “Music - Delete a Song from Device” section.
Note: The Unicode text files can be read on P620/ P640
correctly. Open the text files on computer, select “Save
as…” and choose Code to be Unicode, then press Save
button. And then you can copy the file to and read
from P620/ P640.
23
FM Radio (Optional)
Listen to FM Ratio
FM radio function is optional for P620/ P640. If you purchased one with FM function,
follow steps below to enjoy FM radio.
1.
To listen to the FM radio broadcast by P620/ P640, select
the Radio option on Main Menu and press OK key to
enter. (Also, the earphones have to be plugged, they are
the antenna of P620/ P640)
2.
In the very first time performing FM function, you will
see “Searching…” message on the display. The system
will search for stations available and set as default
channels.
3.
Then you can press OK key to switch between the
channel option and frequency. When channel option is
highlighted with left and right arrows, press left or right
arrow to select a channel preset.
4.
When radio frequency bar is highlighted with left and
right arrows, press the left or right key to adjust the
frequency you want. You can hold the keys to adjust
faster.
24
Customize Channels/ Auto-Scan
You can also set channels at your preference. And if you go to different region, you
can perform Auto Preset to scan available stations.
1.
Adjust the frequency to the station you need, call
submenu, and select Save CH option.
2.
Press up or down key to select a channel number from 1
to 15, and press OK key to confirm saving the frequency
to the station selected.
3.
To automatically scan and save radio stations again, call
submenu, and select Auto Preset option. You will see
“Searching…” message on display. After the message
disappears, new stations will be saved to the device. And
you can select and listen to one of them.
25
Browser
P620/ P640 provides an easy access to file management. The file browser can open
and arrange files stored on built-in hard disk.
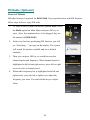
Browse Contents
In Browser, you can open video, music, photo, note files which are readable by each
function page.
1.
Select Browser option on Main Menu and press OK key
to enter.
2.
Select the file you want to browse and press OK key to
open selected file. (Select and enter a folder where the file
locates first if necessary.)
3.
Then you can watch the video, view the photo, listen to
the music, or read the note depends on which sort of file it
is. And you can also operate the function, such as rewind
the video, pause the music, puzzle the photo, and etc.
26
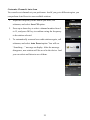
Setting
Enter Setting Menu, you can adjust all the options and allow P620/ P640 to meet your
needs.
1.
Select Setting option on Main Menu and press OK key to
enter.
Lyric On/ Off
P620/ P640 supports lyric display. If you store songs with lyric files, you can turn on
the lyric to read lyric by the steps below.
1.
Select Setting option on Main Menu and press OK key to
enter.
2.
Select Lyric on the sub menu and press OK key to enter.
3.
Select On and press OK key to confirm.
4.
To turn off the function, choose Off option.
Note: Before you can see the lyric, you have to add it to each
MP3. You can download it, write it yourself, use peculiar
programs, or plug-ins of Winamp to edit it.
27
SRS
P620/ P640 supports SRS effect. WOW is a special combination of SRS audio
technologies that creates a thrilling experience with deep rich bass from sound source.
Note that when SRS is enabled, the EQ settings will be disabled at the same time.
1.
Select Setting option on Main Menu and press OK key to
enter.
2.
Select SRS on the sub menu and press OK key to enter.
3.
Select On and press OK key to confirm.
4.
To turn off the effect, choose Off option.
5.
Also you can select the other sound effects Field
Brightness, TruBass, or WOW Volume, and adjust the
values. Select and enter those three options, you can see a
status bar, adjust the value by left and right key, then
press OK key to confirm.
-
Brightness: indicates the SRS effect brightness.
-
TruBass: TruBass is a patented SRS technology that
enhances bass performance and delivers the perception
of deep rich bass.
-
WOW Volume: indicates the WOW effect volume.
28
Set EQ
P620/ P640 provides POP, Rock, Jazz, and Classical EQ modes. Note: Once EQ is
enabled, SRS settings will be disabled at the same time.
1.
Select Setting option on Main Menu and press OK key to
enter.
2.
Select and enter EQ item.
3.
Use
or
key to select Normal, POP, Rock, Jazz or
Classical, then press OK key to confirm.
Set Repeat Mode
1.
Select Setting option on Main Menu and press OK key to
enter.
2.
Select the Repeat item.
3.
Select one option below in Repeat mode submenu, then
press OK key to confirm.
a.
Normal: Play selected tracks in sequence.
b.
Repeat One: Repeat the current track.
c.
Repeat All: Repeat all selected tracks.
d.
Shuffle: Play all selected tracks in random order, for
one time.
e.
Shuffle REP: Plays and repeat all selected tracks in
random order.
29
Record Quality/ File Type/ Source
1.
Select Setting option on Main Menu and press OK key to
enter.
2.
Select and enter Record option.
3.
Select and enter the Quality item.
4.
Select one of the options by your needs.
5.
You can set the record file type to be MP3 or WAV by
selecting the options in File Type, then press OK key to
confirm.
Note: WAV files usually have the quality close to original,
while MP3 files usually cost less capacity.
6.
And you can set the record source to be Mic or Line-in by
selecting the options in Source.
-
Select Mic to record voice by the built-in microphone
-
Select Line-in, you can record audio from external
device connected to the Line-in (Earphones) Jack.
30
Slide Interval/ Slide Repeat/ Transitions
You can set how long each image is displayed.
1.
Select and enter Setting item in Main Menu.
2.
Select and enter Slide Interval item.
3.
Select one from the options to meet your needs.
4.
Press
button once to go back to upper level. Select
and enter Slide Repeat item.
5.
Select On or Off and press OK key to set if repeat the
slideshow.
6.
Press
button once to go back to upper level. Select
and enter Transitions item. Select an option, then press
OK key to confirm.
-
Off: shows no transition effect.
-
Random: shows Push Alpha Blend/ Horizontal /
Vertical effect by haphazard.
-
Push Alpha Blend: change to another photo by fade in
and fade out effect.
-
Horizontal: change to another photo by horizontal
curtain effect.
-
Vertical: change to another photo by vertical curtain
effect.
31
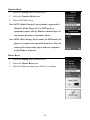
Radio Region
Due to the Radio in Japan is different from the other regions in the world, set Radio
Region to Japan first to enable listening to FM radio if you were in Japan,.
1.
Select the Setting item in Main Menu.
2.
Select the Radio Region item.
3.
Select Japan if you were in Japan. Or, select World, then
press OK key to confirm.
Power Off
You can set the timer under Power Off setting to turn off P620/ P640 automatically.
After the selected period, P620/ P640 will stop playing and be off.
1.
Select the Setting item in Main Menu.
2.
Select the Power Off item.
3.
Select one from the options to meet your needs, then
press OK key to confirm.
Note: if P620/ P640 idles for 5 minutes, it will also shut
down automatically.
32
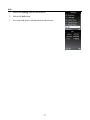
Backlight Off
Backlight timer program can save the power. After having been idle for selected
period, the device will cease backlight. Press any button to have backlight on.
1.
Select the Setting item in Main Menu.
2.
Select the Backlight Off item.
3.
Select one from the options to meet your needs, then
press OK key to confirm.
Brightness
1.
Select the Setting item in Main Menu.
2.
Select the Brightness item.
3.
Adjust the brightness setting, then press OK key to
confirm.
33
Language
1.
Select the Setting item in Main Menu.
2.
Select the Language item.
3.
Select a language you want to use, then press OK key to
confirm.
34
Date and Time
1.
Select the Setting item in Main Menu.
2.
Select the Date/Time item.
3.
To adjust how you want the time to be displayed, select
the Time Format item, and then select 12 hour or 24 hour
format.
4.
Select Set Time or Set date to change the time or date
settings.
5.
The current set time or date is displayed.
6.
Set time or date, then press OK key to confirm.
Note: the date will be applied to the file name of FM/
Line-In/ Mic recording.
35
Transfer Mode
1.
Select the Setting item in Main Menu.
2.
Select the Transfer Mode item.
3.
Select MTP/ MSC item.
Note: MTP: Media Transfer Protocol mode; supported by
Windows Media Player 10. Use MTP mode to
synchronize music files by Windows Media Player 10
can shorten the time to load music tracks.
Note: MSD: Mass Storage Device mode. In MSD mode, the
player is recognized as a portable hard drive. You can
transfer files between the player and your computer
using Windows Explorer.
Master Reset
1.
Select the Setting item in Main Menu.
2.
Select the Master Reset item.
3.
Select the Yes item, then press OK key to confirm.
36
Info
1.
Select the Setting item in Main Menu.
2.
Select the Info item.
3.
You can read device information on the screen.
37
Record
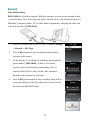
Line-In Recording
P620/ P640 has a build-in encoder. With this encoder, you can record external audio
via Line-In Jack. First of all, plug one end of Line-In cable to the Audio-out jack of a
Walkman, Computer, Radio, TV, or other Audio Equipments, and plug the other end
to the Line-In jack of P620/ P640.
1.
Select to encode audio to MP3 or WAV format by Setting
-> Record -> File Type.
2.
Press A-B[•] button to start recording and play music
from the audio source.
3.
On the display, a recording file should be generated and
placed under [ \RECORD\ ] folder of. File name
sequence starts from LineIn-yearmonthday-001, ex:
LineIn-20060514-001, and so forth. (File extension
depends on the format you selected.)
4.
Press A-B[•] button again to stop recording, there will be
a message telling you the file name and you will see the
file list in the RECORD folder.
38
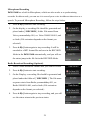
Microphone Recording
P620/ P640 has a built in Microphone, which can also works as a synchronizing
recorder. In other words, you can use it to record your voice in either an interview or a
speech. To proceed Microphone Recording, follow the steps below.
1.
Press A-B[•] button to start recording.
2.
On the display, a recording file should be generated and
placed under [ \RECORD\ ] folder. File named from
Voice-yearmonthday-001, ex: Voice-20060514-001, and
so forth. (File extension depends on the format you
selected.)
3.
Press A-B[•] button again to stop recording. It will be
encoded to a MP3 format file and save in the RECORD
folder in the P620/ P640 automatically, and you will see
the status jump to the file list in the RECORD folder.
Radio Broadcast Recording (Optional)
1.
Select a radio broadcast channel that you want to record.
2.
Press A-B[•] button to start recording.
3.
On the Display, a recording file should be generated and
placed under the folder of [ \RECORD\ ]. The file name
sequence starts from Radio-yearmonthday-001, ex:
Radio-20060514-001, and so forth. (File extension
depends on the format you selected.)
4.
Press A-B[•] button again to stop recording, and you will
see the status return to the previous status.
39
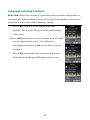
Language Learning Function
P620/ P640 enables users to listen to a particular section repeatedly during music or
voice playback. With this function, users will be able to pay attention to the repeated
section and to achieve the result of language learning.
1.
Press A-B[•] button to set the starting point when
playback. The A- icon will appear on the middle bottom
of the screen.
2. Press A-B[•] button again to set the terminal point. The A-B
icon will appear on the screen. You will hear the
repeating playback that you had set previously over and
over again.
3.
Press A-B[•] button again back to the normal playback.
Meanwhile the A-B icon will disappear on the screen.
40
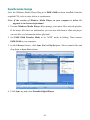
Synchronize Songs
Once the Windows Media Player Plug-in of P620/ P640 has been installed (from the
supplied CD), refer to steps below to synchronize:
Note: If the version of Windows Media Player on your computer is below 10,
upgrade it via Internet beforehand.
1. Execute Windows Media Player 10 to manage your music files and edit playlist.
If the music files have no information, you can also edit them to allow the player
can sort files via information before playback.
2. Set P620/ P640 Transfer Mode to be “MTP” mode in Setting. Then connect
P620/ P640 to your computer.
3. In the Library feature, click Sync List in Playlist pane. Select wanted files and
drag them to Sync List column.
4. Click Sync tag and select Portable Digital Player.
41
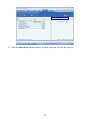
5. Click the Start Sync button in the List pane, and you can see the process.
42
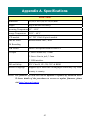
Appendix A. Specifications
P620/ P640
Dimension
95 (W) x 45.8 (D) x 12.9 (H) mm
Weight
80g (with built-in battery)
Operating Temperature 0°C ~ 40°C
Storage Temperature
-20°C ~ 60°C
LCD module
1.8” TFT 128x160 pixels module
Line-In/ Voice/
Record format: MP3, WAV
FM Recording
USB Profile
Meets USB specification revision 2.0
I/O Input
1. Stereo Audio-out, 3.5mm
2. Stereo Line-in jack, 3.5mm
3. USB interface.
EMI and Safety
FCC Class B, CE, CB, CCC & BSMI
Interface Language
Supports up to more than 10 languages which may vary from
country to country.
NOTE: The firmware of P620/ 640 can be updated or updated by advanced users.
To know details of the procedures to recover or update firmware, please
visit http://www.msi.com.tw
43