1
User’s Manual of MSI P500 MP3 Player
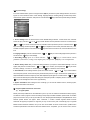
Contents
I.
Brief introduction of the product
1)
General
2)
Accessories
3)
Minimum configuration requirements of the computer
4)
Connection with PC
5)
Product specifications
II. Brief introduction of the player
1.
Schematic diagram of the product
2.
Keys description
III. Switch on / off
IV. Power
V. Introduction of functions
(I)
Playing music
(II)
FM Radio
(III) Recording
(IV) Reading electronic books
(V) Browsing pictures
(VI) MTV
(VII) System settings
VI. Program update and video file conversion
VII. Mobile HD
VIII. Formatting of this device
IX. Problems and answers
I.
1.
Brief introduction of the product
General
This product is a kind of MP3 color screen player elaborated by our company, which has abundant functions
including playing music, radio, realtime recording, browsing pictures, reading electronic books, playing video files
and other functions. It supports music of MP3/WMA//WAV/SMV formats, and the built-in equalizer enables setting
of individualized sound effect mode; it features a HD without a driver(excluding Win98), sound and text
synchronization, A-B rereading, FM internal recording and external recording (built-in microphone) function, and it
enables you looking for other songs while listening one song, and also enables you listening music while reading
electronic books; it supports two kinds of languages: simplified Chinese and English. With a compact and elegant
design and a super display screen, it is able to make you enjoy fully the new digital sound and color life!
2.
Accessories
A P500 contains the following accessories. If there is any accessory missing when purchasing, please contact with
the local distributor.
z
earphone (one set)
1
3.
z
USB line (one)
z
Neck string (one)
z
installation CD (one)
z
operation instruction (one)
Minimum configuration requirements of the computer
● Microsoft Windows 98/2000/XP/ME
● 200MHz Pentium CPU or above
● A USB interface
● CD-ROM
● 40MB HD space
● 32MB memory
4.
Connection with PC
Please connect this device and your PC with the delivered USB line. Connect the smaller port of the USB line with
the USB plughole of this device and connect the bigger port of it to the USB interface of your PC.
5.
Product specification
z
type No.: P500
● storage medium: a built-in 128/256/512MB/1G/2G flash memory (optional)
● interface: USB2.0
● transmission speed: 800KBps
● recording format: WAV
● animation file format: SMV
● bit rate: 8Kbps - 320Kbps
● recording time: dependent on the chosen bit rate and the size of the FLASH
● display screen: 1.8 inch TFT LCD screen 4K color;128×160 (displaying pixel)
● power: high-energy polymer lithium cell
● charging time of the cell: about 3.5 hours
● maximum output: earphone 15mw×2
● FM frequency range: 87.500 - 108.000MHz
● Size: 74 mm(length)×44mm(width)×8.8mm(height)
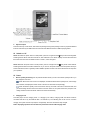
II.
1.
Brief introduction of the player
Schematic diagram of the product
2
2.
Keys description
There are five keys on this device, and short-time pressing and long-time pressing of each key represent different
functions and each key has different functions and also has different functions in different playing status.
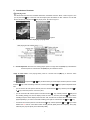
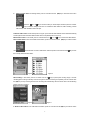
III. Switch on / off
Switch on: When the power switch is in ON position, press for a longer time the【 】key till the screen brightens
indicating that the device has been switched on, after switched on, the device displays first the start LOGO and
then enters the main menu the default of which is “Music”, shown as Figure 1.
Switch off: When the power switch is in ON position, press for a longer time the【 】key till the screen darkens
indicating that the device has been switched off. Or you can turn the power switch to the OFF position directly to
switch off the device, which is generally used as RESET operation in cases such as the device does not respond to
your operations.
IV. Power
1.
Electric quantity monitoring: the cell pictorial indication shows you how much electric quantity is left so you
can charge the cell in time.
When all the bars of the cell icon are displayed, it indicates that the electric quantity is full, and as usage
time increases, the displayed number of bars of the cell icon decreases correspondingly.
When the electric quantity of the cell is almost used up, the inside of the cell icon becomes blank, and
you should charge the cell in time. If the device is forced to switch on, the system will show a prompt box "low
voltage, the device will be turned off" and then shut down automatically.
2.
Charging the cell
This MP3 player has one charging mode, i.e. charging by PC USB (in charging mode, the device should be
connected with the PC by the USB line after it is switched on). The indicating bars of the cell icon roll when
charging. The system will show a prompt box “charged fully” when the cell has been fully charged.
Notes: displaying operations are not able to be performed in the PC USB charging mode.
3
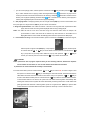
V. Introduction of functions
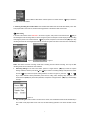
(Ⅰ) Playing music
The device enters the main menu mode after switched on, the default of which is “Music”, shown in Figure 1, then
you can press the【 】key to enter the music file list (the system will indicate “no files” if there is no music files
stored in the device), and press the【 】key to play music, as shown in Figure 2.
Figure 1
Figure 2
1.
Brief introduction of screen displaying in playing status
2.
Volume adjustment: when the music is being played, press for a longer time the【VOL】key to decrease the
volume and press for a shorter time the【VOL】key to increase the volume.
Usage of online menu: in the playing status, press for a shorter time the【M】key to enter the online
menu
, and press the【 】or【 】key to select the item you want to adjust, and then press for a shorter
time the 【 】key to enter the settings of this item, and then press the【 】or【 】key to perform adjustment of this
item.
① you can choose “roll music pieces” and then press for a shorter time the【 】key, and then press the【 】or
【 】key to enter the previous / next music piece;
② you can choose the “AB” and then press for a shorter time the 【 】 key, and then press the 【 】key to set
the rereading starting point, and the display screen will show “A-”, and then press the【 】key to set the
rereading end point, and the display screen will show “A-B”, and then the sound files within this section will be
played repeatedly, if you want to cancel A-B rereading, press again for a shorter time the【 】or【 】key;
③ choose the “EQ” and then press for a shorter time the【 】 key, and then press the 【 】 or 【 】key to switch
between the six kinds of sound effect modes including Normal (NOR), Rock-and-roll (ROC), Jazz (JAZ),
Classical (CLA), Popular (POP), and Customized (USER);
4
④ you can choose “playing mode”, and then press for a shorter time the【 】key, and then press the【 】or【 】
key to switch between the four playing modes including Normal Playing
(the device will play from the
currently chosen file to the last file in the device or the directory), All Repeat
(all the files in the device or the
directory will be played repeatedly), Random Repeat
(files in the device or the directory will be played in
random) and Single Repeat (the current file will be played repeatedly).
4.
Quit playing status: in the playing status, press for a longer time the【M】key to return to the list status, and
then press again for a longer time the【M】key to return to the main interface.
5. Song-text synchronization: if the *.MP3 file and the *.LRC file of one song have been copied into the MP3
player, then the words of the song will be displayed while the song is being played.
Notes: the *.MP3 file and the *.LRC file of the same song must have the same name, for example, the
synchronization of music and words will be realized only when both the On the Golden Hill of
Beijing.MP3 and the On the Golden Hill of Beijing.LRC have been copied into the MP3 player.
6.
How to delete one song: in the music file list status, press for a shorter time the【M】key to enter the song file,
and then press a longer time the【VOL】key, one prompt box
appears, and then press
for a shorter time the【 】 or 【 】key to choose “delete” and then press for a shorter time the 【 】
key, a prompt box “Do you really want to delete it?” pops up, then press the 【 】 or 【 】key to
choose “yes” and then press for a shorter time the【 】 key to delete the chosen file.
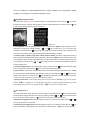
(Ⅱ) FM Radio
Notes: a) Please be sure to plug the earphone when you are searching channels, because the earphone
acts as antenna in radio status, or else no radio stations will be able to be searched.
b) The device can not be switched off manually in search status.
In the main menu status, press for a shorter time the 【 】 or 【 】key to choose “FM”, as shown in Figure 3, and
then press for a shorter time the 【 】key to acknowledge to enter radio module. The device will enter the
radio station list if there is stored radio stations in the device, and you can press the 【 】 or 【 】key to
choose a radio station and then press for a shorter time the 【 】key to listen to this radio station; if there is
no stored radio stations in the device, the system will enter station searching status automatically after
entering this module, and the system will switch automatically to listening status when a radio station with
good signal has been searched. In listening status, press for a longer time the 【M】key to quit the radio
module and return to the radio station list and then repress the same key to return to the main menu.
Figure 3
5
5.
Usage of online menu: in listening status, press for a shorter time the 【M】key to enter the online menu
, press the 【 】 or 【 】key to choose the item you want to adjust, and then press for a shorter
time the 【 】key to enter the settings of this item. It includes the radio station list, radio recording, manual
radio search, radio automatic search and quit.
Automatic radio search: in this status (shown in Figure 4), the searched radio stations will be stored automatically,
and the system enters the radio station list after search completed (shown in Figure 5).
Manual radio search: in this mode, press for a shorter time the 【 】 or 【 】key to search the radio stations.
Store a radio station: in the manual radio search status, press for a shorter time the 【M】key to enter the online
menu
, choose the item of “store a radio station” and then press for a shorter time the 【 】key to store
the currently searched radio station.
Figure 4
Figure 5
FM recording: in this status, press for a shorter time the 【 】key to pause (time counting stops) / continue
recording (time counting continues), as shown in Figure 6, after the recording is completed, press for a shorter time
the【M】key to stop recording and store the recording file automatically, then the device returns to FM listening
status, as shown in Figure 7.
Figure 6
Figure 7
2. Delete a radio station: in the radio station list status, press for a shorter time the【M】key to enter the online
6
menu
, choose “delete a radio station” and then press for a shorter time the 【 】key to delete the
currently chosen radio station.
3. Listening recording file of radio station: the recorded radio station files are stored automatically in the “FM”
loose paper folder in the music list, and their listening operation is the same as that of music files.
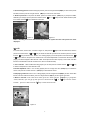
(Ⅲ) Recording
In the main menu status choose “RECORD”, as shown in Figure 8, then press for a shorter time the 【 】key to
acknowledge to enter recording status, as shown in Figure 9 (here an example of screen display in MIC recording
mode is given). Press s for a shorter time the 【 】key to pause, and press for a shorter time the【M】key to stop
recording and store the recording file automatically and then the system will return to the main menu automatically.
Figure 8
Figure 9
Notes: this device has three recording modes: MIC recording and FM internal recording, and only the MIC
recording mode can be entered from main interface.
1.
Recording settings: in the main menu status, press for a longer time the 【M】key to enter the “system
settings” interface, and then press the 【 】 or 【 】key to switch to "recording settings" and press for a shorter
time the 【 】key to enter the specific setting interface, as shown in Figure 10, press the
【 】 or 【 】
key to switch between various parameters (sound source, coding, track, sampling rate), and press
for a
shorter time the【VOL】key to set each parameter, and press for a longer time the 【M】key to acknowledge
and quit.
Figure 10
2.
Play recording file: when the “MIC” sound source is chosen, the recorded files will be stored automatically in
the “VOICE” loose paper folder of the music list, and their listening operation is the same with that of music
files;
7
Notes: the recording files recorded with different parameter settings are different in size, and generally the sampling
rate higher, the recording file is larger and the sound quality is better.
(Ⅳ) Reading electronic book
In the main menu choose “E_BOOK”, as shown in Figure 11, and the press for a shorter time the 【 】 key to enter
the electronic book list, choose the TXT document you want to read and then press for a shorter time the 【 】 key
to enter the text reading interface, as shown in Figure 12.
Figure 11
Figure 12
1. Set a bookmark: on the text reading interface press for a shorter time the 【M】key, and a prompt box of “set a
bookmark or not” will pop up, and then press the
【 】 or 【 】key to choose “yes” or “no”, if you choose "yes"
and press for a shorter time the 【 】key, then the current page of the current document is set as a bookmark, and
the system will jump to the electronic book list automatically after the setting is complete.
2. Listening music ( listening songs while reading electronic books): this device supports the function of
listening songs while reading electronic books, press for a longer time the【M】key to return to the main menu, then
choose “electronic books” to enter reading status, then you can read the electronic book while listening songs, now
you can press for a shorter time the 【 】 or 【 】key to page up or down, and the volume adjustment is the same
as that of playing music.
3. Automatic paging function: in the reading status, press for a longer time the 【 】key to start automatic paging
function and press for a shorter time the【 】key to cancel automatic paging function.
4. Delete a text file: in the file list, choose the text file you want to delete, and press for a shorter time the 【VOL】
key, and a prompt box “delete, attributes, quit” will pop up, press for a shorter time the 【 】 or 【 】key to choose
“delete” and then press for a shorter time the 【 】key to delete the chosen file, or choose "attributes" to check the
size of the currently chosen file, or choose “quit” to quit the prompt box.
5. Quit electronic books: in the reading status, press for a longer time the 【M】 key (or press for a shorter
time the 【M】key, a prompt box “set a bookmark or not” pops up, and then complete the settings) to return
to the file list status, then press for a longer time the 【M】key to return to the main menu.
(Ⅴ) Browsing pictures
In the main menu status, choose “PHOTO”, as shown in Figure 13, and then press the 【 】key to enter the picture
file list (this device supports pictures of “bmp” and “jpg” formats), press the 【 】 or 【 】key to choose the picture
file you want to look and then press the 【 】key to browse this picture, as shown in Figure 14.
1. Manual picture paging function: when browsing the pictures, you can press for a shorter time the【 】or【 】
key to go to the previous or next picture.
2. Automatic picture paging function: when browsing the pictures, you can press for a longer time the 【 】key
to start the automatic picture paging function, and press for a shorter time the 【M】key to cancel this function.
8
3. Quit browsing pictures: when browsing the pictures, press for a longer time the【M】key to return to the picture
list status, and then press for a longer time the 【M】key to return to the main menu.
4. Delete a picture file: in the picture list status, press for a shorter time the 【VOL】key, a prompt box “delete,
attributes, quit” will pop up, then press for a shorter time the 【 】 or 【 】key to choose “delete” and then press
for a shorter time the【 】key to delete the chosen file.
Figure 13
Figure 14
Notes: if decoding errors occur when browsing a picture, the system will show “this picture can not be
displayed”.
(Ⅵ) MTV
In the main menu, choose “MTV”, as shown in Figure 15, and press the 【 】key to enter the video file list, and then
press for a shorter time the 【 】or【 】key to choose the video file you want to see, and then press for a shorter
time the 【 】key to see this Video . When a Video is being played, you can also press for a shorter time the 【 】
or【 】key to switch to the previous or next file to see. The volume adjustment of it is the same with that of music
playing. This device supports video files with “SMV” format (this format is this company’s own format, and video
files are converted with a video file conversion tool, which is introduced after).
1. See a video file: When a video file is being played, you can also press for a shorter time the 【 】or【 】key
to switch to the previous or next video file to see.
2.Volume adjustment: when a Video is being played, press for a longer time the 【VOL】key to increase the
volume, and press for a shorter time the 【VOL】key to decrease the volume.
3.Quit playing a video file: when a Video is being played, press for a longer time the【M】key to return to the video
file list. And in the video file list status, press for a longer time the【M】key to return to the main menu.
4. Delete a video file: in the video file list status, press for a shorter time the 【VOL】key, a prompt box
“delete, attributes, quit” will pop up, then press for a shorter time the 【 】 or 【 】key to choose “delete”
and then press for a shorter time the【 】key to delete the chosen file.
Figure 15
9
(Ⅶ) System settings
In the main interface status, press for a longer time the【M】key to enter the system settings interface, as shown in
Figure 16, which includes six items: screen settings, language settings, recording settings, restore factory status,
customize EQ, system information, and press for a shorter time the【 】key to enter each specific settings interface.
Figure 16
1. Screen settings: there are three functions of this detailed settings interface: “screen savers time, automatic
switch-off, quit”, press the 【 】 or 【 】key to switch between various parameters. Press for a shorter time the
【 】 or 【 】key to choose “screen savers time” (automatic switch-off) and then press for a shorter time the 【 】
key to acknowledge, and then press the 【 】 or 【 】key to adjust the screen savers (automatic switch-off)
time,
and after completion press for a shorter time the 【 】key. Each time this function is set, it become effective for one
time.
2. Language settings: press for a shorter time the 【 】 or 【 】key to choose a language and then press for a
shorter time the 【 】key to acknowledge.
3. Recording settings: press for a shorter time the 【 】 or 【 】 key to switch between various
parameters (sound source, coding, track, sampling rate), and press the 【M】key to set each parameter.
4. Restore factory status: after you enter this settings interface, a prompt box “restore default settings or not” will
appear, and press for a shorter time the 【 】 or 【 】 key to choose “yes” and press the 【 】key to restore
the factory settings, or choose “no” and then press the 【 】key to retain the current settings.
5. Customize EQ: on this settings interface, press for a shorter time the
【 】 or 【 】 key to switch between
various frequency bands, choose one frequency band and then press for a longer / shorter time the 【VOL】key to
adjust the detailed value of this frequency band, after adjustment press again for a shorter time the 【 】 or 【 】
key to switch to other frequency band. After settings of all frequency bands is complete, press for a shorter time the
【 】key to acknowledge and return to the upper directory.
6. System information: after entering this item of settings, you can see the software version, remaining space,
total space information of this device.
Ⅵ. Program update and video file conversion
(I)
Program update
Please place the provided CD into the CD-ROM of your PC (or visit our website to download the latest program),
an install the “TOOL” program in this CD according to the prompts, and after installation, please switch on the MP3
player and connect it with your PC by the USB line, click “Start/programs/ToolsforMp3/ Loadupdatefile.exe” and a
software update window will appear. Press “download”, a window “initialize sigmatel MSCN firmware
download“ will appear, (the speed is so high that you may not see it clear), then it will directly jump to “sigmatel
MSCN firmware download” interface, now you can click “show details” to see the current version, update version
and device specification of this device. When the interface shows “completed”, you can choose "close", thus the
10
program update of this device is completed.
(II)
Video file conversion
1. Summary of tool
This tool is used to convert image and sound files into files with SMV format which are able to be played on the
digital audio and video frequency player designed by our company, and it supports conversion of video frequency
files with the following formats:
AVI format files with an extension of avi;
Windows Media format files with an extension of asf or wmv;
MPEG1 format files with an extension of mpg or mpeg;
Realplay format files with an extension of rm (the rm for windows media player encoder is required to be
installed in your PC and run normally);
VCD format files with an extension of dat;
2. Tool installation
The installation of video converting tool is easy, quick and convenient, the procedures are as follows:
1)start your PC, after it enters Windows system, place the tool installation CD into the CD-ROM, the
installation program will run automatically, click the “next” button according to the prompts, click the “close” button
when it shows successful installation, thus the installation is completed.
If the automatic running function has not been set for your PC, then you need to install the program manually:
a.Double click the Setup.exe file in the root directory of the CD to start the installation guide;
b.Click the “next” button according to the prompts, and click the “close” button when it shows successful
installation, thus the installation is completed.
After the tool has been installed, a “MP3” program group will be generated in the 【Start】—【Program】, in
which “VideoConversion” is the conversion tool.
3.Run the software
1) Open the software
If you want to run the software, you can click【Start】button - 【Program】 menu, and then choose “MP3” –
“VideoConversion” to open the tool interface.
2) Add image and sound files
click “browse”, the image and sound file path will pop up, on this interface click the little button
on the right side of
【type of file】to choose suitable type of file, after the right image and sound files have been selected, click the【open】button
to add the video files:
3)Conversion settings
The 【save path】item of the conversion tool shows the path of image and sound file, and its default is the same path with the
original video file, and it also can be set according to the requirements of the user; ordinary picture quality and high picture
quality are optional in 【options】 item; if you want to snatch some section in the video frequency file, you can check the
【set a time period】item to set the starting and stopping time of the conversion file; if your PC is connected with a U disk,
you can also check the【copy it to the U disk automatically after completion】, then the video files will be automatically
copied to the U disk after conversion completed.
4) Start conversion
After the settings has been finished, choose 【convert】 to start the conversion.
11
5)Reconvert or quit the software: after the conversion is complete, the system will show “conversion completed!”, then
you can click【acknowledge】to return to the conversion interface and then choose other file, then make settings and convert
it, or you can click【quit】 to close the software.
After the conversion is completed, then one “.SMV” file will be generated.
3.
Platform
Windows98, Windows Me, Windows2000 or Windows XP. The version of Windows Media Player should be 9.0 or above;
and the version of DirectX should be 9.0 or above.
5. Notes: a. Before using this software, Directx8.0 or above version is required to be installed in your PC, as for
Windows XP, it has been installed in your PC and need not be installed again!
b. if you find some files can not be converted, please install the corresponding decoder of Windows
Media Player and make sure that Windows Media Player runs normally and then use the
conversion tool!
Ⅷ. Formatting of this device
If data errors occur to the flash memory MP3, it will not be able to be identified by the PC, or respond to the Play
key, and then the device needs to be formatted.
Notes: Formatting will clear all the songs, recordings and data files in the MP3, so backup of important
data should be made regularly.
Formatting method:
Connect the USB port of the player to your PC, and find “mobile disk” and right-click the mouse, a menu will pop up,
and then choose “format (A) …”, and choose【start】 in the pop-up formatting dialog box, a prompt warning
"acknowledge formatting", then click 【acknowledge】, the formatting will start, and a prompt box “formatting
completed” will appear when the formatting is completed.
Ⅸ. Problems and answers
1. Why some songs with WMA format can not be played by the digital player after downloaded to it?
Now there are songs of various formats on the net, many of which are made with WMA format. You may know
that songs of WMA format have a copyright protective method of DRM (license) which enables that the
unauthorized person is not able to play relative songs thus to protect benefits of all concerned persons of the songs
well.
Now there are some websites on the net which provide WMA songs without license protection, you can copy or
play these songs like songs of MP3 format. However, there are also some websites which only provide WMA
songs with license protection (for example, www.9sky.com), in this case you can only play these songs in your
licensed Windows Media Player (Windows Media Player is a free media playing software to play WMA files which
is provided by Microsoft and you can download it from many websites), and are not able to play them on another
unlicensed computer after copied them to it, thus it prevents effectively the spreading of the songs and protects the
benefits of the proprietor.
This digital player also has a function of playing WMA files. If you want to download one licensed WMA song to the
digital player, please don’t download this song to the digital player by a simple copy operation on the computer,
because in that case the song is not able to be played normally by the digital player. Please open first your
12
Windows Media Player, then on the “file” menu choose “open” to open fully the WMA song you want to copy (if the
song can be played, then you can download it). Connect the digital player with the computer via the USB
communication line, and at that time “communicating” will be displayed on the screen of the player, and a mobile
disk (for example F: \) will appear, then click the “portable device” button on the left of the Windows Media Player, a
picture of copying music will appear, and choose the name of the song you want to copy on the left side, and then
click the “copy music” button on the top left corner, thus you copy correctly the licensed song to the digital player.
2. The system requirements of usage of the flash file system
a. IBM PC and compatible PC, notebook PC, Apple PC and so on.
b. Windows 98 (a driver needs to be installed), Windows ME/2000/XP, MAC 9.X or higher version.
c. equipped with a standard USB interface.
3. How will I do if a MP3 file can not be played?
a.
To make sure that the earphone plug has been completely inserted.
b.
To make sure that the volume is not too low.
c.
To make sure that the song file has not been damaged or is valid.
d.
To make sure that the device is in “play” status.
e.
To make sure that your MP3 file is in accordance with the MP3 format.
f.
If the above methods are of no effect, please restart the MP3 player with the Reset function.
4. There is no reaction when the player is connected with the PC
a.
To make sure that your PC and its software have met the relevant requirements, see the system requirements
of the player.
b.
To make sure that the USB interface of the PC is valid.
c.
To disconnect the USB connection, and connect the USB line while pressing the play/pause key.
5. The player can not be started or has no reaction to operations
a.
To make sure that the cell has electric quantity.
b.
Unexpected error occurred or the USB connection line was pulled out during the upgrade of the firmware of
the player.
c.
Some physical damage occurred to the flash memory, making the player not able to be started normally.
6. What are LRC words of a song?
The so-called LRC words of song refer to the words of a song displayed synchronously with the MP3 song being
displayed, and they also include the words displayed synchronously with the foreign language speech.
7. I used a file with a different name from that of the MP3 file to save the words of a song, and no
words of the song are played while the song is being displayed, what is the cause?
The LRC file must have the same name with that of the MP3 file, or else it can not be displayed when the song is
being playing because the file of words of a song with the same name can not be found.
8. Data lost?
Some data are lost because the power is not steady during the downloading process, and our company is not
13
responsible for any data loss and the users are recommended to backup the important data.
9. Why the volume is different for different songs?
The different songs have different volumes, this is because the volume level was increased when some songs
were being recorded and thus the volumes of these songs are bigger than those of other MP3 files.
10. Why sometimes a file with a size less than the available space of the player can not be downloaded
to it?
The memory chip in the player is divided into many memory cells of 16KB or 32KB, and even a file of 1 byte
occupies one memory cell. So it is possible that a file the storage space of which is below the remaining space is
not able to be downloaded to the player.
14
WEEE Statement
English
To protect the global environment and as an environmentalist, MSI must remind you that...
Under the European Union ("EU") Directive on Waste Electrical and Electronic Equipment, Directive 2002/96/EC, which takes effect on
August 13, 2005, products of "electrical and electronic equipment" cannot be discarded as municipal waste anymore and manufacturers of
covered electronic equipment will be obligated to take back such products at the end of their useful life.
MSI will comply with the product
take back requirements at the end of life of MSI-branded products that are sold into the EU. You can return these products to local collection
points.
Русский
Компания MSI предпринимает активные действия по защите окружающей среды, поэтому напоминаем вам, что....
В соответствии с директивой Европейского Союза (ЕС) по предотвращению загрязнения окружающей среды использованным
электрическим и электронным оборудованием (директива WEEE 2002/96/EC), вступающей в силу 13 августа 2005 года, изделия,
относящиеся к электрическому и электронному оборудованию, не могут рассматриваться как бытовой мусор, поэтому
производители вышеперечисленного электронного оборудования обязаны принимать его для переработки по окончании срока
службы. MSI обязуется соблюдать требования по приему продукции, проданной под маркой MSI на территории EC, в переработку по
окончании срока службы. Вы можете вернуть эти изделия в специализированные пункты приема.
Español
MSI como empresa comprometida con la protección del medio ambiente, recomienda:
Bajo la directiva 2002/96/EC de la Unión Europea en materia de desechos y/o equipos electrónicos, con fecha de rigor desde el 13 de agosto
de 2005, los productos clasificados como "eléctricos y equipos electrónicos" no pueden ser depositados en los contenedores habituales de su
municipio, los fabricantes de equipos electrónicos, están obligados a hacerse cargo de dichos productos al termino de su período de vida.
MSI estará comprometido con los términos de recogida de sus productos vendidos en la Unión Europea al final de su periodo de vida. Usted
debe depositar estos productos en el punto limpio establecido por el ayuntamiento de su localidad o entregar a una empresa autorizada para la
recogida de estos residuos.
Nederlands
Om het milieu te beschermen, wil MSI u eraan herinneren dat….
De richtlijn van de Europese Unie (EU) met betrekking tot Vervuiling van Electrische en Electronische producten (2002/96/EC), die op 13
Augustus 2005 in zal gaan kunnen niet meer beschouwd worden als vervuiling.
Fabrikanten van dit soort producten worden verplicht om producten retour te nemen aan het eind van hun levenscyclus. MSI zal
overeenkomstig de richtlijn handelen voor de producten die de merknaam MSI dragen en verkocht zijn in de EU. Deze goederen kunnen
geretourneerd worden op lokale inzamelingspunten.
Deutsch
Hinweis von MSI zur Erhaltung und Schutz unserer Umwelt
Gemäß der Richtlinie 2002/96/EG über Elektro- und Elektronik-Altgeräte dürfen Elektro- und Elektronik-Altgeräte nicht mehr als
kommunale Abfälle entsorgt werden. MSI hat europaweit verschiedene Sammel- und Recyclingunternehmen beauftragt, die in die
15
Europäische Union in Verkehr gebrachten Produkte, am Ende seines Lebenszyklus zurückzunehmen. Bitte entsorgen Sie dieses Produkt zum
gegebenen Zeitpunkt ausschliesslich an einer lokalen Altgerätesammelstelle in Ihrer Nähe.
Français
En tant qu’écologiste et afin de protéger l’environnement, MSI tient à rappeler ceci...
Au sujet de la directive européenne (EU) relative aux déchets des équipement électriques et électroniques, directive 2002/96/EC, prenant
effet le 13 août 2005, que les produits électriques et électroniques ne peuvent être déposés dans les décharges ou tout simplement mis à la
poubelle. Les fabricants de ces équipements seront obligés de récupérer certains produits en fin de vie. MSI prendra en compte cette exigence
relative au retour des produits en fin de vie au sein de la communauté européenne. Par conséquent vous pouvez retourner localement ces
matériels dans les points de collecte.
Srpski
Da bi zaštitili prirodnu sredinu, i kao preduzeće koje vodi računa o okolini i prirodnoj sredini, MSI mora da vas podesti da…
Po Direktivi Evropske unije ("EU") o odbačenoj ekektronskoj i električnoj opremi, Direktiva 2002/96/EC, koja stupa na snagu od 13.
Avgusta 2005, proizvodi koji spadaju pod "elektronsku i električnu opremu" ne mogu više biti odbačeni kao običan otpad i proizvođači ove
opreme biće prinuđeni da uzmu natrag ove proizvode na kraju njihovog uobičajenog veka trajanja. MSI će poštovati zahtev o preuzimanju
ovakvih proizvoda kojima je istekao vek trajanja, koji imaju MSI oznaku i koji su prodati u EU. Ove proizvode možete vratiti na lokalnim
mestima za prikupljanje.
Polski
Aby chronić nasze środowisko naturalne oraz jako firma dbająca o ekologię, MSI przypomina, że...
Zgodnie z Dyrektywą Unii Europejskiej ("UE") dotyczącą odpadów produktów elektrycznych i elektronicznych (Dyrektywa 2002/96/EC),
która wchodzi w życie 13 sierpnia 2005, tzw. “produkty oraz wyposażenie elektryczne i elektroniczne " nie mogą być traktowane jako śmieci
komunalne, tak więc producenci tych produktów będą zobowiązani do odbierania ich w momencie gdy produkt jest wycofywany z użycia.
MSI wypełni wymagania UE, przyjmując produkty (sprzedawane na terenie Unii Europejskiej) wycofywane z użycia. Produkty MSI będzie
można zwracać w wyznaczonych punktach zbiorczych.
TÜRKÇE
Çevreci özelliğiyle bilinen MSI dünyada çevreyi korumak için hatırlatır:
Avrupa Birliği (AB) Kararnamesi Elektrik ve Elektronik Malzeme Atığı, 2002/96/EC Kararnamesi altında 13 Ağustos 2005 tarihinden
itibaren geçerli olmak üzere, elektrikli ve elektronik malzemeler diğer atıklar gibi çöpe atılamayacak ve bu elektonik cihazların üreticileri,
cihazların kullanım süreleri bittikten sonra ürünleri geri toplamakla yükümlü olacaktır. Avrupa Birliği’ne satılan MSI markalı ürünlerin
kullanım süreleri bittiğinde MSI ürünlerin geri alınması isteği ile işbirliği içerisinde olacaktır. Ürünlerinizi yerel toplama noktalarına
bırakabilirsiniz.
ČESKY
Záleží nám na ochraně životního prostředí - společnost MSI upozorňuje...
Podle směrnice Evropské unie ("EU") o likvidaci elektrických a elektronických výrobků 2002/96/EC platné od 13. srpna 2005 je zakázáno
likvidovat "elektrické a elektronické výrobky" v běžném komunálním odpadu a výrobci elektronických výrobků, na které se tato směrnice
vztahuje, budou povinni odebírat takové výrobky zpět po skončení jejich životnosti. Společnost MSI splní požadavky na odebírání výrobků
značky MSI, prodávaných v zemích EU, po skončení jejich životnosti. Tyto výrobky můžete odevzdat v místních sběrnách.
MAGYAR
Annak érdekében, hogy környezetünket megvédjük, illetve környezetvédőként fellépve az MSI emlékezteti Önt, hogy ...
16
Az Európai Unió („EU") 2005. augusztus 13-án hatályba lépő, az elektromos és elektronikus berendezések hulladékairól szóló 2002/96/EK
irányelve szerint az elektromos és elektronikus berendezések többé nem kezelhetőek lakossági hulladékként, és az ilyen elektronikus
berendezések gyártói kötelessé válnak az ilyen termékek visszavételére azok hasznos élettartama végén.
Az MSI betartja a
termékvisszavétellel kapcsolatos követelményeket az MSI márkanév alatt az EU-n belül értékesített termékek esetében, azok élettartamának
végén. Az ilyen termékeket a legközelebbi gyűjtőhelyre viheti.
Italiano
Per proteggere l’ambiente, MSI, da sempre amica della natura, ti ricorda che….
In base alla Direttiva dell’Unione Europea (EU) sullo Smaltimento dei Materiali Elettrici ed Elettronici, Direttiva 2002/96/EC in vigore dal
13 Agosto 2005, prodotti appartenenti alla categoria dei Materiali Elettrici ed Elettronici non possono più essere eliminati come rifiuti
municipali: i produttori di detti materiali saranno obbligati a ritirare ogni prodotto alla fine del suo ciclo di vita. MSI si adeguerà a tale
Direttiva ritirando tutti i prodotti marchiati MSI che sono stati venduti all’interno dell’Unione Europea alla fine del loro ciclo di vita. È
possibile portare i prodotti nel più vicino punto di raccolta.
17