1
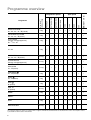
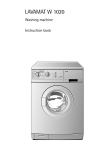
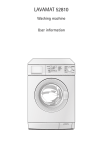
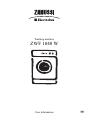
Washing machine
ZWF 1840 W
User information
g
Dear Customer,
Please read this user information carefully and keep
it to refer to later.
Please pass the user information on to any future
owner of the appliance.
The following symbols are used in the
text:
1 Safety instructions
Warning! Information that affects your personal safety.
Important! Information that prevents damage
to the appliance.
3 Useful tips and hints
2 Environmental information
2
Contents
Operating Instructions . . . . . . . . . . . . . . . . . . . . . . . . . . . . . . . . . . . . . . . . . . . . . . . . . . . . . . . . . . . . .
4
Safety . . . . . . . . . . . . . . . . . . . . . . . . . . . . . . . . . . . . . . . . . . . . . . . . . . . . . . . . . . . . . . . . . . . . . . . . . . . . . . .
4
Description of the appliance . . . . . . . . . . . . . . . . . . . . . . . . . . . . . . . . . . . . . . . . . . . . . . . . . . . . . . . . . . . .
5
Control panel . . . . . . . . . . . . . . . . . . . . . . . . . . . . . . . . . . . . . . . . . . . . . . . . . . . . . . . . . . . . . . . . . . . . . . . .
5
Programme overview . . . . . . . . . . . . . . . . . . . . . . . . . . . . . . . . . . . . . . . . . . . . . . . . . . . . . . . . . . . . . . . . . .
6
Cleaning the machine prior to first use . . . . . . . . . . . . . . . . . . . . . . . . . . . . . . . . . . . . . . . . . . . . . . . . . . .
8
Preparing and sorting washing . . . . . . . . . . . . . . . . . . . . . . . . . . . . . . . . . . . . . . . . . . . . . . . . . . . . . . . . . .
8
Running a wash cycle. . . . . . . . . . . . . . . . . . . . . . . . . . . . . . . . . . . . . . . . . . . . . . . . . . . . . . . . . . . . . . . . . .
Opening the door/Loading the washing . . . . . . . . . . . . . . . . . . . . . . . . . . . . . . . . . . . . . . . . . . . . . . . . . . . . .
Adding detergent /conditioner . . . . . . . . . . . . . . . . . . . . . . . . . . . . . . . . . . . . . . . . . . . . . . . . . . . . . . . . . . . .
Switching on the appliance/Setting a programme . . . . . . . . . . . . . . . . . . . . . . . . . . . . . . . . . . . . . . . . . . . . .
Changing the temperature . . . . . . . . . . . . . . . . . . . . . . . . . . . . . . . . . . . . . . . . . . . . . . . . . . . . . . . . . . . . . . .
Changing Spin Speed /Selecting the Night cycle. . . . . . . . . . . . . . . . . . . . . . . . . . . . . . . . . . . . . . . . . . . . . .
Selecting the programme options. . . . . . . . . . . . . . . . . . . . . . . . . . . . . . . . . . . . . . . . . . . . . . . . . . . . . . . . . .
PREWASH . . . . . . . . . . . . . . . . . . . . . . . . . . . . . . . . . . . . . . . . . . . . . . . . . . . . . . . . . . . . . . . . . . . . . . . . .
EXTRA QUICK . . . . . . . . . . . . . . . . . . . . . . . . . . . . . . . . . . . . . . . . . . . . . . . . . . . . . . . . . . . . . . . . . . . . . .
SUPER RINSE . . . . . . . . . . . . . . . . . . . . . . . . . . . . . . . . . . . . . . . . . . . . . . . . . . . . . . . . . . . . . . . . . . . . . .
EASY IRON . . . . . . . . . . . . . . . . . . . . . . . . . . . . . . . . . . . . . . . . . . . . . . . . . . . . . . . . . . . . . . . . . . . . . . . .
Setting the delay timer . . . . . . . . . . . . . . . . . . . . . . . . . . . . . . . . . . . . . . . . . . . . . . . . . . . . . . . . . . . . . . . . . .
Programme progress . . . . . . . . . . . . . . . . . . . . . . . . . . . . . . . . . . . . . . . . . . . . . . . . . . . . . . . . . . . . . . . . . . .
Interrupting a programme/Adding washing . . . . . . . . . . . . . . . . . . . . . . . . . . . . . . . . . . . . . . . . . . . . . . . . . .
End of the wash cycle/Removing the washing . . . . . . . . . . . . . . . . . . . . . . . . . . . . . . . . . . . . . . . . . . . . . . .
9
9
10
11
11
11
12
12
12
12
12
12
13
13
13
Child safety device . . . . . . . . . . . . . . . . . . . . . . . . . . . . . . . . . . . . . . . . . . . . . . . . . . . . . . . . . . . . . . . . . . . .
14
Cleaning and care . . . . . . . . . . . . . . . . . . . . . . . . . . . . . . . . . . . . . . . . . . . . . . . . . . . . . . . . . . . . . . . . . . . . .
15
What to do if... . . . . . . . . . . . . . . . . . . . . . . . . . . . . . . . . . . . . . . . . . . . . . . . . . . . . . . . . . . . . . . . . . . . . . . . .
Remedying small faults yourself . . . . . . . . . . . . . . . . . . . . . . . . . . . . . . . . . . . . . . . . . . . . . . . . . . . . . . . . . . .
If the wash result is not satisfactory . . . . . . . . . . . . . . . . . . . . . . . . . . . . . . . . . . . . . . . . . . . . . . . . . . . . . . . .
Carrying out an emergency drain . . . . . . . . . . . . . . . . . . . . . . . . . . . . . . . . . . . . . . . . . . . . . . . . . . . . . . . . . .
Drain pump . . . . . . . . . . . . . . . . . . . . . . . . . . . . . . . . . . . . . . . . . . . . . . . . . . . . . . . . . . . . . . . . . . . . . . . . . . .
16
16
18
19
20
Disposal . . . . . . . . . . . . . . . . . . . . . . . . . . . . . . . . . . . . . . . . . . . . . . . . . . . . . . . . . . . . . . . . . . . . . . . . . . . . .
21
Technical data . . . . . . . . . . . . . . . . . . . . . . . . . . . . . . . . . . . . . . . . . . . . . . . . . . . . . . . . . . . . . . . . . . . . . . . .
22
Consumption values . . . . . . . . . . . . . . . . . . . . . . . . . . . . . . . . . . . . . . . . . . . . . . . . . . . . . . . . . . . . . . . . . . .
22
Installation and connection instructions . . . . . . . . . . . . . . . . . . . . . . . . . . . . . . . . . . . . . . . . . . . .
23
Safety information concerning installation . . . . . . . . . . . . . . . . . . . . . . . . . . . . . . . . . . . . . . . . . . . . . . . .
23
Installing the appliance . . . . . . . . . . . . . . . . . . . . . . . . . . . . . . . . . . . . . . . . . . . . . . . . . . . . . . . . . . . . . . . .
Transporting the appliance . . . . . . . . . . . . . . . . . . . . . . . . . . . . . . . . . . . . . . . . . . . . . . . . . . . . . . . . . . . . . . .
Removing the transit packaging . . . . . . . . . . . . . . . . . . . . . . . . . . . . . . . . . . . . . . . . . . . . . . . . . . . . . . . . . . .
Where to install . . . . . . . . . . . . . . . . . . . . . . . . . . . . . . . . . . . . . . . . . . . . . . . . . . . . . . . . . . . . . . . . . . . . . . . .
Making the appliance level . . . . . . . . . . . . . . . . . . . . . . . . . . . . . . . . . . . . . . . . . . . . . . . . . . . . . . . . . . . . . . .
23
23
24
25
25
Electrical Connection . . . . . . . . . . . . . . . . . . . . . . . . . . . . . . . . . . . . . . . . . . . . . . . . . . . . . . . . . . . . . . . . . .
26
Connecting the appliance to the water supply . . . . . . . . . . . . . . . . . . . . . . . . . . . . . . . . . . . . . . . . . . . . .
Water inlet . . . . . . . . . . . . . . . . . . . . . . . . . . . . . . . . . . . . . . . . . . . . . . . . . . . . . . . . . . . . . . . . . . . . . . . . . . . .
Water Drainage . . . . . . . . . . . . . . . . . . . . . . . . . . . . . . . . . . . . . . . . . . . . . . . . . . . . . . . . . . . . . . . . . . . . . . . .
27
28
29
Fitting under kitchen worktops . . . . . . . . . . . . . . . . . . . . . . . . . . . . . . . . . . . . . . . . . . . . . . . . . . . . . . . . . .
30
Warranty conditions . . . . . . . . . . . . . . . . . . . . . . . . . . . . . . . . . . . . . . . . . . . . . . . . . . . . . . . . . . . . . . . .
32
Service and Spare Parts . . . . . . . . . . . . . . . . . . . . . . . . . . . . . . . . . . . . . . . . . . . . . . . . . . . . . . . . . . . .
35
3
Operating Instructions
1 Safety
Prior to using the appliance for the
first time
• Follow the “Installation and connection instructions”.
• If the appliance is delivered in the winter months
when there are minus temperatures: store the
washing machine at room temperature for
24 hours before using for the first time.
Correct use
• The washing machine is only designed for the
washing of normal domestic laundry at home.
• Additions or modifications to the washing machine
are not permitted.
• Only use detergents/conditioners that are suitable
for use in domestic washing machines.
• The washing must not contain any flammable solvent. The risk of explosion exists.
• Do not use the washing machine for dry cleaning.
• Dyes/colour removers may only be used in the
washing machine, if the manufacturer of these
products expressly permits this. We cannot accept
liability for any damage arising.
Child safety
• Keep packaging away from children. There is a risk
of suffocation.
• Children often do not recognise the hazards associated with electrical appliances. Don’t allow children to use the washing machine unsupervised.
• Make sure that children and pets don’t climb into
the drum of the washing machine. The risk of
death exists.
4
General safety
• Repairs to the washing machine may only be carried out by qualified/authorised service engineers.
• Never use the appliance when the electrical cable
is damaged or the control panel, worktop or plinth
area are damaged to such an extent that the inside
of the appliance is openly accessible.
• Switch off the washing machine prior to cleaning it
and carrying out maintenance. In addition, remove
the power plug from the power point or – if the appliance has been hard-wired – switch off the cutout in the fuse box or completely remove the fuse.
• If operation is stopped, disconnect the appliance
from the mains supply and turn off the tap.
• Never remove the power plug from the power point
by pulling on the cable. Always pull the plug.
• Multiway-plugs, connectors and extension cables
must not be used. Resulting overheating may
constitute a fire hazard.
• Never wash the washing machine down with a water jet. Danger of electric shock.
• When using wash programmes with high temperatures the glass in the door will become hot. Do not
touch it!
• Before emergency emptying of the appliance, before cleaning the drain pump or opening the door
in an emergency, let the water cool down.
• Small animals can nibble on electrical cables and
water hoses. This can constitute a risk of electrocution and water damage. Keep small animals
away from the washing machine.
Description of the appliance
Control panel
Detergent drawer
Door indicator
Rating plate
(behind door)
Plinth flap/
Drain pump
Screw feet
(height adjustable)
Control panel
Programme knob and
On/Off switch
Programme progress display
Multi-display
Function buttons
5
Programme overview
PREWASH
EXTRA QUICK
SUPER RINSE
EASY IRON
1800
1400
1000
600
(NIGHT CYCLE)
Spin speed
max. load 1)
(dry washing)
Programme options
WHITE COTTONS
90°, 60°, 50°, 40°, X (COLD)
5 kg
•
•
•
•
•
•
•
•
•
COLOURED COTTONS
60°, 50°, 40°, X (COLD)
5 kg
•
•
•
•
•
•
•
•
•
E-COTTONS
(Energy saving programme)
60° 2), 50°, 40°
5 kg
•
•
•
•
•
•
•
•
40° AA
5 kg
•
•
•
•
•
•
•
•
SYNTHETICS
60°, 50°, 40°, X (COLD)
2.5 kg
•
•
•
•
•
•
E-SYNTHETICS 2)
(Energy saving programme)
2.5 kg
•
•
•
•
•
•
DELICATES
40°, X (COLD)
2.5 kg
•
•
•
HANDWASH
40°, X (COLD)
2 kg
•
•
•
WOOL
40°, X (COLD)
2 kg
•
•
•
SILK
X (COLD)
1 kg
•
•
MINI 30°
X (COLD)
2.5 kg
•
•
•
Programme
RINSE
5 kg
•
•
•
•
•
•
•
•
•
•
•
•
•
DRAIN 3)
SPIN
DELICATE SPIN
5 kg
2.5 kg
•
1) A 10 litre bucket contains approx. 2.5 kg of dry washing (cotton)
2) Programme settings for tests in accordance with or support of EN 60 456 and IEC 60 456 are described in the section “Consumption values”.
3) The NIGHT CYCLE indicator will illuminate.
6
Care symbols1)
Application/features:
Programme at 90°C for normally to heavily soiled whites made of cotton/linen.
JMO
Programme for normally to heavily soiled coloureds made of cotton/linen.
JMO
MO
Energy-saving programme for lightly to normally soiled whites/coloureds made of cotton/linen.
Programme for whites or coloureds which are labelled for different wash temperatures. Items,
which according to the care symbols are normally to be washed separately at 40 °C or at 60 °C,
can be washed together in this programme. This makes better use of the drum capacity and thus
saves energy. Through an increased wash time the washing results of a normal 60° programme
are achieved.
JM
IKN
Programme for easy-care mixed fibres and synthetics.
Energy-saving programme at 40 °C for lightly to normally soiled easy-care mixed fibres and synthetics.
Gentle programme for delicate fabrics such as bonded fabrics, microfibres, synthetics, net curtains (max. load for net curtains 15 to 20 m2). With
(NIGHT CYCLE) also suitable for fabrics
with climate membrane, e. g., outdoor clothing.
KN
IK
QLH
Particularly gently programme for fabrics that are normally washed by hand.
Particularly delicate programme for machine washable and hand washable wool or wool mixtures.
Particularly delicate programme at 30 °C, for machine washable and hand washable silk. Wash
very delicate items individually.
QLH
QLH
Special programme at 30 °C, approx. 30 minutes long, for quickly washing through items such as
e. g. once worn, slightly dirty sports clothing or new clothes.
JMO
IKN
Separate rinse (3 rinses, liquid conditioner is washed in from compartment
JMO
, spin).
Drains water away after a rinse hold.
Drains water out and spins, e. g. after a rinse hold, or separate spin for hand-washed cottons/linens and easy-cares.
JMO
IKN
Drain and delicate spin after a rinse hold, or separate delicate spin of handwashed delicates,
woollens, silk.
IKN
QLH
1) The figures in the care symbols indicate the maximum temperatures.
7
Cleaning the machine prior to first use
In order to remove any residues from the drum and
water container which may have been left during
manufacturing, perform the first wash cycle without
any washing in the machine. Programme:
COLOURED COTTONS 60 °C, option EXTRA
QUICK, add approx. 1/4 measuring cup of detergent.
Preparing and sorting washing
Preparing washing
• Empty the pockets. Remove foreign bodies (e.g.
coins, paper clips, nails, etc.).
• Do up zips, button up covers to prevent damage to
washing.
• Remove the runners from net curtains or cover
them with a net or a bag.
• Wash delicate and small items in a net/pillowcase,
e. g. net curtains, tights, small socks, handkerchiefs, bras.
Important: Bras and other items containing wires
should only be washed in a net bag. The wires can
work loose and damage the appliance.
Sorting washing
• By colour: Wash white and coloured washing separately. Washing can run.
• By temperature, type of washing and care symbol.
Important: Do not wash fabrics with the G care
symbol (= do not wash!) in the washing machine.
8
Running a wash cycle
Opening the door/Loading
the washing
1. To open the door: pull the handle on the door.
When the appliance is switched on, the indicator on
the door shows whether the door can be opened:
Door indicator
Can the door be
opened?
illuminated
no1)
not illuminated
yes
1) During the programme the door is locked when the water
level or the temperature is high.
2. Unfold washing and load it loosely into the machine. Mix large and small items.
Important! Do not to trap items of clothing between the door and the rubber door seal.
3. Press the door firmly shut. The catch must audibly
latch.
9
Adding detergent /
conditioner
Important: Only use detergents/conditioners that
are suitable for use in household washing machines.
Add detergent/conditioner in accordance with the
detergent/conditioner manufacturer’s instructions.
Observe instructions on the packaging.
The amount of detergent used depends on:
– the degree of soiling,
– the load size
– the hardness of the tap water.
• If the manufacturer does not make any recommendations with regard to small volumes of washing:
For a half-load use a third less, and for a very small
load use only the half the amount of detergent that
is recommended for a full load.
• Water softener should be used from water hardness range 2 (=medium). The amount of detergent
used can then always be that as for hardness
range 1 (=soft). Your local water company will provide you with information about water hardness in
your area.
1. Pull out the detergent drawer as far as it will go.
2. Add the detergent/conditioner.
3. Push the detergent drawer in fully.
Washing powder/tablets
for the main wash cycle
Conditioner/Wash-care products
to preserve the shape of garments/Starch
Washing powder/tablets for the main wash cycle
If you are using water softener and require the right
compartment for detergent for the pre-wash cycle,
add the water softener on top of the detergent for the
main wash cycle in the left compartment.
Softener, wash-care products to preserve the
shape of garments, starch
Fill the compartment to no more than the MAX indicator. Add water to thick liquid concentrates in accordance with the manufacturer’s instructions before
using them. Dissolve powder starch.
If you are using liquid detergent:
Add liquid detergent using measuring containers
provided by the detergent manufacturer.
10
Stain removal agent/stain removal tablets
Washing powder/tablets
for the pre wash cycle
or water softener
Switching on the appliance/Setting a programme
Select the programme using the programme knob.
3 When you select a programme, you switch the
appliance on at the same time.
– The programme progress display shows the programme steps that the selected programme will
carry out.
– The estimated programme duration (in hours and
minutes) appears in the multi-display.
– Depending on the programme, the washing machine suggests a temperature and a spin speed.
You can change these suggestions.
Changing the temperature
Press the TEMP. key repeatedly until the desired
temperature is displayed.
Changing Spin Speed /Selecting the Night cycle
The washing machine suggests the maximum permitted speed that is suitable for the selected programme. You can reduce this speed:
Press the Spin/ (NIGHT CYCLE) button repeatedly
until the desired display lights up.
3 The speed for the final spin can still be altered
during the programme. To do this:
1. Press the START/PAUSE button.
2. Change the speed.
3. Press the START/PAUSE button again.
Night Cycle
With
(NIGHT CYCLE) the water is just drained at
the end of the cycle.
There is no spinning during the whole washing cycle.
Because of this the programme runs very quietly.
(NIGHT CYCLE) is therefore particularly suitable if
you want to wash at night.
11
Selecting the programme
options
If desired, press the programme option button(s).
The corresponding indicator lights up.
3 If
”Err” flashes in the multi-display, the programme option selected cannot be combined
with the wash programme set.
PREWASH
Warm pre-wash before the main wash that follows
automatically; with intermediate spin for WHITE/
COLOURED COTTONS and SYNTHETICS, without
intermediate spin for DELICATES.
EXTRA QUICK
Shortened wash programme for less soiled items
SUPER RINSE
There are two additional rinses in the WHITE/COLOURED COTTONS, SYNTHETICS and DELICATES
programmes.
EASY IRON
Special programme for easy-care fabrics which, after
this programme, need no or very little ironing.
Setting the delay timer
3 Using
the DELAY START button you can delay
the start of a programme by 30 minutes (30')
to a maximum of 23 hours (23h).
1. Select the programme.
2. Press the DELAY START button repeatedly until the
desired start delay is shown in the multi-display,
e.g. 12h to delay the start of the programme by
12 hours. The DELAY START indicator will illuminate.
3 If the display is showing 23h and you press the
button again, the time delay will be cancelled.
0’ will appear followed by the length of the
wash programme that has been set.
3. To activate the delay timer, press the START/
PAUSE button. The time remaining to the start of
the programme will be continuously shown (e.g.
12h, 11h, 10h,... 30' etc.).
12
Programme progress
• The programme progress display shows the programme step that is currently being carried out.
• The multi-display shows the estimated time remaining (in hours and minutes) until the end of the
programme.
3 During the washing cycle the remaining time
may be increased or stay the same for a while
as the programme adjusts itself to different
conditions (e. g., type and quantity of laundry,
out of balance spin detection, special rinses,
etc.).
Interrupting a programme/
Adding washing
Interrupting a programme
• A washing programme can be interrupted at any
time by pressing the START/PAUSE button and
then re-started by pressing the START/PAUSE button again.
• To stop the washing machine before the programme has ended, turn the programme knob to
OFF.
Important! Be careful if there is water in the appliance!
End of the wash cycle/
Removing the washing
When the programme has finished, END will illuminate on the programme progress display. As soon as
the door indicator goes out, the door can be opened.
1.Open the door and remove the washing.
2.Turn the programme knob to OFF.
3.Turn off the tap.
4.When you have finished washing, pull out the detergent drawer a little to let it to dry out. Keep the
door very slightly open so that the washing machine can air.
If
(NIGHT CYCLE) was selected:
Following a night cycle END will illuminate in the programme progress display.
– To spin, turn the programme knob to OFF and then
to SPIN or DELICATE SPIN. Change the spin
speed, if necessary, and press the START/PAUSE
button (the washing is spun).
Adding washing
1. First press the START/PAUSE button.
– If the door indicator is illuminated, the door cannot
be opened (because of high water level or high
temperature).
– When the door indicator goes out, the door can be
opened and it is possible to add washing.
2. Add washing and close the door again.
3. Press the START/PAUSE button again. The programme continues.
13
Child safety device
If the child safety device has been activated, the
door can no longer be shut.
Activating the child safety device:
Use a coin to turn the knob (on the inside of the
door) in a clockwise direction as far as it will go.
1 Warning! The knob must not be depressed af-
ter being set, otherwise the child safety device
is not activated. The knob must stand proud
as shown in the illustration.
Deactivating the child safety device:
Turn the knob in an anti-clockwise direction as far as
it will go.
14
Cleaning and care
Important: Do not use furniture cleaning products or
aggressive cleaning agents to clean the appliance.
Wipe over the control panel and housing with a
damp cloth.
Detergent drawer
The detergent drawer should be cleaned regularly.
1. Remove the detergent drawer by pulling firmly.
2. Remove the softener insert from the middle compartment.
3. Clean all parts with water.
4. Place the softener insert in as far as it will go, so
that it is firmly in position.
5. Clean the entire drawer recess area of the washing
machine, in particular the jets on the upper side of
the washing-in chamber, with a brush.
6. Place the detergent drawer in its guide rails and
push it in.
Washing drum
Rust deposits in the drum may occur due to rusting
foreign bodies in the washing or tap water containing
iron.
Important! Do not clean the drum with acidic descaling agents, scouring agents containing chlorine or
iron or steel wool.
1. Remove any rust which has accumulated in the
drum using a cleaning agent for stainless steel.
2. Run a washing cycle without any washing to clean
off any cleaning agent residues. Programme: COLOURED COTTONS 60°, option EXTRA QUICK,
add approx. 1/4 of a measuring cup of washing
powder.
Door and rubber collar
Regularly check whether deposits or foreign substances are present in the folds of the rubber collar
or inside on the door glass.
Regularly clean the door glass and the rubber collar.
15
What to do if...
Remedying small faults
yourself
If during use of the appliance one of the following error codes is shown in the multi-display:
– E10 (Problems with the water inflow),
– E20 (Problems with the water outflow),
– E40 (door open),
please consult the following table.
After the error has been remedied, press the START/
PAUSE button.
Problem
Washing machine is not
working.
The door cannot be closed.
In the event of other errors (E and a number or letter):
Switch the appliance off and then on again. Set the
programme again. Press the START/PAUSE button.
If the error appears again, please contact your local
Service Force Centre, stating the error code.
Possible cause
Remedy
Mains plug not plugged in or fuse not
working.
Connect the plug to a mains socket.
Check fuse.
Door not closed properly.
Close door - there should be an audible click.
The Start/Pause button was not
pressed for long enough.
Press the Start/Pause button for longer.
Child safety device engaged.
Release the child safety device.
When a button is pressed,
The selected function cannot be comSelect another function.
Err appears in the multi-disbined with the programme set.
play.
E40 appears. End indicator
flashes 4x.
The door is not closed properly.
Close the door properly. Restart the
programme.
Tap turned off.
Turn on the tap.
The filter in the threaded inlet hose fitE10 appears.
ting is blocked.
End indicator flashes 1x.
(Problems with water inflow)
Water tap is furred with lime scale or is
faulty.
Turn off the tap. Unscrew the hose,
take out the filter and clean it.
Check the tap and have it repaired, if
necessary.
The transit bar has not been removed. Remove the transit bar.
The washing machine vibrates when operating or is
not stable.
The screw feet are not correctly adjust- Adjust the feet as described in the ined.
stallation and connection instructions.
There is very little washing in the drum
Operation is not affected by this.
(e.g., just one bathrobe).
Screw connection on the inlet hose is
leaking.
Screw the inlet hose on tightly.
Drain hose is leaking.
Replace drain hose.
Drain pump cover is not closed propWater is running out from
erly.
under the washing machine.
Washing water is foaming
excessively. At the end of
the washing cycle, the spin
stops.
16
Close the cover properly.
Washing was caught in the door.
Load washing carefully for the next
wash.
Emergency drain hose is leaking.
Close off emergency drain hose properly.
Probably too much detergent has been Follow the manufacturer's instructions
used.
exactly when measuring out detergent.
Problem
E20 appears. End indicator
flashes 2x.
(Problems with water outflow)
Possible cause
Remedy
Kink in drain hose.
Straighten the hose.
Maximum pumping height of 1m exceeded.
Please contact the Customer Care Department.
Drain pump is blocked.
Switch off the appliance. Disconnect
the power plug.
Clean the drain pump. Remove foreign
bodies from the pump housing.
For siphon connections: The siphon is
Clean the siphon.
blocked.
Conditioner not rinsed in,
Conditioner insert in the compartment
Clean the detergent drawer, insert the
compartment for additives is for additives is not correctly attached
conditioner insert firmly.
filled with water.
or is blocked.
Door locked.
The door cannot be opened
when the washing machine
is switched on.
Washing is heavily creased.
There has been a power cut. (All indicators are off.)
Door remains locked for between 4
and 10 minutes.
Possibly too much washing was loaded.
Wait until the door indicator goes out.
The programme will continue when the
power cut is over.
To remove washing:
If water can be seen in the appliance,
before opening the door, first drain off
the water. (See section “Carrying out
an emergency drain”.)
Observe maximum loads.
17
If the wash result is not satisfactory
The washing is grey and there are limescale deposits in the drum
•
•
•
•
Too little detergent was used.
An incorrect detergent was used.
Individual stains were not pre-treated.
The programme or temperature was not set properly.
There are grey stains on the washing
• Items that were soiled with ointments, fats or oils
were washed using too little detergent.
• The wash temperature used was too low.
• A common cause is that conditioner – in particular
the type in concentrated form - has come in contact with the washing. Wash out such marks as
soon as possible and exercise care when using the
said conditioner.
Foam can still be seen following the final
rinse
• Modern detergents can cause foam to be created
even during the final rinse. In spite of this, the
washing has been sufficiently rinsed.
There are white residues on the washing
• What can be seen here are insoluble substances
which modern detergents contain. They are not the
result of insufficient rinsing.
Shake or brush the washing. If possible turn the
washing inside out before washing. Check your
choice of detergent. Especially with dark colours it
is advisable to use liquid detergents.
18
Carrying out an emergency drain
1 Warning! Prior to carrying out an emergency
drain, switch off the washing machine and remove the power plug from the power point.
Warning! The water that comes out of the
emergency drain hose may be hot. There is a
risk of scalding. Let the water cool before performing an emergency drain!
1. Open the plinth flap and remove it.
2. Remove the emergency drain hose.
3. Place a shallow container underneath it. Then
loosen the drain plug by turning it in an anti-clockwise direction and pull it out.
4. The water will run out. If it is necessary to empty
the container more than once, seal up the emergency drain hose with the drain plug while you are
doing so.
When the water has all drained away:
5. Insert the plug firmly into the emergency drain
hose and turn it in a clockwise direction until it is
firmly in place.
6. Replace the emergency drain hose into the retainer.
7. Insert the plinth flap into place and close it.
19
Drain pump
The drain pump is maintenance-free. It is only necessary to open the pump cover if there is a malfunction
and water is no longer being pumped out, e.g. if the
pump wheel is blocked.
Before loading the machine, please always ensure
that there are no foreign bodies present in the pockets or in between the items to be washed. Paper
clips, nails, etc. which may find their way into the
washing machine along with the washing will remain
in the drain pump housing (foreign body trap that
protects the pump wheel).
1 Warning! Before opening the cover of the
drain pump, switch off the washing machine
and remove the power plug from the power
point.
1. First carry out an emergency drain.
2. Place a cloth on the floor in front of the cover of the
drain pump.
Residual water runs out.
3. Unscrew the pump cover in an anti-clockwise direction and remove it.
4. Remove foreign bodies and fluff from the pump
housing and from the pump wheel.
5. Check whether the pump wheel right at the back of
the pump housing can turn. (If the wheel rotates
with a jerky motion, this is normal.) If the pumping
wheel cannot be turned, please contact your local
Service Force Centre.
6. Insert the pump cover. Insert the guides at the
sides of the cover into the guide slots and tighten
the cover by turning in a clockwise direction.
7. Close off the emergency drain hose and place it in
the retainer.
8. Close the plinth flap.
20
Disposal
2
Packaging material
2
Old appliance
The packaging materials are environmentally
friendly and can be recycled. The plastic components are identified by markings, e.g. >PE<,
>PS<, etc. Please dispose of the packaging
materials in the appropriate container at your
local waste disposal facilities.
W
The symbol
on the product or on its packaging indicates that this product may not be
treated as household waste. Instead it shall be
handed over to the applicable collection point
for the recycling of electrical and electronic
equipment. By ensuring this product is disposed of correctly, you will help prevent potential negative consequences for the
environment and human health, which could
otherwise be caused by inappropriate waste
handling of this product. For more detailed information about recycling of this product,
please contact your local city office, your
household waste disposal service or the shop
where you purchased the product.
1 Warning: When your appliance has finished
its working life, remove the plug from the
mains socket. Cut off the cable and plug and
dispose of them.
Destroy the door lock. This prevents children
from trapping themselves inside and endangering their lives.
21
Technical data
5 This
appliance conforms with the following EU
Directives:
– 73/23/EEC dated 19.02.1973 Low Voltage Directive
– 89/336/EEC dated 03.05.1989 EMC Directive inclusive of Amending Directive 92/31/EEC
– 93/68/EEC dated 22.07.1993 CE Marking Directive
Height x Width x Depth
850 x 598 x 630mm
Depth when door is open
1010mm
Height adjustability
about +10/-5mm
Load (depending on programme)
max. 5kg
Area of use
Domestic
Drum spin speed
see rating plate
Water pressure
1-10bar (=10–100N/cm2=0.1–1.0MPa)
Consumption values
The consumption values were obtained under standardised conditions. They may vary when operating in
domestic conditions.
Load size
in kg1)
Water
in litres
Energy
in kWh
5
50
1,80
5
35
0,85
5
46
0,55
SYNTHETICS 40°
2,5
45
0,50
DELICATES X (COLD)
2,5
52
0,35
2
44
0,28
Programme/Temperature
WHITE COTTONS 90°
E-COTTONS 60°
2)
COULERED COTTONS 40°
WOOL
X (COLD)
1) The load size is determined in accordance with the EN 60456 standard load.
2) Note: This 60° programme is the programme setting for testing in accordance with or in support of EN 60 456 and IEC 60 456.
Consumption values will vary from the values quoted depending on water pressure, water hardness, water temperature at filling,
room temperature, type and quantity of washing, detergent used, variations in mains voltage and any options selected.
22
Installation and connection instructions
1 Safety information concerning
installation
• Before using for the first time, check the appliance
for damage sustained while it was being transported. Do not under any circumstances connect an
appliance that is damaged to the mains. In the
event of damage to the appliance contact your
supplier.
• Be sure to remove all the components of the transit
packaging before using the appliance for the first
time. Otherwise when spinning damage may be
caused to the appliance or to neighbouring units or
furniture.
• Before using the appliance for the first time, splash
protection must be completed. (See “Removing
transit packaging”).
• Always plug the mains plug into a correctly installed shockproof socket.
• If hard-wired: hard-wiring to the mains may only be
carried out by an a qualified electrician.
• Prior to using the appliance for the first time, ensure that the rated voltage and current on the rating plate match the mains voltage and current
where the appliance is to be installed. The required
fuse protection is also to be found on the rating
plate.
• If work on the plumbing is required for the proper
connection of the washing machine to the water
supply, this must be undertaken by a registered
plumber.
• If work on the electricity supply system is required
for the proper connection of the washing machine
to the electricity supply, this must be undertaken
by a registered electrician.
• The washing machine’s mains cable must only be
replaced by a
Service Force Engineer
Installing the appliance
Transporting the appliance
1 Warning: The washing machine is very heavy.
There is a risk of injury. Exercise care when lifting the appliance.
• Do not lay the washing machine on its front nor on
its right side
(as seen from the front). Electrical components
may get wet.
• Never transport the appliance without using the
transit packaging. Only remove the transit packaging when the appliance is in its place of installation.
Transporting the appliance without the use of the
transit packaging can cause damage to the appliance.
• Never lift the appliance by the door when it is open
nor by the plinth.
When using a sack trolley to transport
the washing machine:
• Only use the sack trolley on the side of the appliance.
23
Removing the transit packaging
Important! Be sure to remove all the components of
the transit packaging prior to using the appliance for
the first time. Keep the transit packaging in a safe
place, in case it is needed at a later date when the
appliance is to be moved
(e.g. moving house).
1. Open the two hose retainers located at the rear of
the appliance and remove the hoses and electrical
cable.
2. Remove the two hose retainers from the appliance
with a strong tug.
3 Special spanner A and sealing caps B (2 units)
and C (1 unit) come with the appliance.
3. Use special spanner A to remove screw D and the
compression spring.
4. Turn sealing cap C upside down as shown in the illustration.
5. Use sealing cap C to cap the hole.
6. Use special spanner A to remove the two screws
E.
7. Use special spanner A to remove the four screws F.
8. Remove transit bar G.
9. Screw in the four screws F again.
10.Use sealing caps B to cap the two large holes.
Important: Press all sealing caps B (2 items) and C
(1 item) in firmly so that they snap into the rear wall.
24
Where to install
Important! The washing machine must not be operated in a room where there is a danger of frost. There
is a risk of frost damage or adverse effect on the perfomance of the machine. Frost damage is not covered under the warranty.
• The surface on which the appliance is to be installed must be firm and level. Do not install the
appliance on carpeted floors or soft floor coverings.
• The surface on which the appliance is to be installed must be clean and dry and free from
grease, so that the appliance does not slide.
• If the location in which the appliance is to be installed is fitted with small-format tiles, put a rubber
mat (available in the shops) under the appliance.
If the appliance is to stand on a base:
In order for the appliance to be secure on the base,
fixing plates*) must be mounted, into which the appliance is inserted.
If the appliance is to stand on a floor
which moves, e.g. a suspended wooden
floor:
Place the appliance in an area as close as possible
to a corner of the room.
Screw a water-resistant wooden board (at least 15
mm thick) onto at least 2 of the floor joists.
Making the appliance level
The four feet of the appliance are pre-adjusted.
Large degrees of unevenness can be compensated
for by individually adjusting the height adjustable
screw feet.
Use the special spanner supplied to do this.
Important! Do not use pieces of wood, cardboard or
such like to level out unevenness in the floor, but adjust the height adjustable screw feet instead.
25
Electrical Connection
Any electrical work required to install this appliance
should be carried out by a qualified electrician or
competent person.
1 WARNING – THIS APPLIANCE MUST BE
EARTHED.
The manufacturer declines any liability should
these safety measures not be observed.
Before switching on, make sure the electricity supply
voltage is the same as that indicated on the
appliance rating plate.
The appliance is supplied with a 13 amp plug fitted.
In the event of having to change the fuse in the plug
supplied, a 13 amp ASTA approved (BS 1362) fuse
must be used.
Should the plug need to be replaced for any reason,
proceed as described below.
The wires in the mains lead are coloured in accordance with the following code:
Green and Yellow:
Earth
Blue:
Neutral
Brown:
Live
• The wire coloured green and yellow must be connected to the terminal marked with the letter “E“ or
by the earth symbol E or coloured green and yellow.
• The wire coloured blue must be connected to the
terminal “N“ or coloured black.
• The wire coloured brown must be connected to the
terminal marked “L“ or coloured red.
• Upon completion there must be no cut, or stray
strands of wire present and the cord clamp must
be secure over the outer sheath.
1 WARNING! A cut off plug inserted into a
13 amp socket is a serious safety (shock) hazard. Ensure that the cut off plug is disposed of
safely.
26
Permanent Connection
In the case of a permanent connection it is necessary that you install a double pole switch between
the appliance and the electricity supply (mains), with
a minimum gap of 3mm between the switch contacts and of a type suitable for the required load in
compliance with the current electrical regulations.
The switch must not break the yellow and green
earth cable at any point.
This appliance complies with the requirements laid
out in the EEC Directive 76/899.
Voltage 240 V AC: Fuse rating 13amps
See rating plate for further information.
This appliance meets VDE requirements.
Particular regulations of local electricity authorities
must be observed.
This appliance conforms to EEC Directive No. 82/
499/EWG on radio interference.
1 WARNING! Repairs to electrical appliances
must only be carried out by trained personnel.
Improper repairs may lead to serious risks for
the user.
Connecting the appliance to the water
supply
Important:
• This appliance must not be connected to the hot
water supply.
• When connecting the appliance, use only new
hose kits.
• Only connect the appliance to the drinking water
supply. Rain water or water for industrial use may
only be used if it fulfils the requirements of
DIN1986 and DIN1988.
• Do not kink or crush the water inlet hose or drain
hose.
Permitted water pressure
The water pressure must be at least 1 bar (=10N/
cm2 =0.1MPa), and may be a maximum of 10bar
(=100N/cm2 =1MPa).
– If more than 10bar: Connect a pressure reduction
valve.
– If less than 1bar: Disconnect the appliance end of
the inlet hose from the solenoid inlet valve and remove the flow meter. (In addition remove the filter
using pointed pliers and take out the rubber gasket
behind it.) Replace the filter.
27
Water inlet
A 1.35m long pressure hose is supplied with the appliance.
If a longer inlet hose is required, only hoses from the
manufacturer are to be used. Your local Service
Force stocks hose kits of different lengths.
3 Sealing rings are either inserted in the plastic
nuts of the threaded hose fitting or are included as spare parts. Do not use any other sealing rings.
Important! All threaded hose fittings must only be
tightened by hand.
1. Connect the hose with the right-angle connector to
the machine.
Important! Do not position the inlet hose vertically
downwards. Position it to the right or the left as
shown in the illustration.
2. Connect the hose with the straight connector to a
water tap with an R ¾ (inch) screw thread.
3. Slowly turn on the tap and check that all connections are watertight.
28
Water Drainage
The appliance drain hose should hook into a standpipe, the hook in the drain hose is formed using the
plastic “U-Piece“ supplied. The standpipe should
have an internal diameter of approximately 38 mm
(see diagram) thus ensuring there is an air break between the drain hose and standpipe.
Important! It is essential to lay the drainage hose
without kinks.
When discharging into a standpipe ensure that the
top of the curve in the hose end is no more than 90
cm (35.4’’) and no less than 60 cm (23.6’’) above floor
level.
The upright standpipe should have a minimum,
length of 30 cm (12’’) from the bottom of the elbow to
the top of the pipe (see diagram). Make sure that it is
designed in such a way that the end of the drain
hose cannot be covered with water.
Longer drain hoses are available in lengths of 2.7
and 4 metres from your Service Force Centre.
For drainage into an outlet
spigot: If the outlet spigot has not been used before,
remove any blanking plug that may be in place. Push
the drain hose onto the spigot and secure with a clip
if required. Ensure the drain hose is looped upwards
to prevent waste water from the sink entering the
washing machine.
Important! The end of the drainage hose must not
be submerged in the pumped-out water. Otherwise,
the water could be sucked back into the appliance.
Pumping heights of over 1 metre
The washing machine’s drain pump is able to pump
water to a height of 1metre, calculated from the surface on which the appliance is installed.
Important! If pumping height is over 1 metre malfunctions and damage to the appliance may arise.
For pumping heights over 1metre a conversion kit
can be obtained. Please contact Service Force Centre.
29
Fitting under kitchen worktops
Important: The water supply tap and power outlet
must remain accessible after the appliance is installed.
Permanent connection
In the case of a permanent connection it is necessary that you install a double pole switch between
the appliance and the electricity supply (mains), with
a minimum gap of 3 mm between the switch contacts and of a type suitable for the required load in
compliance with the current electrical regulations.
The switch must not break the yellow and green
earth cable at any point.
This operation should only be performed by a qualified electrician.
Kitchen with worktops 85 cm high.
The washing machine can be installed in fully fitted
kitchens with continous worktops 85 cm high, after
removing the machine's top cover. This will reduce
the height of the appliance to about 82cm.
To fit the washing machine, an adapter kit is required. These can be obtained from Customer Service.
1 Warning! If removing the top cover to fit the
machine,
– another protective cover must be mounted and,
the appliance must be earthed with special screws
– a replacement trim must be attached to the top
front edge.
Then only should the appliance be connected electrically, and put into operation. The protective cover,
special screws and replacement trim are included in
adapter kit.
Recess size requirements
(Measurements in mm)
30
Kitchens with worktops 90 cm or
higher
1 Warning! If fitting under a worktop of 90 cm or
higher, the top cover must be left on the appliance, to protect it from splashes. Otherwise,
adequate protection cannot be guaranteed.
In fitted kitchens with worktops 90 cm or higher, insert the appliance in its niche leaving the top cover in
place.
31
Warranty conditions
Standard guarantee conditions
European guarantee
We, Zanussi Electrolux, undertake that if, within 12
months of the date of the purchase, this ZANUSSI
ELECTROLUX appliance or any part thereof is
proved to be defective by reason only of faulty workmanship or materials, we will, at our option repair or
replace the same FREE OF ANY CHARGE for labour,
materials or carriage on condition that:
• The appliance has been correctly installed and
used only on the electricity supply stated on the
rating plate.
• The appliance has been used for normal domestic
purposes only, and in accordance with the manufacturer’s instructions.
• The appliance has not been serviced, maintained,
repaired, taken apart or tampered with, by any person not authorised by us.
• All service work under this guarantee must be undertaken by a Service Force Centre.
• Any appliance or defective part replaced shall become the Company’s property.
• This guarantee is in addition to your statutory and
other legal rights.
Home visits are made between 8.30am and 5.30pm
Monday to Friday. Visits may be available outside
these hours in which case a premium will be
charged.
If you should move to another country within Europe
then your guarantee moves with you to your new
home subject to the following qualifications:
• The guarantee starts from the date you first purchased your product.
• The guarantee is for the same period and to the
same extent for labour and parts as exists in the
new country of use for this brand or range of products.
• The guarantee relates to you and cannot be transferred to another user.
• Your new home is within the European Community
(EC) or European Free Trade Area.
• The product is installed and used in accordance
with our instructions and is only used domestically,
i.e. a normal household.
• The product is installed taking into account regulations in your new country.
Before you move please contact your nearest Customer Care Centre, listed below, to give them details
of your new home. They will then ensure that the local Service Organisation is aware of your move and
able to look after you and your appliances.
Exclusions
This guarantee does not cover:
• Damage or calls resulting from transportation, improper use or neglect, the replacement of any light
bulbs or removable parts of glass or plastic.
• Costs incurred for calls to put right an appliance
which is improperly installed or calls to appliances
outside the United Kingdom.
• Appliances found to be in use within a commercial
environment, plus those which are subject to rental
agreements.
• Products of Zanussi Electrolux manufacture which
are NOT marketed by Zanussi Electrolux.
32
France
Germany
Italy
Sweden
UK
Ireland
Senlis
Nürnberg
Pordernone
Stockholm
Slough
Dublin
+33 (0) 344 62 29 29
+49 (0) 800 234 7378
+39 0434 39 4700
+46 (0) 8 672 53 90
+44 (0) 1753 219897
+44 (0)1 4090751
33
34
Service and Spare Parts
If the event of your appliance requiring service, or if
you wish to purchase spare parts, please contact
Service Force by telephoning:
0870 5 929 929
Your telephone call will be automatically routed to
the Service Force Centre covering your post code area.
For the address of your local Service Force Centre
and further information about Service Force, please
visit the website at
www. serviceforce.co.uk
Before calling out an engineer, please ensure you
have read the details under the heading „What to do
if...“
When you contact the Service Force Centre you will
need to give the following details:
1. Your name, address and post code.
2. Your telephone number.
3. Clear and concise details of the fault.
4. The model and serial number of the appliance
(found on the rating plate)
5. The purchase date.
Please note that a valid purchase receipt or guarantee documentation is required for in-guarantee service calls.
Customer Care Department
For general enquiries concerning your Zanussi Electrolux appliance, or for further information on Zanussi Electrolux products, please contact our Customer
Care Department by letter or telephone at the address below or visit our website at www.zanussi.co.uk.
Customer Care Department
Zanussi Electrolux
55-77 High Street
Slough
Berkshire, SL1 1DZ
Tel: 08705 727727 (*)
(*) calls to this number may be recorded for training
purposes.
35
105 176 055-00-150205-05
Subject to change without notice
The Electrolux Group. The world´s No.1 choice.
The Electrolux Group is the world´s largest producer of powered appliances for kitchen, cleaning and outdoor use. More than 55 million Electrolux Group products
(such as refrigerators, cookers, washing machines, vacuum cleaners, chain saws and lawn mowers) are sold each year to a value of approx. USD 14 billion in
more than 150 countries around the world.