1
Building a High Definition
Recorder for Gameplay
Recording
David Clearwater
Department of New Media
University of Lethbridge, Alberta, Canada
May 2010
Note: this guide does not describe a method for recording copyrighted material in high definition (sorry). 1
Introduction
It is fairly simple to record gameplay footage from consoles that output video in standard definition
(480i, 640 x 480 interlaced) as any common DVD recorder can be used. However, when it comes
to high definition (HD), there are very few commercially-available solutions. Consequently, this
guide describes the process of building a computer which can be used to capture a variety of
types of gameplay footage, specifically from HD sources.
Such a guide is something that I wished I had access to when originally planning such this
project. Instead, I spent a great deal of time researching various subjects (from computer
assembly to video recording and codecs) and even had to pester friends and colleagues for help,
information and advice.
Since there may be others who might have similar questions, I decided to write this guide.
Rather than simply providing a set of instructions and a parts list (which would eventually become
dated), I will describe how and why I built it in the manner I did so that readers can better
understand the principles behind these choices and can make modifications for their own
particular needs.
Disclaimer and Warning
This guide is meant as a general overview and is provided 'as is.' I cannot assume any
responsibility for support nor should any warranty be implied. If you decide to build your own HD
Recorder, then you must assume all responsibilities (financial and otherwise) for undertaking such
a project.
If you desire to build your own computer you will need to spend some time researching
other topics such as safely working with electricity, part compatibility (especially in your country or
locality), and computer assembly. There are many 'how to' assembly guides available online and I
1
Instead, this set-up allows you to record gameplay footage. This recorded gameplay footage differs
significantly from the copyrighted original work (i.e. the software itself) and is recorded for critical and
educational purposes protected under fair use (U.S.) and fair dealing (Canada) provisions under existing
copyright law. Interactive media are very interesting in relation to copyright and intellectual property law
because the fundamental interactivity requires the input of a player or user. Generally with regard to
gameplay, since it is performative on the player's part it is theoretically the 'property' (if you need to think
about it in that way) of the player while the game software and other related trademarks remain the
property of developers and/or publishers. This is the fundamental reason why most companies tolerate
(and encourage) individuals to record and somehow distribute recordings of video game play.
At any rate, this is legitimate material to record and it is important to point out—in this era of
corporate-controlled copyright legislation which continually tries to eliminate the rights of users contained
in copyright law—that fair use or fair dealing are fundamental rights. That being said, this configuration
cannot record copy-protected content as that functionality is prevented by the video capture card used.
1
would suggest reading a few (even slightly outdated ones as they still provide good information on
safety and proper assembly). Also, check online support forums and user/customer reviews of
products and other technical suggestions (especially important is information on the compatibility
of components). At some point in the future I will try to put together a guide with information on
building a PC but for now this is something the reader will have to undertake on his or her own.
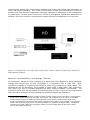
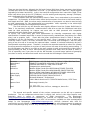
Figure 1: A configuration for recording from common game consoles capable of outputting in enhanced or
high definition standards.
General Functionality and Design Choices
As mentioned, I wanted to build something that would have the capability to record gameplay
footage from sources such as Sony's Playstation 3 or Microsoft's Xbox or Xbox 360. These
consoles are capable of outputting high definition video using component or HDMI cables. The
Nintendo Wii and the Playstation 2 are capable of video output in 480p (480 x 640, progressive
scan) which can also be recorded depending on which capture hardware is purchased. 2 The
Playstation 3 and Xbox 360 are capable of outputting video in 720p or higher and the original Xbox
had a maximum resolution of 720p (although not all games support that resolution).
2 The standard or common definition is 480i and older consoles output at lower resolutions. For Playstation
2 titles which support widescreen and 480p video output, the resolution has to be set by the following
method: when the game is loading and the Playstation 2 logo appears, pressing the triangle and 'x'
buttons simultaneously will load a screen where progressive scan (480p) can be enabled. A very limited
number of PS2 games (Gran Turismo 4 and Tourist Trophy) are purported to support 1080i. The highest
resolution for the Wii is 480p and component cables must be used with both the Wii and the PS2 to
achieve the highest resolutions.
2
When it cam to hardware configuration, I wanted to use good components (for longevity)
but keep the overall costs low. That is, I wanted the HD Recorder to last for many years, but I did
not want to 'overbuild' it either. Keeping operating costs relatively low was also a priority. Since
many high-performance components have equally high energy consumption needs, I decided to go
with those that have modest energy requirements. Again, this necessitated keeping specifications
relatively modest.
What Level of High Definition is Required? Recording in 720p, 1080i,
or 1080p
When it comes to high definition on the Playstation 3 and the Xbox 360, there are various
resolutions available:720p (1280 x 720 pixels, progressive scan), 1080i (1920 x 1080 pixels,
interlaced), and 1080p. Typically, most games support 720p and some support 1080i. Games
supporting 1080p, the highest resolution, are somewhat rare since early HD TVs were not capable
of handling it and it is simply very resource intensive.
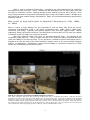
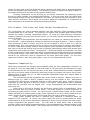
With high definition video, files sizes can become extremely large. As indicated in the
illustration below (Figure 2), 720p is roughly two and a half times the area of standard definition
video and 1080i/p is six times as large. For my purposes, I wanted to archive the footage and so I
decided to to keep the size of files (and, therefore, storage costs) of the recored video relatively
modest. Consequently, I decided that I would record footage in a maximum resolution of 720p.
Others will undoubtedly have different needs.
FIGURE 2: Comparison of Standard and High Definition Resolutions.
Note: Video resolution, like many other aspects of working with video, is confusing and complex. Analogue television
resolutions are measured in scan lines while digital video is expressed in pixels. In the above illustration the Standard
Definition is given as 720 x 480 which is actually the standard DVD resolution while 640 x 480 lines is the technical
standard for NTSC signals originating from many game consoles (such as the Playstation, Dreamcast, GameCube and the
low resolutions for later consoles such as the Playstation 2 and the Xbox 360). The 720 number was used since the
easiest method for capturing gamplay footage in SD is by using a standard DVD recorder.
3
The particular hardware configuration I eventually went with (and which is described in Table 2
below) is capable of recording in 1080i but due to rather large file sizes (50 GB and up
(uncompressed) for about ten minutes of gameplay recording), it is not really practical. The ability
to record at 1080i or 1080p would, I suspect, require a multiple hard-drive configuration in a
striped RAID array. Such a configuration can handle recording large amounts of data at high
speeds but is more costly and technically complex.
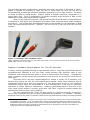
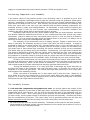
Again, for my particular purposes, I felt the HD Recorder should be able to record footage in
a maximum of 720p while using component RCA cables (YPbPr video and stereo audio, analogue;
see Figure 3). The configuration described below also has the capability to record digitally in HDMI
(from non-copy-protected sources). However, I am not using it in that way and have not fully
tested it.3
Figure 3: Component video and HDMI cables.
cables with RCA connections (the red and white audio cables are not shown) are shown on the left and an
HDMI cable is shown on the right.
Computer Hardware Requirements for the HD Recorder
In reality, recording gameplay footage in high resolution (even in 720p) really necessitates low end
workstation-level hardware at the very least, simply because high definition video is very
bandwidth- and resource-intensive when it comes to data transfer and storage. Consequently,
when it comes to actually acquiring the hardware for such a set-up, the choices are constrained in
some ways.
Purchasing from a big box computer/electronics retailer is usually not a possibility, only
because they tend to not carry PCs of the specifications needed. Hiring a local computer shop or
independent technician to build the computer is a very good choice as the PC can usually be
customized (choice might be constrained to a few manufacturers if the shop or technician
specializes in certain makes of components). Ordering a workstation-level PC from one of the
many major online retailers is another good route (see Table 1 below for sample models and
specifications from two major online retailers).
The most inexpensive and, I think, the best solution is to build the computer yourself as it
can be fully customized and can be easily maintained and upgraded. For example, I wanted a
horizontal case (so the main TV monitor could sit on top) and these are fairly rare from pre-built
3 The reason for this is that I wanted to avoid some of the connectivity problems that I have witnessed when
using HDMI connections. It can be complex and I suspect some of these problems are due to the 'digital
handshake' required (for anti-piracy purposes) by the high-bandwidth digital copy protection (HDCP). Antiduplication signals also exist in analogue connections but in my experience are much more stable and
rarely get in the way of legitimate recording.
4
retailers. In addition, the greatest benefit is that if you take the time to learn about the whole
process, you will gain valuable skills and experience with computer hardware and software.
In terms of the operating system (OS), I wanted to make the most use of open source
software but was constrained because of the particular video editing software I wanted to use for
initially working with the video footage (which is currently only available for Windows). When it
comes to operating systems, the suggested video capture cards mentioned below support Linux,
Windows and Mac OS. Linux-based OSs are increasingly desirable as they are approaching the
casual market and some distributions (such as Ubuntu) are developing audio-visual specific
versions (i.e. Ubuntu Studio, MythBuntu). Those who favour Windows could choose Windows 7 (or
an old copy of XP, I would not suggest using Vista). And for Apple fans, one can even build a
'hackintosh' since modern Macs now utilize common x86 processor-based hardware. 4 There are
guides available but the process is technically complex and the legality of doing it are in question
as it very likely goes against Apple's terms of use policies for its OS software. In reality then, the
choice is limited to buying hardware directly from Apple.
So, an off-the-shelf solution or a custom build are possibilities. No matter what kind of
configuration is used, Table 1 provides a price comparison and gives suggested specifications
(current as of Spring 2010). These specifications are not quite the bare minimum but represent
relatively inexpensive, mid-level systems that should be able to comfortably handle recording in
720p HD.
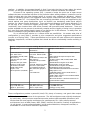
Table 1: Comparison between Leading Workstation Manufacturers and a Custom Build
Apple Mac Pro
Dell T3500 Precision
Workstation
Sample Custom Build
- 2.66 GHz Quad Core Intel
Xeon 3500 series
- 3GB DDR3 (3x1GB) 1066
MHz memory
- 640 GB 7200-rpm SATA
hard drive
- 640 GB 7200-rpm SATA
hard drive (adds $240)
- ATI Radeon HD 4870
512MB (adds $240)
graphics card
-18x SuperDrive (CD/DVD)
- 2.66 GHz Quad Core
Intel Xeon W3520 (Adds
$280)
- 3GB DDR3 (3x1GB) 1333
MHz memory
- 500GB 7200-rpm SATA
hard drive
- 300 GB 10000-rpm SATA
hard drive (adds $460)
- 512 NVIDIA Quadro FX
580 (adds $90) graphics
card
- 16x DVD Rom
- Intel Core i7-920 Bloomfield 2.66GHz Quad
Core
- ASUS P7P55 WS SuperComputer ATX
motherboard
- G.SKILL Trident 3GB (3x1GB) DDR3 1600
MHz memory
- 640GB Western Digital Caviar Blue
WD6400AAKS 7200-rpm SATA
- 300GB Western Digital VelociRaptor
WD3000HLFS 10000-rpm SATA
- ASUS EAH4870/2DI/1GD5 Radeon HD 4870
1GB graphics card
- CORSAIR CMPSU-750TX 750W ATX12V /
EPS12V power supply
- LIAN LI Black Aluminum PC-C32B ATX Media
Center / HTPC Case
- Microsoft Windows 7 Professional 64-bit for
System Builders (OEM)
$3,379.00 Cdn.
$2,425.00 Cdn.
$1,466.00 Cdn.
(apple.ca, April 2010)
(dell.ca, April 2010)
(newegg.ca, May 2010)
These configurations provide a powerful (Intel) CPU, plenty of memory, and good video output.
4 This refers to the architecture for the processor. The x86 architecture was originally developed
by Intel (today, other processor manufacturers also produce x86 compatible processors) and
has become the most popular architecture for contemporary PCs. Many other processor
architectures (such as ARM, Power, MIPS, SPARC, Itanium) are used for a variety of applications
(in cell phones, in some netbooks/tablets, in high-end workstations, videogame consoles, or
embedded in a host of other electronic appliances).
5
There are two hard drives, although the Dell and Custom Build have faster secondary hard drives
(10,000 rpm) which for this application is crucial. (If you decide to use a Mac Pro, I would suggest
upgrading to a faster hard drive.) In fact, the eventual configuration that I went with (Table 2) has
three hard drives (one for the OS (7200rpm), one for working and temporary storage (7200rpm),
and a dedicated drive (10,000rpm) for capture.
I should explain that the specifications listed in Table 1 are constrained by the needs for
comparison. For example, all three builds utilize Intel processors since that is the brand used by
both Apple and Dell. AMD, the other major manufacturer of processors can also be used as long
as other components (i.e. the motherboard) are compatible. AMD, especially in the mid-to-high
range, makes excellent and inexpensive processors.
The final build for my HD Recorder was slightly different from the Custom Build listed in
Table 1. As previously mentioned, I added another hard drive so that the 10,000rpm hard drive
could be used exclusively for capture and went with an AMD processor and compatible
motherboard (with slightly lower specifications).
Of course, one could easily gain more performance by choosing components with higher
specifications if needed (especially in terms of the processor, motherboard, hard drives (in a RAID
array) and a graphics card). I went with the lower specifications listed in Table 2 because I
intended to use the HD Recorder in very specific ways. Since I wanted to use it at work (the
university where I teach), at home, and even lend it to friends and colleagues, I was not really
going to use it to edit or re-encode the captured video. Instead, it is almost intended to be just a
semi-portable recording system. Therefore, I transfer the captured materials to other PCs (usually
the more powerful computers at my place of work) where I do most of the editing and encoding. If
the HD Recorder was also to be used as the main system to edit and encode the video, then it
would probably be wise to use a more powerful processor and video card (as listed in Table 1).
This is especially true if you plan to use the HD Recorder to record longer periods of gameplay
(one hour or more) and also want to edit and re-encode the HD footage in other formats.
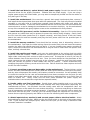
Table 2: Final Build Specifications
Processor
Motherboard
Memory
Graphics
Hard drive
Optical drive
Power Supply
OS
Case
AMD Phenom II X2 550 Black Edition Callisto 3.1GHz 80W Dual-Core
GIGABYTE GA-MA785G-UD3H AMD 785G HDMI ATX
CORSAIR XMS2 4GB (2 x 2GB) 240-Pin DDR2
(integrated on motherboard)
Western Digital Caviar Blue WD3200AAJS 320GB 7200 RPM
Western Digital Caviar Blue WD6400AAKS 640GB 7200 RPM
Western Digital VelociRaptor WD3000HLFS 300GB 10000 RPM
Sony Optiarc 24X DVD/CD Rewritable Drive SATA
CORSAIR CMPSU-550VX 550W ATX12V V2.2
Microsoft Windows 7 Professional
LIAN LI Black Aluminum PC-C32B ATX Media Center / HTPC Case
Capture Card
Blackmagic Intensity Pro
Total:
$1,305.89 (Cdn)
NCIX.ca, newegg.ca, Annex Pro
The brands and specific models of the various components can be left up to personal
preference. The one component where there is slightly less choice is the video capture card,
especially when it comes to component or HDMI connectivity.
The Blackmagic
(http://www.blackmagic-design.com) Intensity Pro (internal PCI express card), the Blackmagic
Intensity Shuttle (external but requiring a USB 3.0 connection, available on most motherboards
today) or the Hauppauge (http://www.hauppauge.com) HD-PVR (external with USB 2.0
connectivity) are all possible solutions. I am much less familiar with Hauppauge and its products
at this time (although they do look very interesting and I will try it in the future). The Blackmagic
6
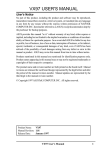
Intesity Pro was used in the Final Build and works extremely well (make sure to download updated
drivers and software from their website). The Intensity Pro does not support recording in 480p (i.e.
the highest resolution for the Wii) but the Intensity Shuttle does.
Choosing components can be daunting, as you will be submersed into seemingly arcane
acronyms, model numbers, and detailed specifications. It does get easier after you spend some
time reading through forums and magazines, and often you will see users post details of their
latest build on retail sites, which allows you to further judge the compatibility of components by
what combinations of components others have used successfully.
File Formats, File Sizes and Final Design Considerations
This configuration can record standard definition and high definition (720p) gameplay footage,
uncompressed and in AVI format. The Intensity Pro capture card provides other choices for file
formats and codecs, including compressed formats. By using any video editing or conversion
software, especially the many open source choices, you can easily encode the resulting files into a
variety of formats.
The type of file-format/codec used will depend on the reason for capturing the footage in
the first place. I capture gameplay footage for teaching and analytical reasons. I want to capture
short sequences as well as longer ones that can be screened in class as well as in labs for
individual study. But I also capture a series of levels or an entire game for research and analysis.
So, while I want decent quality video for some purposes (which translates into larger files sizes), I
also need to record and archive large mounts of footage (necessitating codecs that provide good
compression and smaller file sizes). Consequently, I record the footage and view/edit it (in order
to take screenshots or video sequences) with the compressed AVI format provided by the Intensity
Pro card and encode it into either a DivX MP4 format to compress large files and the H264 MP4
format for any video that I want to compress but still retain good video quality. For very short
sequences for which I want very good quality, I leave it in the compressed AVI format.
Component Compatibility
While many components are virtually interchangeable, there are some compatibility restrictions to
be aware of. First, the make (AMD or Intel) and model of CPU (processor) will determine the type
of motherboard and the CPU socket type that can be used. Motherboards are broadly compatible
with one or the other makes of processor while each model of processor will require one of many
different kinds of socket type (i.e. an AMD compatible motherboard might only support AMD2 or
AMD3 types of sockets).
The motherboard will be compatible with certain kinds of memory. Memory will come in
different types (i.e. DDR2 or DDR3), voltages, latency, and the number of pins. Motherboard
manufacturers will often list compatible memory on their website and, again, checking the user
comments on retail websites is also very useful in this regard. Motherboards come in different
sizes (Mini-ITX, microATX and, the largest, ATX). Larger motherboards can accommodate more
slots, ports, etc.
Cases come in all kinds of varieties but will fit with certain size(s) of motherboard. Some
cases will come with fans and/or a power supply. The power supply is a critical component so
purchasing a quality model is critical. You can purchase a regular power supply (all the internal
cables are fixed) or a modular power supply (more expensive as you only connect cables that you
need). Single rail power supplies make it so the load does not have to manually balanced.
Finally, power supplies will come in different sizes, measured in maximum watts (W)
supplied to the computer. Of course, the power supply will need to accommodate the power
requirements of all the various components, especially in terms of the processor and other energyhungry components like graphics cards. The final build as listed above used a mid-range
processor (80W) and used the integrated graphics on the motherboard (no separate graphics card)
and can get by with a 550W model. The Custom Build as listed in Table 1 uses a 750W power
7
supply to accommodate the more powerful processor (130W) and graphics card.
Purchasing Components and Assembly
If the arcane nature of the previous section is too off-putting, then it is possible to hire a local
technician or computer retail/repair shop to build the computer using the guidelines listed above.
However, assembling it yourself is not that difficult once you have a good understanding of what
goes where and what to look out for. Rest assured, the process will become less confusing the
more time spent with it and once you have selected and purchased suitable components, the
assembly process is really quite straightforward. As mentioned, a major benefit of building the
computer yourself is that you will increase your understanding of computer hardware and
software, and will be better able to upgrade and repair it yourself.
Depending upon where you live, online retailers might offer the most selection, and those
that provide reference materials and forums or user comments/reviews also provide very useful
information. Check to make sure they have good return policies in case you receive a defective
component. If you can access specialty bricks-and-mortar stores in your area, it is always nice to
have face-to-face contact with knowledgeable sales staff.
The assembly of the components can be a lengthy process. Expect to spend four to five
hours in total with the assembly and set-up (more if you have not done it before). It might be
advisable to break up the entire process into separate stages; that is, if you can leave the pile of
parts set up overnight. Leaning over a computer case for a couple of hours can be tedious and
you might have to spend some time consulting the various manuals so that you are completely
sure about what you are doing during the assembly. Consequently, you might want to devote the
first stage to familiarizing yourself with the various parts, preparing the case, and installing the
optical and hard drives (steps 1 and 2 as listed below). For the second stage, you can assemble
the computer in its entirety (steps 3 through 9) and you might even want to leave powering it up,
BIOS set-up, troubleshooting, and OS installation (steps 10 through 14) as a third and final stage.
To begin, you should ensure you have proper tools and that you have a clean place to work.
You should be working at a table or work bench on a bare (linoleum or tile) floor as carpets tend to
produce static electricity, which can be harmful to electronics. You should also take care not to
wear clothes made of synthetic materials that may also generate static electricity.
During the assembly process, it is a very good idea to discharge any static electricity by
touching the metal of the computer case with your bare hand, or touching the screw on the
faceplate of an electrical light switch. You should discharge static electricity in such ways often
and throughout the assembly process.
Finally, two points to remember are: 1) plan ahead, and 2) take your time. Always try to
think ahead as to how the current step in the process might affect later steps in the assembly
process (i.e. so that you don't install a graphics card in one slot without noticing that it will block
SATA ports that you might need to access later).
The Assembly Process
1. Look over the components and prepare the case: You should unpack and inspect all the
parts, paying attention to the kinds of data and power connections required and imagining how
components will fit into the case. (Put the CPU and its heat sink back in the packaging until you
need it to keep it safe.)5 Take a quick glance at the manuals for the motherboard, CPU, graphics
(or other cards), and the power supply to familiarize yourself with assembly. Visualize the airflow
from the configuration of the fans. (For tower cases, cool air generally enters from the front and
bottom and warm air will exit from the back (and, with some cases, the side and/or top).
5 Be careful with the heat sink and fan assembly. The bottom of the heat sink will have thermal
paste applied to its bottom (usually a greyish substance) so be careful not to disturb it until it is
placed on top of the installed processor.
8
2. Install the hard drive(s), optical drive(s) and power supply: Consult the manual for the
case and drives for the proper procedure. Likewise with the power supply. If you are using a
regular power supply with fixed cables, you may want to temporarily bundle and tie the cables so
they don't get in the way.
3. Install the motherboard: If the case has a generic back panel input/output plate, remove it
and install the back panel plate that came with the motherboard. The case may have pre-installed
standoffs or you may have to install them yourself (small brackets with holes onto which the
motherboard is affixed). If there are extra standoffs that do not fit the holes on the motherboard,
remove them so as not to damage the motherboard or to conduct electricity. Lay the motherboard
on top of the standoffs and gently tighten screws so the motherboard is firmly seated.
4. Install the CPU (processor) and its fan/heat-sink assembly: Open the CPU socket clamp
and remove any shield that may be present to protect the socket during shipping. Gently insert
the CPU into the socket (make sure it is aligned correctly), and firmly secure it with the clamp.
Attach the heat-sink and fan assembly and plug the fan's power cable into the provided port on
the motherboard.
5. Install the memory modules: There should be four memory slots in alternating colours on
the motherboard. Push open the white locking clips at the end of each slot and insert the memory
module; the white clips should snap back into place. If you are installing two memory modules or
sticks, consult the manual for the motherboard as it may be best to insert them into specific and,
often, similarly coloured slots.
6. Install the graphics and sound: Look over the motherboard at the various slots into which
expansion cards are installed. Cards will require a certain type of slot and sometimes (especially
larger video cards) may block access to data or power ports. So keep that in mind if you have to
choose between two of the same kind of slot. Once you have decided on the placement of the
cards, remove the slot shields from the back of the computer. Install the cards into their proper
slots and connect any power or data cables that may be present. I would recommend only
installing the graphics and any sound card at this time. Wait to install the video capture card until
the OS has been installed.
7. Connect remaining power and data cables to the motherboard: The hard drives, optical
drives, and front panel connections (usually USB and audio inputs located on the front of the case),
and any other components like memory card readers, should be connected. You will probably have
to consult the manual for the case and motherboard since these connectors are tiny and you will
need to know what goes where, and you also might have to make decisions as to which type of
audio to enable, etc. Finally, make sure the main power between the power supply and
motherboard are connected (there might be two separate cables).
8. Bundle cables and final inspection: Bundle loose cables together and try to tuck them
away so that they do not impede airflow and interfere with other components (especially the
motherboard and fans). Use all-plastic ties that usually come with the components (don't use
common twist ties as the metal core can conduct electricity). Look over everything to make sure
that all components are indeed connected properly. If possible, do not close the case or attach the
case cover until the very end. That way, you can visually inspect the computer as it is running to
ensure fans are spinning properly and cables or ties are not interfering with other components.
9. Attach input devices, monitor(s) and connect power cable to electrical outlet: Attach
keyboard/mouse and the monitor. Make sure the the on/off switch on the back of the power supply
is on. If your monitor has multiple inputs, make sure the input you are using is selected or that
automatic detection is enabled.
9
10. Powering Up: There is no operating system installed so when turned on the computer
should just boot and load the BIOS. Turn on the monitor and then turn on the computer.
11. BIOS set-up. If all the connections are correct and all the components are functioning
properly, then the computer should turn on and begin to load the BIOS. You will see a title screen
from the motherboard and it will indicate that pressing a certain key will allow you to enter the set
up menus for the BIOS. The key is usually 'Delete,' 'F10' or 'F12,' depending on the manufacturer
of the motherboard. Press the key repeatedly while the computer is booting to enter the BIOS setup menus.
Once in the BIOS set up, you can change the date and time and check to see if the various
components are working and being recognized by the motherboard. Select the menu item for the
drives and look to see that all optical and hard drives are present. If you enter the menu for the
System ('System Information' or something similar), you can check the processor(s) and memory.
In another menu (it might be 'Advanced Power Settings' or something like that, you can check the
speeds (in rpm) of the fans and the temperature of the CPU. Also, visually inspect the fans to
make sure all are working and spinning at a consistent speed. Also, you should enter the menu for
'Boot Device Priority' and make the first boot device the CD/DVD (optical) drive and the main hard
drive the second boot device (this forces the BIOS to look at the optical drive first for the presence
of an operating system and then, if none is found, will move on to the main hard drive).
Finally, if everything checks out, save the changes to the settings and exit the BIOS.
If it does not restart automatically, turn off the computer by pressing the front power button (you
might need to hold the button down for five seconds). Wait until it has completely powered down
and then turn it on again.
12. Installing the Operating System: Insert the CD or DVD containing the OS that you want to
install and follow the directions as needed. Once the installation is complete, you should connect a
network cable and install updates and any new drivers. You should visit the manufacturer's
website for the graphics card to download the latest drivers. Check the system's status (in
Windows, look at Device Manager, usually available through the Control Panel; in Linux-based
systems, drives should appear automatically in 'Places' but also look at the system and hardware
tools, such as System Monitor) and check again that all devices and hardware are being
recognized and working properly.
13. Install the capture card and any other remaining devices: Once everything is running
satisfactorily, you can install the capture card and other remaining devices. Make sure to install
the software as well and once it is installed, you should check the manufacturer's website to
update the software and drivers (especially if using the Intensity Pro card as the software and
drivers on the CD are older versions; also, the firmware for the card itself will be updated when
you install the new software and drivers).
14. Troubleshooting: Hopefully, everything is working properly and you have not encountered
any malfunctioning hardware. If a component does not seem to be working properly, you should
check FAQs and troubleshooting at the manufacturer's website and check any forums or online
support. If the problem is persistent, you should contact the support personnel from the online
retailer and check into the return policy.
If everything is working properly, then you can get to work and enjoy your new High Definition
gameplay Recorder.
Dr. David Clearwater teaches in the Department of New Media at the University of Lethbridge. He would
like to thank friends and colleagues for their input and assistance with the original project, especially
Venkat Mahadevan for walking me through the first build and for all kinds of technical advice.
As mentioned in the preamble, I am providing this guide 'as is' and, unfortunately, I do not have the time to
answer your individual questions or help with troubleshooting.
10